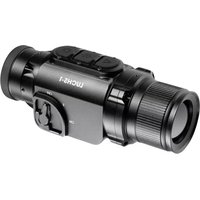
Luchs-1 - Binoculars LIEMKE - Free user manual and instructions
Find the device manual for free Luchs-1 LIEMKE in PDF.


User questions about Luchs-1 LIEMKE
0 question about this device. Answer the ones you know or ask your own.
Ask a new question about this device
Download the instructions for your Binoculars in PDF format for free! Find your manual Luchs-1 - LIEMKE and take your electronic device back in hand. On this page are published all the documents necessary for the use of your device. Luchs-1 by LIEMKE.
USER MANUAL Luchs-1 LIEMKE
natural_image
Illustration of a yellow pig standing upright (no text or symbols)LUCHS-1
natural_image
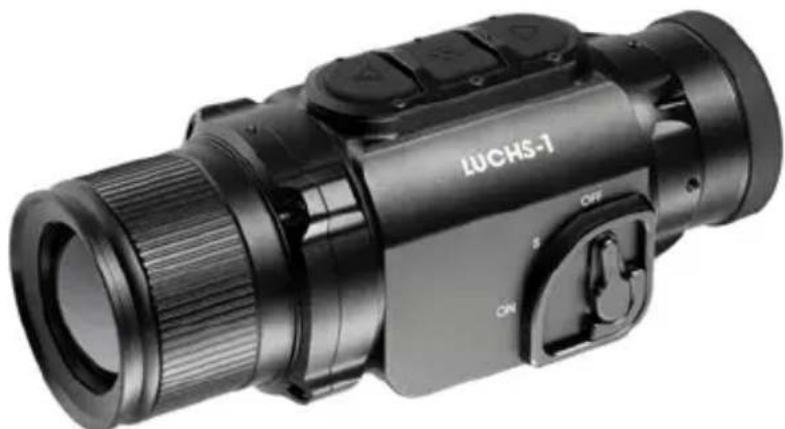
Black LUCHS-1 optical device with lens and control buttons (no visible text or symbols beyond branding)INNOVATION. QUALITY. SERVICE.
by LIEMKE


natural_image
Thermal image of a lion standing in a field at sunset, with warm orange and purple gradients (no text or symbols)Liebe Kunden,
natural_image
Close-up of a black camera lens component with textured grip and mounting bracket (no visible text or symbols)natural_image
Completely dark image with no visible content, text, or symbols.text_image
0.0 cm/100m ↑ 0.0 cm/100m ← 2.5x/3.0x/4.0x move impact → move impact ← short press: ↑/→/ x long press: save G1 [1111] AWiFi

natural_image
Thermal image of a lion standing in a field at sunset, with warm orange and purple gradients (no text or symbols)Dear Customers,
Our mission to always offer you thermal imaging optics that are at the forefront of technology and quality means that you will find products with state-of-the-art technology and outstanding performance parameters in our new range.
With our service promise to return any optics you have sent in to you within ten working days, as well as a guarantee on our products of up to three years, we would like to thank you for your trust and wish you good hunting!
Your LIEMKE team!
CONTENT
EN
-
TECHNICAL DATA 24
-
SAFETY INSTRUCTIONS 25
-
SCOPE OF DELIVERY 26
-
COMPONENTS AND CONTROLS 26
-
BASIC OPERATION 27
-
INPUT MODES 29
STANDARD MODE 30
BASIC MODE 30
CUSTOM MODE 31
-
MOMENTARY 2X ZOOM FUNCTION 31
-
MENU FUNCTIONS 31
BRIGHTNESS 31
IMAGE MODE 32
COLOR MODE 32
INPUT MODE 32
CALIBRATION MODE 33
WIFI 34
SHOT ALIGNMENT 34
ADVANCED SETTINGS 36
-
TAKING PHOTOS AND VIDEOS 37
-
INTERNAL STORAGE 37
-
WIFI CONNECTION 37
-
CHARGING AND LOW BATTERY WARNING 38
-
MAINTENANCE 38
-
TROUBLESHOOTING 38
22
23
LUCHS-1 · Operating Manual 09 / 2021
- TECHNICAL DATA*
| MODEL | LUCHS-1 |
| Detector and optics | |
| Resolution and type | 640x512 Uncooled VOx Microbolometer |
| Pitch 12 μm | |
| Pixel Field of view | 0.34 mrad |
| Detection range | 1750 m |
| Spectral range | 8–14 μm |
| Frame rate | 50 Hz |
| NETD 50 mK | |
| Objective lens | 35mm/F1.0 |
| Field of view | 22x17.6 m/100 m - 12.5°×10.0° |
| Optical magnification | 1x |
| Close-up range | 2 m |
| Adjustment per click | 2.76 cm/100 m / 0.95 MOA |
| Total adjustment | +/- 82,8 cm/100 m / +/- 28 MOA |
| Display | 1024x768 OLED |
| Functions and Media | |
| Digital zoom | 2x momentary digital zoom |
| Color modes | White Hot, Black Hot, Extra Dark, Red Hot, Rainbow |
| MODEL | LUCHS-1 |
| WiFi frequency range | 2400 MHz - 2483.5 MHz |
| WiFi transmission power | ≤20 dBm |
| WiFi signal range 5 m | |
| Internal memory capacity | 32 GB |
| Format of photo/video files | JPG/MP4 |
| Power supply | |
| Battery | built-in rechargeable lithium ion battery, 4800 mAh |
| External power supply | USB-C |
| Battery life 6.5 h to 9 h* | |
| Physical and environmental characteristics | |
| Weight 580 g | |
| Size 161x64x65 mm | |
| Adapter threads M43x0.75 | |
| Water proof | IP67 |
| Operating /storage temperature | -20 °C to +50 °C/-40 °C to +60 °C |
* depending on environmental conditions, settings and media functions. Design, software and technical parameters of the product are subject to change without prior notice.
02. SAFETY INSTRUCTIONS
The thermal imager is not recommended to be used in high temperature environment for a long time. If the temperature is too high, the imager will enter the high-temperature protection state, and automatically shut down.
The recommended temperature for use is -10^ to +50^ .
Make sure that the USB interface cover on the side of the thermal imager is tightly closed when used in humid environments, e.g. on rainy days.
Disposal of waste electrical equipment and batteries
Do not dispose of waste electrical equipment and batteries in the household waste.
Please hand them in to your local recycling centre. Batteries should be fully discharged when disposed of.

CE marking: The devices are in conformity with the EU directives:
EMC Directive 2014/35/EU
RED Directive 2014/53/EU
RoHS Directive 2011/65/EU
For the EU declaration of conformity see the product homepage on the Liemke website.

CAUTION!
Do not point the lens of the unit at intense energy sources, including laser units and the sun. Otherwise, there is a risk of damaging electronic components of the unit. Damage resulting from non-compliance with the operating instructions is not covered by the warranty.
03. SCOPE OF DELIVERY
• LUCHS -1 thermal clip-on device
- Flip-cover (mounted)
- Thread protector with rubber eyecup (mounted)
- USB-C cable
- USB charger
- Thread adapter M43x0.75 to M52x0.75 with lock ring tool
- Lens cleaning cloth
- Manual
04. COMPONENTS AND CONTROLS
- Objective lens with focus ring
- Button panel with three buttons (UP/MENU/DOWN)
- Collimator with thread protector ring
- Three-position switch (ON/standby/OFF)
- Mounting interface on the bottom of the device
- USB-C port with rubber cover for charging and data transfer

text_image
01 02 03 IUCHS-1 04 LIEMKE THERMAL OPTICS 06 0505. BASIC OPERATION
Before use
A technical inspection of the device is recommended before use.
Check the external appearance of the device: There should be no cracks in the casing.
Check the condition of the lens and eyepiece: They should be clean and free of damage.
Check the condition of the battery: It should be charged if necessary.
Check the USB connection and the rubber plug: The contacts should be clean and free of oxidation and the plug should be put firmly in place before use to ensure protection against moisture.
Lens focus ring
Focus the objective lens for different distances by turning the focus ring until the image is sharp.
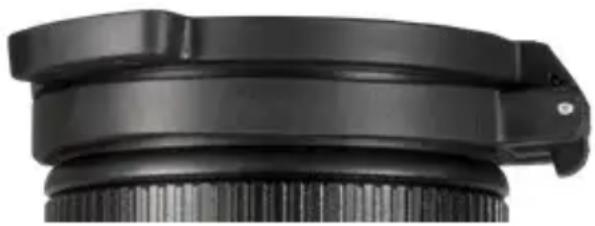
Flip-Cover
The device comes with a protective flip-cover installed.
Open the cover by pushing on the tabs opposite the hinge.
natural_image
Close-up of a black camera lens component with textured grip and mounting bracket (no visible text or symbols)The cover snaps in place as the hinge opens
completely and sits almost flush with the housing. The cover can be rotated to open to the left, right or top. The cover can be removed from the device by grabbing the closed cover at the back of the hinge and pulling it away from the device. It can be reinstalled by pushing it onto the finishing lip of the objective and snapping it in place.
Adapter threads and thread cover
At the rear of the device there are threads (M43x0.75) for attaching to a clip-on adapter. The device is delivered with a protective thread cover with a rubberized eyecup. When using the device as a clip-on, this thread cover needs to be removed by unscrewing it counterclockwise.
LUCHS-1 · Operating Manual 09 / 2021
Three position switch lever
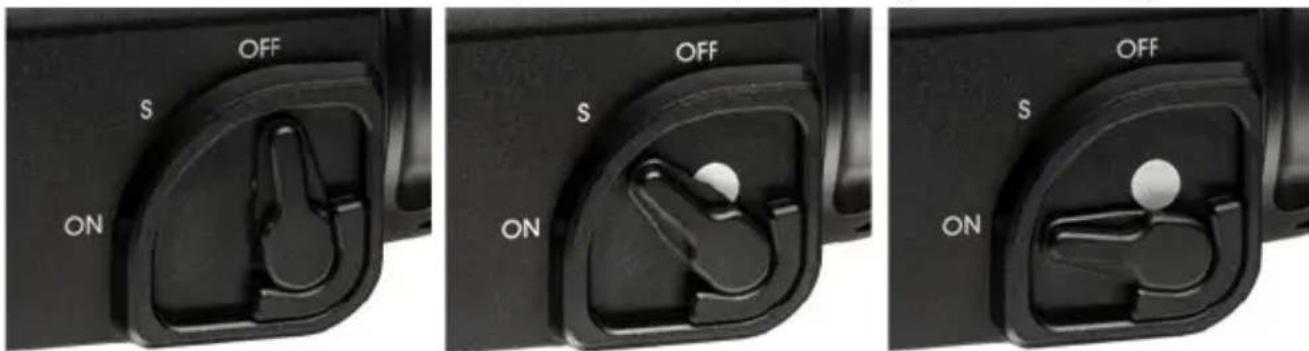
Move the lever to the desired position for OFF, S (standby) and ON settings.
text_image
OFF S ON OFF S ON OFF S ONThe white dot is partly visible in standby mode and completely visible when ON, making the status of the device easily discernible in dim light conditions. Startup time from OFF to ON is 5 seconds for image display. Images and videos can be taken from 20 seconds after startup. The standby function switches off the display and interrupts Wi-Fi transmission (when Wi-Fi is active) to save battery power and cut light emission from the device. When switching from Standby to ON, image and responsiveness are there immediately.
Button Panel
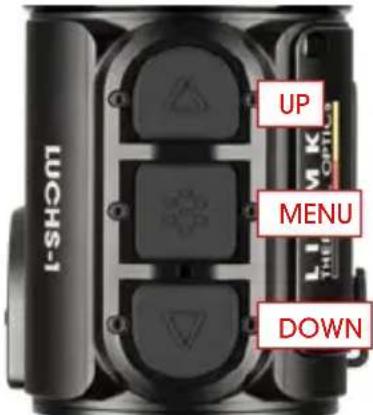
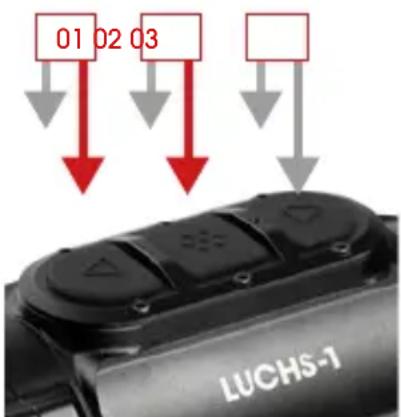
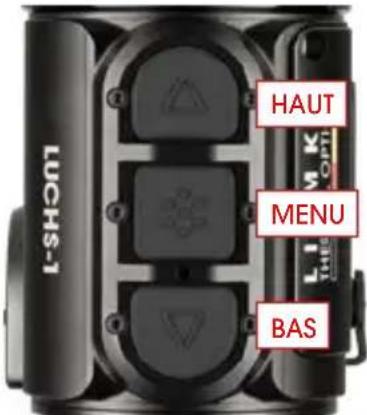
On the top of the device is a panel with three large buttons. There are two different input options for each button:
- Click (short press)
- Long press
A click consists of pressing and releasing a button immediately. A long press consists of pressing and holding a button for at least 0.4 seconds.
- Additionally, you can exit the menu from any point by pressing the MENU button for 2 seconds.
text_image
UP MENU DOWN LUCHS-1Default Screen
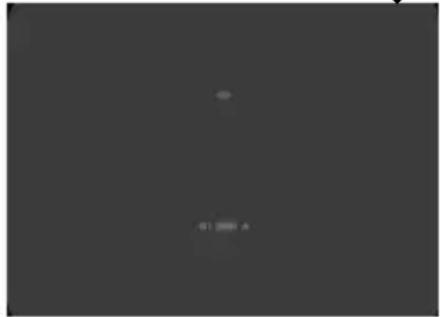
The standard screen (when not in the menu) shows icons for the selected gun profile
(G1-G3), battery charge status and calibration mode (A, M, S). The Wifi symbol is shown in the top center of the image only when Wifi is activated.
For use as a clip-on, the position of the information displayed on the screen can be adjusted to the lowest magnification of the rifle scope. This keeps the information visible but at the edge of the field of view without blocking the view of the target. The icon display setting can be changed in the Shot Alignment submenu and saved together with the alignment setting for the respective riflescope.
Menu navigation
Enter the menu by long pressing the MENU button.
The menu on the left of the screen consists of menu icons. There is a short information text shown in the top center of the screen when a menu item is selected.Navigate to the desired menu item with the UP and DOWN buttons and select the desired menu item with a click of the MENU button. Further submenu items, if available, are indicated by arrows above and below the selected submenu item and can be selected with the UP and DOWN buttons.
Choose a menu or submenu function by clicking the MENU button.
Save and return to the previous menu item by long pressing the MENU button.
To completely exit the menu from any point in the menu, press and hold the MENU button for 2 seconds.

natural_image
Completely dark image with no visible content, text, or symbols.View: 2.5x ↑ 4.0x↓
text_image
G1 2008 A06. INPUT MODES
The LUCHS -1 has three different input modes with specific functions directly accessible by a click or a long press of the buttons. Input Modes can be changed in the Menu item "Input Mode".
Standard Mode
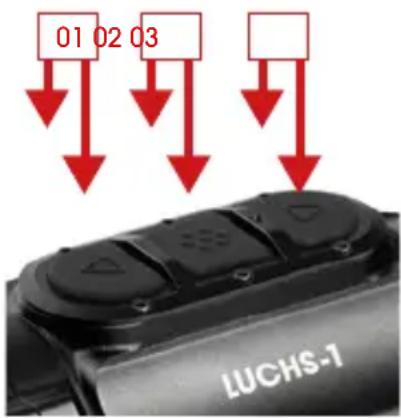
Standard Mode is the default mode that is suitable for most use cases. Brightness and Image Mode as well as the Photo and Video Recording functions are directly accessible via the button panel. The menu is always accessed with a long press of the MENU button and manual calibration is always performed with a long press of the UP button.
text_image
01 02 03 LUCHS-1(01)
click: Brightness
long press: Calibration
(02)
click: Image mode
long press: Menu
(03)
click: Take photo
long press: Start/stop video
Basic Mode
Basic Mode is a simplified input interface for users that do not want to change their settings frequently, for example for only hunting at night and with a fixed set of preferred settings. The menu is accessed with a long press of the MENU button and manual calibration is performed with a
text_image
01 02 03 LUCHS-1(01)
long press: Calibration
(02)
long press: Menu
(03)
-
long press of the UP button. There are no additional functions available via the button panel. Photo and video recording functions are deactivated. Changes to settings like brightness and color mode can be done by entering the menu.
Basic mode provides maximum protection against accidental changes to settings and lowers battery consumption by disabling media functions, providing up to 9 hours of operation on a single battery charge.
Custom Mode
Custom Mode allows the user to personalize the button panel functions based on his usage preferences. Functions that are often used can be directly accessed via the button panel and functions that are not

text_image
01 02 03 LUCHS-1(01)
click: Brightness / Color Mode / Image Mode / none
long press: Calibration
(02)
click: Brightness / Color Mode / Image Mode / none
long press: Menu
(03)
click: Take photo / none
long press: Start/Stop video / none
needed regularly can be switched off to prevent accidental activation. For how to assign functions to the buttons, see "Input Mode" in the Menu section of this manual.
07. MOMENTARY 2X ZOOM FUNCTION
Pressing the UP and DOWN buttons simultaneously activates the momentary 2x zoom function. The 2x zoom is only active while the buttons are pressed. When releasing the buttons, the magnification automatically reverts back to the default 1x zoom.
Important: This function is meant for target identification. Shooting with the zoom function activated may result in a change of point of impact. A warning appears on the screen while the zoom function is activated.
08. MENU FUNCTIONS
Brightness
When changed via the button panel, brightness cycles from 1 to 10 and then goes to 1 again. When changed via the Brightness menu item, brightness can be increased or decreased with the UP and DOWN buttons and it stops at 1 and 10 respectively. This way the brightness can be increased or decreased deliberately which is especially useful in the dark when you want to choose a lower brightness setting without first cycling through the higher brightness settings. Brightness is the first menu item so it is quickly accessible when the customizable buttons in Custom Mode are used for other functions.
Image Mode

Select Sun or Rain.
Choose a mode based on the properties of the scene and your preferences.
Sun mode shows a smooth and natural looking image for scenes with good inherent contrast like on sunny days or nights after a sunny day when objects in the landscape have different temperature levels. It is also useful for seeing fine detail in the warm target.
Rain mode enhances the contrast and makes fine structures visible in scenes with low inherent contrast. It is especially useful to show details of the landscape in rainy or overcast conditions.
Color Mode

Cycle through the activated color modes. Color Modes can be selectively deactivated in the Advanced Settings submenu "Color Mode active/inactive". Deactivated color modes will not show up in this menu so you only cycle through modes that you find useful. The available Color Modes are:
- WH - White Hot: For accurate identification, good for nighttime use because of darker background
- BH - Black Hot: Provides a more realistic visual impression with dark target on brighter background
- ED - Extra Dark: Based on White Hot mode with lower overall brightness and a warm tint, ideal protecting the natural night vision ability of the eye
- RH - Red Hot: For fast detection of heat sources
- RB - Rainbow: For showing small temperature differences
Use case descriptions are only guidelines, use of color modes is largely a matter of personal preference.
Input Mode

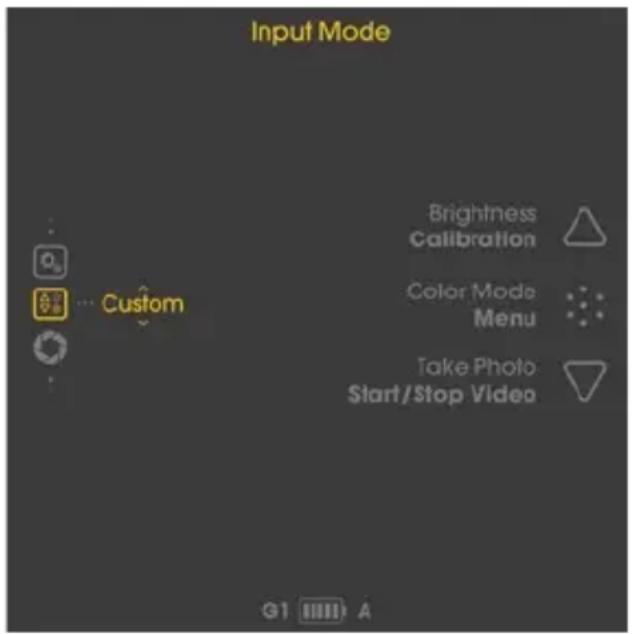
Input Mode allows you to select what functions are controlled directly by button click or long press so you don't have to enter the menu to change them. See chapter 05. for information on the Standard and Basic input modes.
Custom Mode button configuration
In Custom Mode, button functions can be configured to the preferences of the user.
To assign the button functions in the "Custom" submenu, short click the MENU button to toggle through the input functions he functions for click are on top, long press in bottom for each button.
Change the input functions with the UP and DOWN buttons.
Switch to the next button function with a click of the MENU button.
Long press the MENU button to save the settings and return to the Input Mode submenu.
The configuration options are:

UP (click): Brightness / Color Mode / Image Mode / none UP (long press): Calibration
MENU (click): Brightness / Color Mode / Image Mode / none MENU (long press): Enter Menu
DOWN (click): Take Photo / none DOWN (long press): Start/Stop Video / none
text_image
Input Mode Brightness Calibration Color Mode Menu Take Photo Start/Stop Video G1 ACalibration Mode

In this menu item you can choose the calibration mode.
• A - Automatic calibration every 2 minutes
- M - Manual calibration triggered by the user with a long press of the UP button.
- S – Shutterless calibration triggered by the user with a long press of the UP button.
During use, the image gradually deteriorates because of the changing background temperature of the sensor. This is compensated for by periodically calibrating the sensor.
Calibration is performed by activating an internal shutter and equalizing the sensor out-
put. The shutter makes a very faint clicking noise and the image freezes for 0.5s during calibration. When starting the device, automatic calibrations are performed in the first seconds regardless of the calibration mode.
In M mode you can choose the time when the image briefly freezes, which is especially convenient when using the device as a clip-on for shooting to ensure that the image freeze does not occur at the moment you want to take the shot. Perform a manual calibration when you observe deterioration of image quality such as graininess or banding.
S Mode is triggered by the user like M mode, but does not use the internal shutter for completely silent operation.
Important: Close the lens cap during calibration.
WiFi
Activate/deactivate the WiFi connection.
A WiFi symbol is displayed in the top center of the screen when WiFi is activated. For further information about the APP and how to connect the LUCHS -1 to your mobile device, visit: https://liemke.shop/medien
Shot Alignment
The LUCHS -1 is adjusted from the factory so that you have the same line of sight with the device attached as a clip-on that you have with your riflescope. This means that generally the point of impact of your rifle with the LUCHS -1 attached is very close to the point of impact with just the riflescope. However, because attaching an additional device to the riflescope can alter the vibrations of the rifle and scope during the shot, there may be a change in point of impact with a clip-on attached. This potential change in point of impact can be corrected in the Shot Alignment submenu.
Aligning the LUCHS -1 to your rifle
Make sure that the scope is sighted in properly by shooting a group at your sight-in distance without the LUCHS -1 attached
Attach the LUCHS -1 to an adapter following the adapter manufacturer's instructions and mount it to the scope
Enter the Shot Alignment submenu
There are three alignment profiles so you can use the LUCHS -1 for three separate rifles with the respective alignment profiles.
Toggle through the G1, G2, G3 profiles using the UP and DOWN buttons.
Select the profile you want to use by clicking the MENU button.
Important: Make sure the windage/elevation are both set to zero before shooting. If a lot of adjustment is dialed in, you might miss your target completely.
Shoot a group at your sight-in distance through the LUCHS-1.
Measure the deviation from the point of aim to the point of impact (center of the group)
text_image
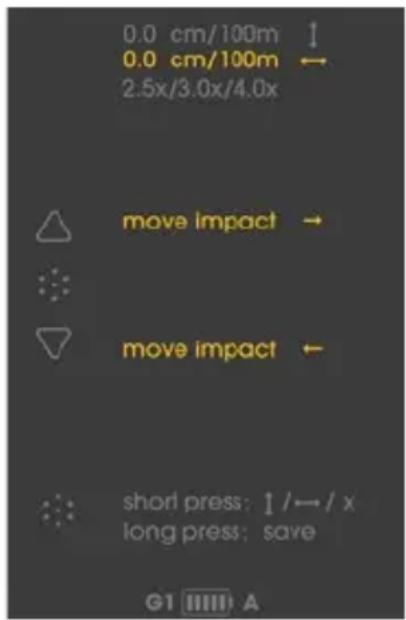
0.0 cm/100m ↑ 0.0 cm/100m ← 2.5x/3.0x/4.0x move impact → move impact ← short press: ↑/←/ x long press: save G1 [1111] AIn the Shot Alignment submenu, you can adjust the point
of impact for elevation and windage and set the minimum riflescope magnification by following the directions on the screen
Toggle through vertical adjustment/horizontal adjustment/icon display setting by clicking the Menu button
One adjustment step equals 2.76 cm/100 m. The amount of adjustment from center will be displayed on the screen. The „+“ sign indicates a correction of the point of impact up and to the right, the „-“ sign indicates a correction of the point of impact down and to the left.
In this submenu you can also adjust the icon display setting for the minimum magnification of your riflescope. You can choose between 2,5x, 3,0x and 4,0x. This setting allows the menu items to be displayed so they are all visible but at the edge of the field of view for typical riflescopes of those magnifications. These magnification values are only guidelines, choose the setting that best matches your riflescope's field of view at your preferred magnification.
Long press the MENU button to save and return.
Important: Make sure to remember which profile is used for which rifle. The selected profile is displayed in the bottom left of the default screen at all times.
Important: After the alignment procedure, confirm your result by shooting a group of at least three shots.
Advanced Settings
1. Color Mode active/inactive

Color Modes can be selectively deactivated in this submenu.
Choose a color mode by toggling with the UP and DOWN buttons and check/un-check it by clicking the MENU button.
Long press the MENU button to save your settings and return to the menu.
Deactivated color modes will not show up in the Color Mode submenu in the main or when toggling through them with a button so you only have to cycle through the color modes that you find useful.
2. Language

Choose between English or German menu language
3. Defective Pixel Repair

If during use there are pixels that are permanently bright ("hot pixels") and that do not disappear after using the calibration function, you can correct these pixels by performing the Defective Pixel repair function.
Attention: Close the lens cap before performing this operation.
Confirm (Y) by clicking the MENU button.
A countdown will appear and then a green tick mark to confirm successful Pixel Repair.
4. Restore Factory Settings

Confirm (Y) by clicking the MENU button to reset the device to the default settings.
Attention: The G1-G3 Shot Alignment profiles will be deleted. Note the adjustment settings before restoring to factory settings if you might want to use them again.
5. Device Info

Displays the serial number of the device and information about the firmware version installed.
09. TAKING PHOTOS AND VIDEOS
Click the DOWN button for taking a Photo.
A symbol will appear briefly on the screen indication the successful recording of the image.
Long press the DOWN button for starting video recording.
A recording symbol with recording time appears on the screen while the device is recording.
Long press the DOWN button again to stop recording.
Photo taking is disabled during video recording.
Note: In Basic Mode, photo and video recording is disabled. In Custom Mode, photo and video functions may be enabled or disabled based on the settings in the Input Mode Custom menu.
Note: Photos and videos can only be taken from 20 seconds after starting the device.
10. INTERNAL STORAGE
The LUCHS -1 has 32 GB of built-in memory and can be connected to a computer as a mass storage device. Connect the device to your computer with the supplied USB-C cable. The device will show up as a mass storage media and allow access to the stored photo and video files.
11. WIFI CONNECTION
To establish a Wifi connection with your smartphone or tablet, activate Wifi in the menu. The Wifi symbol is shown in the top center of the screen when Wifi is activated.
Note: Wifi can only be started 30 seconds after starting the device.
The LUCHS -1 will show up on the list of Wifi networks on your mobile device as "LUCHS_XXXXXX". The default password for connecting with the LUCHS -1 Wifi is "12345678".
See www.liemke.com/APP for information about the Liemke APP.
12. CHARGING AND LOW BATTERY WARNING
Use the supplied USB-C cable and charger to charge the device. During charging, a red indicator LED between the MENU and DOWN buttons is visible. When charging is complete, the indicator light changes from red to green. Unplug the device after charging is complete. The battery symbol at the bottom of the display shows the charging status from full (five bars) to almost empty (red with one bar).
13. MAINTENANCE
Maintenance should be carried out at least twice a year and consist of the following actions:
Wipe the external surfaces of metal and plastic parts free of dust and dirt with a cotton cloth.
Clean the contacts of the unit with isopropanol if necessary.
Check the glass surfaces of the eyepiece and the lens. If necessary, remove dust and sand from the lenses (preferably using a non-contact method).
14. TROUBLESHOOTING
This overview lists all the problems that can occur when using the unit.
Carry out all recommended checks as described in the table.
If an error occurs that is not listed in the table or if you cannot rectify an error yourself, please contact Liemke Service. You can find the contact details here:
https://liemke.shop/de/Reparatur-und-Service/
| Malfunction Possible reason | Correction | |
| The thermal imager cannot be switched on. In the starting process, the LUCHS -1 switches off again after the start logo has been displayed. | Batteries are too weak. | Load the internal battery for half an hour before switching on again. After an initial loading the device can be powered on when loading e.g. with a power bank. |
| Can't be powered by an external power source. | USB cable is damaged. | Replace USB cable. |
| The image is blurred, with thin vertical lines or shadows. | Calibration needed. Calibrate the image. | |
| After calibration, there is a “ghost image” overlayed over the scene. | Calibration mode S was chosen and the lens cap was not closed during calibrat-iong. | Perform another calibration with closed lens cap. |
| Low image quality/reduced detection range. | These problems can occur under adverse weather conditions (high humidity, snowfall, rain, fog, etc.).During long periods of constant weather without sunshine, and especially in rainy conditions, the observed objects cool down to approximately the same temperature, so that the temperature contrast is considerably reduced and the image quality suffers as a result. This characteristic is due to physical reasons and does not represent a defect in the thermal imager. | |
| Taking photos or videos does not work. | 20 seconds time after startup has not passed. | Wait 20 seconds after starting the device before taking photos or videos. |
| Wifi cannot be activated in the menu. | 30 seconds after start-up has not passed. | Wait 30 seconds after starting the device before activating Wifi. |
| Point of impact is not con-stant. | Thread adapter is not tightened or the clamping force of the adapter is not properly adjusted. | Make sure that thread adapter and the clamping adapter are firmly attached and tightened without play in any direction. |
| The parallax adjust-menton the riflescope is set to close range. | Set the parallax adjustment to 100 m. | |
| Minimum mounting distance not observed. | Make sure the distance between the bottom of the LUCHS -1 and the barrel is at least 10 mm. | |
natural_image
Thermal image of a lion standing in a field at sunset, with warm orange and purple gradients (no text or symbols)Estimado cliente,
natural_image
Close-up of a black camera lens component with textured grip and mounting bracket (no text or symbols visible)natural_image
Completely dark image with no visible content, text, or symbols.Vista: 2.5x ↑ 4.0x↓
text_image
05 2004 Atext_image
0.0 cm/100m ↑ 0.0 cm/100m ← 2.5x/3.0x/4.0x move impact → move impact ← short press: ! /← / x long press: save G1 Ⅲ Ⅳ Anatural_image
Thermal image of a lion standing in a field at sunset, with warm orange and purple gradients (no text or symbols)Chers clients,
natural_image
Close-up of a black camera lens component with textured grip and mounting bracket (no visible text or symbols)- Clic (appui court)
- Appui long
text_image
LUCHS-1 HAUT MENU BASnatural_image
Completely dark image with no visible content, text, or symbols.Vue : 2.5x ↑ 4.0x↓
text_image
01 2007 Atext_image
0.0 cm/100m ↑ 0.0 cm/100m ← 2.5x/3.0x/4.0x move impact → move impact ← short press: ↑/→/ x long press: save G1 [1111] AAlignement de visée

natural_image
Thermal image of a lion standing in a field under a bright orange sky (no text or symbols visible)Cari clienti,
natural_image
Close-up of a black camera lens component with textured grip and mounting bracket (no visible text or symbols)natural_image
Completely dark image with no visible content, text, or symbols.natural_image
Dark background with a small bright spot and faint text 'G1 2008 A' in the bottom right corner (no other readable text or symbols)text_image
0.0 cm/100m ↑ 0.0 cm/100m ← 2.5x/3.0x/4.0x move impact → move impact ← short press: ↓ /← / x long press: save G1 [1111] Anatural_image
Thermal image of a lion standing in a field at sunset, with warm orange and purple gradients (no text or symbols)Drodzy Klienci!
natural_image
Close-up of a black camera lens component (no text or symbols visible)natural_image
Completely dark image with no visible content, text, or symbols.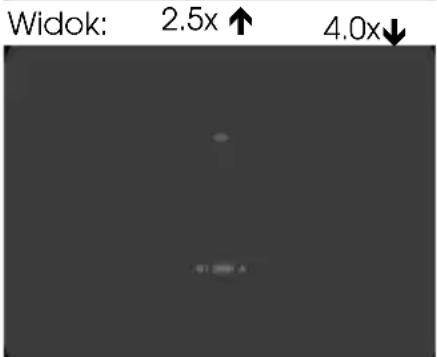
text_image
Widok: 2.5x ↑ 4.0x↓ Atext_image
0.0 cm/100m ↑ 0.0 cm/100m ← 2.5x/3.0x/4.0x move impact → move impact ← short press: ↑/←/ x long press: save G1 Ⅲ Ⅳ APlease note the legal terms of purchase and use for thermal imaging optics in your country or federal state. Changes in design, technical implementation, scope of delivery and prices reserved. For the latest version of this operating manual visit: https://liemke.com/medien
Contact technical service
Contactez le service technique
INNOVATION. QUALITY. SERVICE.
by LIEMKE