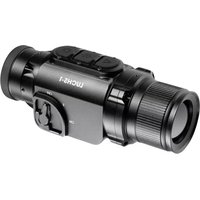
Challenger-15 - Binoculars LIEMKE - Free user manual and instructions
Find the device manual for free Challenger-15 LIEMKE in PDF.
User questions about Challenger-15 LIEMKE
0 question about this device. Answer the ones you know or ask your own.
Ask a new question about this device
Download the instructions for your Binoculars in PDF format for free! Find your manual Challenger-15 - LIEMKE and take your electronic device back in hand. On this page are published all the documents necessary for the use of your device. Challenger-15 by LIEMKE.
USER MANUAL Challenger-15 LIEMKE
natural_image
Illustration of a standing pig with warm orange-yellow coloring (no text or symbols)CHALLENGER-15
BEDIENUNGSANLEITUNG
OPERATING MANUAL
natural_image
Black and white photo of a Challengler 16 optical device with visible lens and control buttons (no text beyond branding)natural_image
Thermal image of a person walking through a field at sunset, with warm orange and purple gradients (no text or symbols)Liebe Kunden,
natural_image
Four-panel image showing a dark, abstract scene with a silhouette, a glowing orange rabbit, and a dark interior (no text or symbols)natural_image
Nighttime street scene with illuminated buildings and a person walking, no visible text or symbols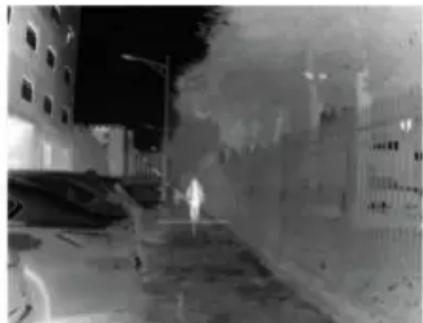
natural_image
Nighttime street scene with illuminated buildings and a person walking (no visible text or symbols)Schritt 1 Schritt 2
natural_image
Thermal image of a person walking through a field at sunset (no text or symbols visible)Dear Customers,
Our mission to always offer you thermal imaging optics that are at the forefront of technology and quality means that you will find products with state-of-the-art technology and outstanding performance parameters in our new range.
With our service promise to return any optics you have sent in to you within ten working days, as well as a guarantee on our products of up to three years, we would like to thank you for your trust and wish you good hunting!
Your LIEMKE team!
CONTENT
E N
| MODEL CHALLENGER-15 | |
| Detector resolution 384×288 px | |
| Pixel size 17 μm | |
| Frame rate 50 Hz | |
| Eyepiece lens 15 mm, fixed focus | |
| Field of vision | 24.9° × 18.8°44.1 m × 33.1 m (H × V) |
| Display LCOS, 720 × 560 | |
| Magnification 1.5 | |
| Digital zoom 2x, 4x | |
| Max. battery life** 6 h | |
| Weight 270 g | |
| Dimensions 169 × 57 × 60 mm | |
| Internal memory | 8 GB |
| Recording formats | JPG (picture), MP4 (video) |
| Operating temperature | -10°C to +50°C |
| Water resistance | IP67 |
| Detection range(Target: 1.8 m × 0.5 m, P (n) = 99%) | 530 m |
* We reserve the right to make changes to improve the technical parameters of the unit. / ** The actual operating time depends on the temperature of the battery and the intensity of use of the WiFi function and the built-in video recorder.
02. COMPONENTS AND CONTROLS
-
Lens
-
Power button
-
Picture/video button
-
Menu button


-
Zoom button
-
Eyepiece
-
Dioptre adjustment wheel
-
Tripod thread
-
USB-C interface
with LED display

text_image
01 02 03 04 05 06 CHALLENGER 15 07 08 0903. SCOPE OF SUPPLY
1x Challenger-15
1x charging cable
1x Operating Manual
04. SAFETY INSTRUCTIONS
The nominal charging voltage of this product is 5 V.
Please charge in good time when the battery is low to avoid a decreased service life due to deep discharge of the battery.
The thermal imager is not recommended to be used in high temperature environment for a long time. If the temperature is too high, the imager will enter the high-temperature protection state, and automatically shut down.
The recommended temperature for use is -10^ to +50^ .
Ensure that the USB-C interface cover on the bottom of the thermal imager is tightly closed when used in humid environments, e.g. on rainy days.
- If the unit is not used for a long period of time, it should be charged at least every 2 months during storage and kept in a dry and ventilated environment.
- The unit should not be charged in an environment above 40 °C.
Disposal of waste electrical equipment and batteries

Do not dispose of waste electrical equipment and batteries in the household waste. Please hand them in to your local recycling centre. Batteries should be fully discharged when disposed of.
CE marking

The devices are in conformity with the EU directives:
EMC Directive 2014/35/EU
RoHS Directive 2011/65/EU
05. OPERATION

CAUTION!
Do not point the lens of the unit at intense energy sources, including laser units and the sun. Otherwise, there is a risk of damaging electronic components of the unit. Damage resulting from non-compliance with the operating instructions is not covered by the warranty.
Before use
A technical inspection of the device is recommended before use.
Check the external appearance of the device: There should be no cracks in the casing.
Check the condition of the lens and eyepiece: There should be no cracks, greasy spots, dirt or other deposits.
Check the condition of the battery: It should be charged if necessary.
Check all electrical contacts: There must be no salts or oxidised spots.
06. SWITCHING ON AND OFF
Switch on the unit by pressing and holding the Power button. The start screen appears and after a few seconds the image is displayed.
Switch off the unit by pressing and holding the Power button.
07. STANDBY MODE
To increase the battery life, the unit can be set to standby mode.
When the unit is switched on, briefly press the Power button to enter standby mode.
The unit goes into standby mode.
Briefly press the Power button again to wake the unit from standby mode.
The unit wakes up immediately; there is no waiting time as is the case when the unit is switched on after it has been switched off completely.
08. DIOPTRE ADJUSTMENT
The dioptre adjustment adjusts the eyepiece of the unit to the individual vision of the user.
Close the lens cover and turn the dioptre adjustment wheel clockwise or anticlockwise until you can see the symbols in the display clearly.
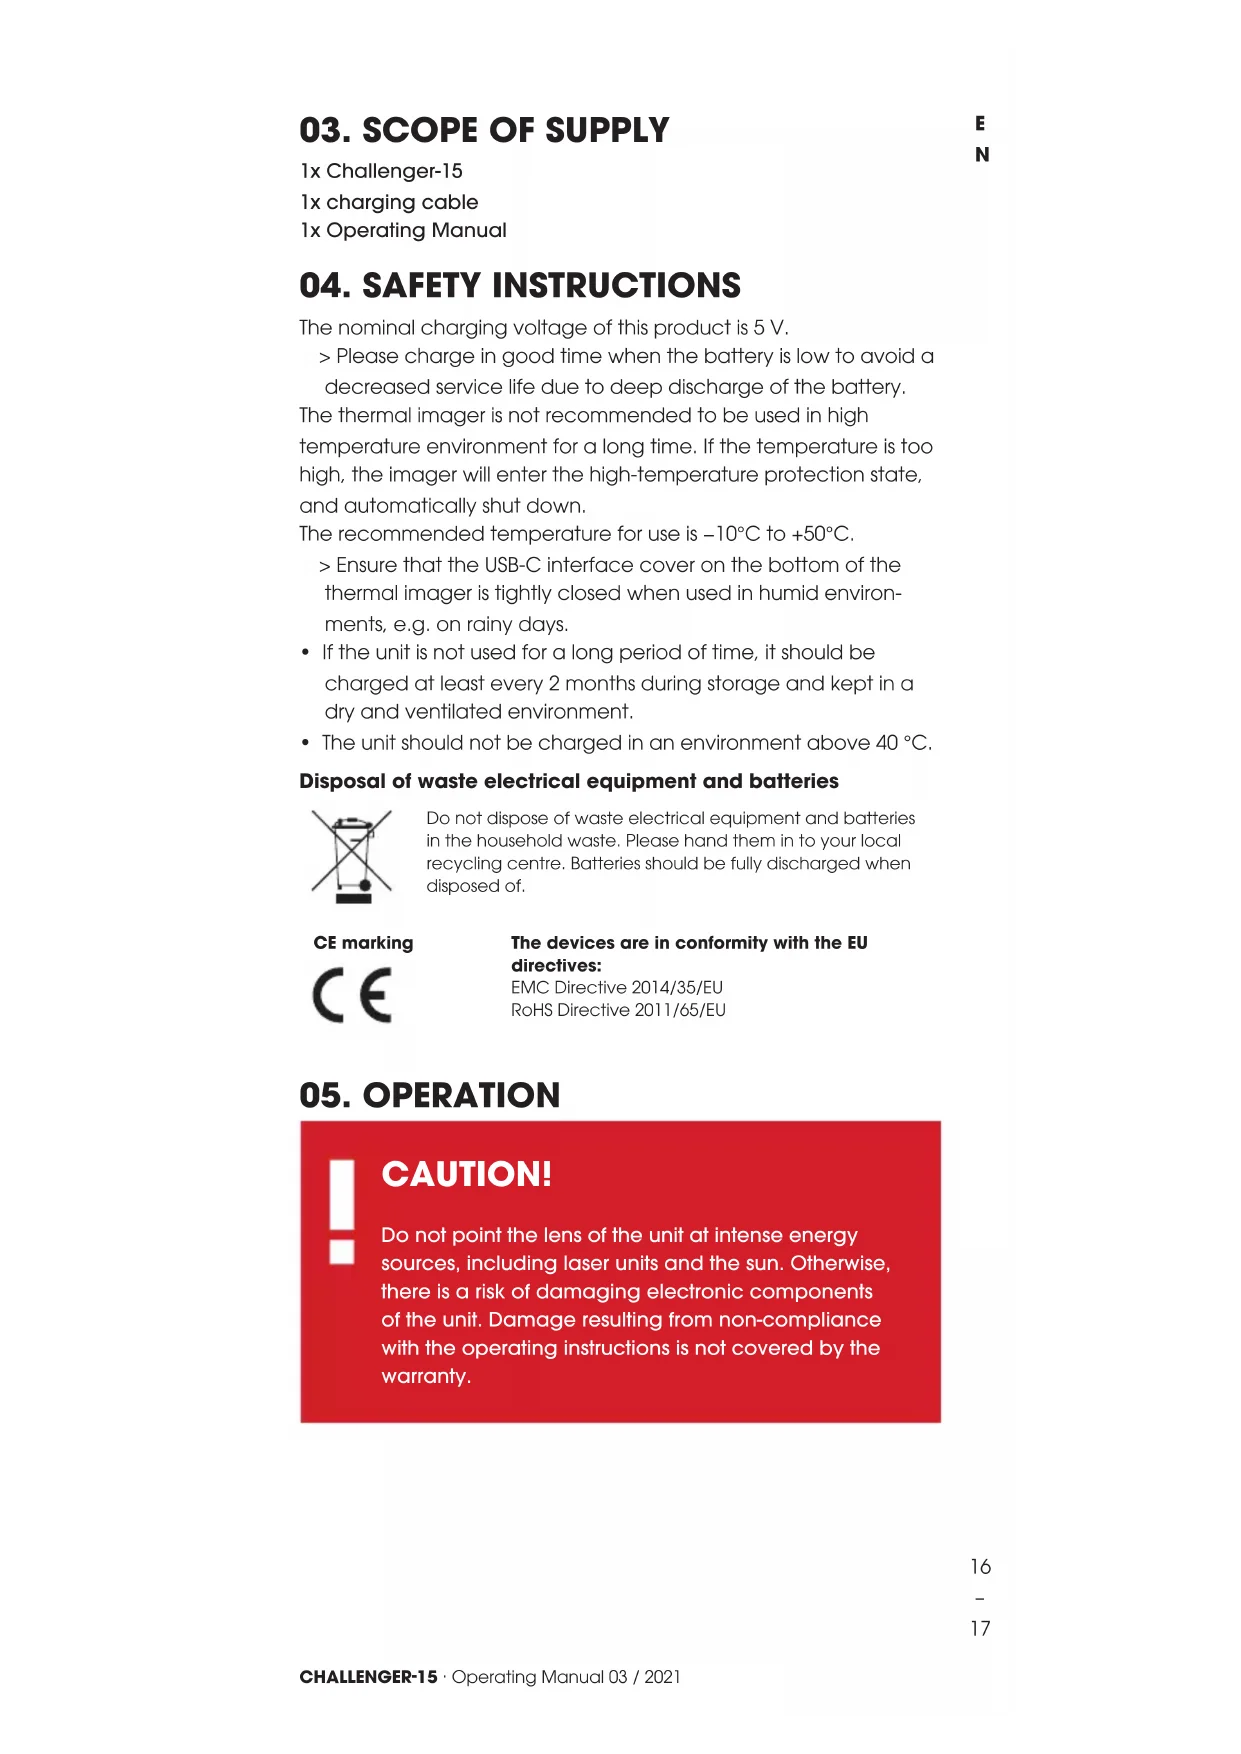
09. INFO BAR
The info bar in the upper right-hand image corner shows the digital zoom
setting, the memory capacity (no bar = empty) and the charge status of the built-in battery (three bars = full). If WiFi is activated, the WiFi symbol from the menu is also displayed in the info bar.

text_image
1X10. MENU ICONS
The menu bar is located on the left edge of the screen.
Press the picture/video button or the zoom button to switch between the menu items.
Press the menu button to select a menu item.
Long press the menu button to exit the menu again.
| SYMBOL Meaning | |
| Auto standby (off/5 min./15 min.) | |
| Visibility of the info bar in the upper right corner of the picture (on/off) | |
| Hot spot tracking/displaying the warmest object (on/off) | |
| WiFi (on/off) | |
| CVBS CVBS | Analogue video output (on/off) |
| Stadiametric rangefinder | |
| Brightness (level 1 to 5) | |
| Contrast (level 1 to 5) | |
| Image optimisation modes for different environmental conditions (warm/cold) | |
| Calibration mode / FCC (auto/manual, external) | |
| Blind pixel correction | |
| System information | |
| Restoring the factory settings (and subsequent restart) | |
11. SWITCHING THE IMAGE MODE
Press the menu button briefly to switch the image mode between White Hot, Black Hot, Fusion and Red Hot modes.

natural_image
Three-panel image showing a dark scene, a silhouette of a person walking, and a thermal imaging of a rabbit (no text or symbols)-
-
- 04.
-
-
White Hot - ideal for precise response
- Black Hot - ideal for quick finding
- Fusion - for detection at close range, e.g. thermal bridges
- Red Hot - for rapid detection of heat sources
12. DIGITAL ZOOM
Briefly press the zoom button to zoom the picture to 1x to 2x, 4x and back to 1x.
The digital zoom factor is displayed in the info bar.
13. TAKING PICTURES AND VIDEOS
In normal display mode, briefly press the picture/video button to take a picture.
The display indicates that the picture has been saved.
Long press the picture/video button to start recording a video.
During video recording, the recording time is displayed in the
upper left corner of the screen.
Long press the picture/video button again to stop recording and save the video.
The display indicates that the video has been saved.
The remaining space in the internal memory is displayed in the info bar.
14. CALIBRATION FUNCTION (FCC)
During use, the image gradually deteriorates due to the changing background temperature of the sensor. This must be compensated for by periodically calibrating the sensor. For calibration, an internal shutter is actuated, which makes a faint clicking sound. The image briefly freezes while the shutter is closed.
- In FCC Auto mode, calibration is performed automatically at intervals set by the unit.
- In FCC Manual mode, no automatic calibration is performed. The manual mode allows the user to determine the time when the image briefly freezes.
If you notice a deterioration in picture quality during use, start manual calibration by pressing and holding the zoom button.
- In FCC External mode, no automatic calibration is performed either. Calibration takes place without the internal shutter and is therefore completely silent. The lens cap must be closed during calibration (this replaces the internal shutter). If the lens cap is inadvertently not closed when performing external calibration, the displayed image is overlapped by a still image of the scene displayed during calibration. This can be corrected by properly calibrating again with the lens cap closed.
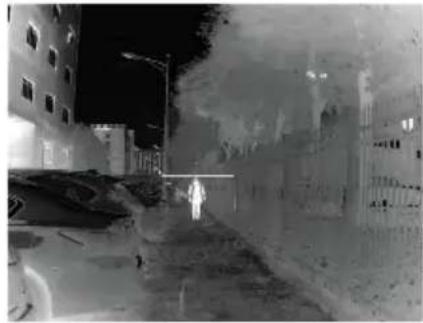
15. STADIAMETRIC RANGEFINDER
For stadiametric distance measurement, you must first set the target size (height) of the target to which you want to measure the distance. To do this, proceed as follows:
Select the menu item Stadiametric Rangefinder in the menu and confirm it with the menu button.
Press the zoom button to enter the Parameters submenu.
Here you can choose between four different target sizes "wolf",
"bear", "deer" and "individual" using the picture/video button or the zoom button.
Confirm your selection with the menu button.
In the sub-item "individual" you can define a custom target size in the range of 0.1 to 9.9 m height using the picture/video button or the zoom button.
Confirm the set value with the menu button.
To measure the distance, proceed as follows:
Select the menu item Stadiametric Rangefinder in the menu and confirm it with the menu button.
A long horizontal line with a short vertical line pointing upwards appears in the display image.
Place the intersection of the two lines at the top edge of the target to be measured and press the menu button (step 1).
The vertical line flashes briefly and then changes to the underside of the horizontal line.
Now place the intersection of the two lines at the lower edge of the target to be measured and press the menu button again (step 2).
The distance to the target is then displayed in the upper left corner of the image.
natural_image
Night street scene with illuminated buildings and a person walking, no visible text or symbols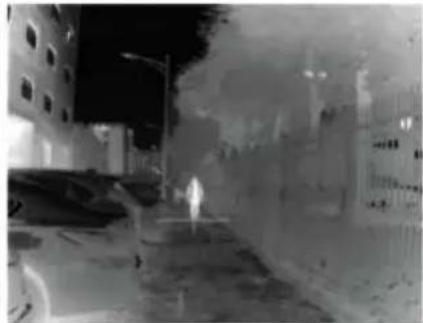
natural_image
Night street scene with illuminated buildings and a street lamp (no visible text or symbols)Step 1 Step 2
Please note: The precision of the distance measurement depends primarily on the correspondence between the defined and the actual target size and on the smoothness of the hand during the measuring process. The sizes of the pre-configured targets are only indicative and may vary.
16. BLIND PIXEL CORRECTION
If a pixel error occurs permanently despite calibration and restart, it can be corrected as follows:
Select the menu item Blind Pixel Correction and open it.
Press the menu button to set the step size of the cursor adjustment to select the faulty pixel (step size 1, 5 or 10 pixels).
Press the menu or picture/video button to select the direction of movement of the cursor (left, right, up, down).
Move the cursor to the missing pixel step by step using the menu button.
An enlarged view of the selected pixel is shown in the lower right corner of the display. If the faulty pixel is covered by the menu display, the display can be mirrored by pressing and holding the picture/video button.
When the pixel is selected, correct it by a pressing and holding the picture/video button.
The number of corrected pixels is displayed at the bottom of the image.
Close the menu with a long press of the menu button.
17. HOT SPOT TRACKING
When hot spot tracking is activated, a green crosshair appears tracking the hottest object on the screen.
18. CHARGING THE BATTERY
The device is equipped with an internal, rechargeable battery that is charged via the USB-C interface on the underside of the housing. The battery indicator in the upper right corner of the screen shows the charge level of the battery.
Please charge the battery at the latest when a low battery charge (red battery symbol) is displayed.
You can charge the battery with the supplied power supply unit or a portable power supply unit such as a USB powerbank. A powerbank with 4000 mAh capacity can double the operating time. The LED indicator next to the USB-C interface lights up red during charging and changes to green when the battery is fully charged. The unit can be charged during operation. It charges faster than is needed for ongoing operation.
19. TRANSFERRING PICTURES AND VIDEOS
Once you have connected the unit to your computer via a USB cable and switched on the unit, it acts as a mass storage device so that you can view, copy or delete your pictures and videos on the computer.
20. WIFI FUNCTION AND APP CONNECTION
The app and information on the app connection can be found at: https://liemke.shop/medien
21. MAINTENANCE
Activate the WiFi function in the menu.
Maintenance should be carried out at least twice a year and consist of the following actions.
Wipe the external surfaces of metal and plastic parts free of dust and dirt with a cotton cloth. Silicone grease can be used for this purpose.
Clean the contacts of the unit with a non-greasy organic solvent.
Check the glass surfaces of the eyepiece and the lens. If necessary, remove dust and sand from the lenses (preferably using a non-contact method). Cleaning of the external surfaces of the optic should be done with substances designed especially for this purpose.
22. TROUBLESHOOTING
This table lists all the problems that can occur when using the unit. Carry out all recommended checks and repairs as described in the table.
If an error occurs that is not listed in the table or if you cannot rectify an error yourself, the unit should be handed over to the responsible service centre for repair.
| Malfunction Possible | reason Correction | |
| The thermal imager cannot be switched on. | The battery is completely discharged. | Charge the battery. |
| Can't be powered by an external power source. | USB cable is damaged. | Replace USB cable. |
| The external power source is discharged | Charge the external power source (if necessary). | |
| The image is blurred, with vertical lines and an uneven background. | Calibration needed. Perform image calibration as described in section 14. "Calibration Function (FCC)". | |
| The image is too dark. The brightness setting is too low. | Set the display brightness | |
| Coloured lines appear on the display or no image is shown. | The unit has been exposed to static electricity during operation. | After the unit has been exposed to static electricity, the unit will either restart automatically or you will have to switch it off and on again manually. |
| Low image quality/reduced detection range. | These problems can occur when an observation is carried out on a day with difficult weather conditions (high humidity, snowfall, rain, fog etc.). | |
| The smartphone or tablet PC cannot be connected to the unit. | The unit's password has been changed. | Delete the network and reconnect using the existing password. |
| The unit is located in an area with a large number of WiFi networks that may cause interference. | To ensure stable WiFi operation, place the unit in another location with fewer or no WiFi networks at all. | |
| No WiFi signal available or interrupted. | The unit is outside the WiFi range. There are obstacles between the unit and the receiver (e.g. concrete walls). | Place the unit within line of sight and range of the WiFi signal. |
| When the unit is used at low temperatures, the image quality of the surroundings is worse than at temperatures above freezing. | At temperatures above freezing, the observed objects (surroundings and background) are different temperatures due to thermal conductivity, resulting in a high temperature contrast. Thus, the picture quality achieved by the unit is higher. At low outdoor temperatures, the observed objects (background) usually cool down to about the same temperature, so that the temperature contrast is considerably reduced and the image quality (details) is lower as a result. This is a property of thermal imagers. | |
natural_image
Thermal image of a person walking through a field at sunset, with warm orange and purple gradients (no text or symbols)Estimados clientes,
natural_image
Three-panel image showing a dark scene with silhouettes, a small orange cat silhouette, and a dark abstract background (no text or symbols)natural_image
Night street scene with illuminated buildings and a person walking, no visible text or symbols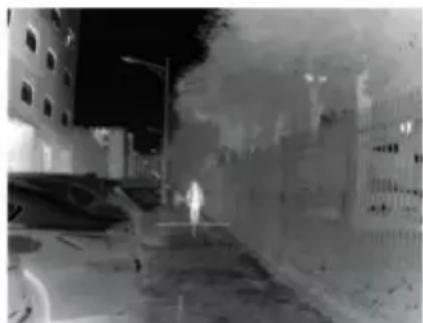
natural_image
Night street scene with illuminated buildings and a person walking (no visible text or symbols)Paso 1 Paso 2
natural_image
Thermal image of a person walking through a field at sunset (no text or symbols visible)Chers clients,
natural_image
Four-panel image showing a snowy scene with a figure, a cat silhouette, an orange rabbit, and a dark abstract background (no text or symbols)natural_image
Nighttime street scene with illuminated buildings and a person walking on a road (no visible text or symbols)
natural_image
Nighttime street scene with buildings and a person walking, no visible text or symbolsÉtape 1 Étape 2
natural_image
Thermal image of a person walking through a field at sunset (no text or symbols visible)Drodzy Klienci,
natural_image
Three-panel image showing a dark scene, a silhouette of a person walking, and a thermal imaging of an orange object (no text or symbols)natural_image
Nighttime street scene with illuminated buildings and a person walking, no visible text or symbols
natural_image
Night street scene with illuminated buildings and a person walking (no visible text or symbols)Krok 1 Krok 2
Changes in construction or design are
reserved. No guarantee for possible errors.
Please note the legal terms of purchase and use for
thermal imaging optics in your country or federal state.
Changes in design, technical implementation,
scope of delivery and prices reserved.
For the latest version of this operating manual visit:
https://liemke.com/medien
LIEMKE · CHALLENGER-15 · Manual de instrucciones
Contact technical service
Contactez le service technique