
PS900C - Lawn mower HUSQVARNA - Free user manual and instructions
Find the device manual for free PS900C HUSQVARNA in PDF.

| Product Type | Battery charger for lawn mower |
| Brand | Husqvarna |
| Model | PS900C |
| Output Voltage | 58 V DC |
| Number of batteries chargeable simultaneously | 1 to 3 |
| Compatible battery types | Li-Ion Husqvarna EM-5240Li, EM-5264Li, EM-5239Li |
| Protection rating | IP54 (protected against dust and splashes) |
| Power supply | Grounded wall outlet |
| Operating temperature | 0 °C to 40 °C |
| Storage temperature | 0 °C to 50 °C |
| Main features | Charges original Husqvarna batteries, automatic shut-off when fully charged |
| Safety | Short-circuit protection, - IP54, - complies with EU directives, - do not use during thunderstorms |
| Maintenance and cleaning | Clean before storage, - store away from frost and sunlight, - do not immerse |
| Spare parts and repairability | Power cord replaceable by an authorized professional, - repairs only by an authorized dealer |
| General information | Supplied with power cord, - removable handle, - do not use an extension cord |
Frequently Asked Questions - PS900C HUSQVARNA
User questions about PS900C HUSQVARNA
0 question about this device. Answer the ones you know or ask your own.
Ask a new question about this device
Download the instructions for your Lawn mower in PDF format for free! Find your manual PS900C - HUSQVARNA and take your electronic device back in hand. On this page are published all the documents necessary for the use of your device. PS900C by HUSQVARNA.
USER MANUAL PS900C HUSQVARNA
EN Operator's manual 2-7
Troubleshooting....6
Transportation, storage and disposal.... 6
Technical data....6
Introduction
Product description
The Husqvarna PS900C is a battery charger.
Intended use
Use the battery charger to charge batteries in applicable Husqvarna products. Do not use the battery charger for other tasks.
Battery charger overview
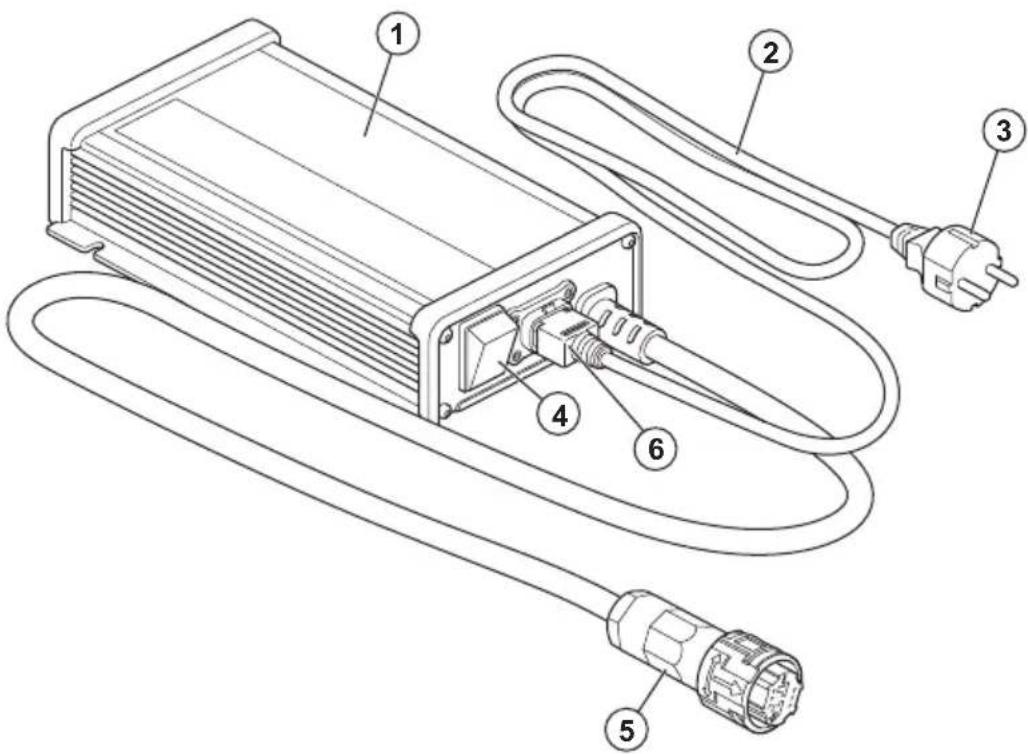
- Battery charger
- Power cord
- Power plug, with different plugs for different markets
- Charger ON/OFF switch
- Charger plug
- Power socket
Symbols on the battery charger

Read the operator's manual carefully and make sure that you understand the instructions before use.

The battery charger agrees with the applicable EC directives.

IP54 - The battery charger has protection against dust and splashing water.
The battery charger or package of the battery charger is not domestic waste. Recycle it at an applicable disposal location for electrical and electronic equipment.
Safety
Safety definitions
Warnings, cautions and notes are used to point out specially important parts of the manual.

WARNING: Used if there is a risk of injury or death for the operator or bystanders if the instructions in the manual are not obeyed.

CAUTION: Used if there is a risk of damage to the product, other materials or the adjacent area if the instructions in the manual are not obeyed.
Note: Used to give more information that is necessary in a given situation.
Important safety instructions

WARNING: Read all safety warnings and all instructions. Failure to obey the warnings and instructions may result in electrical shock, fire and/or serious injury.
Note: Save all warnings and instructions.
- If the power cord is damaged, it must be replaced by the manufacturer, its service agent or similarly qualified persons in order to avoid hazard.
- Regularly examine that the power cord is not damaged. Immediately disconnect the battery charger if the power cord is damaged.
- Only charge Husqvarna original batteries with the battery charger. If you have questions, speak to your Husqvarna dealer.
- Do not charge non-rechargeable batteries.
- Do not try to disassemble or repair the battery charger. All repairs are to be done by an approved dealer only. Do not use a damaged battery charger.
- Do not connect the battery charger terminals to metal objects.
- The power plug must only use a grounded mains socket.
- The power plug must only use a mains socket that has protection from rain.
- Use an approved and grounded mains socket that is not damaged.
- Do not lift the battery charger by the power cord. To disconnect the battery
charger from a mains socket, pull out the power plug. Do not pull the power cord.
- Keep all cables and extension leads away from water, oil and sharp edges. Make sure that the power cord is not caught between doors, fences or equivalent.
- Do not use a damaged battery charger or battery.
- Do not use the battery charger when there is a risk of lightning.
- Do not use the battery charger near flammable materials or materials that can cause corrosion. Pull out the power plug to the battery charger if there is smoke or fire.
- Keep the battery charger away from children. Children
should be supervised to ensure that they do not play with the battery charger.
- Keep the battery charger clean and away from sunlight.
- This battery charger can be used by children aged from 8 years and above and persons with reduced physical, sensory or mental capabilities or lack of experience and knowledge if they have been given supervision or instruction concerning use of the battery charger in a safe way and understand the hazards involved. Children shall not play with the battery charger. Cleaning and user maintenance shall not be made by children without supervision.
Assembly
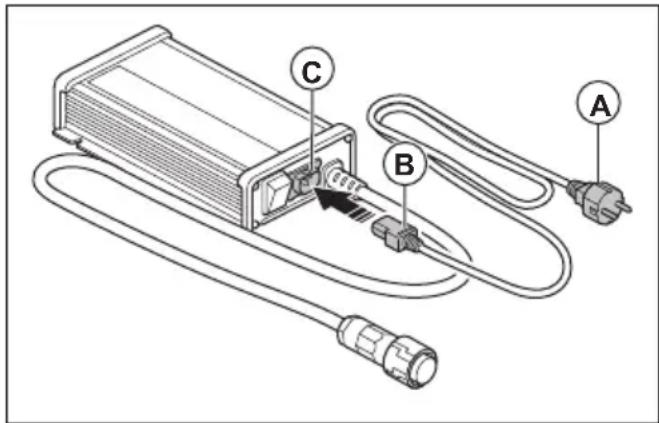
To assemble the battery charger
Note: Only use the battery charger with the supplied power cord set. Do not use external power cord set. If the power cord is damaged, it must be replaced by the manufacturer, its service agent or similarly qualified persons in order to avoid hazard.
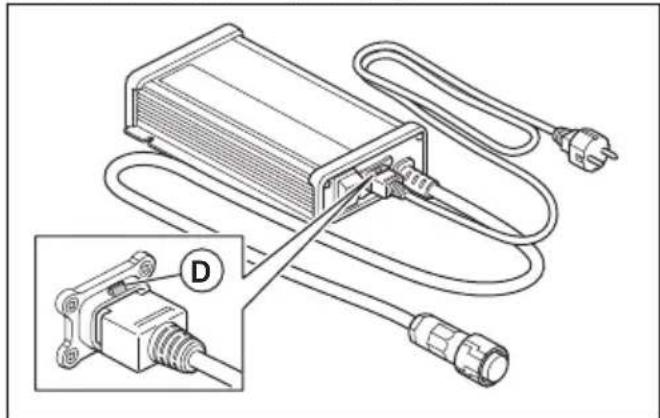
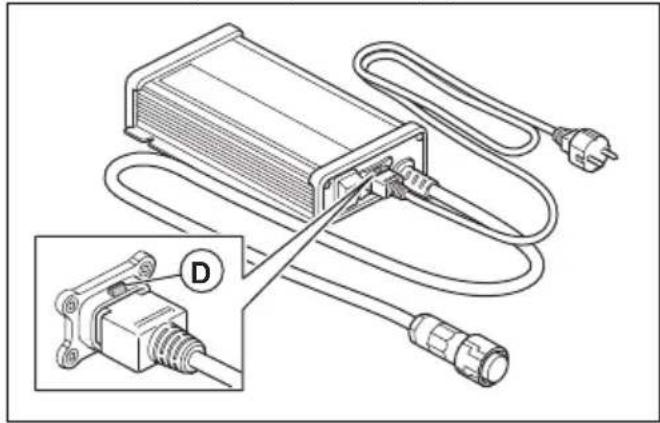
- Make sure that the power plug (A) is not connected to a mains socket.
-
Connect the power cord (B) to the power socket (C) on the battery charger.
-
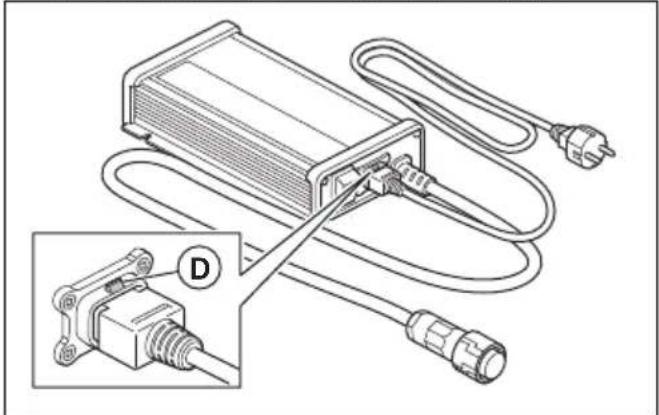
Make sure that the lock function (D) is engaged.
natural_image
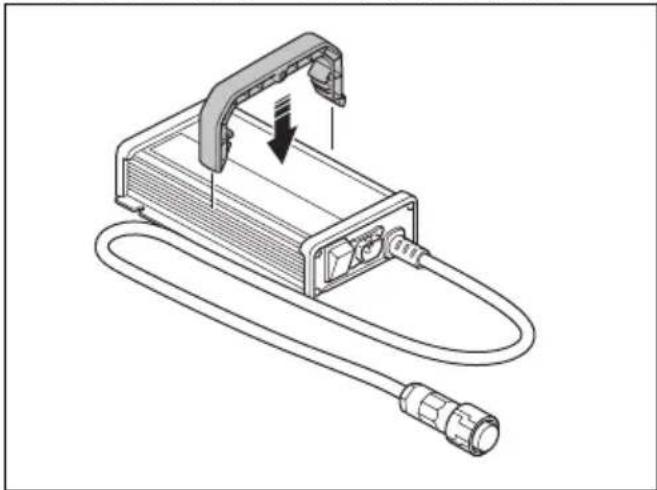
Diagram of an electronic device with attached cable and connector, showing wiring connections without any text or symbols.To install the handle
- Put the battery charger on a flat surface.
-
Align the handle above the battery charger. Make sure that the handle is in the center of the battery charger.
-
Push the handle down until it locks into position.
natural_image
Line drawing of a handheld electronic device with attached cable and connector (no text or symbols)Operation
To charge the battery

CAUTION: Use the battery charger in conditions where the temperature is between 0 °C (32 °F) and 40 °C (104 °F).

CAUTION: Only use the battery charger in a location that has a good airflow.

CAUTION: Do not lift the battery charger by the power cord.
- Make sure that the charger ON/OFF switch is set to OFF.
- Connect the power plug to a grounded mains socket.
CAUTION: Only connect the battery charger to a mains socket that has the
voltage and frequency specified on the rating plate.
- Connect the charger plug to the socket for the battery charger on the product.
- Set the charger ON/OFF switch to ON. If possible, make sure that the product shows that the battery charges.
Note: For the location of the charge indicator, refer to the Operator's manual for the product.
- Set the charger ON/OFF switch to OFF when the battery is fully charged. For charge times, refer to the Operator's manual for the product.
- Disconnect the charger plug from the socket for the battery charger on the product.
- Pull the power plug to disconnect the battery charger from the mains socket. Do not pull the power cord.
Troubleshooting
Troubleshooting
| Symptoms Cause Solution | ||
| The battery does not charge. The battery | charge is not correctly connected to the mains outlet. | Connect the battery charger to a mains outlet. |
| The power cord is not correctly connected to the battery charger. | Connect the power cord to the battery charger. | |
| The charger ON/OFF switch is set to OFF. | Set the charger ON/OFF switch to ON. | |
| The battery charger is not correctly connected to the product. | Connect the battery charger to the product. | |
| The battery is damaged. | Disconnect the battery charger and speak to an approved servicing dealer. | |
| The battery charger or the power cord is damaged. | Disconnect the battery charger and speak to an approved servicing dealer. |
Transportation, storage and disposal
Transportation and storage
- Safely attach the battery charger during transportation to prevent damage and accidents.
- Keep the battery charger away from metal objects, for example nails, screws or jewelry.
- Keep the battery charger in a locked area to prevent access for children or persons that are not approved.
- Put the battery charger in a dry, frost-free and clean area. The ambient temperature must be between 0 °C / 32 °F and 50 °C / 122 °F.
- Keep the battery charger away from sunlight.
-
Clean the battery charger before storage.
-
Disconnect the battery charger before storage.
Husqvarna battery chargers are not domestic waste. Obey the disposal instructions. - Obey the local disposal requirements and applicable regulations.
- Recycle the battery charger and package at an applicable disposal location.
- Speak to your local Husqvarna dealer for more information on how to recycle and discard the battery charger.
Disposal
Technical data
TECHNICAL DATA
| Battery charger PS900C | |
| Output Voltage, VDC 58 | |
| Number of batteries that can be charged at the same time | 1–3 |
TECHNICAL DATA
| Battery EM-5240Li EM-5264Li EM-5239Li | |||
| Type Li-ion Li-ion Li-ion | |||
| Capacity 58.8 V, Max. 38.5 Ah 58.8 V, Max. 63.7 Ah 58.8 V, Max. 39.2 Ah |
Съдържание
Въведение....8
Безопасност....9
Монтаж....11
Операция.... 12
natural_image
Diagram of an electrical connector with plug and cable, showing a close-up view of the connector (no text or symbols present)natural_image
Technical line drawing of a device with cable and connector, showing internal components and a downward arrow indicating motion (no text or symbols)Операция
natural_image
Technical diagram of an electrical connector with attached cable and plug, showing internal wiring and a magnified inset (no text or symbols)Montáž řídítek
natural_image
Technical line drawing of a device with attached cable and connector (no text or symbols)Provoz
Nabití baterie

natural_image
Technical diagram of an electrical connector with attached cable and plug, showing internal wiring and a magnified inset (no text or symbols)natural_image
Technical line drawing of a device with attached cable and connector (no text or symbols)Drift
natural_image
Technical diagram of an electrical connector with wiring and plug, showing a close-up inset (no text or symbols)natural_image
Line drawing of a device with attached cable and connector, showing no text or symbolsBetrieb
natural_image
Diagram of an electrical connector with attached wires and connectors, showing a close-up view of the connector (no text or symbols present)natural_image
Line drawing of a device with a cable and connector, no text or symbols presentΛειτουργία
natural_image
Diagram of an electrical connector with wiring and plug, showing a component inserted into a socket (no text or labels)Instalación del asa
natural_image
Line drawing of a device with a cable and connector, showing no text or symbolsFuncionamiento
Carga de la batería

- Akulaadija
- Toitekaabel
- Toitepistik, koos erinevate pistikutega erinevatele turgudele
- Laadija ON/OFF (sees/väljas) lüliti
- Laadija pistik
- Pistikupesa
Sümbolid akulaadijal

natural_image
Technical diagram of an electrical connector with wiring and plug, showing a close-up view of the component (no text or symbols present)Käepideme paigaldamine
natural_image
Diagram of an electronic device with a cable and connector, showing internal components and a downward arrow indicating motion (no text or symbols present)Töö
Aku laadimine

natural_image
Diagram of an electrical connector with plug, cable, and socket, showing internal wiring and a close-up inset (no text or symbols)Kahvan asentaminen
natural_image
Line drawing of a device with a cable and connector, no text or symbols presentKäyttö
Akun lataaminen

natural_image
Diagram of an electrical connector with plug, cable, and socket (no text or symbols)natural_image
Line drawing of a device with a cable and connector, no text or symbols presentUtilisation
- Punjač baterije
- Kabel napajanja
- Električni utikač, na različitim tržištima različiti su utikači
- Sklopka za UKLJUČIVANJE/ISKLJUČIVANJE punjača
- Utikač punjača
- Električna utičnica
- Pojni kabel (B) priključite na električnu utičnicu (C) na punjaču baterije.
- Provjerite je li primijenjena funkcija blokade (D).

natural_image
Technical diagram of an electrical connector with attached cable and plug, showing internal wiring and a magnified inset (no text or symbols)Ugradnja ručke
natural_image
Technical line drawing of a device with attached cable and connector (no text or symbols)Rad
Zamjena baterije

OPREZ: Punjač baterije upotrebljavajte u uvjetima s temperaturama između 0 °C (32 °F) i 40 °C (104 °F).

natural_image
Diagram of an electronic device with connectors and wiring, showing a connector inserted into a housing (no text or symbols present)natural_image
Line drawing of a device with a cable and connector, no text or symbols presentÜzemeltetés
natural_image
Diagram of an electronic device with attached cables and connectors, showing a close-up view of the connector (no text or symbols present)natural_image
Line drawing of a device with a handle, cable, and connector (no text or symbols)Utilizzo
- Akumuliatoriaus jkroviklis
- Maitinimo laidas
- Maitinimo kištukas su įvairioms rinkoms skirtais skirtingais kištukais
- [kroviklio [JUNGIMO / IŠJUNGIMO jungiklis
- [kroviklio kištukas
- Maitinimo lizdas
natural_image
Diagram of an electrical connector with plug, socket, and cable, showing internal wiring and a magnified inset (no text or symbols)Rankenos montavimas
natural_image
Line drawing of a device with a cable and connector, showing no text or symbolsNaudojimas
natural_image
Diagram of an electrical connector with attached cable and plug, showing internal wiring and a magnified inset (no text or symbols)Roktura uzstādīšana
natural_image
Line drawing of a portable electronic device with attached cable and connector (no text or symbols)Lietošana
Akumulatora uzlāde
natural_image
Diagram of an electrical connector with plug, cable, and socket, showing wiring connections (no text or symbols)De hendel installeren
natural_image
Line drawing of an electronic device with a cable and connector, showing internal components and a downward arrow indicating motion (no text or symbols)Werking
De accu opladen
-
Koble strømledningen (B) til strømuttaket (C) på batteriladeren.
-
Kontroller at läsefunksjonen (D) er koblet inn.
natural_image
Technical diagram of an electrical connector with plug, socket, and cable connections (no text or symbols)Slik monterer du håndtaket
natural_image
Line drawing of a device with a cable and connector, showing internal components and a downward arrow indicating motion (no text or symbols)Drift
natural_image
Diagram of an electrical connector with wiring and plug, showing internal components and connection (no text or labels)Montowanie uchwytu
natural_image
Line drawing of a device with attached cable and connector, showing internal components and a downward arrow indicating motion (no text or symbols)Przeznaczenie
natural_image
Diagram of an electrical connector with plug, cable, and socket, showing wiring connections (no text or symbols)Instalar o punho
natural_image
Line drawing of a device with a connector and cable, showing no text or symbolsFuncionamento
Carregar a bateria

natural_image
Technical diagram of an electrical connector with attached cable and plug, showing internal wiring and a close-up inset (no text or symbols)Montarea mânerului
natural_image
Line drawing of a device with a cable and connector, showing no text or symbolsFunctionarea
Încărcarea bateriei

natural_image
Technical diagram of an electrical connector with wiring and plug, showing a close-up inset (no text or symbols)Inštalácia rukoväti
natural_image
Line drawing of a portable electronic device with attached cable and connector (no text or symbols)Prevádzka
Nabíjanie akumulátora

natural_image
Technical diagram of an electrical connector with wiring and plug, showing a close-up inset (no text or symbols)Namestitev ročaja
natural_image
Line drawing of a handheld electronic device with attached cable and connector (no text or symbols)Delovanje
- Povežite kabl za napajanje (B) na strujnu utičnicu (C) na punjaču baterije.
- Uverite se da je funkcija blokade (D) aktivna.
natural_image
Technical diagram of an electrical connector with attached cable and plug, showing internal wiring and a close-up inset (no text or symbols)Postavljanje ručke
-
Položite punjač baterije na ravnu površinu.
-
Poravnajte ručku iznad punjača baterije. Proverite da li je ručka na sredini punjača baterije.
- Gurnite ručku nadole dok ne legne na mesto.

natural_image
Technical line drawing of a device with attached cable and connector (no text or symbols)Rukovanje
Punjenje baterije

OPREZ: Koristite punjač baterije u uslovima u kojima je temperatura između 0 °C (32 °F) i 40 °C (104 °F).

OPREZ: Koristite punjač baterije samo na lokaciji na kojoj postoji dobra ventilacija.

OPREZ: Nemojte podizati punjač baterije za kabl za napajanje.
- Uverite se da je prekidač za uključivanje/isključivanje punjača u položaju OFF.
- Priključite utikač kabla u uzemljenu mrežnu utičnicu.

OPREZ: Povežite punjač baterije samo na strujnu utičnicu čiji su napon i frekvencija naznačeni na pločici tipa.
- Priključite utikač punjača u utičnicu za punjač baterije na proizvodu.
- Prebacite prekidač za uključivanje/isključivanje punjača u položaj ON. Ako je moguće, uverite se da se na proizvodu prikazuje da se baterija puni.
Napomena: Da biste utvrdili lokaciju indikatora punjenja, pogledajte korisničko uputstvo za proizvod.
- Postavite prekidač za uključivanje/isključivanje punjača u položaj OFF kada je baterija napunjena do kraja. Za informacije o vremenu punjenja, pogledajte korisničko uputstvo za proizvod.
- Izvucite utikač punjača iz utičnice za punjač baterije na proizvodu.
- Povucite utikač kabla da biste isključili punjač baterije sa mrežne utičnice. Ne vucite kabl za napajanje.
Rešavanje problema
Rešavanje problema
natural_image
Technical diagram of an electrical connector with plug, socket, and cable connections (no text or symbols)Installera handtaget
natural_image
Line drawing of an electronic device with a cable and connector, no text or symbols presentDrift
Att ladda batteriet

natural_image
Diagram of an electrical connector with attached cable and plug, showing wiring connections (no text or labels)Tutma yerini takma
natural_image
Line drawing of a device with a connector and cable, no text or symbols presentÇalışma
Aküyü şarj etme
