
D27902M - Vacuum Cleaner DEWALT - Free user manual and instructions
Find the device manual for free D27902M DEWALT in PDF.

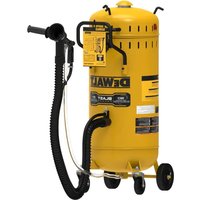
| Product type | Industrial wet/dry vacuum |
| Brand | DEWALT |
| Model | D27902M |
| Supply voltage | 220-240 V / 50-60 Hz |
| Maximum power | 1380 W |
| Nominal power | 1200 W |
| Tank capacity | 43 L (liquid: 30 L) |
| Maximum airflow | 140 m³/h |
| Maximum vacuum | 22.0 kPa (220 mbar) |
| Flat filter surface area | 0.6 m² |
| Protection class | I |
| Hose connection | 35 mm (C-DN/C-ID) |
| Dimensions (L x W x H) | 520 x 380 x 695 mm |
| Weight | 13.7 kg |
| Sound pressure level | 67 dB(A) |
| Hand-arm vibration | < 2.5 m/s² |
| Operating temperature | -10 to +40 °C |
| Relative humidity | 30-90 % |
| Dust class | M (according to EN 60335-2-69) |
| Functions | Wet and dry vacuuming, dust extraction, automatic filter cleaning, automatic shut-off in wet mode |
| Safety | Antistatic system, flow alarm, power tool socket with delay |
| Maintenance | Washable flat filter, paper filter bag, disposal bag, membrane filter (optional) |
| Included accessories | Suction hose, floor nozzle, suction tube, rubber lips |
| Warranty | 30-day satisfaction, 1-year support |
Frequently Asked Questions - D27902M DEWALT
User questions about D27902M DEWALT
0 question about this device. Answer the ones you know or ask your own.
Ask a new question about this device
Download the instructions for your Vacuum Cleaner in PDF format for free! Find your manual D27902M - DEWALT and take your electronic device back in hand. On this page are published all the documents necessary for the use of your device. D27902M by DEWALT.
USER MANUAL D27902M DEWALT
2006/42/EF (+2009/127/EF)
2004/108/EF
Vice President Engineering and Product Development
DEWALT
Vice President Engineering and Product Development
DEWALT
You have chosen a DEWALT tool. Years of experience, thorough product development and innovation make DEWALT one of the most reliable partners for professional power tool users.

Please read and comply with these original instructions prior
to the initial operation of your appliance and store them for later use or subsequent owners.
- Before first start-up it is definitely necessary to read the safety indications Nr. 5.956-249!
- The non-compliance of the operating and safety instructions may lead to damages of the appliance and to dangers for the operator and other persons.
In case of transport damage inform vendor immediately
Contents
Environmental protection . EN . . .1
Symbols in the operating instructions EN .1
Proper use EN.2
Device elements. EN...2
Symbols on the machine.. EN...2
Safety instructions EN.2
Start up. EN..3
Operation EN.4
Transport EN.6
Storage. EN..6
Maintenance and care . . . EN . . .6
Troubleshooting EN...7
Disposal EN.8
Warranty. EN .8
Accessories and Spare Parts EN . . .9
EC Declaration of Conformity EN . . .9
Technical data EN .10
Environmental protection

Separate collection. This product must not be disposed of with normal household waste.
Should you find one day that your DEWALT product needs replacement, or if it is of no further use to you, do not dispose of it with household waste. Make this product available for separate collection.

Separate collection of used products and packaging allows materials to be recycled and used again.
Re-use of recycled materials helps prevent environmental pollution and reduces the demand for raw materials.
- Local regulations may provide for separate collection of electrical products from the household, at municipal waste sites or by the retailer when you purchase a new product.
- DEWALT provides a facility for the collection and recycling of DEWALT products once they have reached the end of their working life. To take advantage of this service please return your product to any authorised repair agent who will collect them on our behalf.
- You can check the location of your nearest authorised repair agent by contacting your local DEWALT office at the address indicated in this manual. Alternatively, a list of authorised DEWALT repair agents and full details of our after-sales service and contacts are available on the Internet at:
www.2helpU.com
Symbols in the operating instructions
Danger
Immediate danger that can cause severe injury or even death.
Warning
Possible hazardous situation that could lead to severe injury or even death.
Caution
Possible hazardous situation that could lead to mild injury to persons or damage to property.
Proper use
- The machine is meant for dry and wet cleaning of floors and walls.
- The appliance is suited for the extraction of dry, non-combustible, harmful dusts on machines and appliances; dust class M according to EN 60 335-2-69. Restriction: No carcinogenic substances except wood dust may be sucked in.
- This appliance is suited for the commercial use, e.g. in hotels, schools, hospitals, factories, shops, offices, and rental companies.
Device elements
1 Electrodes
2 Suction hose
3 Cable hook
4 Air outlet, working air
5 Suction head lock
6 Impeller
7 Air inlet, motor cooling air
8 Dirt receptacle
9 Steering roller bow
10 Suction head
11 Steering roller
12 Suction support
13 Floor nozzle (not included in the delivery)
14 Suction pipe (not included in the delivery)
15 Rotary switch for suction hose cross section
16 Carrying handle
17 Filter cover
18 Scale of the suction hose cross section
19 Bender
20 Rotary switch for suction output (min-max)
21 Indicator lamp
22 Socket
23 Automatic filter deducting
24 Main switch
25 Flat fold filter
26 Filter deducting
27 Floor nozzle holder
28 Holder for crevice nozzle
29 Holder for suction pipes
30 Power cord
31 Nameplate
Symbols on the machine
WARNING: This appliance contains harmful dust. The emptying and maintenance, including the removal of the dust bag, may
only be executed by trained personnel wearing suitable protection equipment. Do not switch on until the complete filter system has been installed and until the function of the volume flow control has been checked.
| Flat fold filter | |
| Order No. 10 | 03284-00 |
| Paper filter bag | |
| Order No. 10 | 03245-00 |
Safety instructions
Danger
-
When the outgoing air is carried back into the room, a sufficient ventilation rate L in the room must be ensured. To comply with the required limit values the carried back volume flow must be 50% of the fresh air volume flow (room volume V_R × ventilation rate L_W ) at maximum. Without a specific ventilation system the following applies: L_W = 1h^-1 .
Only persons trained in the use of the machine and the handling of substances for which the machine is to be used including training in the safe disposal of the sucked-in material may use the machine. -
This appliance contains harmful dust. Evacuation and maintenance work, including the disposal of the dust collection containers, may only be performed by specialists who wear the appropriate protective equipment.
- Do not use the appliance without the complete filtering system.
- Please follow the safety regulations applicable to the materials that are to be treated.
Start up
The appliance allows 2 operating modes:
1 Industry vacuum cleaner mode (socket not used)
2 Dust extractor mode (socket used)
Connect the suction hose and insert insert the suction nozzle or connect to the dust-generating device depending on the operating mode.
Warning
Do not vacuum without the filter elements; otherwise, the suction motor can get damaged and this can be hazardous to health on account of increased release of fine dust particles.
Horn
The horn blows when the air speed falls below 20m / s
Note: The horn reacts to negative pressure.
Set the rotary switch to the correct suction hose cross-section.
Anti-static system
Static charge is deflected by providing earthing to the connection nozzles. This prevents the formation of sparks and current shocks due to attachments (option) with electrical conductivity.
Dry vacuum cleaning
The device is fitted with a paper filter bag with locking slide, order no. 1003245-00 (5 pcs).
Note: You can use this appliance to take up all types of dust up to dust class M. It is statutorily necessary to use a dust collection bag (see Filter systems for order number).
Note:The appliance is suited as industrial vacuum cleaner and as deducting device for the mobile operation to take up dry, noncombustible dusts with MAK values greater than or equal to 0.1mg / m^3
Warning
The flat pleated filter must must always be in place while vacuuming.
- To suck fine dust, you can also use an additional paper filter bag, a dust disposal bag (special accessory) or a membrane filter (special accessory).
Inserting the paper filter bag Illustration A
Release and remove the suction head.
Insert the paper filter bag.
Insert and lock the suction head.
Installing the dust disposal bag Illustration B
Note: The opening of the disposal bag must be pulled all the way over the ledge of the suction support.
Release and remove the suction head.
Attach the disposal bag (option).
Pull disposal bag over the container.
Insert and lock the suction head.
Install membrane filter
Danger
The membrane filter must not be used to vacuum health-hazardous dusts.
Note: If you work without the paper filter bag/disposal bag, you must use a membrane filter to protect the suction head.
Illustration C
Release and remove the suction head.
Pull the membrane filter (option) over the container edge.
Insert and lock the suction head.
Wet vacuum cleaning
Danger
No dusts hazardous to health should be sucked in during wet vacuuming.
Inserting the rubber lips
Illustration D
Remove the brush strips.
Install the rubber lips.
Note: The structured side of the rubber lips must point outwards.
Close the suction connection
Illustration E
Properly insert the connection socket in the suction connection.
Push in the connection socket until it locks into place.
Turn the suction connection with the connection socket to the right to close it tightly.
Note: The accurate fit is ensured by means of a "bayonet connection".
Remove the paper filter bag
Illustration F
Release and remove the suction head.
Pull the paper filter bag out towards the rear.
Pull the locking slide up and seal the paper filter bag tightly when removing it.
Dispose off the used paper filter bag in a dust-tight bag according to the statutory provisions.
Insert and lock the suction head.
- To suck wet dirt, first remove the paper filter bag.
Removing the dust disposal bag
Illustration G
Release and remove the suction head.
Put the disposal bag over.
Pull the opening of the disposal bag out toward the back over the suction support and seal it tightly.
Tightly seal the disposal bag with closure strips underneath the opening.
Remove disposal bag.
Dispose of the disposal bag according to the local provisions.
Insert and lock the suction head.
- To vacuum wet dirt, always remove the disposal bag (option).
Remove the membrane filter.
Illustration H
Release and remove the suction head.
Remove the membrane filter.
Insert and lock the suction head.
- To vacuum wet dirt, always remove the membrane filter (option).
General
Warning
The flat pleated filter must must always be in place while vacuuming.
- If wet dirt is vacuumed with the upholstery or crevice nozzle, or if water is sucked up from a container, it is recommended to deactivate the "automatic filter cleaning" function.
If the maximum liquid level is reached the appliance will turn off automatically.
In case of non-conductive liquids (such as emulsion drilling fluids, oils, and greases) the appliance is not turned off when the container is full. The filling level must be continuously monitored and the container must be emptied in time.
After the wet vacuuming: Clean the flat folded filter with the filter cleaning. Clean the electrodes with a brush. Clean the container with a damp rag and dry it.
Clip connection
Illustration 1
The suction hose is equipped with a clip system. All C-35/C-DN-35 accessories can be connected.
Operation
Turning on the Appliance
Plug in the main plug.
Switch on the appliance at the main switch.
Adjust the suction output
Set the suction output (min-max) at the rotary switch.
Working with electrical power tools
Danger
Risk of injury and damage! The socket outlet is only for the connection of power tools to the vacuum cleaner. Any other use of the socket outlet is not permitted.
Connect the mains plug of the electric power tool to the vacuum cleaner.
Switch on the appliance at the main switch.
Indicator lamp is on; vacuum cleaner is in the standby mode.
Note: The vacuum cleaner is turned on and off automatically with the electric power tool.
Note: The vacuum cleaner starts automatically within 0.5 seconds and continues to run for 15 seconds after the power tool has been switched off.
Note: Please refer to "Technical specifications" for the power connection specifications of the power tools.
Illustration J
Adjust the stepped power tool adaptor to fit the connection of the electric power tool.
Illustration K
Remove the elbow from the suction hose.
Attach the stepped power tool adaptor to the suction hose.
Illustration
Connect the adaptor to the electric power tool.
Note: The different suction hose sections are required to allow an adjustment to the connection sections of the processing tools.
Set the minimum volume flow for the suction hose cross section at the rotary switch.
The scale displays the suction hose cross section.
Note: To use the appliance as a dust extractor for mobile operation (processing tool connected to the vacuum cleaner) the built-in monitoring must be adjusted to the connected processing tool (dust-generating device). This means that the user must be warned if the minimum volume flow of 20m / s that is required for the suction is fallen short of.
Note: Please refer to the type plate for the specification of the minimum volume flow in dependence on the negative pressure.
Automatic filter cleaning
The appliance has an innovative filter cleaning system that is particularly effective with fine dust. The flat pleated filter is automatically cleaned every 15 seconds through an air jet (pulsating sound).
Note: Automatic filter deducting is switched on at the factory.
Note: The automatic filter deducting function can only be switched on/off when the appliance is switched on.
- To switch off automatic filter cleaning:
Activate the switch. Indicator lamp in the switch goes off.
- To switch on automatic filter cleaning:
Press the switch again. Indicator lamp in the switch glows green.
Turn off the appliance
Switch off the appliance at the main switch.
Pull out the mains plug.
After each operation
Empty the container.
Vacuum and wipe the appliance inside and outside with a damp cloth.
Storing the Appliance
Illustration M
Store the suction hose and the mains cable as shown in the illustration.
Place the appliance in a dry room and secure it from unauthorized use.
Transport
Caution
Risk of injury and damage! Observe the weight of the appliance when you transport it.
Close the suction connection, see wet vacuuming.
Remove the suction pipe with the floor nozzle from the holder. Hold the appliance at the handle and at the suction pipe to transport it.
When transporting in vehicles, secure the appliance according to the guidelines to prevent slipping and tipping over.
Storage
Caution
Risk of injury and damage! Note the weight of the appliance in case of storage. This appliance must only be stored in interior rooms.
Maintenance and care
Danger
First pull out the plug from the mains before carrying out any tasks on the machine. Dust extracting machines are safeguards for the prevention or elimination of hazards defined in the regulations of BGV A1.
In order to carry out maintenance work, the user must disassemble, clean and service the unit, in so far as this is possible without endangering maintenance personnel and other persons. Suitable precautions include decontamination before the unit is disassembled. Precautions must be taken for local filtered forced air ventilation at the place where the unit is dissassembled, the cleaning of the maintenance surface and suitable protection of the personnel.
- The outside of the unit should be cleaned thoroughly and any harmful
substances removed. Alternatively, a sealed coating may be applied before the unit is removed from the danger area. All unit parts are to be considered contaminated when they are removed from the danger area. To avoid distribution of the dust, you must take the appropriate measures.
- In the framework of maintenance and repair work all contaminated objects that cannot be cleaned satisfactorily must be disposed of. Such objects must be disposed of in impermeable bags in accordance with the valid provisions for the disposal of such waste.
- During the transport and maintenance of the appliance the extraction opening is to be closed with the connection socket.
Warning
Safety equipment for preventing hazards must be serviced and maintained regularly. This means that the manufacturer's staff or persons trained by the manufacturer must check the equipment for proper functioning at least once a year, i.e. check for leaks, filter damage, functioning of the controlling elements, etc.
Caution
Risk of damage! Do not use detergents containing silicone to clean.
- No outside help is required for carrying out basic maintenance and cleaning.
- The appliance surface and the inside of the container should be cleaned regularly using a damp cloth.
Danger
Risk due to dust hazardous to health. Always use disposal clothing and P2 or higher breath-safe masks while carrying out maintenance tasks (such as changing filters).
Exchanging the flat pleated filter
Open filter door.
Take out the flat folded filter.
Dispose off the used flat-folded filter in a dust-tight bag according to the statutory provisions.
Remove the dirt that has accumulated on the pure air side.
Insert new flat-folded filter.
Close the filter door, it must lock into place.
Exchanging the paper filter bag/disposal bag
Close the suction connection
Illustration E
Close the suction connection, see wet vacuuming.
Exchanging the paper filter bag
Illustration F
Release and remove the suction head.
Pull the paper filter bag out towards the rear.
Pull the locking slide up and seal the paper filter bag tightly when removing it.
Dispose off the used paper filter bag in a dust-tight bag according to the statutory provisions.
Insert the new paper filter bag.
Insert and lock the suction head.
Replace the disposal bag
Illustration
Release and remove the suction head.
Put the disposal bag over.
Pull the opening of the disposal bag out toward the back over the suction support and seal it tightly.
Tightly seal the disposal bag with closure strips underneath the opening.
Remove disposal bag.
Dispose of the disposal bag according to the local provisions.
Attach the new disposal bag.
Pull disposal bag over the container.
Insert and lock the suction head.
Replace membrane filter
Illustration H
Release and remove the suction head.
Remove the membrane filter.
Pull the new membrane filter over the container edge.
Insert and lock the suction head.
Cleaning the electrodes
Release and remove the suction head.
Clean the electrodes with a brush.
Insert and lock the suction head.
Troubleshooting
Danger
First pull out the plug from the mains before carrying out any tasks on the machine.
Note: In case of a failure (e.g. filter breakage) the appliance must be turned off immediately. The failure must be remedied before the appliance is put into operation again.
Suction turbine does not run
Check cables, plugs, fuse, socket and electrodes.
Turn on the appliance.
Suction turbine turns off
Empty the container.
Suction turbine does not start again after the container has been emptied
Turn off the appliance and wait for 5 seconds, turn it on again after 5 seconds.
Clean the electrodes as well as the space between the electrodes with a brush.
Suction capacity decreases
Remove blockages in the suction nozzle, suction tube, suction hose, or flat pleated filter.
Replace the full paper filter bag.
Replace the filled disposal bag (option).
Ensure the filter cover properly locks into place.
Clean or replace the membrane filter (special accessory) under running water.
Replace the flat pleated filter.
Dust comes out while vacuuming
Check for proper installation of the flat pleated filter.
Replace the flat pleated filter.
Automatic shut-off (wet vacuum cleaning) does not react
Clean the electrodes as well as the space between the electrodes with a brush.
Continuously check the filling level in case of non-conductive liquid.
Horn sounds
Set the rotary switch to the correct suction hose cross-section.
If the paper filter bag is full and the minimum volume flow is fallen short of it has to be replaced.
If the disposal bag (option) is full and the minimum volume flow is not achieved, this filter has to be replaced.
Automatic filter cleaning is not working
Suction hose is not connected.
Automatic filter cleaning cannot be switched off
Inform Customer Service
Automatic filter cleaning cannot be switched on
Inform Customer Service
Disposal
At the end of its lifetime the appliance is to be disposed of according to the statutory provisions.
Warranty
30 DAY NO RISK SATISFACTION GUARANTEE
If you are not completely satisfied with the performance of your DEWALT tool, simply return it within 30 days, complete as purchased, to the point of purchase, for a full refund or exchange. Proof of purchase must be produced.
ONE YEAR FREE SERVICE CONTRACT
If you need maintenance or service for your DEWALT Tool, in the 12 months following purchase, it will be undertaken free of charge at an authorized DEWALT repair agent. Proof of purchase must be produced. Includes labour and spare parts for power tools. Excludes accessories.
ONE YEAR FULL WARRANTY
If your DEWALT product becomes defective due to faulty materials or workmanship within 12 months from the date of purchase, we guarantee to replace all defective parts free of charge or, at our descretion, replace the unit free of charge provided that:
- The product has not be misused.
- Repairs have not been attempted by unauthorized persons.
- Proof of purchase date is produced. This guarantee is offered as an extra benefit and is additional to consumers statutory rights.
For the location of your nearest authorized DEWALT repair agent, please use the appropriate telephone number on the back of this manual. Alternatively, a list of authorized DEWALT repair agents and full details on our after-sales service are available on the internet at
www.2helpU.com
Accessories and Spare Parts
- Only use accessories and spare parts which have been approved by the manufacturer. The exclusive use of original accessories and original spare parts ensures that the appliance can be operated safely and trouble free.
- For additional information about spare parts, please visit your DEWALT vendor.
Declaration of Conformity
MACHINERY DIRECTIVE

D27902M
DEWALT declares that these products described under "technical data" are in compliance with:
Relevant EU Directives
2006/42/EC (+2009/127/EC)
2004/108/EC
Applied harmonized standards
EN 55014-1:2006 + A1:2009
EN 55014-2: 1997 + A2: 2008
EN 60335-1
EN 60335-2-69
EN 61000-3-2: 2006 + A2: 2009
EN 61000-3-3:2008
EN 62233: 2008
Applied national standards
For more information, please contact
DEWALT at the following address or refer to the back of the manual.
The undersigned is responsible for compilation of the technical file and makes this declaration on behalf of DEWALT.
Horst Großmann
Vice President Engineering and Product Development
DEWALT
2006/42/CE (+2009/127/CE)
2004/108/CE
Vice President Engineering and Product Development
DEWALT
GARANTIE TOTALE D'UN AN
2006/42/CE (+2009/127/CE)
2004/108/CE
Vice President Engineering and Product Development
DEWALT
2006/42/CE (+2009/127/CE)
2004/108/CE
Vice President Engineering and Product Development
DEWALT
Vice President Engineering and Product Development
DEWALT
Stille inn sugeytelse.
2006/42/EF (+2009/127/EF)
2004/108/EF
Anvende overensstemmende normer
EN 55014-1: 2006 + A1: 2009
EN 55014-2: 1997 + A2: 2008
EN 60335-1
EN 60335-2-69
EN 61000-3-2: 2006 + A2: 2009
EN 61000-3-3: 2008
EN 62233: 2008
Vice President Engineering and Product Development
DEWALT
2006/42/CE (+2009/127/CE)
2004/108/CE
Vice President Engineering and Product Development
DEWALT
Vice President Engineering and Product Development
DEWALT
Montera in membranfilter
△Fara
Vice President Engineering and Product Development
DEWALT
Vice President Engineering and Product Development
DEWALT
Vice President Engineering and Product Development
DEWALT
Jaaal jc goo bawll Jr
J 1 J 1
5jgJgJg
duwsc
aobic
.olwJyI y
aiaeio bawll o9
g, bawll aog f sWyI ayj p
jgl,gsb>gl bawl g
.2bawal sgsbail
Jlll llll 1
Jlln no Jss
.(aollaJd>laIx>1)
.
J 1
gJlJlJawI (aJzJ)
.0
2bawal gbsal jdlal p
bJll 1ic aJyI Jw
gall lll aagll gll 5
.2
aalssgall jllp
b) JJl JjJ 0>g
.
a#bic
.0aLshyJyI y
JLJI 1000000000000000000000000000000000000000000
JdJI s
- 2baw
ab = 12
g jglj 1 jssuall
-
JllgJl.
2b00sfoj
f 1
.
J 1/ jj J J J J J J J
bawl alog yle
国
gws. s rjfo jaoall Joo
U 1
JAA.
jglJl Jla!
JIaal 1b jg>J Js W gJ.
1
baow aylac J5 12
.1JgUgGgEe
Jg JgJgJgJgJgJgJgJg
aabpplsswlycghjllgwwll
.
jglj
Moo
Jglllwwg bawll pgoj
.
511 20
a 2000 J5w aolzawl pso
0
alalog JgJugll aJg p
.
Koo
.
.
0
olly Jgogg 1Jgogp
.
baaw gbojgblao abogald:
g aagill JJ 0s g s o j aol
Jolal ojge Jgglabla
JIaJb Jd 100
.1
.
aJyI Jgss
go) aolol
aagj (aaiSall aJl00 jge
aJlal jIgJ Ia g aS Jll aJl Jll 0>g
ai j 1j. (jlll|d0! o>9) Jaaill
Joo 000000000000000000000000000000000000000000
20 1g
.02iunll
pU2w/ sL 2gauo uC. oJwlo auiSAL
μaaJ
Gaa>lao!0g
• leolg
J
a>19
p> ly lalc|g aJl JI bfo
aJl JawI gLcYI b.
g j 1000
aIgll
Lg 1000
LdsyjgJllgJdIJIbawic
1)JlJlJnJnJLJLJ
.(aolol)
JlJrJg
HlaIoo
lgos = 1
JlssjI JdJI E jp
g 100
LdJyBgAaIJIgJgJgJgJgJgJgJgJgJgJgJgJgJgJgJgJgJgJgJgJgJgJgJgJgJgJgJgJgJgJgJgJgJgJgJgJgJgJgJgJgJgJgJgJgJgJgJgJgJgJg
J
( a_0 + 2) = 1
aoleblai
#
12kuaal gbaal jla/ Ej y
bawll aylac
aagg aagll gaae
baw xic g| gaaaill aogg 1 wll
a
JyI 1
"Jul
Jllssgss J! Jgogg
.1sJlogjg| jg>ll gLc| p
Llrgs algo rJlgw baw sic
JU JUJIJIJIJIJIJI
JgWy (uogdglg
f j 1j

a/baw jy y bJbawll dJ
.
aI aI I J
Doo
.0lwhjllabrwhjp
.
aIbIaI Ig>ll aIeSjll a>ll:laJ
J
bawll alog gXle
国
aalgog Jug aJg
J J J J J J J J J J J J J J
Jl jjai jgLplao
Lc> Lg jll g
palaIw
Jaaalll jll
abwJgJgJlJxJxJxJxJxJxJxJxJxJxJxJxJxJxJxJxJxJxJxJxJxJxJxJxJxJxJxJxJxJxJxJxJxJxJxJxJxJxJxJxJxJxJxJxJxJxJxJxJxJxJX J.100 3p/0.1 sglw (MAK)
aLw|dzlwr|
#
-
Lglgll JJgJg
aJ. 2JU, JdJd50%
VRx a9jI (LW cgl. J20 1-1-h1= LW:aa
a a a a a a a a a a a a a a a a a a a a a a a a a a a a a a a a a a a a a a
pI 121111111111111111111111111111111111111
J
J 1
J 1
J2
J 2
J 2
J 2
bawll
aagall algll .19
-1yI) 20
(
pS>J 21
Jaa .22
JyI JJI 23
J 24
25
J 26
aJyI aG Jol> .27
gJ 28
IaJll oJgwo Jol> .29
JL 30
gaiJ .31
jIg>JlJeoo>Jg00
a j1 l0 jge//i 5g i2
g/ a, j g y Jllg. dall o20
yJ-14/11 mssg jds Lay - aL
120 192y jnnnnaaio 1/
Jeuw y.aaXaI a2W//la>JI
a2gJolSJIjIJI jge JsJJg>
.11/120 a/so a/bg
OE BC
Jy 1
baaiI pgbj .2
JWJ 3
g> g>gallglgllglgll 4
JaJl
aJwJnJawg .5
J 6
J>all 2y wclg,clgll J>do .7
J 8
a>gll 1s
10
a>g oJy .11
bawl a0g .12
g>go JIDEWALT JSGIgic
Jlaiy jS y dLg g, 1
c L.1g20d 1aI aI I aI J
Lg 100000000000000000000000000000000000000000000
aollll aoei d 51g
Jc aai JIyI DEWALT
gagll 1w yA
www.2helpU.com:Jy
www.2helpU.com
J 1 Jd D d 0000

JSSS 100000000000000000000000000000000000000
.
≤ 1,1 > r > 1
jgeJrRJDEWA
gaaag aIgb gglc Jdo Jc oaaaal
a aaae eae eae eae eae eae eae
a aiee eae DEWALT
a|j>yll a|l,8<|0j>yl pdsimol.
JU 1 J 1 J 0e J

Jolll p,psjgeJpIddwI JgJgI
JdI I dI aI JgJgJg
V p|dsawl JJ JJU b>Vg
y p 2000
-ooJ
pJrJlA|JdJrJoo
5.956249!
aLwlllJdJg
JgJgJgJgJgJgJgJgJgJgJgJgJgJgJgJgJgJgJgJgJgJgJgJgJgJgJgJgJgJgJgJgJgJgJgJgJgJgJgJgJgJgJgJgJgJgJgJgJgJgJ
aaln 1yI yI g daiall
JaiI a>lae b>do a>
JgJgJgJgJgJgJg
aI I aI>

j.00 1c all oal
aolalqulp 100
.aaJJIaJiaJI
DEWALT D 1
J 151g1 pLlU 1000
jg j, s o aol
.ajjai aolal jgaoa
aio 1i jll l 1s y
.

Jnnnnae
S 0> Jc Igio J5 alasusssuall g
s>loo oosawyIg gall
| Belgique etLuxembourg | Black & Decker - DEWALT | Dutch | Tel: +32 70 220 063 | Fax: +32 70 225 585 |
| Nieuwlandlaan 7, IZ Aarschot B156 | French | Tel: +32 70 220 062 | Fax: +32 70 222 441 | |
| BelgienLuxembourg | B-3200 Aarschot | www.dewalt.be | ||
| Danmark DEWALT | TIf: 70201511 | |||
| Sluseholmen 2-4 | Fax: 70224910 | |||
| 2450 K benhavn SVø | www.dewalt.dk | |||
| Deutschland DEWALT | Tel: 06126-21-1 | |||
| Richard Klinger Str. 11 | Fax: 06126-21-2770 | |||
| 65510 Idstein | www.dewalt.de | |||
| Eλλάς) A.E. +30 210 898πηδι6 | www.dewalt.grΕλλάς Bla | |||
| Στράβωνος 7 & Bouλίαγμένης 159 | Service: +30 210 8981-616 | |||
| Γλυφάδα 16674, Αθήνα | Φαξ: +30 210 8983-570 | |||
| España DEWALT | Tel: 934 797 400 | |||
| Parque de Negocios "Mas Blau" | Fax: 934 797 419 | |||
| Edificio Muntadas, c/Bergadá, 1, Of. A6 | www.dewalt.es | |||
| 08820 El Prat de Llobregat (Barcelona) | ||||
| France DEWALT | Tel: 04 72 20 39 20 | |||
| 5, allée des hêtres | Fax: 04 72 20 39 00 | |||
| BP 30084, 69579 Limonest Cedex | www.dewalt.fr | |||
| SchweizSuisseSwizzera | DEWALT | Tel: 01 - 730 67 47 | ||
| In der Luberzen 40 | Fax: 01 - 730 70 67 | |||
| 8902 Urdorf | www.dewalt.ch | |||
| Ireland DEWALT | Tel: 00353-2781800 | |||
| Calpe House Rock Hill | Fax: 00353-2781811 | |||
| Black Rock, Co. Dublin | www.dewalt.ie | |||
| Italia DEWALT | Tel: 800-014353 | |||
| Viale Elvezia 2 | Fax: 039-2387592 | |||
| 20052 Monza (Mi) | www.dewalt.it | |||
| Nederlands | Black & Decker - DEWALT | Tel: +31 164 283 063 | ||
| Joulehof 12 | Fax: +31 164 283 200 | |||
| 4600 AB Bergen Op Zoom | www.dewalt.nl | |||
| Norge DEWALT | Tel: 45 25 13 00 | |||
| Postboks 4613, Nydalen | Fax: 45 25 08 00 | |||
| 0405 Oslo | www.dewalt.no | |||
| Österreich | DEWALT | Tel: 01 - 66116 - 0 | ||
| Werkzeug Vertriebsges m.b.H | Fax: 01 - 66116 - 14 | |||
| Oberlaaerstrasse 248 | www.dewalt.at | |||
| A-1230 Wien | ||||
| Portugal | DEWALT | Tel: 214 66 75 00 | ||
| Centro de Escritórios de Sintra Avenida Almirante | Fax: 214 66 75 75 | |||
| Gago Coutinho, 132/134, Edificio 142710-418 Sintra | www.dewalt.pt | |||
| 2710-418 Lisboa | ||||
| Suomi | DEWALT | Puh: 010 400 430 | ||
| Tekniikantie 12 | Faksi: 0800 411 340 | |||
| 02150 Espoo, Finland | www.dewalt.fi | |||
| Sverige | DEWALT | Tel: 031 68 61 00 | ||
| Box 94 | Fax: 031 68 60 08 | |||
| 431 22 Mölndal | www.dewalt.se | |||
| Türkije | KALE Hirdavat ve Makina AŞ. | Tel: 0212 533 52 55 | ||
| Defterdar Mah. Savaklar Cad. No:15 | Faksi: 0212 533 10 05 | |||
| Edirnekapi / Eyüp / ISTANBUL 34050 TÜRKİYE | www.dewalt.com.tr | |||
| UnitedKingdom | DEWALT | Tel: 01753-56 70 55 | www.dewalt.co.uk | |
| 210 Bath Road; Slough, Berks SL1 3YD | Fax:01753-57 21 12 | |||
| Middle EastAfrica | DEWALT | Tel: +971 4 8863030 | ||
| P.O. Box - 17164, | Fax: +971 4 8863333 | |||
| Jebel Ali (South Zone), Dubai, UAE | www.dewalt.ae |


- DEWALT
- Contents
- Environmental protection
- Symbols in the operating instructions
- Danger
- Warning
- Caution
- Proper use
- Device elements
- Symbols on the machine
- Safety instructions
- Start up
- Horn
- Anti-static system
- Dry vacuum cleaning
- Inserting the paper filter bag Illustration A
- Installing the dust disposal bag Illustration B
- Install membrane filter
- Illustration C
- Wet vacuum cleaning
- Inserting the rubber lips
- Close the suction connection
- Remove the paper filter bag
- Removing the dust disposal bag
- Remove the membrane filter.
- General
- Clip connection
- Operation
- Turning on the Appliance
- Adjust the suction output
- Working with electrical power tools
- Illustration J
- Illustration K
- Illustration
- Automatic filter cleaning
- Turn off the appliance
- After each operation
- Storing the Appliance
- Illustration M
- Transport
- Storage
- Maintenance and care
- Exchanging the flat pleated filter
- Exchanging the paper filter bag/disposal bag
- Illustration E
- Exchanging the paper filter bag
- Illustration F
- Replace the disposal bag
- Replace membrane filter
- Illustration H
- Cleaning the electrodes
- Troubleshooting
- Suction turbine does not run
- Suction turbine turns off
- Suction turbine does not start again after the container has been emptied
- Suction capacity decreases
- Dust comes out while vacuuming
- Automatic shut-off (wet vacuum cleaning) does not react
- Horn sounds
- Automatic filter cleaning is not working
- Automatic filter cleaning cannot be switched off
- Automatic filter cleaning cannot be switched on
- Disposal
- Warranty
- DAY NO RISK SATISFACTION GUARANTEE
- ONE YEAR FREE SERVICE CONTRACT
- ONE YEAR FULL WARRANTY
- Accessories and Spare Parts
- Declaration of Conformity
- MACHINERY DIRECTIVE
- D27902M
- Relevant EU Directives
- Applied harmonized standards
- Applied national standards
- GARANTIE TOTALE D'UN AN
- Stille inn sugeytelse.
- Anvende overensstemmende normer
- Montera in membranfilter
- △Fara
- Jaaal jc goo bawll Jr
- J 1 J 1
- aiaeio bawll o9
- bJll 1ic aJyI Jw
- b) JJl JjJ 0>g
- J 1/ jj J J J J J J J
- jglJl Jla!
- baow aylac J5 12
- jglj
- Gaa>lao!0g
- #
- aLw|dzlwr|
- J
- jIg>JlJeoo>Jg00
- OE BC
- J 1 Jd D d 0000
- aI I aI>
Brand : DEWALT
Model : D27902M
Category : Vacuum Cleaner