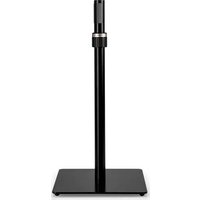
29680 - Speaker stands K&M - Free user manual and instructions
Find the device manual for free 29680 K&M in PDF.


| Brand | K&M |
| Model | 29680 |
| Product type | Speaker stand |
| Intended use | For Teufel ROCKSTER AIR 2 and ROCKSTER AIR speakers |
| Load capacity | Max. 14.5 kg |
| Dimensions (W x D x H) | 292 x 292 x 536 mm |
| Package dimensions (W x D x H) | 495 x 335 x 95 mm |
| Weight | 5.0 kg |
| Base and tube material | Black powder-coated steel |
| Clamping sleeve material | Anodized aluminum |
| Coating material | Rubber |
| Fixing system | "Ring Lock" for diameter 35–37 mm |
| Package contents | Base, base tube, 4 rubber pads, 3 M6x16 screws, Allen key SW4 |
| Assembly | Screw the base tube onto the base with 3 screws, max. torque 8 Nm |
| Warning | Risk of crushing during speaker installation |
| Maintenance | Regularly check the tightness of the screws |
| Cleaning | Slightly damp cloth, no chlorinated or abrasive products |
| Repairability | Only repair with necessary knowledge; contact manufacturer for parts |
| Storage | Dry place |
| Disposal | Separate metal, plastic, and cardboard components |
| Warranty | Warranty void in case of improper use or unauthorized modifications |
| Manufacturer contact | Tel. +49 9342/8060, contact@k-m.de, www.k-m.de |
Frequently Asked Questions - 29680 K&M
User questions about 29680 K&M
0 question about this device. Answer the ones you know or ask your own.
Ask a new question about this device
Download the instructions for your Speaker stands in PDF format for free! Find your manual 29680 - K&M and take your electronic device back in hand. On this page are published all the documents necessary for the use of your device. 29680 by K&M.
USER MANUAL 29680 K&M
1 Zubehörbeutel:
4x Gummiauflage
3x Senkschraube M6 x 16 mm
The speaker stand is suitable for holding the Teufel speakers ROCKSTER AIR 2 and ROCKSTER AIR. With this stand, the speaker can be picked up safely and placed freely in the room. With the »Ring Lock« system, the speaker can be mounted firmly and free of play on the stand.
Foreseeable misapplication
Do not open the clamping screws during use.
General
The speaker stand must be placed on a level and stable surface.
▶ The speaker must be firmly connected to the stand.
▶ Observe the operating instructions and instructions for the speaker used.
▶ When placing or repositioning the stand with the speaker mounted, increased caution is required in order to prevent unexpected bumping of the speaker or stand.
▶ Personal injury or property damage may occur if the speaker stand falls over.
▶ When plugging in the speaker, there is a risk of crushing between the components.
The user must be physically fit and technically competent.
The usage information is an integral part of the product and should be kept for its service life or passed on to any subsequent owner or user.

Warranty
No warranty is given for damage caused by:
▶ Non-observance of the usage information and the "General safety and assembly instructions".
▶ Improper use or use for other than the intended purpose.
▶ Improper installation or use by the buyer or third parties.
▶ Natural wear and tear.
▶ Careless handling.
▶ Improper modifications or repair work by the buyer and third parties.
▶ Impact on components of foreign origin.
▶ Use of non-original spare parts.
Modifications, additions and conversions that may impair safety are prohibited without the manufacturer's approval.
Technical data
| Material | Base, base tube: steel powder-coated, black Countersunk screw, spacer bushing, cylindrical pin: galvanized steel Clamping sleeve: anodized aluminum Cone pin, clamping element: plastic, gray/black Threaded bush: aluminum, bright Rubber overlay: rubber |
| Load capacity | Teufel ROCKSTER AIR 2 and ROCKSTER AIR, max. 14.5 kg |
| Dimensions | (W) 292 x (D) 292 x (H) 536 mm »Ring Lock« mount diameter 35-37 mm |
| Packaging (W) | 495 x (D) 335 x (H) 95 mm |
| Weight 5.0 kg |
Mounting
1.) Unpack and check product for damage and completeness
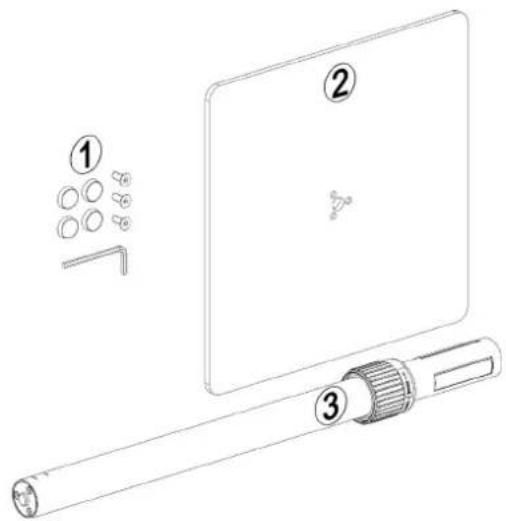
1 Accessory bag:
4x Rubber support
3x Countersunk screw M6 x 16 mm
1x Allen key SW4
2 Base
3 Base tube
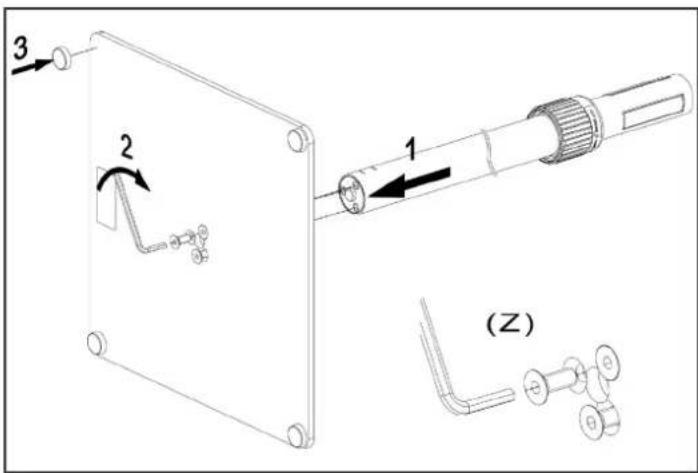
2.) Mount the stand
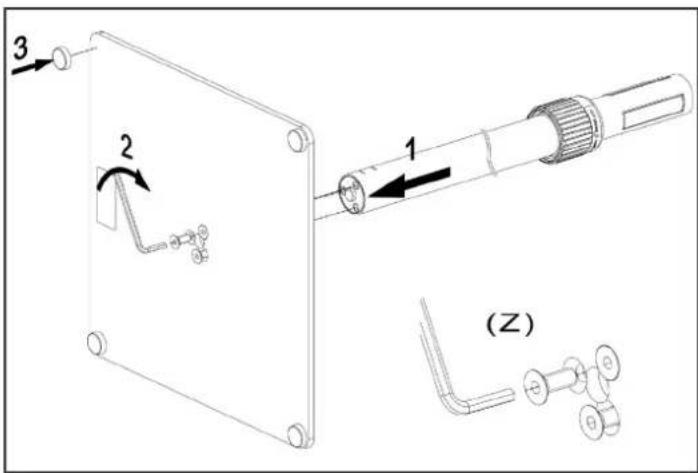
Insert the base tube with the threaded bolt into the base 1 and screw it with the three countersunk screws 2.
NOTE: Make sure the indentations in the base are facing down Z. The maximum tightening torque may not exceed 8 Nm.
Glue the four rubber supports to the base as shown 3.

!When mounting the speaker, there is a danger of crushing between the components!
3.) Mount the speaker on the stand
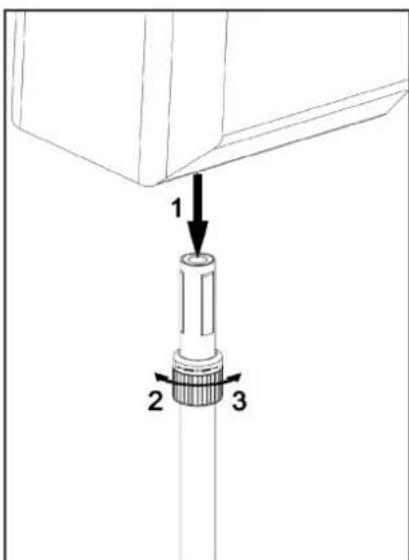
√ The stand is properly set up.
√ The stand must be placed on a level surface that can hold the weight involved.
√ The cap of the flange bushing on the ROCKSTER AIR 2 is open.
√ The »Ring Lock« is set to open and thus to the smallest diameter.
Place the ROCKSTER AIR 2 on the »Ring Lock« from above 1. The »Ring Lock« must be completely inserted into the flange bushing.
Align the ROCKSTER AIR 2 in the desired position and secure the speaker on the stand firmly and free of play by turning in the close direction 2 on the clamping sleeve. By turning in the open direction 3, the speaker is released again and can be removed from the stand.
Maintenance, cleaning and repair

▶ Maintenance: Regularly check if the screw connections are tight.
▶ Cleaning: Use a slightly damp cloth to clean the speaker stand. Do not use chlorinated or abrasive cleaning agents. These will cause damage to the surface and varnish.
▶ Repair: Immediately repair any damage that occurs and stop using the speaker stand. Maintenance work may only be carried out if you have the necessary knowledge. If any parts are missing, contact the manufacturer at www.k-m.de.
Fault and troubleshooting
| Fault/cause Check/Remedy | |
| The stand wobbles or is unstable | Check surface and footprint.Check screw connection between base and base tube, and re-tighten if necessary. |
| Speaker cannot be mounted on stand | Check whether the smallest diameter is set on the »Ring Lock«. Turn the clamping sleeve in the open direction. |
Storage, disposal
Store the speaker stand in a dry place.
Recycle the components after they are disassembled:
▶ Scrape all components made of metal.
▶ Recycle or reuse all plastic, paper, and cardboard components.
▶ Sort all other components according to material composition and dispose of them according to local regulations.
Contact information
1 Toebehorenzakje:
4x rubber pad
3x verzonken schroef M6 x 16 mm
1x inbussleutel SW4
2 sokkel
3 basispijp
2.) Statief monteren

Brand : K&M
Model : 29680
Category : Speaker stands