imageRUNNER ADVANCE C3320i - Printer CANON - Free user manual and instructions
Find the device manual for free imageRUNNER ADVANCE C3320i CANON in PDF.

User questions about imageRUNNER ADVANCE C3320i CANON
0 question about this device. Answer the ones you know or ask your own.
Ask a new question about this device
Download the instructions for your Printer in PDF format for free! Find your manual imageRUNNER ADVANCE C3320i - CANON and take your electronic device back in hand. On this page are published all the documents necessary for the use of your device. imageRUNNER ADVANCE C3320i by CANON.
USER MANUAL imageRUNNER ADVANCE C3320i CANON
C3330i/C3325i/C3320/C3320i
Support Guide
Read this guide first.
Please read this guide before operating this product. After you finish reading the guide, store it in a safe place for future reference.
Guide d'assistance
A litre en premier.
Do You Have the Following Troubles?
If You Cannot Print
P.14
If Paper Jams Occur
P.16
How to Print on Special Paper
P.21

How to Print on Envelopes
P.20

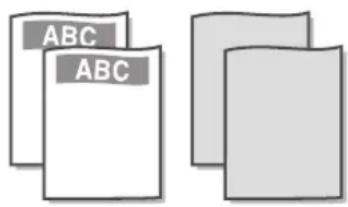
How to Print on the Reverse Side of Paper
P.22

If Originals Loaded in the Feeder and Prints Become Dirty

P.18
If Two-Sided Printing Settings Do Not Work Correctly
P.19
If You Cannot Send/Forward
P.24
If the "Call service representative." Message Is Displayed
P.26
If the "Load paper." Message Is Displayed
P.23
If an Error Message Is Displayed
P.22
Trouble with Print Results

Paper Curls

P.28

Irregularities Appear in Images/Images Are Faint

P.28

Streaks Appear in Images

P.29

Images Are Shifted/ Slanted/Skewed

P.30

Colours Are Shifted

P.31

Colours Are Too Light/Colour Quality Is Poor

P.31

Bleed-through Occurs

P.31

Documents Are Not Printed with the Specified Size

P.32

The Front and Back Sides of a Document Are Reversed

P.32
Contents
Preface 08
How To Use This Manual 08
Symbols 08
Keys and Buttons 08
09
Illustrations 09
Trademarks 09
Manuals for the Machine 11
How to Use the e-Manual 12
How to Install the e-Manual 12
If the e-Manual (CD-ROM) Does Not Start 12
Top Page of the e-Manual 12
Chapter 1 Troubleshooting
If You Cannot Print 14
Check the following first. 14
If You Cannot Print from a Computer 15
If Paper Jams Occur 16
Paper Jams Occur Frequently 16
If Originals Loaded in the Feeder and Prints Become Dirty... 18
Cleaning the Feeder Rollers 18
Cleaning the Document Feed Scanning Area 18
If Two-Sided Printing Settings Do Not Work Correctly... 19
How to Print on Envelopes 20
How to Print on Special Paper 21
How to Print on the Reverse Side of Paper 22
If an Error Message Is Displayed 22
If the "Load paper." Message Is Displayed 23
If You Cannot Send/Forward 24
If You Cannot Save Documents to a Server Using [Scan and Send]: 24
If You Cannot Send/Forward Faxes 24
If the Problem Cannot Be Solved 25
If the "Call service representative." Message Is Displayed.. 26
When You Need to Contact Your Local Authorized Canon Dealer 26
When the Print or Scan Function Does Not Operate Normally 26
When a Message Is Displayed on the Touch Panel Display...26
Before Contacting Your Local Authorized Canon Dealer 27
Trouble with Print Results 28
Paper Curls 28
Irregularities Appear in Images/Images Are Faint 28
Streaks Appear in Images 29
Images Are Shifted/Slanted/Skewed 30
Colours Are Shifted 31
Colours Are Too Light/Colour Quality Is Poor 31
Bleed-through Occurs 31
Documents Are Not Printed with the Specified Size 32
The Front and Back Sides of a Document Are Reversed 32
Chapter 2 Routine Maintenance
Loading Paper 36
Loading Paper into a Paper Drawer 36
Checking the Types of Paper That Can Be Used 38
Replacement Parts 39
Replacing the Stamp Cartridge (For the Feeder) 40
Replacing the Staple Case in the Staple Unit (Staple Finisher-U1/Booklet Finisher-U1) 41
Replacing the Staple Cartridge in the Saddle
Stitcher Unit (Booklet Finisher-U1) 43
Replacing the Staple Case (Inner Finisher-G1) 45
Replacing the Toner Cartridge 47
Replacing the Waste Toner Container 50
Replacing the Drum Unit 52
Consumables 55
Recommended Paper 55
Toner 55
Drum Unit 56
Stamp Ink Cartridge 56
Staple Cartridge 56
Genuine Consumables 56
Chapter 3 Before Using This Machine
Parts and Their Functions 58
External View 58
Internal View 59
Feeder 60
Control Panel Parts and Functions 60
Adjusting the Angle of the Control Panel 61
Main Power and Energy Saver Key 62
How to Turn ON the Main Power 62
Energy Saver Key 63
Shutting Down the Machine 63
Backing Up/Exporting Data 64
Data You Can Back Up 64
Data You Can Export 64
Batch Exporting 64
Individual Exporting 64
Introduction to the Functions of the Machine 65
Copying/Printing Functions 65
Sending Function 66
Scanning Function 67
Remote UI 69
Specifications 70
Main Unit 70
Feeder (DADF-AQ1) 73
Cassette Feeding Unit-AL1 73
Inner Finisher-G1 74
Staple Finisher-U1 76
Booklet Finisher-U1 77
Inner 2way Tray-J1 78
Copy Tray-J2 79
Copy Card Reader-F1 79
Super G3 FAX Board-AR1 80
Send Function (Scan Features) 81
Send Function (E-Mail and I-Fax Features) 82
Network Environment (Hardware Specifications) 82
Network Environment (Software Specifications) 83
Printer Settings (Software Specifications) 83
Chapter 4 Appendix
Installation Location and Handling 86
Installation Precautions 86
Avoid Installing the Machine in the Following Locations... 86
Select a Safe Power Supply 87
Moving the Machine 87
Provide Adequate Installation Space 87
Handling Precautions 88
Important Safety Instructions 89
Installation 89
Power Supply 89
Handling 90
Maintenance and Inspections 91
Consumables 92
OtherWarnings 92
Legal Notices 93
Product Name 93
EMC requirements of EC Directive 93
Laser Safety 93
Additional Information 93
International ENERGY STAR Program 94
IPv6 Ready Logo 94
WEEE Directive 94
R & TTE Directive 95
Information Security Standard (IEEE 2600) 95
Copyright 95
Disclaimers 95
Legal Limitations on the Usage of Your Product and
the Use of Images 95
Super G3 96
Preface
Thank you for purchasing the Canon imageRUNNER ADVANCE C3330i/C3325i/C3320/C3320i. Please read this manual thoroughly before operating the machine to familiarize yourself with its capabilities, and to make the most of its many functions. For information on the detailed settings for the functions described in this manual, see the e-Manual. After reading this manual, store it in a safe place for future reference.
How To Use This Manual
Symbols
The following symbols are used in this manual to explain procedures, restrictions, handling precautions, and instructions that should be observed for safety.

WARNING
Indicates a warning concerning operations that may lead to death or injury to persons if not performed correctly. To use the machine safely, always pay attention to these warnings.

CAUTION
Indicates a caution concerning operations that may lead to injury to persons if not performed correctly. To use the machine safely, always pay attention to these cautions.

IMPORTANT
Indicates operational requirements and restrictions. Be sure to read these items carefully to operate the machine correctly, and avoid damage to the machine or property.

NOTE
Indicates a clarification of an operation, or contains additional explanations for a procedure. Reading these notes is highly recommended.

ates an operation that must not be performed.
Read these items carefully, and make sure not to perform the described operations.
Keys and Buttons
The following symbols and key/button names are a few examples of how keys and buttons to be clicked or pressed are expressed in this manual:
Touch Panel Display Keys: [Key Name] Example: [Cancel]
Control Panel Keys: Key Icon (Key Name) Example: (Start)
Buttons on Computer Operation Screens: [Button Name] Example: [OK]
Screens
Screens of the touch panel display used in this manual are those taken when the imageRUNNER ADVANCE C3330i has the following optional equipment attached to it:
Cassette Feeding Unit-AL1
Booklet Finisher-U1
Super G3 FAX Board
Web Access Software
Note that functions that cannot be used depending on the model or options do not appear on the touch panel display.
Keys to Press for Operation

The keys which you should press are marked with a as shown above. When multiple keys can be pressed on the touch panel display, all keys are marked. Select the keys, which suit your needs.
Screens used in this manual may differ from the ones you actually see.
Illustrations
Illustrations used in this manual are those displayed when the imageRUNNER ADVANCE C3330i has the following optional equipment attached to it:
Cassette Feeding Unit-AL1
Booklet Finisher-U1
Trademarks
"MEAP" is a trademark of CANON Inc., referring to an "application platform" for Canon multifunction and single function printers.
This product contains the Universal Font Scaling Technology or UFST under license from Monotype Imaging, Inc. UFST is a trademark of Monotype Imaging, Inc. registered in the United States Patent and Trademark Office and may be registered in certain jurisdictions.
Apple, AppleTalk, EtherTalk, LocalTalk, Mac, Macintosh, Mac OS, and Safari are trademarks of Apple Inc., registered in the U.S. and other countries.
Microsoft, Windows, Windows Vista, Windows Server, Internet Explorer, Excel, and PowerPoint are either registered trademarks or trademarks of Microsoft Corporation in the United States and/or other countries.
AdobePostScript3
Adobe, PostScript, and the PostScript logo are either registered trademarks or trademarks of Adobe Systems Incorporated in the United States and/or other countries.
Copyright © 2007-08 Adobe Systems Incorporated. All rights reserved.
Protected by U.S. Patents 5,737,599; 5,781,785; 5,819,301; 5,929,866; 5,943,063; 6,073,148; 6,515,763; 6,639,593; 6,754,382; 7,046,403; 7,213,269; 7,242,415; Patents pending in the U.S. and other countries.
All instances of the name PostScript in the text are references to the PostScript language as defined by Adobe Systems Incorporated unless otherwise stated. The name PostScript also is used as a product trademark for Adobe Systems' implementation of the PostScript language interpreter.
Except as otherwise stated, any reference to a "PostScript printing device," "PostScript display device," or similar item refers to a printing device, display device or item (respectively) that contains PostScript technology created or licensed by Adobe Systems Incorporated and not to devices or items that purport to be merely compatible with the PostScript language.
Adobe, the Adobe logo, PostScript, the PostScript logo, and PostScript 3 are either registered trademarks or trademarks of Adobe Systems Incorporated in the United States and/or other countries.
Linux is a registered trademark of Linus Torvalds. Microsoft and Windows are either registered trademarks or trademarks of Microsoft Corporation in the United States and/or other countries.
All other trademarks are the property of their respective owners.

The PDF logo is a trademark or registered trademark of Adobe Systems Incorporated in the United States and other countries.
Copyright © 2008 Adobe Systems Incorporated. All rights reserved.
Protected by U.S. Patents 6,185,684; 6,205,549; 7,213,269; 7,272,628; 7,278,168; Patents pending in the U.S. and other countries.
All instances of the name PostScript in the text are references to the PostScript language as defined by Adobe Systems Incorporated unless otherwise stated. The name PostScript also is used as a product trademark for Adobe Systems' implementation of the PostScript language interpreter.
Except as otherwise stated, any reference to a "PostScript printing device," "PostScript display device," or similar item refers to a printing device, display device or item (respectively) that contains PostScript technology created or licensed by Adobe Systems Incorporated and not to devices or items that purport to be merely compatible with the PostScript language.
Adobe, the Adobe logo, PostScript, the PostScript Logo, and PostScript 3 are either registered trademarks or trademarks of Adobe Systems Incorporated in the United States and/or other countries.
All other trademarks are the property of their respective owners.
Other product and company names herein may be the trademarks of their respective owners.
Manuals for the Machine
The manuals for this machine are divided as follows. Please refer to them for detailed information.

Guides with this symbol are printed manuals.

Guides with this symbol are included on the accompanying CD-ROM.

Support Guide (This Manual)
Describes the troubleshooting procedures and maintenance procedures for the machine.
Includes the specifications of the machine.
Describes the precautions for using the machine.

e-Manual (HTML Manual)
Describes all the functions of the machine. Also provided with a search function that is useful for finding and checking information.
Includes "Practical Workflows," which introduces flows of practical operations using functions of the machine.

Driver Installation Guide
Provides instructions on installing the printer, fax, and other drivers. Included on the same CD-ROM as each driver.
Windows:
- Printer Driver Installation Guide
- Fax Driver Installation Guide
-Color Network ScanGear 2 Installation Guide
Mac OS:
- Canon Printer Driver Guide
- Canon Fax Driver Guide
The CD-ROM/DVD-ROM provided for this product may include manuals in PDF format. If you do not have access to Adobe Reader to view the manuals in PDF format, try other programs such as PDF Preview developed by Vivid Document Imaging Technologies.
How to Use the e-Manual
How to Install the e-Manual
Windows
- Insert the e-Manual CD-ROM in your computer.
- Select the language for the e-Manual click [Next]. If you select [Display], the e-Manual is displayed without installation.
- Read the License Agreement, and then click [Yes].
- Click [Install].

NOTE
If the shortcut icon created on the Desktop or the [index. html] file is double-clicked, the e-Manual is displayed.
Macintosh
- Insert the e-Manual CD-ROM into your computer.
- Drag-and-drop the [iADV_C3330i Manual_eng] folder to the location you want to save it.
- Double-click [index.html] in the [iRADV_C3330i Manual_eng] folder, and the e-Manual is displayed.

NOTE
Depending on the operating system you are using, a security protection message may appear. In this case, allow the content to be displayed.
If the e-Manual (CD-ROM) Does Not Start
The CD-ROM auto run function may be disabled. In this case, you must perform the following procedure.
Windows 8/Server 2012
- Display the desktop click the explorer icon on the taskbar.
- Click [Computer].
- Double-click the e-Manual icon.
- Double-click [Maninst.exe].
Windows Vista/7/Server 2008
- Click [Start] on the taskbar click [Computer].
- Double-click the e-Manual icon.
- Double-click [Maninst.exe].
Windows XP/Server 2003
- Click [Start] on the taskbar click [My Computer].
- Double-click the e-Manual icon.
- Double-click [Maninst.exe].
Top Page of the e-Manual
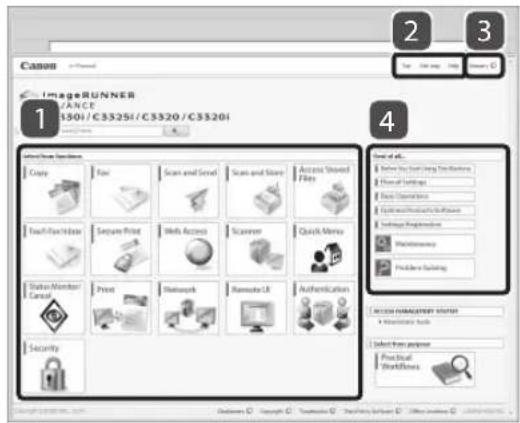
1 Select from functions
The instructions for each function and operation method are described.
2 Top, Site map, Help
Links to the e-Manual's top page, site map, and help are displayed.
3 Glossary
A link to the glossary is displayed.
4 First of all...
This section contains information needed to use the machine, and information on optional products and software.
1
Troubleshooting
If You Cannot Print 14
Check the following first. 14
If You Cannot Print from a Computer 15
If Paper Jams Occur 16
Paper Jams Occur Frequently 16
If Originals Loaded in the Feeder and Prints Become Dirty18
Cleaning the Feeder Rollers 18
Cleaning the Document Feed Scanning Area 18
If Two-Sided Printing Settings Do Not Work Correctly19
How to Print on Envelopes 20
How to Print on Special Paper 21
How to Print on the Reverse Side of Paper 22
If an Error Message Is Displayed 22
If the "Load paper." Message Is Displayed 23
If You Cannot Send/Forward 24
If You Cannot Save Documents to a Server Using [Scan and Send]: 24
If You Cannot Send/Forward Faxes 24
If the Problem Cannot Be Solved 25
If the "Call service representative." Message Is Displayed26
When You Need to Contact Your Local Authorized Canon Dealer 26
When the Print or Scan Function Does Not Operate Normally-26
When a Message Is Displayed on the Touch Panel Display...26
Before Contacting Your Local Authorized Canon Dealer 27
Trouble with Print Results 28
Paper Curls 28
Irregularities Appear in Images/Images Are Faint 28
Streaks Appear in Images 29
Images Are Shfted/Slanted/Skewed 30
Colours Are Shifted 31
Colours Are Too Light/Colour Quality Is Poor 31
Bleed-through Occurs 31
Documents Are Not Printed with the Specified Size 32
The Front and Back Sides of a Document Are Reversed 32
If You Cannot Print

Check the following first.
heck 1
Is a message displayed on the touch panel display?
For information on the meaning of messages and their remedies, see the e-Manual.

heck 2

(Energy Saver) lit?

heck 3
Is the main power indicator Off?
If the main power indicator does not light when you turn the main power ON, check the power plug.
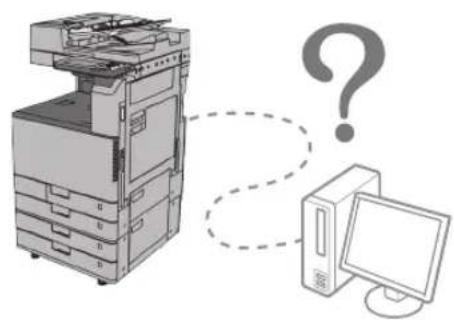
heck 4
Is the machine correctly connected to the computer?
Check the network connection. For more information, see the e-Manual.

If You Cannot Print from a Computer
Cause
Internal processes have stopped for some reason.
Remedy
Restart the machine. Turn OFF the machine, wait at least 10 seconds, and then turn it ON.

Cause
The printer driver is not installed correctly.
Remedy
Install the printer driver again. For more information, see the driver installation guide.

Cause
The IP address is not set correctly.
Remedy
Set the IP address again. For more information, see the e-Manual.
If Paper Jams Occur
If a paper jam occurs, the procedure for removing the jammed paper is displayed on the touch panel display. Refer to the screen to remove the jammed paper. For more information, see the e-Manual.


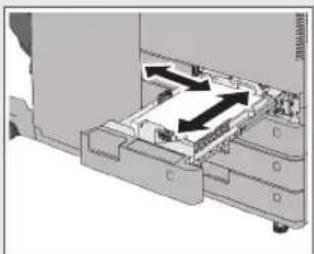
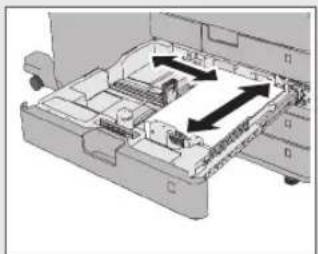
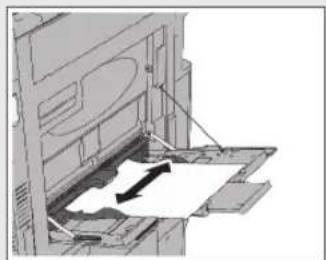
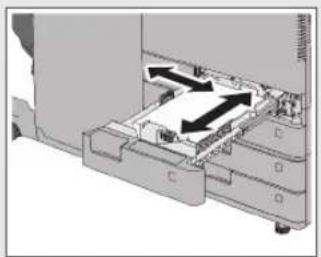
Paper Jams Occur Frequently
Cause
The position of the slide guides is not correct.
Remedy
Adjust the slide guides to match the size of the paper. If multiple sheets of paper are fed together or paper jams occur, change the orientation of the paper and load it again.
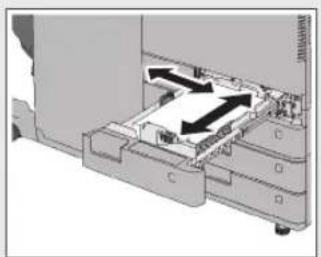
Paper Drawer 1 Paper Drawer 2, 3, and 4
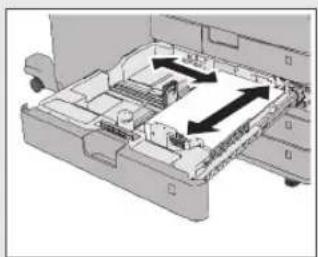
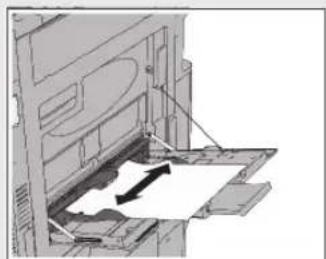
Multi-Purpose Tray
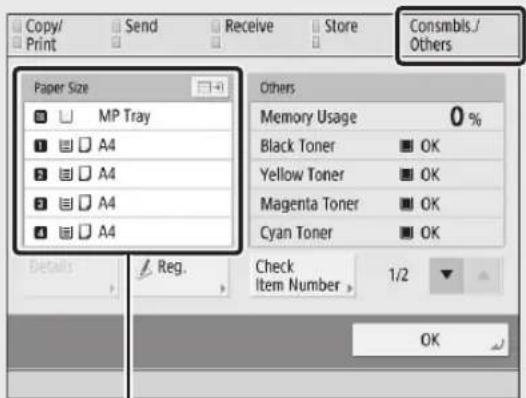
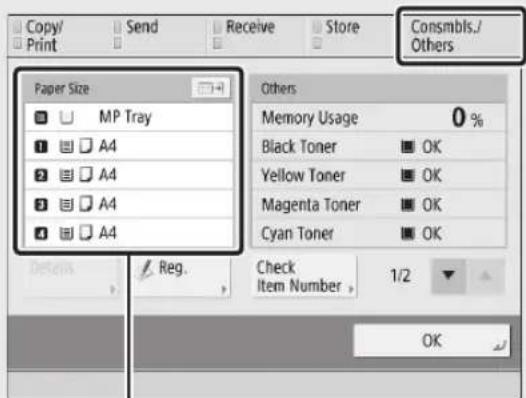
Cause
The paper settings do not match the paper that is loaded.
Remedy
Check the paper settings in [Consmbls./Others] in [Status Monitor/Cancel]. If the paper settings do not match the paper that is loaded, change the settings so that they match.

NOTE
The paper loaded in the paper drawers and multi-purpose tray can be set in (Settings/Registration) [Preferences] [Paper Settings]. For more information, see the e-Manual.
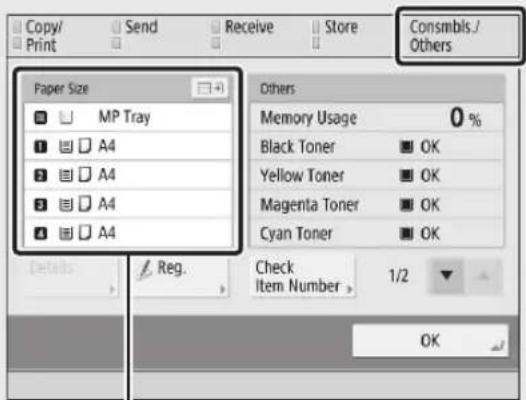
Paper settings
Cause
There are torn pieces of paper left inside the machine.
Remedy
When you pull out jammed paper, the paper may tear, causing pieces of paper to remain in the machine. Check the location where the paper jam is, and remove any torn pieces of paper.
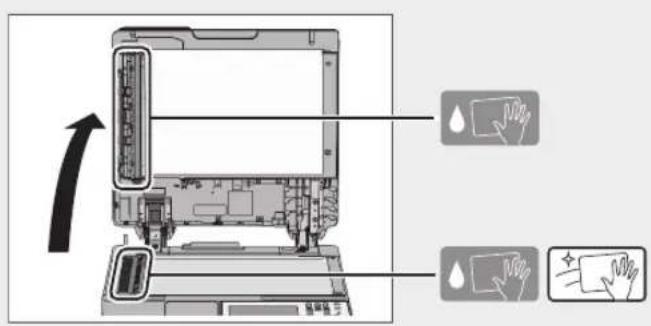
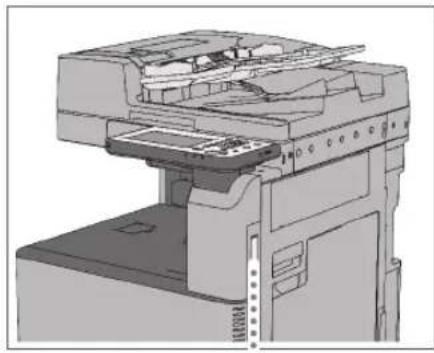
If Originals Loaded in the Feeder and Prints Become Dirty
If originals loaded in the feeder and paper that is output get dirty, clean the area that is illustrated below.

Clean the machine with a cloth which is wrung after being dampened in water, and then wipe it clean with a soft, dry cloth.

IMPORTANT
Never use alcohol, benzene, paint thinner, or other solvents for cleaning.

Clean the machine with the glass cleaning sheet included with the machine.

NOTE
When the glass cleaning sheet is dirty, rinse it with water and spread it out to let it dry.

Cleaning the Feeder Rollers
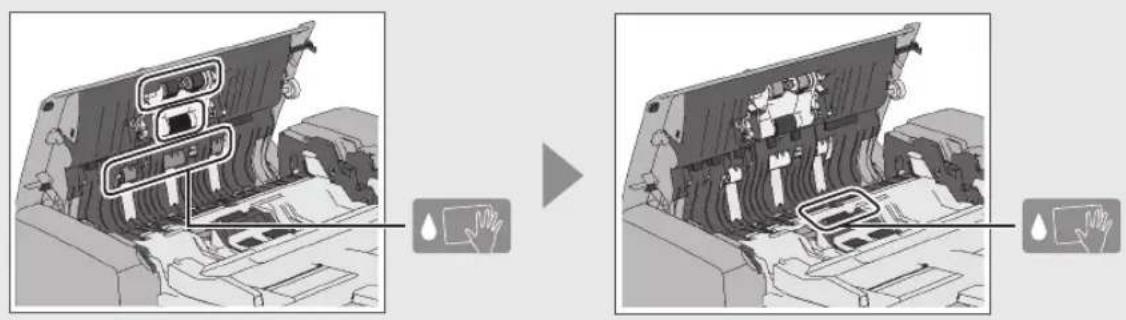

IMPORTANT
Spin the rollers while cleaning them.

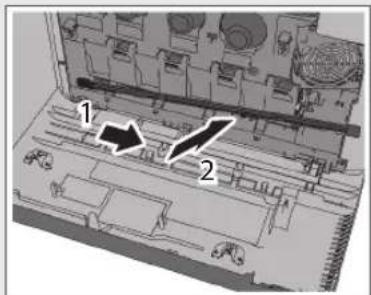
Cleaning the Document Feed Scanning Area
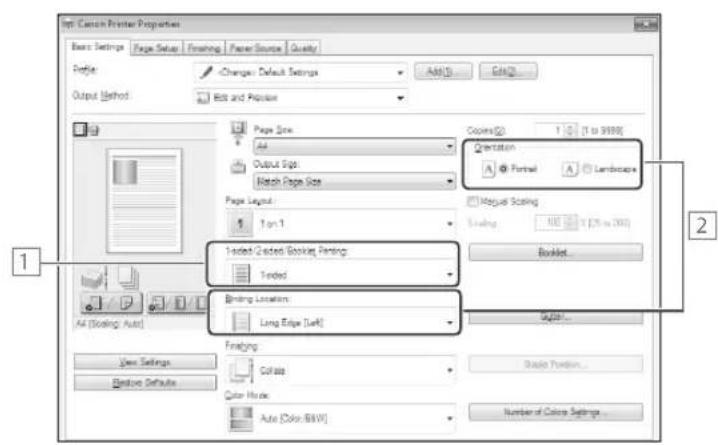
If Two-Sided Printing Settings Do Not Work Correctly
Two-sided printing settings are specified with a combination of [Orientation] and [Binding Location] on the [Properties] screen of the printer driver. Follow the procedure below to specify the settings again.
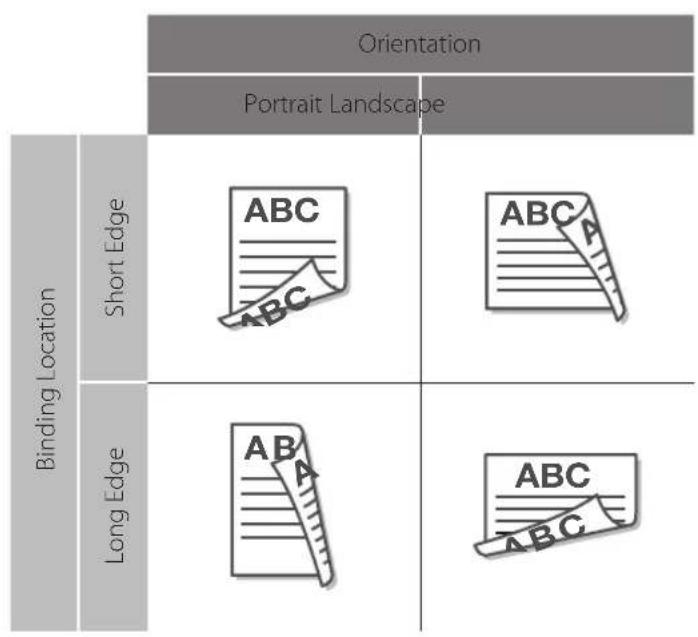
Select [2-sided Printing].
2 Specify a combination of [Orientation] and [Binding Location] by referring to the following table.
How to Print on Envelopes
Envelopes can be loaded into Paper Drawer 1, Paper Drawer 2, and the multi-purpose tray. Load the paper correctly by referring to the illustrations. For more information, see the e-Manual.

NOTE
After loading the paper, specify the loaded paper in (Settings/Registration) [Preferences] [Paper Settings].
When loading envelopes other than ISO-C5 and Kakugata 2 envelopes in a paper drawer, the Envelope Feeder Attachment must be attached.
Paper Drawer 1 Paper Drawer 2

How to Print on Special Paper
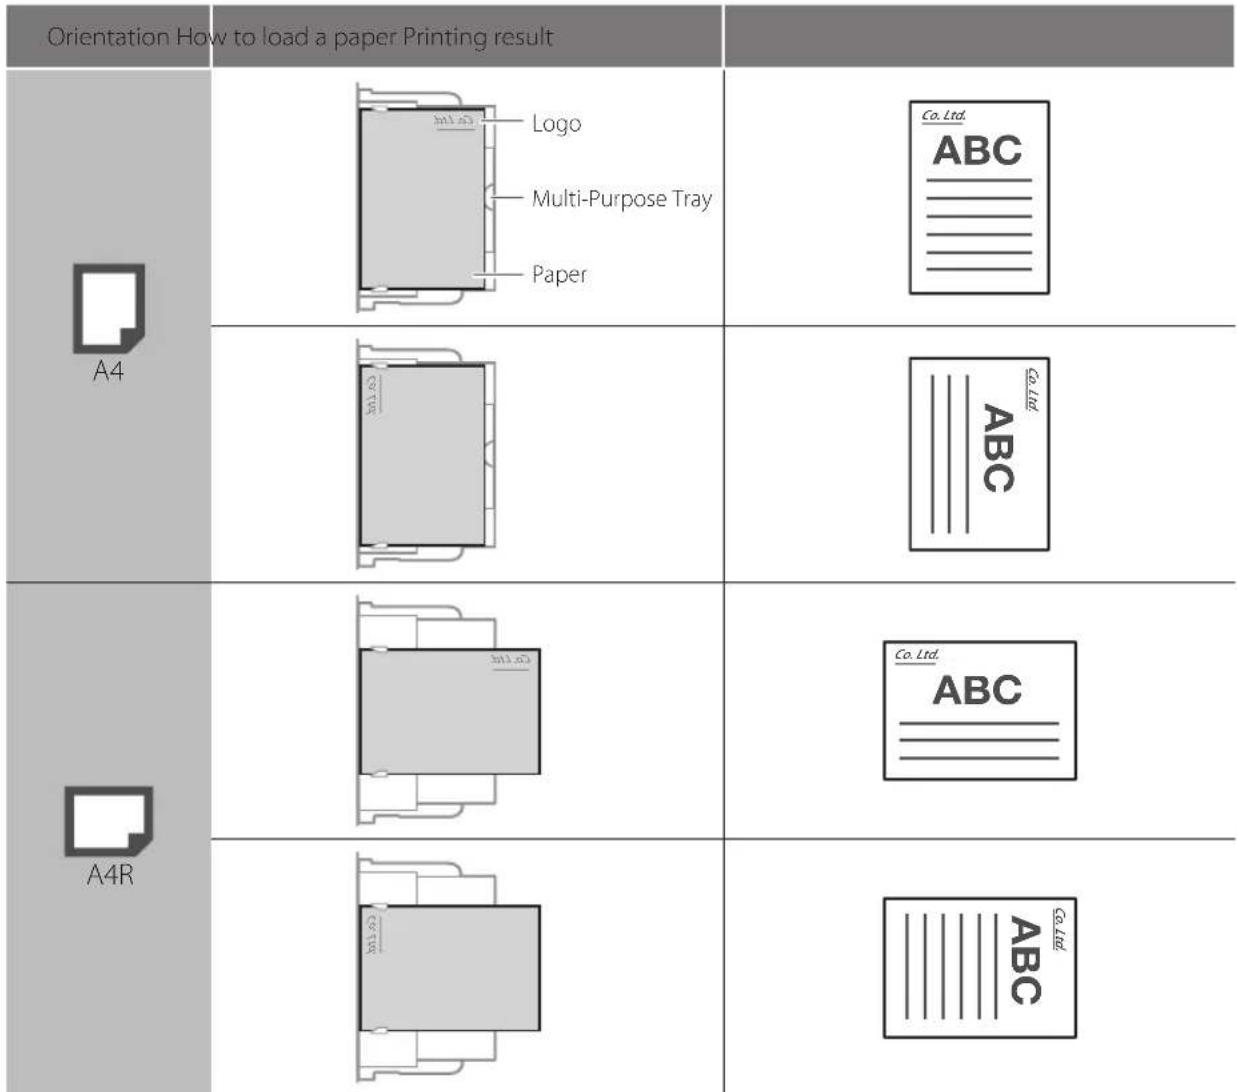
Load paper such as labels or paper with printed logos in the multi-purpose tray. The printing result differs according to the direction that the paper is loaded. Refer to the illustration below to load the paper correctly.

NOTE
After loading the paper, specify the loaded paper in (Settings/Registration) [Preferences] [Paper Settings]. Load the side to print on face down when using the multi-purpose tray.
Example: A4 size paper with printed logos
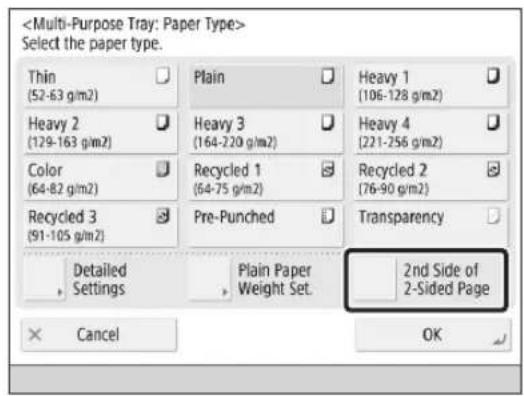
How to Print on the Reverse Side of Paper
If you want to print on the reverse side of the paper, load the paper face down in the multi-purpose tray. After loading the paper, select [2nd Side of 2-Sided Page] on the paper type selection screen.
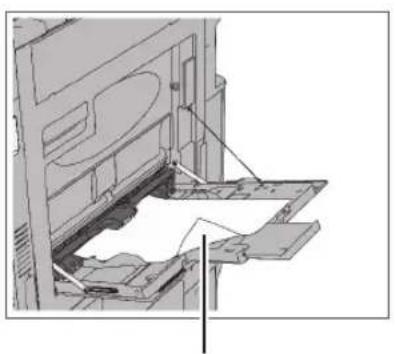
Side to Print on
If an Error Message Is Displayed
In the following cases, an error message may be displayed on the touch panel display or in the Web browser. For information on resolving errors, etc., see the e-Manual.
When scanning or printing cannot be performed because of an operational error When you need to perform an operation while scanning or printing
Touch Panel Display Web Browser
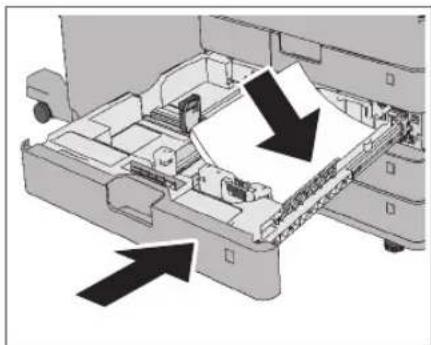
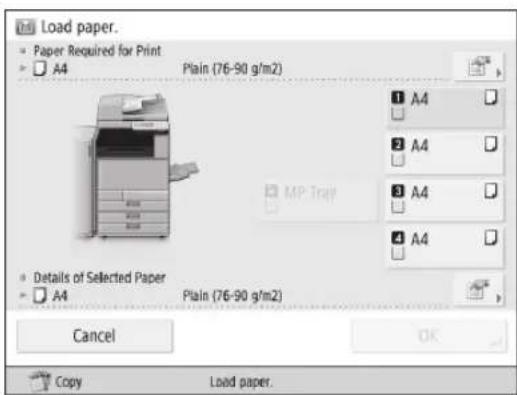
If the "Load paper." Message Is Displayed
Cause
The paper source is out of paper.
Remedy
Load paper in the paper source indicated on the touch panel display. For information on loading paper, see "Loading Paper," on p.36.

Cause
Remedy
The position of the slide guides is not correct.
Adjust the slide guides to match the size of the paper. Paper may overlap when it is fed or a paper jam may occur, depending on the cut surface of the paper. Changing the paper orientation and loading it again may reduce the effect of the cut surface.
Paper Drawer 1 Paper Drawer 2, 3, and 4 Multi-Purpose Tray

Cause
The paper settings do not match the paper that is loaded.
Remedy
Check the paper settings in [Consmbls./Others] in [Status Monitor/Cancel]. If the paper settings do not match the paper that is loaded, change the settings so that they match.

NOTE
The paper loaded in the paper drawers and multipurpose tray can be set in (Settings/Registration) [Preferences] [Paper Settings]. For more information, see the e-Manual.
Paper settings

Cause
The paper settings in the printer driver or application differ from the paper that is loaded.
Remedy
Check the paper settings on the [Printing Preference] sheet of the printer driver, and match them with the paper that is loaded.
If You Cannot Send/Forward

If You Cannot Save Documents to a Server Using [Scan and Send]
Cause
The password of the file server has been updated.
Remedy
For information on the updated password, contact your server administrator.

Cause
The directory and name of folder to save to has been changed on the server.
Remedy
Change the address of the file server that is registered in the machine. You can check whether the machine can connect to the file server correctly by pressing [Check Connection] on the screen for registering destinations. For more information, see the e-Manual.

If You Cannot Send/Forward Faxes
Cause
The destination is not set correctly.
Remedy
If you cannot send faxes, register the destination again in [Dest./Fwd. Settings] [Register Destinations] [Register New Dest.]. If you cannot forward, register the destination again in (Settings/Registration) [Function Settings] [Forwarding Settings]. For more information, see the e-Manual.

NOTE
When setting destinations, it is convenient to use the Remote UI. For more information, see the e-Manual.

Cause
The fax transmission speed is too fast, which causes a communication error.
Remedy
Set the speed again in (Settings/Registration) [Function Settings] [TX Start Speed].

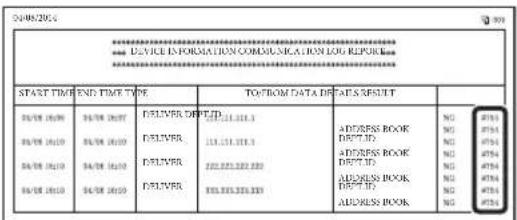
If the Problem Cannot Be Solved
A three digit number (error code) is displayed on the detailed information screen of [Status Monitor/ Cancel]. For information on each error code and its remedy, see the e-Manual.


NOTE
Error codes are also printed in the Results column of various reports such as the Communication Management Report.
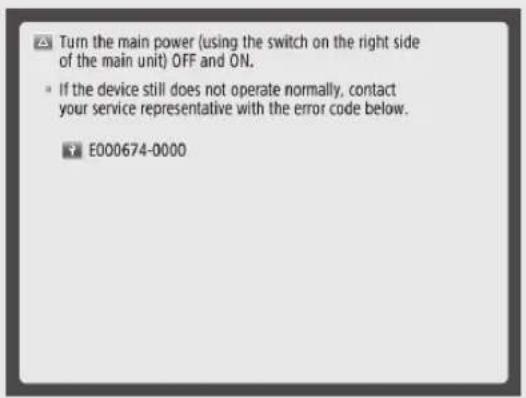
If the "Call service representative." Message Is Displayed

When You Need to Contact Your Local Authorized Canon Dealer
If a malfunction occurs and the machine cannot operate normally, a screen prompting you to contact your local authorized Canon dealer is displayed. If a screen is displayed, contact the dealer. For more information, see "Before Contacting Your Local Authorized Canon Dealer," on p.27.

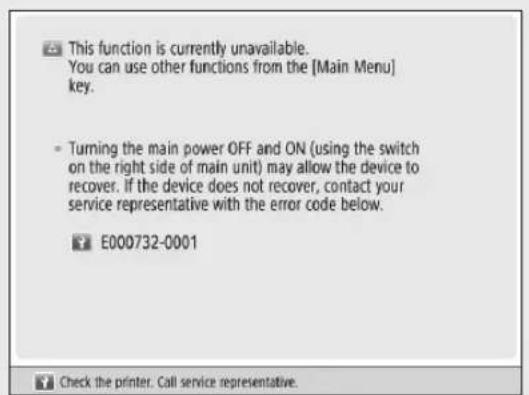
When the Print or Scan Function Does Not Operate Normally
The selected function cannot be used. Press [Main Menu] to return to the Main Menu.

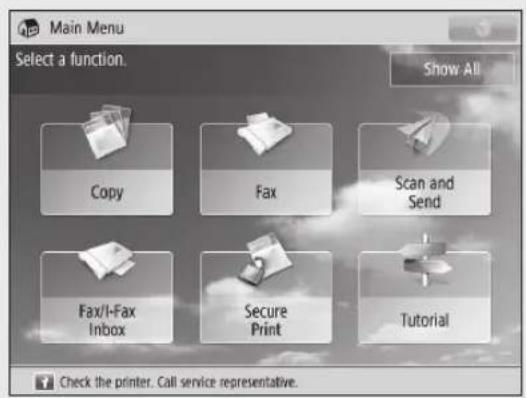
When a Message Is Displayed on the Touch Panel Display
If the message "Call service representative." is displayed on the bottom of the touch panel display, you may be able to continue using the machine, depending on the function. For more information, see the table on the next page.
| Available Functions | When the Print function is restricted | When the Scan function is restricted |
| Copy -- | ||
| Fax | ✓1 | - |
| Scan and Send | ✓ | - |
| Scan and Store | ✓ | - |
| Access Stored Files - | ✓2 | |
| Fax/I-Fax Inbox - | ✓ | |
| Secure Print - | ✓ | |
| Scanner - | ✓ | |
| Web Access | ✓ | ✓ |
| Shortcut to Settings/Registration -- | ||
| Tutorial | ✓ | ✓ |
| iW Function Flow -- | ||
| Document Scan Code Analyzer*3 | ✓ | ✓ |
| MEAP Applications*4 | ✓ | ✓ |
| Quick Menu*5 | ✓ | ✓ |
| The Status Monitor/Cancel Screen | ✓6 | ✓ |
| Settings/Registration -- | ||
| Remote UI*7 | ✓ | ✓ |
1 Sending a fax from a computer is not available.
^2 [Add Files (Scan and Store)] on the Edit File screen is not available.
3 Document Scan Code Analyzer is included in the Document Scan Lock Kit.
4 Available by installing each MEAP application. May not be available depending on the restricted functions.
5 The registered button may not be available depending on the restricted functions.
*6 [Print List] on the Job Log screen and [Register] on the Consumable screen are not available.
7 Some of the menus may not be available depending on the restricted functions.

Before Contacting Your Local Authorized Canon Dealer
Turn the main power OFF and then ON. If the operation still cannot be performed correctly, follow the procedure described below to contact your local authorized Canon dealer.

IMPORTANT
If you turn OFF the main power switch when there is a job waiting to print, that job is erased.
01 Make a note of the code displayed on the screen.
02 Turn the machine OFF, and disconnect the power plug from the power outlet.
03 Check the product name and contact your local authorized Canon dealer.
Trouble with Print Results

Paper Curls
Cause
The paper settings do not match the paper that is loaded.
Remedy
Check the paper settings in [Consmbls./Others] in [Status Monitor/Cancel]. If the paper settings do not match the paper that is loaded, change the settings so that they match.

NOTE
The paper loaded in the paper drawers and multi-purpose tray can be set in (Settings/Registration) [Preferences] [Paper Settings]. For more information, see the e-Manual.

Paper settings

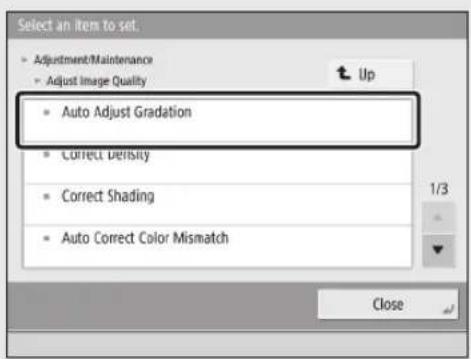
Irregularities Appear in Images/Images Are Faint
Cause
The gradation, density, and colour settings need adjustment.
Remedy
Adjust the machine with (Settings/Registration) [Adjustment/Maintenance] [Auto Adjust Gradation].

Streaks Appear in Images
Cause
The document feed scanning area is dirty.
Remedy
Clean the document feed scanning area. For information on cleaning the document feed scanning area, see "Cleaning the Document Feed Scanning Area," on p.18.

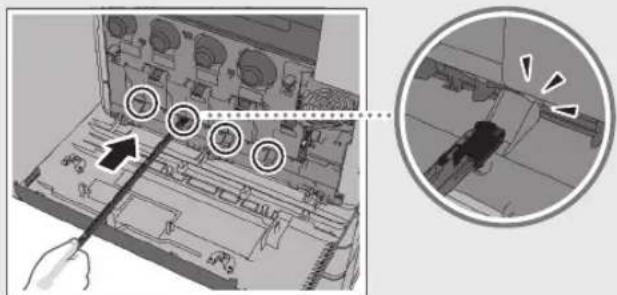
Cause
The dust proof glass is dirty.
Remedy
Use the dust proof glass cleaner included with the machine to clean the four areas illustrated below.

Cause
The feeder rollers are dirty.
Remedy
Clean the rollers using (Settings/Registration) [Adjustment/Maintenance] [Clean Feeder].

Cause
The inside of the machine is dirty.
Remedy
Clean the inside of the machine using (Settings/Registration) [Adjustment/Maintenance] [Clean Inside Main Unit].

Images Are Shifted/Slanted/Skewed
Cause
The position of the slide guides is not correct.
Remedy
Adjust the guides to match the size of the paper.


Paper Drawer 1 Paper Drawer 2, 3, and 4 Multi-Purpose Tray
Cause
The paper settings do not match the paper that is loaded.
Remedy
Check the paper settings in [Consmbls./Others] in [Status Monitor/Cancel]. If the paper settings do not match the paper that is loaded, change the settings so that they match.

NOTE
The paper loaded in the paper drawers and multi-purpose tray can be set in (Settings/Registration) [Preferences] [Paper Settings]. For more information, see the e-Manual.
Paper settings

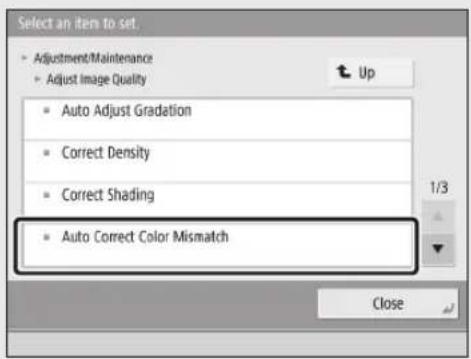
Colours Are Shifted
Adjust the machine with Settings/Registration)
[Adjustment/Maintenance] [Auto Correct Color
Mismatch]. For more information, see the e-Manual.

Colours Are Too Light/Colour Quality Is Poor
Execute [Full Adjust] in (Settings/Registration)
[Adjustment/Maintenance] [Auto Adjust Gradation]. If the problem is still not resolved, adjust the density using the [Density] setting of each function. For more information, see the e-Manual.

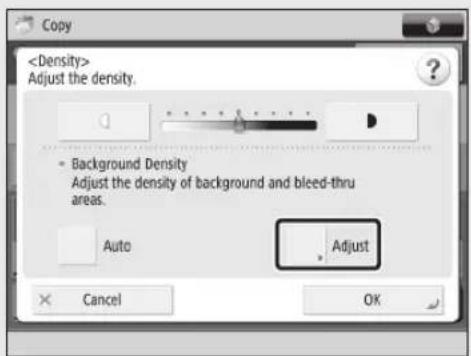
Bleed-through Occurs
Set

Documents Are Not Printed with the Specified Size
Cause T
The paper settings in the printer driver or application differ from the paper that is loaded.
Remedy
Check the paper settings on the [Printing Preference] sheet of the printer driver, and match them with the paper that is loaded.

The Front and Back Sides of a Document Are Reversed
Cause
The paper orientation is incorrect or the paper is set as the front and back are reversed.
Remedy
Load the paper in the correct orientation.
For information on loading paper in paper drawers, see "Loading Paper," on p.36.
For information on loading paper in the multi-purpose tray, see "How to Print on Special Paper," on p.21.
For information on loading envelopes, see "How to Print on Envelopes," on p.20.
2
Routine Maintenance
Loading Paper 36
Loading Paper into a Paper Printer 36
Checking the Types of Paper That Can Be Used 38
Replacement Parts 39
Replacing the Stamp Cartridge (For the Feeder) 40
Replacing the Staple Case in the Staple Unit (Staple Finsher-U1/Booklet Finsher-U1) 41
Replacing the Staple Cartridge in the Saddle
Stitcher Unit (Booklet Finisher-U1) 43
Replacing the Staple Case (Inner Finisher-G1) 45
Replacing the Toner Cartridge 47
Replacing the Waste Toner Container 50
Replacing the Drum Unit 52
Consumables 55
Recommended Paper 55
Toner 55
Drum Unit 56
Stamp Ink Cartridge 56
Staple Cartridge 56
Genuine Consumables 56
Loading Paper
If the selected paper runs out, or the selected paper drawer runs out of paper during printing, a screen prompting you to load paper appears on the touch panel display.
CAUTION
When handling paper, take care not to cut your hands on the edges of the paper.
Loading Paper into a Paper Printer
When loading paper into the paper drawer for the first time, or when a message is displayed on the touch panel display prompting you to load paper, follow the procedure below.
0IMPORTANT
A screen prompting you to load paper also appears if the paper drawer is not fully inserted into the machine. Make sure that the paper drawer is properly in place.
Do not load the following types of paper into the paper drawers. Doing so may cause a paper jam.
-
Severely curled or wrinkled paper
-
Thin straw paper
-
Paper which has been printed on using a thermal transfer printer
-
The reverse side of paper which has been printed on using a thermal transfer printer
Fan the stack of paper well before loading it. Paper such as thin paper, recycled paper, pre-punched paper, and heavy paper should be fanned particularly well before loading it.
Never place paper or any other items in the empty part of the drawer next to the paper stack. Doing so may cause paper jams.
When you are printing in the Staple mode, do not remove the output sheets that are waiting to be stapled. (Printing and stapling resume after you clear the paper jam.)
NOTE
Register the size and type of the loaded paper in [Paper Settings] in [Preferences] (Settings/Registration).
You can use custom paper sizes. (See e-Manual > Settings/Registrations.)
You can name, register, and edit custom paper types. (See e-Manual > Settings/Registrations.)
Paper Drawers 3 and 4 can be used if the optional Cassette Feeding Unit-AL1 is attached.
For information on paper that can be loaded, see e-Manual > Basic Operations.
If a message prompting you to load paper appears while printing, the remaining prints are automatically made after you load the correct paper. If you select a different paper drawer, the remaining prints are made after you press [OK].
Press [Cancel] to cancel printing.
01 Grip the handle, and pull out the paper drawer until it stops.
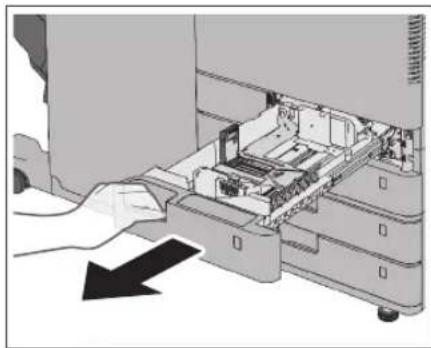
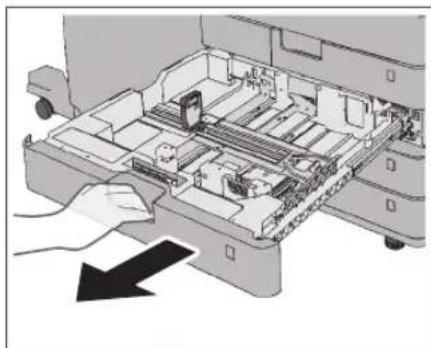
02 When loading paper into the paper drawer for the first time, or when changing the paper size, adjust the position of the paper drawer guides.
- Slide the left guide while squeezing it on the top to align it with the mark for the desired paper size.
- Slide the front guide while squeezing it on the top to align it with the mark for the desired paper size.
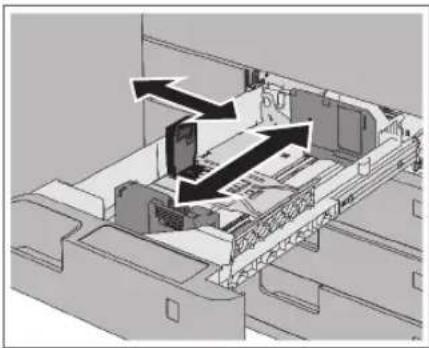
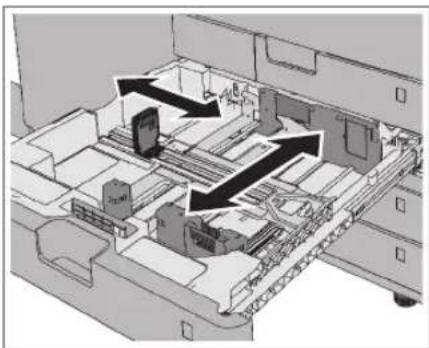
0IMPORTANT
Slide the guides until they click into place. If the left guide and front guide are not aligned correctly, the paper size will not correctly appear on the touch panel display. It is also necessary to adjust the guides correctly to avoid causing a paper jam, dirty prints, or making the inside of the machine dirty.
03 Prepare the paper to load.
Open the packaging for the paper and remove the paper stack.

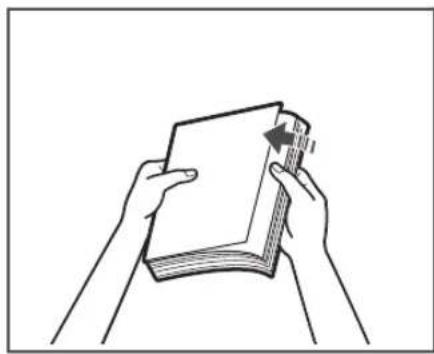

NOTE
For high-quality printouts, use paper recommended by Canon.
Before loading paper, always fan the sheets several times, and align the edges to facilitate feeding.
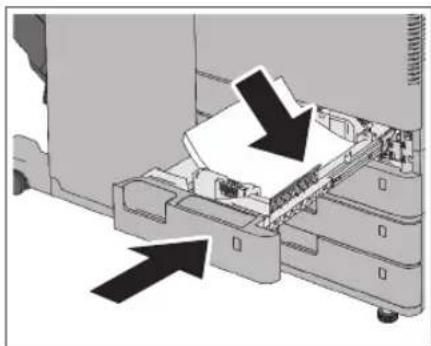
04 Load the paper stack into the paper drawer.
- Make sure that the paper size setting of the paper drawer matches the size of the paper to load in the paper drawer.
- Load the paper stack against the right wall of the paper drawer.
- Gently push the paper drawer back into the machine.

CAUTION
When returning the paper drawer to its original position, be careful not to get your fingers caught, as this may result in personal injury.

IMPORTANT
Paper which is curled must be straightened out before loading it into the paper drawer.
You will not be able to make copies or print if you load paper that exceeds the loading limit mark (or if the paper drawer is not completely pushed into the machine.
Make sure that the height of the paper stack does not exceed the loading limit mark (
Always check that the paper drawers are in place.

NOTE
Each paper drawer holds up to 550 sheets of paper (80g / m^2) or 640 sheets of paper (64g / m^2) .
If there are instructions on the paper package about which side of the paper to load, follow those instructions.
When the paper is loaded into the paper drawer, the side facing up is the one printed on.
Paper may overlap when it is fed or a paper jam may occur, depending on the cut surface of the paper. Changing the paper orientation and loading it again may reduce the effect of the cut surface.
Rewrap any remaining paper in its original package, and store it in a dry place, away from direct sunlight.
If paper runs out and printing is stopped, load a new paper stack. Printing restarts after the new paper stack is loaded.
If you print on the paper which has absorbed moisture, steam may come out from the output area of the machine. This is because the moist on the paper evaporates when the high temperature is applied when a toner is fixed to the paper. It is not a malfunction. (This especially happens in low room temperature.)
05 When loading paper into the paper drawer for the first time, or when changing the paper size, attach a paper size label to the paper drawer.
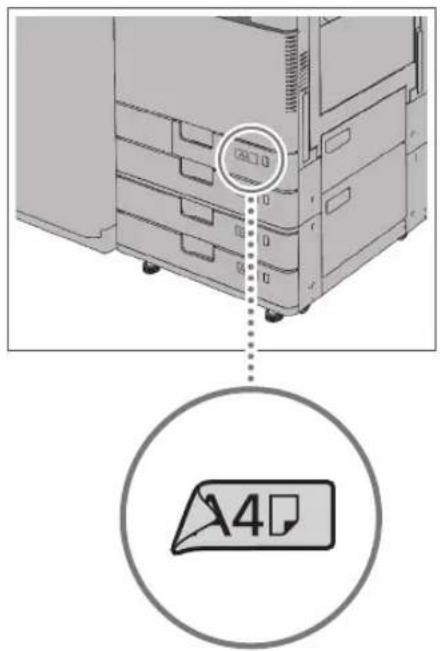

IMPORTANT
The paper size labels included with the machine contain paper sizes not supported by the machine.
06 If the paper has been changed, register the size and type of the loaded paper.
Register the size and type of paper you loaded in the paper drawer in [Paper Settings] in [Preferences] (Settings/Registration). For more information, see e-Manual > Settings/Registration.
Checking the Types of Paper That Can Be Used
For more information on the types of paper you can use, see e-Manual > Basic Operations.
Replacement Parts
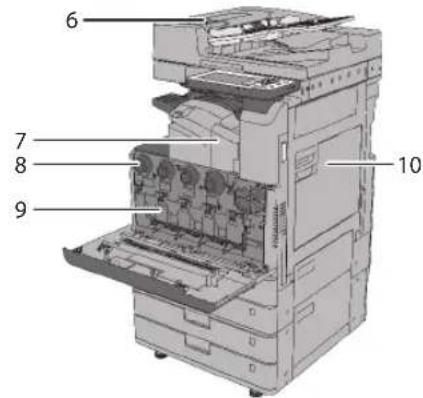
This section describes those parts that require replacement and their item numbers. Use a replacement part after checking its item number.
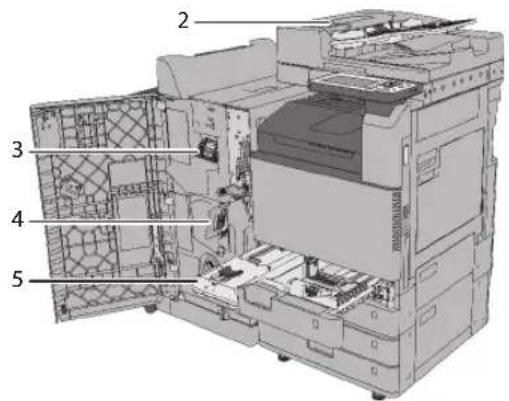
1 Staple Case for the Staple Finisher-U1 Item Number: Staple-J1
2 Stamp Ink Cartridge Item Number: Stamp Ink Cartridge-C1
3 Staple Case for the Booklet Finisher-U1 Item Number: Staple-J1
4 Staple Cartridge for the Booklet Finisher-U1 Item Number: Staple Cartridge-D2 Staple Cartridge-D3
5 Waste Toner Container Item Number: WT-202
6 ADF Pickup Roller/Separation Roller Item Number: DR-202
7 Staple Case for the Inner Finisher-G1 Item Number: Staple-P1
8 Toner Cartridge Item Number: Canon C-EXV 49 Toner Black Canon C-EXV 49 Toner Cyan Canon C-EXV 49 Toner Magenta Canon C-EXV 49 Toner Yellow
9 Drum Unit Item Number: Canon C-EXV 49 Drum Unit
10 Fixing Assembly Item Number:FX-202
For instructions on replacing parts 1, 2, 3, 4, 5, 7, 8, and 9, see the following page. You can find links to the instructions on replacing parts 6 on the top page of the e-Manual. For instructions on replacing parts 10, refer to the packing box for the Fixing Assembly.
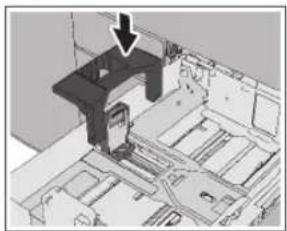
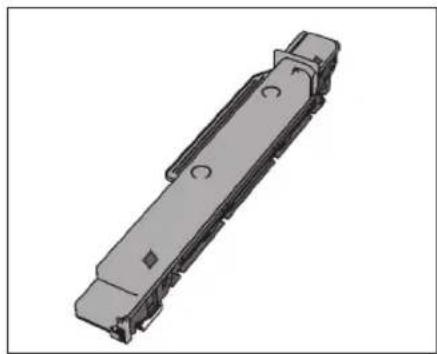
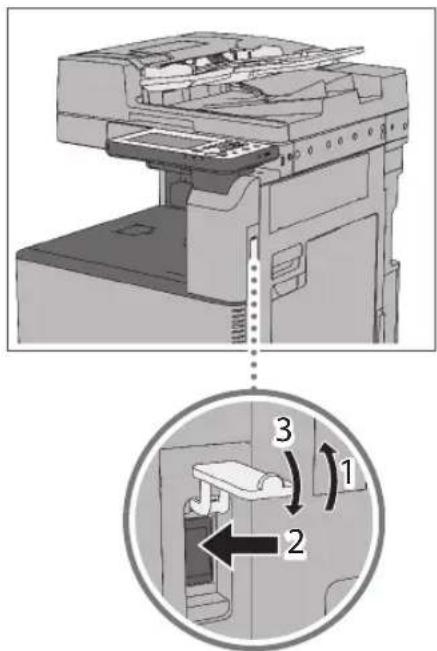
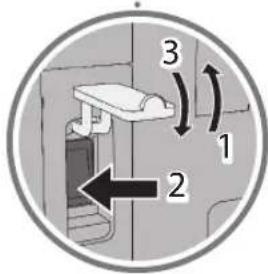
Replacing the Stamp Cartridge (For the Feeder)
Originals sent via the feeder can be stamped to indicate that they have been sent. Replace the stamp cartridge when the stamp mark is faint or no longer visible.
CAUTION
When replacing the stamp cartridge, take care not to allow ink to come into contact with your hands or clothing. If ink gets onto your hands or clothing, wash it off immediately with cold water.

NOTE
If you are using the imageRUNNER ADVANCE C3320, the feeder (DADF-AQ1) is an optional product.
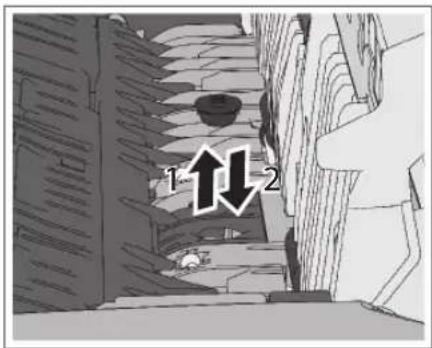
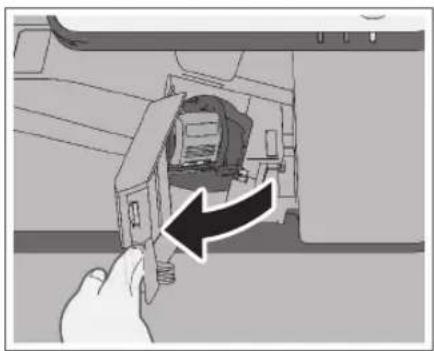
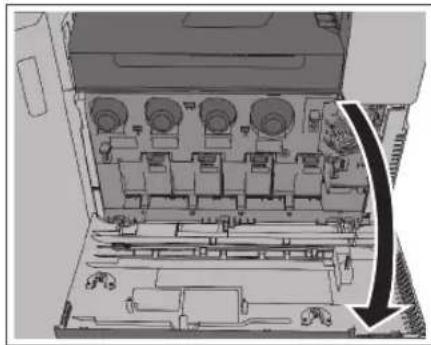
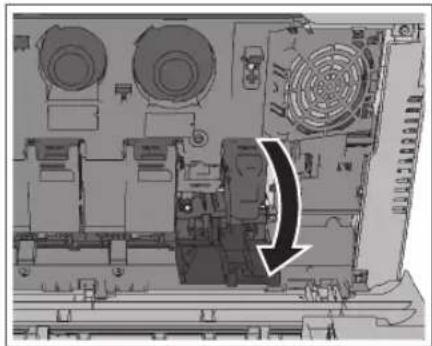
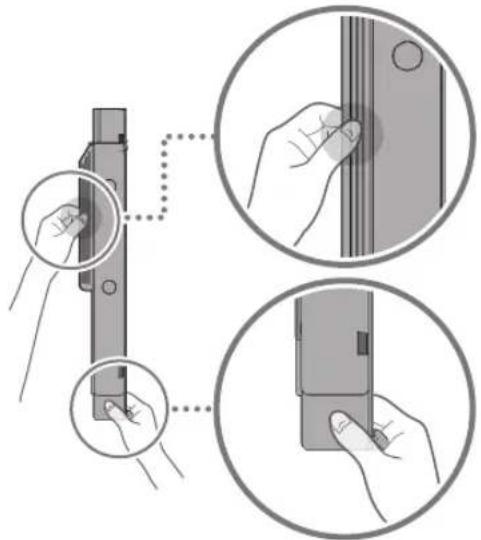
01 Open the covers.
- Pull the lever open the feeder cover.
- Open the inner cover, holding it by its tab.

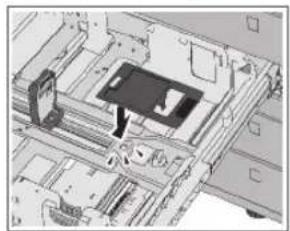
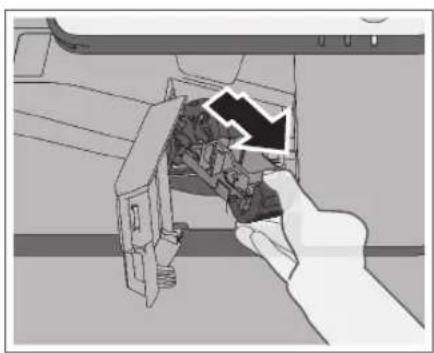
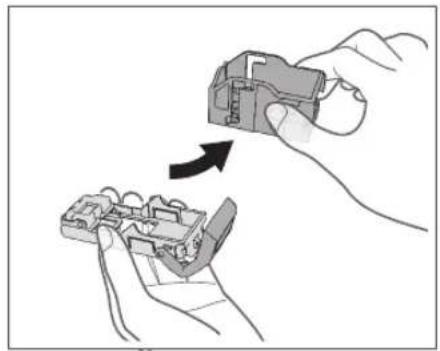
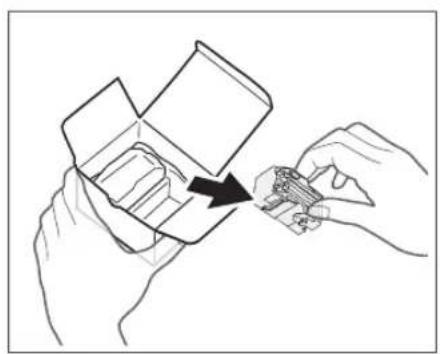
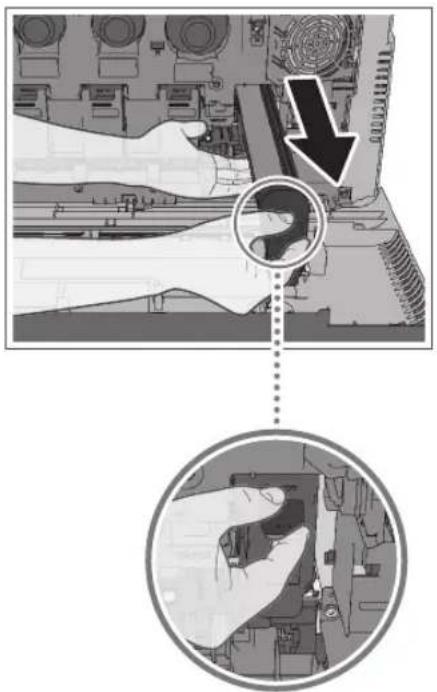
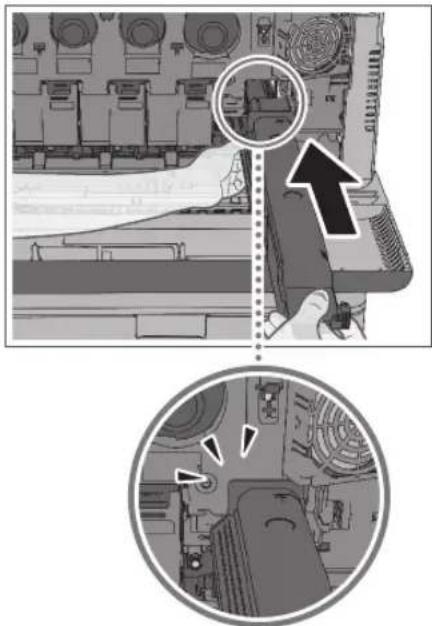
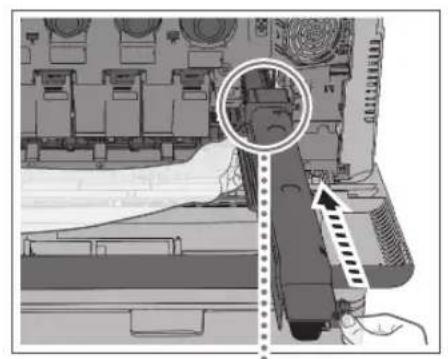
02 Load the stamp cartridge.
- Remove the old stamp cartridge, using tweezers.
- Push in the new stamp cartridge until it clicks, using tweezers.
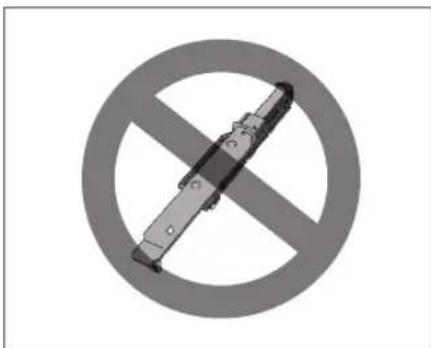
0IMPORTANT
Make sure that the stamp cartridge is not protruding from the surface.
Insert the stamp cartridge properly, or paper jams may occur.
03 Close the covers.
- Close the inner cover.
- Close the feeder cover.
CAUTION
When closing the covers, be careful not to get your fingers caught, as this may result in personal injury.
Replacing the Staple Case in the Staple Unit (Staple Finisher-U1/Booklet Finisher-U1)
When the stapler unit of the Staple Finisher-U1 or Booklet Finisher-U1 is almost out of staples and the staple case in the stapler unit must be replaced, a screen prompting you to replace the staple case appears on the touch panel display. Follow the procedure described below to replace the staple case.

IMPORTANT
Remove the orange seal that holds the staples together after you place the staple case into the staple cartridge.

NOTE
The Staple Finisher-U1 and Booklet Finisher-U1 are optional products.
We recommend that you order staple case from your local authorized Canon dealer before your stock runs out.
Use only staple cases intended for use with this machine.
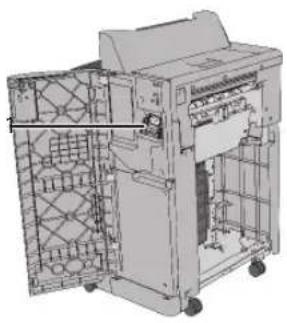
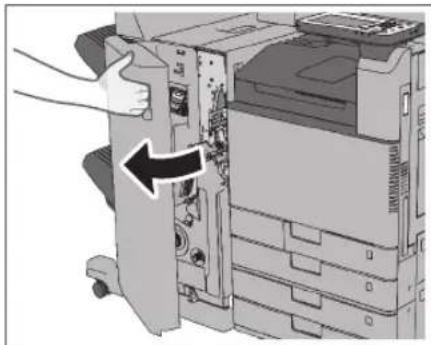
01 Open the front cover of the finisher.
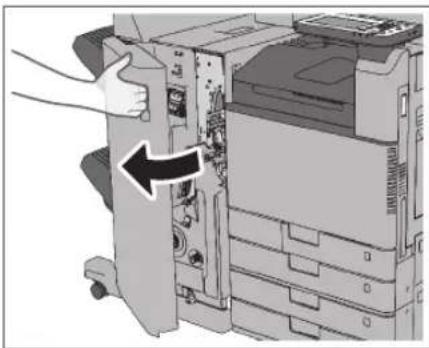
Booklet Finisher-U1
Staple Finisher-U1
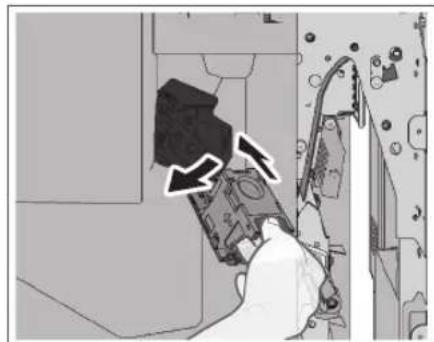
02 Pull out the staple cartridge.
- Hold and pull up the green part to unlock the staple cartridge.
- Pull out the staple cartridge.
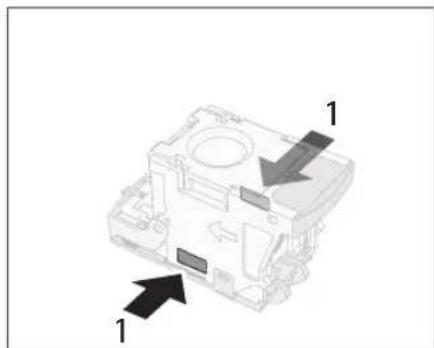
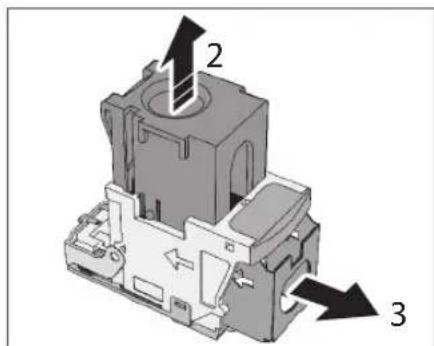
03 Pull out the empty staple case from the staple cartridge.
- Press the areas indicated by PUSH on both sides of the staple cartridge.
- Pull up the clear part.
- Remove the empty staple case.
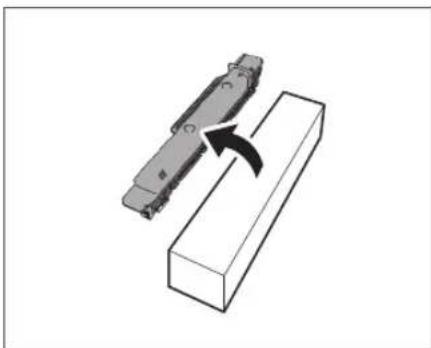
04 Remove the new staple case from its box.
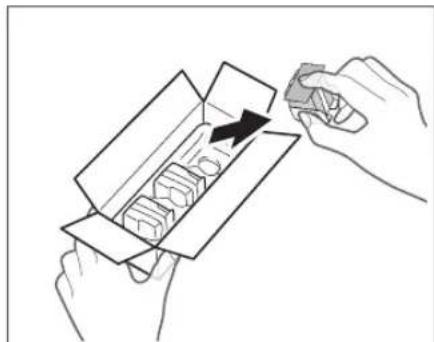
0IMPORTANT
Do not remove the seal that holds the staples together with a tag before you place the staple cartridge into the staple case.
05 Insert a new staple case into the staple cartridge.
- Insert a new staple case.
- Push down the clear part.
- Hold the tag of the seal, and pull it straight out.
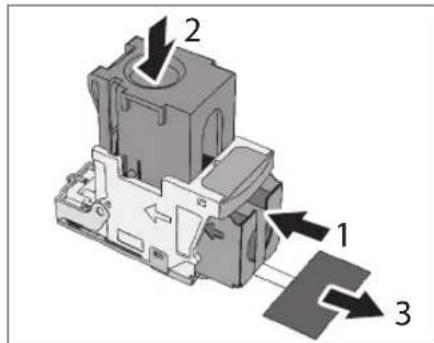
0IMPORTANT
Only one staple case can be inserted at a time.
Make sure that you pull the seal straight out. If you pull it out at an angle, it may tear.
06 Gently push the staple cartridge back into the finisher and push down firmly until it is securely in place.
07 Close the front cover of the finisher.
CAUTION
When closing the front cover of the finisher, be careful not to get your fingers caught, as this may result in personal injury.
NOTE
After the cover is closed, the stapler unit may automatically perform a "dry" stapling operation to reposition the staples.
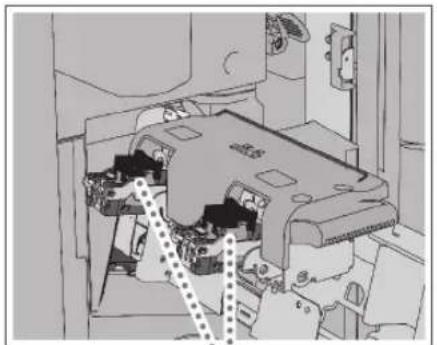
Replacing the Staple Cartridge in the Saddle Stitcher Unit (Booklet Finisher-U1)
When the saddle stretcher unit of the Booklet Finisher-U1 is almost out of staples and the staple cartridge must be replaced, a screen prompting you to replace the staple cartridge appears on the touch panel display. Follow the procedure described below to replace the staple cartridge.

IMPORTANT
If necessary, remove all output paper in the booklet tray before replacing the staple cartridge of the saddle stretcher unit.

NOTE
The Booklet Finisher-U1 is an optional product.
We recommend that you order staple cartridge from your local authorized Canon dealer before your stock runs out.
Use only staple cartridges intended for use with this machine.
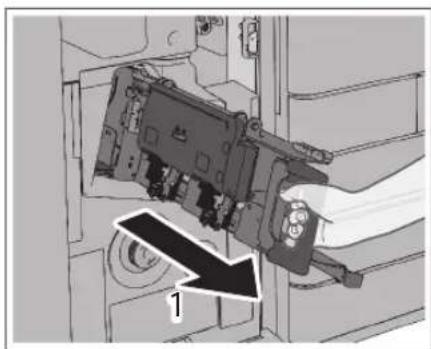
01 Open the front cover of the finisher.
02 Pull out the saddle stitcher unit.
- Grip the handle of the saddle stitcher unit, and pull out until it stops.
- Pull the stapler unit of the saddle stretcher unit towards you, and then push it up.

03 Pull out the empty staple cartridge.
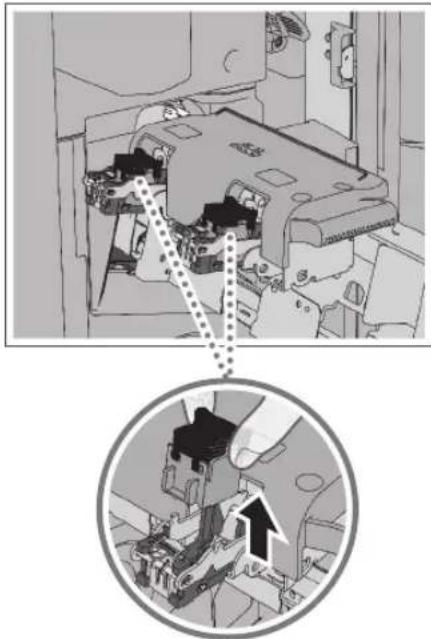
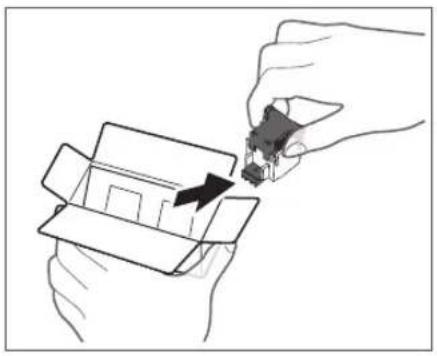
04 Prepare the new staple cartridge.
- Remove the (two) new staple cartridges from their box.
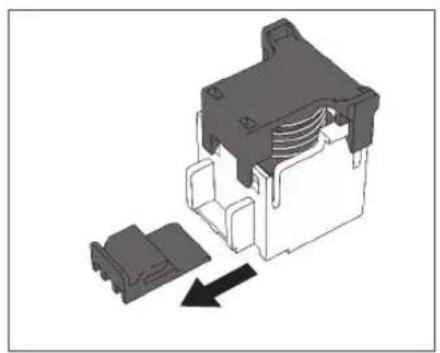
- Remove the black part on the end before inserting the staple cartridge.
05 Insert the new staple cartridge in until it clicks into place.
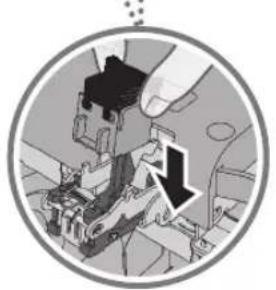
0IMPORTANT
When replacing the staple cartridges, replace both the front and back staple cartridges.
Only one staple cartridge can be inserted at a time on each side.
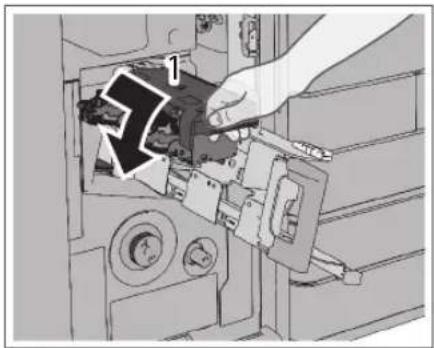
06 Push the saddle stitcher unit back into its original position.
- Pull the stapler unit of the saddle stitcher unit towards you, and then push it down into its original position.
- Grip the handle of the saddle stitcher unit, and return it to its original position.
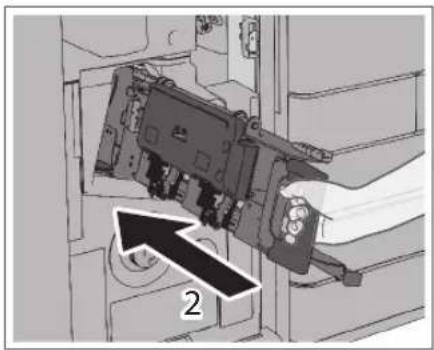
CAUTION
When pushing the saddle stitcher unit back into its original position, be careful not to get your fingers caught, as this may result in personal injury.
07 Close the front cover of the finisher.
CAUTION
When closing the front cover of the finisher, be careful not to get your fingers caught, as this may result in personal injury.
NOTE
When you have replaced the staple case, be sure to manually reposition the staples in the saddle stretcher unit. For more information, see the e-Manual.
Replacing the Staple Case (Inner Finisher-G1)
This section describes how to replace the staple case and staple cartridge in the stapler unit. When the Inner Finisher-G1 is almost out of staples and the staple case must be replaced, a screen prompting you to replace the staple case appears on the touch panel display. Follow the procedure described below to replace the staple case.

NOTE
The Inner Finisher-G1 is an optional product.
We recommend that you order staple cases from your local authorized Canon dealer before your stock runs out.
Use only staple cases intended for use with this machine.
01 Open the front cover of the finisher.
02 Pull out the staple cartridge from the finisher.
- Push down the green part to unlock the staple cartridge.
- Push up the staple cartridge slightly and pull it out.
03 Pull out the empty staple case from the staple cartridge.
04 Remove the new staple case from its box.
05 Insert a new staple case into the staple cartridge.
0IMPORTANT
Only one staple case can be inserted at a time.
06 Push the staple cartridge into the finisher until it clicks into place.
07 Close the front cover of the finisher.
CAUTION
When closing the front cover of the finisher, be careful not to get your fingers caught, as this may result in personal injury.
NOTE
After the cover is closed, the stapler unit may automatically perform a "dry" stapling operation to reposition the staples.
Replacing the Toner Cartridge
When there is only a small amount of toner remaining inside the machine, a message appears on the touch panel display. You can continue printing, but at this time you should purchase a new toner cartridge to have it available when needed.
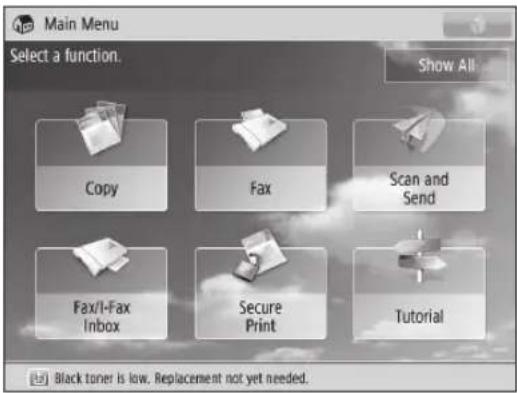
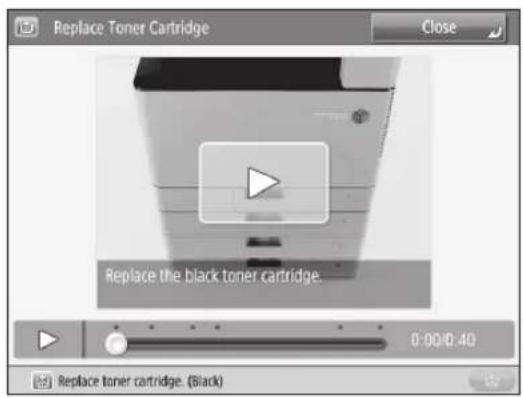
When the Black toner or all of the toners run out completely and prints can no longer be made, a screen with instructions on how to replace the toner cartridge appears on the touch panel display. Follow the procedure described below to replace the toner cartridge.
If you press [Close], you can continue operations, such as setting modes and scanning originals, even if you do not replace the toner cartridge immediately.

WARNING
Do not burn or throw used toner cartridges into open flames, as this may cause the toner to ignite, resulting in burns or a fire.
If you accidentally spill or scatter toner, carefully wipe up the loose toner with a damp, soft cloth and avoid inhaling any toner dust. Do not use a vacuum cleaner that is not equipped with safety measures to prevent dust explosions to clean up loose toner. Doing so may cause damage to the vacuum cleaner or result in a dust explosion due to static discharge.

CAUTION
Keep toner out of the reach of small children.
If toner is ingested, consult a physician immediately.
toner gets onto your hands or clothing, wash it off immediately with cold water. Washing it off with warm water will set the toner, and make it impossible to remove the toner stains.

IMPORTANT
Use only toner cartridges intended for use with this machine.
For information on the supported Canon genuine toner, see "Replacement Parts," on p.39.
Do not replace toner cartridges until the message prompting you to do so appears.
Do not attempt to replace the toner cartridge while the machine is printing.
The colour of the toner to be replaced is displayed on the touch panel display. If multiple toner cartridges must be replaced, replace the toner cartridges in the following order: Black, Yellow, Magenta, Cyan.
If you continue copying or printing in black-and-white after cyan, magenta, or yellow toner runs out, do not remove the depleted toner cartridges from the machine.
You can set the machine to display a message indicating that the remaining toner is low. (See e-Manual > Settings/Registrations.)

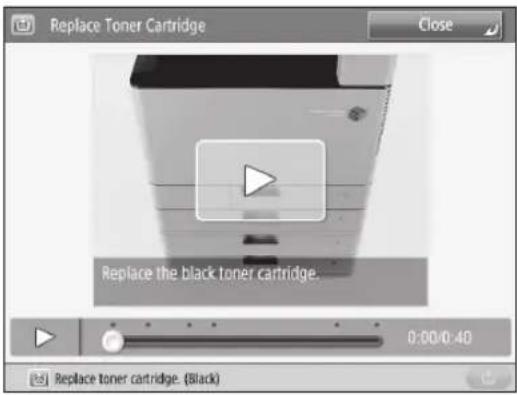
NOTE
Complete instructions on how to replace the toner cartridge can be accessed by pressing [Previous] or [Next] on the touch panel display.
If toner runs out during a print job, the remaining prints are made after you replace the toner cartridge.
If black toner is left, you can continue copying and printing in black-and-white.
After replacing toner cartridges, if printed colours are different from the colours printed before you replaced the toner cartridges, perform [Auto Adjust Gradation] in [Adjustment/Maintenance]. (See e-Manual > Settings/Registrations.)
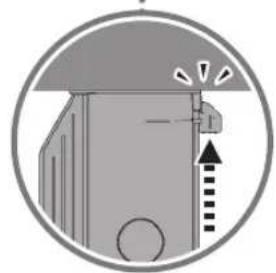
01


NOTE
If the Black toner or all of the toners run out, this step is not necessary.
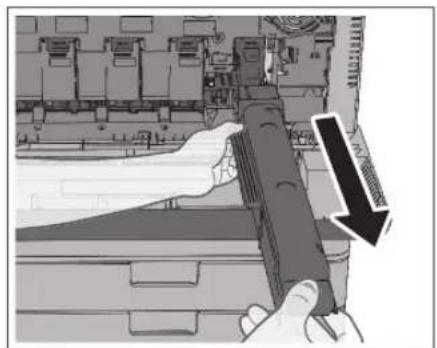
02 Remove the toner cartridge of the displayed colour.
- Open the front cover of the main unit.
- Pull out the toner cartridge to replace.
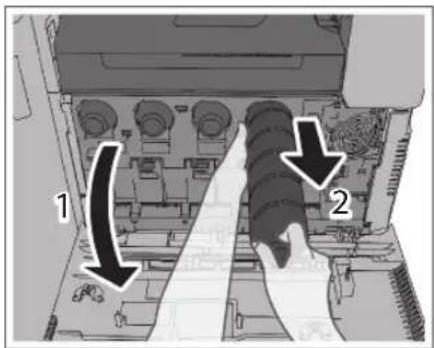
Pull the toner cartridge out halfway, and then remove it completely while supporting it and keeping it straight with your other hand from underneath.

WARNING
Do not burn or throw used toner cartridges into open flames, as this may cause the toner remaining inside the cartridges to ignite, resulting in burns or a fire.

IMPORTANT
Do not subject the toner cartridge to shock or hit it. Doing so may cause the toner cartridge to leak.
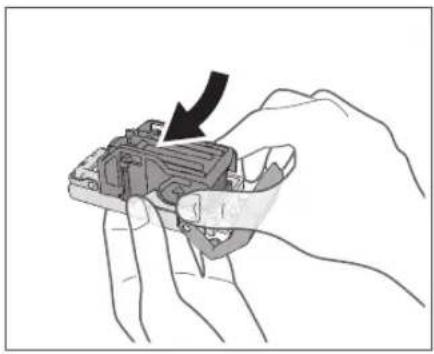
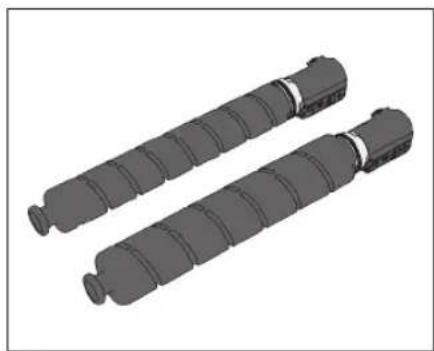
03 Prepare the new toner cartridge.
- Open the package of the toner cartridge, and remove the toner cartridge.

- Hold the new toner cartridge in both hands as shown in the illustration, and shake it vertically approximately 10 times.
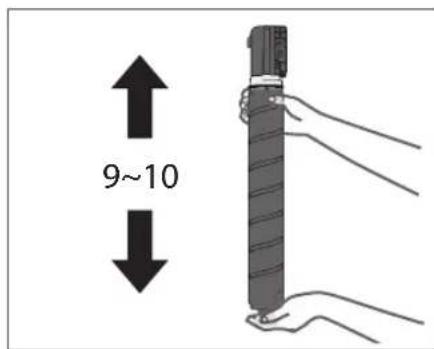

IMPORTANT
Do not allow the white part of the toner cartridge to face down. Doing so may cause the toner to not output properly.
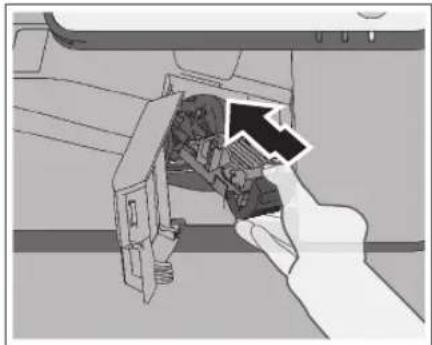
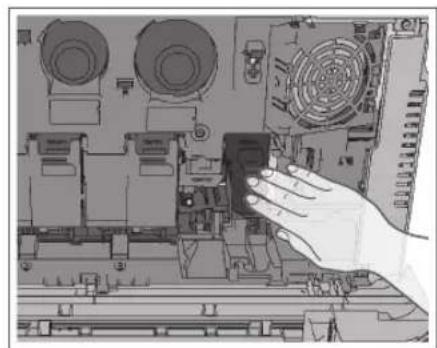
04 Insert the new toner cartridge.
- Match the new toner cartridge with the slot on the main unit as shown in the illustration.
- Push the new toner cartridge in as far as possible.
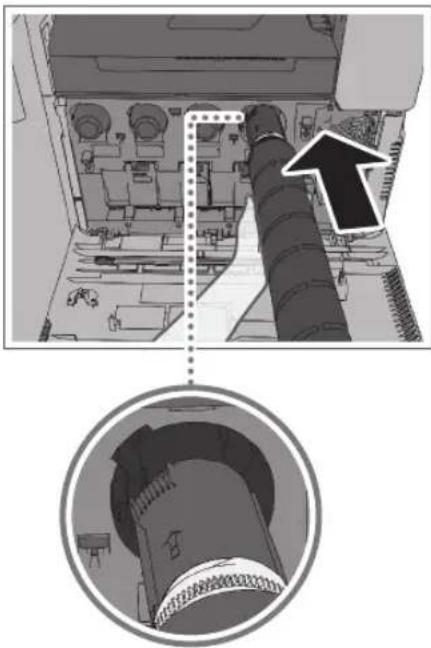

NOTE
Support the new toner cartridge with your hand from underneath while pushing it into the machine with your other hand.

Close the front cover of the main unit.

CAUTION
When closing the cover, be careful not to get your fingers caught, as this may result in personal injury.
If the Following Screen Is Displayed after Replacing the Toner Cartridge
After replacing the toner cartridge, the following screen may appear.
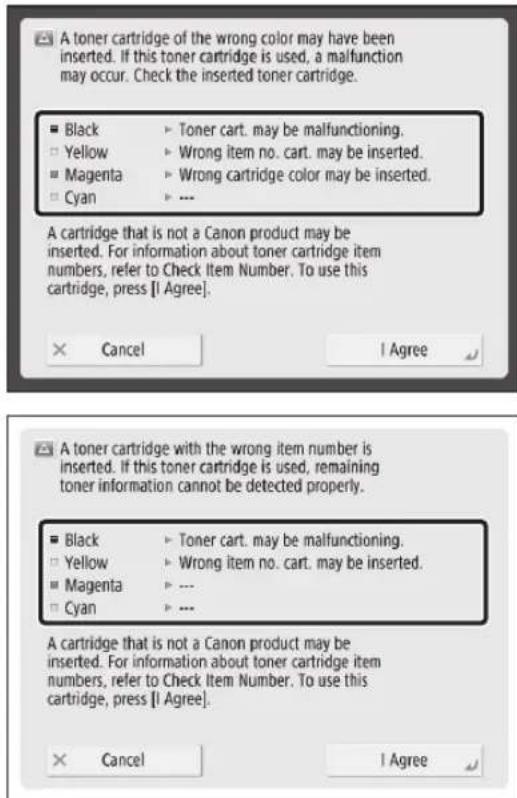
The status of each of the toner cartridges attached to the machine is displayed in the enclosed area of the screen, shown above.
| Message Status | |
| Wrong cartridge color may be inserted. | A toner cartridge of the wrong colour is inserted. |
| Wrong item no. cart. may be inserted. | A toner cartridge with the wrong item number is inserted. |
| Toner cart. may be malfunctioning. | The inserted toner cartridge may have been damaged. |
| ---- | The correct toner cartridge is inserted. |
To continue using the toner cartridge, press [I Agree]. If you select this option, the operation of the machine is not guaranteed.
To replace the toner cartridge, press [Cancel].
If you are not sure about the remedies, contact your local authorized Canon dealer from which you purchased the toner cartridge.
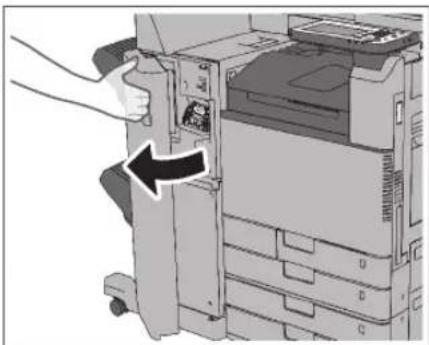
Replacing the Waste Toner Container
When the waste toner container nears capacity, a message appears on the touch panel display. In this case, you should prepare a new waste toner container.
Even if you do not replace the waste toner container immediately, you can perform printing for a while. The number of prints you can make depends on the content you print.
When the waste toner container is full, a screen with instructions on how to replace the waste toner container appears on the touch panel display. Follow the procedure described below to replace the waste toner container.

WARNING
Do not burn or throw used waste toner containers into open flames. Also, do not store waste toner containers in places exposed to open flames, as this may cause the toner to ignite, resulting in burns or a fire.
If you accidentally spill or scatter toner, carefully wipe up the loose toner with a damp, soft cloth and avoid inhaling any toner dust. Do not use a vacuum cleaner that is not equipped with safety measures to prevent dust explosions to clean up loose toner. Doing so may cause damage to the vacuum cleaner or result in a dust explosion due to static discharge.

CAUTION
If toner is ingested, consult a physician immediately.
If toner gets onto your hands or clothing, wash it off immediately with cold water. Washing it off with warm water will set the toner, and make it impossible to remove the toner stains.

IMPORTANT
Your local authorized Canon dealer will dispose of used waste toner containers.
Used toner cannot be reused. Do not mix new and used toner together.
Use only waste toner containers intended for use with this machine.
Do not replace the waste toner container before the message prompting you to replace it appears on the touch panel display.

NOTE
Complete instructions on how to replace the waste toner container can be accessed by pressing [Previous] or [Next] on the touch panel display.
If the waste toner container must be replaced during a print job, the remaining prints are made after the new waste toner container is installed.
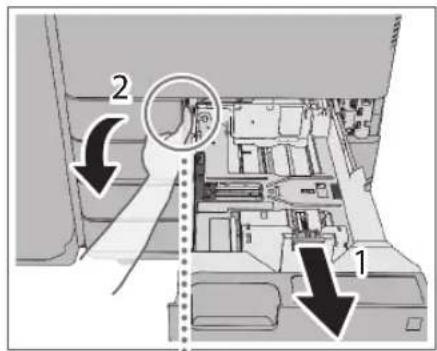
01 Press
02 Open the waste toner cover.
- Pull out Paper Printer 1.
- Pull the tab, and open the cover of the waste toner container.
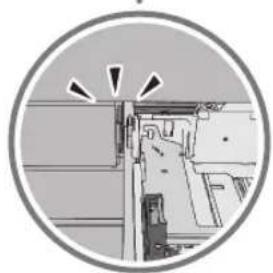
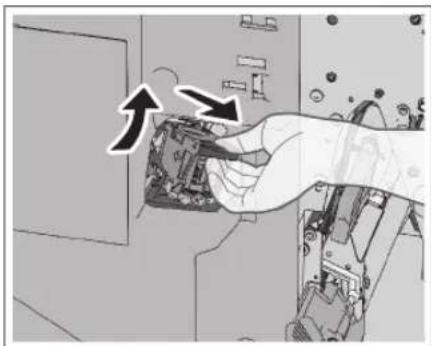
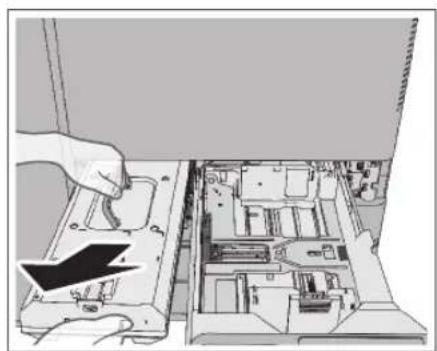
03 Remove the waste toner container.
- Grip the handle, and pull out the waste toner container slowly until the entire handle on top can be seen.
- Grip the handle on top, and remove the waste toner container.
CAUTION
Be careful not to drop the waste toner container when you pull it out. Doing so may cause injury.
04 Prepare a new waste toner container, and store the removed waste toner container.
- Take the new waste toner container out of the box.
- Insert the removed waste toner container into a bag.

Tie up the opening of the bag as indicated in the diagram, so that the waste toner does not spill out.
05 Insert the new waste toner container into the main unit.
- Insert the waste toner container with the Canon logo on top of the container towards the back of the machine, and push it in to load it.
- Close the waste toner cover and the paper drawer 1.
Replacing the Drum Unit
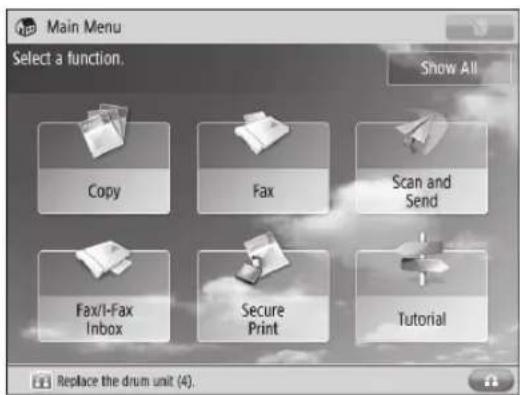
When the drum unit approaches the end of its service life and needs to be replaced, a message appears on the touch panel display. Follow the procedure described below to replace the drum unit. The following example describes the replacement procedure for drum unit 4.

IMPORTANT
For high-quality printouts, when replacing the drum unit we recommend using a Canon drum unit.
Store drum units in a location away from light sources such as direct sunlight.
Storing the drum unit in a room that is cold but rapidly heated, or has other rapid temperature changes, causes water droplets (condensation) to form inside it.
Do not remove the orange protective cover until you insert the drum unit into the machine.

NOTE
Complete instructions on how to replace the drum unit can be accessed by pressing [Previous] or [Next] on the touch panel display.
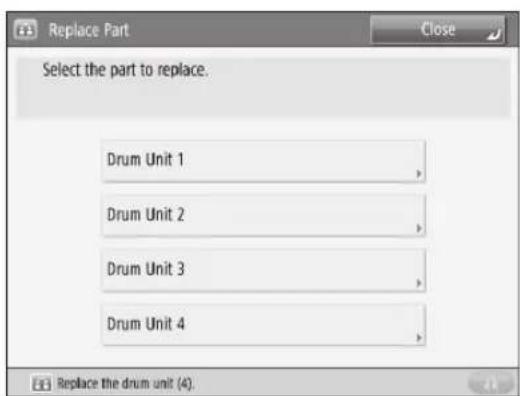
Depending on your contract, a message prompting you to replace the drum unit may appear on the bottom of the touch panel display. Only the drum unit that needs to be replaced can be selected on the touch panel display. Do not replace drum units that cannot be selected.
When the front cover of the main unit is closed after replacing the drum unit, initialization of the drum unit starts automatically. If multiple drum units need to be replaced, do not close the front cover of the main unit until all of the drum units are replaced.
When you finish replacing the drum unit, press [Close].

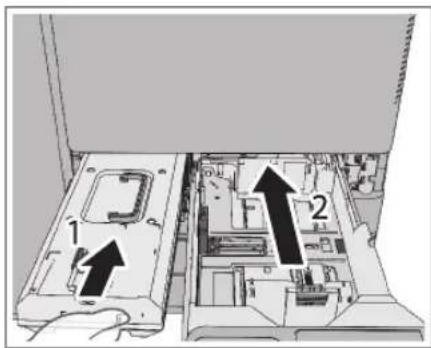
01 Open the front cover of the main unit.
02 Open the cover of the drum unit.
03 Pull out the drum unit to replace.

IMPORTANT
Pull out the drum unit while supporting it with your hands as indicated in the diagram.

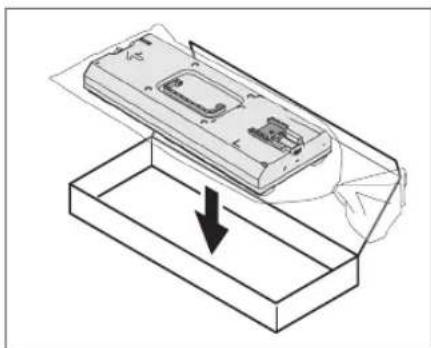
Prepare the new drum unit.

IMPORTANT
Do not remove the orange protective cover yet.
05 Hold the new drum unit as indicated.
06 Insert the new drum unit into the main unit with its protective cover attached.

NOTE
Insert the drum unit until the flange of the protective cover touches the main unit.
07 Push the lever on the right side of the protective cover back into the machine.
08 Remove the protective cover by pulling it out of the machine.
09 Push the drum unit and confirm that it does not move.
10 Close the cover of the drum unit.
CAUTION
When closing the front cover of the main unit, be careful not to get your fingers caught, as this may result in personal injury.
11 Follow the procedure in steps 2 to 10 to replace all the drum units that need to be replaced, and then close the front cover of the main unit.
Consumables
The following consumables are available from Canon. For more information, contact your local authorized Canon dealer. We recommend that you order paper stock and toner from your local authorized Canon dealer before your stock runs out.
Recommended Paper
In addition to plain paper (A3, A4, and A5 sizes), recycled paper, colour paper, transparencies (recommended for this machine), tracing paper, labels, and other types of paper stock are available.

CAUTION
Do not store paper in places exposed to open flames, as this may cause the paper to ignite, resulting in burns or a fire.

IMPORTANT
Some commercially available paper types are not suited for this machine. Contact your local authorized Canon dealer when you need to purchase paper.
To prevent moisture build-up, tightly wrap any remaining paper in its original package for storage.

NOTE
For high-quality printouts, use paper recommended by Canon.
Toner
Confirm that the code on the front cover of the machine and the one on the package of the genuine toner are the same.

If a message prompting you to replace the toner cartridge appears on the touch panel display, replace the used toner cartridge of the displayed colour with a new one.
Toner comes in four colours: black, cyan, magenta, and yellow.
Check the toner colour that you need to replace before ordering toner from your local authorized Canon dealer. Also, when replacing the toner cartridge, make sure that you replace toner of the correct colour.
Use only toner cartridges intended for use with this machine.
For optimum print quality, using Canon genuine toner is recommended.
For information on the dedicated toner cartridge item numbers for this machine, see "Replacement Parts," on p.39.

WARNING
Do not burn or throw used toner cartridges into open flames, as this may cause the toner remaining inside the cartridges to ignite, resulting in burns or a fire.
Do not store toner cartridges in places exposed to open flames, as this may cause the toner to ignite, resulting in burns or a fire.
If you accidentally spill or scatter toner, carefully wipe up the loose toner with a damp, soft cloth and avoid inhaling any toner dust. Do not use a vacuum cleaner that is not equipped with safety measures to prevent dust explosions to clean up loose toner. Doing so may cause damage to the vacuum cleaner or result in a dust explosion due to static discharge.

CAUTION
Keep toner out of the reach of small children. If toner is ingested, consult a physician immediately.

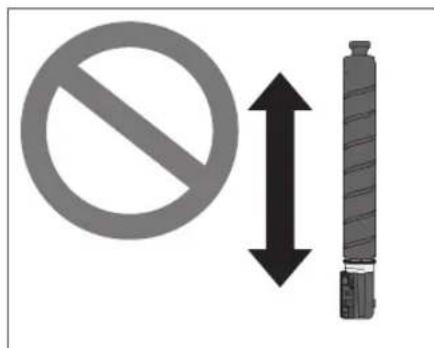
IMPORTANT
Store toner cartridges in a cool location, away from direct sunlight. (The recommended storage conditions are temperatures below 30^ and humidity below 80% .
Do not store toner cartridges in an upright position. [Be careful of counterfeit toners]
Please be aware that there are counterfeit Canon toners in the marketplace. Use of counterfeit toner may result in poor print quality or machine performance. Canon is not responsible for any malfunction, accident or damage caused by the use of counterfeit toner.
For more information, see canon.com/counterfeit.
Drum Unit
When you replace the drum unit with a new one, be sure to use only drum units intended for use with the machine.
For optimum print quality, using Canon genuine drum unit is recommended.
For information on the drum unit item numbers for this machine, see "Replacement Parts," on p.39.

CAUTION
For cardiac pacemaker users:
This drum unit emits low level magnetic flux. If you use a cardiac pacemaker and feel abnormalities, please move away from the drum unit, and consult a physician.
Stamp Ink Cartridge
The stamp ink cartridge is used to stamp originals. Use the tweezers provided to remove and replace the stamp ink cartridge.
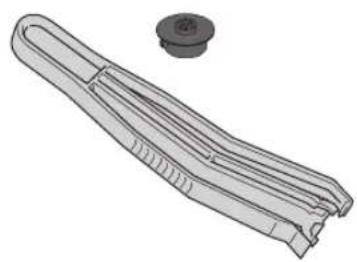
Stamp Ink Cartridge-C1
Staple Cartridge
| Finisher Name Shape | ||
| Staple Finisher-U1 | Staple-J1 | |
| Booklet Finisher-U1 | Staple Cartridge-D2 Staple Cartridge-D3 | |
| Staple-J1 | ||
| Inner Finisher-G1 | Staple-P1 | |
Genuine Consumables
Canon continuously develops technology innovations in Canon Toners, Drums and Cartridges, specifically designed for use in Canon Multi-Functional machines. Experience the benefits of optimal print performance, print volume and high quality outputs, achieved through Canon's new advanced technologies. Therefore, the use of Canon genuine consumables is recommended for your Canon Multi-Functional machines.

3
Before Using This Machine
Parts and Their Functions 58
External View 58
Internal View 59
Feeder 60
Control Panel Parts and Functions 60
Main Power and Energy Saver Key 62
How to Turn ON the Main Power 62
Energy Saver Key 63
Shutting Down the Machine 63
Backing Up/Exporting Data 64
Data You Can Back Up 64
Data You Can Export 64
Introduction to the Functions of the Machine 65
Copying/Printing Functions 65
Sending Function 66
Scanning Function 67
Remote UI 69
Specifications 70
Main Unit 70
Feeder (DADF-AQ1) 73
Cassette Feeding Unit-AL1 73
Inner Finisher-G1 74
Staple Finsher-U1 76
Booklet Finisher-U1 77
Inner 2way Tray-J1 78
Copy Tray-J2 79
Copy Card Reader-F1 79
Super G3 FAX Board-AR1 80
Send Function (Scan Features) 81
Send Function (E-Mail and I-Fax Features) 82
Network Environment (Hardware Specifications) 82
Network Environment (Software Specifications) 83
Printer Settings (Software Specifications) 83
Parts and Their Functions
This section provides you with the names and functions of all the parts of the machine. For more information on optional products, parts and their functions, see e-Manual > Optional Products/Software.
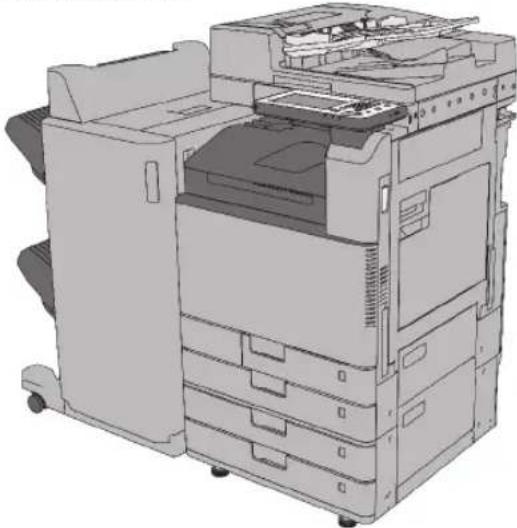
External View
When the Cassette Feeding Unit-AL1 and DADF-AQ1 are attached:
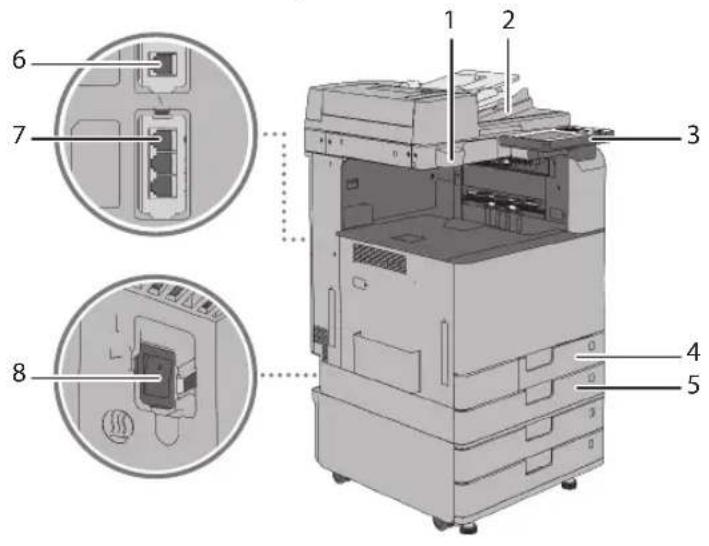
1 G lass Cleaning Sheet Storage Box
Use this box to store sheets for cleaning the platen glass.
2 Feeder
Originals placed in the feeder are automatically fed sheet by sheet to the scanning area. The feeder also automatically turns over two-sided originals to make one- or two-sided copies.
3 Control Panel
The control panel includes the keys, touch panel display, and indicators required for operating the machine. (See "Control Panel Parts and Functions," on p.60.)
4 Paper Drawer 1
Holds up to 550 sheets of paper (80g / m^2)
5 Paper Drawer 2
Holds up to 550 sheets of paper (80g / m^2)
6 LINE2
Use this port to connect the Super G3 2nd Line Fax Board to the machine.
7 LINE 1
Use this port to connect a fax line to the machine.
8 Dehumidification Switch
Use this switch when paper in a paper drawer is damp to dry the paper by warming it up, in order to prevent printing problems.
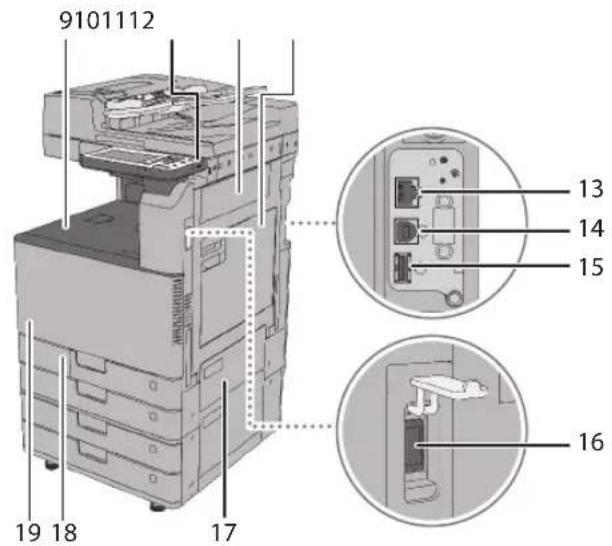
9 Output Tray
Prints are output to this tray.
10 USB Port (1)
Use the USB port to connect USB memory, external hard disks, and other devices to the machine.
11 Right Cover of the Main Unit
Open this cover when clearing a paper jam inside the main unit. (See e-Manual > Problem Solving.)
12 Multi-Purpose Tray
Use the multi-purpose tray to feed paper manually, and for loading nonstandard paper stock. (See e-Manual > Basic Operations.)
13 LAN Port
Use an Ethernet cable to connect the machine to a network.
14 USB Port (2)
Use the USB port to insert a USB cable for connecting to a computer.
15 USB Port (3)
Use the USB port to connect external hard disks and other devices to the machine.
16 Main Power Switch
Press to the "I" side to turn ON the machine. (See "Main Power and Energy Saver Key," on p.62.)
17 Upper Right Cover of the Paper. Drawer
Open this cover when clearing a paper jam. (See e-Manual > Problem Solving.)
18 Waste Toner Cover
Open this cover when replacing the waste toner container.
19 Toner Code
This code indicates the type of genuine toner that can be used with the machine. Use toner with a code that includes the same letters as the code on the front cover of the machine.
Internal View
When the Cassette Feeding Unit-AL1 and DADF-AQ1 are attached:
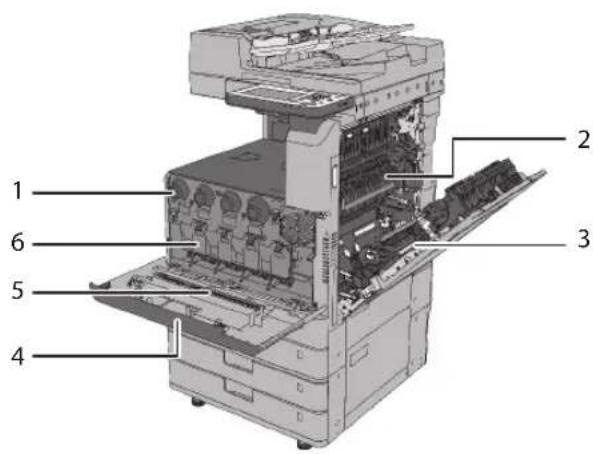
1 Toner Cartridge
When toner runs out, pull out the toner cartridge and replace it with a new one (p.47.)
2 Fixing Assembly
The unit that fixes toner onto paper.
3 Duplexing Unit
If paper is jammed in the duplexing unit, remove the paper jam. (See e-Manual > Problem Solving.)
4 Front Cover of the Main Unit
Open this cover to replace the toner cartridge and the drum unit.
5 Dust Proof Glass Cleaner
Use this cleaner when cleaning the dust proof glass.
6 Drum Unit
The unit that sets toner onto paper (p.52.)
7 Waste Toner Container
When the waste toner container becomes full, replace it with a new one (p.50.)
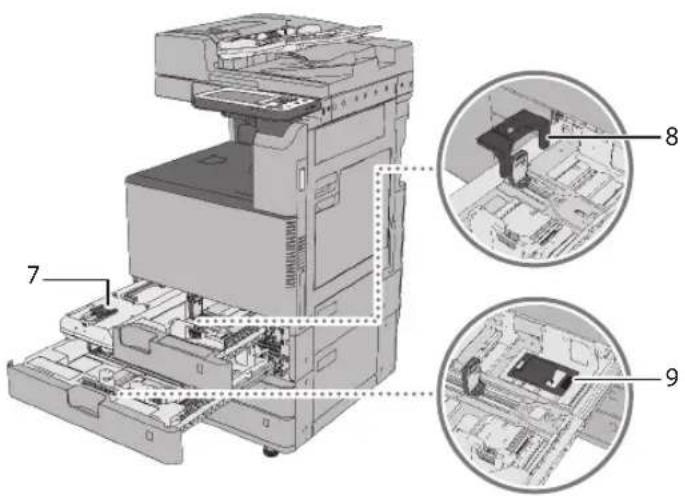
8 Envelope Feeder Attachment B
Used with Paper Drawer 1. Envelopes are loaded horizontally.
9 Envelope Feeder Attachment A
Used with Paper Drawer 2. Envelopes are loaded vertically.
Feeder
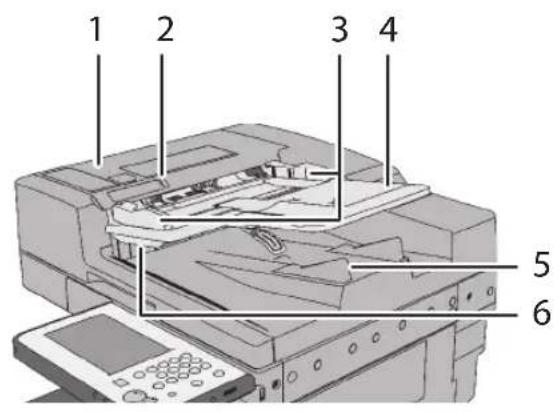
1 Feeder Cover
Open this cover to remove jammed paper.
2 Original Set Indicator
Lights when originals are placed in the original supply tray.
3 Slide Guides
Adjust these guides to match the width of the original.
4 Original Supply Tray
Originals placed here are automatically fed sheet by sheet into the feeder. Place originals into this tray with the surface that you want to scan face up.
5 Original Output Area
Originals that have been scanned from the original supply tray are output into the original output area.
6 Original Output Indicator
Lights up when originals are being output and flashes for a certain period after the originals have finished being output, to prevent the user from forgetting to take their originals.
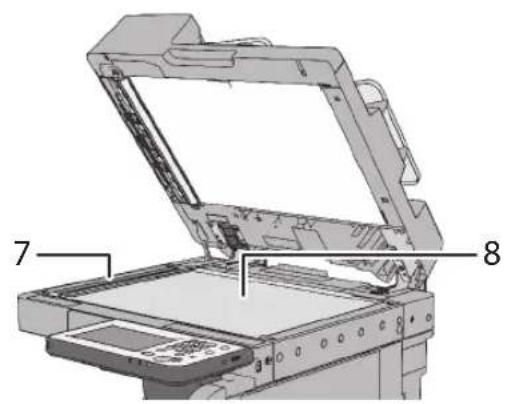
7 Document Feed Scanning Area
Scans documents sent from the feeder.
8 Platen Glass
Use the platen glass when scanning books, thick originals, thin originals, transparencies, etc.
Control Panel Parts and Functions
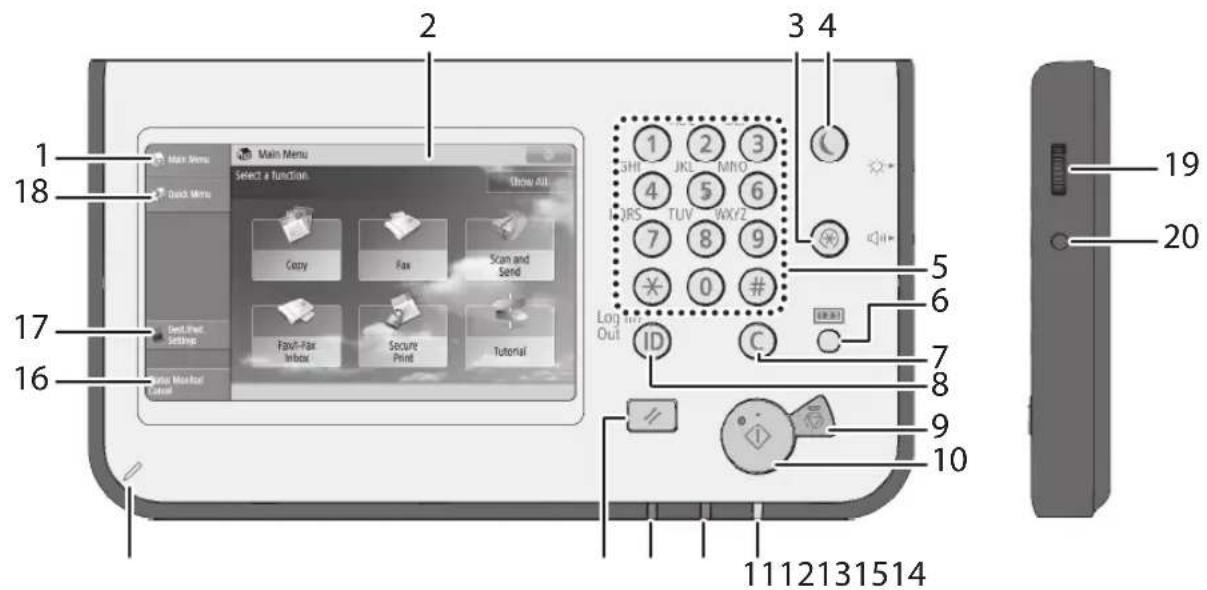
Control Panel Parts and Functions
1 [Main Menu]
Press to display the Main Menu screen. If the Main Menu screen is not displayed when using a function, it is necessary to press [Main Menu] before using the function.
2 Touch Panel Display
The settings screen for each function is shown on this display. Six function keys are displayed by default.
3 Settings/Registration key
Press to specify settings/registration.
4 Energy Saver key
Press to set or cancel the Sleep mode. Lights when the machine enters the Sleep mode. For more information on the Auto Sleep mode, see "Main Power and Energy Saver Key," on p.62.
5 Numeric keys
Press to enter numerical values.
6 Counter Check key
Press to display the copy and print count totals on the touch panel display.
7 Clear key
Press to clear entered values or characters.
8 ID (Log In/Out) key
Press to log in/out when a login service such as User Authentication or DepartmentID Management has been set.
9 Stop key
Press to stop a job in progress, such as a scan, copy, or fax (scanning only) job.
10 Start key
Press to start an operation.
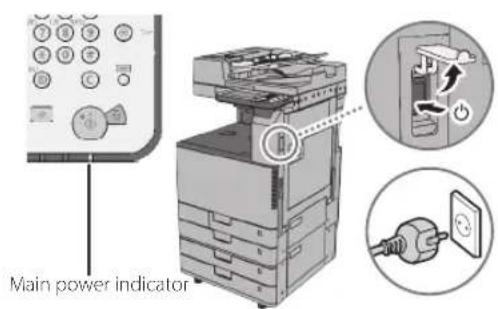
11 Main Power Indicator
Lights when the main power is turned On.
12 Error Indicator
Flashes or lights if there is an error in the machine. When the Error indicator flashes, follow the instructions that appear on the touch panel display. When the Error indicator maintains a steady red light, contact your local authorized Canon dealer.
13 Processing/Data Indicator
Flashes or blinks green when the machine is performing operations, and maintains a steady green light when fax data is stored in memory.
14 Reset key
Press to restore the standard settings of the machine.
15 Edit Pen
Use when operating the touch panel display, such as to enter characters.
16 [Status Monitor/Cancel]
Press to check the status of jobs or to cancel print jobs. Also, you can check the status of the machine such as the amount of paper remaining in the paper source.
17 [Dest./Fwd. Settings]
Press to register e-mail addresses and phone numbers, and set forwarding destinations for received documents.
18 [Quick Menu]
Press to display functions registered in the Quick Menu.
19 Brightness Adjustment Dial
Use to adjust the brightness of the touch panel display.
20 Volume Settings key
Press to display the screen for adjusting settings, such as the transmission volume and fax sending/receiving alarm volume.
Adjusting the Angle of the Control Panel
The angle of the control panel is adjustable as shown below.
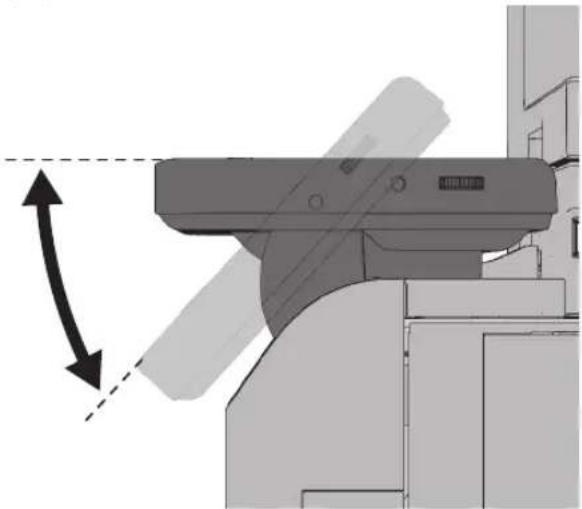
0IMPORTANT
Do not apply excess force to the control panel when adjusting its angle.
Main Power and Energy Saver Key
This section describes how to use the main power switch and the Energy Saver key.
How to Turn ON the Main Power
Make sure that the power plug is firmly inserted into the power outlet.

WARNING
Do not connect or disconnect the power cord with wet hands, as this may result in electrical shock.

IMPORTANT
If you want to turn OFF the main power and then back ON again, wait for at least 10 seconds after the main power indicator is turned OFF before turning ON the main power. However, when [Quick Startup Settings for Main Power] is enabled, if you do not wait more than 20 seconds after the main power indicator is turned OFF, quick startup is not performed.
01 Press the switch to the "l" side to turn the main power ON.
The main power indicator on the control panel lights when you turn ON the main power switch.
Various screens appear when system software is loading.
If you are using a login service, log in using the procedure for the login service you are using.

NOTE
You can change the default display that appears after the machine is turned ON from [Default Screen after Startup/Restoration] on the Settings/Registration screen. (See e-Manual > Settings/Registration.)
If this machine is connected to a powered off Macintosh computer by USB cable, the computer may turn on automatically when this machine does. In this case, disconnect the USB cable from the machine. You may also be able to solve this problem by using a USB hub between the machine and the computer.
The response of the buttons and keys may not be optimal immediately after you turn ON the main power of the machine.
If you set [Quick Startup Settings for Main Power] to 'On' in [Preferences] (Settings/Registration), the tone sounds when turning ON the main power of the machine. (Depending on the conditions, the machine does not startup quickly and the tone does not sound.)
Depending on the conditions under which the machine is being used, the machine may not startup quickly if you set [Quick Startup Settings for Main Power] to 'On'. For more information, see e-Manual > Settings/Registration.
For information on the method for logging in using DepartmentID Management with the Copy Card Reader-F1, see e-Manual > Optional Products/Software.
For information on the method for logging in when User Authentication is set, see the e-Manual.
For information on the method for logging in when DepartmentID Management is set, see the e-Manual.
Energy Saver Key
You can press (Energy Saver) to make the machine enter the Sleep mode and reduce power consumption.
The machine also enters the Sleep mode if no operations have been performed for a certain period of time. You can press (Energy Saver) to cancel the Sleep mode.
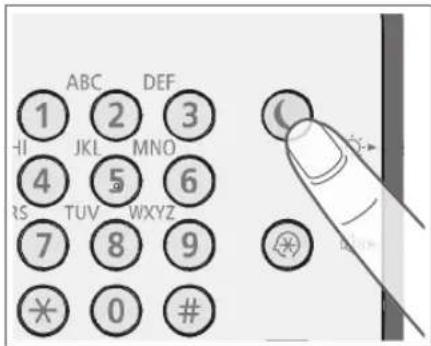

NOTE
The machine can receive and print documents from a personal computer when it is in the Sleep mode. I-fax and fax documents can also be received while the machine is in the Sleep mode.
Shutting Down the Machine
This machine performs a procedure to protect the memory when the machine is shut down.
This enables the machine to be shut down safely, even if there are any jobs being processed, or a MEAP application is running while the machine is shutting down.
01 Press the switch to the "side to turn the main power OFF.

IMPORTANT
Do not turn the main power OFF while using the Fax/I-Fax function. Sending or receiving I-fax or fax documents cannot be completed when the main power is turned OFF.
The machine may take some time to completely shutdown. Do not unplug the power cord until the main power indicator of the machine is Off.
If the main power is turned OFF while scanning on printing, a paper jam may occur.

NOTE
If [Quick Startup Settings for Main Power] in [Preferences] (Settings/Registration) and [Sleep Mode Tone], which appears when you press on the control panel, are both set to 'On', the tone sounds when turning OFF the main power of the machine. (Depending on the situations, the machine does not startup quickly and the tone does not sound.)
You can shut down the machine from the Remote UI using the Remote Shutdown mode. For more information, see e-Manual > Remote UI.
You can also use the Auto Shutdown mode to shut down the machine. For more information, see e-Manual > Remote UI.
Backing Up/Exporting Data
Various data such as the received data, stored data, address book, and Settings/Registration settings are stored on the hard disk of the machine. A malfunction in the hard disk may cause these data to be lost. Please regularly back up/export your important data. Please note that Canon will not be held responsible for any damages caused by the loss of data.

NOTE
The passwords and PINs are backed up at the same time. However, some of the passwords may not be backed up, depending on the type of the password.
If your machine is not connected to a network, it is recommended that you print and store important information such as the Address Book.
You can connect USB memory to the machine to export data using the USB memory.
Data You Can Back Up
You can use the backup function of the Remote UI to save a copy of data to your computer.
Mail Box Settings
Memory RX Inbox Settings
Confidential Fax Inbox Settings
Files in the Mail Box/Confidential Fax Inbox/Memory RX Inbox
License files for MEAP applications
Data You Can Export
You can use the export function of the Remote UI to save the converted data to your computer. The data can be imported to another imageRUNNER ADVANCE series machine.
Batch Exporting
You can use the batch export function to export the data of your choice from various types of data.
Settings/Registration Basic Information
Paper Type Management Settings
Forwarding Settings
Mail Box related settings
DepartmentID Management Settings
Key Settings
Certificate/Certificate Revocation List (CRL) Settings
Main Menu Settings
Web Access Settings
Favorite Settings
Address Book
Authenticated user settings
Personal Setting Information
Quick Menu Settings
MEAP Application Setting Information
Individual Exporting
You can individually export the data of your choice.
Address Lists
Device Settings (Forwarding Settings, Address Book, Send Function Favorite Settings)
Printer Settings
Paper Information
Web Access Favorites
User information registered in the Local Device
Authentication of User Authentication
Introduction to the Functions of the Machine
Various functions and settings can be performed on the machine. This section describes some of these functions and settings. For more information, see the e-Manual.
Copying/Printing Functions
Copy: Modes that can be used when copying
Print: Modes that can be used when printing
Installing the Printer Driver Print
In order to use the print function on your computer, you must first install a printer driver. For instructions on installing the printer driver, see the installation guide included with the printer driver CD-ROM.
2-Sided Copy Print
Scans one-sided originals and prints them on both sides of the paper, or scans two-sided originals and prints them on one side of the paper.

Copy ID Card Copy Print
Scans a two-sided original, such as driver's license and ID card, and prints images of the both sides on one sheet of paper.

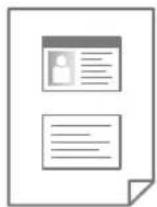
N on 1 Copy Print
Scans multiple pages of originals and prints them on a single page.

Finishing Copy Print
Outputs prints after making the print results easier to see and management easier.
Collate (Page Order)
Collates copies into sets in page order.
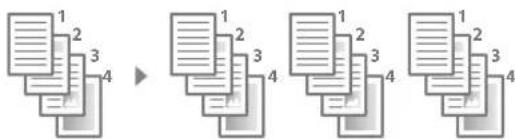
Group (Same Pages)
Collates copies into groups of the same pages.
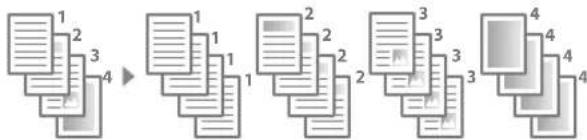
Staple
Collates pages and staples them.

Eco (Staple-Free)
Binds copies in one corner without using staples.

Offset
Collates copies into sets and delivers each set to a position slightly offset from the previous set.

Select Paper Copy Print
The screen for selecting a paper source for copying/ printing enables you to check the information of paper loaded in each paper source. Select the option appropriate for the original.
Screen for Selecting Paper for Copying
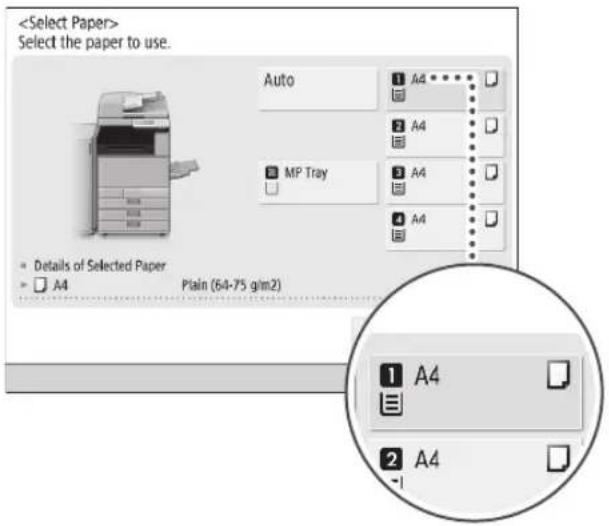
Screen for Selecting Paper for Printing
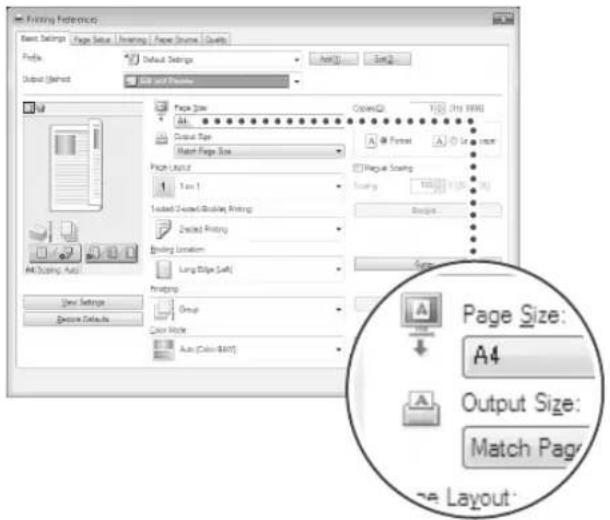
Sending Function
- Specifying a Destination from the Address Book
Registering a frequently used fax number or e-mail address in the Address Book can save the effort of entering them each time you send a job. You can also register multiple destinations in a single group, and send to the entire group at once.
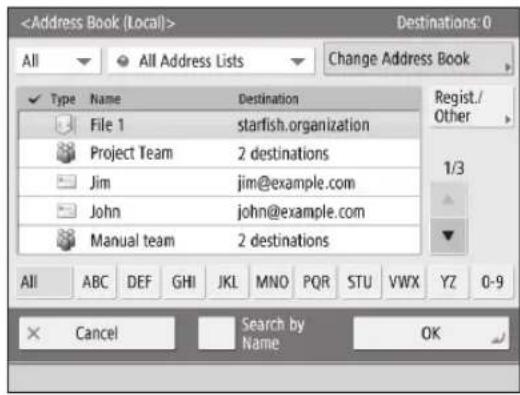
Specifying the Destination Using a One-Touch Button
Registering a frequently used destination as a One-Touch button can prevent you from having to search through the Address Book for it, and save you time.

Sending Data According to the Original Type
There are settings appropriate for various types of original, such as text-only originals and originals that include photos.
Original Type
By setting the original type, the quality of the image is adjusted to one appropriate for the original.
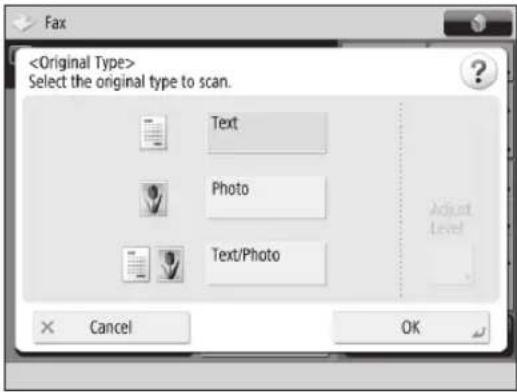
Density
You can manually adjust the density to the most appropriate level for the original. The density of the background can also be adjusted, so if you are concerned about bleedthrough, you can lighten the density of only the background.
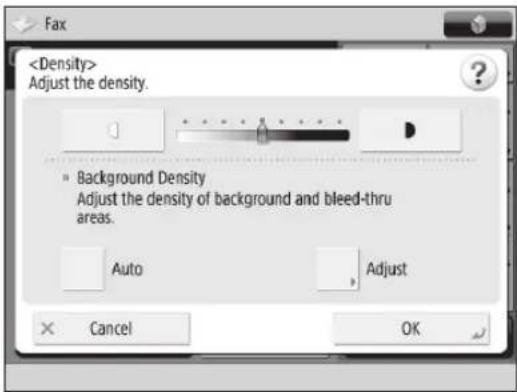
Resolution
By setting the resolution to be high, the data size increases but the quality of the copy increases as well, enabling you to send data closer to that of the original.
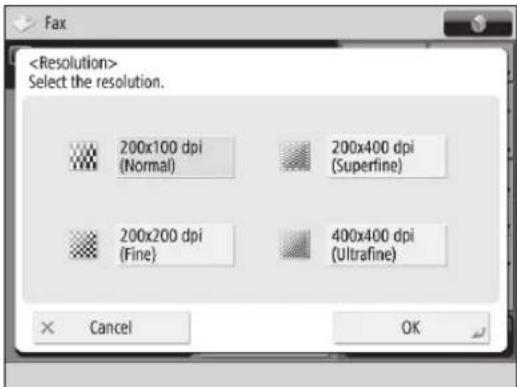
Sending Data to a Server
If you create a shared folder on a network, you can manage scanned data on a server.
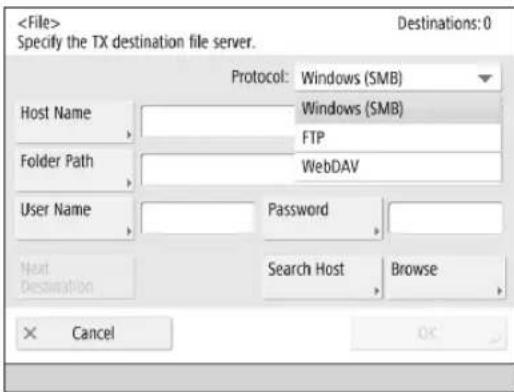
- To use a file server, settings are required on both the server side and the machine (client side).
Scanning Function
File Format
Scanned images can be sent/stored in one of the following file formats. You can select the optimal file type for how you want to use the data.
JPEG
JPEG is a high quality image file format used in Web sites, etc. The Grayscale or Full Color mode is selected for the color mode.
TIFF
TIFF is a standard image file format that supports various resolutions and formats. The Black & White mode is selected for the color mode.
PDF is a data format compressed using Adobe Acrobat. You can use the detailed settings to include various elements.
XPS
XPS is a page description language developed by Microsoft.
OOXML (Office Open XML)
OOXML is a document format for Word, Excel, PowerPoint, etc. The Grayscale or Full Color mode is selected for the color mode.
Set Details
You can configure additional settings if you select the PDF format.
Trace & Smooth
You can create a PDF that contains an outline image reusable in Adobe Illustrator. By overlaying scanned images, you can display clear, easy to read text in the document.
Reader Extensions
You can create PDF documents that are compatible with Adobe Reader's (PDF viewing software) comments function.
Encrypt
You can set restrictions on opening and printing a PDF. A password can also be set.
Compact
You can compress a scanned original using a high compression ratio. Set this when you want to reduce the file size.
OCR (Text Searchable)
You can use this to extract data that can be recognized as text and create a text searchable PDF document.
Add Digital Signatures
You can create a PDF with a digital signature in order to prevent the file from being altered.

* Some modes require optional products.
Sharing Data with Other Machines
You can share data if this machine and another imageRUNNER ADVANCE with an Advanced Space are connected to the same network. You can store scanned data in the Advanced Space of another machine, and print data in another machine's Advanced Space from this machine.
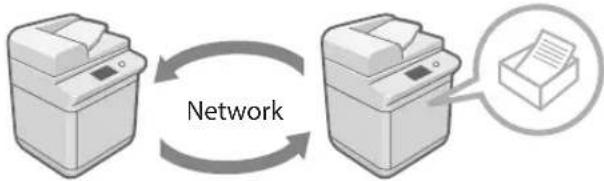
Remote UI
What Is the Remote UI?
The Remote UI is a function that enables you to confirm the status of the machine, configure settings, and manage the machine remotely from your computer.
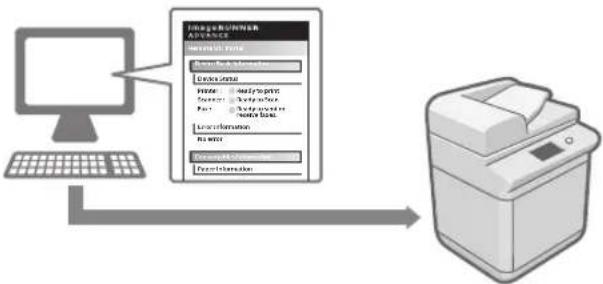
What the Remote UI Can Do
You can configure and manage the following from a computer.
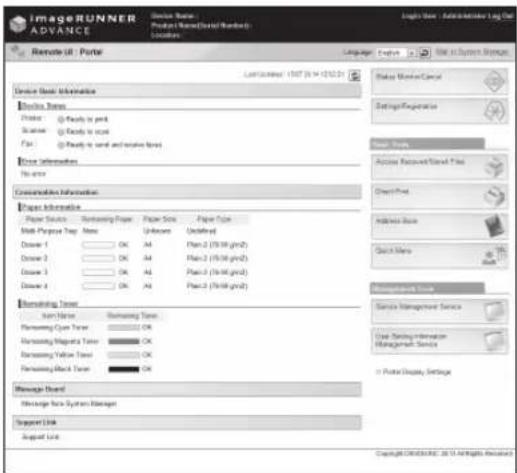
Checking the Job Status and Job Logs
You can check jobs that are being executed and finished jobs. You can also change the order of jobs.
Registering Settings and Restarting the Machine
You can register and edit settings on the machine. You can also remotely turn OFF or restart the machine.
Managing the Address Book
You can manage the Address Book and register new destinations from a computer. Using a keyboard that you are used to makes editing destinations easy.
Direct Printing
You can print a file on the desktop of your computer directly with the machine.
Installing Software
You can install new software and update software.
Only the administrator can change the settings.
Checking Consumables
You can check the remaining amount of paper, toner, and other consumables.
Importing/Exporting Registered Information
You can import/export various information, such as the Address Book, One-Touch buttons, and Web Access information. You can share exported information with another imageRUNNER ADVANCE.
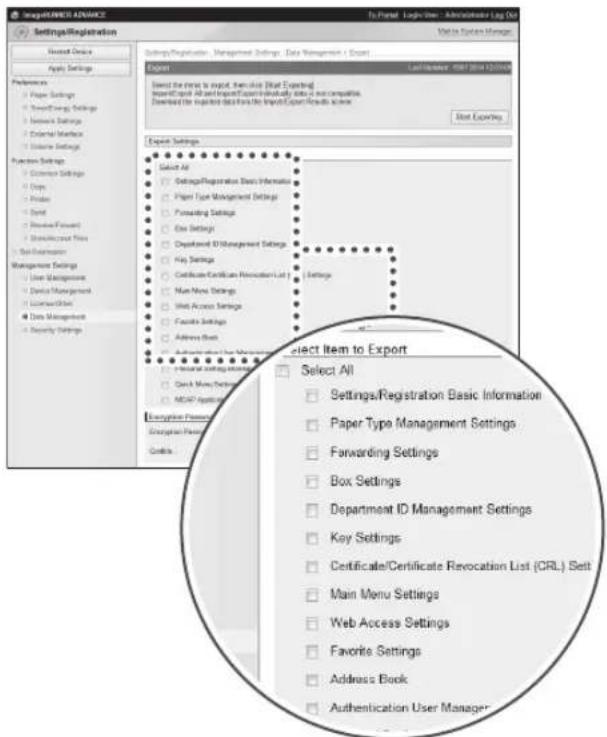
Switching the Login Service
The machine supports the following login services. You can switch the login service to use from "Service Management Service (SMS)" in the Remote UI.
User Authentication
You can manage login information by the ID and password assigned to each user. Use this when you need to configure settings differently for each user.
DepartmentID Management
You can manage login information by the ID and PIN assigned to each department. You can set various settings, such as setting the machine to count the number of pages printed and restricting the use of the Copy function.
Specifications
Specifications are subject to change without notice for product improvement or future release.
Main Unit
| ItemSpecifications | |
| Name Canon imageRUNNER ADVANCE C3330i/C3325i/C3320/C3320i | |
| Type Reader printer separated, Desktop | |
| Colour Supported Full Colour | |
| Resolution for Reading 600 x 600 dpi | |
| Resolution for Writing 1,200 x 1,200 dpi | |
| Number of Tones 256 | |
| Available Paper Paper Printer: | Weight: 52 to 220 g/m² Type: Thin (52 to 63 g/m²), Plain 1 (64 to 75 g/m²), Plain 2 (76 to 90 g/m²), Plain 3 (91 to 105 g/m²), Recycled 1 (64 to 75 g/m²), Recycled 2 (76 to 90 g/m²), Recycled 3 (91 to 105 g/m²), Color, Pre-Punched, Bond, Heavy 1 (106 to 128 g/m²), Heavy 2 (129 to 163 g/m²), Heavy 3 (164 to 220 g/m²), Transparency, and Envelopes |
| Multi-Purpose Tray: Weight: 52 to 256 g/m² Type: Thin (52 to 63 g/m²), Plain 1 (64 to 75 g/m²), Plain 2 (76 to 90 g/m²), Plain 3 (91 to 105 g/m²), Recycled 1 (64 to 75 g/m²), Recycled 2 (76 to 90 g/m²), Recycled 3 (91 to \(105\mathrm{g / m}^2\) ), Color, Pre-Punched, Bond, Heavy 1 (106 to 128 g/m²), Heavy 2 (129 to 163 g/m²), Heavy 3 (164 to 220 g/m²), Heavy 4 (221 to 256 g/m²), Tracing, Coated, Labels, Transparency, and Envelopes | |
| Acceptable Originals Sheet, book, and three dimensional objects (up to 2 kg) | |
| Paper Sizes Paper Printer1: | A4, A5R, Custom size (139.7 x 182 mm to 297 x 215.9 mm), and Envelopes (Nagagata 3, Younagagata 3, and ISO-C5) Paper Printer2: A3, A4, A4R, A5R, Custom size (139.7 x 182 mm to 304.8 x 457.2 mm), and Envelopes (Nagagata 3, Younagagata 3, Kakugata 2, Monarch, COM10 No.10, and DL) Multi-Purpose Tray: A3, A4, A4R, A5, A5R, Custom size (98.4 x 139.7 mm to 320 x 457.2 mm), and Envelopes |
| Warm-Up Time* | After Powering ON (when [Quick Startup Settings for Main Power] is set to 'Off): 34 seconds or lessAfter Powering ON (when [Quick Startup Settings for Main Power] is set to 'On'): 10 seconds or lessThe time until key operations can be performed on the touch panel display is 7 seconds or less.Even if [Quick Startup Settings for Main Power] is set to 'On', the machine does not startup quickly, depending on the situations.Returning from the Sleep mode: 10 seconds or less* Activation time may vary, depending on the environment and conditions under which the machine is being used. (At a room temperature of 20 °C in all above cases.) |
| First Copy Time Full Colour: 8.2 secondsBlack-and-White: 5.9 seconds | |
| Copy Speed* | 1:1imageRUNNER ADVANCE C3330i:A3 15 sheets/minuteA4 30 sheets/minuteimageRUNNER ADVANCE C3325i:A3 15 sheets/minuteA4 25 sheets/minuteimageRUNNER ADVANCE C3320/C3320i:A3 15 sheets/minuteA4 20 sheets/minute* Except when paper is fed from the multi-purpose tray.The copy speed may vary, depending on the settings for paper type, paper size, and the sending method.When continuously copying, adjustments for machine temperature or image quality may cause machine operations to pause or become slow. |
| Margin Top: 4.0 mm | Left and Right: 2.5 mmBottom: 2.5 mm |
| Magnification Regular paper size: | Same Ratio1:1Reduction1:0.70 (A3 → A4), 1:0.50 (A3 → A5), and 1:0.25Enlargement1:1.41 (A4 → A3), 1:2.00 (A5 → A3), and 1:4.00Copy Ratio: 25 to 400% (in 1% increment) |
| Paper Feeding System/Capacity Paper | Paper Drawera550 sheets (80 g/m2) or 640 sheets (64 g/m2)Multi-Purpose Tray:100 sheets (80 g/m2) |
| Multiple Copies 999 sheets | |
| Memory Capacity 4 GB | |
| Hard Disk Capacity* | 250 GB or more (Used space: 250 GB) * The hard disk capacity is subject to change in future release. |
| Power Source 220 - 240 V AC, 50/60 Hz, 4.0 A | |
| Power Consumption Maximum Power Consumption: 1.5 kW or lessWhen the machine is in the Sleep mode*: 0.8 WWhen the main power switch is turned OFF: When [Quick Startup Settings for Main Power] is set to 'On': 0.45 W When [Quick Startup Settings for Main Power] is set to 'Off': 0.1 W * Depending on the system and conditions of use, these values may differ. | |
| Dimensions (H x W x D) imageRUNNER ADVANCE C3330i/C3325i/C3320i: 878 mm x 565 mm x 693 mmimageRUNNER ADVANCE C3320: 777 mm x 565 mm x 665 mm | |
| Weight imageRUNNER ADVANCE C3330i/C3325i/C3320i: Approximately 71.2 kgimageRUNNER ADVANCE C3320: Approximately 64.2 kg | |
| Installation Space (W x D) imageRUNNER ADVANCE C3330i/C3325i/C3320i: 894 mm x 1,117 mm (when the multi-purpose tray is extended) imageRUNNER ADVANCE C3320: 894 mm x 1,088 mm (when the multi-purpose tray is extended) | |
Feeder (DADF-AQ1)

NOTE
The DADF-AQ1 is standard equipment on the imageRUNNER ADVANCE C3330i/C3325i/C3320i. If you are using the imageRUNNER ADVANCE C3320, the DADF-AQ1 is an optional product.
| ItemSpecifications | |
| Original Feeding Mechanism Automatic Document Feeder | |
| Size and Weight of Originals Size: | A3, A4, A4R, A5, and A5R Weight: 1-Sided Scanning: 42 to 128 g/m² 2-Sided Scanning: 50 to 128 g/m² |
| Original Tray Capacity 100 sheets | 80 g/m 2) |
| Original Scanning Speed Copying | 1-sided scanning: 30 sheets/minute (A4 in Black-and-White/Full Colour at 600 x 600 dpi) Scanning: 1-sided scanning: 55 sheets/minute (A4 in Black-and-White/Full Colour at 300 x 300 dpi) |
| Power Source/Maximum Power Consumption | From the main unit/Approximately 36 W |
| Dimensions (H x W x D) 139 mm x 565 mm x 525 mm | |
| Weight Approximately 8.1 kg | |
Cassette Feeding Unit-AL1
| ItemSpecifications | |
| Paper Sizes A3, A4, A4R, A5R, and | Custom size (139.7 x 182 mm to 304.8 x 457.2 mm) |
| Paper Drawers Capacity 550 sheets (80 g/m2) | |
| Power Source/Maximum Power Consumption | From the main unit/Approximately 30 W |
| Dimensions (H x W x D) 248 mm x | 565 mm x 615 mm |
| Weight Approximately 16.1 kg | |
Inner Finisher-G1
| ItemSpecifications | |
| Paper Size/Weight/Type Size: | 305 mm x 457 mm, 320 mm x 450 mm (SRA3), A3, A4, A4R, A5, A5R, and Custom Size (98.4 x 139.7 mm to 320 x 457.2 mm) |
| Weight:52 to 256 g/m2 | |
| Type:Thin (52 to 63 g/m2), Plain 1 (64 to 75 g/m2), Plain 2 (76 to 90 g/m2), Plain 3 (91 to 105 g/m2), Recycled 1 (64 to 75 g/m2), Recycled 2 (76 to 90 g/m2), Recycled 3 (91 to 105 g/m2), Color, Pre-Punched, Bond, Heavy 1 (106 to 128 g/m2), Heavy 2 (129 to 163 g/m2), Heavy 3 (164 to 220 g/m2), Heavy 4 (221 to 256 g/m2), Tracing, Coated, Labels, Transparency, and Envelopes | |
| Capacity Per Tray (Upper Tray) No | finishing set, Collate, and Group mode:A4, A5, and A5R:100 sheets (or 10.4 mm in height)305 mm x 457 mm, 320 mm x 450 mm (SRA3), A3, and A4R:50 sheets (or 5.2 mm in height)With different paper sizes:50 sheets (or 5.2 mm in height) |
| Capacity Per Tray (Lower Tray) No | finishing set, Collate, Group, Collate + Offset, and Group + Offset mode:A4:500 sheets (or 52 mm in height)A3 and A4R:250 sheets (or 26 mm in height)Staple mode:A4:30 sets (or 52 mm in height)A3 and A4R:30 sets (or 26 mm in height)With different paper sizes:30 sets (or 26 mm in height)No finishing set, Collate, and Group mode:With different paper sizes:250 sheets (or 26 mm in height) |
| Max. Stapling Capacity/ Available Staple Size | Corner: A4: 50 sheets (52 to 81.4 g/m2) 30 sheets (81.5 to 105 g/m2) 2 sheets (106 to 256 g/m2) A3 and A4R: 30 sheets (52 to 81.4 g/m2) 20 sheets (81.5 to 105 g/m2) 2 sheets (106 to 256 g/m2) Staple-Free (Eco): All sizes: 5 sheets (52 to 64 g/m2) 4 sheets (65 to 81.4 g/m2) 3 sheets (81.5 to 105 g/m2) Manual Staple: All sizes: 40 sheets (80 g/m2) |
| Power Source/Maximum Power Consumption | From the main unit/Approximately 36 W |
| Dimensions (H x W x D) 188 mm x 604 mm x 525 mm (when the extension tray is extended) | |
| Weight Approximately 7.2 kg | |
| Installation Space Including the Main Unit (W x D) | 1,026 mm x 693 mm (when the Feeder (DADF-AQ1) is attached and the multi-purpose tray is extended) |
Staple Finisher-U1
| ItemSpecifications | |
| Paper Size/Weight/Type Size: | 305 mm x 457 mm, 320 mm x 450 mm (SRA3), A3, A4, A4R, A5, A5R, and Custom Size (98.4 x 139.7 mm to 320 x 457.2 mm) |
| Weight:52 to 256 g/m2 | |
| Type:Thin (52 to 63 g/m2), Plain 1 (64 to 75 g/m2), Plain 2 (76 to 90 g/m2), Plain 3 (91 to 105 g/m2), Recycled 1 (64 to 75 g/m2), Recycled 2 (76 to 90 g/m2), Recycled 3 (91 to 105 g/m2), Color, Pre-Punched, Bond, Heavy 1 (106 to 128 g/m2), Heavy 2 (129 to 163 g/m2), Heavy 3 (164 to 220 g/m2), Heavy 4 (221 to 256 g/m2), Tracing, Coated, Labels, Transparency, and Envelopes | |
| Capacity Per Tray No finishing set | Collate, and Group mode:A4, A5, and A5R:1,000 sheets (or 147 mm in height)A3 and A4R:500 sheets (or 73.5 mm in height)With different paper sizes:500 sheets (or 73.5 mm in height)Collate + Offset and Group + Offset mode:A4:1,000 sheets (or 147 mm in height)A3 and A4R:500 sheets (or 73.5 mm in height)Staple mode:A4:50 sets (or 147 mm in height)A3 and A4R:50 sets (or 73.5 mm in height)With different paper sizes:50 sets (or 73.5 mm in height) |
| Max. Stapling capacity/Available Staple Size | A4:50 sheets (52 to 81.4 g/m2)30 sheets (81.5 to 105 g/m2)2 sheets (106 to 256 g/m2)A3 and A4R:30 sheets (52 to 81.4 g/m2)20 sheets (81.5 to 105 g/m2)2 sheets (106 to 256 g/m2) |
| Power Source/Maximum Power Consumption | From the Buffer Pass Unit/Approximately 106 W |
| Dimensions (H x W x D) 971 mm x | 662 mm x 646 mm (when the extension tray is extended) |
| Weight Approximately 40.5 kg | |
| Installation Space Including the Main Unit (W x D) | 1,561 mm x 693 mm (when the Feeder (DADF-AQ1) is attached and the multi-purpose tray is extended) |
Booklet Finisher-U1
| ItemSpecifications | |
| Paper Size/Weight/Type Size: | 305 mm x 457 mm, 320 mm x 450 mm (SRA3), A3, A4, A4R, A5, A5R, and Custom Size (98.4 x 139.7 mm to 320 x 457.2 mm) |
| Weight:52 to 256 g/m2 | |
| Type:Thin (52 to 63 g/m2), Plain 1 (64 to 75 g/m2), Plain 2 (76 to 90 g/m2), Plain 3 (91 to 105 g/m2), Recycled 1 (64 to 75 g/m2), Recycled 2 (76 to 90 g/m2), Recycled 3 (91 to 105 g/m2), Color, Pre-Punched, Bond, Heavy 1 (106 to 128 g/m2), Heavy 2 (129 to 163 g/m2), Heavy 3 (164 to 220 g/m2), Heavy 4 (221 to 256 g/m2), Tracing, Coated, Labels, Transparency, and Envelopes | |
| Capacity Per Tray No finishing set, | Collate, and Group mode:A4, A5, and A5R:1,000 sheets (or 147 mm in height)A3 and A4R:500 sheets (or 73.5 mm in height)With different paper sizes:500 sheets (or 73.5 mm in height) |
| Collate + Offset and Group + Offset mode:A4:1,000 sheets (or 147 mm in height)A3 and A4R:500 sheets (or 73.5 mm in height)Staple mode:A4:50 sets (or 147 mm in height)A3 and A4R:50 sets (or 73.5 mm in height)With different paper sizes:50 sets (or 73.5 mm in height) | |
| Max. Stapling capacity/Available Staple Size | A4:50 sheets (52 to 81.4 g/m2)30 sheets (81.5 to 105 g/m2)2 sheets (106 to 256 g/m2)A3 and A4R:30 sheets (52 to 81.4 g/m2)20 sheets (81.5 to 105 g/m2)2 sheets (106 to 256 g/m2) |
| Max. Saddle Stitch Capacity/ Available Saddle Stitch Size | Saddle Stitch: 16 sheets/10 sets (60 to 81.4 g/m2) 10 sheets/15 sets (81.5 to 105 g/m2) 5 sheets/10 sets (106 to 120 g/m2) Saddle Folding: 1 sheet/25 sets (60 to 105 g/m2) 1 sheet/10 sets (106 to 256 g/m2) Size: 305 mm x 457 mm, A3, and A4R |
| Power Source/Maximum Power Consumption | From the Buffer Pass Unit/Approximately 220 W |
| Dimensions (H x W x D) 971 mm x 771 mm x 657 mm (when the extension tray is extended) | |
| Weight Approximately 67.5 kg | |
| Installation Space Including the Main Unit (W x D) | 1,670 mm x 693 mm (when the Feeder (DADF-AQ1) is attached and the multi-purpose tray is extended) |
Inner 2way Tray-J1
| ItemSpecifications | |
| Paper Size/Weight/Type Size: | 305 mm x 457 mm, 320 mm x 450 mm (SRA3), A3, A4, A4R, A5, A5R, and Custom Size (98.4 x 139.7 mm to 320 x 457.2 mm) |
| Weight: 52 to 256 g/m2 | |
| Type: Thin (52 to 63 g/m2), Plain 1 (64 to 75 g/m2), Plain 2 (76 to 90 g/m2), Plain 3 (91 to 105 g/m2), Recycled 1 (64 to 75 g/m2), Recycled 2 (76 to 90 g/m2), Recycled 3 (91 to 105 g/m2), Color, Pre-Punched, Bond, Heavy 1 (106 to 128 g/m2), Heavy 2 (129 to 163 g/m2), Heavy 3 (164 to 220 g/m2), Heavy 4 (221 to 256 g/m2), Tracing, Coated, Labels, Transparency, and Envelopes | |
| Capacity Per Tray* | Tray A: 250 sheets |
| Tray B: 100 sheets | |
| * When A4 size paper is used. | |
| Dimensions (H x W x D) 76 mm x 427 mm x 407 mm | |
| Weight Approximately 574 g | |
Copy Tray-J2
| ItemSpecifications | |
| Paper Size/Weight/Type Size: | A3, A4, A4R, A5R, and Custom Size (139.7 x 182 mm to 297 x 431.8 mm) |
| Weight:52 to 220 g/m2 | |
| Type:Thin (52 to 63 g/m2), Plain 1 (64 to 75 g/m2), Plain 2 (76 to 90 g/m2), Plain 3 (91 to 105 g/m2),Recycled 1 (64 to 75 g/m2), Recycled 2 (76 to 90 g/m2), Recycled 3 (91 to 105 g/m2), Color,Pre-Punched, Bond, Heavy 1 (106 to 128 g/m2), Heavy 2 (129 to 163 g/m2), and Heavy 3 (164 to220 g/m2) | |
| Capacity Per Tray* | 100 sheets* When A4 size paper is used. |
| Dimensions (H x W x D) 176 mm x | 444 mm x 373 mm (when the extension tray is extended) |
| Weight Approximately 473 g | |
| Installation Space Including theMain Unit (W x D) | 1,009 mm x 693 mm(when the Feeder (DADF-AQ1) is attached and the multi-purpose tray is extended) |
Copy Card Reader-F1
| ItemSpecifications | |
| Available Cards Magnetic | |
| Card Readout Method Magnetic readout | |
| Magnetic Card Reading Direction | Face up |
| Store/Replay Replay | |
| Power Source From the main unit | |
| Dimensions (H x W x D) 40 mm x 88 mm x 96 mm (excluding the attachment kit and cable) | |
| Weight Approximately 200 g | (including the attachment kit and cable) |
Super G3 FAX Board-AR1

NOTE
Specifications remain the same even when the Super G3 2nd Line Fax Board is installed.
| ItemSpecifications | |
| Telephone Line Used*1 | Public Switched Telephone Network |
| Scan Line Density (Scan Transmission) | Normal: 8 pels *2/mm x 3.85 line/mm Fine: 8 pels *2/mm x 7.7 line/mm Super-Fine: 8 pels*2/mm x 15.4 line/mm Ultra-Fine: 16 pels *2/mm x 15.4 line/mm |
| Transmission Speed Super G3: 33.6 kbps G3: 14.4 kbps | |
| Compression Method MH, MR, MM | MR, and JBIG |
| Transmission Type Super G3 and G3 | |
| Sending Original Sizes A3, A4, and A5 | A5 *3 |
| Receiving Paper Sizes A3, A4, and A5 | |
| Transmission Times | JBIG: Approximately 2.6 seconds |
| Auto Dial Function | Address Book: 1,800 destinations (including destinations stored in one-touch buttons) |
| Image Memory | Approximately 6,000 pages |
1 When using an IP telephone service, facsimile communication may not be performed normally via an IP telephone line. It is recommended to use facsimile communication via a general telephone (Public Switched Telephone Network) line.
2 Pels stands for picture elements (pixels).
*3 Sent as A4.
Send Function (Scan Features)
| ItemSpecifications | |
| Communication Protocol FTP (TCP/IP), SMB (TCP/IP), and WebDAV | |
| Data Format TIFF, JPEG, PDF, XPS, and OXML (PowerPoint and Word) | |
| Resolution 100 x 100 dpi, 150 x 150 dpi, 200 x 100 dpi, 200 x 200 dpi, 200 x 400 dpi, 300 x 300 dpi, 400 x 400 dpi, 600 x 600 dpi | |
| System Environment Windows Server 2003 R2 SP2, Windows Vista SP2, Windows Server 2008 SP2, Windows Server 2008 R2 SP2, Windows 7, Windows 8, Windows 8.1, Windows Server 2012, Windows Server 2012 R2, Solaris 10, Mac OS X 10.6.x/10.7.x/10.8.x/10.9.x, and Red Hat Linux 9 | |
| Interface 1000BASE-T, 100BASE-TX, and 10BASE-T | |
| Colour Mode Automatic-Colour Select (Full Colour/Grayscale), Automatic-Colour Select (Full Colour/Black-and-White), Full Colour, Grayscale, and Black-and-White | |
| Original Type Text, Text/Photo, and Photo | |
| Other Preview and Browse Windows (SMB) File Server | |
| Optional PDF/XPS/OOXML Functions | PDF: Compact, Trace and Smooth, Encryption, OCR, Device Signature, User Signature, Optimization for Web*, PDF/A-1b, and Reader Extensions XPS: Compact, OCR, Device Signature, and User Signature OOXML: PowerPoint, Word, and OCR |
*1 PDF files optimized for Web viewing.
Send Function (E-Mail and I-Fax Features)
| ItemSpecifications | |
| Communication Protocol SMTP and POP3 | |
| I-Fax Communication Mode Simple and Full | |
| Resolution For Sending E-mail (Black-and-White/Colour):100 x 100 dpi, 150 x 150 dpi, 200 x 100 dpi, 200 x 200 dpi, 200 x 400 dpi, 300 x 300 dpi,400 x 400 dpi, 600 x 600 dpiFor Sending I-Fax (Black-and-White):200 x 100 dpi, 200 x 200 dpi, 200 x 400 dpi*1, 300 x 300 dpi*1, 400 x 400 dpi*1, 600 x 600 dpi*1 | |
| Format E-mail:TIFF, JPEG, PDF, XPS, and OOXML (PowerPoint and Word)I-Fax (Black-and-White):TIFF (MH, MR*1, and MMR*) | |
| Original Size E-mail:A3, A4, and A5I-Fax:A3, A4, and A5*2 | |
| Server Software Microsoft Exchange 2003 SP2, Microsoft Exchange 2007 SP2, Microsoft Exchange 2010, MicrosoftExchange 2013, Sendmail 8.14.4, and Lotus Domino R7.0 | |
| Other Searches a destination via the | The LDAP Server and Preview |
| Optional PDF/XPS/OOXML Functions (E-mail only) | PDF:Compact, Trace and Smooth, Encryption, OCR, Device Signature, User Signature, Optimizationfor Web*3, PDF/A-1b, and Reader ExtensionsXPS:Compact, OCR, Device Signature, and User SignatureOOXML:PowerPoint, Word, and OCR |
1 Available after setting RX conditions of the destination.
2 Sent as A4.
*3 PDF files optimized for Web viewing.
Network Environment (Hardware Specifications)
| ItemSpecifications | |
| Network Interface 10Base-T/100Base-TX/1000Base-T (RJ-45) |
Network Environment (Software Specifications)
| ItemSpecifications | |
| Protocol Supported TCP/IP: | Frame type: Ethernet II Print applications: LPD/Raw/IPP/IPPS/FTP/WSD/SMB AppleTalk |
Printer Settings (Software Specifications)
| ItemSpecifications | |
| Operating Modes Auto, PS, PCL, XPS, Imaging, and PDF | |
| Resident Fonts PCL: | 93 Scalable fonts, 2 OCR fonts, and AndaleFont*1 (Japanese, Korean, Simplified Chinese, and Traditional Chinese) |
| PS: 136 Scalable fonts | |
| When using the Direct Print (for PDF/XPS): Japanese Fonts: 2 Canon Heisei fonts*2 (Heisei Mincho W3/Heisei Kaku Gothic W5) European Fonts: 136 fonts*2 | |
| *1 The optional PCL International Font Set needs to be activated to use Andale* and WorldType* Collection, or Andale Mono WT. *2 These fonts are included for use with PDF files. | |
| Printable Area PCL5c and PCL6: | Reduced to 4.2 mm from the top, bottom, left, and right edges of the paper. |
| PostScript 3: Reduced to 4 mm from the top, bottom, left, and right edges of the paper. | |
| When printing in the Expand Print Region and Print mode, the upper margin becomes 4 mm, the lower margin becomes 2.5 mm, and the side margins both become 2.5 mm. The printable area is enlarged. | |
| When an original has data that extends all the way to the edges, even if you select [Expand Print Region and Print], the periphery of the data may be cut off when printing. In this case, specify the reduction ratio in the printer driver so that data is not cut off, and perform printing again. | |
4
Appendix
Installation Location and Handling 86
Installation Precautions 86
Handling Precautions 88
Important Safety Instructions 89
Installation 89
Power Supply 89
Handling 90
Maintenance and Inspections 91
Consumables 92
OtherWarnings 92
Legal Notices 93
Product Name 93
EMC requirements of EC Directive 93
Laser Safety 93
Additional Information 93
International ENERGY STAR Program 94
IPv6 Ready Logo 94
WEEE Directive 94
R & TTE Directive 95
Information Security Standard (IEEE 2600) 95
Copyright 95
Disclaimers 95
Legal Limitations on the Usage of Your Product and
the Use of Images 95
Super G3 96
Installation Location and Handling
This section describes precautions for installation location and handling. We recommend that you read this section prior to using this machine.
Installation Precautions
Avoid Installing the Machine in the Following Locations
Avoid locations subject to temperature and humidity extremes, whether low or high.
For example, avoid installing the machine near water.
fucets, hot water heaters, humidifiers, air conditioners,
heaters, or stoves.
Avoid installing the machine in direct sunlight.
If this is unavoidable, use curtains to shade the machine. Be sure that the curtains do not block the machine's ventilation slots or louver, or interfere with the electrical cord or power supply.
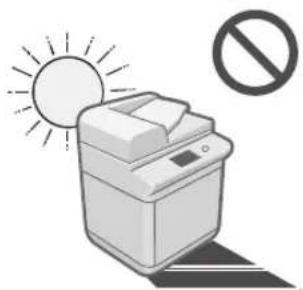
Avoid locations where a considerable amount of dust accumulates./Avoid locations where ammonia gas is emitted./Avoid locations near volatile or flammable materials, such as alcohol or paint thinner.
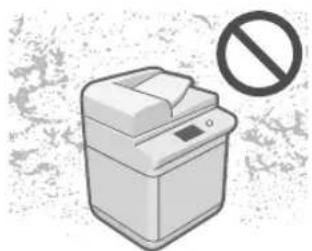
Avoid poorly ventilated locations.
This machine generates a slight amount of ozone etc. during normal use. Although sensitivity to ozone etc. may vary, this amount is not harmful. Ozone etc. may be more noticeable during extended use or long production runs, especially in poorly ventilated rooms. It is recommended that the room be appropriately ventilated, sufficient to maintain a comfortable working environment, in areas of machine operation. In addition, do not install this machine where it exhausts directly onto a person.
Avoid locations that are subject to vibration./ Avoid exposing the machine to rapid changes in temperature.
If the room in which the machine is installed is cold
but rapidly heated, water droplets (condensation) may form inside the machine. This may result in a noticeable degradation in the quality of the copied image, the inability to properly scan an original, or the copies having no printed image at all.
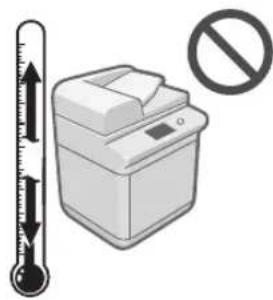
Avoid installing the machine near computers or other precision electronic equipment.
Electrical interference and vibrations generated by the machine while printing can adversely affect the operation of such equipment.
Avoid installing the machine near televisions, radios, or similar electronic equipment.
The machine might interfere with sound and picture signal reception.
Insert the power plug into a dedicated power outlet, and maintain as much space as possible between the machine and other electronic equipment.
Contact an authorized Canon dealer if communication is unavailable.
Depending on your locale or your telephone connection, you may be unable to perform data communication. In this case, contact your local authorized Canon dealer.
Avoid installing the machine at high altitudes of about 3,000 metres above sea level, or higher.
Machines with a hard disk may not operate properly when used at high altitudes of about 3,000 metres above sea level, or higher.
Select a Safe Power Supply
Plug the machine into a 220 - 240 V AC outlet.
Make sure that the power supply for the machine is safe, and has a steady voltage.
Do not connect other electrical equipment to the same power outlet to which the machine is connected.
Do not connect the power cord to a multiplug power strip, as this may cause a fire or electrical shock.
The power cord may become damaged if it is stepped on, affixed with staples, or if heavy objects are placed on it. Continued use of a damaged power cord can lead to an accident, such as a fire or electrical shock.
The power cord should not be taut, as this may lead to a loose connection and cause overheating, which could result in a fire.
If excessive stress is applied to the connection part of the power cord, it may damage the power cord or the wires inside the machine may disconnect. This could result in a fire. Avoid the following situations:
- Connecting and disconnecting the power cord frequently.
- Tripping over the power cord.
- The power cord is bent near the connection part, and continuous stress is being applied to the power outlet or the connection part.
- Applying excessive force on the power plug.
Moving the Machine
If you intend to move the machine, even to a location on the same floor of your building, contact your local authorized Canon dealer beforehand. Do not attempt to move the machine yourself.
Provide Adequate Installation Space
Provide enough space on each side of the machine for unrestricted operation.
When the DADF-AQ1 is attached:
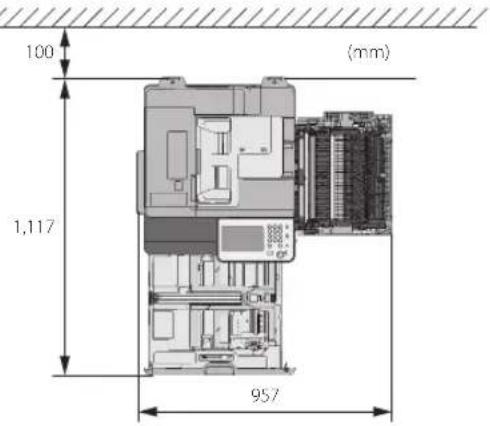
When the DADF-AQ1, Cassette Feeding Unit-AL1, and Booklet Finisher-U1 are attached:
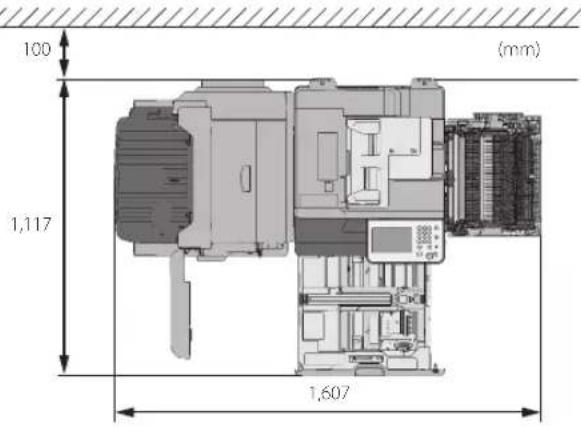
Handling Precautions
Do not attempt to disassemble or modify the machine.
Some parts inside the machine are subject to high-voltages and temperatures. Take adequate precautions when inspecting the inside of the machine. Do not carry out any inspections that are not described in the manual.
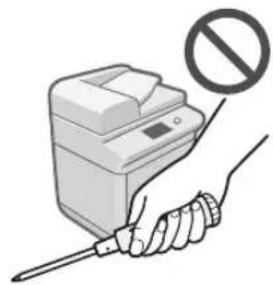
Be careful not to spill liquid or drop any foreign
objects, such as paper clips or staples inside the machine. If a foreign object comes into contact with electrical parts inside the machine, it might cause a short circuit and result in a fire or electrical shock.

If there is smoke, or unusual noise, immediately turn the main power switch OFF, disconnect the power cord from the power outlet, and then call your local authorized Canon dealer. Using the machine in this state may cause a fire or electrical shock. Also, avoid placing objects around the power plug so that the machine can be disconnected whenever necessary.
Do not turn the main power switch OFF or open the covers while the machine is in operation. This may result in paper jams.
Do not use flammable sprays, such as spray glue, near
the machine. There is a danger of ignition.
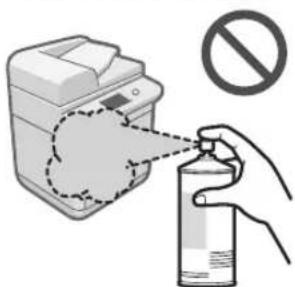
For safety reasons, press (Energy Saver) when it will not be used for a long period of time, such as overnight. As an added safety measure, turn OFF the main power switch, and disconnect the power cord when the machine will not be used for an extended period of time, such as during consecutive holidays.
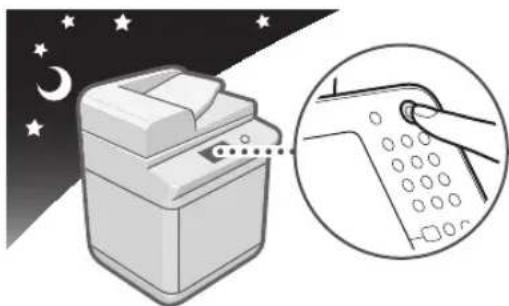
Use a modular cable that is shorter than 3 metres.
Use a USB cable that is shorter than 3 metres.
Important Safety Instructions
Please read these "Important Safety Instructions" thoroughly before operating the machine. As these instructions are intended to prevent injury to the user or other persons or destruction of property, always pay attention to these instructions. Also, since it may result in unexpected accidents or injuries, do not perform any operation unless otherwise specified in the manual. Improper operation or use of this machine could result in personal injury and/or damage requiring extensive repair that may not be covered under your Limited Warranty.
Installation

WARNING
Never block the ventilation slots and louver on the machine. These openings are provided for proper ventilation of working parts inside the machine. Blocking these openings can cause the machine to overheat. Never place the machine on a soft surface, such as a sofa or rug.
Do not install the machine in the following locations:
- A damp or dusty location
- A location near water faucets or water
- A location exposed to direct sunlight
- A location subject to high temperatures
- A location near open flames
Do not install the machine near alcohol, paint thinner, or other flammable substances. If flammable substances come into contact with electrical parts inside the machine, it may result in a fire or electrical shock.
Do not place the following items on the machine. If these items come into contact with a high-voltage area inside the machine, it may result in a fire or electrical shock.
If these items are dropped or spilled inside the machine, immediately turn OFF the main power switch, and disconnect the power cord from the power outlet. Then, contact your local authorized Canon dealer.
- Necklaces and other metal objects
Cups, vases, flowerpots, and other containers filled with water or liquids

CAUTION
Do not install the machine in unstable locations, such as unsteady platforms or inclined floors, or in locations subject to excessive vibrations, as this may cause the machine to fall or tip over, resulting in personal injury.
Do not remove the machine's leveling feet after the machine has been installed, as this may cause the machine to fall or tip over, resulting in personal injury.
Power Supply

WARNING
Do not damage or modify the power cord. Also, do not place heavy objects on the power cord, or pull on or excessively bend it, as this could cause electrical damage and result in a fire or electrical shock.
Keep the power cord away from a heat source; failure to do this may cause the power cord coating to melt, resulting in a fire or electrical shock.
Do not connect or disconnect the power cord with wet hands, as this may result in electrical shock.
Do not connect the power cord to a multiplug power strip, as this may cause a fire or electrical shock.
Do not bundle up or tie the power cord in a knot, as this may result in a fire or electrical shock.
Insert the power plug completely into the power outlet, as failure to do so may result in a fire or electrical shock.
Do not use power cords other than the power cord provided, as this may result in a fire or electrical shock.
The provided power cord is intended for use with this machine. Do not connect the power cord to other devices.
As a general rule, do not use extension cords. Using an extension cord may result in a fire or electrical shock.
Do not use power supplies with voltages other than those specified herein, as this may result in a fire or electrical shock.
Always grasp the power plug when disconnecting the power cord. Pulling on the power cord may expose or snap the core wire, or otherwise damage the power cord. If the power cord is damaged, this could cause current to leak, resulting in a fire or electrical shock.

IMPORTANT
Install this machine near the power outlet and leave sufficient space around the power plug so that it can be unplugged easily in an emergency.
Handling

WARNING
Do not attempt to disassemble or modify the machine. There are high-temperature and high-voltage components inside the machine which may result in a fire or electrical shock.
If the machine makes strange noises, or gives off smoke, heat, or strange smells, immediately turn OFF the main power switch, and disconnect the power cord from the power outlet. Then, contact your local authorized Canon dealer. Continued use of the machine in this condition may result in a fire or electrical shock.
Do not use highly flammable sprays near the machine. If gas from these sprays comes into contact with the electrical components inside the machine, it may result in a fire or electrical shock.
To avoid damage to the power cord and creating a fire hazard, always turn OFF the main power switch, and unplug the interface cable when moving the machine. Otherwise, the power cord or interface cable may be damaged, resulting in a fire or electrical shock.
Make sure that the power plug is firmly inserted into the power outlet if the machine was moved. Do not use the machine while the connection is loose, as doing so may cause a fire.
Do not drop paper clips, staples, or other metal objects inside the machine. Also, do not spill water, liquids, or flammable substances (alcohol, benzene, paint thinner, etc.) inside the machine. If these items come into contact with a high-voltage area inside the machine, it may result in a fire or electrical shock. If these items are dropped or spilled inside the machine, immediately turn OFF the main power switch, and disconnect the power cord from the power outlet. Then, contact your local authorized Canon dealer. Do not use this product for uses other than as a colour digital multitasking machine.
CAUTION
Do not place heavy objects on the machine, as they may tip over or fall resulting in personal injury.
Close the feeder gently to avoid catching your hands,
as this may result in personal injury.
Close the feeder gently to avoid catching your hands in the back of the feeder, as this may result in personal injury.
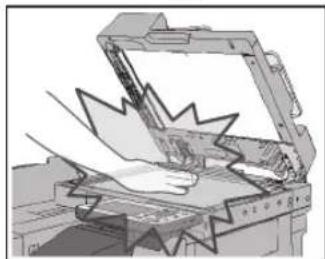
Do not press down hard on the feeder when using the platen glass to make copies of thick books. Doing so may damage the platen glass and result in personal injury.
Do not touch the finisher while the machine is printing, as this may result in personal injury.
Paper that has just been output from the machine may be hot. Be careful when removing or aligning paper from the output tray. Touching paper right after it is output may result in low-temperature burns.
Do not place your hands, hair, clothing, etc., near the exit and feed rollers. Even if the machine is not in operation, your hands, hair, or clothing may get caught in the rollers, which may result in personal injury or damage if the machine suddenly starts printing.
Do not place your hands in the part of the tray where stapling is performed (near the rollers) when a finisher is attached, as this may result in personal injury.
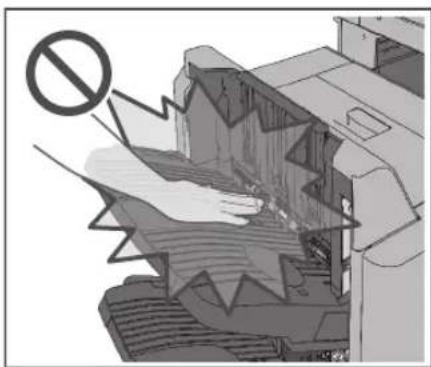
Booklet Finisher-U1
Do not insert your hand into the machine while the paper drawer is removed, as this may result in personal injury.
The laser beam can be harmful to human bodies. Since radiation emitted inside the product is completely confined within protective housings and external covers, the laser beam cannot escape from the machine during any phase of user operation. Read the following remarks and instructions for safety.
- Never open covers other than those instructed in the manuals for this machine.
- Do not remove the following caution label which is attached to the machine. If the label has been removed, contact your local authorized Canon dealer.
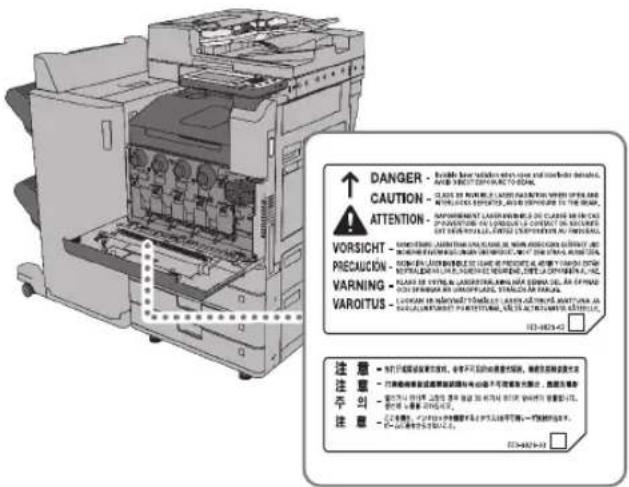
- If the laser beam escapes from the machine, exposure may cause serious damage to your e
- Controlling, adjusting, or operating the machine in ways not mentioned in the manuals for this machine may cause dangerous radiation to escape from the machine.

IMPORTANT
Press (Energy Saver) for safety when the machine will not be used for a long period of time, such as overnight. Also, turn OFF the main power switch, and disconnect the power cord for safety when the machine will not be used for an extended period of time, such as during consecutive holidays.
Maintenance and Inspections

WARNING
When cleaning the machine, first turn OFF the main power switch, then disconnect the power cord. Failure to observe these steps may result in a fire or electrical shock.
Unplug the power plug periodically and clean with a dry cloth to remove dust and grime. Accumulated dust may absorb humidity in the air and may result in a fire if it comes into contact with electricity.
Clean the machine using a slightly dampened cloth with a mild detergent mixed with water. Do not use alcohol, benzene, paint thinner, or other flammable substances. Check detergent for flammability prior to use. If flammable substances come into contact with a high-voltage area inside the machine, it may result in a fire or electrical shock.
There are some areas inside the machine which are subject to high-voltages. When removing jammed paper or when inspecting the inside of the machine, do not allow necklaces, bracelets, or other metal objects to touch the inside of the machine, as this may result in burns or electrical shock.
Do not burn or throw used toner cartridges into open flames, as this may cause the toner remaining inside the cartridges to ignite, resulting in burns or a fire.
Make sure that the power plug is firmly inserted into the power outlet after cleaning the machine. Do not use the machine while the connection is loose, as doing so may cause a fire.
Check the power cord and power plug regularly. If the following conditions occur, contact your local authorized Canon dealer, as the condition may cause a fire:
- There are burn marks on the power plug.
- The blade on the power plug is deformed or broken.
- The power goes OFF and ON when the power cord is bent.
- There are cuts, cracks, or indentations on the power cord.
A part of the power cord becomes hot.
Check the power cord and power plug regularly to make sure that they are not handled in the following manner, as this may result in a fire or electrical shock:
- The connection part of the power plug is loose.
- Stress is being applied to the power cord by a heavy object or by affixing it with staples.
- The power plug is loose.
- The power cord is tied in a bundle.
- The power cord protrudes into a walkway.
- The power cord is in front of a heater.

CAUTION
The fixing unit and its surroundings inside the machine may become hot during use. When removing jammed paper or when inspecting the inside of the machine, do not touch the fixing unit and its surroundings, as doing so may result in burns or electrical shock.
When removing jammed paper or when inspecting the inside of the machine, do not expose yourself to the heat emitted from the fixing unit and its surroundings for a prolonged period of time. Doing so may result in low temperature burns, even though you did not touch the fixing unit and its surroundings directly.
There are high-temperature and high-voltage components inside the machine. Touching them may result in personal injury or burns. Do not touch the internal parts of the machine which are not instructed to in the manuals for the machine.
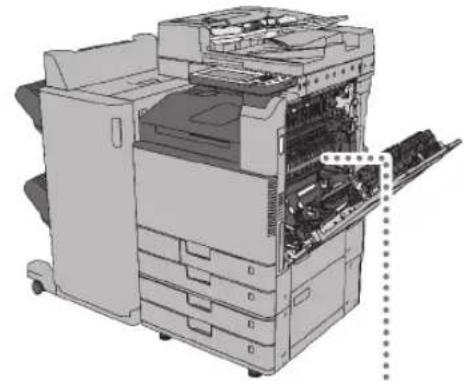

Consumables

WARNING
Do not burn or throw used toner cartridges into open flames, as this may cause the toner remaining inside the cartridges to ignite, resulting in burns or a fire.
Do not store toner cartridges or copy paper in places exposed to open flames, as this may cause the toner or paper to ignite, resulting in burns or a fire.
If you accidentally spill or scatter toner, carefully wipe up the loose toner with a damp, soft cloth and avoid inhaling any toner dust. Do not use a vacuum cleaner that is not equipped with safety measures to prevent dust explosions to clean up loose toner. Doing so may cause damage to the vacuum cleaner or result in a dust explosion due to static discharge.
For cardiac pacemaker users:
This drum unit emits low level magnetic flux. If you use a cardiac pacemaker and feel abnormalities, please move away from the drum unit, and consult a physician.

CAUTION
Keep toner and other consumables out of the reach of small children. If these items are ingested, consult a physician immediately.
Do not dismantle the toner cartridge, as doing so may cause toner to fly out and enter your eyes or mouth. If toner gets into your eyes or mouth, wash them immediately with cold water and immediately consult a physician.
If toner escapes from the toner cartridge, make sure not to ingest the toner or allow it to directly touch your skin. If toner touches your skin, wash it away with soap and water. If your skin still feels irritated after washing it, or you ingest toner, consult a doctor immediately.
Do not touch the electrical contacts.
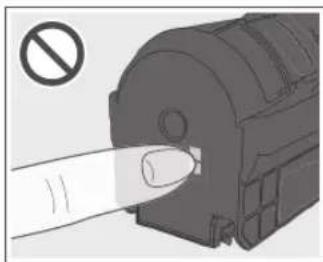
OtherWarnings

WARNING
For cardiac pacemaker users:
This product emits low level magnetic flux. If you use a cardiac pacemaker and feel abnormalities, please move away from the product and consult your doctor.
Legal Notices
Product Name
Safety regulations require the product's name to be registered. In some regions where this product is sold, the following name(s) in parenthesis may be registered instead.
ImageRUNNER ADVANCE C3330i/C3325i/C3320/ C3320i (F167600)
EMC requirements of EC Directive
This equipment conforms with the essential EMC requirements of EC Directive. We declare that this product conforms with the EMC requirements of EC Directive at nominal mains input 230V 50Hz although the rated input of the product is 220 to 240V 50 / 60Hz . Use of shielded cable is necessary to comply with the technical EMC requirements of EC Directive.
Laser Safety
This Product is certified as a Class 1 laser product under IEC60825-1:2007 and EN60825-1:2007. This means that the product does not produce hazardous laser radiation.
Since radiation emitted inside the product is completely confined within protective housings and external covers, the laser beam cannot escape from the machine during any phase of user operation.
Do not remove protective housings or external covers, except as directed by the equipment's manual.
Additional Information
When servicing or adjusting the optical system of the product, be careful not to place screwdrivers or other shiny objects in the path of the laser beam. Also, accessories such as watches and rings should be removed before working on the product.
The reflected beam, even though visible or invisible, can permanently damage your eyes.
The label shown below is attached to the inside of the front cover.
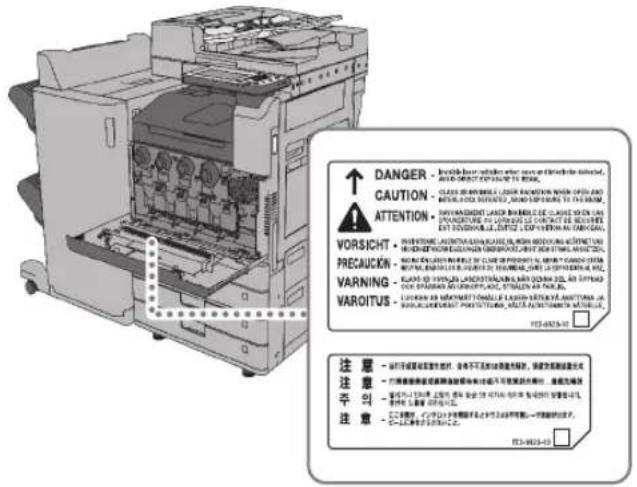
This Product has been classified under IEC60825-1:2007 and EN60825-1:2007, which conform to the following classes;
CLASS 1 LASER PRODUCT
LASER KLASSE 1
APPAREIL A LASER DE CLASSE 1
APPARECCHIO LASER DI CLASSE 1
PRODUCTO LASER DE CLASE 1
APARELHO A LASER DE CLASSE 1
LUOKAN 1 LASER-TUOTE
LASERPRODUKT KCLASS 1
CAUTION
Use of controls, adjustments, or performance of procedures other than those specified in the manuals for this machine may result in hazardous radiation exposure.
International ENERGY STAR Program

As an ENERGY STAR® Partner, Canon Inc. has determined that this machine meets the international ENERGY STAR Program for energy efficiency.
The International ENERGY STAR Office Equipment Program
is an international program that promotes energy saving through the use of computers and other office equipment. The program backs the development and dissemination of products with functions that effectively reduce energy consumption. It is an open system in which business proprietors can participate voluntarily. The targeted products are office equipment, such as computers, displays, printers, facsimiles, and copiers. The standards and logos are uniform among participating nations.
IPv6 Ready Logo

The protocol stack included in this machine has obtained the IPv6 Ready Logo Phase-2 established by the IPv6 Forum.
WEEE Directive


Only for European Union and EEA (Norway, Iceland and Liechtenstein)
These symbols indicate that this product is not to be disposed of with your household waste, according to the WEEE Directive (2012/19/EU), the Battery Directive (2006/66/EC) and/or national legislation implementing those Directives.
If a chemical symbol is printed beneath the symbol shown above, in accordance with the Battery Directive, this indicates that a heavy metal (Hg = Mercury, Cd = Cadmium, Pb = Lead) is present in this battery or accumulator at a concentration above an applicable threshold specified in the Battery Directive.
This product should be handed over to a designated collection point, e.g., on an authorized one-for-one basis when you buy a new similar product or to an authorized collection site for recycling waste electrical and electronic equipment (EEE) and batteries and accumulators. Improper handling of this type of waste could have a possible impact on the environment and human health due to potentially hazardous substances that are generally associated with EEE. Your cooperation in the correct disposal of this product will contribute to the effective usage of natural resources.
For more information about the recycling of this product, please contact your local city office, waste authority, approved scheme or your household waste disposal service or visit www.canon-europe.com/weee, or www.canon-europe.com/battery.
R & TTE Directive

This equipment (F167600) conforms with the essential requirements of EC Directive 1999/5/EC and is usable in EU. (Only for models with facsimile functionality.)
(For Europe Only)
Canon Inc./Canon Europa N.V.
Information Security Standard (IEEE 2600)
This machine is compliant with IEEE Std 2600TM - 2008 (hereinafter referred to as IEEE 2600), a global information security standard for multifunction peripherals and printers, and is able to achieve the security requirements defined in IEEE 2600.
For information on how this machine meets the security requirements defined in IEEE 2600, see e-Manual > Security > IEEE 2600 Security Standard.
- IEEE 2600.1 CC Authentication has not been obtained for this machine.
Copyright
Copyright 2015 by Canon Inc. All rights reserved.
No part of this publication may be reproduced or transmitted in any form or by any means, electronic or mechanical, including photocopying and recording, or by any information storage or retrieval system without the prior written permission of Canon Inc.
This product includes software and/or software modules that are licensed by Canon Inc. or its licensors from third parties. Use and distribution of this software and/or software modules are subject to conditions (a) through (c) below.
(a)
UFST: Copyright © 1989-1996, 1997, 2003, 2004, 2008, all rights reserved, by Monotype Imaging Inc.
(b)
Copyright © Unpublished Work of Novell, Inc. All Rights Reserved.
(c)
Portions of this software are copyright © 2007 The FreeType Project (www.freetype.org). All rights reserved.
Disclaimers
The information in this document is subject to change without notice.
CANON INC. MAKES NO WARRANTY OF ANY KIND WITH REGARD TO THIS MATERIAL, Either EXPRESS OR IMPLIED, EXCEPT AS PROVIDED HEREIN, INCLUDING WITHOUT LIMITATION, THEREOF, WARRANTY AS TO MARKETABILITY, MERCHANTABILITY, FITNESS FOR A PARTICULAR PURPOSE OR USE, OR NON-INFRINGEMENT. CANON INC. SHALL NOT BE LIABLE FOR ANY DIRECT, INCIDENTAL, OR CONSEQUENTIAL DAMAGES OF ANY NATURE, OR LOSSES OR EXPENSES RESULTING FROM THE USE OF THIS MATERIAL.
Legal Limitations on the Usage of Your Product and the Use of Images
Using your product to scan, print or otherwise reproduce certain documents, and the use of such images as scanned, printed or otherwise reproduced by your product, may be prohibited by law and may result in criminal and/or civil liability. A non-exhaustive list of these documents is set forth below. This list is intended to be a guide only. If you are uncertain about the legality of using your product to scan, print or otherwise reproduce any particular document, and/or of the use of the images scanned, printed or otherwise reproduced, you should consult in advance with your legal advisor for guidance.
Paper Money
Travelers Checks
Money Orders
Food Stamps
Certificates of Deposit
Passports
Postage Stamps (cancelled or uncancelled)
Immigration Papers
Identifying Badges or Insignias
Internal Revenue Stamps (cancelled or uncancelled)
Selective Service or Draft Papers
Bonds or Other Certificates of Indebtedness
Checks or Drafts Issued by Governmental Agencies Stock Certificates
Motor Vehicle Licenses and Certificates of Title
Copyrighted Works/Works of Art without Permission of Copyright Owner
Super G3

Super G3 is a phrase used to describe the new generation of fax machines that use ITU-TV.34 standard 33.6 Kbps modems. Super G3 High Speed Fax
machines allow transmission times of approximately 3 seconds per page which results in reduced telephone line charges.
- Approximately 3 seconds per page fax transmission time based on CCITT/ITU-T No.1 Chart, (JBIG, Standard Mode) at 33.6 Kbps modem speed. The Public Switched Telephone Network (PSTN) currently supports 28.8 Kbps modem speeds or slower, depending on telephone line conditions.

NOTE
The fax function is available only if the FAX Board is installed.
imageRUNNER ADVANCE C3330i/C3325i/C3320/C3320i Guide d'assistance
Impression impossible
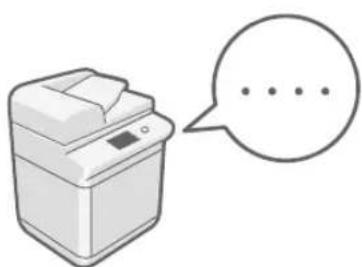
P.14
Bourrage de papier
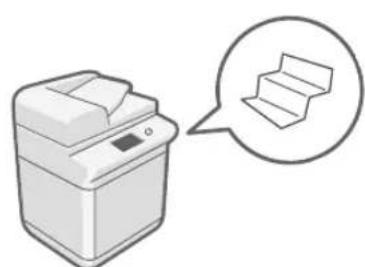
P.16
Directive R & TTE 95
Copyright © 2007-08 Adobe Systems Incorporated. All rights reserved.
Protected by U.S. Patents 5,737,599; 5,781,785; 5,819,301; 5,929,866; 5,943,063; 6,073,148; 6,515,763; 6,639,593; 6,754,382; 7,046,403; 7,213,269; 7,242,415; Patents pending in the U.S. and other countries.
All instances of the name PostScript in the text are references to the PostScript language as defined by Adobe Systems Incorporated unless otherwise stated. The name PostScript also is used as a product trademark for Adobe Systems' implementation of the PostScript language interpreter.
Except as otherwise stated, any reference to a "PostScript printing device," "PostScript display device," or similar item refers to a printing device, display device or item (respectively) that contains PostScript technology created or licensed by Adobe Systems Incorporated and not to devices or items that purport to be merely compatible with the PostScript language.
Adobe, the Adobe logo, PostScript, the PostScript logo, and PostScript 3 are either registered trademarks or trademarks of Adobe Systems Incorporated in the United States and/or other countries.
Linux is a registered trademark of Linus Torvalds. Microsoft and Windows are either registered trademarks or trademarks of Microsoft Corporation in the United States and/or other countries.
All other trademarks are the property of their respective owners.

Copyright © 2008 Adobe Systems Incorporated. All rights reserved.
Protected by U.S. Patents 6,185,684; 6,205,549; 7,213,269; 7,272,628; 7,278,168; Patents pending in the U.S. and other countries.
All instances of the name PostScript in the text are references to the PostScript language as defined by Adobe Systems Incorporated unless otherwise stated. The name PostScript also is used as a product trademark for Adobe Systems' implementation of the PostScript language interpreter.
Except as otherwise stated, any reference to a "PostScript printing device," "PostScript display device," or similar item refers to a printing device, display device or item (respectively) that contains PostScript technology created or licensed by Adobe Systems Incorporated and not to devices or items that purport to be merely compatible with the PostScript language.
Adobe, the Adobe logo, PostScript, the PostScript Logo, and PostScript 3 are either registered trademarks or trademarks of Adobe Systems Incorporated in the United States and/or other countries.
All other trademarks are the property of their respective owners.
Impression impossible

Canon C-EXV 49 Toner Cyan (Cyan)
Canon C-EXV 49 Toner Magenta (Magenta)
Canon C-EXV 49 Toner Yellow (Jaune)
9 Tambour
Numero de piece : Canon Tambour C-EXV 49
10 Ensemble de fixation
Numero de piece:FX-202
16 [Suivi statut/Annulation]
Directive R & TTE 95
CLASS 1 LASER PRODUCT
LASER KLASSE 1
APPAREIL A LASER DE CLASSE 1
APPARECCHIO LASER DI CLASSE 1
PRODUCTO LASER DE CLASE 1
APARELHO A LASER DE CLASSE 1
LUOKAN 1 LASER-TUOTE
LASERPRODUKT KCLASS 1
ATTEMPTION
UFST: Copyright © 1989 - 1996, 1997, 2003, 2004, 2008, all rights reserved, by Monotype Imaging Inc.
(b)
Copyright © Unpublished Work of Novell, Inc. All Rights Reserved.
(C)
Portions of this software are copyright © 2007
The FreeType Project(www.freetype.org). All rights reserved.
Copyright © 2007-08 Adobe Systems Incorporated. All rights reserved.
Protected by U.S. Patents 5,737,599; 5,781,785; 5,819,301; 5,929,866; 5,943,063; 6,073,148; 6,515,763; 6,639,593; 6,754,382; 7,046,403; 7,213,269; 7,242,415; Patents pending in the U.S. and other countries.
All instances of the name PostScript in the text are references to the PostScript language as defined by Adobe Systems Incorporated unless otherwise stated. The name PostScript also is used as a product trademark for Adobe Systems' implementation of the PostScript language interpreter.
Except as otherwise stated, any reference to a "PostScript printing device," "PostScript display device," or similar item refers to a printing device, display device or item (respectively) that contains PostScript technology created or licensed by Adobe Systems Incorporated and not to devices or items that purport to be merely compatible with the PostScript language.
Adobe, the Adobe logo, PostScript, the PostScript logo, and PostScript 3 are either registered trademarks or trademarks of Adobe Systems Incorporated in the United States and/or other countries.
Linux is a registered trademark of Linus Torvalds. Microsoft and Windows are either registered trademarks or trademarks of Microsoft Corporation in the United States and/or other countries.
All other trademarks are the property of their respective owners.

Copyright © 2008 Adobe Systems Incorporated. All rights reserved.
Protected by U.S. Patents 6,185,684; 6,205,549; 7,213,269; 7,272,628; 7,278,168; Patents pending in the U.S. and other countries.
All instances of the name PostScript in the text are references to the PostScript language as defined by Adobe Systems Incorporated unless otherwise stated. The name PostScript also is used as a product trademark for Adobe Systems' implementation of the PostScript language interpreter.
Except as otherwise stated, any reference to a "PostScript printing device," "PostScript display device," or similar item refers to a printing device, display device or item (respectively) that contains PostScript technology created or licensed by Adobe Systems Incorporated and not to devices or items that purport to be merely compatible with the PostScript language.
Adobe, the Adobe logo, PostScript, the PostScript Logo, and PostScript 3 are either registered trademarks or trademarks of Adobe Systems Incorporated in the United States and/or other countries.
All other trademarks are the property of their respective owners.
Canon C-EXV 49 Toner Cyan (Cyan)
Canon C-EXV 49 Toner Magenta (Magenta)
Canon C-EXV 49 Toner Yellow (Gelb)
9 Trommeleinheit
ArticleNumber: Canon C-EXV 49 Trommel Einheit
10 Fixiereinheit
ArticleNumber:FX-202
16 [Status Monitor/Abbruch]
CLASS 1 LASER PRODUCT
LASER KLASSE 1
APPARELÁ LASER DE CLASSE 1
APPARECCHIO LASER DI CLASSE 1
PRODUCTO LASER DE CLASE 1
APARELHO A LASER DE CLASSE 1
LUOKAN 1 LASER-TUOTE
LASERPRODUKT KCLASS 1
VORSICHT
UFST: Copyright © 1989 - 1996, 1997, 2003, 2004, 2008, all rights reserved, by Monotype Imaging Inc.
(b)
Copyright © Unpublished Work of Novell, Inc. All Rights Reserved.
(c)
Portions of this software are copyright © 2007 The FreeType Project (www.freetype.org). All rights reserved.
Inner Finisher-G1 74
Staple Finisher-U1 76
Booklet Finisher-U1 77
Inner 2way Tray-J1 78
Copy Tray-J2 79
Copy Card Reader-F1 79
Super G3 FAX Board-AR1 80
Copyright © 2007-08 Adobe Systems Incorporated. All rights reserved.
Protected by U.S. Patents 5,737,599; 5,781,785; 5,819,301; 5,929,866; 5,943,063; 6,073,148; 6,515,763; 6,639,593; 6,754,382; 7,046,403; 7,213,269; 7,242,415; Patents pending in the U.S. and other countries.
All instances of the name PostScript in the text are references to the PostScript language as defined by Adobe Systems Incorporated unless otherwise stated. The name PostScript also is used as a product trademark for Adobe Systems' implementation of the PostScript language interpreter.
Except as otherwise stated, any reference to a "PostScript printing device," "PostScript display device," or similar item refers to a printing device, display device or item (respectively) that contains PostScript technology created or licensed by Adobe Systems Incorporated and not to devices or items that purport to be merely compatible with the PostScript language.
Adobe, the Adobe logo, PostScript, the PostScript logo, and PostScript 3 are either registered trademarks or trademarks of Adobe Systems Incorporated in the United States and/or other countries.
Linux is a registered trademark of Linus Torvalds. Microsoft and Windows are either registered trademarks or trademarks of Microsoft Corporation in the United States and/or other countries.
All other trademarks are the property of their respective owners.

Copyright © 2008 Adobe Systems Incorporated. All rights reserved.
Protected by U.S. Patents 6,185,684; 6,205,549; 7,213,269; 7,272,628; 7,278,168; Patents pending in the U.S. and other countries.
All instances of the name PostScript in the text are references to the PostScript language as defined by Adobe Systems Incorporated unless otherwise stated. The name PostScript also is used as a product trademark for Adobe Systems' implementation of the PostScript language interpreter.
Except as otherwise stated, any reference to a "PostScript printing device," "PostScript display device," or similar item refers to a printing device, display device or item (respectively) that contains PostScript technology created or licensed by Adobe Systems Incorporated and not to devices or items that purport to be merely compatible with the PostScript language.
Adobe, the Adobe logo, PostScript, the PostScript Logo, and PostScript 3 are either registered trademarks or trademarks of Adobe Systems Incorporated in the United States and/or other countries.
All other trademarks are the property of their respective owners.
Canon C-EXV 49 Toner Yellow (Giallo)
9 Unità tamburo
| Finisher Nome Forma | ||
| Staple Finisher-U1 | Staple-J1 | |
| Booklet Finisher-U1 | Staple Cartridge-D2 Staple Cartridge-D3 | |
| Staple-J1 | ||
| Inner Finisher-G1 | Staple-P1 | |
Inner Finisher-G1 74
Staple Finisher-U1 76
Booklet Finsher-U1 77
Inner 2way Tray-J1 78
Copy Tray-J2 79
Copy Card Reader-F1 79
Super C3 FAX Board-AR1 80
9 Envelope Feeder Attachment A
CLASS 1 LASER PRODUCT
LASER KLASSE 1
APPAREIL A LASER DE CLASSE 1
APPARECCHIO LASER DI CLASSE 1
PRODUCTO LASER DE CLASE 1
APARELHO A LASER DE CLASSE 1
LUOKAN 1 LASER-TUOTE
LASERPRODUKT KCLASS 1
ATTENZIONE
UFST: Copyright © 1989 - 1996, 1997, 2003, 2004, 2008, all rights reserved, by Monotype Imaging Inc.
(b)
Copyright © Unpublished Work of Novell, Inc. All Rights Reserved.
(c)
Portions of this software are copyright © 2007 The FreeType Project(www.freetype.org).
All rights reserved.
Copyright © 2007-08 Adobe Systems Incorporated. All rights reserved.
Protected by U.S. Patents 5,737,599; 5,781,785; 5,819,301; 5,929,866; 5,943,063; 6,073,148; 6,515,763; 6,639,593; 6,754,382; 7,046,403; 7,213,269; 7,242,415; Patents pending in the U.S. and other countries.
All instances of the name PostScript in the text are references to the PostScript language as defined by Adobe Systems Incorporated unless otherwise stated. The name PostScript also is used as a product trademark for Adobe Systems' implementation of the PostScript language interpreter.
Except as otherwise stated, any reference to a "PostScript printing device," "PostScript display device," or similar item refers to a printing device, display device or item (respectively) that contains PostScript technology created or licensed by Adobe Systems Incorporated and not to devices or items that purport to be merely compatible with the PostScript language.
Adobe, the Adobe logo, PostScript, the PostScript logo, and PostScript 3 are either registered trademarks or trademarks of Adobe Systems Incorporated in the United States and/or other countries.
Linux is a registered trademark of Linus Torvalds. Microsoft and Windows are either registered trademarks or trademarks of Microsoft Corporation in the United States and/or other countries.
All other trademarks are the property of their respective owners.

Copyright © 2008 Adobe Systems Incorporated. All rights reserved.
Protected by U.S. Patents 6,185,684; 6,205,549; 7,213,269; 7,272,628; 7,278,168; Patents pending in the U.S. and other countries.
All instances of the name PostScript in the text are references to the PostScript language as defined by Adobe Systems Incorporated unless otherwise stated. The name PostScript also is used as a product trademark for Adobe Systems' implementation of the PostScript language interpreter.
Except as otherwise stated, any reference to a "PostScript printing device," "PostScript display device," or similar item refers to a printing device, display device or item (respectively) that contains PostScript technology created or licensed by Adobe Systems Incorporated and not to devices or items that purport to be merely compatible with the PostScript language.
Adobe, the Adobe logo, PostScript, the PostScript Logo, and PostScript 3 are either registered trademarks or trademarks of Adobe Systems Incorporated in the United States and/or other countries.
All other trademarks are the property of their respective owners.
Canon C-EXV 49 Toner Cyan (Cian)
Canon C-EXV 49 Toner Magenta (Magenta)
Canon C-EXV 49 Toner Yellow (Amarillo)
9 Unidad de tiempo
Verifical consumables
CLASS 1 LASER PRODUCT
LASER KLASSE 1
APPAREIL A LASER DE CLASSE 1
APPARECCHIO LASER DI CLASSE 1
PRODUCTO LASER DE CLASE 1
APARELHO A LASER DE CLASSE 1
LUOKAN 1 LASER-TUOTE
LASERPRODUKT KCLASS 1
ATENCLON
UFST: Copyright © 1989 - 1996, 1997, 2003, 2004, 2008, all rights reserved, by Monotype Imaging Inc.
(b)
Copyright © Unpublished Work of Novell, Inc. All Rights Reserved.
(c)
Portions of this software are copyright © 2007
The FreeType Project (www.freetype.org).
All rights reserved.
30-2, Shimomaruco 3-chome, Ohta-ku, Tokyo 146-8501, Japan
CANON U.S.A., INC.
One Canon Park, Melville, NY 11747, U.S.A.
CANON CANADA INC.
6390 Dixie Road Mississauga, Ontario L5T 1P7, Canada
CANONE EUROPA N.V.
Bovenkerkerweg 59, 1185 XB Amstelveen, The Netherlands
(See http://www.canon-europe.com/ for details on your regional dealer)
CANON AUSTRALIA PTY. LTD
Building A, The Park Estate, 5 Talavera Road, Macquarie Park, NSW 2113, Australia
CANON CHINA CO., LTD
15F Jinbao Building No.89 Jinbao Street, Dongcheng District, Beijing 100005, China
CANON SINGAPORE PTE. LTD.
1 HarbourFront Avenue #04-01 Keppel Bay Tower, Singapore 098632
CANON HONGKONG CO., LTD
19/F., The Metropolis Tower, 10 Metropolis Drive, Hunghom, Kowloon, Hong Kong