21058 - Screwdriver APA - Free user manual and instructions
Find the device manual for free 21058 APA in PDF.


User questions about 21058 APA
0 question about this device. Answer the ones you know or ask your own.
Ask a new question about this device
Download the instructions for your Screwdriver in PDF format for free! Find your manual 21058 - APA and take your electronic device back in hand. On this page are published all the documents necessary for the use of your device. 21058 by APA.
USER MANUAL 21058 APA
natural_image
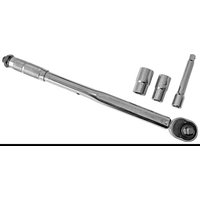
Rotor wrench tool with four metallic components, no visible text or symbolsD Art.-Nr.: 21058
Torque wrench TÜV GS
Operating instructions ...... 6
FR Réf. 21058
natural_image
Close-up of a mechanical component with circular arrows indicating rotational motion (no text or symbols)Please read the operating instructions carefully prior to use and observe all safety instructions!
Non-compliance can lead to personal injuries, damage to the device or your property!
Store the original packaging, the receipt and these instructions so that they may be consulted at a later date! When passing on the product, please also include these operating instructions.
Please check the contents of package for integrity and completeness prior to use!
1. PROPER USE OF THE PRODUCT
The torque wrench is used to tighten screws and nuts with a pre-set force. Only use the torque wrench for tightening screw connections, but never for loosening. It is not suitable for this purpose.
This device is not designed to be used by children or persons with limited mental abilities or without experience and/or lack of required specialist knowledge. Keep children away from the device.
The device is not designated for commercial use.
Use according to the intended purpose also includes the observance of all information in these operating instructions, particularly the observance of the safety notes. Any other utilisation is considered to be contrary to the intended purpose and may lead to material damage or personal injuries. EAL GmbH assumes no liability for damage resulting from improper use.
2. SCOPE OF DELIVERY
1 x torque wrench, 1 x extension, 125 mm
1 x socket 17/19 mm 1 x storage case
1 x socket 21/23 mm 1 x instructions
3. SPECIFICATIONS
Measurement range: 28 – 210 Nm Weight: approx. 1.335 kg
Drive: 12,7 mm 12 " Length: approx. 450 mm
4. SAFETY PRECAUTIONS

- The warning triangle indicates all instructions which are important for safety. Always follow these otherwise you could injure yourself or damage the device.
• Children may not play with the device. - Cleaning and user maintenance may not be carried out by children without supervision.
- Do not treat packaging material carelessly. This may become a dangerous plaything for a child!
- Only use this product for its designated purpose!
- Do not manipulate or disassemble the device!
- For your own safety, only use accessories and spare parts that are stated in these instructions or that are recommended by the manufacturer!
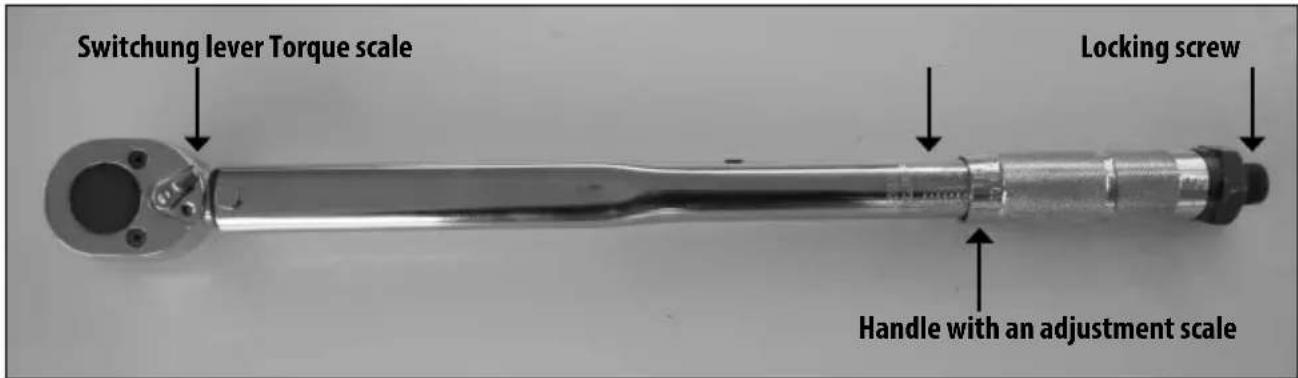
5. OPERATING INSTRUCTIONS Overview
text_image
Switchung lever Torque scale Locking screw Handle with an adjustment scaleFigure 1: Overview
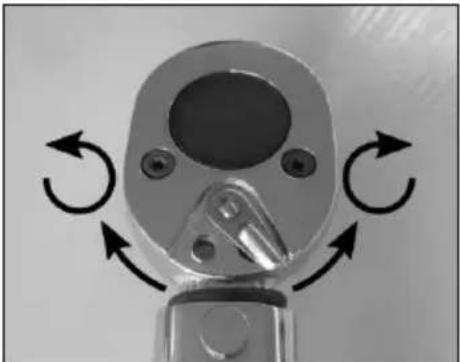
Setting the direction of rotation:
natural_image
Close-up of a mechanical component with circular arrows indicating rotational motion (no text or symbols)You can set the direction of rotation using the changeover lever on the top of the torque wrench. When the lever is in the right hand position, screws can be tightened clockwise. If it is in the left hand position, the direction of rotation is counterclockwise.
Figure 2: Setting the direction of rotation
Setting the torque in Nm:
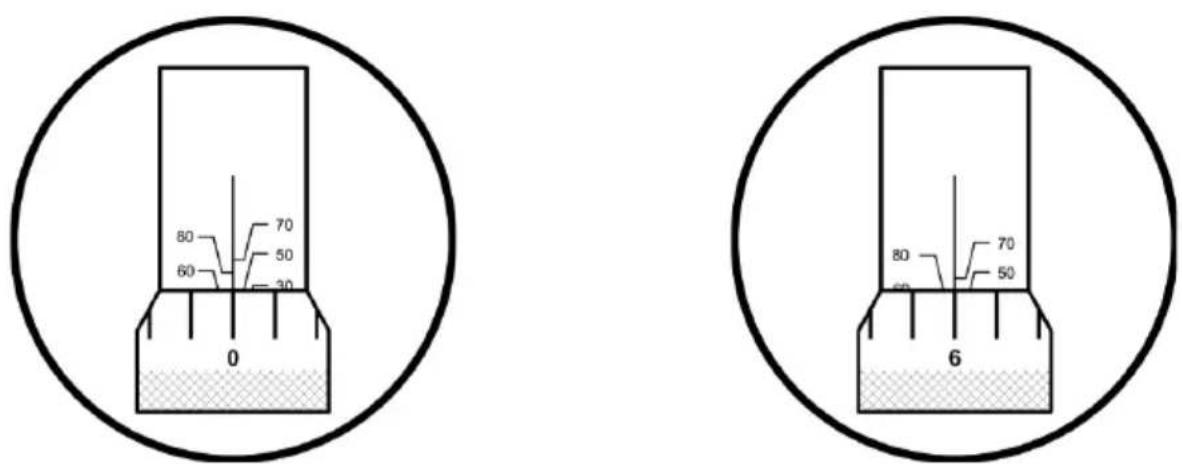
Unlock the handle by turning the locking screw counterclockwise. Hold the torque wrench in your hand in such a way that you have the torque scale in view. By turning the handle, you can now set the desired torque. The scale on the shaft of the wrench indicates the torque in Newton metres (Figure 3). For precise adjustment, use the adjustment scale on the handle (Fig. 4). Tighten the locking screw by turning it clockwise in order to lock the handle against twisting. This prevents adjustment of the torque during work.
Example: Adjusting the torque
text_image
80 70 50 60 30 0 80 70 50 6Figure 3: Example setting 50 Nm Fig. 4: Example setting 56 Nm
Tightening a screw/nut with a set torque:

Caution:
Do not use ball joints or cardan joints and avoid the use of long extensions so that the set value is not distorted.
Put the required tool onto the drive square of the torque wrench. Put the tool onto the screw or nut. Tighten evenly but not jerkily until you hear a click, both acoustically and in the hand.

Caution:
Finish the tightening process immediately after the "click", especially with small torque settings.

Caution:
Release the torque wrench release mechanism after fi nishing work. To do this, turn the handle back beyond the smallest adjustable torque.
6. MAINTENANCE AND CARE
- Only store the torque wrench in a relaxed state.
- Store the torque wrench in its case in a dry place.
- Before it is used the next time, loosen the torque wrench several times with a small torque in order to ensure sufficient lubrication of the mechanism.
- Only clean the torque wrench with a dry cloth. Never allow liquids to get into the torque wrench.
7. NOTES REGARDING ENVIRONMENTAL PROTECTION
Please dispose of this device via the recycling bin or the public/municipal collection points.
The materials are recyclable. You make an important contribution to protecting our environment by recycling, material utilisation or other forms of reusing waste equipment!