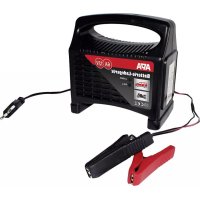
16649 - Battery charger APA - Free user manual and instructions
Find the device manual for free 16649 APA in PDF.


User questions about 16649 APA
0 question about this device. Answer the ones you know or ask your own.
Ask a new question about this device
Download the instructions for your Battery charger in PDF format for free! Find your manual 16649 - APA and take your electronic device back in hand. On this page are published all the documents necessary for the use of your device. 16649 by APA.
USER MANUAL 16649 APA
© EAL GmbH, 16649 05.2023
D Art.-Nr.: 16649
Microprocessor battery charger
12 V/24 V 10 A
Operating instructions 8
FR Réf. 16649
text_image
88.8°C 12V V A 24V Win. Sum. Rep. Flt. 100% 80% 60% 40% 20%Ladestufenanzeige:
text_image
Row of icons representing battery, car, motorcycle, LF, and wrench symbols with 'O' indicators below each.AGM Auto Moto LiFePO4 Rep.
Cd = Cadmium, Hg = Quecksilber, Pb = Blei
9. KONTAKTINFORMATIONEN
EAL GmbH
Read the operating instructions carefully prior to initial use and observe all of the safety notes! Not observing such may lead to personal injury, damages to the device or your property! Store the original packaging, the receipt and these instructions so that they may be consulted at a later date! On transfer of the product, please include these operating instructions as well. Please check the contents of package for integrity and completeness prior to use!
1. PROPER USE OF THE PRODUCT
The charger is suitable for charging both open and sealed lead-acid batteries
- Wet-cell batteries, 12 / 24 V (STD), lead-acid batteries (liquid electrolyte)
• AGM batteries, 12 / 24 V, (electrolyte in fi breglass mat) - Gel batteries, 12 / 24 V, (electrolyte, gel-like) and
- LiFeP04 batteries, 12 / 24 V other batteries may not be charged with this device.
This device is not designed to be used by children or persons with limited mental abilities or without experience and/or lack of required specialist knowledge. Keep children away from the device.
The device is not designated for commercial use.
Utilisation according to the intended purpose also includes the observance of all information in these operating instructions, particularly the observance of the safety instructions. Any other utilisation is considered to be contrary to the intended purpose and may lead to material damage or personal injuries. EAL GmbH assumes no liability for damage resulting from improper use.
2. SCOPE OF DELIVERY
1 x microprocessor battery charger 1x Instructions for use
3. SPECIFICATIONS
Dimensions: approx. 170 x 100 x 65 [mm]
Weight: approx. 605 kg
Length of mains cable: approx. 1.00 m
Length of charging cable: approx. 0.50 m
Mains voltage: 110/230 V AC, 50/60 Hz
Battery size: 12 V: 64 Ah – 180 Ah, 24 V: 64 Ah – 90 Ah
Charge voltage: 12 / 24 V
Charge current: 10 / 5 A
Battery capacity 12 V: 6 – 180 Ah
Battery capacity 24 V: 6 – 90 Ah
Ambient temperature: -5 °C to +40 °C
4. SAFETY PRECAUTIONS

- The warning triangle sign indicates all instructions which are important for safety. Always follow these otherwise you could injure yourself or damage the device.
• Children must not play with the device
• Cleaning and user maintenance may not be carried out by children without supervision - Do not treat packaging material carelessly. It may become a dangerous plaything for children!
- Only use this product for its designated purpose!
- Do not manipulate or disassemble the device!
- For your own safety, only use accessories and spare parts that are stated in these instructions or that are recommended by the manufacturer!
- Only rechargeable lead-acid batteries should be charged, never attempt to charge disposable batteries. Risk of explosion!
- Only connect the device to a power socket installed according to regulations. The voltage must correspond to the specification on the type plate of the device.
- Do not trap the power cable and protect it from sharp edges, damp, heat or oil. The power cable of the unit cannot be replaced. In the event that the cable is damaged, the unit must be disposed of.
- Do not operate the device or immediately pull the plug if it is damaged or you suspect it may be defective. In this case, contact our technicians.
- Pull the mains plug when the device is not being operated.
- Remove all plastic from the device before use.
- Place the mains cable in such a manner that it does not impede and that it cannot be unplugged accidentally.
- Disconnect the battery charger from the power supply after the charging process.
- Keep the charger in a place that cannot be accessed by children or unauthorised persons.
- Do not operate the device close to combustible material or in an explosive environment.



• Always wear suitable working clothes, protective gloves and goggles. Battery acid is corrosive! Immediately rinse any acid splashes with lots of water and consult a physician, if required. If battery acid gets into the eyes, immediately rinse under running water for at least 10 minutes and consult a doctor.
- Do not cover the charger, this may lead to overheating and result in damages. Never set the charger up for operation on a surface that is insulating (e.g. polystyrene). There is a risk of heat built up!
- If you want to charge a vehicle battery in a removed state, place it on a well-ventilated surface.
- If you want to charge a vehicle battery in an installed state, first park the vehicle safely, engage the parking brake, and turn off the ignition. Disconnect the battery from the vehicle's electrical system by removing the positive (+) cable from the battery. Refer to your vehicle's manual or consult your authorized workshop for further instructions.
- Hold the power cable only at the power plug when disconnecting from the power socket.
- Never expose the charger to the vicinity of fire, heat and extensive temperatures over +40°C.
- Store these instructions carefully and, if necessary, pass them on to other users.


5. EXPLANATION OF SYMBOLS

Corresponds to EC directives

Labelled electrical products may not be disposed of in the household waste

Devices with this symbol may only be operated indoors (dry environment)

Insulated housing (protection class II).

Read the operating instructions
6. OPERATING INSTRUCTIONS

Before using the device make sure that you have read the operating instructions for the battery and the vehicle and you have understood all of the safety precautions.
6.1 OVERVIEW
1 Display 4 Mode switch
2 Charging level display 5 Fan grille
3 Selection of charging programs 6 Fan
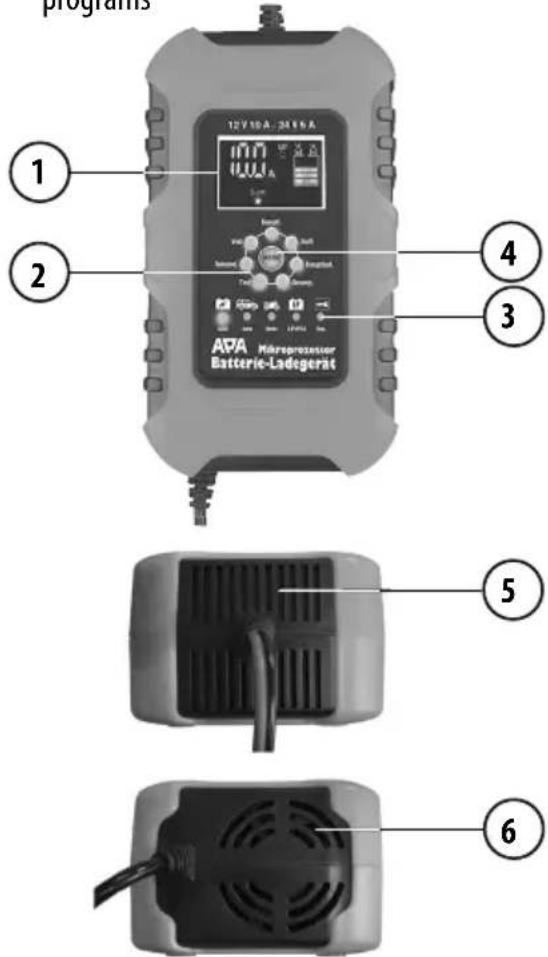
text_image
programs 12V 10A - 34V 9A APA Microprocessor Batterie-Ladegerät 1 2 3 4 5 6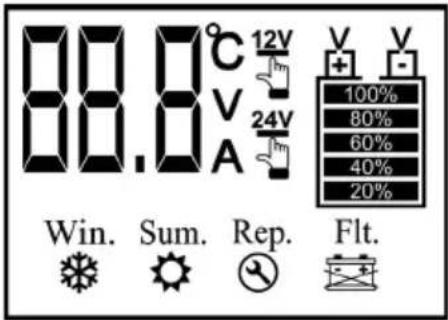
text_image
88.8°C 12V V A 24V Win. Sum. Rep. Flt. 100% 80% 60% 40% 20%Charging level display:
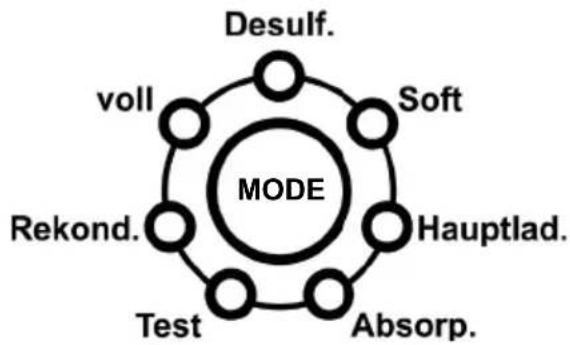
Desulf. Desulphurisation
Soft Softstart
Hauptlad Main charge
Absorp. Absorption charging
Test Test mode
Rekond. Reconditioning charge voll Trickle charging
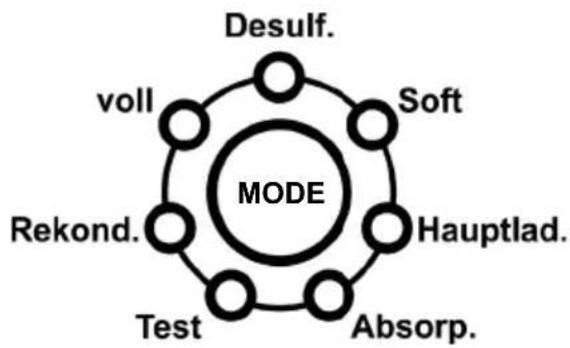
flowchart
graph TD
    A["Desulf."] --> B["Soft"]
    C["voll"] --> D["Hauptlad."]
    E["Rekond."] --> F["Test"]
    G["Absorp."] --> H["Soft"]
    I["MODE"] --> J["Soft"]
Figure 1: Overview
Displays:
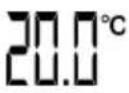 | Temperature in the charger |  | Low battery chargeThe battery voltage is too low for a charging program or the self-discharge is too high |
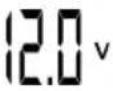 | Charge voltage End of the re de  | ||
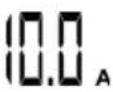 | Charge current Winter mode Win.  | Only for auto mode, Temperature below 10 °C | |
 & Rep. & Rep. | Repair mode Summer mode Sum.  | Only for auto mode, Temperature above 28 °C | |
 | Readiness for charging Incorrect polarity  | Check the connection of the terminal clampsFaulty batteryInspection of the battery by a professional workshopPoor contactCheck the connection charger/battery | |
 | Battery fully charged | Flt.  | |
 | Desulphurisation mode Only for AGM and auto setting |  | Detection12 V or 24 V battery |
 | Test modeAutomatic battery test after absorption charging | 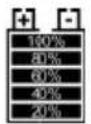 | Charging status |
6.2 PREPARATION
Clean the battery poles to remove dust and corrosion residue.
Only for open batteries:
Remove the plugs of the battery cells. Check the liquid level in the cells, consult the operating instructions of your battery for more information. Replenish only sufficient distilled water to ensure that the minimum filling level is achieved. The liquid will expand during the charging process and the battery may overflow. Leave the cells of the battery open until the end of the charging process.
In case of closed and maintenance-free batteries, please follow the instructions of the battery manufacturer to the letter.
6.3 SETTING THE CHARGING PROGRAM

Do not connect the battery charger to your battery yet.
Connect the battery charger to a suitable power outlet. An audible signal will sound, and the display (Position 1 in the diagram) and indicator lights (Positions 2 and 3 in the diagram) will activate.
Use the mode switch (Position 4 in the diagram) to select the appropriate charging program.
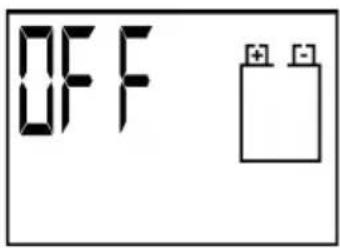
text_image
OFFImage 2: Start display

The switch is designed as a touch-sensitive switch. A simple touch of the button is sufficient; there's no need to press it firmly.
By repeatedly touching the mode switch, you can sequentially select the following charging programs:

text_image
Row of icons representing vehicle-related functions including lightning bolt, van, motorcycle, LF, and wrenchAGM Auto Moto LiFePO4 Rep.
Image 3: Selection of charging programs
AGM Charging program for AGM, calcium and gel batteries
Auto Charging program for car batteries (wet batteries)
Moto Charging program for motorcycle batteries (wet batteries)
LiFePO4 Charging program for lithium batteries Rep Repair program for old, long-unused, and sulphated batteries. Only for wet batteries.
6.4 CONNECTING THE BATTERY

Cut the battery off from the on-board network of your vehicle. To do this, read the manual of your vehicle or ask your specialist workshop.
How to connect the charger with the battery. First, connect the red clamp to the positive terminal (+), and then connect the black clamp to the negative terminal (-) of your battery. Be sure to follow this order!
6.5 CHARGING PROCESS
The charging process will start automatically. The current values of the active charging stage will be displayed on the screen. A steady illumination of each indicator light indicates the completion of that charging stage.

The charging stages cannot be manually adjusted; they are performed by the charger's automatic function.

The colour change of the mode switch during the charging process is purely a visual design element and serves no functional purpose.
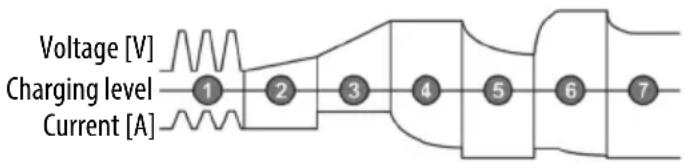
text_image
Voltage [V] Charging level Current [A] 1 2 3 4 5 6 7Figure 4: Charging levels
1 Desulphurisation
2 Softstart
3 Main charge
4 Absorption charging
5 Test mode
6 Reconditioning charge
7 Trickle charging
6.6 REMOVING THE CHARGER

CAUTION
First pull the plug out of the socket and observe the sequence for disconnection. This prevents sparks from forming. Since charging generates a detonating gas, this is particularly important for the sake of your safety.
Disconnect the charger from the mains power supply. First disconnect the pole callipers from the battery, first minus then plus.
Let the battery cool down.
Only for open batteries:
Fill the cells with distilled water up to the level specified by the battery manufacturer. Close the battery cells with the stoppers.
7. MAINTENANCE AND CARE
7.1 MAINTENANCE
The device is maintenance-free if used according to its intended purpose.
7.2 CARE
Clean the pole clamps every time the charging procedure is completed. Remove all battery acid splashes from the pole clamps to prevent corrosion. Clean the device carefully with a dry cloth. Do not use liquids or chemical cleaning agents. Never submerge the device in liquid. Never allow liquid to flow over the device.
Before storing the device, roll up the cables properly in order to prevent damages to the cables and device. Store the device in a dry and clean location.
8. NOTES REGARDING ENVIRONMENTAL PROTECTION

natural_image
Simple line drawing of a trash bin with crossed lines and a horizontal bar below (no text or symbols)The packaging is made up of environmentally friendly materials which may be disposed of via your local recycling points. Do not put electrical devices into the household waste. Electronic and electrical devices must be collected separately and sent for environmentally friendly recycling. Contact your community or town administration for information regarding the disposal of electrics.
9. CONTACT INFORMATION
EAL GmbH
42115 Wuppertal, Germany
+49 (0)202 42 92 83 0
text_image
88.8°C 12V V A 24V Win. Sum. Rep. Flt. 100% 80% 60% 40% 20%text_image
Row of icons representing battery, car, motorcycle, and wrench symbols with 'O' indicators below each.AGM Auto Moto LiFePO4 Rep.
natural_image
Simple line drawing of a trash bin with cross symbol and blank base (no text or labels)text_image
88.8°C 12V V A 24V Win. Sum. Rep. Flt. 100% 80% 60% 40% 20%Laadniveau-indicator:
Desulf. Desulfatie
Soft Softstart
Hauptlad. Hoofdlading
Absorp. Absorptielading
Test Testmodus
Rekond. Herstellading
voll Druppellading
flowchart
graph TD
    A["Desulf."] --> B["MODE"]
    C["voll"] --> B
    D["Soft"] --> B
    E["Hauptlad."] --> B
    F["Absorp."] --> B
    G["Test"] --> B
    H["Rekond."] --> B
    I[" "] --> B
Afb. 1: Overzicht
Displayweergaven: