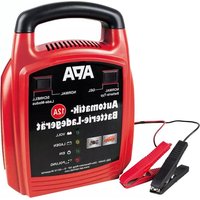
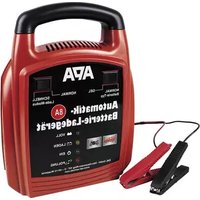
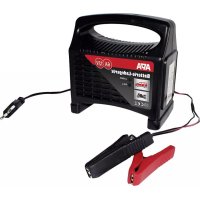
16633 - Battery charger APA - Free user manual and instructions
Find the device manual for free 16633 APA in PDF.
| Product type | Intelligent microprocessor battery charger |
| Brand | APA |
| Model | 16633 |
| Input voltage | 220-240 V AC 50/60 Hz |
| Output voltage (6V) | 7,2 V DC 2,5 A |
| Output voltage (12V motorcycle) | 14,3 V DC 2,5 A |
| Output voltage (12V car) | 14,6 V DC 5,0 A |
| Max charging current | 2,5 A (6V/motorcycle) / 5 A (car) |
| Compatible battery capacity (6V) | Min. 1,2 Ah - Max. 14 Ah |
| Compatible battery capacity (12V) | Min. 1,2 Ah - Max. 150 Ah |
| Compatible battery types | Open lead-acid (WET), gel, AGM, maintenance-free (MF) |
| Enclosure protection | IP65 (enclosure only) |
| Dimensions | 180 x 80 x 45 mm |
| Weight | 0,465 kg |
| Mains cable length | 1,50 m |
| Charging cable length | 1,00 m + 0,50 m adapter |
| Functions | Mode selection (6V, motorcycle, car, winter), reverse polarity protection, charge maintenance, automatic shut-off |
| Display | Screen with voltage and charge status |
| Included accessories | Cable with crocodile clips and cable with eyelets |
| Maintenance | Clean the clips after use; clean the device with a dry cloth |
| Operating temperature | -5°C to +40°C |
| Protection class | II (double insulation) |
| Fuse | Time-delay, 1,6 A |
| Manufacturer | EAL GmbH, Germany |
Frequently Asked Questions - 16633 APA
User questions about 16633 APA
0 question about this device. Answer the ones you know or ask your own.
Ask a new question about this device
Download the instructions for your Battery charger in PDF format for free! Find your manual 16633 - APA and take your electronic device back in hand. On this page are published all the documents necessary for the use of your device. 16633 by APA.
USER MANUAL 16633 APA
natural_image
Two black electrical test probes with clamps and metal contacts, labeled 'Inkl. Zubehör' (no other text or symbols visible)Inhalt
GB Microprocessor battery charger, 6 V / 12 V, 5 A with cable roller
Article No. 16633
Contents
- Proper use of the product 9
- Scope of delivery 10
- Specifications 10
- Explanation of symbols ____ 10
- Safety notes 10
- Operating instructions ____ 11
6.1 Overview 11
6.2 Using the adapter charging cable 12
6.3 Preparation 12
6.4 Connecting the battery charger 12
6.4.1 Connecting the adapter charging cable with pole callipers 12
6.4.2 Connecting the adapter charging cable with eyes 12
6.5 Charging the battery 12
6.5.1 Selecting the charging programme 13
6.6 Removing the charger 14 - Maintenance and care 14
7.1 Maintenance 14
7.2 Care 14 - Notes regarding environmental protection 14
- Contact information 14
WARNING

Read the operating instructions through carefully prior to initial use and observe all of the safety notes! Not observing such may lead to personal injury, damages to the device or your property! Store the original packaging, the receipt and these instructions so that they may be consulted at a later date! Prior to initial use check the contents of the packaging to ensure that they are in perfect condition and complete!
1. Proper use of the product
The charger is suitable for charging open and a variety of closed, maintenance-free lead-acid batteries, for example:
- Wet batteries (WET), lead-acid batteries (fluid electrolyte)
• Gel batteries (gel electrolyte)
• AGM batteries (electrolyte in fibreglass fleece) - Maintenance-free lead-acid batteries (MF)
Other batteries may not be charged with this device.
The charger may not be used as a starter aid. First charge the battery of your vehicle fully and remove the charger before starting the vehicle.
The charger may not be used as a source of direct current or for other purposes.
The battery charger is designed for use in dry and protected environments at temperatures of -5^ to +40^ .
This device is not designed to be used by children and people with limited mental capacities or those without experience and/or knowledge. Keep children away from the device.
The device is not designated for commercial use.
Any other use or modification to the device is considered improper usage and may be dangerous. EAL GmbH accepts no liability for damages caused as a result of improper use.
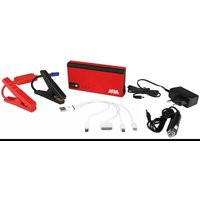
2. Scope of delivery
- 1x Charger • 1 x Operating instructions
- 1 x Adapter charging cable with pole callipers - 1 x Adapter charging cable with eyes
3. Specifications
Dimensions: 180 x 80 x 45 [mm]
Weight: 0.465 kg
Long mains cable: 1.50 m
Length of charging cable: 1.00 m + 0.50 m adapter charging cable
Input: 220-240 V AC 50/60 Hz
Output: 6 V mode: 7.2 V DC 2.5 A
Motorbike: 14.3 V DC 2.5 A
Auto: 14.6 V DC 5.0 A
Battery capacity:
6 V min 1.2 Ah
max. 14 Ah
12 V min 1.2 Ah
max. 150 Ah
Protection class:
IP65 (only device housing, not connection and charging cable)
Ambient temperature:
-5^ C to +40^ C
4. Explanation of symbols

Corresponds to EC directives

Labelled electrical product may not be disposed of in the household waste

Devices with this symbol may only be operated in the house (dry environment)

Insulated housing (protection class II).

Fuse, here: Slow-burning, 1.6A

Recommended battery capacity

Read the operating instructions

Corresponds to the requirements of § 21 of the German Product Safety Law (Produktsicherheitsgesetz)
IP65
Protection class Spray water protected
5. Safety notes
- The warning triangle labels all instructions important to safety. Always follow these otherwise you could injure yourself or damage the device.
- Only connect the device to a correctly installed socket. The voltage must correspond to the specification on the type plate of the device.
- Do not trap the power cable and protect it from sharp edges, damp, heat or oil. The power cable of the unit cannot be replaced. In the event that the cable is damaged, the unit must be disposed of.
- Do not operate the device or immediately pull the plug if it is damaged or you suspect it may be defective. In this case, contact our technicians.
- Pull the plug when the device is not in use.
- Keep packaging materials, especially plastic and plastic bags, away from children. Risk of suffocation!
- Remove all plastic from the device before use.
- Lay the mains cable in such a way that you are not hindered by it, and no one is able to accidentally pull it.
- Disconnect the battery charger from the power supply after charging.
- Keep the charger in a place that cannot be accessed by children or unauthorised persons.


• Never operate the device in the vicinity of flammable materials or in an environment prone to explosion.
• Always wear suitable working clothes, protective gloves and goggles. Battery acid is corrosive! Immediately and thoroughly wash off any splashed acid and consult a doctor if necessary. If battery acid gets into the eyes, immediately rinse under running water for at least 10 minutes and consult a doctor.
- Do not cover the charger, this may lead to overheating and result in damages. Never set the charger up for operation on a surface that is insulating (e.g. polystyrene). There is a risk of heat build up!
- If you wish to charge a vehicle battery in the installed state, first park the vehicle safely, put on the parking brake and switch off the ignition. Cut the battery off from the on-board network of your vehicle. To do this, consult the manual for your vehicle, or ask your specialist workshop.
- This charger enables you to charge a battery without needing to disconnect it from the on-board network. If you wish to make use of this option, make sure that your vehicle will not be damaged by this process. For this purpose, read the manual of your vehicle or ask your specialist workshop.
- For vehicles with a start/stop system, pay attention to the instructions in the vehicle manual regarding charging of batteries. Only use the connection points specified in the manual. Ask your specialist workshop or the vehicle manufacturer. (If this instruction is not maintained, damages may be caused to the electrical systems of the vehicle).
- Do not leave the charger connected for more than 5 days.
- When pulling the mains cable out of the socket, only hold the plug.
- Never expose the charger to the vicinity of fire, heat and extensive temperatures over +40^ .
- Store these instructions carefully and, if necessary, pass them on to other users.
6. Operating instructions

Before using the device make sure that you have read the operating instructions for the battery and the vehicle and you have understood all of the safety precautions.
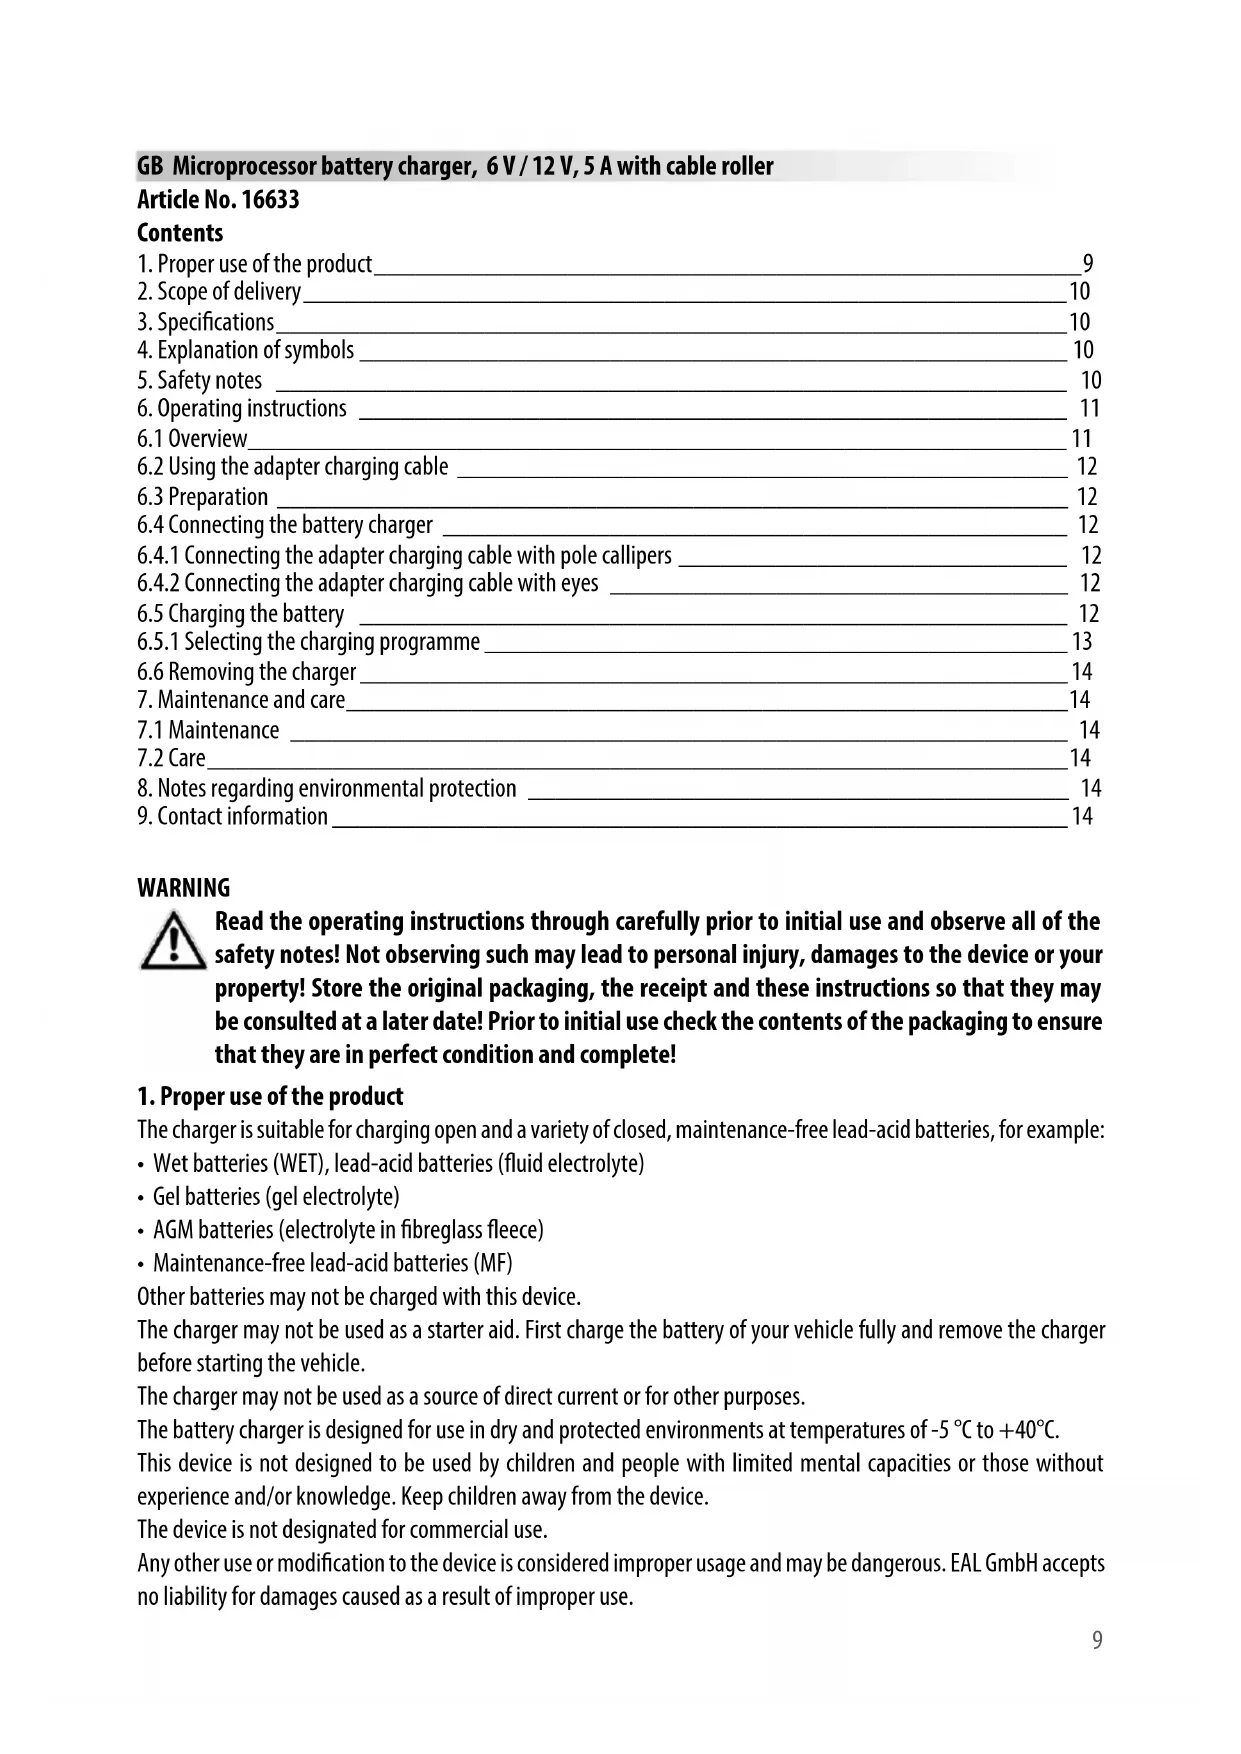
6.1 Overview
text_image
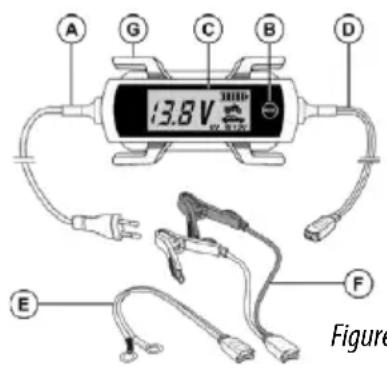
A G C B D 13.8 V E F FigureFigure 1: Overview
text_image
13.8V 6V 12V Figure 2: DisplayA Mains cable
B Mode button
C Display
D Charging cable
E Adapter harging cable with eyes
F Adapter charging cable with pole callipers
G Hook for rolling up the cable
- Battery voltage display
- 6 V charging programme
- Winter charging programme
- 12 V charging programme
- Car charging programme
- Motorbike charging programme
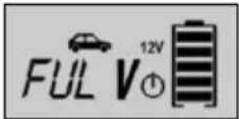
- Battery charge status display
6.2 Using the adapter charging cable
The adapter charging cable with pole callipers (Position F in the overview) is used if you wish to connect the charger in the classic way to the poles of the battery. The adapter charging cable with eyes (Position E in the overview) is designed to remain firmly attached to a battery which is difficult to access. The charger can be conveniently connected using the adapter.
6.3 Preparation
Clean the battery poles to remove dust and corrosion residue.
Only for open batteries: Remove the plugs of the battery cells. Check the liquid level in the cells, consult the operating instructions of your battery for more information. Replenish only sufficient distilled water to ensure that the minimum filling level is achieved. The liquid will expand during the charging process and the battery may overflow. Leave the cells of the battery open until the end of the charging process.
In the event of closed and maintenance-free batteries, please follow the instructions of the battery manufacturer to the letter.
6.4 Connecting the battery charger
6.4.1 Connecting the adapter charging cable with pole callipers

Caution: Make sure that the charger is not connected to the power socket and that the adapter charging cable is not connected to the battery charger.
Always connect the red plus cable (+) to the positive pole of the battery first. Subsequently, connect the black minus cable (-) to the negative pole of the battery. If you charge the battery in situ, connect the black negative cable (-) to the car body (exposed part), far away from the battery, the carburettor and fuel lines. Always maintain this sequence.
6.4.2 Connecting the adapter charging cable with eyes

Caution: Make sure that the charger is not connected to the power socket and that the adapter charging cable is not connected to the battery charger.
Attach the eye of the red plus cable to the plus connection cable of your vehicle battery, e.g. the screws of the pole terminal. Attach the eye of the black minus cable to the earth connection cable (minus cable) of your battery. Lay the cable so that it is free from bends and tensions. It may not be attached in the vicinity of hot or rotating parts of the motor. The connection plug may not get wet.
6.5 Charging the battery
Connect the adapter charging cable to the charging cable (Position D in the overview) of the battery charger. Now connect the mains connection cable (Position A in the overview) of the battery charger to the power socket. The background illumination of the display is activated.
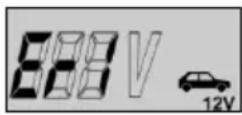
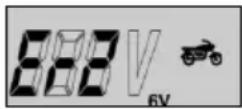
If the battery has been connected incorrectly (wrong poles) or the charger has no contact, the following error message appears on the display "Er1". If the error message "Er2" is shown, a defective 6 V battery has been connected, this cannot be charged using the battery charger. If the battery has been correctly connected, the display shows the current battery voltage and the symbol for the set charging programme.

Caution: After plugging the mains cable inselect the desired charging pro-gramme by operating the MODE button multiple times. If the MODE button is not pressed, the charging process is not started. When charging has started it is no longer possible to switch to another charging program, If you wish to work with a program other than the set charging program, pull the plug out of the socket and wait until the display has gone dark. Then insert the plug again and proceed as described above.
6.5.1 Selecting the charging programme
By pressing the MODE button (multiple times), you can select the appropriate charging programme for your needs. The charging programmes appear in the following order and may be selected by pressing the MODE button:
Motorbike 6 V
Motorbike 6 V winter
Motorbike 12 V
Motorbike 12 V winter
Car 12 V
Car 12 V winter
Depending on the charging state of the battery, the device adapts the charging current in order to best charge the connected battery. The specified maximum charging current is only used during the main charging phase. Shortly before the full charging capacity is achieved, the device switches to a lower charging current. This ensures that the battery is gently and optimally charged to full capacity. The battery symbol (Position 7 in the overview) shown on the display indicates the current filling level of the battery. Das im Display angezeigte Batteriesymbol (Position 7 in der Übersicht), zeigt den aktuellen Füllstand der Batterie an.
Possible charging programmes
| 6 Volt modeCharging programme for 6 V batteries, 1.2 Ah to 14 Ah, temperatures above 0°CCharge current: 2.5 A maximumCharge voltage: 7.2 V | 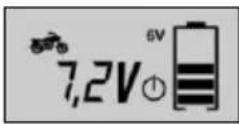 |
| 6 Volt winter modeCharging programme for 6 V batteries, 1.2 Ah to 14 Ah, temperature below 0°CCharge current: 2.5 A maximumCharge voltage: 7.4 V | 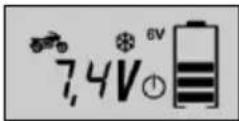 |
| Motorbike modeCharging programme for 12 V batteries from 1.2 Ah to 14 Ah, temperatures above 0°CCharge current: 2.5 A maximumCharge voltage: 14.3 V | 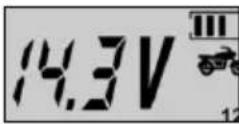 |
| Motorbike winter modeCharging programme for 12 V batteries from 1.2 Ah to 14 Ah, temperatures below 0°CCharge current: 2.5 A maximumCharge voltage: 14.8 V | 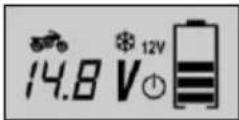 |
| Car modeCharging programme for 12 V batteries from 14 Ah to 150 Ah, temperatures above 0°CCharge current: 5 A maximumCharge voltage: 14.6 V | 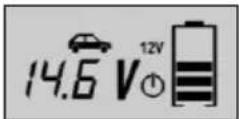 |
| Car winter modeCharging programme for 12V batteries from 14 Ah to 150 Ah, temperatures below 0°CCharge current: 5 A maximumCharge voltage: 14.8 V | 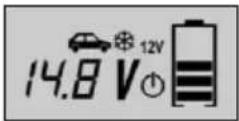 |
 |
Error messages
Display of error after faulty connection (wrong poles), short-circuit (battery short-circuit), no contact, selection of an incorrect charging programme or overheating.
Error message in 6 V - mode, if a battery is connected with less than 5.5 V ± 0.2 or the voltage is still lower than 6 V after 5 hours of charging time. In this case, the battery is defective and must be replaced.
6.6 Removing the charger

Caution: First pull the plug out of the socket and observe the sequence for disconnection. This prevents sparks from forming. Since charging generates a detonating gas, this is particularly important for the sake of your safety.
Disconnect the charger from the mains power supply. Separate the adapter connection of the charging cable.
Disconnect the pole callipers from the battery, first minus then plus.
Allow the battery to cool down.
Only for open batteries: Fill the cells with distilled water up to the level specified by the battery manufacturer.
Close the battery cells with the stoppers.
7. Maintenance and care
7.1 Maintenance
If used correctly, the device is maintenance-free.
7.2 Care
Clean the pole callipers every time the charging procedure is completed. Remove all splashed battery acid from the pole callipers to prevent corrosion. Clean the device carefully with a dry cloth. Do not use liquids or chemical cleaning agents. Never submerge the device in liquids. Never allow liquid to flow over the device.
Before storing the device, roll up the cables properly using the designated hook in order to prevent damages to the cables and device. Store the device in a clean and dry place.
8. Notes regarding environmental protection
The packaging is made up of environmentally friendly materials which may be disposed of via your local recycling points. Do not put electrical devices into the household waste. Electronic and electrical devices must be collected separately and sent for environmentally friendly recycling. Contact your community or town administration for information regarding the disposal of electrics.
9. Contact information
EAL GmbH
42115 Wuppertal, Germany
+49 (0)202 42 92 83 0
text_image
A G C B D 13.8V E F AfterWe herewith confirm that the appliance as detailed below complies with the mentioned directives.
Artikelbezeichnung:
Article description:
Microprocessor battery charger 6/12V 5A
Artikelnummer:
Article number:
16633
Type:
HFGA5DVL
Firmenanschrift:
Company address:
governing EU-directives
Radio and Telecommunication Terminal Equipment
2014/53/EU
- RoHS 2 Restriction of Hazardous Substance 2011/65/EU
harmonised EN-Standards
The article complies with the standards as mentioned below which are necessary to obtain the CE-symbol:
zu 1. EN 55014-1:2006+A1:2009+A2:2011
EN 55014-2:1997+A1:2001+A2:2008
EN 61000-3-2:2014
EN 61000-3-3:2013
zu 2. EN 60335-1:2012+A11:2014
EN 62335-2-29:2004+A2:2010
EN 62233:2008
zu 3.
zu 4. IEC 62321