16628 - Battery charger APA - Free user manual and instructions
Find the device manual for free 16628 APA in PDF.
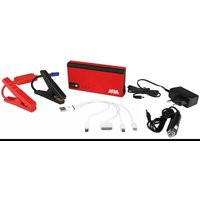
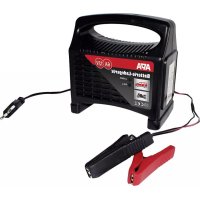
| Product type | Mini Lithium Powerpack with jump start assistance |
| Brand | APA |
| Model | 16628 |
| Dimensions (L x W x H) | 15 x 7.8 x 2.8 cm |
| Weight | 0.370 kg |
| Battery capacity | 11 000 mAh (35.52 Wh) |
| USB output | 5 V / 2.1 A |
| Jump start output | 12 V (EC5), 200 A (peak 380 A) |
| Charge input | 15 V / 1 A |
| Charging time | Approximately 11 hours |
| Temperature range | 0 °C to 40 °C |
| Package contents | Powerpack, USB adapter, plug charger, jump start cable, car charging cable, manual |
| Main functions | USB charger for mobile devices, 12 V gasoline jump start max 2.0 L, LED lamp (steady, flashing, SOS) |
| Cleaning | With a soft cloth, without solvent or penetrating liquid |
| Storage | Dry place, away from humidity, oil, dust, high temperatures |
| Maintenance | Recharge every 3 months if unused |
| Spare parts | Replaceable fuse in the car charging cable |
| Safety | Do not disassemble, use only the supplied accessories, avoid short circuits, do not use on frozen battery |
| General information | Not suitable for children or inexperienced persons, household use only |
Frequently Asked Questions - 16628 APA
User questions about 16628 APA
0 question about this device. Answer the ones you know or ask your own.
Ask a new question about this device
Download the instructions for your Battery charger in PDF format for free! Find your manual 16628 - APA and take your electronic device back in hand. On this page are published all the documents necessary for the use of your device. 16628 by APA.
USER MANUAL 16628 APA
natural_image
Exterior view of a power bank card with visible branding and control buttons (no text-heavy elements)
natural_image
Interior view of a car showing battery pack and wiring (no visible text or symbols)
natural_image
Close-up of a car engine bay with visible battery and wiring (no text or symbols)© EAL GmbH, 16480, 06. 2022
D Art.-Nr.: 16480
Mini Lithium Powerpack with starting aid
Operating instructions 8
FR Réf. 16480
text_image
Diagram of a device rear panel with labeled components including buttons and portsBild 1: Übersicht
text_image
Labeled diagram of electronic components including power adapter, cable, clamp, and connector with numbered partsnatural_image
Simple line drawing of a battery with an arrow indicating rotation (no text or symbols)1
natural_image
Simple line drawing of a device with a curved cable and arrow indicating motion (no text or symbols)2

text_image
START3
natural_image
Simple line drawing of a device with a curved arrow indicating motion or force (no text or symbols)4
natural_image
Simple line drawing of a battery with a curved wire and a switch, no text or symbols present.Read the operating instructions carefully prior to initial use and observe all of the safety notes! Not observing such may lead to personal injury, damages to the device or your property! Store the original packaging, the receipt and these instructions so that they may be consulted at a later date! On transfer of the product, please include these operating instructions as well. Please check the contents of package for integrity and completeness prior to use!
1. PROPER USE OF THE PRODUCT
The Mini Lithium Power Pack is used to charge batteries in mobile phones, smartphones, tablet computers, MP3 players and similar devices that can be charged through a USB cable. On top of that, there is a starting aid facility for 12 V vehicles with maximum 2.0 l petrol engines.
This device is not designed to be used by children or persons with limited mental capabilities or without experience and/or lack of required specialist knowledge. Keep children away from the device.
The device is not designated for commercial use.
Use according to the intended purpose also includes the observance of all information in these operating instructions, particularly the observance of the safety notes. Any other utilisation is considered to be contrary to the intended purpose and may lead to material damages or personal injuries. EAL GmbH assumes no liability for damage resulting from improper use.
2. SCOPE OF DELIVERY
1 x Mini Lithium Power Pack 1 x USB adapter
1 x Plug charger 1 x Jumper cable
1 x Vehicle charging cable 1 x Operating instructions
3. SPECIFICATIONS
Size (L x W x H) 15 x 7.8 x 2.8 [cm]
Weight 0.370 kg
Battery 11.000 mAh, 35,52 Wh
Output 5 V 2.1 A (USB), 12 V (EC5 starting aid)
Input 15 V, 1 A
Maximum load 200 A starting aid, (380 A, peak)
Charging time approx. 11 hours
Temperature rage 0 – 40 °C
4. SAFETY NOTES


- The warning triangle identifies all instructions relevant for safety. Always follow these as otherwise you could injure yourself or damage the device.
- Do not let children play with the device!
- Cleaning and user maintenance must not be carried out by children without supervision.
- Do not treat packaging material carelessly. This may become a dangerous toy for a child!
- Only use this product as intended!
- Do not manipulate or disassemble the device!
- For your own safety, only use accessories and spare parts that are stated in these instructions or that are recommended by the manufacturer!
- When using lead batteries, always wear protective glasses and protective clothing.
- Lead batteries contain aggressive, corrosive acids. Prevent skin and eyes from coming into contact with the lead battery fluids! Never disassemble lead batteries! Wash affected skin thoroughly using soap and water. If acid gets into eyes, rinse immediately for at least 10 minutes under clean, running, lukewarm water! Then immediately consult a doctor!
- If acid gets on your clothing, rinse immediately with plenty of soap and water!
- Never wear rings, necklaces, watches or similar when handling batteries or chargers. Short-circuiting the battery contacts brings a risk of burns and explosion!
- The power pack is only designed as a starting aid for a vehicle that has a battery of its own. The power pack cannot replace the vehicle battery.
• Always store the power pack with the jumper cable pulled off to prevent a short-circuit between the battery terminal clamps. - Do not attempt to remove and replace the rechargeable battery in the power pack. If the battery comes to the end of its useful life, dispose of the entire power pack in accordance with your local guidelines.
- Never charge the power pack using a damaged charger.
- Do not leave the Powerpack unsupervised during the charging process.
- Only used the supplied accessories to charge the power pack.
- Never attempt to start a vehicle when the battery is frozen, this brings a risk of explosion.
- Store these instructions carefully and pass them on to other users.
5. EXPLANATION OF SYMBOLS


Corresponds to EC directives
Labelled electrical product may not be disposed of in the household waste

Devices with this symbol may only be operated in the house (dry enviroment)

Insulated housing (protection class II)

Read the operating instructions

Polarity of the plug connector
6. OPERATING INSTRUCTIONS
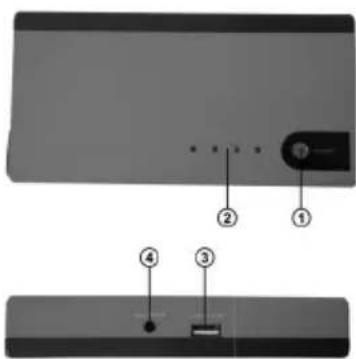
6.1 OVERVIEW
text_image
Diagram of a device rear panel with labeled components including a button and three numbered parts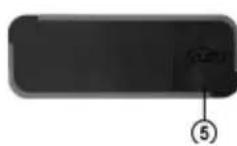


natural_image
Diagram of a mechanical clamp or clamp device with labeled parts (11, 12, 13), no readable text or symbols present.
natural_image
Black electrical plug connected to a cable with two terminal connectors (no text or symbols visible)
natural_image
Close-up of a black electrical plug with two terminal connectors, labeled 9 and 10 (no text or symbols on the plug body)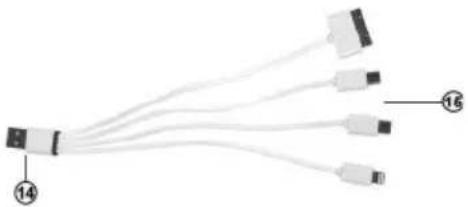
natural_image
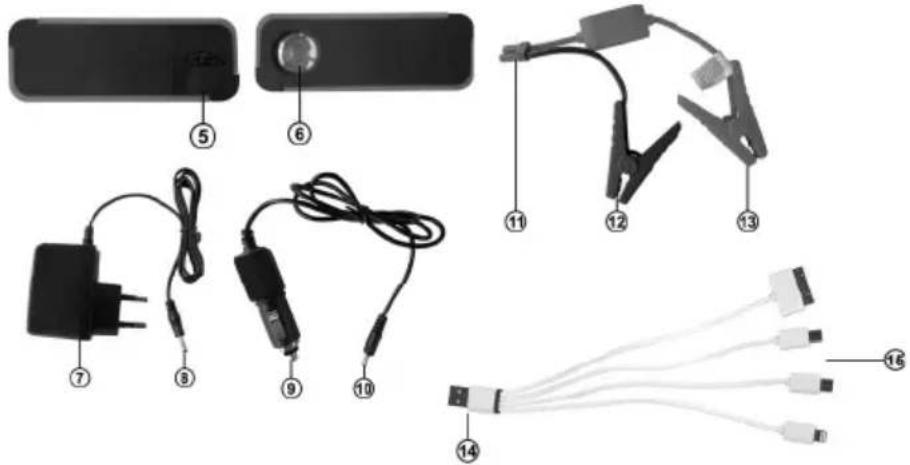
Pure diagram of four connected cable wires with numbered labels (14 and 16), no text or symbols present.1 ON/OFF switch
2 Charge status display
3 USB charge connection
4 Charging socket
5 Starting aid connection
6 LED lights
7 Plug charger
8 Charging plug
9 12V vehicle charging plug
10 Charging plug
11 Jumper cable connection plug
12 Black terminal clamp (-)
13 Red terminal clamp (+)
14 USB plug
15 Device plug/Apple 30-pins, Apple Lightning, Micro-USB
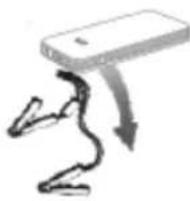
Plug the charging plug (Position 8 in the overview) of the plug charger (Position 7 in the overview) into the charging socket of the power pack (Position 4 in the overview). Plug the plug charger into a 230 V mains socket. Should the power pack ever need to be charged without supervision, place it on a fi reproof base (stone, tiles or metal plate) during the charging process. Remove all combustible objects in the perimeter of one metre.
6.2.2 CONNECTING THE POWER PACK TO THE VEHICLE CHARGING CABLE
Plug the charging plug (Position 10 in the overview) of the vehicle charging cable (Position 9 in the overview) into the charging socket of the power pack (Position 4 in the overview). Then plug the cigarette lighter plug into the 12 V socket of your vehicle.

CAUTION: Only charge the power pack with the vehicle charging cable when driving or when the engine is running, otherwise there is a risk that the starter battery of your vehicle may be discharged.
During the charging process the indicator lights (Position 2 in the overview) flash successively. The number of permanently illuminated indicator lights indicates the charge status of the power pack. When all indicator lights are permanently illuminated the charging process is finished.
Indicator lights:
Press the ON/OFF switch (Position 1 in the overview) of the unit to check the charge status.
| Indicator lights 1 | flashes | 1 permanent light | 2 permanent lights | 3 permanent lights | 4 permanent lights |
| Charge status 0 % | 25 % 50 % 75 % | 100 % |
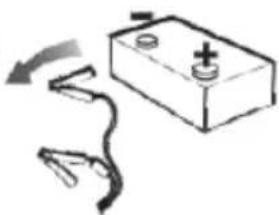
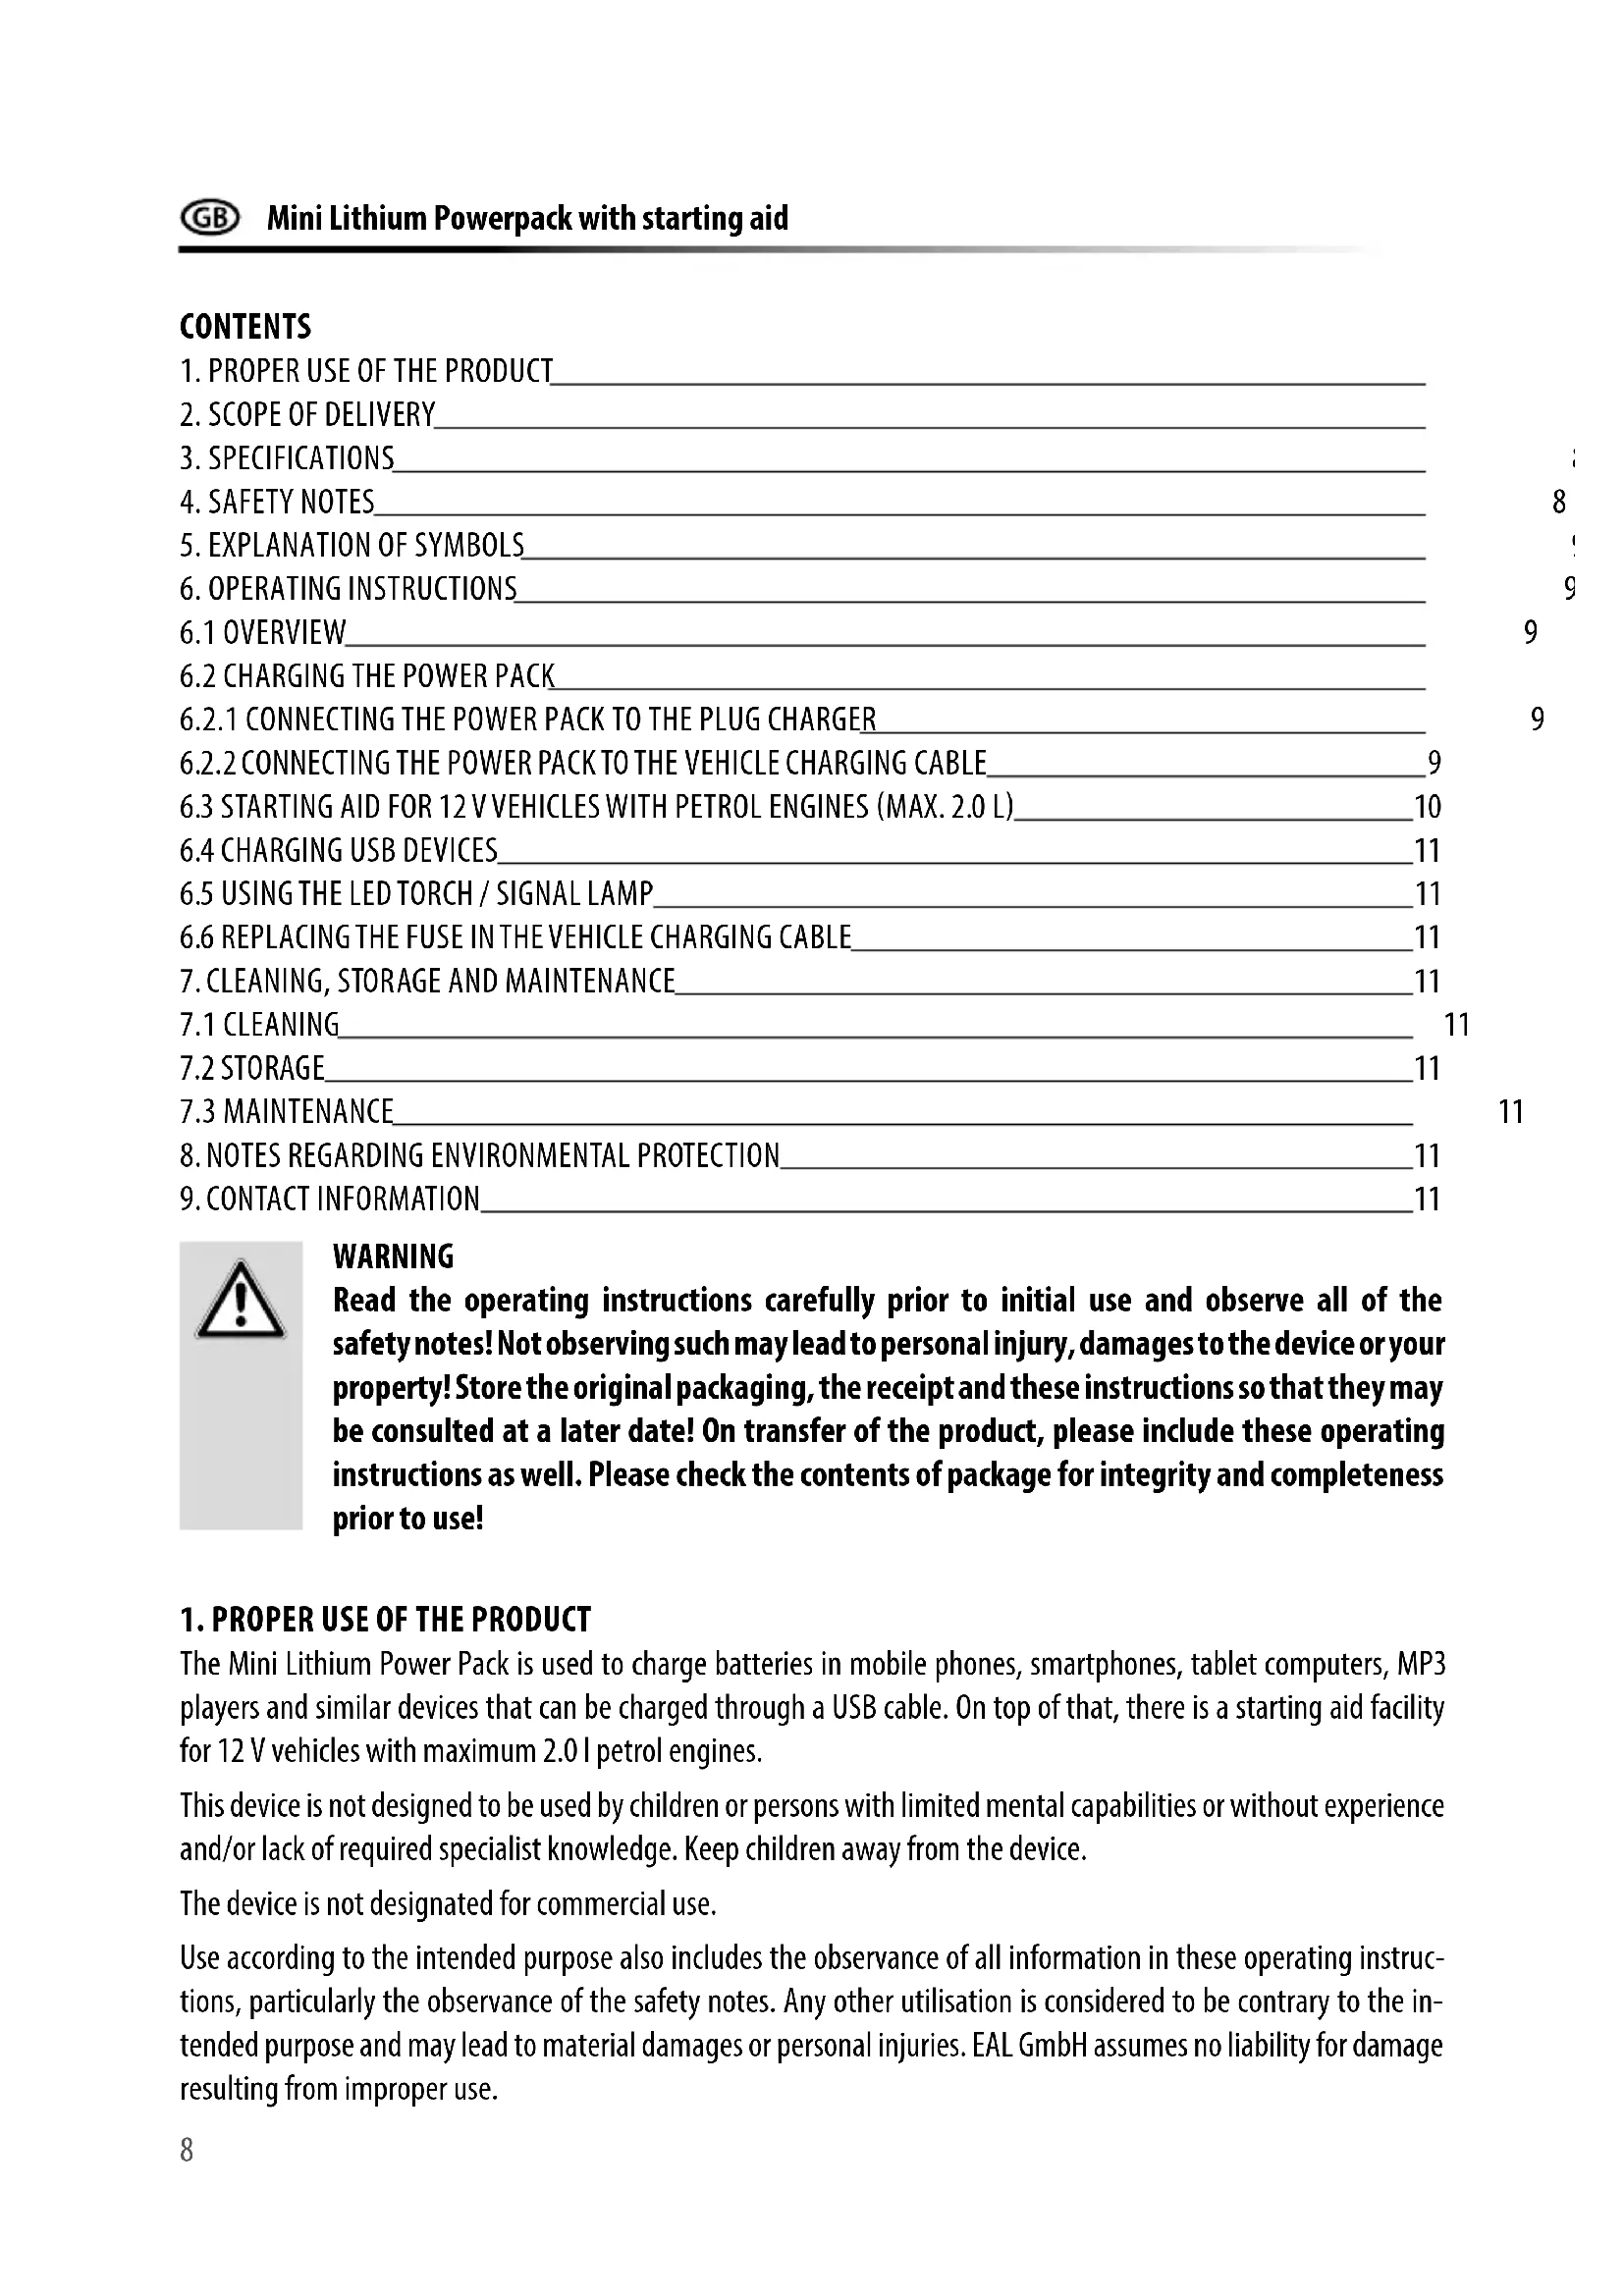
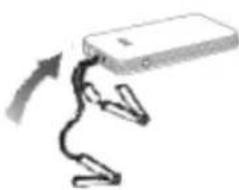
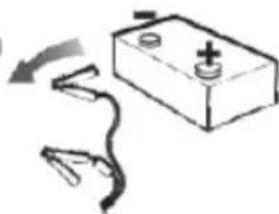
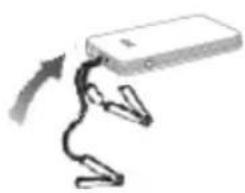
6.3 STARTING AID FOR 12 V VEHICLES WITH PETROL ENGINES (MAX. 2.0 L)
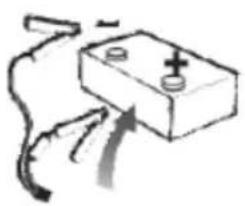
Make sure that at least three power pack indicator lights are permanently illuminated and that the battery terminal is not soiled or oxidised.
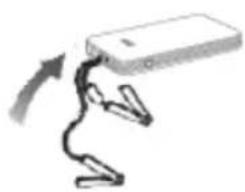
Disconnect the power pack from the jumper cable.
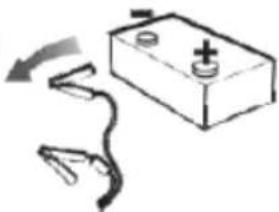
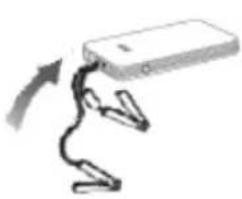
- First connect the red terminal clamp (Position 13 in the overview) of the jumper cable with the positive terminal and then the black terminal clamp (Position 12 in the overview) with the minus terminal of the vehicle battery. The terminal clamps must have firm and secure contact with the battery terminals.
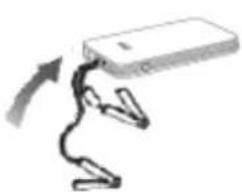
- Connect the power pack with the jumper cable and make sure that the plug (Position 11 in the overview) is firmly and securely plugged in.
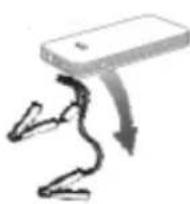
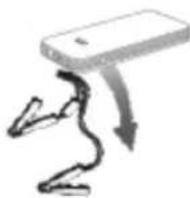
- Start the motor. Do not operate the starter for longer than 6 seconds. If the attempt to start is not successful, wait at least three minutes before the next attempt. If the third attempt fails, do not try any more start attempts; check your vehicle for faults.
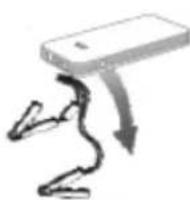
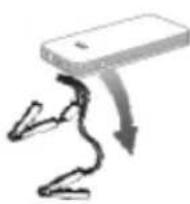
- Disconnect the power pack from the jumper cable within 30 seconds after the engine has started running.
- Remove the terminal clamps from the battery terminals.
natural_image
Simple line drawing of a battery with a handle and arrow indicating rotation (no text or symbols)1
natural_image
Simple line drawing of a device with a curved cable and connectors, no text or symbols present.2

text_image
START3
4

natural_image
Simple line drawing of a battery with a curved wire and a switch, no text or symbols present.5
Fig. 2: Starting aid with the power pack

CAUTION: Always maintain this sequence; risk of explosion
6.4 CHARGING USB DEVICES
Select the appropriate adapter (Position15 in the overview) for your USB device and connect it. Plug the USB plug (Position 14 in the overview) to the USB output (Position 3 in the overview) of the power pack. Press the push button (Position 1 in the overview) of the power pack to start the charging process.
After the charging process is finished the LED's for the charge status (Position 2 in the overview) go out. First pull the charging cable out of the power pack and then remove the charging cable from your USB device.
6.5 USING THE LED TORCH / SIGNAL LAMP
To switch on the LED torch keep the ON/OFF switch (Position 1 in the overview) of the power pack pressed for approx. 3 seconds. Press the switch again to switch on the following light functions consecutively: Flashing, SOS, off.
6.6 REPLACING THE FUSE IN THE VEHICLE CHARGING CABLE
Turn the knurled nut at the tip of the 12 V plug (Position 9 in the overview) counter clockwise until the plug comes off and remove it. The fuse is released and can be pulled out of the plug. Replace it with a new fuse of the same amperage and screw the knurled nut back into the plug.
7. CLEANING, STORAGE AND MAINTENANCE
7.1 CLEANING
Clean the Mini Lithium Power Pack only with a soft cloth and do not use any aggressive cleaning agents or solvents. Never allow liquids to ingress into the housing.
7.2 STORAGE
When not in use, store the Mini Lithium Power Pack in a dry place. Do not expose the power pack to moisture, oil, dust, dirt, high temperatures, strong vibrations, or mechanical stress. Always store the power pack with the jumper cable pulled off to prevent a short-circuit between the battery terminal clamps.
7.3 MAINTENANCE
Charge the power pack every three months when not in use.
8. NOTES REGARDING ENVIRONMENTAL PROTECTION
The packaging is made up of environmentally friendly materials which may be disposed of via your local recycling points. Do not put electrical devices into the household waste. Electronic and electrical devices must be collected separately and sent for environmentally friendly recycling. Contact your community or town administration for information regarding the disposal of electrics.
9. CONTACT INFORMATION
EAL GmbH
text_image
Diagram of a device with labeled parts, showing front and side views with numbered annotations.


natural_image
Mechanical clamp device with numbered parts (11, 12, 13), no visible text or symbols on the device itself
natural_image
Black electrical plug connected to a cable with two terminal connectors (no text or symbols visible)
natural_image
Close-up of a black electrical plug with coiled cable, labeled with numbers 9 and 10 (no text or symbols on the plug itself)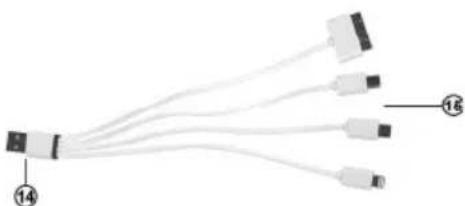
natural_image
Pure diagram of multiple white cable connectors with numbered labels (14 and 16), no text or symbols present.natural_image
Simple line drawing of a battery with a handle and arrow indicating rotation (no text or symbols)1
natural_image
Simple line drawing of a device with a curved cable and connectors, no text or symbols present.2

text_image
START3
4

natural_image
Simple line drawing of a battery with a curved arrow indicating direction (no text or symbols)text_image
Diagram of a device rear panel with labeled components including a button and three numbered parts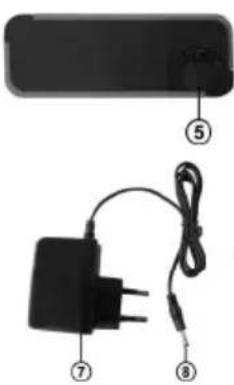
natural_image
Product diagram showing a black rectangular device with labeled parts and an attached black plug (no text or symbols present)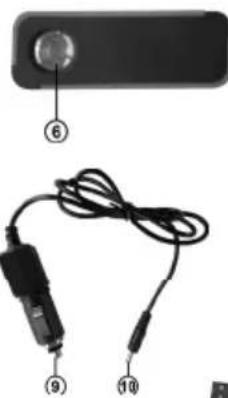
natural_image
Close-up of a black electronic device with a cable and plug, labeled with numbers 6, 9, and 10 (no text or symbols on the device itself)
natural_image
Mechanical component diagram with numbered parts (11, 12, 13), no readable text or symbols beyond labels
natural_image
Pure electrical connector diagram showing four leads (labeled 14) without any text or symbols1 AAN/UIT-schakelaar
2 Laadtoestandsindicator
natural_image
Simple line drawing of a battery with a handle and arrow indicating rotation (no text or symbols)1
natural_image
Simple line drawing of a device with a curved cable and connectors, no text or symbols present.2

text_image
START3
4
natural_image
Simple line drawing of a battery with a curved wire and two terminals, no text or symbols present.text_image
Diagram of a device with labeled parts including a button, numbered indicators (1-4), and a connector pin.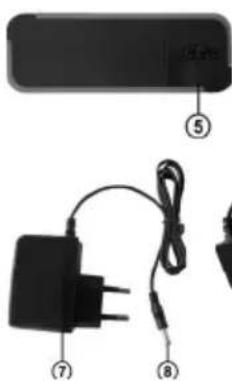
text_image
Diagram showing labeled components of a device with numbered parts and a cable, likely illustrating an electrical or electronic setup.
text_image
Diagram showing cable and plug components with numbered labels ⑥, ⑨, and ⑩ pointing to different parts.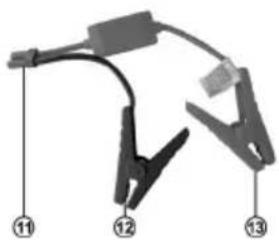
natural_image
Mechanical clamp device with labeled parts (no text or symbols on body)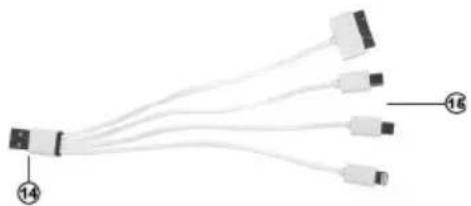
natural_image
Pure electrical connector diagram showing multiple leads (no text or symbols)natural_image
Simple line drawing of a battery with a switch and curved lines indicating electrical connections (no text or symbols)1
natural_image
Simple line drawing of a device with a curved cable and connectors, no text or symbols present.2

text_image
START3
4