16629 - Battery charger APA - Free user manual and instructions
Find the device manual for free 16629 APA in PDF.
| Product type | Automatic battery charger |
| Input voltage | 220-240 V AC, 50/60 Hz |
| Output voltage | 12 V DC |
| Normal charge current | 2.5 A (3.75 A RMS) |
| Fast charge current | 8 A (12 A RMS) |
| Recommended battery capacity | 20 – 225 Ah |
| Dimensions (L x W x H) | 180 x 105 x 235 mm |
| Weight | 2.245 kg |
| Power cable length | 1.70 m |
| Charging cable length | 1.40 m |
| Ambient temperature | -5 °C to +40 °C |
| Compatible battery types | Open lead-acid (WET), AGM, maintenance-free (MF), Gel |
| Indicator lights | Green (on/full charge), Yellow (charging), Red (polarity reversal) |
| Selectors | Charge mode (Normal/Fast), Battery type (Normal/Gel) |
| Fuse | Time-delay, 1.6 A |
| Protection class | II (double insulation) |
| Maintenance | Requires no specific maintenance; clean the clamps after use |
| Use | Indoor only (dry environment) |
| Included accessories | 4 cable holders |
Frequently Asked Questions - 16629 APA
User questions about 16629 APA
0 question about this device. Answer the ones you know or ask your own.
Ask a new question about this device
Download the instructions for your Battery charger in PDF format for free! Find your manual 16629 - APA and take your electronic device back in hand. On this page are published all the documents necessary for the use of your device. 16629 by APA.
USER MANUAL 16629 APA
Battery charger 12 Amp. 12 V
Operating instructions....7
FR Réf. art. 16629
text_image
Diagram of a device with numbered parts labeled 1 through 11, likely for assembly or labeling purposes.Read the operating instructions through carefully prior to initial use and observe all of the safety notes! Not observing such may lead to personal injury, damages to the device or your property! Store the original packaging, the receipt and these instructions so that they may be consulted at a later date! When passing on the product, please include these operating instructions as well.
Please check the contents of package for integrity and completeness prior to use!
1. PROPER USE OF THE PRODUCT
The charger is suitable to charge open and a variety of closed, maintenance-free lead acid batteries:
- Wet batteries (WET), lead-acid batteries (fluid electrolyte)
• AGM batteries (electrolyte in fibreglass fleece)
- Maintenance-free lead-acid batteries MF
• Gel batteries (gel electrolyte)
Other batteries may not be charged with this device.
The charger may not be used as a starter aid. First charge the battery of your vehicle fully and remove the charger before starting the vehicle.
The charger may not be used as a source of direct current or for other purposes.
The battery charger is designed for use in dry and protected environments at temperatures of -5^ to +40^ .
This device is not designed to be used by children or persons with limited metal abilities or without experience and/or lack of required specialist knowledge. Keep children away from the device.
The device is not designated for commercial use.
Use according to the intended purpose also includes the observance of all information in these operating instructions, particularly the observance of the safety notes. Any other utilisation is considered to be contrary to the intended purpose and may lead to material damages or personal injuries. EAL GmbH assumes no liability for damage resulting from improper use.
2. SCOPE OF SUPPLY
- 1x Battery charger • 4x Cable holders • 1x Operating instructions
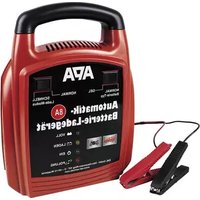
3. SPECIFICATIONS
Dimensions (L x W x H): 180 x 105 x 235 [mm]
Weight: 2.245 kg
Long mains cable: 1.70 m
Long charger cable: 1.40 m
Input: 220-240 V AC 50/60 Hz
Output Normal charge: 12 V, 2.5 A (3.75 A RMS), DC
Output Fast charge: 12 V, 8 A (12 A RMS), DC
Battery capacity: 20 – 225 Ah
Ambient temperature: -5 °C to +40 °C
4. SAFETY INFORMATION


- Keep children away and do not allow children to operate this device!
- Only use this product as intended!
- Do not manipulate or disassemble the device!
- For your own safety, only use accessories and spare parts that are stated in these instructions or that are recommended by the manufacturer!
- The warning triangle labels all instructions important to safety. Always follow these otherwise you could injure yourself or damage the device.
- Do not smoke and do not ignite naked flames when working on the battery. There is a risk of explosion.
- Only connect the device to a power socket installed according to regulations. The voltage must correspond to the specification on the type plate of the device.
- Do not trap the power cable and protect it from sharp edges, damp, heat or oil. The power cable of the unit cannot be replaced. In the event that the cable is damaged, the unit must be disposed of.
- Do not operate the device or immediately pull the plug if it is damaged or you suspect it may be defective. In this case, contact our technicians.
- Pull the plug when the device is not in use.
- Keep packaging materials, especially plastic and plastic bags, away from children. Risk of suffocation.
- Remove all plastic from the device before use.
- Place the mains cable in such a manner that it does not impede and that it cannot be unplugged accidentally.
- Disconnect the battery charger from the power supply after the charging process.
- Store the charger in a place which is out of the reach of children and unauthorised persons.
- Never operate the device in the vicinity of flammable materials or in an environment prone to explosion.
- Always wear suitable working clothes, protective gloves and goggles. Battery acid is corrosive! Immediately and thoroughly wash off any splashed acid and consult a doctor, if necessary. If battery acid gets into the eyes, immediately rinse under running water for at least 10 minutes and consult a doctor.
- Do not cover the charger, this may lead to overheating and result in damages. Never set the charger up for operation on a surface that is insulating (e.g. polystyrene). There is a risk of heat built up!
- If you wish to charge a vehicle battery in the installed state, first park the vehicle safely, put on the parking break and switch off the ignition. Cut the battery off from the on-board network of your vehicle. To do this, consult the manual for your vehicle, or ask your specialist workshop.
- When pulling the mains cable out of the socket, only hold the plug.
- Never expose the charger to the vicinity of fire, heat and extensive temperatures over +40^ .
- Store these instructions carefully and, if necessary, pass them on to other users.
5. EXPLANATION OF SYMBOLS


Complies with EC directives
Labelled electrical products may not be disposed of in the household waste

Devices with this symbol may only be operated in the house (dry environment)

Insulated housing (protection class II)

Fuse, here: Slow-burning, 1.6 A

Recommended battery capacity

Read the operating instructions

Corresponds to the requirements of § 21 of the German Product Safety Law (Produktsicherheitsgesetz)
6. OPERATING INSTRUCTIONS

Before using the device make sure that you have read the operating instructions for the battery and the vehicle and you have understood all of the safety precautions.
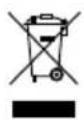
6.1 OVERVIEW
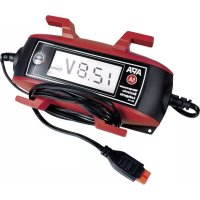
text_image
1 2 3 VOLT LADEN MTR POLYNE 4 5 6 71 Carry handle
2 Switch for selecting charging mode normal/fast
3 Switch for selecting battery type normal/gel
4 Control lamp – Green - Fully charged
5 Control lamp – Yellow - Charging
6 Control lamp – Green - Operating
7 Control lamp - Red - Pole callipers connected incorrectly
Figure 1: View of front
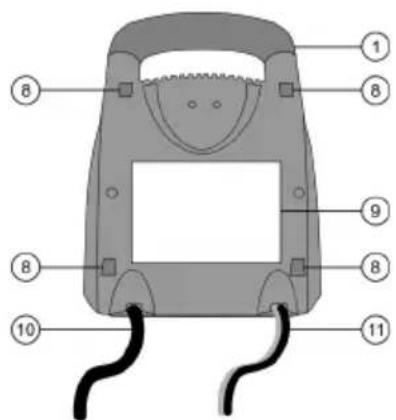
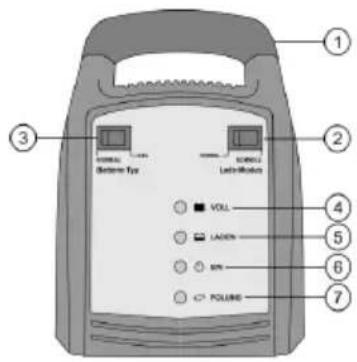
text_image
Diagram of a device with numbered parts labeled 1 through 11, showing internal components and wiring.1 Carry handle
8 Mounts for cable holder
9 Type plate
10 Mains connection cable
11 Charging cable
Figure 2: View of rear
6.2 INSERTING THE CABLE HOLDER
Insert the cable holder into the mounts (Position 8 in the overview) on the rear of the charger so that the openings of the vertically aligned cable holders face away from each other.
6.3 PREPARATION
Clean the battery poles to remove dust and corrosion residue.
Only for open batteries: Remove the plugs of the battery cells. Check the liquid level in the cells, consult the operating instructions of your battery for more information. Replenish only sufficient distilled water to ensure that the minimum filling level is achieved. The liquid will expand during the charging process and the battery may overflow. Leave the cells of the battery open until the end of the charging process.
In case of closed and maintenance-free batteries, please follow the instructions of the battery manufacturer to the letter.
6.4 CONNECTING THE BATTERY CHARGER

Caution: Make sure that the charger is not connected to the power socket. Always connect the red positive cable (+) of the charger (Position 11 in the overview) to the positive pole of the battery first. Then connect the black minuscable (-) to the minus pole of the battery. If you charge the battery in situ, connect the black negative cable (-) to the car body (exposed part), far away from the battery, the carburettor and fuel lines. Always maintain this sequence.

Caution: When the red control lamp (Position 7 in the overview) lights up, the charging cables have been connected incorrectly. Remove the pole callipers from the battery poles and connect them correctly.
6.5 CHARGING THE BATTERY
6.5.1 SELECTING THE BATTERY TYPE
If a standard lead acid battery, a maintenance-free battery or an AGM battery is to be charged, set the switch for the battery type (Position 3 in the overview) to the „NORMAL“ position. For gel batteries, set the switch to „GEL“.
6.5.2 SELECTING THE CHARGING MODE
If only a small battery is to be charged or normal charging is sufficient, set the switch for charging mode (Position 2 in the overview) to the „NORMAL“ setting. For large batteries, or if fast charging is required, set the switch to „FAST“.
Now connect the mains connection cable (Position 10 in the overview) of the battery charger to the power socket. Now the green control lamp „ON“ (Position 6 in the overview) and the yellow control lamp „CHARGING“ (Position 5 in the overview) light up. The battery is being charged.
Once the battery is fully charged, the battery charger switches over to maintenance mode. The green „FULL“ control lamp (Position 4 in the overview) lights up.
6.6 REMOVING THE CHARGER

Caution: First pull the plug out of the socket and observe the sequence for disconnection. This prevents sparks from forming. Since charging generates a detonating gas, this is particularly important for the sake of your safety.
Disconnect the charger from the mains power supply.
Then disconnect the black callipers (minus). Then remove the battery callipers from the plus pole of the battery (red callipers). Allow the battery to cool down.
Only for open batteries: Fill the cells with distilled water up to the level specified by the battery manufacturer. Close the battery cells with the stoppers.
7. MAINTENANCE AND CARE
7.1 MAINTENANCE
The battery charger is maintenance-free when used in accordance with the intended purpose.
7.2 CARE
Clean the pole callipers every time the charging procedure is completed. Remove all splashed battery acid from the pole callipers
to prevent corrosion. Clean the device carefully with a dry cloth. Do not use liquids or chemical cleaning agents. Never submerge the device in liquid. Never allow liquid to flow over the device.
Properly roll up the cable onto the holders supplied before storing the device in order to prevent damage to the cables and the device. Store the device in a dry and clean location.
8. NOTES REGARDING ENVIRONMENTAL PROTECTION

The packaging is made up of environmentally friendly materials which may be disposed of via your local recycling points.
Do not put electrical devices into the household waste. Electronic and electrical devices must be collected separately and sent for environmentally friendly recycling. Please contact your community or city administration regarding disposal options for electronic scrap.
9. CONTACT INFORMATION
EAL GmbH
42115 Wuppertal, Germany
+49 (0)202 42 92 83 0
text_image
Labeled diagram of a handheld device with numbered parts for identificationtext_image
Labeled diagram of a device with numbered parts, likely an analog or electronic component.1 Draaggreep
text_image
1 2 3 4 5 6 7 NORMAL LED Bottler Top NORMAL OFF Lock Motion YELL LADEN BA POLPINGtext_image
Diagram of a device with numbered parts labeled 1 through 11, showing internal components and wiring.EU – Declaration of Conformity
We herewith confirm that the appliance as detailed below complies with the mentioned directives.
Artikelbezeichnung:
Article description:
automatic battery charger 12V 12A
Artikelnummer:
Article number:
16629
Type:
HB-1212ES
Firmenanschrift:
governing EU-directives
Low Voltage Directive (LVD)
2014/35/EU

Radio and Telecommunication Terminal Equipment
2014/53/EU

- RoHS 2
Restriction of Hazardous Substances
2011/65/EU
harmonised EN-Standards
The article complies with the standards as mentioned below which are necessary to obtain the CE-symbol:
zu 1. EN 55014-1:2006+A1:2009+A2:2011
EN 55014-2:1997+A1:2001+A2:2008
EN 61000-3-2:2014
EN 61000-3-3:2013
zu 2. EN 60335-1:2012+A11:2014
EN 60335-2-29:2004+A2:2010
EN 62233:2008
zu 3.
zu 4. IEC 62321