
LPJ-280WH - Projector LENCO - Free user manual and instructions
Find the device manual for free LPJ-280WH LENCO in PDF.

| Brand | Lenco |
| Model | LPJ-280WH |
| Product Type | LCD Projector |
| Light Source | LED Lamp |
| Brightness | 45 lumens |
| Native Resolution | 800 x 480 pixels |
| Supported Video Resolutions | 1080p, 1080i, 720p, 576i, 480p, 480i |
| Projection Size | 30 to 100 inches |
| Built-in Speakers | Yes |
| Bluetooth | Yes |
| Connectivity | HDMI (x2), VGA, AV, USB, Micro SD, 3.5mm audio output |
| Supported Formats (USB/SD) | MPEG1, MPEG2, MPEG4, MP3, JPEG |
| Power Supply | Power adapter 12V DC 3.5A (100-240V AC) |
| Power Consumption | 36 W (operation), 0.8 W (standby) |
| Weight | 0.9 kg |
| Dimensions (L x W x H) | 203 x 150 x 82 mm |
| Remote Control | Yes (AAA batteries not included) |
| Keystone Correction | Manual (knob) |
| Focus | Manual (knob) |
| Ceiling Mount | Possible (mount not included) |
| Maintenance and Cleaning | Soft dry cloth |
| Safety | Do not obstruct vents, avoid heat sources, do not expose to humidity |
| Repairability | Refer to a qualified technician; any opening voids the warranty |
| General Information | Domestic use, non-professional; warranty through retailer |
Frequently Asked Questions - LPJ-280WH LENCO
User questions about LPJ-280WH LENCO
0 question about this device. Answer the ones you know or ask your own.
Ask a new question about this device
Download the instructions for your Projector in PDF format for free! Find your manual LPJ-280WH - LENCO and take your electronic device back in hand. On this page are published all the documents necessary for the use of your device. LPJ-280WH by LENCO.
USER MANUAL LPJ-280WH LENCO
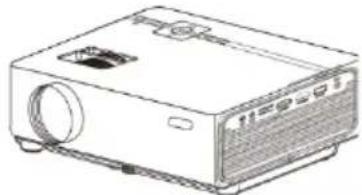
natural_image
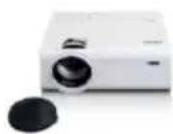
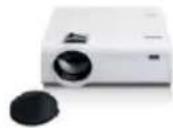
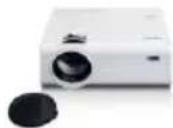
White Lenovo projector with a black cover and lid, shown against a plain background (no text or symbols visible on the device itself)User manual – LCD projector Gebruikshandleiding – LCD-projector Bedienungsanleitung – LCD-Projektor Mode d'emploi – Projecteur LCD Manual de usuario – Proyector LCD Brugervejledning – LCD-projektorh Bruksanvisning – LCD-projektor Kä yttö ohje – LCD-projektori
Index
English 2
Nederlands....27
Deutsch 56
Français 86
Español 114
Dansk/Norsk 143
Svenska 170
Suomi 197
Version : 2.0
CAUTION:
Usage of controls or adjustments or performance of procedures other than those specified herein may result in hazardous radiation exposure.
KEEP THESE INSTRUCTIONS IN MIND:
- Do not cover or block any ventilation openings. When placing the device on a shelf, leave 5 cm (2") free space around the whole device.
- Install in accordance with the supplied user manual.
- Keep the device away from heat sources such as radiators, heaters, stoves, candles and other heat-generating products or naked flame. The device can only be used in moderate climates. Extremely cold or warm environments should be avoided. Working temperature between 0^ and 35^ C.
- Avoid using the device near strong magnetic fields.
- Electrostatic discharge can disturb normal usage of this device. If so, simply reset and restart the device following the instruction manual. During file transmission, please handle with care and operate in a static-free environment.
- Warning! Never insert an object into the product through the vents or openings. High voltage flows through the product and inserting an object can cause electric shock and/or short circuit internal parts. For the same reason, do not spill water or liquid on the product.
- Do not use in wet or moist areas such as bathrooms, steamy kitchens or near swimming pools.
- The device shall not be exposed to dripping or splashing and make sure that no objects filled with liquids, such as vases, are placed on or near the apparatus.
- Do not use this device when condensation may occur. When the unit is used in a warm wet room with damp, water droplets or condensation may occur inside the unit and the unit may not function properly; let the unit stand in power OFF for 1 or 2 hours before turning on the power: the unit should be dry before getting any power.
-
Although this device is manufactured with the utmost care and checked several times before leaving the factory, it is still possible that problems may occur, as with all electrical appliances. If you notice smoke, an excessive build-up of heat or any other unexpected phenomena, you should disconnect the plug from the main power socket immediately.
-
This device must operate on a power source as specified on the specification label. If you are not sure of the type of power supply used in your home, consult your dealer or local power company.
- Keep away from animals. Some animals enjoy biting on power cords.
- To clean the device, use a soft dry cloth. Do not use solvents or petrol based fluids.
To remove severe stains, you may use a damp cloth with dilute detergent. - The supplier is not responsible for damage or lost data caused by malfunction, misuse, modification of the device or battery replacement.
- Do not interrupt the connection when the device is formatting or transferring files. Otherwise, data may be corrupted or lost.
- If the unit has USB playback function, the USB memory stick should be plugged into the unit directly. Don't use an USB extension cable because it can cause interference resulting in failing of data.
- The rating label has been marked on the bottom or back panel of the device.
- This device is not intended for use by people (including children) with physical, sensory or mental disabilities, or a lack of experience and knowledge, unless they're under supervision or have received instructions about the correct use of the device by the person who is responsible for their safety.
- This product is intended for non professional use only and not for commercial or industrial use.
- Make sure the unit is adjusted to a stable position. Damage caused by using this product in an unstable position vibrations or shocks or by failure to follow any other warning or precaution contained within this user manual will not be covered by warranty.
- Never remove the casing of this device.
- Never place this device on other electrical equipment.
- Do not allow children access to plastic bags.
- Only use attachments/accessories specified by the manufacturer.
- Refer all servicing to qualified service personnel. Servicing is required when the device has been damaged in any way, such as the power supply cord or the plug, when liquid has been spilled or objects have fallen into the device, when the device has been exposed to rain or moisture, does not operate normally, or has been dropped.
- Long exposure to loud sounds from personal music players may lead to temporary or permanent hearing loss.
-
If the product is delivered with power cable or AC power adaptor:
-
If any trouble occur, disconnect the AC power cord and refer servicing to qualified personnel.
- Don’t step on or pinch the power adaptor. Be very careful, particularly near the plugs and the cable’s exit point. Do not place heavy items on the power adaptor, which may damage it. Keep the entire device out of children’s reach! When playing with the power cable, they can seriously injure themselves.
- Unplug this device during lightning storms or when unused for a long period.
- The socket outlet must be installed near the equipment and must be easily accessible.
- Do not overload ac outlets or extension cords. Overloading can cause fire or electric shock.
● Devices with class 1 construction should be connected to a main socket outlet with a protective earthed connection.
● Devices with class 2 construction do not require a earthed connection.
● Always hold the plug when pulling it out of the main supply socket. Do not pull the power cord. This can cause a short circuit.
- Do not use a damaged power cord or plug or a loose outlet. Doing so may result in fire or electric shock.
- If the product contains or is delivered with a remote control containing coin/cell batteries:
Warning:
-
“Do not ingest battery, Chemical Burn Hazard” or equivalent working.
● [The remote control supplied with] This product contains a coin/button cell battery. If the battery is swallowed, it can cause severe internal burns in just
2 hours and can lead to death. -
Keep new and used batteries away from children.
- If the battery compartment does not close securely, stop using the product and keep it away from children.
-
If you think batteries might have been swallowed or placed inside any part of the body, seek immediate medical attention.
-
Caution about the use of Batteries:
● Danger of explosion if battery is incorrectly replaced. Replace only with the same or equivalent type.
● Battery cannot be subjected to high or low extreme temperatures, low air pressure at high altitude during use, storage or transportation.
● Replacement of a battery with an incorrect type that can result in an explosion or the leakage of flammable liquid or gas.
● Disposal of a battery into fire or a hot oven, or mechanically crushing or cutting of a battery, that can result in an explosion.
● Leaving a battery in an extremely high temperature surrounding environment that can result in an explosion or that leakage of flammable liquid or gas.
● A battery subjected to extremely low air pressure that may result in an explosion or the leakage of flammable liquid or gas.
- Attention should be drawn to the environmental aspects of battery disposal.
INSTALLATION
- Unpack all parts and remove protective material.
- Do not connect the unit to the mains before checking the mains voltage and before all other connections have been made.
Do not connect the unit to the mains before checking the mains voltage and before all other connections have been made. Packing Included:
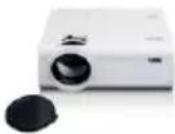
natural_image
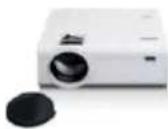
Line drawing of a projector with ventilation slots and a label (no text or symbols on the device itself)Main unit
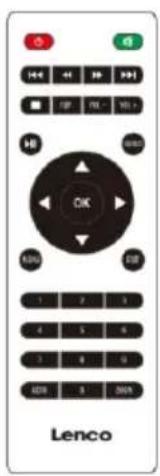
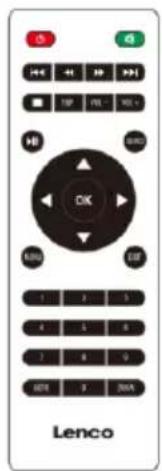
Remote (2 X AAA batteries not included)
natural_image
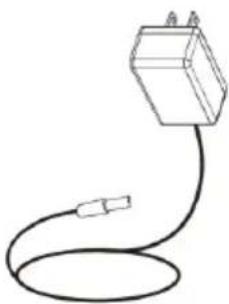
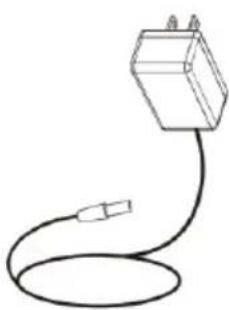
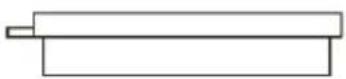
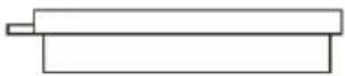
Simple line drawing of a cable with a connector (no text or symbols)AC Power Adapter

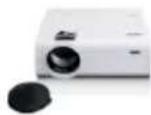
Lens Cover
Lenco
Model LPJ-280WH

(see noted) - LCD projector
Radio station drawing - LCD projector
Fiction angrading - (CD PROTON)
Water storage - Processor LCD
Nonlinear sensors - Processor LCD
In range heating - LCD projector
Breakwater heating - LCD projector
User Manual
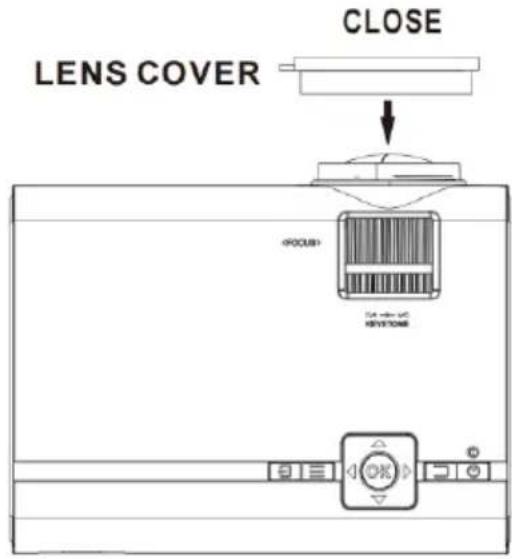
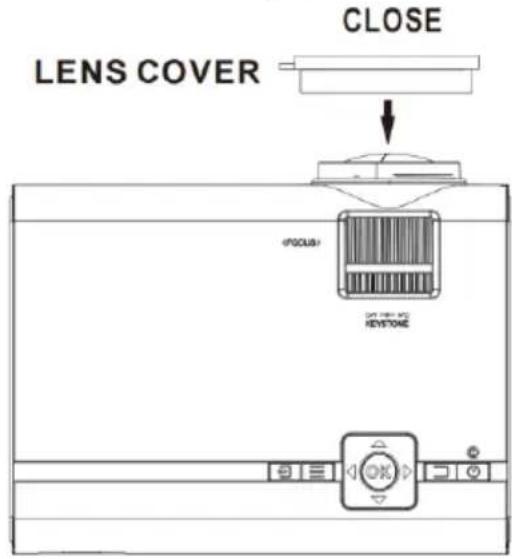
Remove & Close The Lens Cover
Remove the lens cover before using
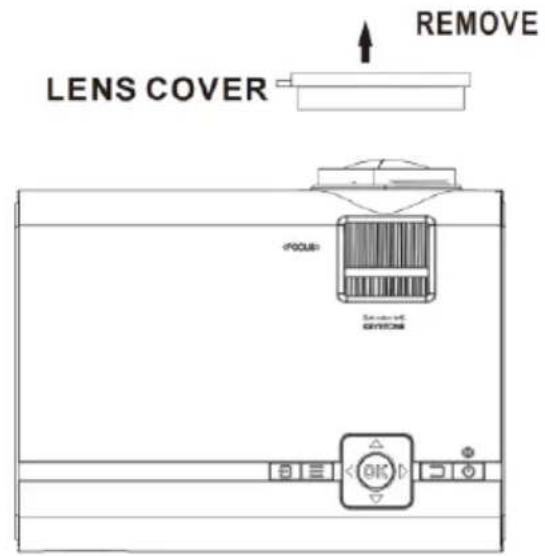
Close the lens cover after use.
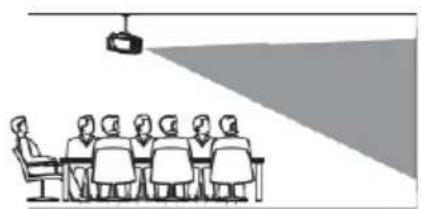
Placing Your Projector
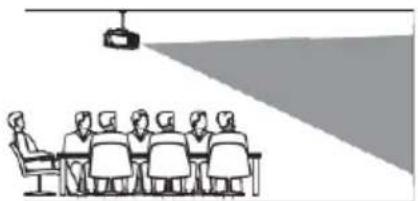
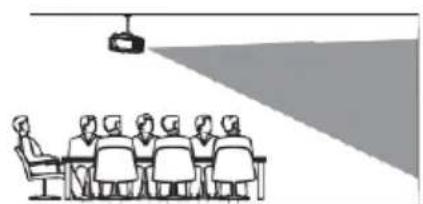
Your projector can be installed in four different configurations (see picture below):
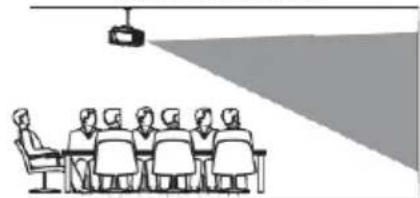
Table mounting front:
Select this location with the projector is placed in front of the screen. This is the most common way to position the projector for quick setup and portability.
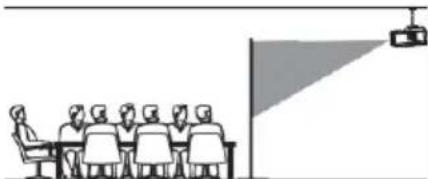
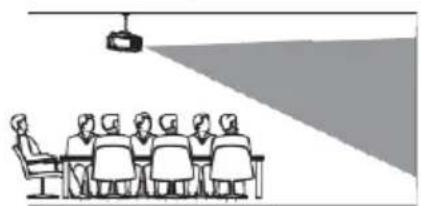
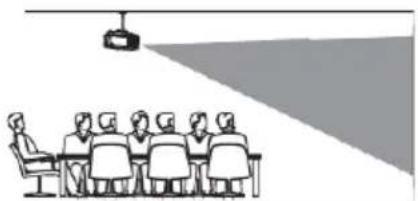
Ceiling mounting front:
Select this location when the projector is mounted upside down at the ceiling in front of the screen.
NOTE: A projector mount is required to mount the projector on the ceiling.
Table mounting rear:
Select this location if you want to place the projector at the rear of the screen.
NOTE: That a special rear projection screen is required.
Ceiling mounting rear:
Select this location when the projector is mounted upside down at the ceiling at the rear of the screen.

natural_image
Illustration of a group of people seated at a table facing a presentation screen (no text or symbols visible)FRONT TABLE
natural_image
Illustration of a meeting with a projection screen above a group of people seated at a table (no text or symbols present)FRONT CEILING

natural_image
Illustration of a group of people seated at a table facing a large triangular flag (no text or symbols present)REAR TABLE
natural_image
Illustration of a meeting room with a speaker at the front and a projection screen on the right (no text or symbols)NOTE: That a projector mount and a rear projection screen is required to mount the projector on the ceiling.
REAR CEILING
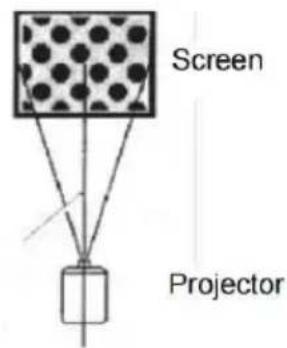
To Reduce Image Distortion
It is recommended to move the projector as close to center of screen.
Square/Rectangle
Distance Between The Projector And Screen
Measure the distance between the projector and where you want to position the screen. This is the projection distance and the screen diagonal indicated in inches.
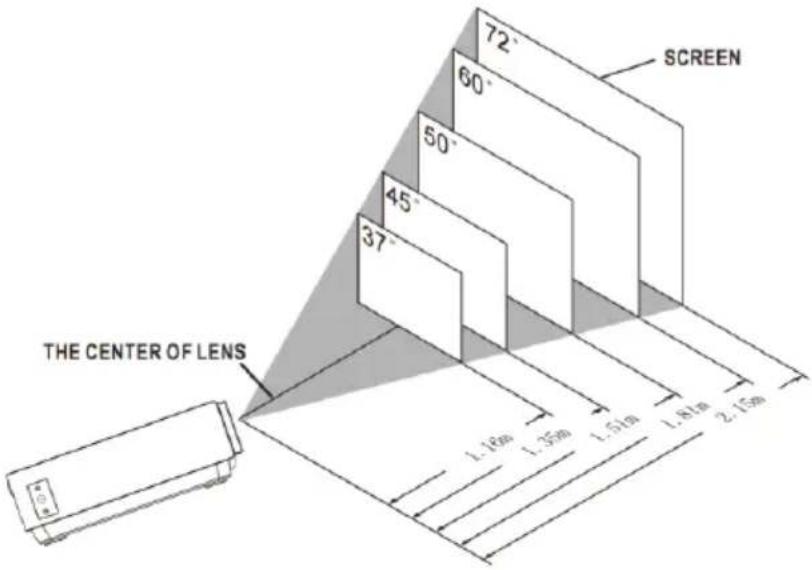
| Screen diagonal Inch | Screen diagonal CM | Projection distance Inch | Projection distance CM |
| 37 | 94 | 46 | 116 |
| 45 | 114 | 53 | 135 |
| 50 | 127 | 59 | 151 |
| 60 | 152 | 71 | 181 |
| 72 | 183 | 85 | 215 |
| 100 | 254 | 142 | 360 |
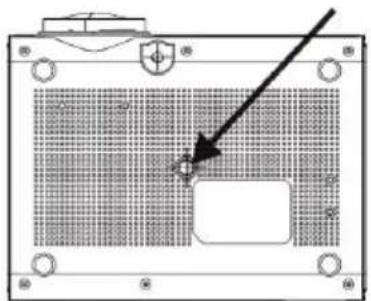
Placing Your Projector On Ceiling
When you mount the projector on the ceiling, make sure you purchase a projector mount that is recommended for this use and follow the instructions that come with the mount. Before installing the projector on the ceiling, please check to make sure the ceiling structure can support the weight of the projector and the mount. If in doubt, please ask the advice from an installation professorial.
NOTE: Projector mount and screw(s) not included

FIXED HANGER HOLE
natural_image
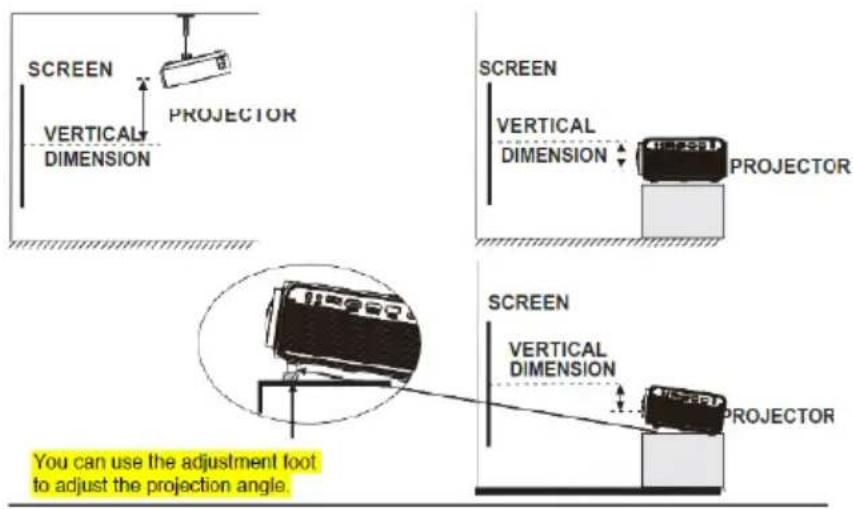
Technical diagram of a computer monitor front panel with no visible text or symbolsAdjust The Vertical Location
Follow below picture to adjust the vertical location.
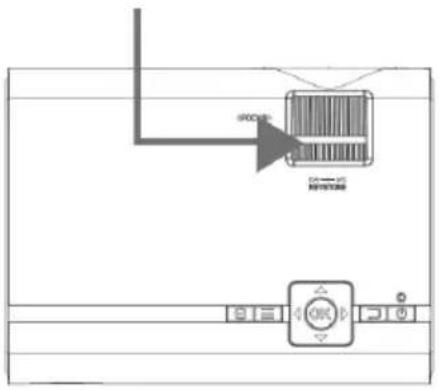
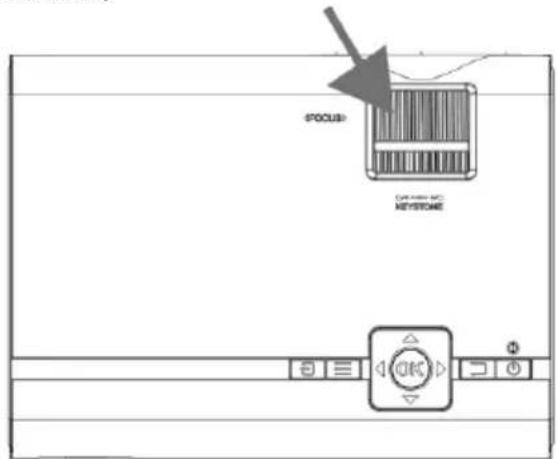
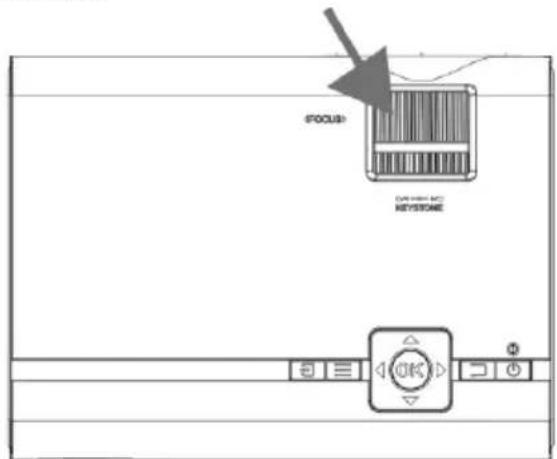
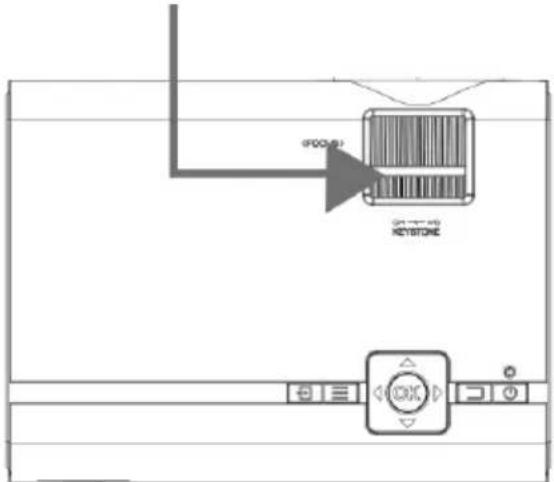
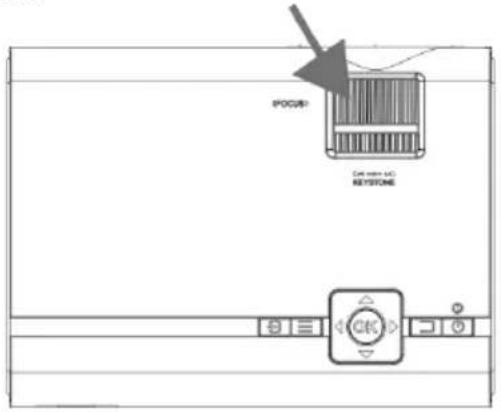
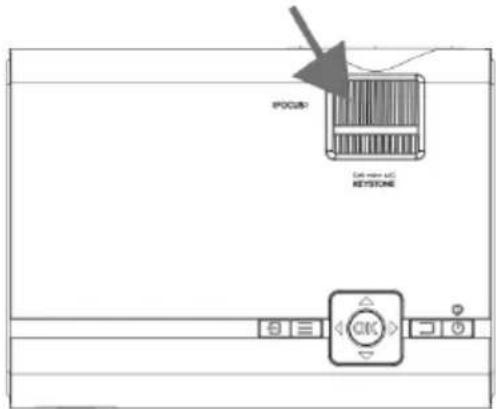
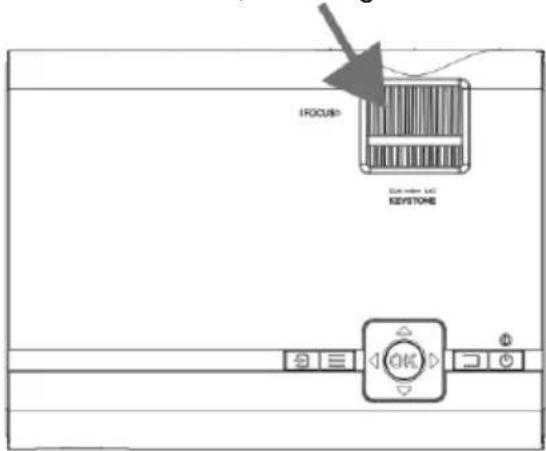
Adjust The Focus And Keystone
Follow below picture to adjust the focus and trapezoidal screen.
Adjust the focus by turning the adjusting wheel while observing the image pixels near the center of the screen. Optimal focus is obtained when the pixels are clearly visible. Depending on the projected screen size, the focus near the screen edges may be less sharp than the screen center.
FOCUS ADJ. Wheel by turning the focus wheel, the image is focused.
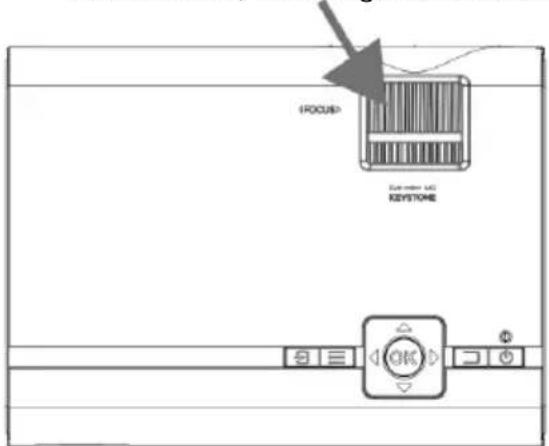
TRAPEZOIDAL ADJ. Wheel
Keystone image is created when the projector beam is projected to the screen in an angle. Keystone correction will restore the distorted image to a rectangular or square shape.
flowchart
graph TD
    A["Input"] --> B["Device"]
    B --> C{Output}
    C -->|Control| D["Control Button"]
    D --> E["Output"]
    style A fill:#f9f,stroke:#333
    style B fill:#ccf,stroke:#333
    style C fill:#cfc,stroke:#333
    style D fill:#fcc,stroke:#333
    style E fill:#ffc,stroke:#333
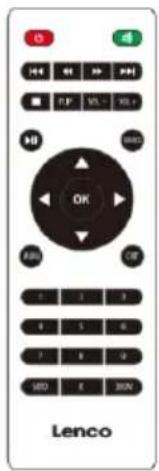
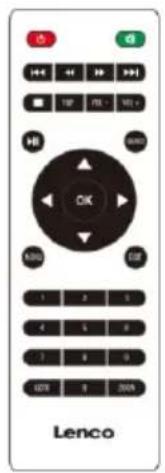
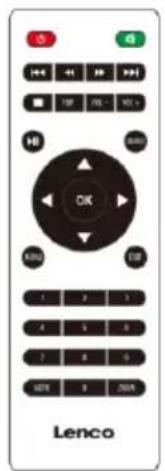
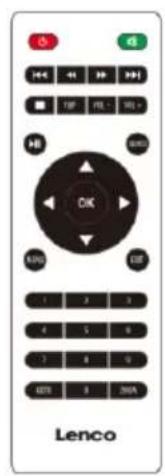
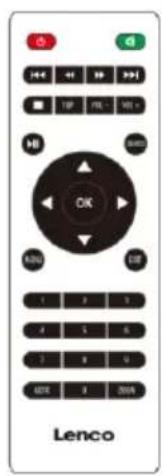
Controls Of Remote
Power
Press to power ON.
Long press to power OFF.

Press to skip between chapters or tracks.

Press to stop playback.

Press to flip display image 180°.

Press to play or pause an individual chapter or track.

Press to navigate and confirm selections in
Settings and other menus.

Press to access projector Settings.

Press to enter specific chapter or track numbers. Use Play button to start playing.
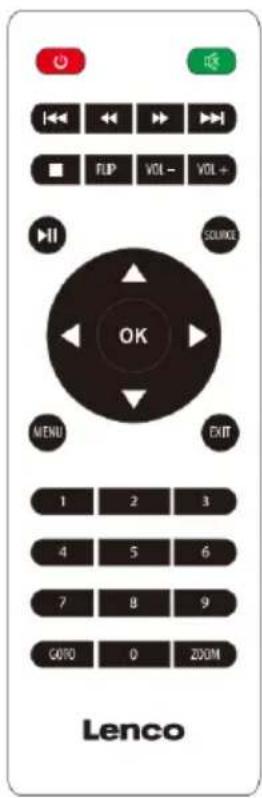
Mute
Press to mute volume.

Press to search through an individual chapter or track.
VOL+/VOL-
Press to adjust audio level.
Source
Press to select media source (AV, PC, HDMI, MEDIA).
Exit
Press to exit menu.
Zoom
Press to zoom display image in or out.
Install/Remove Battery Of Remote
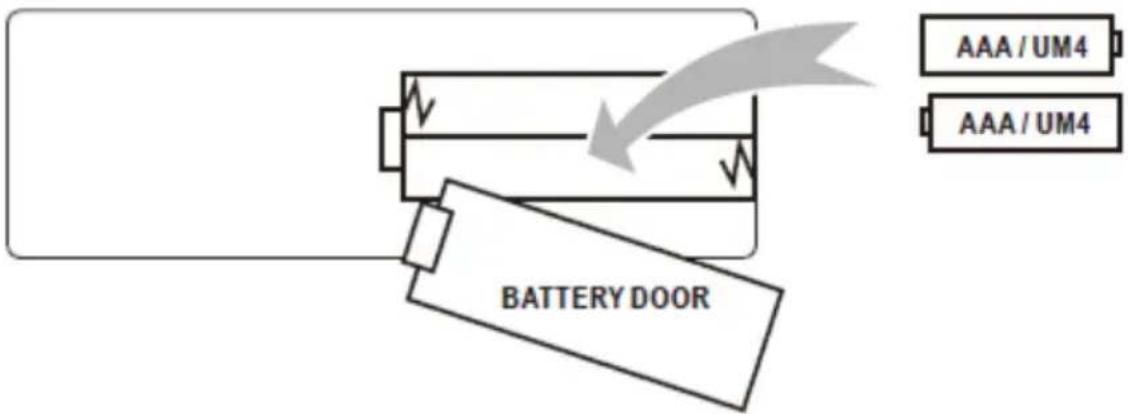
Remove the battery compartment cover on the back of your remote by carefully sliding it open. The battery cover can then be lifted away. Fit the correct batteries (2 X AAA batteries not included), referring to the polarity markings. Finally, replace the cover.
NOTES:
- Batteries shall not be exposed to excessive heat such as direct sunlight, fire.
• Be sure to check the correct polarity when installing the batteries
• Do not mix old and new batteries.
• Only use type AAA/LR03/UM4 type batteries - Do not throw batteries into fire because it may explode. Never try to recharge a single use battery.
- Do not mix alkaline, standard (carbon-zinc), or rechargeable (ni-cad, ni-mh, etc.) batteries.
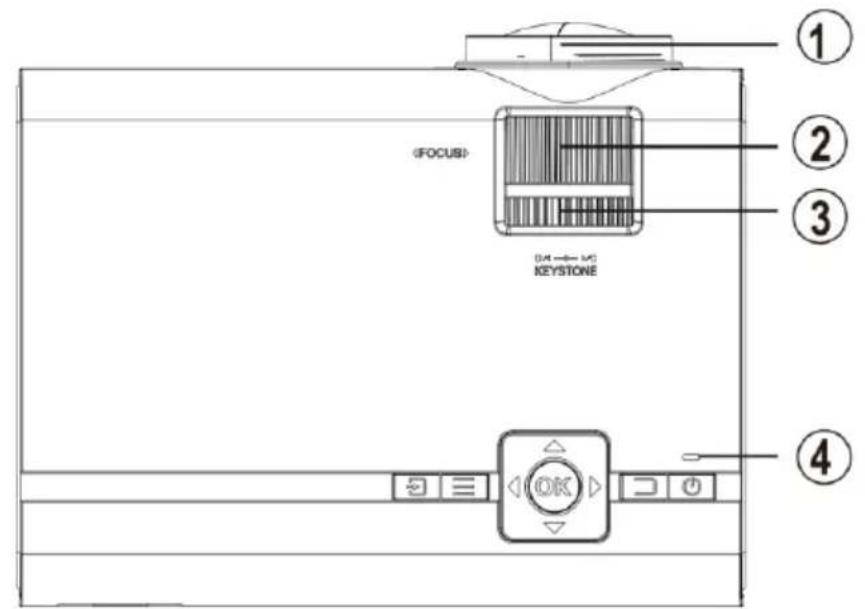
Explanation
⑤ ⑥
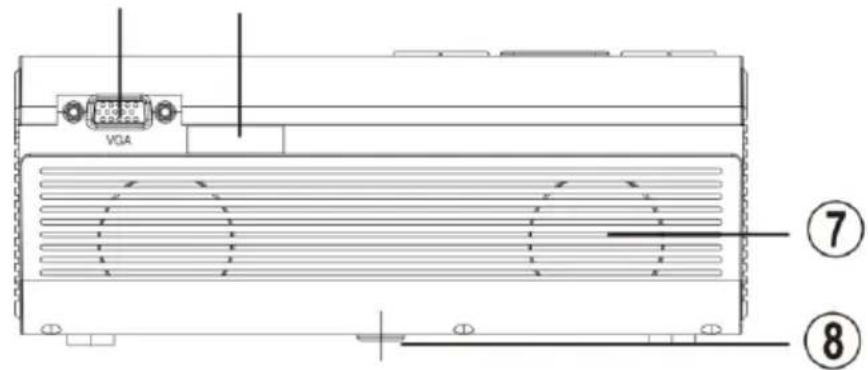
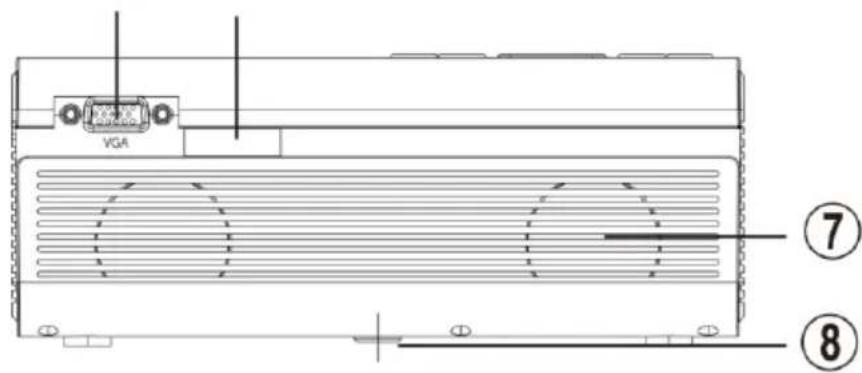
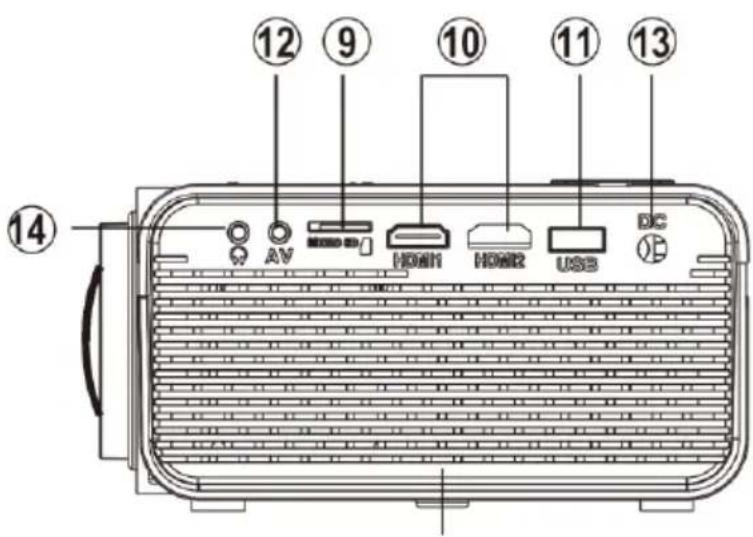
Main Operation
- Projector Lens
- Focus Adjustment
- Keystone Adjustment
- Controls/Power Indicator
- VGA/PC Input
- Remote Sensor (duplicated on the front of the projector)
-
Speakers
-
Adjustable foot
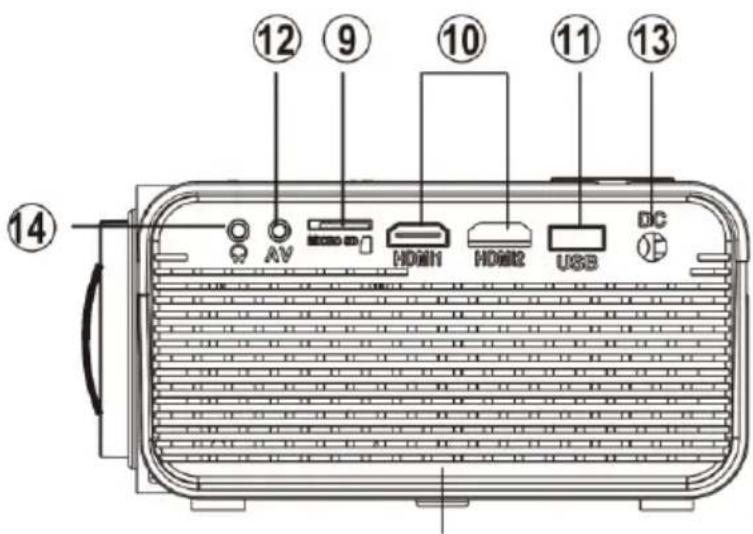
- Micro SD Card Port
- HDMI Input 1 & 2
- USB Port
- 3.5mm Audio Output
- DC Power Port
- 3.5mm AV Input
Controls

flowchart
graph LR
    A["Source<br>Press to change media source mode."] --> B["Menu<br>Press to access on-screen menu and options."]
    B --> C["OK"]
    C --> D["Arrows/OK<br>Press to navigate on-screen menu and make selections."]
    D --> E["Return<br>Press to return to a previous page or setting in the on-screen menu."]
    E --> F["Power/Pair<br>Press to power on the projector.<br>Press and hold to power OFF."]
Install Power Adapter
Follow below picture to connect the power adapter.
First connect the round connector to the projector and then the adapter to the power network.

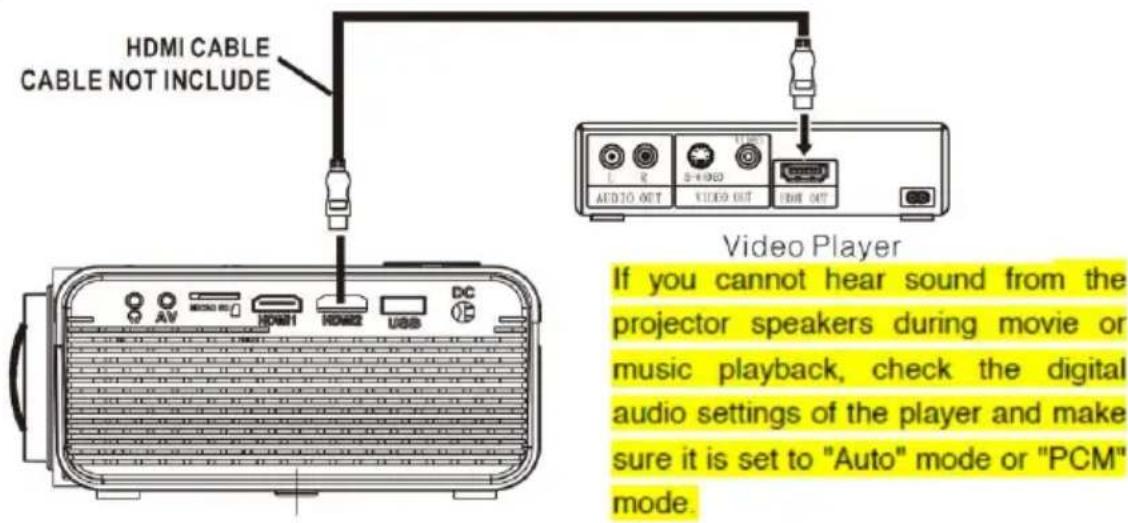
Connect HDMI
Follow the picture below to connect a device with an HDMI cable.
- Turn off the projector before connecting the HDMI cable.
- After connecting, press the button to turn on the projector and the power indicator will light up GREEN
- Press the SOURCE button to go to HDMI mode and the video of the HDMI device will show on the projector screen. There are 2 HDMI inputs, HDMI1 interface corresponds to HDMI 1 in SOURCE mode, and HDMI2 interface corresponds to HDMI 2 in SOURCE mode.
- Press the button to turn off the unit power.
HDMI HD signal input
- Using a MHL HDMI cable: This projector is compatible with MHL cables: this means that you can connect your smartphone or tablet (if MHL compatible) and stream in HD from your smartphone or tablet to the projector with a MHL cable (not included).
- Using a Chromecast dongle: The HDMI connectors are compatible with the use of a chrome cast dongle to enable you to stream wirelessly from your smartphone or tablet
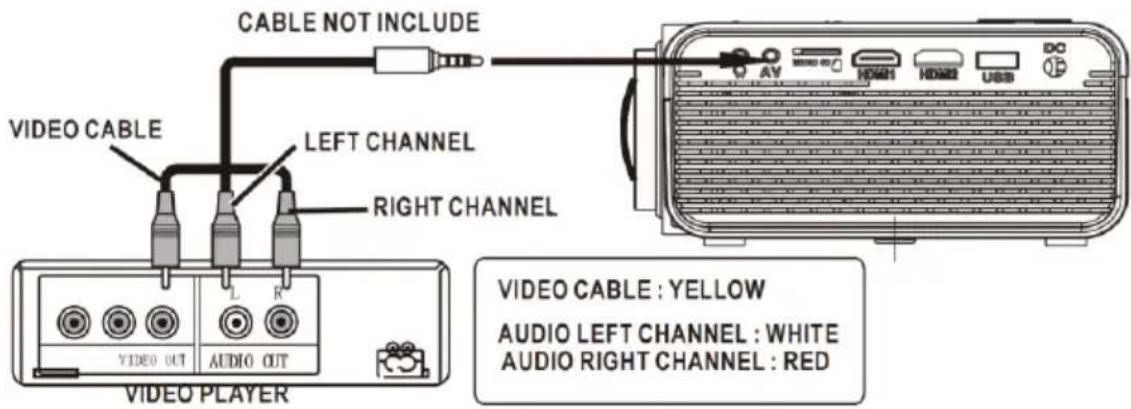
Connecting an AV Source
Follow the picture below to connect a device with an AV cable.
- Turn off the unit before connecting the AV cable.
- Use the AV cable to connect a device as shown in the image below.
- After connecting, press the button to turn on the projector and the power indicator will light up GREEN
- Press the SOURCE button to go to the AV mode and the video of AV device will show on the projector screen.
- Press the button to turn off the unit power.
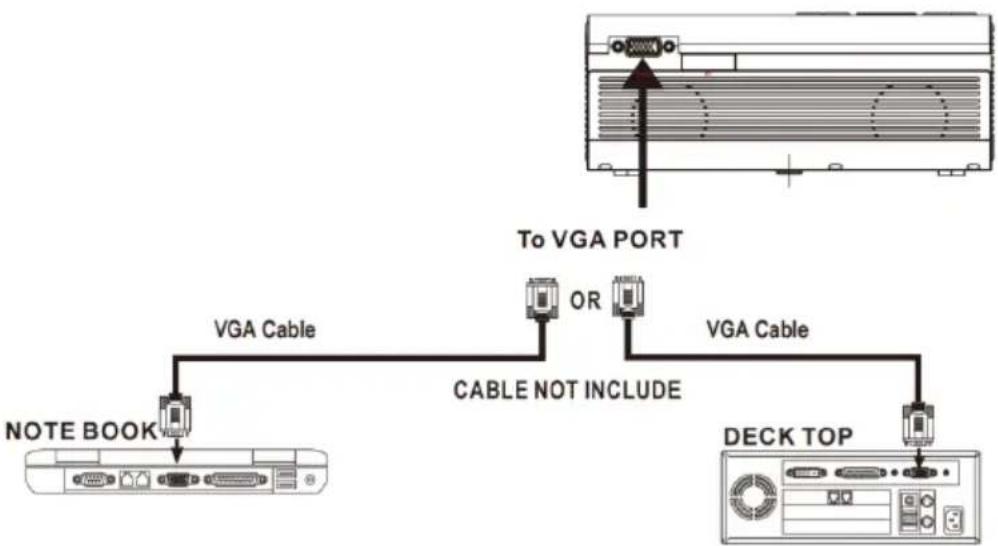
Connecting a VGA source
Follow the picture below to connect a device with a VGA cable.
- Turn off the projector before connecting the VGA cable.
- Press the button to turn off the power of your projector before connecting.
- After connecting, press the button to turn on the projector and the power indicator will up light GREEN
- Press the SOURCE button to go to the VGA mode and the video of VGA device will show on projector screen.
- Press the button to turn off the unit power.
flowchart
graph TD
    A["Note Book"] --> B["VGA Cable"]
    B --> C["CABLE NOT INCLUDE"]
    C --> D["To VGA PORT"]
    D --> E["Deck Top"]
    style A fill:#f9f,stroke:#333
    style E fill:#ccf,stroke:#333
Please refer to the following table to adjust the output signal from computer.
| Type | Resolution | Frequency | Field Frequency | |
| PC | VGA | 640x480 | 31.5 | 60 |
| 34.7 | 70 | |||
| 37.9 | 72 | |||
| 37.5 | 75 | |||
| SVGA | 800x600 | 31.4 | 50 | |
| 35.1 | 56 | |||
| 37.9 | 60 | |||
| 46.6 | 70 | |||
| 48.1 | 72 | |||
| 46.9 | 75 | |||
| XGA | 1024x768 | 40.3 | 50 | |
| 48.4 | 60 | |||
| 56.5 | 70 | |||
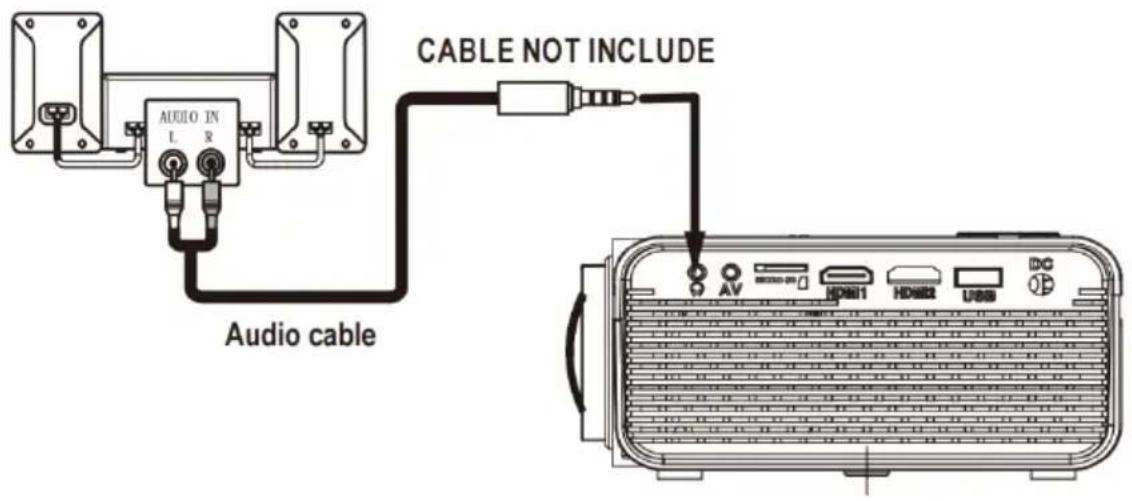
Connecting an Audio device
Follow the picture below to connect a device with an Audio cable.
- Press the button to turn off the power of your projector before connecting.
- Use the audio cable to connect the devices as shown in the image below.
- After you have connected both devices you will hear the sound through the connected device.
- Switch off both devices after use.
Station Amplifier
Connect USB Device And Micro SD Card
“TF”
Follow below picture to connect a USB stick and Micro SD card.
Turn off the projector before connecting the USB/Micro SD card.
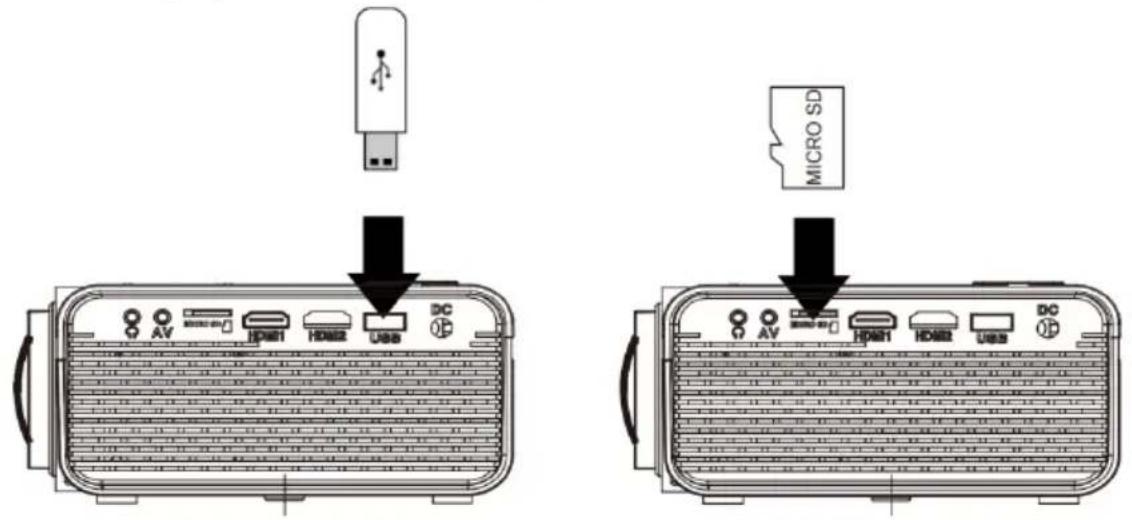
Using a Micro SD Card or USB Stick
Connect USB/Micro SD device:
- Turn off the unit before connecting USB/Micro SD card.
- Connect the USB device to the USB port.
-
After connecting, press the button to turn on the projector and the power indicator light up GREEN.
-
Press the /E SOURCE button to enter and use the buttons to search the MEDIAPLAYER mode.
- After selection, use the buttons to search the MUSIC/PHOTO/MOVIE icon and press the button to enter, if necessary, use the button to select Micro SD card or USB and press the button to enter.
- Use the buttons to search the correct file and press the button to preview playback file and press the button of unit or button of remote to start playback.
- Press button to search forwards and backwards quickly.
- Press button to search next or previous file.
- During playback, press the button to pause and press again to resume.
NOTE: Remove USB/Micro SD card device, press the button to turn off power FIRST.
| Sub-Menu on Photo screen | |
| 1. While playing photos, press the OK button and more function are being displayed (figure 1).2. Use the button to select icon and press button to play special function. | Figuur 1. |
| Sub-Menu on Music screen | |
| 3. While playing music, press the OK button and more function are being displayed (figure 2).4. Use the button to select icon and press button to play special function. | Figuur 2.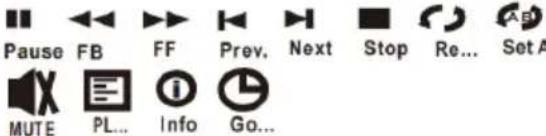 |
| Sub-Menu on Movie screen | |
| 5. While playing a movie, press the OK button and more function are being displayed (figure 3).6. Use the button to select icon and press button to play special function. | Figuur 3.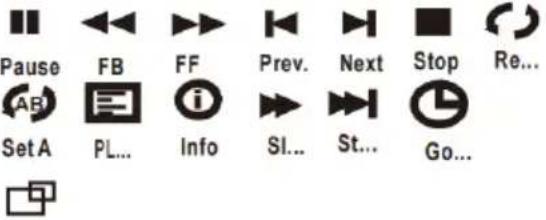 AS... AS... |
Using Projector Menu 1.0
Press button to enter projector menu. Press again to previous status.
| Picture Mode | Standard |
| Contrast | 50 |
| Brightness | 50 |
| Color | 50 |
| Sharpness | 50 |
| Tint | 50 |
| Color Temperature | Medium |
| Aspect Ratio | Auto |
| Noise Reduction | Middle |
| Screen |
Use buttons to select an item. The selected item is displayed in the upper right of the screen.
1. Picture Mode
Select Vivid, User (custom), Soft, or Standard
2. Contrast, Brightness, etc.
Set Picture Mode to "User" to adjust these settings. Tint can only be adjusted in AV and NTSC IN
3. Color Temperature
Select Warm, Cool, or Medium.
4. Aspect Ratio
Select 16:9, 4:3, or Auto
5. Noise Reduction
Select Off, Low, Middle, High or Default
6. Screen
Can only be a adjusted when in VGA mode
| Color temper... (temperature) | |
| Customer define | Parameter |
| red | 0-100 |
| blue | 0-100 |
| green | 0-100 |
| Aspect Ratio | |
| 4:3 | The signal in a 4:3 aspect ratio projection image. |
| 16:9 | The signal in a 16:9 aspect ratio projection image. |
Using Projector Menu 2.0
Press button to enter projector menu. Press again to previous status.
| Sound Mode | Standard |
| Treble | 50 |
| Bass | 50 |
| Balance | 0 |
| Auto Volume | Off |
| Surround Sound | Off |
Use buttons to select an item. The selected item is displayed in the upper right of the screen.
1. Sound Mode
Select Music, Movie, User (custom), Sports, or Standard.
2. Treble, Bass
Set Sound Mode to "User" to adjust these settings.
3. Balance
Adjust the audio balance.
4. Surround Sound
Turn Surround Sound ON or OFF.
| Sound Mode - User | Parameter |
| Treble | 0-100 |
| Bass | 0-100 |
Using Projector Menu 3.0
Press button to enter projector menu.
Press again to previous status.
| OSD Language | English |
| Restore Factory Default | |
| Panel Rotate | 0 |
| Info |
Use buttons to select an item. The selected item is displayed in the upper right of the screen.
1. OSD Language
Select different language, Follow below figure.
2. Restore Factory Default
Select Y or N.
3. Panel Rotate
Select rotate 0, rotate 1, rotate 2, rotate 3.
4. INFO
Display the unit information as below.
Specifications
| Light Source Type | LED |
| Brightness Output | LED bulb 2800 LumensWhite light output 45 Lumens |
| Display Native Resolution | 800 x 480 |
| HDMI Input Supported Video Resolution. | 1080p, 1080i, 720p, 576i, 480p, and 480i |
| Power Consumption | Operating 36W; Standby 0.8W |
| Power Input Connect Included Adapter | DC 12V, 3.5A |
| Included Adapter Connect DC input of unit | Input AC100-240V,50/60HzOutput DC12V, 3.5 A |
| Display Color | 16.7K |
| Projection Size | 30-100 inch |
| Signal Port | Video/VGA/HDMI |
| USB Port | Support USB device up to 32GBSupport format mpeg1, Mpeg2,mpeg4, mp3, Jpeg |
| SD Card | Support SD card up to 32GBSupport format mpeg1, Mpeg2,mpeg4, mp3, Jpeg |
| Weight | 0.9 KG |
| Dimension | 203 x 150 x 82 mm |
Use only the power supply listed in the user instructions
| Information | Value and and precision |
| Manufacturers name or trade mark, commercial registration and address | - SHENZHEN KEZHEN ELECTRONIC CO.,LTD / 4/F BLDG D LIUXIAN 2 RD AREA 71 BA0'AN DISTRICT SHENZHEN,GUANGDONG 518101 CHINA |
| Model Identifier | - KZ1203500V |
| Input voltage | AC 100-240V |
| Input AC frequency | 50/60Hz |
| Output voltage | 12.0 V |
| Output current | 3.5A |
| Output Power | 42.0 W |
| Average active efficiency | 87.66% |
| Efficiency at low load (10%) | 83.11 % |
| No load Power consumption | 0.10W |
TROUBLESHOOTING
Before contacting the customer service, please kindly check by yourself with the following chart.
| No Image is Projected or a "No Signal" message is displayed | 1. Power light is on. If it is not on, check the projector is plugged into the mains, that the socket is switched on, and then press the power button on the projector.2. Check the lens cover has been removed.3. Check the cables are securely attached and installed as per the User Manual.4. The image source may not be set correctly. Press the Source button on the Control Panel or the Remote, to select the correct setting.5. Check in the Menu section under Video input signal to make sure that has been set correctly. |
| The Lamp (Bulb) switches off after a period of time | Is the warning light indicator red? If so, the projector is overheating which turns the light off automatically.1. Leave the projector to cool for a few moments.2. Once cooled, check nothing is blocking the ventilation vents.3. Check the air filter is clean and clean if necessary.4. Turn on the projector.If the issue persists please contact your support provider for further assistance. |
| The Image is wider at the top/bottom of the screen | This is called keystone and is due to the projection angle not being perpendicular to the screen. To correct use the projectors inbuilt keystone function to adjust the image. |
| Spots on the screen | Using a vacuum cleaner to clean the lens. If cleaning doesn't resolve things, please contact your support provider for further assistance. |
| The image brightness has faded | This could possibly be caused by the ambient light in the room. If not, the chances are that you need to replace the lamp (bulb). |
Guarantee
Commaxx B.V. offers service and warranty in accordance to European law, which means that in case of repairs (both during and after the warranty period) you should contact your local dealer.
Important note: It is not possible to send products that need repairs to Commaxx B.V. directly.
Important note: If this unit is opened or accessed by a non-official service center in any way, the warranty expires.
This device is not suitable for professional use. In case of professional use, all warranty obligations of the manufacturer will be voided.
Disclaimer
Updates to Firmware and/or hardware components are made regularly. Therefore some of the instruction, specifications and pictures in this documentation may differ slightly from your particular situation. All items described in this guide for illustration purposes only and may not apply to particular situation. No legal right or entitlements may be obtained from the description made in this manual.
Disposal of the Old Device

natural_image
Symbol of a trash bin crossed with a diagonal line, no text or numbers presentThis symbol indicates that the relevant electrical product or battery should not be disposed of as general household waste in Europe. To ensure the correct waste treatment of the product and battery, please dispose them in accordance to any applicable local laws of requirement for disposal of electrical equipment or batteries. In so doing, you will help to conserve natural resources and improve standards of environmental protection in treatment and disposal of electrical waste (Waste Electrical and Electronic Equipment Directive).
CE MARKING

Hereby, Commaxx B.V. Wiebachstraat 37, 6466 NG Kerkrade, The Netherlands, declares that this product is in compliance with the essential EU directive requirements.
The declaration of conformity may be consulted via techdoc@commaxxgroup.com
Service
For more information and helpdesk support, please visit www.lenco.com
Commaxx B.V. Wiebachstraat 37, 6466 NG Kerkrade, The Netherlands.
LET OP:
natural_image
Line drawing of a projector with lens and ventilation slots (no text or symbols)Hoofdapparaat
natural_image
Simple line drawing of a cable with a connector (no text or symbols)AC-stroomadapter
Lenskap
Lenco
Model LPJ-280WH
Our manual - LCD projector
Subcar� mechanical driving - LCD projector
Electrical open-circuiting - LCD projector
Mode d'impedial - Projector LCD
Manual to account - Projector LCD
Draper voltage driving - LCD projector
Electrical winding - LCD projector
Gebruiksaanwijzi ng
| EN | NL |
| REMOVE | VERWIJDEREN |
| LENS COVER | LENSKAP |
| CLOSE | SLUITEN |
natural_image
Line drawing of a meeting with participants seated at a table facing a presentation screen (no text or symbols)TAFEL VÓÓR
natural_image
Illustration of a meeting with a projection screen above a group of people seated at a table (no text or symbols present)PLAFOND VÓÓR

natural_image
Illustration of a group of people seated at a table facing a large triangular flag, with a monitor nearby (no text or symbols present)TAFEL ACHTER
Plafondmontage achter:
natural_image
Technical diagram of a computer monitor front panel with grid and control buttons (no text or symbols)| EN | NL |
| HANGER | HANGER |
| CEILING | PLAFOND |
| FIXED HANGER HOLE | VAST HANGERGAT |
| EN | NL |
| SCREEN | SCHERM |
| PROJECTOR | PROJECTOR |
| VERTICAL DIMENSION | VERTICALE AFMETING |
| You can use the adjustment foot to adjust the projection angle. | U kunt de verstelpoot gebruiken om de projectiehoek aan te passen. |
By turning the focus wheel, the image is focused

flowchart
graph TD
    A["Source\nPress to change media source mode."] --> B["Menu\nPress to access on-screen menu and options."]
    B --> C["OK"]
    C --> D["Arrows/OK\nPress to navigate on-screen menu and make selections."]
    D --> E["Return\nPress to return to a previous page or setting in the on-screen menu."]
    E --> F["Power/Pair\nPress to power on the projector.\nPress and hold to power OFF."]
| EN | NL |
| Source | Bron |
| Press to change media source mode. | Indrukken om van mediabron te wisselen. |
| Menu | Menu |
| Press to access on-screen menu and options. | Indrukken om schermmenu's en opties te openen. |
| Arrows/OK | Pijltjes/OK |
| Press to navigate on- screen menu and make selections. | Indrukken om schermmenu's te navigeren en selecties te maken. |
| Return | Terug |
| Press to return to a previous page or setting in the on- screen menu. | Indrukken om terug te keren naar een vorige pagina of instelling in de schermmenu's. |
| Power/Pair | Aan/Uit/Koppelen |
| Press to power on the projector. | Indrukken om de projector in te schakelen. |
| Press and hold to power OFF. | Ingedrukt houden om UIT te schakelen. |
De stroomadapter installeren
| EN | NL |
| HDMI CABLE | HDMI-KABEL |
| CABLE NOT INCLUDE | KABEL NIET INBEGREPEN |
| Video Player | Videospeler |
| If you cannot hear sound from the projector speakers during movie or music playback, check the digital audio settings of the player and make sure it is set to "Auto" mode or "PCM" mode. | Als er geen geluid klinkt uit de luidsprekers van de projector speakers tijdens video- of muziekweergave, controleer dan de digitale audio-instellingen van de speler en zorg ervoor dat deze ingesteld is op de modus "Auto" of "PCM". |
| EN | NL |
| CABLE NOT INCLUDE | KABEL NIET INBEGREPEN |
| Audio cable | Audiokabel |
2. Contrast, Brightness (Helderheid), enz.
1. OSD Language (OSD Taal)
Selecteer Y (Ja) of N (Nee).
3. Panel Rotate (Paneel draaien)
Selecteer rotate 0, rotate 1, rotate 2, rotate 3 (draaien 0, 1, 2 of 3).
4. INFO
natural_image
Symbol of a trash bin crossed with diagonal lines, no text or numbers presentnatural_image
Line drawing of a projector with lens and ventilation slots (no text or symbols)Hauptgerät
natural_image
Simple line drawing of a cable with a connector (no text or symbols)AC-Netzadapter
Objektivabdeckung
Lenco
Model LPJ-280WH
User material - LCD projector
Gebruikton shielding - LCD projector
Dialium anodelecting - LCD projector
Mode d'emploi - Protractor LCD
Manual de acuera - Protractor LCD
Energizing coating - LCD propellant
Bulbance coating - LCD projector
Bedienungsanleitung
| EN | DE |
| REMOVE | ABNEHMEN |
| LENS COVER | OBJEKTIVABDECKUNG |
| CLOSE | AUFSETZEN |
natural_image
Diagram of a computer monitor front panel with a black arrow pointing to the screen area (no text or symbols present)| EN | DE |
| HANGER | DECKENHALTERUNG |
| CEILING | DECKE |
| FIXED HANGER HOLE | FESTE DECKENHALTERUNGSBOHRUNG |
By turning the focus wheel, the image is focused

flowchart
graph LR
    A["Source\nPress to change media source mode."] --> B["Menu\nPress to access on-screen menu and options."]
    B --> C["OK"]
    C --> D["Arrows/OK\nPress to navigate on-screen menu and make selections."]
    D --> E["Return\nPress to return to a previous page or setting in the on-screen menu."]
    E --> F["Power/Pair\nPress to power on the projector.\nPress and hold to power OFF."]
| EN | DE |
| CABLE NOT INCLUDE | KABEL NICHT IM LIEFERUMFANG ENTHALTEN |
| Audio cable | Audiokabel |

4. Surround Sound (Surroundklang)
4. INFO (INFORMATION)
natural_image
Symbol of a trash bin crossed with no text or numbers, representing waste sorting or disposal (no text present)natural_image
Line drawing of a projector with front panel and screen (no text or symbols)Unité principale
Télé command e (2 piles AAA non fournies)
natural_image
Simple line drawing of a cable with a connector (no text or symbols)| EN | FR |
| REMOVE | ENLEVER |
| LENS COVER | CACHE DE L’OBJECTIF |
| CLOSE | REMETTRE |
natural_image
Illustration of a group of people seated at a table facing a presentation screen (no text or symbols visible)TABLE À L'AVANT
natural_image
Illustration of a meeting with a projection screen above a group of people seated at a table (no text or symbols present)PLAFOND À L'AVANT

natural_image
Illustration of a group of people seated at a table facing a large triangular flag, with no visible text or symbols.TABLE À L'ARRIÈRE
natural_image
Technical diagram of a computer monitor front panel with grid and control buttons (no text or symbols)| EN | FR |
| HANGER | SUSPENSION |
| CEILING | PLAFOND |
| FIXED HANGER HOLE | TROU DE SUSPENSION FIXE |
Ajuster la position verticale
By turning the focus wheel, the image is focused
| EN | FR |
| FOCUS ADJ. wheel | Molette de RÉGLAGE DE LA MISE AU POINT |
| By turning the focus wheel, the image is focused. | Tourner la molette de mise au point permet de centrer l'image. |
| TRAPEZOIDAL ADJ. wheel | Molette de RÉGLAGE DE LA DISTORSION |
flowchart
graph TD
    A["Source\nPress to change media sourcemode."] --> B["Menu\nPress to access on-screen menu and options."]
    B --> C["Arrows/OK\nPress to navigate on-screen menu and make selections."]
    C --> D["Return\nPress to return to a previous page or setting in the on-screen menu."]
    D --> E["Power/Pair\nPress to power on the projector.\nPress and hold to power OFF."]
| EN | FR |
| To VGA PORT | Vers le port VGA |
| OR | OU |
| VGA Cable | Câ ble VGA |
| CABLE NOT INCLUDE | CÂBLE NON FOURNI |
| NOTE BOOK | ORDINATEUR PORTABLE |
| DESK TOP | ORDINATEUR DE BUREAU |
| EN | FR |
| CABLE NOT INCLUDE | CÂBLE NON FOURNI |
| Audio cable | Câ ble audio |
6. Treble, Bass (Aigus, Graves)
7. Balance (Balance)
4. INFO (INFORMATION)
natural_image
Symbol of a trash bin crossed with a diagonal line, no text or numbers presentnatural_image
Line drawing of a projector with front panel and screen (no text or symbols)Unidad principal
natural_image
Simple line drawing of a cable with a connector (no text or symbols)Adaptador de CA
Tapa de la lente
Lenco
Model LPJ-280WH
User manual - LCD projector
Lodewattenschließlich - LCD projector
Befrafengeschäft - LCD Provector
Mode d'expression - Proyecheur LCD
Manual de reagent - Proyecheur LCD
Foggerprojektung - LCD propeller
Bakserwartung - LCD-prophysis
Manual del
usuario
| EN | ES |
| REMOVE | QUITAR |
| LENS COVER | TAPA DE LA LENTE |
| CLOSE | CERRAR |
natural_image
Illustration of a group of people seated at a table facing a presentation screen (no text or symbols visible)PARTE FRONTAL DE LA MESA

natural_image
Illustration of a meeting with a projection screen above a group of people seated at a table (no text or symbols present)PARTE FRONTAL DEL TECHO

natural_image
Illustration of a group of people seated at a table facing a large triangular flag, with no visible text or symbols.DETRÁS DE LA MESA
natural_image
Simple diagram of a suspended object with a dotted pattern above it, no text or symbols present.Pantalla
Proyector
natural_image
Diagram of a computer monitor front panel with a highlighted button and grid pattern (no text or symbols)| EN | ES |
| HANGER | GANCHO |
| CEILING | TECHO |
| FIXED HANGER HOLE | ORIFICIO PARA COLGAR FIJO |
By turning the focus wheel, the image is focused
TRAPEZOIDAL ADJ. Wheel
| EN | ES |
| FOCUS ADJ. wheel | ENFOQUE ADJ. rueda |
| By turning the focus wheel, the image is focused. | Al girar la rueda de enfoque, la imagen se enfoca. |
| TRAPEZOIDAL ADJ. wheel | TRAPEZOIDAL ADJ. rueda |
⑤ ⑥
flowchart
graph LR
    A["Source<br>Press to change media source mode."] --> B["Menu<br>Press to access on-screen menu and options."]
    B --> C["OK"]
    C --> D["Arrows/OK<br>Press to navigate on-screen menu and make selections."]
    D --> E["Return<br>Press to return to a previous page or setting in the on-screen menu."]
    E --> F["Power/Pair<br>Press to power on the projector.<br>Press and hold to power OFF."]
natural_image
Symbol of a trash bin crossed with two crossed lines, no text or numbers presentnatural_image
Line drawing of a projector with lens and control panel (no text or symbols)Hovedenhed
natural_image
Simple line drawing of a cable with a connector (no text or symbols)Strø mforsyning
Linsedæksel
Lenco
Model LPJ-280WH
Kurs manazl - LCD projector
Gezalkonabolding - LCD projector
Dellorsengesleistung - LCD projector
Mole d'emploi - Projector LCD
Mensel de saaris - Projector LCD
Ingelegungung - LCD projector
Bruttoer/sozky - LCD projector
Brugervejledning
natural_image
Illustration of a group of people seated at a table facing a presentation screen (no text or symbols visible)BORDPLACERING FORAN
natural_image
Illustration of a meeting with a projection screen above a group of people seated at a table (no text or symbols present)LOFTSPLACERING FORAN

natural_image
Illustration of a group of people seated at a table with a triangular flag and a projector (no text or symbols present)BORDPLACERING BAGVED
Loftplacering bagved:
natural_image
Front view of a computer monitor with a grid-patterned panel and a black arrow pointing to a button (no text or symbols)| EN | DK |
| HANGER | OPHÆ NG |
| CEILING | LOFT |
| FIXED HANGER HOLE | FAST HUL TIL OPHÆ NG |
Justé r lodret placering
| EN | DK |
| SCREEN | SKÆ RM |
| PROJECTOR | PROJEKTOR |
| VERTICAL DIMENSION | LODRET DIMENSION |
| You can use the adjustment foot to adjust the projection angle. | Du kan bruge justeringsfoden til at justere projektionsvinklen. |
By turning the focus wheel, the image is focused
| EN | DK |
| FOCUS ADJ. wheel | FOKUS JUST. hjul |
| By turning the focus wheel, the image is focused. | Nå r fokushjulet drejes, fokuseres billedet. |
| TRAPEZOIDAL ADJ. wheel | TRAPEZ JUST. hjul |
Knapper på fjernbetjening
Tænd/sluk
Tryk for at tænde.
flowchart
graph LR
    A["Source\nPress to change media source mode."] --> B["Menu\nPress to access on-screen menu and options."]
    B --> C["OK"]
    C --> D["Arrows/OK\nPress to navigate on-screen menu and make selections."]
    D --> E["Return\nPress to return to a previous page or setting in the on-screen menu."]
    E --> F["Power/Pair\nPress to power on the projector.\nPress and hold to power OFF."]
| EN | DK |
| Source | Kilde |
| Press to change media source mode. | Tryk for at skifte tilstand for mediekilde. |
| Menu | Menu |
| Press to access on-screen menu and options. | Tryk for at få adgang til skæmmenu og valgmuligheder. |
| Arrows/OK | Pile/OK |
| Press to navigate on- screen menu and make selections. | Tryk for at navigere i menuen på skærmen og foretage valg. |
| Return | Tilbage |
| Press to return to a previous page or setting in the on- screen menu. | Tryk for at vende tilbage til en tidligere side eller indstilling i skæmmenuen. |
| Power/Pair | Strø m/parring |
| Press to power on the projector. | Tryk for at tænde projektoren. |
| Press and hold to power OFF. | Tryk og hold nede for at slukke (OFF) |
Tilslut strø mforsyning
Fø lg billedet nedenfor for at tilslutte strø mforsyningen.
| EN | DK |
| HDMI CABLE | HDMI-KABEL |
| CABLE NOT INCLUDE | KABEL MEDF∅LGER IKKE |
| Video Player | Videoafspiller |
| If you cannot hear sound from the projector speakers during movie or music playback, check the digital audio settings of the player and make sure it is set to "Auto" mode or "PCM" mode. | Hvis du ikke kan høre lyd fra projektorhøjtalerne under afspilningen af film eller musik, skal du kontrollere indstillingerne for digital lyd for afspilleren og sørge for, at den er indstillet til "Auto mode" eller "PCM" |
| EN | DK |
| CABLE NOT INCLUDE | KABEL MEDF∅LGER IKKE |
| Audio cable | Lydkabel |
Tilslut USB-enhed og microSD-kort "TF"
Tænd (ON) eller sluk (OFF) for surroundsound
| Lydtilstand – bruger | Parameter |
| Diskant | 0-100 |
| Bas | 0-100 |
Brug af Projektormenu 3.0
Tryk på knappen, for at å bne projektormenuen. Tryk igen for at vende tilbage til forrige tilstand.
| OSD-sprog | Dansk/Norsk |
| Gendan fabriksindstillinger | |
| Roté r panel | 0 |
| Oplysninger |
natural_image
Symbol of a trash bin crossed with two crossed lines and a blank rectangular base (no text or numbers present)natural_image
Line drawing of a projector with lens and control panel (no text or symbols)Huvudenhet
natural_image
Simple line drawing of a cable with a connector (no text or symbols)Nä tadapter
Linsskydd
Lenco
Model LPJ-280WH
User manuel - LCD projector
Cobaltelhauskolding - LCD projector
Bruttoengeschichtung - LCD projector
Moto d'engesamt - Projecteur LCD
Maser de Canada - Projecteur LCD
Begarnvulming - LCD projecteur
Sakservlartrag - LCD projector
Bruksanvisning
natural_image
Illustration of a group of people seated at a table facing a presentation screen (no text or symbols visible)BORD, FRAMFÖR
natural_image
Illustration of a meeting with a projection screen above a group of people seated at a table (no text or symbols present)TAK, FRAMFÖR

natural_image
Illustration of a group of people seated at a table facing a large triangular screen (no text or symbols visible)BORD, BAKOM
Takmontering, bakom:
natural_image
Illustration of a meeting scene with a speaker at the front and a projection screen on the right (no text or symbols)TAK, BAKOM
natural_image
Front view of a computer monitor with a grid-patterned panel and a black arrow pointing to the center (no text or symbols)| EN | SE |
| HANGER | UPPHÄNGNING |
| CEILING | TAK |
| FIXED HANGER HOLE | UPPHÄNGNINGSHÅL |
| EN | SE |
| SCREEN | DUKEN |
| PROJECTOR | PROJEKTOR |
| VERTICAL DIMENSION | VERTIKAL DIMENSION |
| You can use the adjustment foot to adjust the projection angle. | Du kan använda justeringsfoten för att justera projektorns vinkel. |
FOCUS ADJ.wheel By turning the focus wheel, the image is focused
| EN | SE |
| FOCUS ADJ. wheel | FOKUS JUST. hjul |
| By turning the focus wheel, the image is focused. | Genom att vrida på fokuseringshjulet fokuseras bilden. |
| TRAPEZOIDAL ADJ. wheel | KEYSTONE JUST. hjul |
flowchart
graph LR
    A["Source\nPress to change media source mode."] --> B["Menu\nPress to access on-screen menu and options."]
    B --> C["OK"]
    C --> D["Arrows/OK\nPress to navigate on-screen menu and make selections."]
    D --> E["Return\nPress to return to a previous page or setting in the on-screen menu."]
    E --> F["Power/Pair\nPress to power on the projector.\nPress and hold to power OFF."]
| EN | SE |
| CABLE NOT INCLUDE | KABEL INGÅR INTE |
| Audio cable | Ljudkabel |
natural_image
Symbol of a trash bin crossed with no text or numbers, representing waste sorting or disposal (no text present)natural_image
Line drawing of a projector with no visible text or symbols on the device itselfPä ä laite

natural_image
Simple line drawing of a cable with a connector (no text or symbols)AC-verkkolaite
Linssin suojus
Lenco
Model LPJ-280WH
User manual - LCD projector
Radio station drawing - LCD projector
Fstation installation - (CD/PRO Martin)
Water storage - Processor LCD
Nonlinear sensors - Projector LCD
Hyper-Indicating - LCD projector
Microsensing - LCD projector
Kä yttö opas
natural_image
Illustration of a group of people seated at a table facing a presentation screen (no text or symbols visible)ETEEN PÖYDÄLLE
natural_image
Illustration of a meeting with a projection screen and audience (no text or symbols)ETEEN KATTOON

natural_image
Illustration of a group of people seated at a table facing a large triangular flag, with a monitor nearby (no text or symbols present)TAAKSE PÖYDÄLLE
Asennus taakse kattoon:
| EN | FI |
| Screen | Valkokangas |
| Projector | Projektori |
natural_image
Diagram of a computer monitor front panel with grid and control buttons (no text or symbols)| EN | FI |
| HANGER | RIPUSTIN |
| CEILING | KATTO |
| FIXED HANGER HOLE | KIINTEÄ RIPUSTUSREIKÄ |
FOCUS ADJ. Wheel by turning the focus wheel, the image is focused.
flowchart
graph LR
    A["Source<br>Press to change media source mode."] --> B["Menu<br>Press to access on-screen menu and options."]
    B --> C["OK"]
    C --> D["Arrows/OK<br>Press to navigate on-screen menu and make selections."]
    D --> E["Return<br>Press to return to a previous page or setting in the on-screen menu."]
    E --> F["Power/Pair<br>Press to power on the projector.<br>Press and hold to power OFF."]
natural_image
Symbol of a trash bin crossed with diagonal lines, no text or numbers present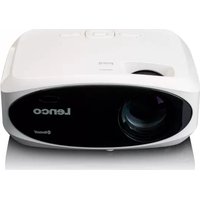
- Index
- CAUTION:
- KEEP THESE INSTRUCTIONS IN MIND:
- Warning:
- INSTALLATION
- Remove & Close The Lens Cover
- Placing Your Projector
- To Reduce Image Distortion
- Distance Between The Projector And Screen
- Placing Your Projector On Ceiling
- Adjust The Vertical Location
- Adjust The Focus And Keystone
- Controls Of Remote
- Power
- Mute
- VOL+/VOL-
- Source
- Exit
- Zoom
- NOTES:
- Main Operation
- Install Power Adapter
- Connect HDMI
- Connecting an AV Source
- Connecting a VGA source
- Connecting an Audio device
- Connect USB Device And Micro SD Card
- “TF”
- Using a Micro SD Card or USB Stick
- Using Projector Menu 1.0
- Picture Mode
- Contrast, Brightness, etc.
- Color Temperature
- Aspect Ratio
- Noise Reduction
- Screen
- Using Projector Menu 2.0
- Sound Mode
- Treble, Bass
- Balance
- Surround Sound
- Using Projector Menu 3.0
- OSD Language
- Restore Factory Default
- Panel Rotate
- INFO
- TROUBLESHOOTING
- Guarantee
- Disclaimer
- Disposal of the Old Device
- CE MARKING
- Service
- LET OP:
- De stroomadapter installeren
- Contrast, Brightness (Helderheid), enz.
- OSD Language (OSD Taal)
- Panel Rotate (Paneel draaien)
- Surround Sound (Surroundklang)
- INFO (INFORMATION)
- Ajuster la position verticale
- Treble, Bass (Aigus, Graves)
- Balance (Balance)
- Justé r lodret placering
- Knapper på fjernbetjening
- Tænd/sluk
- Tilslut strø mforsyning
- Tilslut USB-enhed og microSD-kort "TF"
- Brug af Projektormenu 3.0
Brand : LENCO
Model : LPJ-280WH
Category : Projector