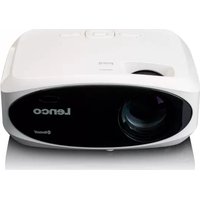
LPJ-900WH - Projector LENCO - Free user manual and instructions
Find the device manual for free LPJ-900WH LENCO in PDF.



| Product type | LED projector |
| Brand | Lenco |
| Model | LPJ-900WH |
| Native resolution | 1920 x 1080 (Full HD) |
| Brightness (LED lamp) | 9000 lumens |
| Brightness (white light) | 250 lumens |
| Light source | LED |
| Projection size | 35 to 165 inches |
| Connectivity | 2 HDMI inputs, 1 AV input (3.5 mm), 1 USB port, 1 Micro SD slot, 3.5 mm audio output |
| Supported formats | MPEG1, MPEG2, MPEG4, MP3, JPEG |
| Bluetooth | Version 5.0 (audio transmission only) |
| Power supply | AC adapter 100-240 V~50/60 Hz, output 19 V DC 4.75 A |
| Power consumption | 90 W operation, 0.8 W standby |
| Dimensions (W x D x H) | 354 x 197 x 110 mm |
| Weight | 1.66 kg |
| Operating temperature | 0 to 35 °C |
| Keystone correction | Yes, built-in adjustment wheel |
| Focus | Manual via wheel |
| Image rotation | 180° (remote control) |
| Maintenance | Clean with a soft dry cloth, do not use solvent |
| Safety | Do not open the device, avoid humidity, do not block ventilation |
| Included accessories | Remote control (batteries not included), AC adapter, lens cap, user manual |
Frequently Asked Questions - LPJ-900WH LENCO
User questions about LPJ-900WH LENCO
0 question about this device. Answer the ones you know or ask your own.
Ask a new question about this device
Download the instructions for your Projector in PDF format for free! Find your manual LPJ-900WH - LENCO and take your electronic device back in hand. On this page are published all the documents necessary for the use of your device. LPJ-900WH by LENCO.
USER MANUAL LPJ-900WH LENCO
Usage of controls or adjustments or performance of procedures other than those specified herein may result in hazardous radiation exposure.
KEEP THESE INSTRUCTIONS IN MIND:
- Do not cover or block any ventilation openings. When placing the device on a shelf, leave 5cm (2") free space around the whole device.
- Install in accordance with the supplied user manual.
- Keep the device away from heat sources such as radiators, heaters, stoves, candles and other heat-generating products or naked flame. The apparatus can only be used in moderate climates. Extremely cold or warm environments should be avoided. Working temperature between 0^ and 35^ C.
- Avoid using the device near strong magnetic fields.
- Electrostatic discharge can disturb normal usage of this device. If so, simply reset and restart the device following the instruction manual. During file transmission, please handle with care and operate in a static-free environment.
- Warning! Never insert an object into the product through the vents or openings. High voltage flows through the product and inserting an object can cause electric shock and/or short circuit internal parts. For the same reason, do not spill water or liquid on the product.
- Do not use in wet or moist areas such as bathrooms, steamy kitchens or near swimming pools.
- The apparatus shall not be exposed to dripping or splashing and make sure that no objects filled with liquids, such as vases, are placed on or near the apparatus.
- Do not use this device when condensation may occur. When the unit is used in a warm wet room with damp, water droplets or condensation may occur inside the unit and the unit could maybe not work properly; let the unit stand in power OFF for 1 or 2 hours before turning on the power: the unit should be dry before getting any power.
-
Although this device is manufactured with the utmost care and checked several times before leaving the factory, it is still possible that problems may occur, as with all electrical appliances. If you notice smoke, an excessive build-up of heat or any other unexpected phenomena, you should disconnect the plug from the main power socket immediately.
-
This device must operate on a power source as specified on the specification label. If you are not sure of the type of power supply used in your home, consult your dealer or local power company.
- Keep away from rodents. Rodents enjoy biting on power cords.
- To clean the device, use a soft dry cloth. Do not use solvents or petrol based fluids. To remove severe stains, you may use a damp cloth with dilute detergent.
- The supplier is not responsible for damage or lost data caused by malfunction, misuse, modification of the device or battery replacement.
- Do not interrupt the connection when the device is formatting or transferring files. Otherwise, data may be corrupted or lost.
- If the unit has USB playback function, the usb memory stick should be plugged into the unit directly. Don't use an usb extension cable because it can cause interference resulting in failing of data.
- The rating label has been marked on the bottom or back panel of the apparatus.
- This device is not intended for use by people (including children) with physical, sensory or mental disabilities, or a lack of experience and knowledge, unless they're under supervision or have received instructions about the correct use of the device by the person who is responsible for their safety.
- This product is intended for non professional use only and not for commercial or industrial use.
- Make sure the unit is adjusted to a stable position. Damage caused by using this product in an unstable position vibrations or shocks or by failure to follow any other warning or precaution contained within this user manual will not be covered by warranty.
- Never remove the casing of this apparatus.
- Never place this apparatus on other electrical equipment.
- Do not allow children access to plastic bags.
- Only use attachments/accessories specified by the manufacturer.
- Refer all servicing to qualified service personnel. Servicing is required when the apparatus has been damaged in any way, such as the power supply cord or the plug, when liquid has been spilled or objects have fallen into the apparatus, when the apparatus has been exposed to rain or moisture, does not operate normally, or has been dropped.
- Prolonged exposure to loud sounds from personal music players may lead to temporary or permanent hearing loss.
-
If the product is delivered with power cable or AC power adaptor :
-
If any trouble occur, disconnect the AC power card and refer servicing to qualified personnel.
- To completely disconnect the power input, the mains plug of the apparatus shall be disconnected from the mains, as the disconnect device is the mains plug of apparatus.
- Don't step on or pinch the power adaptor. Be very careful, particularly near the plugs and the cable's exit point. Do not place heavy items on the power adaptor, which may damage it. Keep the entire device out of children's reach! When playing with the power cable, they can seriously injure themselves.
- Unplug this device during lightning storms or when unused for a long period.
- The socket outlet must be installed near the equipment and must be easily accessible.
- Do not overload ac outlets or extension cords. Overloading can cause fire or electric shock.
- Devices with class 1 construction should be connected to a main socket outlet with a protective earthed connection.
- Devices with class 2 construction do not require a earthed connection.
- Always hold the plug when pulling it out of the main supply socket. Do not pull the power cord. This can cause a short circuit.
-
Do not use a damaged power cord or plug or a loose outlet. Doing so may result in fire or electric shock.
-
If the product contains or is delivered with a remote control containing coin / cell batteries:
Warning:
- "Do not ingest battery, Chemical Burn Hazard" or equivalent working.
- [The remote control supplied with] This product contains a coin / button cell battery is swallowed, it can cause severe internal burns in just 2 hours and can lead to death.
- Keep new and used batteries away from children.
- If the battery compartment does not close securely, stop using the product and keep it away from children.
-
If you think batteries might have been swallowed or placed inside any part of the body, seek immediate medical attention.
-
Caution about the use of Batteries:
-
Danger of explosion if battery is incorrectly replaced. Replace only with the same or equivalent type.
-
Battery cannot be subjected to high or low extreme temperatures, low air pressure at high altitude during use, storage or transportation.
- Replacement of a battery with an incorrect type that can result in an explosion or the leakage of flammable liquid or gas.
- Disposal of a battery into fire or a hot oven, or mechanically crushing or cutting of a battery, that can result in an explosion.
- Leaving a battery in an extremely high temperature surrounding environment that can result in an explosion or that leakage of flammable liquid or gas.
- A battery subjected to extremely low air pressure that may result in an explosion or the leakage of flammable liquid or gas.
- Attention should be drawn to the environmental aspects of battery disposal.
INSTALLATION
- Unpack all parts and remove protective material.
- Do not connect the unit to the mains before checking the mains voltage and before all other connections have been made.
Do not connect the unit to the mains before checking the mains voltage and before all other connections have been made. Packing Included:
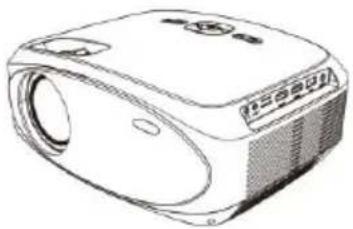
Main unit
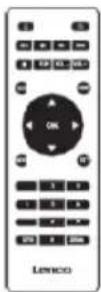
Remote (2 X AAA batteries not included)
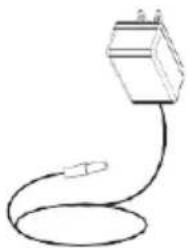
AC Power Adapter
Lens Cover
User Manual
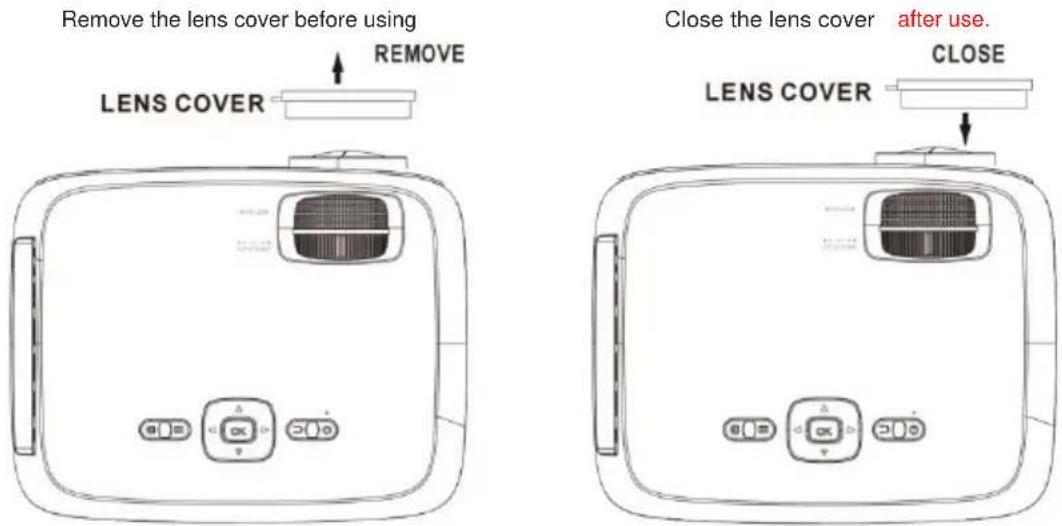
Remove & Close The Lens Cover
Placing Your Projector
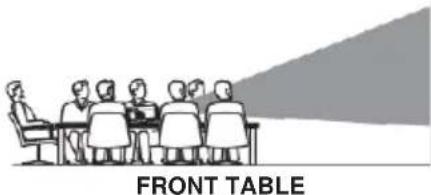
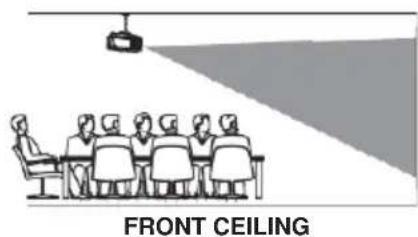
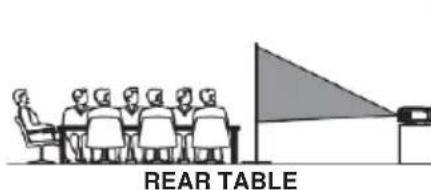
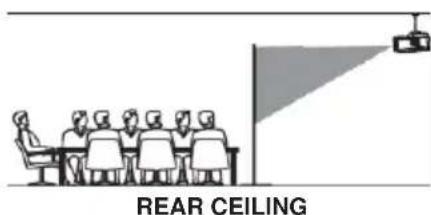
Your projector can be installed in four different configurations (see picture below):
Table mounting front:
Select this location with the projector is placed in front of the screen. This is the most common way to position the projector for quick setup and portability.
Ceiling mounting front:
Select this location when the projector is mounted upside down at the ceiling in front of the screen.
NOTE: A projector mount is required to mount the projector on the ceiling.
Table mounting rear:
Select this location if you want to place the projector at the rear of the screen.
NOTE: That a special rear projection screen is required.
Ceiling mounting rear:
Select this location when the projector is mounted upside down at the ceiling at the rear of the screen.
NOTE: That a projector mount and a rear projection screen is required to mount the projector on the ceiling.
To Reduce Image Distortion
It is recommended to move the projector as close to center of screen.
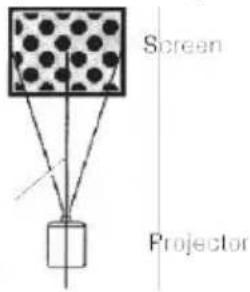
Square/Rectangle
Distance Between The Projector And Screen
Measure the distance between the projector and where you want to position the screen. This is the projection distance and the screen diagonal indicated in inches.
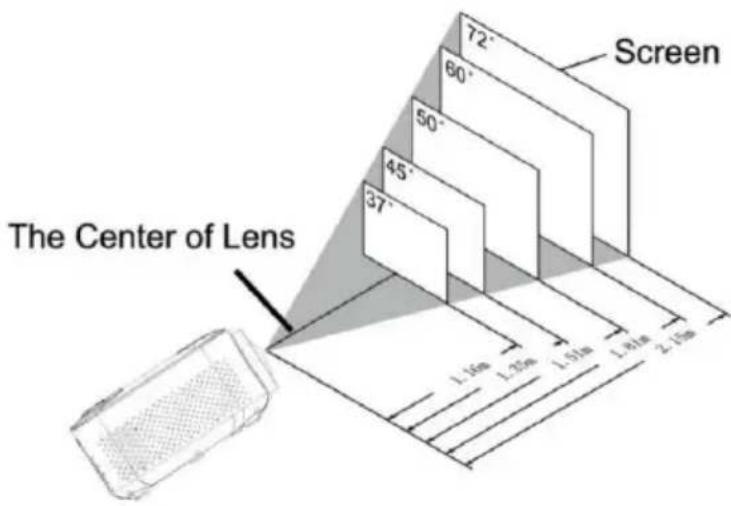
| Screen diagonal Inch | Screen diagonal CM | Projection distance Inch | Projection distance CM |
| 37 | 94 | 46 | 116 |
| 45 | 114 | 53 | 135 |
| 50 | 127 | 59 | 151 |
| 60 | 152 | 71 | 181 |
| 72 | 183 | 85 | 215 |
| 100 | 254 | 142 | 360 |
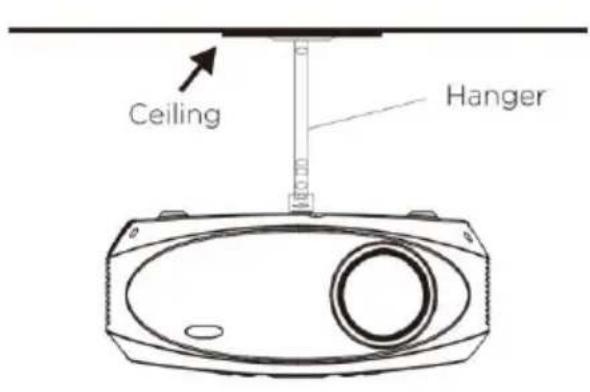
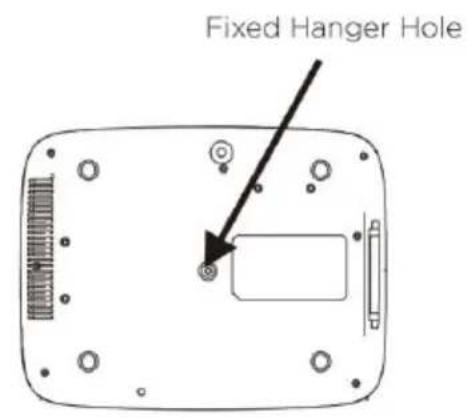
Placing Your Projector On Ceiling
When you mount the projector on the ceiling, make sure you purchase a projector mount that is recommended for this use and follow the instructions that come with the mount. Before installing the projector on the ceiling, please check to make sure the ceiling structure can support the weight of the projector and the mount. If in doubt, please ask the advice from an installation professorial.
NOTE: Projector mount and screw(s) not included
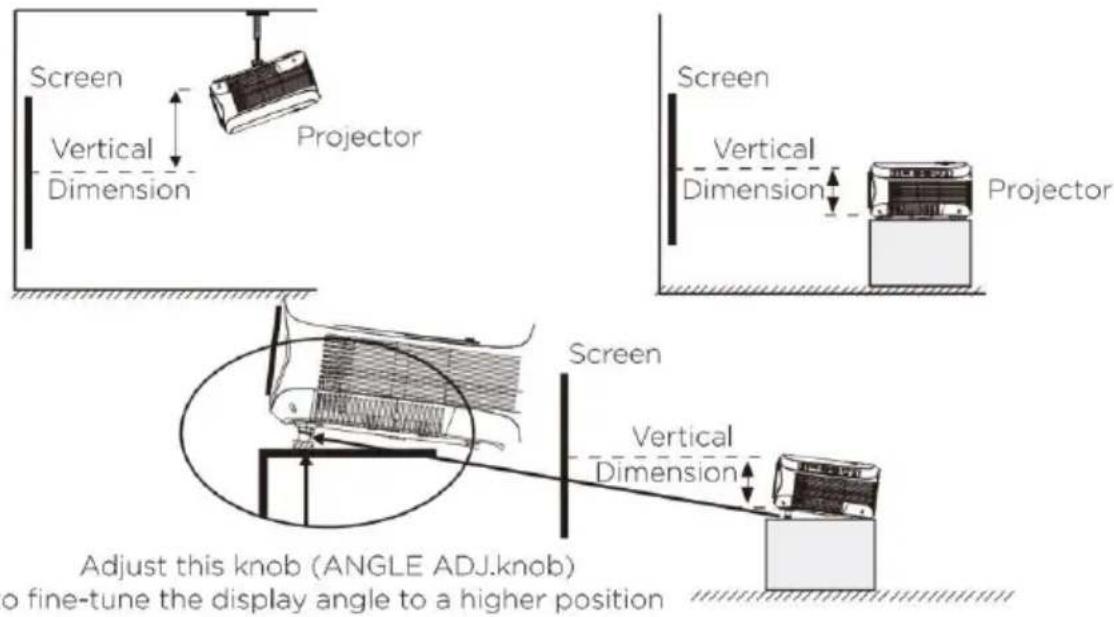
Adjust The Vertical Location
Follow below picture to adjust the vertical location.
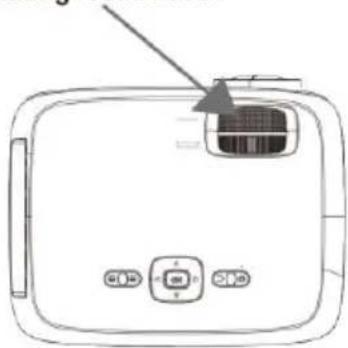
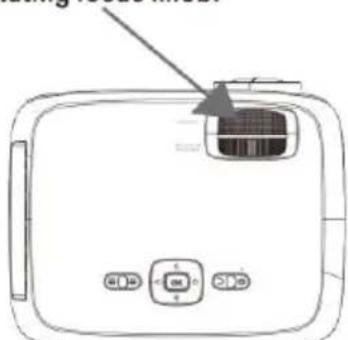
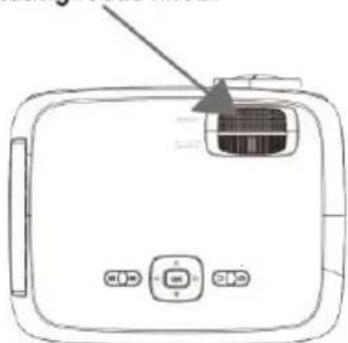
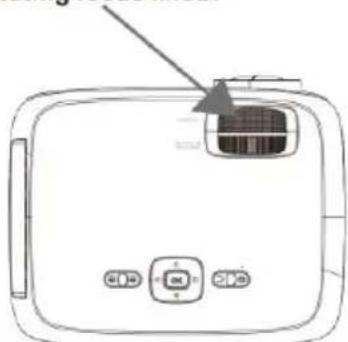
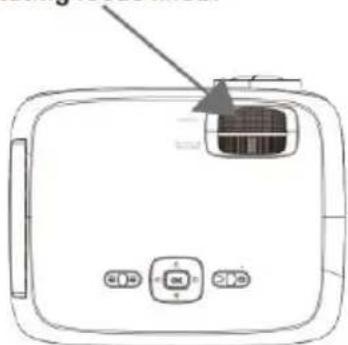
Adjust The Focus And Keystone
Follow below picture to adjust the focus and trapezoidal screen.
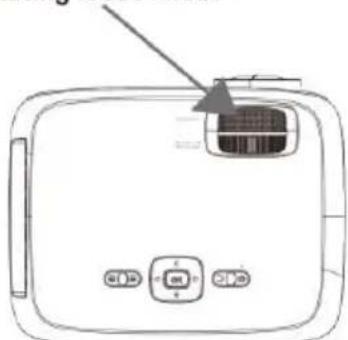
Adjust the focus by turning the adjusting wheel while observing the image pixels near the center of the screen. Optimal focus is obtained when the pixels are clearly visible. Depending on the projected screen size, the focus near the screen edges may be less sharp than the screen center.
FOCUS ADJ.KNOB
Then sharpen the image by rotating focus knob.
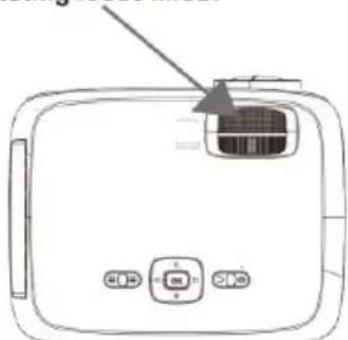
FOCUS ADJ. KNOB Then sharpen the image by rotating focus knob.
Keystone image is created when the projector beam is projected to the screen in an angle. Keystone correction will restore the distorted image to a rectangular or square shape.
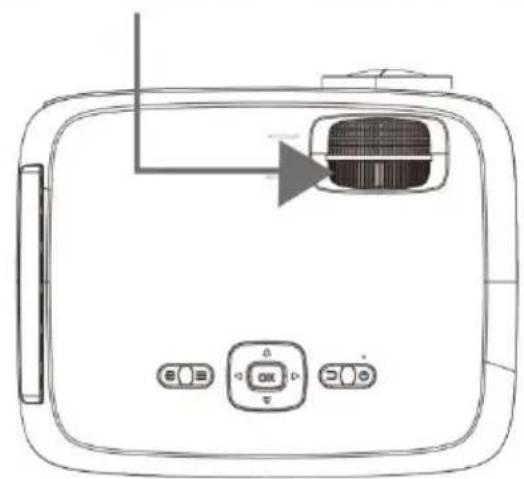
TRAPEZOIDAL ADJ. KNOB
TRAPEZOIDAL ADJ. KNOB
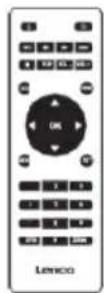
Controls Of Remote
Power
Press to power ON.
Long press to power OFF.
Previous/Next
Press to skip between chapters or tracks.
Stop
Press to stop playback.
Flip
Press to flip display image 180^ .
Play/Pause
Press to play or pause an individual chapter
or track.
Arrows/OK
Press to navigate and confirm selections in
Settings and other menus.
Menu
Press to access projector Settings.
Go To/Number Keypad
Press to enter specific chapter or track
numbers. Use Play button to start playing.
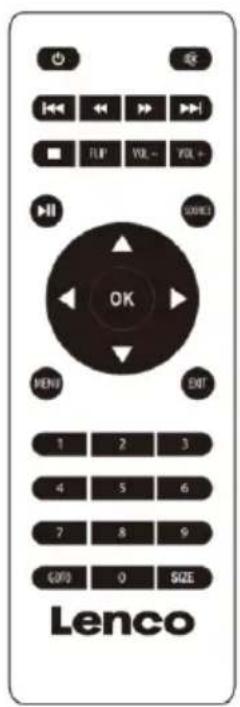
Mute
Press to mute volume.
Back/Fwd
Press to search through an individual chapter or track.
VOL+/VOL-
Press to adjust audio level.
Source
Press to select media source (AV, PC, HDMI, MEDIA).
Exit
Press to exit menu.
Size
Press size to switch aspect ratio
between 16:9/4:3
Install/Remove Battery Of Remote
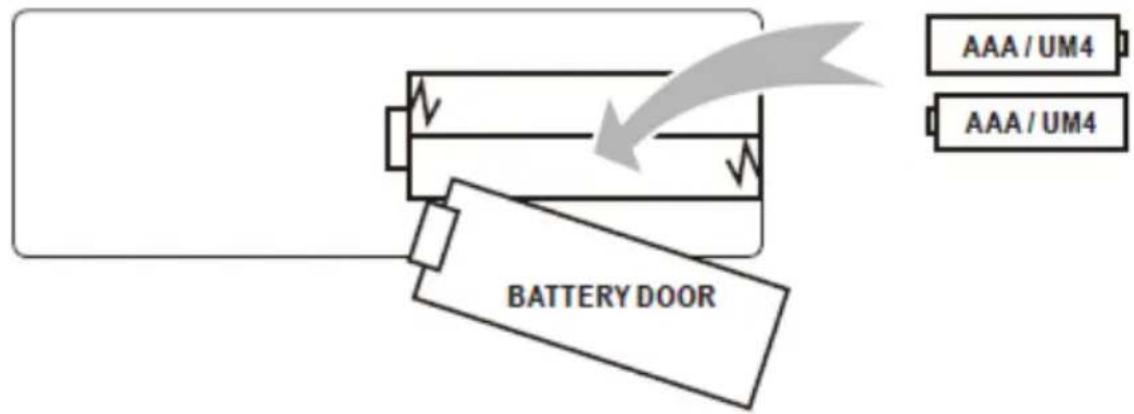
Remove the battery compartment cover on the back of your remote by carefully sliding it open. The battery cover can then be lifted away. Fit the correct batteries (2 X AAA batteries not included), referring to the polarity markings. Finally, replace the cover.
NOTES:
- Batteries shall not be exposed to excessive heat such as direct sunlight, fire.
- Be sure to check the correct polarity when installing the batteries
- Do not mix old and new batteries.
- Only use type AAA/LR03/UM4 type batteries
- Do not throw batteries into fire because it may explode. Never try to recharge a single use battery.
- Do not mix alkaline, standard (carbon-zinc), or rechargeable (ni-cad, ni-mh, etc.) batteries.
Explanation
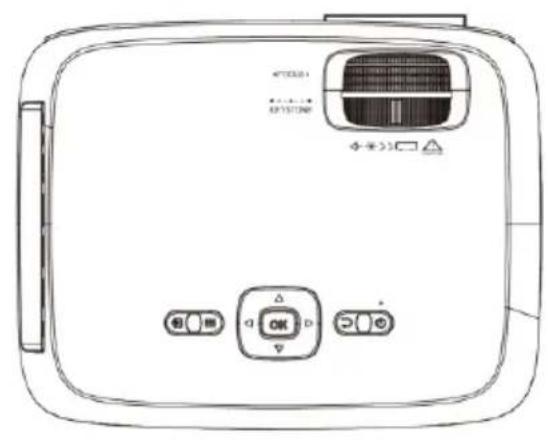
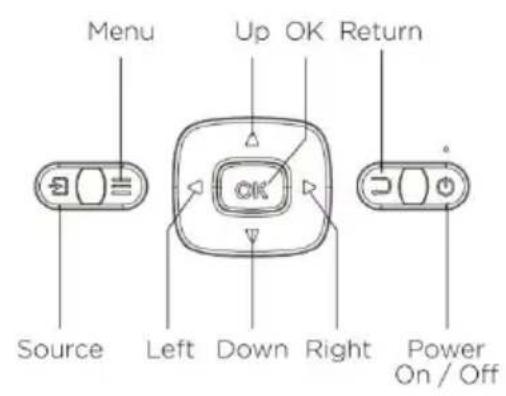
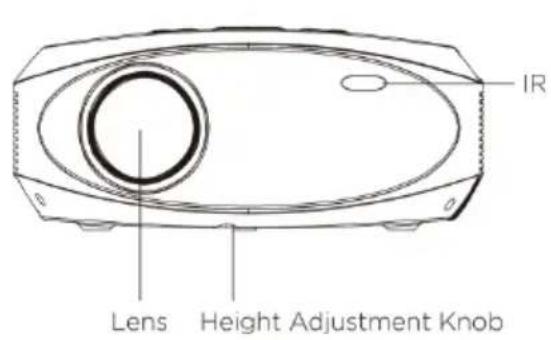
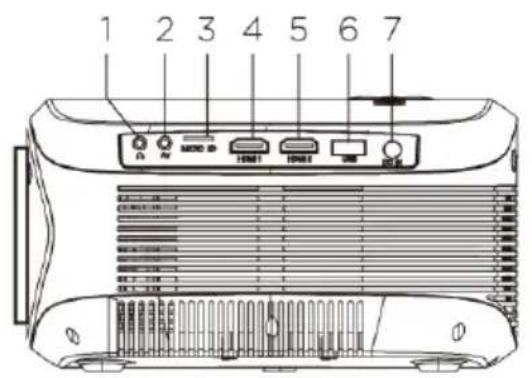
Main Operation
- 3.5mm Audio Output
- 3.5mm AV Input
- Micro SD Card Port
-
HDMI Input 1
-
HDMI Input 2
- USB Port
- DC Power Port
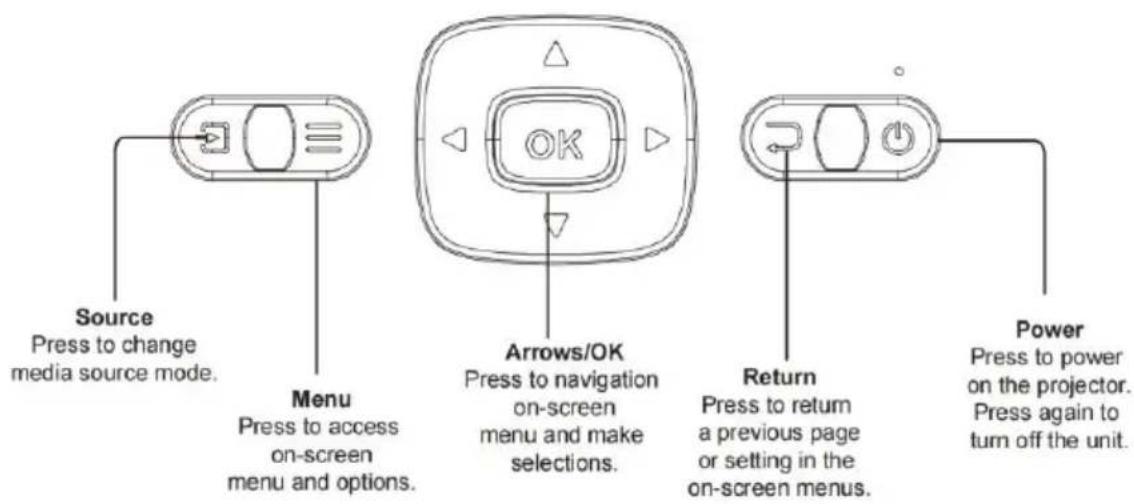
Controls
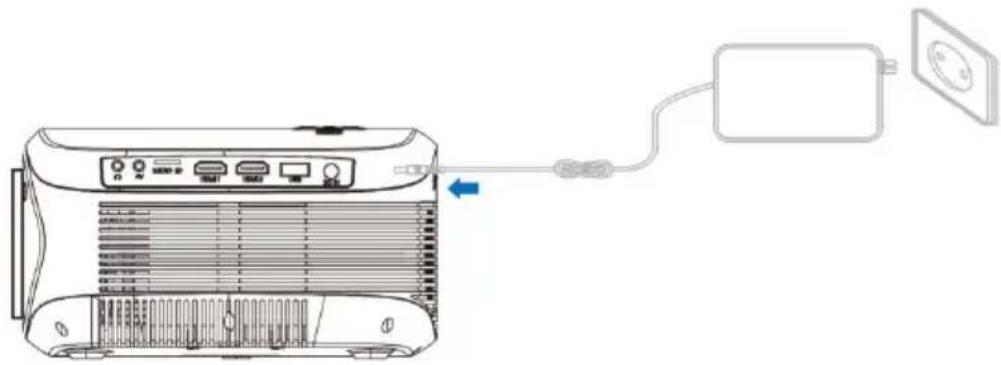
Install Power Adapter
Follow below picture to connect the power adapter.
First connect the round connector to the projector and then the adapter to the power network.
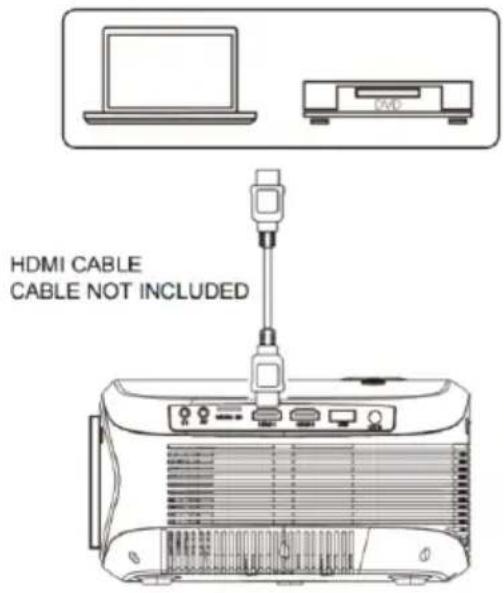
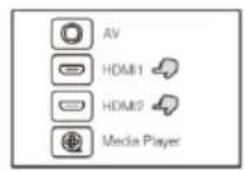
Connect HDMI
Follow the picture below to connect a device with an HDMI cable.
- Turn off the projector before connecting the HDMI cable.
- After connecting, press the button to turn on the projector and the power indicator will light up GREEN
- Press the SOURCE button to go to HDMI mode and the video of the HDMI device will show on the projector screen. There are 2 HDMI inputs,
HDMI1 interface corresponds to HDMI 1 in SOURCE mode, and HDMI2 interface corresponds to HDMI 2 in SOURCE mode.
- Press the button to turn off the unit power.
HDMI HD signal input
If you cannot hear sound from the projector speakers during movie or music playback, check the digital audio settings of the player and make sure it is set to "Auto mode or "PCM" mode
Using a MHL HDMI cable:
This projector is compatible with MHL cables: this means that you can connect your smartphone or tablet (if MHL compatible) and stream in HD from your smartphone or tablet to the projector with a MHL cable (not included).
Using a Chromecast dongle:
The HDMI connectors are compatible with the use of a chrome cast dongle to enable you to stream wirelessly from your smartphone or tablet
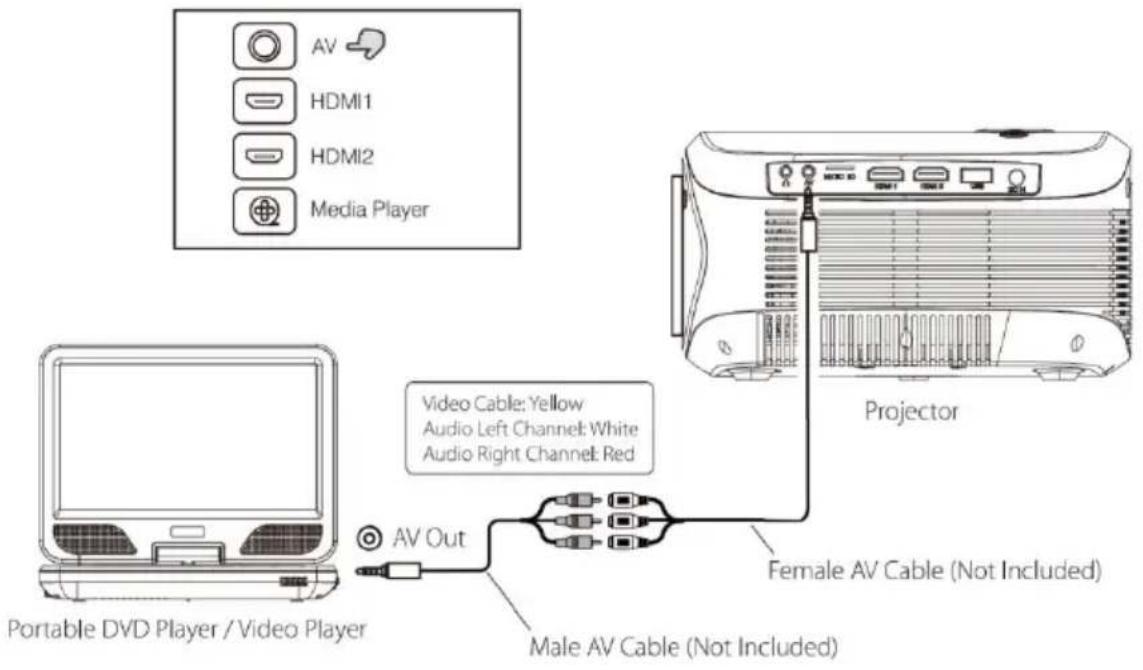
Connecting an AV Source
Follow the picture below to connect a device with an AV cable.
-
Turn off the unit before connecting the AV cable.
-
Use the AV cable to connect a device as shown in the image below.
-
After connecting, press the button to turn on the projector and the power indicator will light up GREEN
-
Press the SOURCE button to go to the AV mode and the video of AV device will show on the projector screen.
-
Press the button to turn off the unit power.
Connecting an Audio device
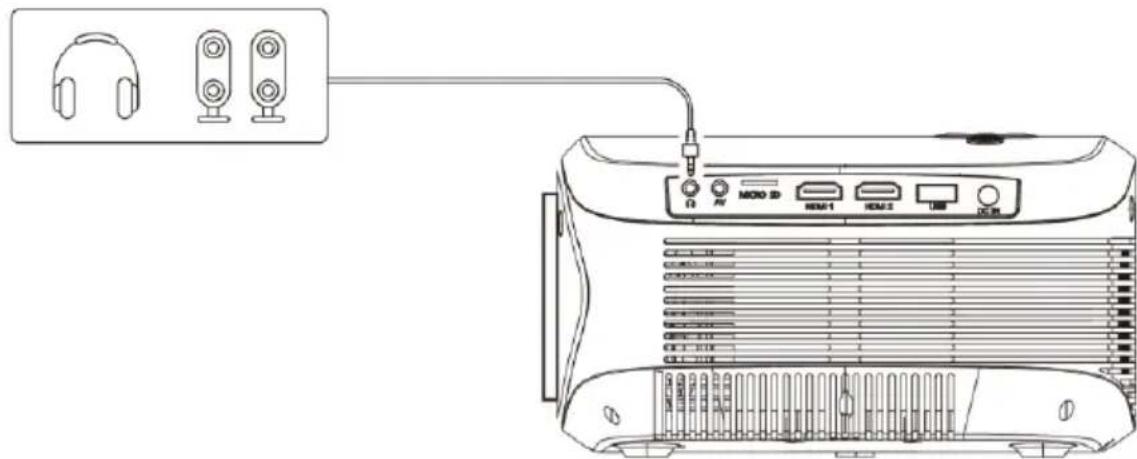
Follow the picture below to connect a device with an Audio cable.
- Press the button to turn off the power of your projector before connecting.
- Use the audio cable to connect the devices as shown in the image below.
- After you have connected both devices you will hear the sound through the connected device.
- Switch off both devices after use.
Station Amplifier
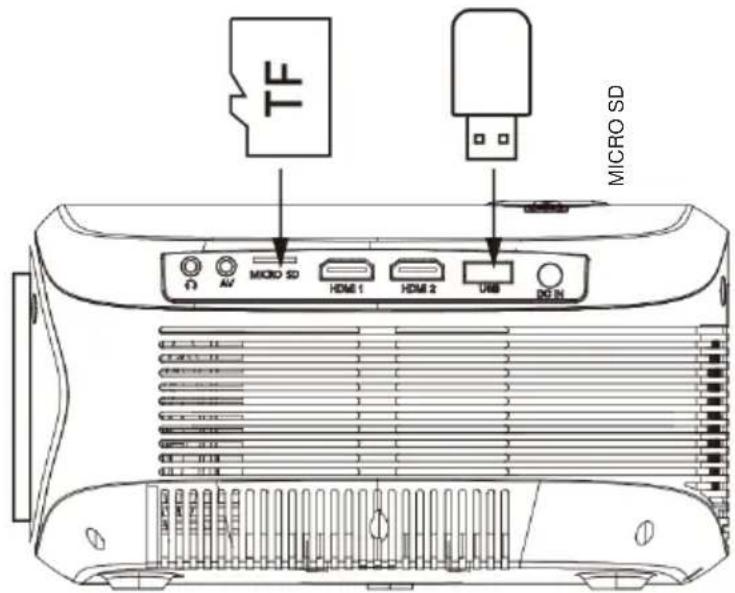
Connect USB Device And Micro SD Card "TF"
Follow below picture to connect a USB stick and Micro SD card. Turn off the projector before connecting the USB/Micro SD card.
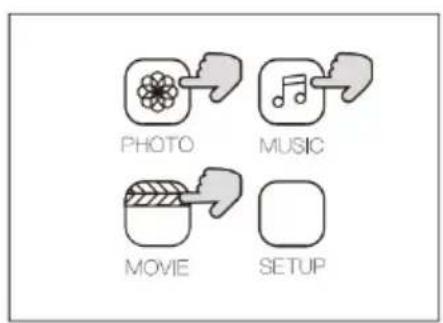
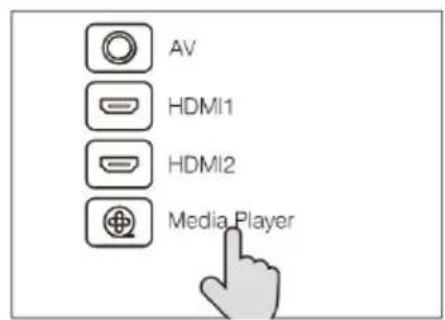
Using a Micro SD Card or USB Stick
Connect USB/Micro SD device:
- Turn off the unit before connecting USB/Micro SD card.
- Connect the USB device to the USB port.
- After connecting, press the button to turn on the projector and the power indicator light up GREEN.
- Press the SOURCE button to enter and use the buttons to search the MEDIAPAYER mode.
-
After selection, use the buttons to search the MUSIC/PHOTO/MOVIE icon and press the button to enter, if necessary, use the button to select Micro SD card or USB and press the button to enter.
-
Use the buttons to search the correct file and press the button to preview playback file and press the button of unit or button of remote to start playback.
- Press button to search forwards and backwards quickly.
- Press bnto search next or previous file.
- During playback, press the button to pause and press again to resume. NOTE: Remove USB/Micro SD card device, press the button to turn off power FIRST.
| Sub-Menu on Photo screen | |
| 1. While playing photos, press the OK button and more function are being displayed (figure 1).2. Use the button to select icon and press button to play special function. | Figuur 1.Pause Prev. Next Stop Re... music Source PL... InfoRotate Rotate Zo... M... |
| Sub-Menu on Music screen | |
| 3. While playing music, press the OK button and more function are being displayed (figure 2).4. Use the button to select icon and press button to play special function. | Figuur 2.Pause FB FF Prev. Next Stop Re... Set A MUTE PL... Info Go... |
| Sub-Menu on Movie screen | |
| 5. While playing a movie, press the OK button and more function are being displayed (figure 3).6. Use the button to select icon and press button to play special function. | Figuur 3.Pause FB FF Prev. Next Stop Re... Set A PL... Info SI... St... Go...AS... |
Using Bluetooth Playback
Pairing to Bluetooth Wireless Speakers or Sound Bar
NOTE: Bluetooth is ON by default when the projector first powers ON. Bluetooth can be turned ON or OFF from the OPTIONS Menu.
- Enable Bluetooth on the receiver (external speakers, sound bar, etc.) to which you wish to connect. Devices such as smartphones, tablets, or computers are not Bluetooth receivers and will not connect to the projector. To eliminate confusion, you should disable Bluetooth on all receivers to which you do not wish to connect.
- Power on the projector and make sure the projector's Bluetooth is ON (see note above). The projector will begin searching for nearby Bluetooth devices to connect to, and will automatically initiate pairing.
- When successfully paired, the Bluetooth receiver should indicate it is connected, usually with a chime or other audible noise. Check the user manual on your Bluetooth receiver for more information.
- When successfully connected, the projector will display the Bluetooth receiver's name on the top right portion of the Main Menu screen, and sound played from the projector will be heard through the Bluetooth receiver.
After initial pairing, the projector and the Bluetooth speakers will stay paired unless unpaired manually by the user, or erased due to a reset of either device. If this occurs or you find either unit is unable to connect, repeat the above steps.
"This product has a bluetooth transmission function, you can not receive any Bluetooth sound on it: this means that you can transmit wirelessly a bluetooth sound signal to an external device like a bluetooth speaker, bluetooth headphone, audio system with bluetooth reception,..."
Warning about sound delay during Bluetooth transmission
It could be that you experience a slight delay between the image of a movie and the sound you transmit.
This is due to different Bluetooth chipsets used in the LCD projector and your audio device (speaker or headphone).
You can try to stop and reconnect the audio device a few times, but if the problem is not solved you better connect the external speaker or headphone by cable through the audio output jack (1)
Using Projector Menu 1.0
Press button to enter projector menu. Press again to previous status.
| Picture Mode | Standard |
| Contrast | 50 |
| Brightness | 50 |
| Color | 50 |
| Sharpness | 50 |
| Tint | 50 |
| Color Temperature | Medium |
| Aspect Ratio | Auto |
| Noise Reduction | Middle |
| Screen |
Use buttons to select an item. The selected item is displayed in the upper right of the screen.
1. Picture Mode
Select Vivid, User (custom), Soft, or Standard
2. Contrast, Brightness, etc.
Set Picture Mode to "User" to adjust these settings. Tint can only be adjusted in AV and NTSC IN
3. Color Temperature
Select Warm, Cool, or Medium.
4. Aspect Ratio
Select 16:9, 4:3, or Auto
5. Noise Reduction
Select Off, Low, Middle, High or Default
6. Screen
Can only be a adjusted when in VGA mode
| Aspect Ratio | |
| 4:3 | The signal in a 4:3 aspect ratio projection image. |
| 16:9 | The signal in a 16:9 aspect ratio projection image. |
Using Projector Menu 2.0
Press button to enter projector menu. Press again to previous status.
| Sound Mode | Standard |
| Treble | 50 |
| Bass | 50 |
| Balance | 0 |
| Auto Volume | Off |
Use buttons to select an item. The selected item is displayed in the upper right of the screen.
1. Sound Mode
Select Music, Movie, User (custom), Sports, or Standard.
2. Treble, Bass
Set Sound Mode to "User" to adjust these settings.
3. Balance
Adjust the audio balance.
| Sound Mode - User | Parameter |
| Treble | 0-100 |
| Bass | 0-100 |
Using Projector Menu 3.0
Press button to enter projector menu. Press again to previous status.
| OSD Language | English |
| Bluetooth | |
| Restore Factory Default | |
| Panel Rotate | 0 |
| Info |
Use buttons to select an item. The selected item is displayed in the upper right of the screen.
1. OSD Language
Select different language, Follow below figure.
2. Bluetooth
Turn Bluetooth ON or OFF.
3. Restore Factory Default
Select Y or N.
4. Panel Rotate
Select rotate 0, rotate 1, rotate 2, rotate 3.
5. INFO
Display the unit information as below.
Specifications
| Light Source Type | LED |
| Bluetooth version | V5.0 |
| Brightness Output | LED bulb 9000 Lumens White light output 250 Lumens |
| Display Native Resolution | 1920 x 1080 |
| HDMI Input Supported Video Resolution. | 1080p, 1080i, 720p, 576i, 480p, and 480i |
| Power Consumption | Operating 90W; Standby 0.8W |
| Power Input Connect Included Adapter | DC 19V, 4.75A |
| Included Adapter Connect DC input of unit | Input AC100-240V,50/60Hz Output DC19V, 4.75 A |
| Display Color | 7000K-8000K |
| Projection Size | 35-165 inch |
| Signal Port | AV/HDMI |
| USB Port | Support USB device up to 32GB Support format mpeg1, Mpeg2,mpeg4, mp3, Jpeg |
| SD Card | Support SD card up to 32GB Support format mpeg1, Mpeg2,mpeg4, mp3, Jpeg |
| Weight | 1.66 KG |
| Dimension | 354 x 197 x 110 mm |
Use only the power supply listed in the user instructions
| Information | Value and and precision |
| Manufacturers name or trade mark, commercial registration and address | -SHENZHEN TEKA TECHNOLOGY CO.,LTD. / BUILDING A, NO. 21, XIFU ROAD, RED STAR COMMUNITY, SONGGANG STREET, BAOAN DISTRICT, SHENZHEN, GUANGDONG PROVINCE, 5181G5 CHINA |
| Model Identifier | TEKA-EA1900475 |
| Input voltage | AC 100-240V |
| Input AC frequency | 50/60Hz |
| Output voltage | 19 V |
| Output current | 4.75A |
| Output Power | 90W |
| Average active efficiency | 89.8% |
| Efficiency at low load (10%) | 91.3 % |
| No load Power consumption | 0.15W |
TROUBLESHOOTING
Before contacting the customer service, please kindly check by yourself with the following chart.
| No Image is Projected or a "No Signal" message is displayed | 1. Power light is on. If it is not on, check the projector is plugged into the mains, that the socket is switched on, and then press the power button on the projector. 2. Check the lens cover has been removed. 3. Check the cables are securely attached and installed as per the User Manual. 4. The image source may not be set correctly. Press the Source button on the Control Panel or the Remote, to select the correct setting. 5. Check in the Menu section under Video input signal to make sure that has been set correctly. |
| The Lamp (Bulb) switches off after a period of time | Is the warning light indicator red? If so, the projector is overheating which turns the light off automatically. 1. Leave the projector to cool for a few moments. 2. Once cooled, check nothing is blocking the ventilation vents. 3. Check the air filter is clean and clean if necessary. 4. Turn on the projector. If the issue persists please contact your support provider for further assistance. |
| The Image is wider at the top/bottom of the screen | This is called keystone and is due to the projection angle not being perpendicular to the screen. To correct use the projectors inbuilt keystone function to adjust the image. |
| Spots on the screen | Using a vacuum cleaner to clean the lens. If cleaning doesn't resolve things, please contact your support provider for further assistance. |
| The image brightness has faded | This could possibly be caused by the ambient light in the room. If not, the chances are that you need to replace the lamp (bulb). |
| Delay between image and sound in Bluetooth | This is due to different Bluetooth chipsets used in the LCD projector and your audio device (speaker or headphone by cable through the audio output jack (1) |
Guarantee
Lenco offers service and warranty in accordance to European law, which means that in case of repairs (both during and after the warranty period) you should contact your local dealer.
Important note: It is not possible to send products that need repairs to Lenco directly.
Important note: If this unit is opened or accessed by a non-official service center in any way, the warranty expires.
This device is not suitable for professional use. In case of professional use, all warranty obligations of the manufacturer will be voided.
Disclaimer
Updates to Firmware and/or hardware components are made regularly. Therefore some of the instruction, specifications and pictures in this documentation may differ slightly from your particular situation. All items described in this guide for illustration purposes only and may not apply to particular situation. No legal right or entitlements may be obtained from the description made in this manual.
Disposal of the Old Device
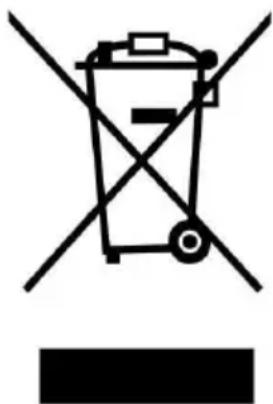
This symbol indicates that the relevant electrical product or battery should not be disposed of as general household waste in Europe. To ensure the correct waste treatment of the product and battery, please dispose them in accordance to any applicable local laws of requirement for disposal of electrical equipment or batteries. In so doing, you will help to conserve natural resources and improve standards of environmental protection in treatment and disposal of electrical waste (Waste Electrical and Electronic Equipment Directive).
DECLARATION OF CONFORMITY
Hereby, Commaxx declares that the radio equipment type [Lenco LPJ-900] is in compliance with directive 2014/53/EU. The full text of the EU declaration of conformity is available at the following internet address:
https://commaxx-certificates.com/doc/lpj-900.doc.pdf
| Type RF | Frequency range (MHz) | Power (dBm) |
| Bluetooth | 2402-2480 | <6 |
Service
FOCUS ADJ. KNOB Then sharpen the image by rotating focus knob.
If you cannot hear sound from the projector speakers during movie or music playback, check the digital audio settings of the player and make sure it is set to "Auto mode or "PCM" mode
| EN | NL |
| HDMICABLE CABLE NOT INCLUDED | HDMI-KABEL KABEL NIET INBEGREPEN |
| If you cannot hear sound from the projector speakers during movie or music playback, check the digital audio settings of the player and make sure it is set to "Auto mode or "PCM" mode | Als u geen geluid hooruit de projectorluidsprekersijdens het afspelen van films of muziek, controlleren dan de digitale geluidsinstellungen van de spelener en zorg ervoor dat deze is ingesteld op "Auto mode" of "PCM mode". |
- Meteen MHL HDMI-kabel:
Selecteer Y (Ja) of N (Nee).
4. Paneel draaien
Then sharpen the image by rotating focus knob.
If you cannot hear sound from the projector speakers during movie or music playback, check the digital audio settings of the player and make sure it is set to "Auto mode or "PCM"mode
Telecommande (2 piles AAA non fournies)
Then sharpen the image by rotating focus knob.
If you cannot hear sound from the projector speakers during movie or music playback, check the digital audio settings of the player and make sure it is set to "Auto mode or "PCM" mode
Then sharpen the image by rotating focus knob.
RUEDA DE AJUSTE DE ENFOQUE A
If you cannot hear sound from the projector speakers during movie or music playback, check the digital audio settings of the player and make sure it is set to "Auto mode or "PCM" mode
Loftplacering bagved:
Vaelg donne placering, hvor projektoren er placeret med bunden i vegret bagved skaermen.
Then sharpen the image by rotating focus knob.
Tryk for at afl Slutte menuen.
Billedformat
Tryk for at skiteb billedformat mellem
16:9 og 4:3
If you cannot hear sound from the projector speakers during movie or music playback, check the digital audio settings of the player and make sure it is set to "Auto mode or "PCM"mode
| EN | DA |
| HDMICABLE CABLE NOT INCLUDED | HDMI-KABEL MEDFØLGER IKKE |
| If you cannot hear sound from the projector speakers during movie or music playback, check the digital audio settings of the player and make sure it is set to “Auto mode or “PCM” mode | Hvis du ikke kan hare lyd fra Projektorhøjtalerne under afspilningen af film eller musik, skal du kontrollere indstillingerne for digital lyd for afspilleren og sorge for, at den er indstillet til “Auto mode” eller“PCM” |
| EN | SW |
| The Center of Lens | Linsens mitt |
| Screen | Duk |
| Dukens diagonal i tum | Dukens diagonal i cm | Projektnisavständ i tum | Projektnisavständ i cm |
| 37 | 94 | 46 | 116 |
| 45 | 114 | 53 | 135 |
| 50 | 127 | 59 | 151 |
| 60 | 152 | 71 | 181 |
| 72 | 183 | 85 | 215 |
| 100 | 254 | 142 | 360 |
Placera Projektorn i taket
Then sharpen the image by rotating focus knob.
If you cannot hear sound from the projector speakers during movie or music playback, check the digital audio settings of the player and make sure it is set to "Auto mode or "PCM"mode
- KEEP THESE INSTRUCTIONS IN MIND:
- INSTALLATION
- Remove & Close The Lens Cover
- Placing Your Projector
- To Reduce Image Distortion
- Distance Between The Projector And Screen
- Placing Your Projector On Ceiling
- Adjust The Vertical Location
- Adjust The Focus And Keystone
- Controls Of Remote
- Power
- Stop
- Flip
- Play/Pause
- or track.
- Menu
- Go To/Number Keypad
- Mute
- Back/Fwd
- Install/Remove Battery Of Remote
- NOTES:
- Explanation
- Main Operation
- Controls
- Install Power Adapter
- Connect HDMI
- HDMI HD signal input
- Connecting an AV Source
- Connecting an Audio device
- Station Amplifier
- Connect USB Device And Micro SD Card "TF"
- Using a Micro SD Card or USB Stick
- Using Bluetooth Playback
- Pairing to Bluetooth Wireless Speakers or Sound Bar
- NOTE: Bluetooth is ON by default when the projector first powers ON. Bluetooth can be turned ON or OFF from the OPTIONS Menu.
- Warning about sound delay during Bluetooth transmission
- Using Projector Menu 1.0
- Picture Mode
- Contrast, Brightness, etc.
- Color Temperature
- Aspect Ratio
- Noise Reduction
- Screen
- Using Projector Menu 2.0
- Sound Mode
- Treble, Bass
- Balance
- Using Projector Menu 3.0
- OSD Language
- Bluetooth
- Restore Factory Default
- Panel Rotate
- INFO
- TROUBLESHOOTING
- Guarantee
- Disclaimer
- Disposal of the Old Device
- DECLARATION OF CONFORMITY
- Service
- Paneel draaien
- Billedformat
- Placera Projektorn i taket
Brand : LENCO
Model : LPJ-900WH
Category : Projector