
Dehumidifier - Dehumidifier LANAFORM - Free user manual and instructions
Find the device manual for free Dehumidifier LANAFORM in PDF.

| Product type | Air dehumidifier with purification |
| Brand | Lanaform |
| Model | Dehumidifier |
| Weight | 14 kg |
| Power supply | 220-240 V, 50 Hz |
| Power | 370 W |
| Extraction capacity (24h) | Up to 16.2 L at 26°C and 80% humidity |
| Adjustable humidity range | 40% to 70% |
| Main functions | Manual/automatic dehumidification, air purification, ionization, timer (start/stop), air outlet grille orientation, self-cleaning, automatic defrost |
| Filters | Air filter + carbon filter (removable and washable) |
| Water tank | With float and level indicator, manual emptying or continuous drainage possible |
| Warranty | 2 years (excluding normal wear and misuse) |
| Included accessories | Drainage tube, carbon filter |
| Safety | Automatic shut-off when tank is full, frost protection (auto defrost), control panel lock |
| Usage | Indoor, domestic use only |
| Cleaning and maintenance | Tank: clear warm water; carbon filter: vacuum or soak in warm water; main unit: damp cloth |
Frequently Asked Questions - Dehumidifier LANAFORM
User questions about Dehumidifier LANAFORM
0 question about this device. Answer the ones you know or ask your own.
Ask a new question about this device
Download the instructions for your Dehumidifier in PDF format for free! Find your manual Dehumidifier - LANAFORM and take your electronic device back in hand. On this page are published all the documents necessary for the use of your device. Dehumidifier by LANAFORM.
USER MANUAL Dehumidifier LANAFORM
Dehumidifies and purifies your air
Thank you for your interest in Lanaform's ^® dehumidifier. This dehumidifier will enable you, not only to reduce the humidity of your rooms, but also to purify the air you breathe. The LANAFORM ^® dehumidifier allows you to control the level of humidity of the air and prevent excessive of humidity. Simply select the preferred level of humidity and the dehumidifier will automatically manage the percentage of water content in the ambient air.
PLEASE READ ALL THE INSTRUCTIONS BEFORE USING YOUR DEHUMIDIFIER, IN PARTICULAR THESE FEW FUNDAMENTAL SAFETY RULES:
- Check that your mains voltage is compatible with that of the appliance.
- This appliance is not intended for use by persons (including children) whose physical, sensorial or mental capabilities are impaired, or by persons lacking experience or knowledge, unless they are supervised or instructed in the use of the appliance first by a person responsible for their safety. Children should be supervised to ensure that they do not play with the appliance.
- Do not connect or disconnect the plug with wet hands.
- If the power lead is damaged, it must be replaced by a special or similar lead available from the supplier or its after-sales department.
- Never use any appliance with a damaged plug, or after any failure or damage. In this case, return the appliance to the supplier or its after-sales department.
• Always place the dehumidifier on a hard, flat and horizontal surface at a distance from walls (at least 20 cm) and sources of heat such as ovens, radiators, etc. - Do not tilt the dehumidifier, water could pour and cause damage to the appliance.
- Disconnect the appliance when not in use or before cleaning.
- This appliance is intended for domestic and indoor use only. Do not use the dehumidifier for other purposes.
- Never place any object on the dehumidifier. This could prevent normal operation.
- Never place any object other than the articles listed in this manual in the dehumidifier.
• Never pour liquid in the dehumidifier. - Clean the dehumidifier using a soft cloth only.
- Never use a spray in the same room as the dehumidifier.
- Wait 5 minutes before restarting your appliance after a power cut or shutdown to allow the systems of the appliance to return to operating status.
- Due to the presence of gas, moving your dehumidifier requires a degree of care. Avoid moving the dehumidifier on its side. Always wait a minimum of 2 hours before connecting it again.
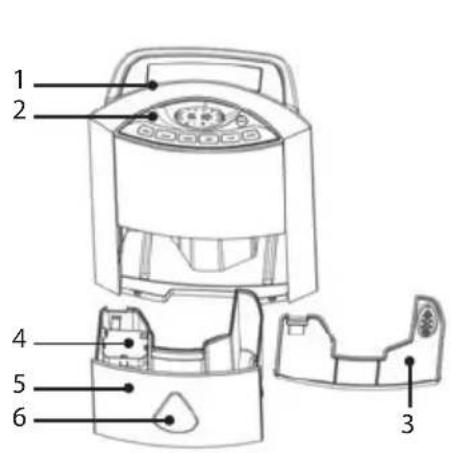
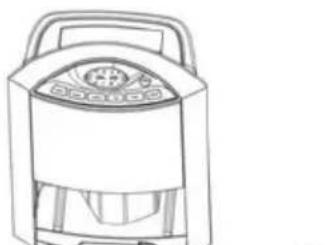
COMPONENTS
FRONT PANEL
- Air vent
- Control panel
- Tank lid
- Float
- Water tank
- Water level indicator
REAR PANEL
-
Handle
-
Carbon filter
-
Air inlet
CONTROL PANEL
- On/Off key.
- Mode key: use to program the dehumidifier or purify the air.
- Timer key: use to program the automatic start up or shutdown of the appliance.
- Humidity key: use to select the preferred humidity level if the appliance is running in dehumidifier mode or fan speed if the appliance is running in purification mode.
- Drying key: use to clean the appliance after an extended period without use.
- Swing key: use to direct ventilation for the air vent.
- Ionizer key: use to activate the ionization function.
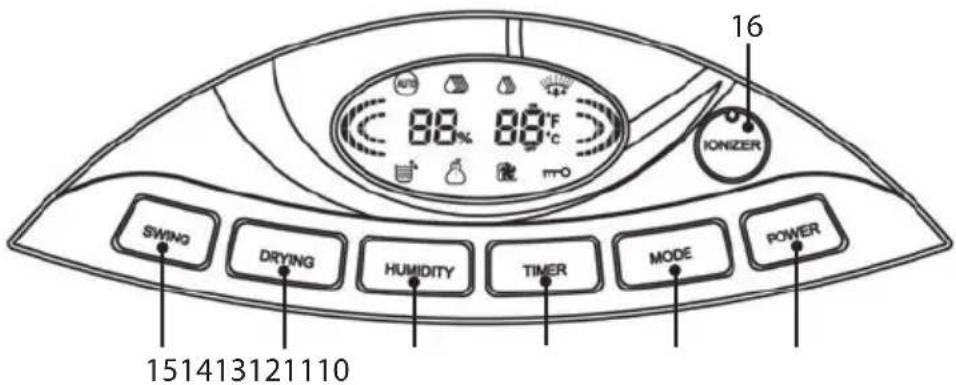
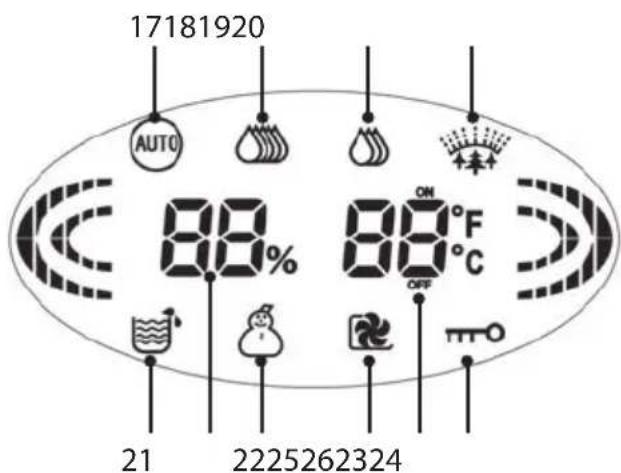
LCD SCREEN
- Auto: indicates that the dehumidifier is in automatic mode.
- High (dehumidifier): Indicates that the dehumidifier is in manual mode and set to a high level.
- Low (dehumidifier): Indicates that the dehumidifier is in manual mode and set to a low level.
- Air purification: Indicates that the appliance is running in air purification mode.
- Water tank: Indicates that the water tank is full.
- Temperature alarm: Indicates that the appliance is located in a room with an ambient temperature of between 5^ and 15^ . If the icon flashes, the temperature of the room is less than 5^ and the dehumidifier program cannot run.
- Drying: Indicates that the appliance is in self-cleaning mode.
- Blocking of the control panel: Indicates that the control panel of the dehumidifier is locked.
- Humidity level indicator: Indicates the level of humidity in the room.
- Temperature/time indicator: Indicates room temperature or the duration before the appliance starts/stops
INSTALLATION
-
Check that the water tank is empty before using the dehumidifier.
• To save energy and improve performance, close all doors and windows when the dehumidifier is on. -
The dehumidifier must be placed as close as possible to the source of humidity.
- To reduce the noise and vibrations produced by the appliance, we recommend the use of an anti-vibrations mat. These mats are available from specialist stores.
EN
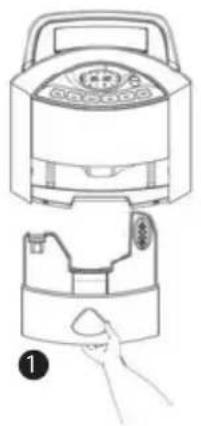
INSTALLATION OF THE WATER TANK
Check that the water tank is empty prior to each use. Empty the tank following the instructions below:
- Check that the appliance is turned off and unplugged before draining the tank.
- Place your hand on the bottom of the dehumidifier and remove the base (1).
- Remove the cover located above the tank and empty the water (2).
- Replace the cover before refitting the tank.
natural_image
Line drawing of a kitchen appliance with a handle and lid, showing top and side views (no text or symbols)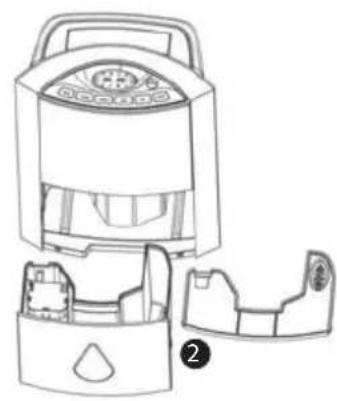
natural_image
Line drawing of a portable air conditioner unit with internal compartments and a handle (no text or symbols)Notes: When the water tank is full, the appliance will immediately cease to operate. The water tank icon (21) will start to flash and the alarm will sound 15 times.
INSTALLATION OF THE DRAIN PIPE
If the appliance is used in a very humid environment, your appliance may be equipped with a permanent drainage connection (supplied) as shown below:
- Cut the cover behind the appliance using scissors or a pair of pliers (not supplied) (1).
- Insert the pipe (supplied) in the drainage hole and check that the pipe fits to avoid any risk of water leakage. (2)

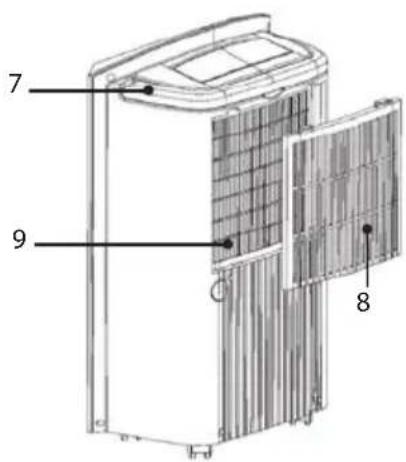
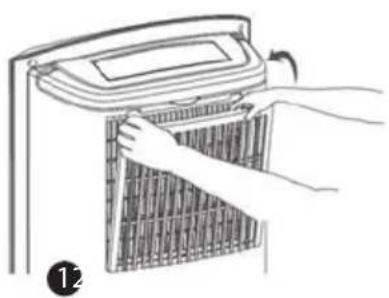
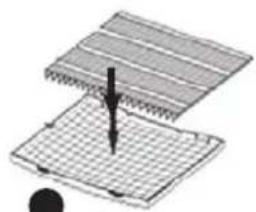
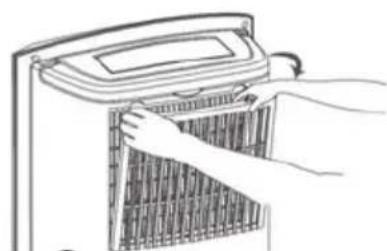
INSTALLATION OF THE CARBON FILTER
The dehumidifier is fitted with a carbon filter in addition to the air filter located under the grid. This carbon filter clears the room of unpleasant odours. Follow the instructions below to install the carbon filter:
- Open the compartment (1).
- Place the carbon filter over the air filter as shown on the diagram (2).
- Replace the filter in the compartment (3).
natural_image
Illustration of hands installing or adjusting a grid-patterned panel inside a device (no text or symbols visible)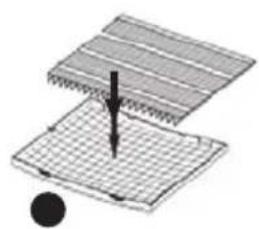
natural_image
Diagram of a mechanical or electrical component with layered structure and a black circular element (no text or symbols)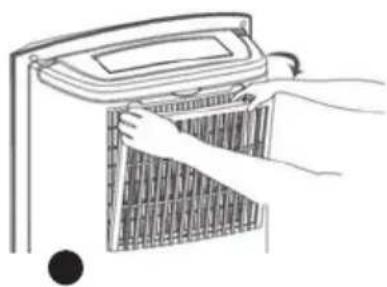
natural_image
Line drawing of hands installing or removing a heater panel (no text or symbols)Note: It is not necessary to fit the carbon filter when you use the appliance to dehumidify air in a room. In fact, the absorption capacity of the air is reduced if the carbon filter is fitted.
SETTING PARAMETERS
The LCD screen may display the temperature in degrees Celsius or Fahrenheit. To select the preferred display, press on the Humidity (13) and Timer (12) keys simultaneously.
USE OF THE DEHUMIDIFIER
A. DEHUMIDIFIER FUNCTION
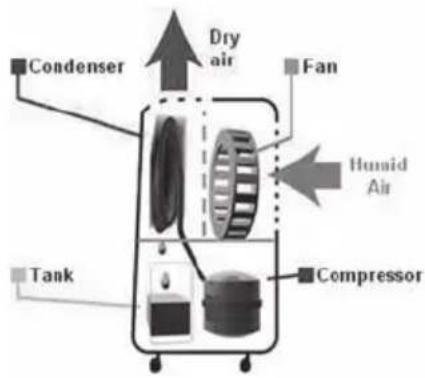
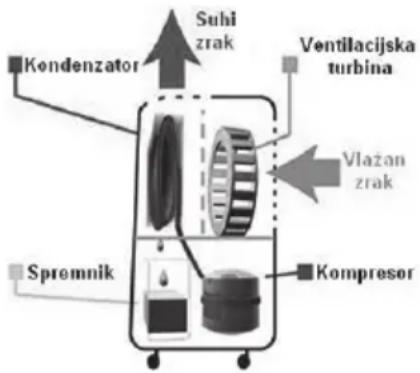
The principle of the dehumidifier involves the suction of humid air from the room. This air is then filtered and directed to a condenser at a lower temperature (the compressor acts on a coolant gas which lowers the temperature of the condenser), which transforms the water vapour in the air into water, which is then collected in a tank. The «dried» air is returned to the room. The most comfortable relative humidity for human beings is between 45 % and 55 %.
The dehumidifier can operate in manual or automatic mode.
Use in manual mode
• In manual mode, you may select between low (19) or high (18).
- To select the level of the dehumidifier, press on the Power key (10) and then on the Mode key(11) until the desired icon appears.
Use in automatic mode
- In automatic mode, you may set the desired degree of humidity. This can vary between 40 % and 70 %.
- To select the degree of humidity, press on the Power key (10) and then on the Mode key(11) until the desired icon appears.
- You must then press the Humidity key (13) to select the degree of humidity. The selected degree will flash for a few seconds. When operating, the appliance will indicate the degree of humidity and the temperature of the room.
- The appliance will then automatically maintain or create the selected degree of humidity.
Automatic anti-freeze
- The appliance is equipped with an automatic anti-freeze system. If the temperature of the room is less than 5^ , the dehumidifier program cannot run.
- The dehumidifier is also equipped with a second temperature sensor located near to the condenser. The role of this sensor is to measure the temperature of the air in this area and prevent freezing, which could affect the normal operation of the appliance. This temperature is checked every 38 minutes. If the temperature detected is less than -5^ , the compressor will stop and the anti-freeze program will automatically start. After the anti-freeze program, the fan function will run for 5 minutes. After this period of time, if the temperature is less than 1^ , the appliance will trigger ventilation for a further 3 minutes. When the temperature exceeds 1^ , the dehumidifier will restart.
- The following table indicates mean water quantities extracted over a 24-hour period based on a range of temperatures and levels of humidity* for informative purposes:
| Temperature Degree of humidity | ||
| 22° 7,2L 13,5L | ||
| 26° 9L 16,2L | ||
*These figures are mean values and may vary depending on where the appliance is used
B. DIRECTING THE AIR VENT
- When the dehumidifier or air purification functions are running, you may set the direction of the air vent. Press the Swing key (15) once. The grid will rotate 90^ . Press the Swing key (15) a second time, the grid will remain in the desired position.
C. TIMER FUNCTION
This function enables you to program the automatic startup (if the appliance is off) or shutdown (if the appliance is on) of the appliance.
Programming automatic shutdown
When the appliance is running, press the Timer key (12) until the LCD screen displays the intended number of hours. The selected number of hours will flash for a few seconds. The LCD screen will then display the degree of humidity and remaining time before the appliance shuts down. «OFF» will appear below the time.
Programming automatic starts
When the appliance is off, press the Timer key (12) until the LCD screen displays the intended number of hours. The selected number of hours will flash for a few seconds. The LCD screen will then display the degree of humidity in the room and remaining time before the appliance starts. «ON» will appear above the time.
D. AIR PURIFICATION
- The appliance is equipped with an air purification function. To activate this function, start by selecting the Power key (10). Then press the Mode key (11) until the icon (20) appears.
- You may then select the level of operation using the Humidity key (13).
- You can also select the direction of the air vent as described above.
E. IONIZATION
You may activate the air ionization function in dehumidifier or purification mode. Ionization provides many benefits: improved well-being, improved air quality, etc.
To activate the function, press on the lonizer key (16) on the control panel.
F. BLOCKING OF THE CONTROL PANEL
You may lock the control panel to avoid damage to the appliance due to use by others. Hold the Mode key (11) in for 3 seconds. To release the control panel, hold the Mode key (11) on the control panel in for 3 seconds again.
G. SELF-CLEANING FUNCTION
After a long period of inactivity, the appliance may trigger an internal cleaning sequence to remove all water and mould in the dehumidifier.
Press the Drying key (14) to trigger this sequence.
The appliance will then run for 1 hour thanks to the fan (the compressor will not operate during this program). You can stop this program by pressing on either Power (10) to turn off the appliance or on the Drying key (14). The appliance will then return to the previous program.
CLEANING AND MAINTENANCE
Make sure you turn off and unplug your appliance before cleaning.
Never use detergents to clean the dehumidifier.
CLEANING AND MAINTENANCE OF THE WATER TANK
Use clean warm water to clean the water tank and tank cover to avoid any risk of mould.
DRY THE TANK AND TANK COVER USING A SOFT DRY CLOTH.
Cleaning and maintenance of the main unit
CLEAN THE MAIN UNIT USING A WET CLOTH ONLY.
Cleaning of the carbon filter
The carbon filter must be cleaned on a regular basis due to the accumulation of dust (at least once every two weeks, or more often if necessary).
- If the carbon filter is not too dirty, remove the dust using a handheld vacuum.
- In all other cases, clean the carbon filter by soaking in warm water for 5 minutes.
- Leave to dry naturally. Do not bring the filter near to a source of heat.
BREAKDOWN AND REMEDIES
If the appliance malfunctions in everyday use, please refer to the table below:
| Problem Possible cause Solution | ||
| Neither the fan nor the compressor function | No power Maybe the appliance is not connected correctly or your power supply is faulty | |
| The water tank is full or incorrectly fitted | Empty the water tank and/or reposition the tank in the main unit | |
| The fan is running, but not the compressor | The temperature of the room is too low | The appliance stops the dehumidifier program if temperature is below 5°. |
| The level of humidity in the room is too low | The selected level of humidity is higher than that in the room or less than 40%. | |
| The compressor will not run | The temperature around the condenser is less than -5°C. The appliance will stop the dehumidifier program and run the anti-freeze program before restarting operation. | |
| No air emitted through the appliance air vent | The appliance is in self-cleaning mode | No air is emitted after 30 minutes of self-cleaning for a short period |
| Dirty filter Clean the filter | ||
| Very noisy appliance | The appliance is incorrectly positioned | Move the appliance to a flat stable surface or place an anti-vibrations mat under the dehumidifier. |
| Dirty filter Clean the filter. | ||
| No or little dehumidification | Clogged filter Clean the filter | |
| Temperature too low Check room temperature | ||
| Emission of hot air | / The condenser is emitting hot air. The appliance is not malfunctioning. | |
TECHNICAL SPECIFICATION
Voltage: 220-240 Volts
Frequency: 50 Hz
Power: 370 Watts
Weight: 14 kg
ADVICE REGARDING THE DISPOSAL OF WASTE
- All the packaging is composed of materials that pose no hazard for the environment and which can be disposed of at your local sorting centre to be used as secondary raw materials. The cardboard may be disposed of in a paper recycling bin. The packaging film must be taken to your local sorting and recycling centre.
- When you have finished using the device, please dispose of it in an environmentally friendly way and in accordance with the law.
LIMITED WARRANTY
LANAFORM® guarantees this product against any material or manufacturing defect for a period of two years from the date of purchase, except in the circumstances described below.
The LANAFORM ^® guarantee does not cover damage caused as a result of normal wear to this product. In addition, the guarantee covering this LANAFORM ^® product does not cover damage caused by abusive or inappropriate or incorrect use, accidents, the use of unauthorized accessories, changes made to the product or any other circumstance, of whatever sort, that is outside LANAFORM ^® 's control.
LANAFORM ^® may not be held liable for any type of circumstantial, indirect or specific damage.
All implicit guarantees relating to the suitability of the product are limited to a period of two years from the initial date of purchase as long as a copy of the proof of purchase can be supplied.
On receipt, LANAFORM ^® will repair or replace your appliance at its discretion and will return it to you. The guarantee is only valid through LANAFORM ^® 's Service Centre ^® . Any attempt to maintain this product by a person other than LANAFORM ^® 's Service Centre will render this guarantee void.
natural_image
Line drawing of a kitchen appliance with a handle and lid, showing top view and side view (no text or symbols)
natural_image
Line drawing of a portable air conditioner unit with internal compartments and a handle (no text or symbols)natural_image
Illustration of hands installing or adjusting a grid-patterned air conditioner cover (no text or symbols visible)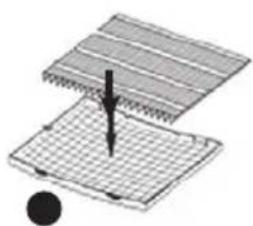
natural_image
Diagram of a layered structure with a central arrow and a black dot, no text or symbols present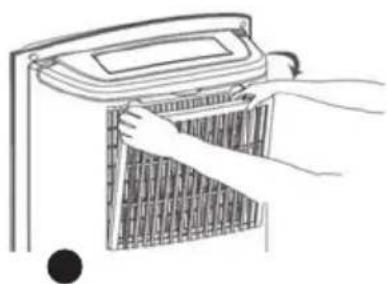
natural_image
Line drawing of hands installing or removing a grid-patterned device (no text or symbols)natural_image
Line drawing of a portable electric cooker with handle and control panel, plus a hand holding the lid (no text or symbols)
natural_image
Line drawing of a portable air purifier with internal compartments and a handle (no text or symbols)
INSTALLATIE VAN DE KOOLSTOFFILTER
natural_image
Illustration of hands installing or adjusting a grid-patterned air conditioner unit (no text or symbols visible)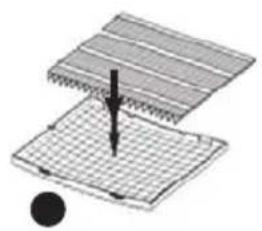
natural_image
Diagram of a layered structure with a central arrow and a black circle, no text or symbols present.
natural_image
Line drawing of hands installing or adjusting a grid-patterned device (no text or symbols)natural_image
Line drawing of a portable electric cooker with handle and control panel, plus a hand holding the socket (no text or symbols)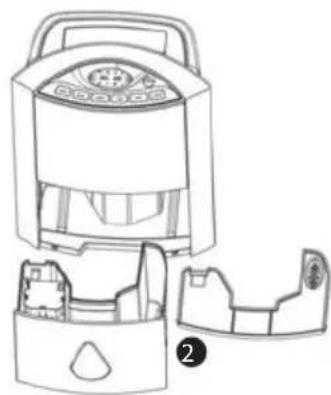
natural_image
Line drawing of a portable air purifier with internal compartments and a handle (no text or symbols)natural_image
Illustration of hands installing or adjusting a grid-patterned air conditioner unit (no text or symbols visible)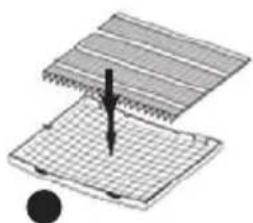
natural_image
Diagram of a mechanical assembly with layered components and a central fastener (no text or symbols)
natural_image
Illustration of hands installing or removing a grid-patterned device (no text or symbols visible)natural_image
Line drawing of a portable electric cooker with handle and control panel, no text or symbols present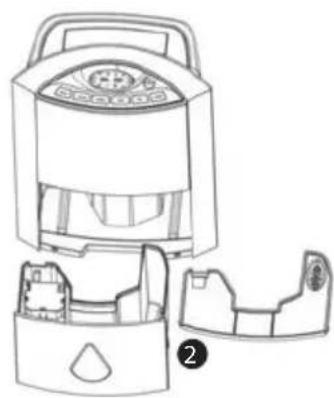
natural_image
Line drawing of a portable air conditioner unit with internal compartments and a handle (no text or symbols)
EINSETZEN DES KOHLEFILTERS
natural_image
Illustration of hands installing or removing a grid-patterned device into a container (no text or symbols visible)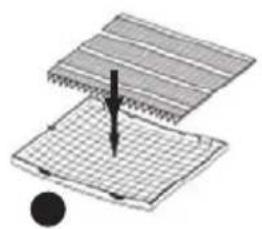
natural_image
Diagram showing a mechanical component with a downward arrow and a black circular element (no text or symbols)
natural_image
Line drawing of hands installing or removing a grid-patterned air conditioner unit (no text or symbols)BESCHRÄNKTE GARANTIE
natural_image
Line drawing of a portable air fryer with a hand holding the lid (no text or symbols)
natural_image
Line drawing of a portable air purifier with internal compartments and a handle (no text or symbols)natural_image
Illustration of hands installing or adjusting a grid-patterned air conditioner cover (no text or symbols visible)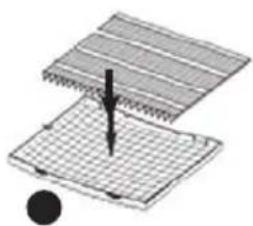
natural_image
Diagram of a layered structure with a central arrow and a black circle, no text or symbols present.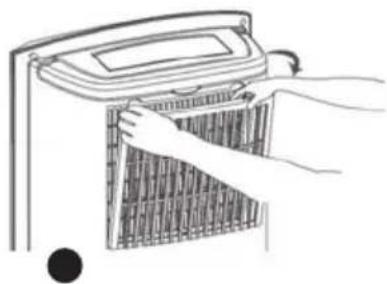
natural_image
Line drawing of hands installing or removing a grid-patterned heater (no text or symbols)natural_image
Line drawing of a portable electric stove or air purifier unit (no text or symbols)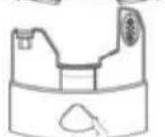
1
natural_image
Line drawing of a portable electric stove or refrigerator with control panel (no text or symbols)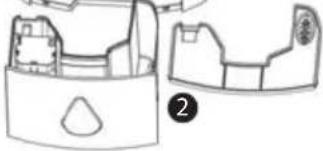
natural_image
Line drawing of a mechanical component with two views, one showing internal structure and the other a flanged part (no text or symbols)نصب مخزن آب
نصب لوله ی زهکشی
natural_image
Illustration of hands installing or removing a grid-patterned device into a fan (no text or symbols)12
natural_image
Diagram showing a mechanical or structural component with a downward arrow and grid pattern (no text or symbols)●
natural_image
Line drawing of hands installing or removing a heater panel (no text or symbols)●
natural_image
Line drawing of a portable electric cooker with handle and control panel, no text or symbols present
natural_image
Line drawing of a device with internal components and a labeled part (no text or symbols)natural_image
Illustration of hands installing a grid-patterned air conditioner cover (no text or symbols)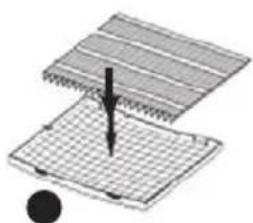
natural_image
Diagram of a layered structure with a central arrow and a black circle, no text or symbols present.
natural_image
Line drawing of hands installing or adjusting a grid-patterned panel inside a device (no text or symbols)natural_image
Line drawing of a portable electric cooker with handle and control panel, no text or symbols present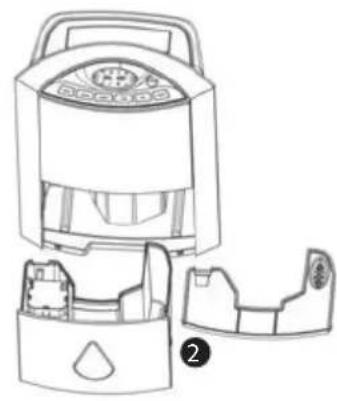
natural_image
Line drawing of a portable air purifier with internal compartments and control panel (no text or symbols)
INSTALACJA FILTRA WĘGLOWEGO
natural_image
Illustration of hands installing or adjusting a grid-patterned air conditioner unit (no text or symbols visible)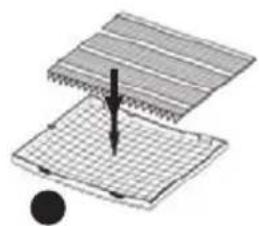
natural_image
Diagram of a mechanical assembly with a tool inserted into a grid-patterned component (no text or symbols)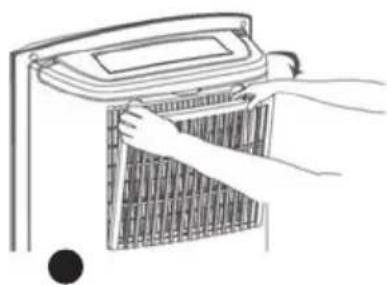
natural_image
Line drawing of hands installing or removing a grid-patterned device (no text or symbols)natural_image
Line drawing of a portable electric cooker with handle and control panel, no text or symbols present
natural_image
Line drawing of a portable air conditioner unit with internal compartments and a handle (no text or symbols)Napomene: Kada je spremnik pun, ureČaj odmah prestaje raditi. Ikona spremnika za vodu (21) počinje treptati, a alarm se oglašuje 15 puta.
INSTALACIJA CIJEVI ZA ODVOD VODE
UGRADNJA UGLJENOG FILTRA
Osim filtra za zrak smještenog ispod rešetke, odvlativač je opremljen ugljenim filtrom. Potonji omogućuje posebno uklanjanje loših mirisa iz prostorije. Da biste ugradili ugljeni filtar, molimo Vas da slijedite niže navedene upute:
- Otvorite pretinac (1).
- Stavite ugljeni filtar na filtar za zrak kao što je navedeno na shemi (2).
• Vratite filtar u pretinac (3).

natural_image
Illustration of hands installing or removing a grid-patterned device into a container (no text or symbols)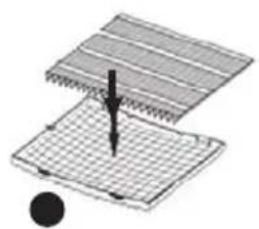
natural_image
Diagram of a mechanical assembly with a central pin and grid pattern (no text or symbols)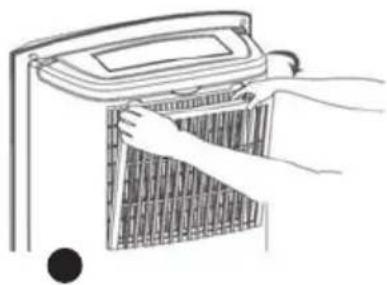
natural_image
Illustration of hands installing or removing a grid-patterned heater (no text or symbols)Napomena: Ne trebate stavljati ugljeni filtar kada koristite urećaj da biste odvlațili zrak jedne prostorije. Kada je stavljen ugljeni filtar zapravo se smanjuje kapacitet apsorpcije zraka.
PODEŠAVANJE PARAMETARA STUPNJEVA
LCD zaslon mođe prikazivati temperaturu u stupnjevima Celzijusa ili Fahrenheit. Da biste odabrali țeljeni tip prikaza, pritisnite istovremeno tipke Humidity (13) i Timer (12).
KORIŠTENJE ODVLATIVAČA ZRAKA
A. FUNKCIJA ODVLAŽIVANJA ZRAKA
Načelo odvlativanja zraka sastoji se u usisavanju vlađnog zraka iz prostorije, njegovog filtriranja, usmjeravanja prema kondenzatoru koji je niže temperature (kompresor komprimira rashladni plin koji omogućuje smanjivanje temperature kondenzatora), što dovodi do transformacije pare od vode sadrđane u zraku u vodu koja se skuplja u spremniku. Zrak koji je na taj način „osušen“ ponovo izlazi u prostoriju. Za ljude, najugodnija relativna vlaga iznosi izmeČu 45 % i 55 %.
Odvlațivać mođe raditi u ručnom ili automatskom načinu rada.
Upotreba u ručnom načinu rada
- U ručnom račinu rada, moțete odabrati izmeĆu slabog intenziteta (19) odvlațivača ili jako intenziteta (18).
- Da biste odabrali jačinu odvlativanja, pritisnite najprije tipku Power (10), zatim uzastopno tipku Mode (11) sve dok se ne pojavi teljena ikona.
Upotreba u automatskom načinu rada
- U automatskom načinu rada moțete odrediti țeljeni postotak vlage. On moțe varirati od 40% do 70%.
- Da biste odredili postotak vlage, pritisnite najprije tipku Power (10), zatim uzastopno tipku Mode (11) sve dok se ne pojavi ikona (17).
- Zatim uzastopce pritišćite tipku Humidity (13) kako biste odabrali postotak vlage. Kada ste ga odabrali, postotak će nekoliko sekundi treptati. Tijekom svog rada, ureČaj će pokazivati postotak vlage kao i temperature prostorije.
- UreČaj se automatski regulira kako bi zadrțao ili postigao odabrani postotak vlage.
Automatsko odmrzavanje
natural_image
Line drawing of a portable air fryer with a hand holding the lid (no text or symbols)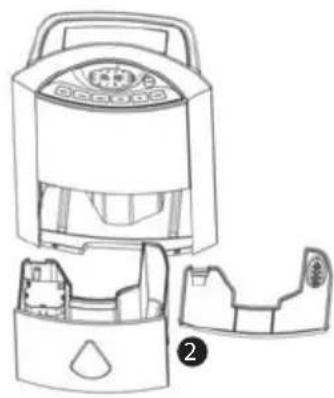
natural_image
Line drawing of a portable air conditioner unit with internal compartments and a handle (no text or symbols)Opombe: Ko je posoda za vodo polna, aparat takoj neha delovati. Ikona posode za vodo (21) začne utripati in alarm se oglasi 15 krat.
NAMESTITEV ODTOČNE CEVI
NAMESTITEV OGLENEGA FILTRA
natural_image
Illustration of hands installing or adjusting a grid-patterned device (no text or symbols visible)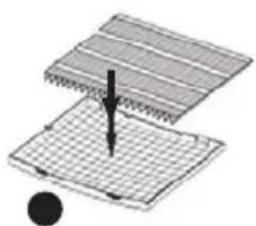
natural_image
Diagram showing a mechanical or structural assembly with layered components and a force arrow, no text or symbols present.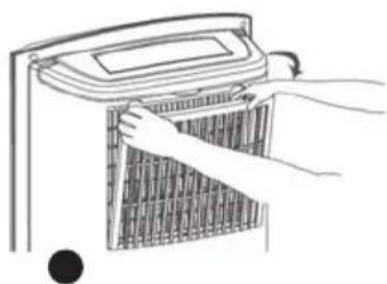
natural_image
Line drawing of hands installing or removing a wall-mounted device (no text or symbols)natural_image
Line drawing of a portable electric heater with a hand holding the lid (no text or symbols)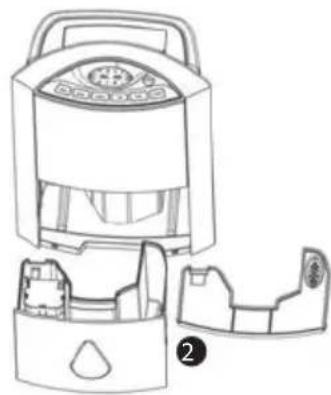
natural_image
Line drawing of a portable air conditioner unit with internal compartments and a handle (no text or symbols)natural_image
Illustration of hands installing or adjusting a grid-patterned air conditioner unit (no text or symbols visible)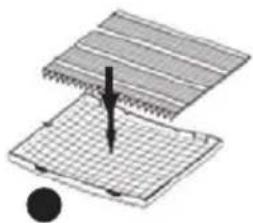
natural_image
Diagram of a mechanical assembly with layered components and a central rod (no text or symbols)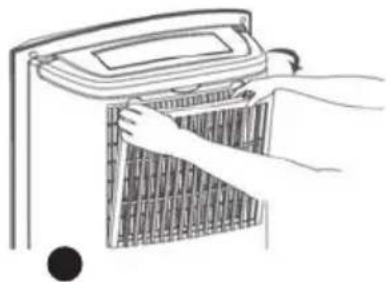
natural_image
Illustration of hands installing or removing a grid-patterned device (no text or symbols visible)natural_image
Line drawing of a kitchen electric cooker with handle and control panel, no text or symbols present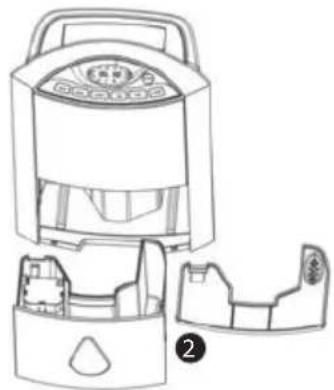
natural_image
Line drawing of a portable air purifier with internal compartments and a handle (no text or symbols)توكيب خزان الماء
تركيب أنوب الصرف
natural_image
Illustration of hands installing or removing a grid-patterned device into a container (no text or symbols)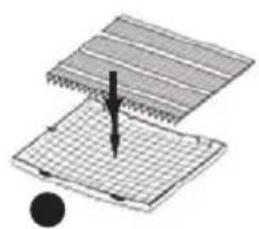
natural_image
Diagram of a layered structure with a central arrow and a black circle, no text or symbols present.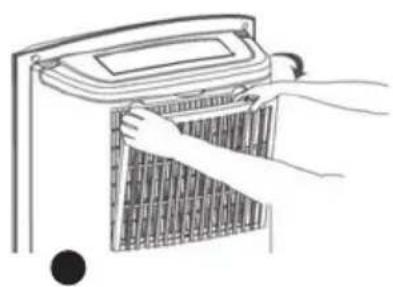
natural_image
Illustration of hands installing a grid-patterned panel on a device (no text or symbols visible)AR
natural_image
Line drawing of a portable electric heater with a hand holding the lid (no text or symbols)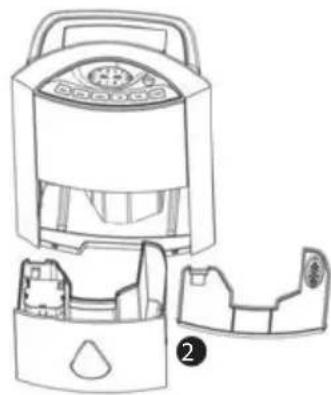
natural_image
Line drawing of a portable air conditioner unit with internal compartments and a handle (no text or symbols)INSTALACE UHLÍKOVÉHO FILTRU
natural_image
Illustration of hands installing or adjusting a grid-patterned air conditioner unit (no text or symbols visible)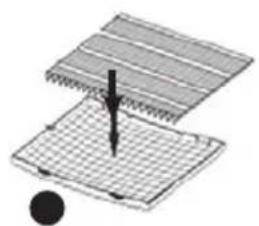
natural_image
Diagram of a mechanical assembly with layered structure and a central pin (no text or symbols)
natural_image
Illustration of hands installing or removing a grid-patterned heater (no text or symbols)


- PLEASE READ ALL THE INSTRUCTIONS BEFORE USING YOUR DEHUMIDIFIER, IN PARTICULAR THESE FEW FUNDAMENTAL SAFETY RULES:
- COMPONENTS
- FRONT PANEL
- REAR PANEL
- CONTROL PANEL
- LCD SCREEN
- INSTALLATION
- INSTALLATION OF THE WATER TANK
- INSTALLATION OF THE DRAIN PIPE
- INSTALLATION OF THE CARBON FILTER
- SETTING PARAMETERS
- USE OF THE DEHUMIDIFIER
- DEHUMIDIFIER FUNCTION
- Use in manual mode
- Use in automatic mode
- Automatic anti-freeze
- DIRECTING THE AIR VENT
- TIMER FUNCTION
- Programming automatic shutdown
- Programming automatic starts
- AIR PURIFICATION
- IONIZATION
- BLOCKING OF THE CONTROL PANEL
- SELF-CLEANING FUNCTION
- CLEANING AND MAINTENANCE
- CLEANING AND MAINTENANCE OF THE WATER TANK
- DRY THE TANK AND TANK COVER USING A SOFT DRY CLOTH.
- CLEAN THE MAIN UNIT USING A WET CLOTH ONLY.
- BREAKDOWN AND REMEDIES
- TECHNICAL SPECIFICATION
- ADVICE REGARDING THE DISPOSAL OF WASTE
- LIMITED WARRANTY
- INSTALLATIE VAN DE KOOLSTOFFILTER
- EINSETZEN DES KOHLEFILTERS
- BESCHRÄNKTE GARANTIE
- INSTALACJA FILTRA WĘGLOWEGO
- INSTALACIJA CIJEVI ZA ODVOD VODE
- UGRADNJA UGLJENOG FILTRA
- PODEŠAVANJE PARAMETARA STUPNJEVA
- KORIŠTENJE ODVLATIVAČA ZRAKA
- FUNKCIJA ODVLAŽIVANJA ZRAKA
- Upotreba u ručnom načinu rada
- Upotreba u automatskom načinu rada
- Automatsko odmrzavanje
- NAMESTITEV ODTOČNE CEVI
- NAMESTITEV OGLENEGA FILTRA
- توكيب خزان الماء
- تركيب أنوب الصرف
- INSTALACE UHLÍKOVÉHO FILTRU
Brand : LANAFORM
Model : Dehumidifier
Category : Dehumidifier