S1 - Dehumidifier LANAFORM - Free user manual and instructions
Find the device manual for free S1 LANAFORM in PDF.

User questions about S1 LANAFORM
0 question about this device. Answer the ones you know or ask your own.
Ask a new question about this device
Download the instructions for your Dehumidifier in PDF format for free! Find your manual S1 - LANAFORM and take your electronic device back in hand. On this page are published all the documents necessary for the use of your device. S1 by LANAFORM.
USER MANUAL S1 LANAFORM
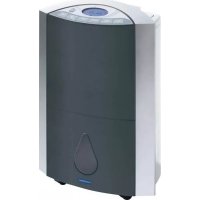
Thank you for your interest in the LANAFORM® "S1 Dehumidifier". This dehumidifier will not only help you reduce humidity in your rooms, but also purify the air. The LANAFORM® dehumidifier controls the level of humidity in the air and stops it rising too high. Simply select the preferred level of humidity and the dehumidifier will automatically manage the percentage of water content in the ambient air.
PLEASE READ ALL THE INSTRUCTIONS BEFORE USING YOUR DEHUMIDIFIER, ESPECIALLY THIS BASIC SAFETY INFORMATION:
- Check that your mains voltage is the same as that of your appliance.
- This appliance is not intended for use by people (including children) with reduced physical, sensory or mental capabilities, or people with lack of experience or knowledge, unless someone responsible for their safety can supervise or instruct them beforehand on how to use the appliance. Children should be supervised to ensure that they do not play with the appliance.
- Do not connect or disconnect the plug of the appliance with wet hands.
- If the power cable is damaged, it must be replaced by a special or similar lead available from the supplier or its after-sales department.
- Never use any appliance with a damaged plug, or after it has broken down or been damaged. In this case, return the appliance to the supplier or its after-sales department.
- Do not use the dehumidifier close to inflammable, corrosive or explosive sources.
- Always place the dehumidifier on a hard, flat, horizontal surface, away from walls (at least 50cm ) and sources of heat such as ovens, radiators etc.
- Do not tilt the dehumidifier as water could spill out and cause damage to the appliance.
- Disconnect the appliance when not in use and before cleaning it.
- This appliance is intended for domestic and indoor use ONLY. Do not use it for other purposes.
- Do not place any object on the dehumidifier as this could interfere with its normal operation.
- Do not insert any object other than those stipulated in this manual into the dehumidifier.
- Hot air from the appliance may be detrimental to the state of health of people and animals. Do not therefore stay too long in front of the exhaust vent grid.
- Never pour any liquid into the dehumidifier.
- Clean the dehumidifier using a soft cloth only.
- Never use a spray in the same room as the dehumidifier.
- Wait 5 minutes before restarting your appliance after a shutdown or power cut to allow the internal system of the appliance to return to operating status.
- Due to the presence of gas, moving your dehumidifier requires a degree of care. Avoid moving the dehumidifier on its side. Always wait a minimum of 6 hours before re-connecting it.
COMPONENTS
Front panel
- Handle
- Air vent
- Drainage pipe connector
- Water tank
- Power supply
Rear panel
- Control panel
- Exhaust vent
- Carbon filter
- Compartment grid of the carbon filter
Control panel
- On/Off key.
- Timer key: programs automatic start-up of the appliance
- Humidity/timer key: selects preferred level of humidity when the appliance is running in dehumidifier mode or the dehumidifying time when programming the timer.
- Humidity/timer key: selects preferred level of humidity when the appliance is running in dehumidifier mode or the dehumidifying time when programming the timer.
- Control screen
- Anti-freeze indicator: indicates that the appliance is in anti-freeze mode
- Timer indicator: the timer indicator light comes on when the time is set. The light flashes when adjusting the operating time.
- Operating indicator: when the dehumidifier is connected, the operating indicator light flashes. Once the dehumidifier is running, the indicator light is permanently green.
- Collection tank indicator: the water indicator light flashes when the water collection tank is full. At this point, the appliance switches to stand-by mode.
INSTALLATION
- Check that the water tank is empty before using the dehumidifier.
- To save energy and improve performance, close all doors and windows when the dehumidifier is on.
- The dehumidifier must be placed as close as possible to the source of humidity.
- To reduce the noise and vibrations produced by the appliance, we recommend the use of an anti-vibrations mat. These mats are available from specialist stores.
Installing the water tank
Check that the water tank is empty prior to each use. To do this, empty the tank, following the instructions below:
- Check that the appliance is turned off and unplugged before emptying the tank.
- Place your hand on the sides of the water tank and remove it.
- Remove the cover located above the tank and empty the water.
- Replace the cover before refitting the tank.
Note: When the water tank is full, the appliance will immediately stop running. The water tank icon (18) will start to flash.
Installing the drainage pipe
If the appliance is used in a very humid environment, it may be fitted with a permanent drainage connection (supplied) as shown below:
- Switch off the dehumidifier and disconnect it.
- Remove the plug on the tank's cover (figure 1) and put it in the hole provided for this purpose at the back of the dehumidifier.
- Cut the cover located at the back of the appliance using scissors or a pair of pliers (not supplied) (figure 2).
- Insert the pipe (supplied) into the drainage hole, checking that this fits to avoid any risk of water leakage (figure 3).
Installing the carbon filter
The dehumidifier is fitted with a carbon filter in addition to the air filter located under the grid. This carbon filter clears the room of unpleasant odours.
To install the carbon filter, follow the instructions below:
- Open the compartment (1).
- Insert the carbon filter (2).
- Replace the air filter grid in the compartment (3).
Note: you do not have to insert the carbon filter when you use the appliance to dehumidify the air in a room In fact, the absorption capacity of the air is reduced if the carbon filter is inserted.
USING THE S1 DEHUMIDIFIER
A. Dehumidifier function
The principle of the dehumidifier involves the suction of humid air from the room. This air is then filtered and directed to a condenser at a lower temperature (the compressor compresses a refrigerant gas, which lowers the temperature of the condenser), the effect of which is to turn the water vapour in the air into water, which is then collected in a tank. The "dried" air is returned to the room. The most comfortable relative humidity for human beings is between 45% and 55% . The dehumidifier can operate in manual or automatic mode.
Important note: before operating the dehumidifier, you must first adjust the exhaust vent (7) before switching on the appliance.
Use in manual mode:
- To configure the dehumidifier in manual mode, you must select "CO" when adjusting the humidity level.
- To do this, connect the dehumidifier. The operating indicator (17) starts to flash. Next, adjust the angle of the exhaust vent (7).
- Then press the On/Off button (10) to switch on the dehumidifier. The operating indicator light will be constantly green.
- Select "CO" by pressing the Humidity/Timer keys (12 and 13).
The dehumidifier will run continuously in manual mode, whatever the level of humidity in the room in which the appliance is installed.
Use in automatic mode
- In automatic mode, you can set the level of humidity you require. This may vary between 30% and 80% .
- To set the level of humidity, first select the On/Off key(10) followed by the Humidity/Timer keys (12 and 13) to select the level of humidity required.
- Once selected, the level will flash for a few seconds before displaying the room's actual level of humidity.
- The appliance adjusts itself automatically to maintain or reach the level of humidity selected. The dehumidifying process will therefore start within 5 minutes of the appliance starting. Once the level of humidity selected is 3% higher than the level of humidity in the room, the dehumidifying process will stop but the fan will continue running. Once the level of humidity selected is 3% higher than the level of humidity in the room, the dehumidifying process will stop but the fan will continue running.
Automatic anti-freeze
- The appliance is fitted with an automatic ant-freeze system. If the temperature of the room is below 5^ , the dehumidifier program cannot run.
- The dehumidifier is also fitted with a second temperature detector located close to the condenser. Its role is to measure the temperature of the air in this area and thus prevent any risk of freezing, which could affect normal operation of the appliance. If the temperature detected is below 0^ , the compressor will stop and the anti-freeze program will automatically start. When the detector's temperature is above 5^ , the dehumidifier will restart.
- The following table indicates average water quantities extracted over a 24-hour period based on a range of temperatures and levels of humidity* for information purposes:
| Temperature Humidity Level | ||
| 60% 80% | ||
| 27°C 6L 8.9L | ||
| 30°C 6.2L 10L | ||
*These figures are mean values and may vary depending on where the appliance is used
B. Timer function
This function allows you to program the automatic shutdown of the appliance.
Programming automatic shutdown
Once the appliance is running, press the Timer key (11). The "00" indicator will flash. Then press the Humidity/Timer keys (12&13) until the LCD screen displays the number of hour(s) required. Once selected, the number of hours will flash for a few seconds. The LCD screen will then display the room's level of humidity.
C. Blocking the control panel
The dehumidifier is fitted with a function blocking the control panel. To do this, press the two Humidity/Timer keys (12 and 13) at the same time for two seconds. The control panel will display "LC". To release the control screen, repeat the operation.
CLEANING AND MAINTENANCE
Switch off and unplug the appliance before cleaning it or moving it.
Never use detergents to clean the dehumidifier.
Cleaning and maintaining the water tank
To clean the water tank and its cover, first switch off and unplug the appliance. Use the clean, warm water to avoid any risk of mould growth.
Dry the tank and its cover with a soft, dry cloth.
Cleaning and maintaining the main unit
Clean the main unit using a damp cloth only.
Cleaning the carbon filter
The carbon filter must be cleaned on a regular basis due to the accumulation of dust (at least once every two weeks, or more often if necessary).
- If the carbon filter is not too dirty, remove the dust using a hand-held vacuum.
- Otherwise, clean the filter by soaking it in warm water (temperature below 40^ ) for 5 minutes.
- Then leave it to dry naturally without exposing it to heat sources.
Cleaning the drainage pipe
You must check whether the drainage pipe is clean and not clogged with dust or dirt preventing water from circulating normally. Check it regularly and replace if necessary.
BREAKDOWNS AND REMEDIES
In the event of a malfunction, under normal conditions of use, please refer to the following chart:
| Problem Possible cause | Solution | |
| The dehumidifier is not working | The appliance is not connected Plug in | the appliance or check your power supply to see whether it is faulty. |
| The appliance is not connected Connect | the appliance. | |
| The water tank is full or incorrectly positioned | Empty the water tank and/or reposition it in the main unit | |
| The fan runs but not the compressor The temperature of the room is too low. | The temperature of the room is too low. | The appliance stops the dehumidifier program if the temperature is below 5°C. |
| The room's level of humidity is too low. | The humidity level selected is above that of the room or is below 40%. | |
| The compressor is no longer running The temperature around the condenser is below 0°C.The appliance will stop the dehumidifying function and trigger the anti-freeze programme before restarting. | ||
| No air is emitted through the appliance's exhaust vent | The appliance is running in self-cleaning mode | No air is emitted after 30 minutes of self-cleaning for a short period |
| The filter is dirty Clean the filter | ||
| Very noisy appliance The appliance is incorrectly positioned | Move the appliance onto a stable, hard surface or place an anti-vibration mat under the dehumidifier. | |
| The filter is dirty Clean the filter. | ||
| No or little dehumidification The filter is clogged Clean the filter | ||
| Temperature too low The dehumidifying capacity may be reduced if the room temperature is below 18°C. Try and increase the temperature. | ||
| The level of humidity selected is higher than the actual level of humidity in the room | Select a level of humidity that is lower than the level of humidity in the room. | |
| The water drainage pipe is obstructed or bent | Check the drainage pipe and replace it if necessary. | |
| The operating time is too short Wait until the dehumidifying time is sufficient. | ||
| Hot air emission - The condenser is emitting hot air. | The appliance is not malfunctioning. | |
| The humidity level selected has not been reached after a lengthy period | Doors and windows have not been closed or the room is not sufficiently air-tight | Close the doors and windows or try and improve the room's air-tightness |
| Water noise | Coolant flow | Normal effect. |
ERROR CODES
Please contact your reseller or manufacturer if any of the following codes appear on the control panel.
| Code E1 E2 | ||
| Error Error in coil temperature The temperature sensor is broken | ||
| Display Flashes every 30 seconds Flashes every 30 seconds | ||
TECHNICAL DETAILS
Voltage: 220-240V
Frequency:50Hz
Power: 220W
Weight: 9.5kg.
ADVICE REGARDING THE DISPOSAL OF WASTE
-
All the packaging is composed of materials that pose no hazard for the environment and which can be disposed of at your local sorting centre to be used as secondary raw materials. The cardboard may be disposed of in a paper recycling bin. The packaging film must be taken to your local sorting and recycling centre.
-
When you have finished using the device, please dispose of it in an environmentally friendly way and in accordance with the law.
LIMITED WARRANTY
LANAFORM® guarantees this product against any material or manufacturing defect for a period of two years from the date of purchase, except in the circumstances described below.
The LANAFORM® guarantee does not cover damage caused as a result of normal wear to this product. In addition, the guarantee covering this LANAFORM® product does not cover damage caused by abusive or inappropriate or incorrect use, accidents, the use of unauthorized accessories, changes made to the product or any other circumstance, of whatever sort, that is outside LANAFORM®'s control.
LANAFORM® may not be held liable for any type of circumstantial, indirect or specific damage.
All implicit guarantees relating to the suitability of the product are limited to a period of two years from the initial date of purchase as long as a copy of the proof of purchase can be supplied.
On receipt, LANAFORM® will repair or replace your appliance at its discretion and will return it to you. The guarantee is only valid through LANAFORM®'s Service Centre. Any attempt to maintain this product by a person other than LANAFORM®'s Service Centre will render this guarantee void.
This function allows you to program the automatic shutdown of the appliance.
Voltage:220-240 Volts
Fréquence:50HZ
Puisance:220Watts
Poids: 9.5 kg
CONSEILS RELATIFS À L'ELIMINATION DES DÉCHETS
BESCHRANKTE GARANTIE
HENCIPABHOCTN IN CNOCObI INX YCTPAHEHNA
B cnyuae HncnpaBHOCTn npn HopMaIbHbIX ycIOBnX KcNpyaTcuN CM. HnHexceJeDyUOyUo Ta6nuy:
TEXHNUECKMEIPODPOBHOCTN
HapjkeHne: 220-240 BoJbT
Yactota: 50
MoUHocTB:220BaTT
Macca: 9,5 K
PEKOMEHDAUINIPOYTNIN3AUUNOTXODOB
-
YnaKOBka cIeJHa n3 6e30NaChbIX dIg OkpyKaIOSeI cpeI bMaTePuaNob, KoTOpBie MOryt 6bITb nepepa6OtaHbI nICNoJIb3OBAHbI B KaueCTBe BToPnUHO rCbp. KapTOH MoXHO Bbl6pAcBtB B 6aK dJa c6opa 6yMaRn. YnaKOBouHaj PIIeHka NODLeXHT nepepa6OTKe B MeCTHom ueHTpe No nepepa6OTKe W yTINn3aunn OTxODoB.
-
Ecn np6op 60bhe He nCnoB3yETc, yTnH3npyTe ero 6e30nacbIM dIg Okpykaioue cpebl cnocobom, co6nlaB Bce DeiCTByIOUne npedncaHna.
OgPAnHueHnIgTAPAHTN
LANAFORM® rapaHTnpyET OTCYCTBNE KaKx-Im6o DeΦeKTOB MaTePwana N c6opKn pni6opa B TeueHne DByX JeT C DaTbI erO npodaxn co CLENyUOuMm NCKNIOUeHnMa.
TapaHTnLAFAORM He paCnpocTpahReTcHa NoBpeKdEnHb pe3yIbTaTe 0bIuHOro n3Hoc aDaHHOrToBaPa.
Kpome TOrO, rapaTnHa daHbI ToBap MapKn LANAFORM He pacnpoctpaHaeTc H a Cnyan, KOrda Tobap npuwen B Herodnoctb B pe3yIbTaTe IIO6oro HeHaJnxAeero, HenpaBnIbHOro NnHecoOTBeCTByUeero NcNoIb30BaHnA, abApnn, npImeHeHn AIO6bIX HeOpRnHaIbHbIX PnHaJnxKHoCTei, NepeDenKToBapa Nn Ha IIO6bIe DpyrVe He yKa3aHHbIe 3decb clyaun Bhe KOHTpon LANAFORM.
LANAFORM® He HeceT KaKoI-Ni6o OTBeTCTBHeHocTn B CBr3N C IIO6bIMN NIO6OHyBMN, KOCBeHHbIMN INN CneuaJIbHbIMN NOBpeJdeHnMaMn Pn60pa.
Bce noJpa3yMeBaemble rapaHTn OTHocntelbHO pa6OTocno6HcTn TObapa orpaHueHb IByXHeTM CpOKOM c TaTbI 3HaayAbHoN NOKynK ToBapa npYcIOBn IpeOCTabJeHn KOnn DOKyMeHTa, NOITBepxdaIoUeero NOKynKy.
IonyuB Baw np6op, komnaHnLA NAFORM B 3aBncmocTn OT o6CToTeNbCTB OTPeMoHTnpyeT erO nI npOn3Beet 3ameHy dTeAe, a 3aTeM Bo3BpATNT erO Bam. IapaHTnHOe 06cnyXnBaHne BbIOJNHeT TObKO cepBnChble ceHTpbI LANAFORM. Ecn texHnueckoe 06cnyXnBaHne daHHoro ToBapa 6blIO BBIOJNHeHO He cepBnCHbIM ueHTpOM LANAFORM, a KaKIM-Ni6o DpyrMM Niqom, HactoYIe rapaHTnHbIe 063aTeNbCTBa CHTaOTc HedeIcTBtENbHbIM.

a a a a a a a a a a a a a a a a a a a a a a a a
Jzj 1
a a a a a a a a a a a a a a a a a a a a a a a a a a a a a a a a a
u55. 155%45
aiee aee eae ee eae eae eae eae eae eae eae
(7)gjzj (204
yds yas gys
B
a
(17)
.(13 Humidity/Timer (12 0
y 1
auiuui 1
.80%30
12) (10)
A. all A. all A. all
aaii i 1
aiaaa aai
11j11s,1sag,ayg yall aygbll aaiy jssjj bial kgsj g jalb
a 10000000000000000000000000000000000000000
Jell aagall yauuus uul sll aygbll all j! dssu uul aygbur uu 3
aai jai aai 2gai ai ay b jai y i %3- o jiaai ay b jai y i jaii laie
.5
aaii aiee i 1
5 5 5 5 5 5 5 5 5 5 5 5 5 5 5 5 5 5 5 5 5 5 5 5 5 5 5 5 5 5 5 5 5 5 5 5 5
0 12345678900000000000000000000000000000000000000000000000000000000000000
*
| \( \% \) | \( \% \) | |
| 80% | 60% | |
| \( 8.9 \) | 6 | 27 |
| 10 | 6.2 | 30 |
piai 1j kui jiu d, kua i y la ciuall oie
Csgall a.
jll jilj1 1y1 y
SjIgjy1
J 00> (11) Cgall jz jge bia (13912) Cglll Bgll
aill aol Jbcai.C
y jie ll gill ie biinol dlliy y. kill a gl lboa aydo y do y bll jy 1
aillll
aigilllll lll 1y y jaiy jaiy jaiy jaiy jaiy
a
LANAFORM