
CSC024X - Multi-cooker Crock-Pot - Free user manual and instructions
Find the device manual for free CSC024X Crock-Pot in PDF.

| Product type | Multi-cooker |
| Brand | Crock-Pot |
| Model | CSC024X |
| Cooking functions | Sear/Sauté, Simmer, Roast, Bake, Steam |
| Cooking pot | Removable, non-stick coating |
| Lid | Tempered glass |
| Included accessories | Two-way rack, measuring cup |
| Control panel | Digital with display, temperature and time buttons |
| Temperature range | 65°C to 250°C depending on function |
| Timer | Up to several hours, adjustable in increments |
| Keep warm function | Yes (Warm), up to 4 hours |
| Power supply | 220-240 V, 50/60 Hz |
| Power | Approximately 1000 W |
| Safety | Automatic shut-off if all water evaporates (steam) |
| Care and cleaning | Pot, lid, rack and measuring cup are dishwasher safe (pot recommended hand wash) |
| Materials | Steel heating base, non-stick pot, glass lid |
| After-sales service | France: 0805 042 055, email: CrockpotEurope@newelco.com |
Frequently Asked Questions - CSC024X Crock-Pot
User questions about CSC024X Crock-Pot
0 question about this device. Answer the ones you know or ask your own.
Ask a new question about this device
Download the instructions for your Multi-cooker in PDF format for free! Find your manual CSC024X - Crock-Pot and take your electronic device back in hand. On this page are published all the documents necessary for the use of your device. CSC024X by Crock-Pot.
USER MANUAL CSC024X Crock-Pot
5.6L Digital Slow and Multi-Cooker
Instruction manual · Notice d'utilisation · Bedienungsanleitung · Manual de instrucciones · Manual de instruções · Manuale di istruzioni · Gebruiksaanwijzing · Bruksanvisning · Ohjeet · Betjeningsvejledning · Instruksjonshändbok · Instrukcja obšugi · Uživatelská príručka · Námod na použitie · Használati utasítás · Manual de utilizesze · Pькововство 3a уnotpe6a ·
| English | 3 |
| François/French | 12 |
| Deutsch/German 21 | |
| Espanol/Spanish | 30 |
| Portugués/Portuguese | 39 |
| Italiano/Italian 48 | |
| Nederlands/Dutch | 56 |
| Svenska/Swedish | 64 |
| Suomi/Finnish 72 | |
| Dansk/Danish | 80 |
| Norsk/Norwegian | 88 |
| Polski/Polish | 96 |
| Česky/Czech 105 | |
| Slovenčina/Slovakian 113 | |
| Magyar/Hungarian 121 | |
| Română/Romanian 129 | |
| Бъларский/Bulgarian | 138 |
ENGLISH
IMPORTANT SAFEGUARDS
READ CAREFULLY AND SAVE FOR FUTURE REFERENCE
This appliance shall not be used by children from 0 year to 8 years. This appliance can be used by children aged from 8 years and above if they are continuously supervised. This appliance can be used by people with reduced physical, sensory or mental capabilities or lack of experience and knowledge if they have been given supervision or instruction concerning use of the appliance in a safe way and understand the hazards involved. Children must not play with the appliance. Cleaning and user maintenance must not be done by children. Keep the appliance and its cord out of the reach of children aged less than 8 years.
Parts of the appliance are liable to get hot during use.
This product must be positioned on a stable surface with the handles positioned to avoid the spillage of hot liquids.
Never operate the product by means of an external timer or separate remote-control system.
If the supply cord is damaged, it must be replaced by the manufacturer, its service agent or similarly qualified persons in order to avoid a hazard.
This appliance generates heat during use. Adequate precaution must be taken to prevent the risk of burns, scalds, fires or other damage to persons or property caused whilst in use or during cooling.
- Never use this appliance for anything other than its intended use. This appliance is for household use only. Do not use this appliance outdoors.
Always ensure that hands are dry before handling the plug or switching on the appliance.
Always use the appliance on a stable, secure, dry and level surface.
This appliance must not be placed on or near any potentially hot surfaces (such as a gas or electric hob).
Do not use the appliance if it has been dropped, if there are any visible signs of damage or if it is leaking.
Ensure the appliance is switched off and unplugged from the supply socket after use and before cleaning
Always allow the appliance to cool before cleaning or storing.
- Never immerse the body of the appliance or power cord and plug in water or any other liquid.
- Never let the power cord hang over the edge of a worktop, touch hot surfaces or become knotted, trapped or pinched
- Do not touch the external surfaces of the appliance during use as they may become very hot. Use oven gloves or a cloth when removing the lid. Beware of escaping steam when removing the lid.
NEVER attempt to heat any food item directly inside the base unit. Always use the cooking bowl.
- Some surfaces are not designed to withstand the prolonged heat generated by certain appliances. Do not set the appliance onto a surface that may be damaged by heat. We recommend placing an insulating pad or trivet under the appliance to prevent possible damage to the surface.
The slow cooker lid is made of tempered glass. Always inspect the lid for chips, cracks or any other damage. Do not use the glass lid if it is damaged, as it may shaller during use.
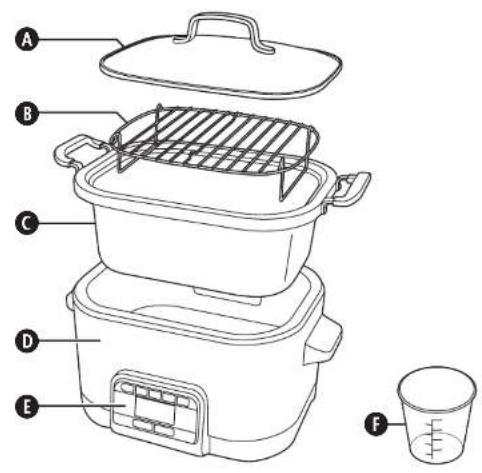
PARTS
A Lid
8 2-way rack
Cooking bowl
Heating base
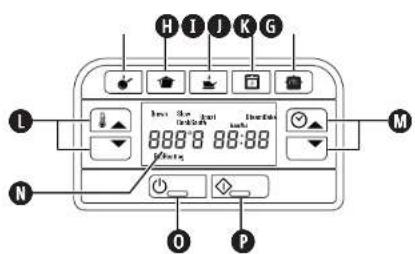
Control panel
Rice measure
6 Brown (sear)/Sauté function button
Slow cook function button
Roast function button
Bake function button
Steam function button
Increase/decrease temperature buttons
Increase/decrease timer buttons
Display
0 Standby button
Stop/start button
PREPARING FOR USE
Make sure your Crocpot® multi-cooker is switched off and unplugged from the mains supply socket before cleaning. Never immerse the heating base, cord or plug in water or any other liquid.
Before using your multi-cooker for the first time, wash the lid, cooking bowl. 2-way rack and rice measure in warm, soapy water. Rinse and dry thoroughly. Do not use harsh abrasives, chemicals or oven cleaners.
Before cooking for the first time, wipe the interior of the cooking bowl with a light coat of cooking oil to condition the cooking surface.
- Using a damp cloth or sponge, wipe the exterior and interior of the heating base. Use a mild detergent solution. Dry thoroughly.
IMPORTANT NOTES: Some countertop and labie surfaces are not designed to withstand the prolonged heat generated by certain appliances. Do not set the healed unit on a surface that may be damaged by heat. We recommend placing an insulated pad or suitably sized travel under your multi-cooker to prevent possible damage to the surface.
During initial use of this appliance, some slight smoke or odour may be detected. This is normal with many heating appliances and will not recur after a few uses.
COOKING FUNCTIONS
Your multi-cooker has five cooking functions:
Brown (sear)/Sauté Use this function to seal or brown meat and poultry before cooking. This is especially useful when you intend cooking meat using the slow cooker function. Your multi cooker has five brown (sear)/sauté temperatures.
Slow cook Slow cooking works by building up heat and maintaining an even temperature. For the best results do not remove the glass lid before half the cooking time has elapsed. The glass lid allows you to monitor cooking progress without interrupting the cooking time.
Roast Use your multi cooker to roast meat and poultry, potatoes and other root vegetables.
Bake The baking function of your multi cooker can be used to bake everything from fish to cakes.
Steam Effortlessly create perfect fluffy rice or steam vegetables and fish for delicious, healthy meals
USAGE NOTES
- Never fill the cooking bowl to the rim. Always allow a 2.5 cm gap between the contents of the cooking bowl and the
mm.
Changes to the cooking time or selected cooking temperatures can be made at any time during cooking using the timer or temperature increase/decrease buttons. - If additional time is needed after the cooking cycle has finished, first, press the required function button (Roast, Bake, Steam, etc.). Next, use the increase/decrease time buttons to set the additional cooking time required (in 5 minute increments) then press the start/stop button. Your multi-cooker will continue cooking for the added time.
- The Brown (sea)/Sauté function and the Steam functions can be used without setting the timer. However, if desired, you can use the timer feature of your multi-cocoker by setting a time using the timer increase/decrease buttons.
- After use, unplug your multi-cooker from the supply socket. Your multi-cooker does not switch off automatically.
BROWN (SEAR)/SAUTE FUNCTION
- Place the cooking bowl into the heating base. Plug in your multi cooker.
- Press the standby button (D) Your multi cooker will beep and the red standby button light will come on. The display will flash.
- Press the Brown (sear)/Sauté function button () . The display will stop flashing and show HI. This is the default sauté temperature. To change the temperature use the increase/decrease temperature buttons to select High,
Medium High, Medium, Medium Low or Low. We recommend that you use the High setting to brown/sea meat and poultry before cooking. -
Add oil to the bowl if you are using it than press the start/slot button . The button will light up green and the display will show "PreHeating".
-
Your multi cooker will start to heat up. Once the selected temperature has been reached, your multi cooker will beep.
- Trim meat and pat dry before browning/searing. Saute or sear the food in small batches. The cooking bowl and other parts of your multi cooker will be HOT!
- After you have finished, press the start/stop button to exit the sauté function. The green light will go out and the display will flash. You can switch off the sauté function at any time by pressing the start/stop button.
SLOW COOKING FUNCTION
- Place the cooking bowl into the heating base, add your ingredients into the cooking bowl and cover with the lid. Browning meat before slow cooking adds flavour and depth. Browning (saute or searing) meat before slow cooking adds flavour and depth. Use the Brown (sea)/Saute features of your multi-cooker to do this. Plug in your multi-cooker. To avoid under- and over cooking, fill cooking bowl 1/2 to 3/4 full (do not fill over 1/4 full to avoid spillovers).
- Press the standby button (O) Your multi-cooker will beep and the red standby button light will come on. The display will flash.
- Press the slow cook function button ( ) . The display will stop flashing and show LO and 6:00 These are the default slow cooking and lime settings. To change the cooking setting use the increase/decrease temperature buttons to select either Low, High or Warm. NOTE: The Warm setting is ONLY for keeping food warm that has already been cooked. DO NOT try to cook on the Warm setting. We do not recommend using the Warm setting for more than 4 hours.
- Next, set the required cooking time. The default cooking time is 6 hours but you can change it in 30 minute increments by using the increase/decrease timer buttons (
- Press the start/slot button (▶) to begin cooking. The button will light up green and your multi-cocker will start to heat up. The timer will count down in 1 minute increments.
- When cooking has finished your multi-cooker will beep three times and then automatically switch to the keep warm mode. Your multi-cooker will remain in keep warm mode until you press the stop/start button, standby button or disconnect the unit from the mains supply.
- You can cancel the slow cooking function at any time by pressing the start/slot button. Due to the multi-functionality of the CSC024X appliance, its slow cooking function works in a slightly different way to regular Crockpots. If using a recipe for a similar-sized Crockpot, you may need to increase the cooking time for use with the CSC024X.
Note that the Crocpot® recipes found in the CSCO24X Recipes Book have been designed specifically for this Crocpot® millu cooker and need no adjustment.
ROASTING FUNCTION
- Place the cooking bowl into the heating base, then place the rack into the cooking bowl. The rack can be used in the high position or the low position depending on what you are roasting. You can also use aluminium foil when roasting. Fill the lid.


- Press the standby button (C) Your multi-cooker will beep and the red standby button light will come on. The display will flash.
- Press the roast function button (1). The display will stop flashing and show 150^ and 02:00. These are the default roasting temperature and time settings. To change the temperature setting use the increase/decrease temperature buttons to select a temperature between 65^ and 230^ . To change the cooking time, use the increase/decrease timer buttons (2) as required.
- Press the start/slop button (◇). The button will light up green and the display will show "PreHealing".
-
Your multi-cooker will start to heat up. Once the selected temperature has been reached, your multi-cooker will beep.
-
The timer will start to count down as soon as the unit has pre heated to the selected temperature so add the food as soon as possible. The cooking bowl and other parts of your multi-cooker will be HOT!
- When the timer has counted down to zero and cooking has finished your multi-cooker will beep three times and the green start/sstop switch light will go out and the display will flash.
- You can switch off the roasting function at any time by pressing the start/stop button.
Tips
If a browner skin is required when you are roasting poultry, place the poultry with the breast side down for the first 30 minutes of cooking. Then, turn it the right way up for the rest of the cooking time.
For a superb roast, sear the meat first using the Brown (sear)/Sauté function before wrapping it in kitchen foil. This will stop any roasting juices from escaping out of the steam vent in the lid. Carefully wipe the cooking bowl clean with kitchen paper before placing the meat onto the rack.
BAKING FUNCTION
- Place the cooking bowl into the healing base, then place the rack into the cooking bowl if you are using it. Fit the lid.
- Press the standby button (O) Your multi-cooker will beep and the red standby button light will come on. The display will flash.
- Press the bake function button. The display will stop flashing and show 175^ and 01:00. These are the default baking temperature and time settings. To change the temperature setting the increased/decrease temperature buttons to select a temperature between 65^ and 230^ . You must now enter a cooking time. Use the increase/decrease timer buttons to enter the time in 5 minute increments.
- Press the start/stop button . The button will light up green and the display will show "PreHeating".
- Your multi-cooker will start to heat up. Once the selected temperature has been reached, your multi-cooker will beep.
- Cooking will start when the unit has pre healed to the selected temperatures so add the food as soon as possible. The cooking bowl and other parts of your multi-cooker will be HOT!
- When the timer has counted down to zero and cooking has finished your multi-cooker will beep three times and the green start/stop switch light will go out and the display will flash.
- You can switch off the baking function at any time by pressing the start/stop button.
Tips
Certain ingredients can be cooked directly in the cooking bowl. However, cakes and other recipes with a high fatsugar content should be cooked in suitable bakeware placed on the 2-way rack. When baking directly in the cooking bowl, line it with baking paper to prevent ingredients sticking.
STEAMING FUNCTION
Steaming food is healthy. It doesn't require any fat and less of the nutrients and vitamins in the food are lost. When steaming, the food is placed on the 2-way rack so it is kept clear of the water then water is added to the cooking bowl. The amount of water you can add to the bowl is dependent on the rack position.
- Place the cooking bowl into the heating base, then place the rack into the cooking bowl in the high or low position as required. With the rack in the low position, add 180ml of cold water. This will give about 5 minutes of steaming-perfect for leafy vegetables and asparagus. With the rack in the high position, add 1.2 litres of cold water. This will provide steam for about 45 minutes.
- Press the standby button (O) Your multi-cooker will beep and the red standby button light will come on. The display will flash.
- Press the steam function button (OK). The display will stop flashing and show HI. Program the cooking time using the increase/decrease timer buttons (Qts required. You don't need to set the timer
- Press the start/slop button 0 . The button will light up green and the display will show "PreHealing".
- Your multi-cooker will start to heat up. Once it has healed up sufficiently to produce steam, your multi-cooker will beep
- The timer will start to count down as soon as the unit has pre heated so add the food as soon as possible. The cooking bowl and other parts of your multi-cooker will be HOT!
-
When the timer has counted down to zero and cooking has finished your multi-cooker will beep three times and the green start/stop switch light will go out and the display will flash.
-
You can switch off the steaming function at any time by pressing the start/stop button.
| Food | Rack Position | Approx. Time | Notes |
| Asparagus spears | Low | 4-5 minutes | Cut off woody ends |
| Spinach | Low | 3-4 minutes | Whole, cleaned |
| Carrots | High | 7-10 minutes | Peel and cut into 5mm slices |
| New potatoes | High | 15-20 minutes | Scrub and leave whole |
| Cabbage | High | 10-15 minutes | Cut into quarters, remove core |
| Broccoli | High | 5-8 minutes | Trim stalk and cut into florets |
| Corn on the cob | High | 10-15 minutes | Whole, husks removed |
| Leeks | High | 8-10 minutes | Clean and cut into 1cm rounds |
| Cauliflower | High | 5-10 minutes | Cut into florets |
| Sugar snap peas | High | 5-8 minutes | Top and tail, leave whole |
| Brussel sprouts | High | 10-15 minutes | Peel and cut cross on the base |
| Celery | High | 5-10 minutes | Leave whole or dice |
| Butternut Squash | High | 10-12 minutes | Peel and cut into 2cm cubes |
| Sweet potatoes | High | 8-12 minutes | Peel and cut into 2cm cubes |
| Chicken fillet | High | 10-15 mins depending on size | Trim, leave whole |
| Salmon fillet | High | 6-10 minutes, depending on size | Add seasoning if required |
| Small whole fish | High | 10-15 minutes depending on size | Gut, rinse then dry |
| Whole prawns | High | 5-7 minutes | Wash then dry |
| Dim Sum | High | Cook according to pack instructions | |
Boil Dry Safety Feature
If the water runs out during steaming, your multi-cooker will turn itself off as a safety feature. If this happens, the display will show OFF. If you have finished steaming and your food is cooked through you don't need to do anything else except switch off your multi-cooker. However, if you need to carry on steaming or want to steam other items, do the following:
- Switch off your multi-cooker by pressing the standby button (
- Refill the cooking bowl with cold water as required (180ml minimum).
- Let your multi-cooker stand for 2 minutes to allow the boil dry safety feature to reset itself.
- Switch your multi-cooker on by pressing the standby button (B).
- Press the steam function button (
- Press the start/stop button (◇). The button will light up green and the display will show "Pre-Heating". Once the unit has pre healed, you can carry on cooking as before.
- If the display doesn't show "PreHeating", switch off your multi-cooker and allow it to cool down for longer before continuing from step 4 again.
Cooking Rice with your Multi-cooker
Your multi-cooker will cook brown and white rice beautifully using the Steam function. You don't need to set the timer because your multi-cooker will automatically switch off when the rice is cooked.
Cooking time will vary depending on the amount of water and rice added to the bowl but as an example, 2 cups of washed basmati rice take about 10 minutes, (including preheating).
Always rinse whitebasmat uncooked rice in cold water prior to cooking. This removes the starchy residue and produces fluffy rice. Place the rice into a suitable sieve and rinse well until the water runs clear. Allow to drain for 5 minutes.
- When steaming rice, place the water into the cooking bowl first, then add the washed rice. Ensure the rice is evenly spread around the base of the bowl before steaming.
- The preheating cycle of your multicooker is included in the cooking time, so place your rice in the unit before preheating.
- When steaming smaller amounts of rice, there may be some slight spitting of water from the steam oven in the lid. This is entirely normal, however we advise that you position your multi-cooker away from any electrical sockets etc.
You may notice that a sticky residue of cooked rice is left on the bowl after steaming your rice. Most of this should be removable using a non-metallic spoon or spatula. The remainder can be removed by soaking the bowl in hot soapy water for a few minutes.
- Cooking rice using your multi-cooker will only work when the correct ratio of rice and water is used. Therefore, it is imperative that you measure out the rice and water using the rice measure provided. Do not try to guess.
- Always use cold water.
Always place the lid on your multi-cooker when steaming rice
The rice does not need to be stirred during the steaming process.
Once cooked your multi-cooker will automatically switch off. However, leaving the rice in the bowl with the lid on for 1 or 2 minutes will allow the rice to soften further.
White Basmati Rice
| Uncooked rice measures Cold water measures Cooked rice portions | ||
| 12 13 24 | ||
| 10 11 20 | ||
| 8 10 16 | ||
| 6 7.5 12 | ||
| 4 5 8 | ||
| 2 2.5 4 | ||
Brown Rice
| Uncooked rice measures Cold water measures Cooked rice portions | ||
| 10 14 20 | ||
| 8 11.5 16 | ||
| 6 8.5 12 | ||
| 4 6.5 8 | ||
| 2 3.5 4 | ||
CLEANING
Never immerse any part of the heating base or power cord and plug in water or any other liquid.
ALWAYS unplug your multi-cooker from the electrical outlet and allow it to cool before cleaning.
- Wash the lid, 2-way rack, cooking bowl and rice measure in hot, soapy water. Rinse and dry thoroughly. Do not use abrasive cleaning compounds or scouring pad. A cloth, sponge, or rubber spatula will usually remove residue. To remove water spots from the surface of the cooking bowl, soak it in a solution of vinegar or lemon juice and warm water for 30 minutes. Rinse thoroughly then dry.
The lid and 2-way rack can also be washed in the dishwasher. Although the cooking bowl is dishwasher safe, we recommend hand washing only.
The outside of the heating base can be cleaned with a soft cloth dampened with warm, soapy water. Wipe dry. Do not use abrasive cleaners.
No other servicing should be performed.
AFTER SALES SERVICE
These appliances are built to the very highest of standards. There are no user serviceable parts. Follow these steps if the unit fails to operate:
- Check the instructions have been followed correctly.
- Check that the fuse has not blown.
- Check that the mains supply is functional
If the appliance will still not operate, return the appliance to the place it was purchased for a replacement. To return the appliance to the Customer Service Department, follow the steps below:
1. Pack it carefully (preferably in the original carton). Ensure the unit is clean.
2. Enclose your name and address and quote the model number on all correspondence.
3. Give the reason why you are returning it.
4. If within the guarantee period, state when and where it was purchased and include proof of purchase (e.g. till receipt).
5. Send it to our Customer Service Department at the address below:
Customer Service Department
Jarden Consumer Solutions (Europe) Limited
Middleton Road, Royton, Oldham
OL2 5LN,UK
Telephone: 0161 621 6900 Fax: 0161 626 0391
e-mail: enquiriesEurope@jardencs.com
FITTING A PLUG (U.K. & IRELAND ONLY)
This appliance must be earthed.
If the plug is not suitable for the socket outlets in your home, it can be removed and replaced by a plug of the correct type.
If the fuse in a moulded plug needs to be changed, the fuse cover must be refitted. The appliance must not be used without the fuse cover fitted.
If the plug is unsuitable, it should be dismantled and removed from the supply cord and an appropriate plug fitted as detailed. If you remove the plug it must not be connected to a 13 amp socket and the plug must be disposed of immediately.
If the terminals in the plug are not marked or if you are unsure about the installation of the plug please contact a qualified electrician.

Plug should be ASTA approved to BS1363.
Fusca should be ASTA approved to BS1362.
Ensure that the outer sheath of
the cable is finlly held by the cord grip
AFTER SALES SERVICE
In the case the apnilie still does not operable but is under warranty, return the product to the place it was purchased for a replacement. Please be aware that a valid form of proof of purchase will be required. For additional support, please contact our Consumer Service Department at United Kingdom: 0800 028 7154 [Spain: 0900 81 65 10] | France: 0805 542 055. For all other queries, please call: +44 800 028 7154 International office only. Alternatively, a mail
An other comment: please call: CrockpotEurope@newelloc.com.
WASTE DISPOSAL
Waste electronic products should not be disposed of with household waste. Please recycle where facilities exist. E-mail us at CrockpotEurope@newelco.com for further recycling and WEEE information.

FRANÇAIS
IMPORTANT: CONSIGNES DE SECURITE
SkeriKpIeRiknIaRiksFulitmVilrtaeVurHdNtBvHbDyHdNtBnAeP
JATTEIDEN HAVITTAMINEN
© 2021 Jarden Consumer Solutions (Europe) Limited. All rights reserved.
Jarden Consumer Solutions (Europe) Limited, 5400 Lakeside, Cheadle Royal Business Park, Cheadle, Cheshire, SK8 3GQ, United Kingdom.
Newell Poland Services Sp. z o.o., Plac Andersa 7, Poznan, 61-894, Poland.
Jarden Consumer Solutions (Europe) Limited and Newell Poland Services Sp. z o.o. are subsidiaries of Newell Brands Inc.
The product you buy may differ slightly from the one shown on this carton due to continuing product development.
- 5.6L Digital Slow and Multi-Cooker
- ENGLISH
- IMPORTANT SAFEGUARDS
- READ CAREFULLY AND SAVE FOR FUTURE REFERENCE
- Parts of the appliance are liable to get hot during use.
- PARTS
- PREPARING FOR USE
- COOKING FUNCTIONS
- USAGE NOTES
- BROWN (SEAR)/SAUTE FUNCTION
- SLOW COOKING FUNCTION
- ROASTING FUNCTION
- Tips
- BAKING FUNCTION
- STEAMING FUNCTION
- Boil Dry Safety Feature
- Cooking Rice with your Multi-cooker
- CLEANING
- Never immerse any part of the heating base or power cord and plug in water or any other liquid.
- AFTER SALES SERVICE
- FITTING A PLUG (U.K. & IRELAND ONLY)
- This appliance must be earthed.
- WASTE DISPOSAL
- FRANÇAIS
- IMPORTANT: CONSIGNES DE SECURITE
- JATTEIDEN HAVITTAMINEN
Brand : Crock-Pot
Model : CSC024X
Category : Multi-cooker