
PC-ES-KA 1265 - Coffee machine PROFICOOK - Free user manual and instructions
Find the device manual for free PC-ES-KA 1265 PROFICOOK in PDF.

| Product Type | Espresso Coffee Machine |
| Brand | ProfiCook |
| Model | PC-ES-KA 1265 |
| Pump Pressure | 20 bar |
| Power | 1150-1360 W |
| Voltage | 220-240 V~, 50 Hz |
| Water Tank Capacity | Approx. 1 liter |
| Net Weight | Approx. 3 kg |
| Main Functions | Espresso, cappuccino, hot water, steam |
| Compatible Coffee Types | Ground coffee and compatible Nespresso® capsules |
| Filters Included | 1 filter for 1 cup, 1 filter for 2 cups, capsule adapter |
| Accessories Provided | Measuring spoon/tamper, drip tray, residual water container, screw-on steam nozzle |
| Housing Material | Plastic and metal (hot plate) |
| Auto Shut-off | After 10 minutes of inactivity (standby mode) |
| Cleaning and Maintenance | Clean steam nozzle after each use; regular descaling recommended |
| Safety | Filter holder lock, auto shut-off, grounded plug |
| Protection Class | I |
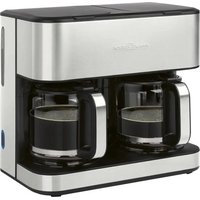
| Number of Cups | 1 or 2 cups simultaneously |
Frequently Asked Questions - PC-ES-KA 1265 PROFICOOK
User questions about PC-ES-KA 1265 PROFICOOK
0 question about this device. Answer the ones you know or ask your own.
Ask a new question about this device
Download the instructions for your Coffee machine in PDF format for free! Find your manual PC-ES-KA 1265 - PROFICOOK and take your electronic device back in hand. On this page are published all the documents necessary for the use of your device. PC-ES-KA 1265 by PROFICOOK.
USER MANUAL PC-ES-KA 1265 PROFICOOK
natural_image
Exterior view of a modern espresso machine with control panel and buttons (no visible text or symbols)Espresso-Kapselmaschine PC-ES 1265
Espresso Capsule Machine • Espresso capsule machine • Machine à capsules expresso
Máquina de cápsulas de café espresso • Macchina per caffè espresso a capsule • Ekspres kapsułkowy do espresso
Eszpresszó kapszulás gép • Капсульная машина для эспрессо • آتَة كبسولات اسبيسو
CE
Bedienungsanleitung......Seite 4
Instruction Manual...... Page 14
Gebruiksaanwijzing......Pagina 23
Mode d'emploi.... Page 32
Manual de instrucciones ...... Página 42
Istruzioni per l'uso....Pagina 52
Instrukcja obsługi......Strona 62
Használati utasítás .... Oldal 72
Руководство по эксплуатации ...... стр. 81
98 صفحة ____ دليل التعليمات
WICHTIG:
natural_image
Line drawing of a sewing machine with a rotary knob and base mount (no text or symbols)natural_image
Line drawing of a mechanical device with no visible text or symbolsBe sure to read the separately enclosed safety instructions first.
Instruction Manual
Thank you for choosing our product. We hope you will enjoy using the appliance.
Read the instruction manual and the separately enclosed safety instructions very carefully before using this appliance. Keep these documents, including the warranty certificate, receipt and, if possible, the box with the inner packaging in a safe place. If you pass the appliance on to a third party, always include all the relevant documents.
Symbols in this Instruction Manual
Important information for your safety is specially marked. It is essential to comply with these instructions in order to avoid accidents and prevent damage to the appliance:

WARNING:
This warns you of dangers to your health and indicates possible injury risks.

CAUTION:
This refers to possible hazards to the appliance or other objects.
Content
Overview of the Components....3
Unpacking the Appliance....14
Scope of Delivery....14
Overview of the Components....14
Warnings for the Use of the Appliance ....15
Notes for Use....15
Location....15
Electrical Connection 15
Indicator Lights of the Buttons 15
Switch On/Off 15
European Regulations on Energy Saving ....15
Interesting Facts about Espresso 15
Tips and Tricks for Perfect Coffee Enjoyment 16
Use of the Capsule Adapter....16
Operation....16
Assembly / Disassembly of the Filter Holder....16
Inserting the Collection Container/Drip Grid 16
Initial Start-up/Venting 16
Program Individual Coffee Quantity....17
Delete Programmed Coffee Quantity 17
Insert and Remove Filter Inserts....17
Espresso Preparation 17
Cappuccino Preparation 18
Use of Nespresso Compatible Capsules....19
Hot Water Function 19
Cleaning....19
Brew Head and Rubber Seal....20
Accessories....20
De-scaling....20
Storage....20
Troubleshooting....20
Technical Data....22
Disposal 22
Meaning of the "Dustbin" Symbol 22
Unpacking the Appliance
-
Remove the appliance from its packaging.
-
Remove all packaging material, such as foils, filling material, cable ties and cardboard packaging.
-
Check the scope of delivery for completeness.
-
If the contents of the packaging are incomplete or if damage can be detected, do not operate the appliance. Return it to the dealer immediately.
-
There may still be dust or production residues on the appliance. We recommend that you clean the appliance as described under "Cleaning".
Scope of Delivery
1 × Espresso capsule machine
1 × Removable water tank
1 × Screwed-on steam nozzle
1 × Filter holder
1 × 1-cup filter insert
1 × 2-cup filter insert
1 × Adapter for Nespresso compatible capsules
1×Dripgrid
1 × Collection container for residual water
1 × Measuring spoon / tamper
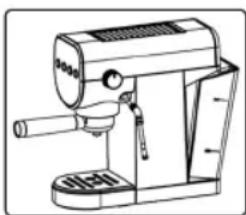
Overview of the Components
1 Button (on / off) with indicator light
2 button (quantity selection one cup) with indicator light
3 📋 button (quantity selection two cups) with indicator light
4 button (steam) with indicator light
5 Hot plate / cup tray
6 controller (steam / hot water / off)
7 Removable water tank
8 Rubber handle
9 Steam pipe with screwed-on steam nozzle
10 Measuring spoon / tamper (1 part, 2 functions)
11 Filter insert for 2 cups
12 Filter insert for 1 cup
13 Collection container for residual water
14 Drip grid
15 Filter holder
Without Illustration
Adapter for Nespresso compatible capsules
Warnings for the Use of the Appliance

WARNING:
- Check the controller position before each operation! The controller must be in position before you plug the mains plug into a socket!
- Do not allow moisture to enter the housing. There is a risk of electric shock.
- The brew head, filter holder, steam nozzle and cup tray become very hot during operation. Danger of burns!

CAUTION:
Do not brew espresso while pressure is still building up in the appliance (e.g. if milk has previously been foamed). If there is too much pressure in the appliance, espresso will leak from the edge of the brew head. The rubber seal in the brew head wears out more quickly.
- Make sure that the filter holder is correctly and securely closed during operation, as this appliance operates under pressure.
- Only use the appliance when there is water in the water tank.
• Fill the water tank only with cold water. - Only use drinking water. Never use carbonated water (sparkling water).
- Do not move the appliance when it is in operation.
Notes for Use
Location
- Place the appliance on a flat and non-slip surface.
- Do not operate the appliance under wall cabinets because of the rising heat and fumes.
- Do not place the appliance directly next to a gas or electric cooker or any other heat source.
Electrical Connection
- Before you insert the mains plug into the socket, check that the mains voltage you want to use matches that of the appliance. You will find the information on the type plate.
- Check the controller position! The controller must be in position O.
- Only connect the appliance to a properly installed earthed socket. A beep sounds and all indicator lights flash briefly. The appliance then goes into standby mode.
Indicator Lights of the Buttons
The indicator lights of the buttons display which function is activated.
| Button | Indicator Light | |
| Flashes Lights | up | |
| The appliance heats up to the brewing temperature for making coffee. | The brewing temperature for coffee preparation has been reached. | |
| The appliance heats up to the brewing temperature for steam generation. | The brewing temperature for steam generation has been reached. | |
- When the three indicator lights light up alternately, the appliance is in standby mode. (See section "European Regulations on Energy Saving".)
Switch On/Off
- Press the ⏻ button to switch on the appliance. A beep sounds. The indicator light of the ⏻ button lights up while the two indicator lights of the cups flash. The appliance starts heating. The heating plate becomes hot.
- When the required brewing temperature is reached, two beeps sound and the indicator lights on the cups light up.
- Press the ⏻ button to switch off the appliance. Then pull the mains plug out of the socket.
European Regulations on Energy Saving
The European Directive 2009 / 125 / EC (Ecodesign) bundles measures for energy saving.
Therefore, the appliance switches to standby after 10 minutes. This is displayed by the indicator lights alternately lighting up. To use the appliance again, you must first switch it off with the ⏻ button.
You benefit from increased safety and lower power consumption.
Interesting Facts about Espresso
- Espresso beans are roasted longer, so espresso is more suitable for people with sensitive stomachs than regular coffee.
- Espresso tastes stronger than coffee. This is due to the different roasting process. It is usually drunk without milk. Depending on taste, it can be drunk sweetened or unsweetened.
- The choice of variety is a matter of personal preference. Espresso beans are either blends (mixtures of different varieties from different regions for a consistent taste) or single variety beans from one growing region (single origin).
- In blends, a proportion of Robusta (20 to 30 %) is often added to the Arabica beans. With a high proportion
of Robusta, it is easier to obtain a good crema during preparation.
Tips and Tricks for Perfect Coffee Enjoyment
For a successful espresso preparation, it is important to consider a few things:
- The espresso machine must be preheated to operating temperature.
- Preheat the cups with hot water. Place the cups on the warm warming plate until use. Thick-walled porcelain cups hold the heat well.
- Only use espresso beans. It is ideal to grind the espresso beans just before preparation. Coffee that has already been ground quickly loses its aroma.
- The coffee grounds should be ground finely, but not too finely. If ground too coarsely, the finished espresso lacks aroma; if ground too finely, it tastes bitter. Try different varieties until you find your taste.
- Compaction of the Coffee Grounds:
Depending on how firmly the ground coffee has been pressed into the filter insert, the espresso results (espresso quantity and crema) may vary. It is therefore important to distribute and press the ground coffee properly in the filter insert so that the water can flow through evenly at all points.
- The filter insert must be dry before the ground coffee is poured in.
- Use the tamper provided to press on the coffee grounds. Do not press too hard or too lightly.
- The pressed coffee grounds must have a flat surface.
- Press, do not turn! Turning while pressing loosens up the "coffee cake" again. Press straight down and from above on the coffee grounds.
To find the ideal “espresso experience” for you, we recommend experimenting with the amount of coffee grounds and how you press the coffee grounds down.
- For example, if you have just frothed milk, it is important to hold the filter holder with the filter insert under cold running water before the next espresso preparation to cool these parts down.
It is also important to release the pressure and lower the temperature of the water in the appliance. This is because water that is too hot can “burn” the coffee grounds and the espresso tastes bitter. To do this, proceed as follows:
-
Place a suitable container (heat-resistant / approx. 300 ml) under the steam nozzle.
-
Make sure that the two indicator lights for the cups are lit. Unscrew the controller to position and release the steam for approx. 5 – 10 seconds.
-
Press the button to pump cold water into the appliance.
-
When only water without steam comes out of the steam nozzle, press the button again. Then turn the controller to position ○
-
Wait until the two indicator lights for the cups light up. Then the correct brewing temperature for your next espresso has been reached.
Use of the Capsule Adapter
The appliance can only be operated with Nespresso-compatible capsules!
- Different brands of Nespresso-compatible capsules are available in the shops. There are different types of capsules from brand to brand and also within brands, which produce different results due to different manufacturing. This is not a defect of the appliance.
- The different roasts, from light to strong, can affect the amount and flow of coffee. A slight drip is normal.
Operation
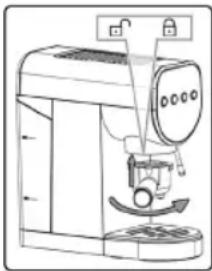
Assembly / Disassembly of the Filter Holder
- To fit the filter holder to the brew head, hold it with the handle on the left edge of the appliance. Cause the guide lugs to fit into the recesses on the brew head. Pull the filter holder by the handle to the right until it reaches the centre of the appliance. Make sure that the filter holder is firmly seated in the brew head.
- To detach the filter holder from the brew head, pull it to the left.

WARNING: Risk of Burns!
After the brewing process, the metal parts of the filter holder and the filter insert are hot.
natural_image
Line drawing of a sewing machine with a drum and base mount (no text or symbols)Inserting the Collection Container / Drip Grid
- Insert the collection container for the residual water.
- Place the drip grid on top of the collection container as a cover.
Initial Start-up/Venting

CAUTION:
Especially before putting into operation for the first time or if the appliance has not been used for a long time, the appliance must be vented. Do not use coffee powder during this procedure!
-
Remove the water tank by pulling it out by the handle. Fill the water tank with clean, fresh water up to the MAX mark.
-
Replace the water tank by first inserting it at the bottom. Then press the top firmly until the wa
natural_image
Line drawing of a mechanical device with no visible text or symbols-
Insert the filter holder.
-
Switch on the appliance. A beep sounds. The indicator light of the button lights up while the two indicator lights of the cups flash. The appliance starts heating. The heating plate becomes hot.
-
Swivel the steam pipe outwards. Make sure that the steam nozzle is turned up.
-
Place a suitable container (heat-resistant / approx. 500 ml) under the steam nozzle.
-
Press the button for steam.
8.

WARNING: Risk of Burns!
Hot steam comes out of the steam nozzle.
To produce steam, set the controller to position ✗. When a steady stream of water comes out of the steam nozzle, switch off the pump. Set the controller to position Q (off).

WARNING: Risk of Burns!
-
When moving the steam nozzle after steaming, always grasp it by the black rubber handle!
• The water in the vessel is hot. -
Empty the receptacle and place it under the brew head. To do this, remove the collection container for the residual water if necessary.
- Make sure the controller is in position O.
- Press the button for the steam again. As soon as both control lights for the buttons light up, start the pump with the button. A water flow starts. Let 2 – 3 cups run through. To empty the vessel in the meantime, switch off the pump. To do this, press the button.

WARNING: Risk of Burns!
The water in the vessel is hot.
- The appliance is now vented and ready for operation.
Program Individual Coffee Quantity
You have the option of changing the factory-set coffee quantity. Two standard quantities for one cup (☐) and for two cups (☐) are set at the factory. To change these according to your wishes, proceed as follows:
- Fill the water tank with sufficient water and reinsert it.
- Fit the filter holder without the coffee grounds.
- Place a cup under the brew head.
- Insert the mains plug into a socket and switch on the appliance.
- Wait until the two indicator lights of the cups light up. Then press and hold the button whose standard quantity is to be set.
- Once the desired quantity is reached, release the button.
- A beep sounds and the indicator lights flash to display that the programming has been successfully saved. The appliance is now ready for use again.
Delete Programmed Coffee Quantity
Proceed as follows to delete the individually programmed coffee quantity and restore the standard quantity:
- Fill the water tank with sufficient water and reinsert it.
- Fit the filter holder without the coffee grounds.
- Place a cup under the brew head.
- Insert the mains plug into a socket, but do not switch on the appliance.
- Press and hold both buttons (☐ / ☐) simultaneously. Then press and hold the button in addition.
- To display that the programming has been deleted, 5 beeps sound.
- After the reset, the appliance switches off. Press the ⏻ button. The appliance emits beeps. These only stop when the ☐ or button is pressed.
- Press one of the two buttons. Some water comes out of the brew head, then the beeping stops.
- The two indicator lights flash. Then two beeps are heard and the indicator lights light up. The appliance is now ready for use again.
Insert and Remove Filter Inserts
- There are guide lugs on the filter inserts. These must be inserted into the notch of the filter holder. Then turn the filter insert by 90 degrees so that it does not fall out when emptying later.
- To be able to remove the filter insert, it must be turned in such a way that the guide nose is again in the notch of the filter holder. Now the filter insert can be removed.
Espresso Preparation
- Fill the water tank with sufficient water and reinsert it. The water level must be between the MIN and MAX marks.
-
Switch on the appliance. A beep sounds. The indicator light of the ⏻ button lights up while the two indicator lights of the cups flash. The appliance starts heating. The heating plate becomes hot.
-
If you have previously frothed milk, release all pressure from the appliance:
3.1 When the indicator light of the ⏻ button is on, press this button to switch off the function. Also make sure that the controller is set to ⭕
3.2 Place a suitable vessel under the steam nozzle.
3.3 Set the controller to position until no more steam comes.
3.4 Turn the controller back to position
-
Select a filter insert (11 / 12). Place it in the filter holder. Make sure that the filter insert is turned 90 degrees so that it does not fall out when emptying later. See previous chapter "Insert and Remove Filter Inserts".
-
Fill the filter insert with espresso grounds. Use the measuring spoon provided (one measuring spoonful = 1 cup). Distribute the coffee grounds evenly and press
down lightly with the tamper. Clean the edge of the filter holder.
- Fit the filter holder to the brew head. Make sure that the filter holder is firmly seated in the brew head.
- When the required brewing temperature is reached, two beeps sound and the indicator lights of the cups light up. Place the cup(s) under the brew head on the drip tray.
- Press the or button. The hot water is pressed through the filter.
- When no more coffee flows, remove the cup(s).
- Remove the filter holder after each preparation. This prolongs the life of the rubber seal in the brew head.
- Detach the filter holder from the brew head.
- To brew another cup of espresso, you must empty the filter insert and refill it:

WARNING: Risk of Burns!
The metal parts on the filter holder and the filter insert are hot.
Tap the coffee grounds out of the filter insert. If necessary, use a spoon to help. Rinse out any leftover coffee grounds with water.
- To prepare the next cup(s) of espresso, proceed as described above.
- The coffee temperature of the first cup prepared and the following cup(s) may be different.
Cappuccino Preparation
A cappuccino usually consists of one third coffee, one third hot milk and one third milk foam.
The milk foam should not be so firm that you can shape it with a spoon. Rather, it should be creamy, like whipped cream that is not quite stiff, i. e. have a thick consistency.
In addition, you will need for the preparation:
- a larger, bulbous cup (approx. 180 ml) in which you prepare the espresso;
- a small frothing jug with a pronounced spout (e. g. 0.3 litre);
• any small, heat-resistant vessel;
• cold milk with a fat content of at least 3.5 % fat.

CAUTION: Note the Order!
- Brew espresso.
- Froth the milk.
To prepare cappuccino, proceed as described under
"Espresso Preparation".
To froth the milk you need, proceed as follows:

WARNING: Danger of Scalding!
Escaping hot steam can cause injuries. During the heating process, hot steam / hot water may escape from the brewing head and / or from the steam nozzle for a short time!
- Make sure that the controller is in position ○ before switching on the steam function.
-
Never point the steam jet at people.
• Always place a container under the steam nozzle. -
Swivel the steam pipe outwards. Make sure that the steam nozzle is screwed on.
- Place a heat-resistant container under the steam nozzle.
-
Fill the jug up to a maximum of one third with cold milk.
-
Press the ⏻ button and wait until the indicator light is on.
-
Before each frothing, turn the controller briefly in the direction of to drain off the accumulated condensation. When only steam comes out, the appliance is ready for frothing.
-
Place the filled milk jug under the steam nozzle.
-
Lift the jug so that the steam nozzle is submerged just below the surface of the milk.
-
Do not hold the steam nozzle in the middle of the jug but at the inner edge. This position is important so that the milk is set into a swirling motion during frothing. We recommend using the spout of the jug as a guide for the steam nozzle.
-
Turn the controller slowly in the direction of ✗ until the desired amount of steam is set. Move the jug slightly up and down. When the milk has reached the desired volume (approx. 50 %), turn the controller to position○.
-
If you want to heat the milk further, hold the steam nozzle to the bottom of the vessel while steam is being produced. Make sure that the milk does not boil. This would cause the foam to break down.
-
If the indicator light goes out during steam production, the water is no longer hot enough. Turn the controller to O. Wait until the indicator light lights up again. Then you can start frothing milk again.
-
After foaming, the jug can be tapped briefly on the tabletop (as if you were putting it down roughly) to remove the last coarse air bubbles. Swirl the jug with slight twisting movements. This mixes the foam again a little after whipping. Now do not let much time pass.
-
While swirling the jug with light circular movements, slowly pour the frothed milk into the espresso.
-
With a few deft movements, you can draw patterns in the foam.
-
Depending on taste, the foam can be sprinkled with cocoa powder or cinnamon.
-
IMPORTANT: Clean the steam nozzle immediately after each frothing! This is because when you close the controller, a vacuum is created in a fraction of a second, which sucks some milk into the steam nozzle. Place
your heat-resistant container under the steam nozzle. Turn the controller up again briefly so that the milk residue is rinsed out of the steam nozzle. Wipe the steam nozzle with a damp cloth.
- You switch off the steam function by pressing the button. The indicator light on the button goes out and the other two indicator lights for the cups light up.
Use of Nespresso Compatible Capsules
The appliance can also be used with Nespresso compatible capsules.
- Fill the water tank with sufficient water and reinsert it. The water level must be between the MIN and MAX marks.
- Switch on the appliance. A beep sounds. The indicator light of the ⏻ button lights up while the two indicator lights of the cups flash. The appliance starts heating. The heating plate becomes hot.
- If you have previously frothed milk, release all pressure from the appliance:
3.1 When the indicator light of the ⬆ button is on, press this button to switch off the function. Also make sure that the controller is set to ○
3.2 Place a suitable vessel under the steam nozzle.
3.3 Set the controller to position until no more steam comes.
3.4 Turn the controller back to position ○
- Insert a Nespresso compatible capsule into the capsule adapter. To do this, proceed as follows:
4.1 Open the flap on the capsule adapter.
4.2 Press the capsule into the adapter with light pressure. The metal tips at the bottom of the adapter pierce the capsule.
4.3 Close the flap again so that it audibly clicks into place.
-
Insert the adapter for the capsules into the filter holder.
-
Fit the filter holder to the brew head. Make sure that the filter holder is firmly seated in the brew head.
-
When the required brewing temperature is reached, two beeps sound and the indicator lights of the cups light up. Place the cup(s) under the brew head on the drip tray.
- Press the ☐ or ☐ button. The hot water is pressed through the filter.
- When no more coffee flows, remove the cup(s).
- Remove the filter holder after each preparation. This prolongs the life of the rubber seal in the brew head.
- Detach the filter holder from the brew head.
- To prepare another cup, the capsule must be replaced with a new capsule:
WARNING: Risk of Burns!
The metal parts on the filter holder and the filter insert are hot.
Before you can change the capsule, you must cool the adapter for Nespresso compatible capsules under cold water.
- To prepare the next cup(s), proceed as described above.
- The coffee temperature of the first cup prepared and the following cup(s) may be different.
Hot Water Function
The appliance can also be used to prepare hot water for tea. To do this, proceed as follows:
- Fill the water tank with sufficient water and reinsert it.
- Swivel the steam pipe outwards. Make sure that the steam nozzle is screwed on.
- Place a cup under the steam nozzle.
- Switch on the appliance with the ⏻ button. Wait until the two indicator lights of the cups light up.
- Turn the controller to the position ✗. And then press the □ or □ button.
- When the appropriate amount of water for one or two cups has been dispensed, return the controller to the position ○
Cleaning

WARNING:
- Always pull the mains plug out of the socket before cleaning and wait until the appliance has cooled down.
- Do not immerse the appliance in water. It could cause an electric shock or fire.
- The steam nozzle is hot immediately after use!

CAUTION:
- Do not use a wire brush or other abrasive objects.
- Do not use harsh or abrasive cleaning agents.
Clean the outside of the appliance with a slightly damp cloth if necessary – without any additives.
Brew Head and Rubber Seal
Wipe the brew head and the rubber seal with a damp cloth. Dampen a soft nylon brush beforehand to remove stubborn dirt. Dry off with a dry cloth.
Accessories
You can clean the filter holder, filter inserts, drip grid, collection container, measuring spoon, water tank and steam nozzle in warm rinsing water with a little hand dishwashing liquid. If necessary, you can use a fine, soft nylon brush. Rinse with clean water. Dry the parts with a soft cloth.

CAUTION:
These parts are not suitable for cleaning in the dishwasher. Exposure to heat and harsh cleaners could cause them to warp or discolour.
Water Tank
- Remove the water tank by pulling it out by the handle. Replace it after cleaning and drying.
- Replace the water tank by first inserting it at the bottom. Then press the top firmly until the water tank clicks into place.
Steam Nozzle
Clean the steam pipe and the screwed-on steam nozzle immediately after each preparation of milk foam. Milk residues that have dried up make cleaning more difficult.
-
Unscrew the steam nozzle. Let it soak in the warm rinse water for a while. This helps to loosen the milk residues.
-
Wipe the steam pipe on the appliance with a damp cloth.
- To loosen dried-on residues, fill a vessel with hot water. Place it under the steam pipe so that it is immersed in it.
- Screw the steam nozzle back onto the steam pipe after cleaning. Place a heat-resistant empty container under the steam nozzle. Operate the appliance as described in "Cappuccino Preparation" points 4 and 5. After this steam cleaning, the steam nozzle is ready for use again.
De-scaling
Limescale deposits endanger the function of the appliance. Therefore, the appliance must be descaled regularly. The intervals between descaling depend on the hardness of the water and the frequency of use.
Descale with a commercially available descaling agent, as recommended for coffee machines.
- Follow the dosage instructions on the packaging or package insert.
- Operate the appliance without the filter holder, as for espresso preparation, until the tank is empty. Run the solution through the brew head.

WARNING:
- Rinse out the water tank and run a full tankful of fresh water through the brew head to rinse out any descaling agent residue.
- Do not use this water for consumption.
Storage
- Clean the appliance as described. Allow the accessories to dry completely.
- We recommend storing the appliance in its original packaging if you do not intend to use it for a longer period of time.
• Always store the appliance out of the reach of children in a well-ventilated and dry place.
Troubleshooting
| Problem Possible Cause Remedy | ||
| The appliance has no function. | The appliance has no power supply. | Check the power socket with another appliance. |
| Insert the mains plug correctly. | ||
| Check the house fuse. | ||
| The appliance is defective. Contact our | service or a specialist. | |
| There is no more coffee running in. | Switch off the Appliance! | |
| The water tank is empty. Fill the water tank with fresh water. | ||
| The water tank is not inserted correctly, the valve is not open. | Press the water tank firmly on the upper side until it locks into place. | |
| The holes in the filter holder and the outlet on the brew head are blocked. | Clean the filter holder, the filter and the outlet on the brew head. | |
| Air has got into the heating circuit. | erate steam as described under “Cappuccino Preparation”. Turn the controller in the direction as far as it will go. | |
| The coffee powder is too fine or has been pressed on too firmly. | Loosen the coffee powder. Distribute it evenly and press it only lightly with the tamper. | |
| The appliance is calcified. Descale the appliance as described. | ||
| The pump makes loud noises. | Switch off the Appliance! | |
| The water tank is empty. Fill the water tank with fresh water. | ||
| The water tank is not inserted correctly, the valve is not open. | Press the water tank firmly on the upper side until it locks into place. | |
| The appliance was not vented before first use. | Vent the appliance as described under “Initial Start-up / Venting”. | |
| Air has entered the water circuit. | ||
| The espresso comes out at the edge of the filter holder. | Stop the Brewing Process! | |
| The filter holder was not inserted correctly or was not closed tightly enough. | Insert the filter holder correctly as described under “Assembly / Disassembly of the Filter Holder”. | |
| There is too much coffee powder in the filter insert. | Remove any excess coffee powder. | |
| There is coffee grounds residue on the rubber seal of the brew head. | Switch off the appliance and let it cool down. Clean the rubber seal as described. | |
| After preparing milk foam, the appli-ance is still under pressure. | Release the pressure completely. Refer to chapter “Espresso Preparation”, point 3. | |
| The espresso coffee is too cold. | The cups were not preheated. Rinse the cups with hot water. | |
| The coffee foam is slightly discoloured (the coffee comes out quickly). | The coffee powder is too coarse or it has not been distributed evenly. | Use the tamper supplied to help you. |
| There is too little coffee powder in the filter insert. | Depending on the filter insert used (1 cup or 2 cups), fill one or two measuring spoonfuls into the filter ice pack (one measuring spoonful = 1 cup). | |
| The coffee foam is darkly discoloured (the coffee comes out slowly). | The coffee powder is too fine or has been pressed on too firmly. | Loosen the coffee powder. Distribute it evenly and press it only lightly with the tamper. |
| There was too much coffee powder in the filter insert. | Use less coffee powder. Depending on the filter insert used (1 cup or 2 cups), fill one or two measuring spoonfuls into the filter ice pack (one measuring spoonful = 1 cup). | |
| The espresso is not creamy enough. | Unsuitable espresso powder was chosen. | Change the brand if necessary. |
| The milk is not frothed. | The milk is unsuitable. | Use milk with a fat content of at least 3.5% fat. |
| The milk is not cold enough. Use chilled milk. | ||
| The steam nozzle is dirty. Clean the steam nozzle as described. | ||
| The brewing process cannot be started. The three control indicator lights light up alternately. | This is not a fault of the appliance. To comply with the Ecodesign Directive (2009 / 125 / EC), the appliance automatically switches to standby after a maximum of 10 minutes after the end of the brewing process. | To use the appliance again, you must first switch it off with the button. Then switch the appliance on again. |
Technical Data
Model: PC-ES 1265
Power supply: 220 - 240 V\~, 50 Hz
Power consumption: 1150–1360 W
Filling quantity: ....approx. 1 litre
Protection class: I
Pressure: 20 bar
Net weight: .... approx. 3 kg
The right to make technical and design modifications in the course of continuous product development remains reserved.
This appliance has been tested according to all applicable, current CE directives and built according to the latest safety regulations.
Disposal
Meaning of the "Dustbin" Symbol
Protect our environment: do not dispose of electrical equipment in the domestic waste.
Please return any electrical equipment that you will no longer use to the collection points provided for their disposal.
This helps avoid the potential effects of incorrect disposal on the environment and human health.
This will contribute to the recycling and other forms of re-utilisation of electrical and electronic equipment.
Information concerning where the equipment can be disposed of can be obtained from your local authority. Your dealer and contractual partner is also obliged to take back the old appliance free of charge.
BELANGRIJK:
natural_image
Diagram of a sewing machine with a rotary knob and base mount (no text or labels)⚠ WAARSCHUWING: Verbrandingsgevaar!
natural_image
Line drawing of a mechanical device with no visible text or symbolsWAARSCHUWING: Verbrandingsgevaar!
WAARSCHUWING: Verbrandingsgevaar!
WAARSCHUWING: Verbrandingsgevaar!
WAARSCHUWING: Verbrandingsgevaar!
⚠ WAARSCHUWING: Verbrandingsgevaar!
natural_image
Line drawing of a sewing machine with a circular component and mechanical parts (no text or symbols)natural_image
Line drawing of a coffee machine with a side panel and control panel (no text or symbols)
natural_image
Line drawing of a coffee maker machine (no text or symbols)natural_image
Line drawing of a sewing machine with a rotary knob and base mount (no text or symbols)natural_image
Line drawing of a coffee maker with handle and spout (no text or symbols)natural_image
Line drawing of a sewing machine with a circular dial and mechanical components (no text or symbols)natural_image
Line drawing of a coffee maker machine (no text or symbols)CTC Clatronic Sp. z o.o
Ul. Brzeska 1
45-960 Opole
Usuwanie
natural_image
Line drawing of a sewing machine with a circular dial and mechanical components (no text or symbols)natural_image
Line drawing of a coffee maker with handle and spout (no text or symbols)natural_image
Line drawing of a sewing machine with a drum and base, showing mechanical components without any text or symbols.natural_image
Line drawing of a coffee maker with handle and spout (no text or symbols)natural_image
Line drawing of a sewing machine with a coffee cup and base mount (no text or symbols)natural_image
Line drawing of a coffee maker with handle and spout (no text or symbols)- ticketing from justifying a highway in the United States! I begin to take on a highway to take it.
.٥ الوضع

- Espresso-Kapselmaschine PC-ES 1265
- WICHTIG:
- Be sure to read the separately enclosed safety instructions first.
- Instruction Manual
- Symbols in this Instruction Manual
- WARNING:
- CAUTION:
- Content
- Unpacking the Appliance
- Scope of Delivery
- Overview of the Components
- Without Illustration
- Warnings for the Use of the Appliance
- Notes for Use
- Location
- Electrical Connection
- Indicator Lights of the Buttons
- Switch On/Off
- European Regulations on Energy Saving
- Interesting Facts about Espresso
- Tips and Tricks for Perfect Coffee Enjoyment
- - Compaction of the Coffee Grounds:
- Use of the Capsule Adapter
- Operation
- Assembly / Disassembly of the Filter Holder
- WARNING: Risk of Burns!
- Inserting the Collection Container / Drip Grid
- Initial Start-up/Venting
- Program Individual Coffee Quantity
- Delete Programmed Coffee Quantity
- Insert and Remove Filter Inserts
- Espresso Preparation
- Cappuccino Preparation
- CAUTION: Note the Order!
- WARNING: Danger of Scalding!
- Use of Nespresso Compatible Capsules
- Hot Water Function
- Cleaning
- Brew Head and Rubber Seal
- Accessories
- Water Tank
- Steam Nozzle
- De-scaling
- Storage
- Technical Data
- Disposal
- Meaning of the "Dustbin" Symbol
- BELANGRIJK:
- ⚠ WAARSCHUWING: Verbrandingsgevaar!
- WAARSCHUWING: Verbrandingsgevaar!
- Usuwanie
Brand : PROFICOOK
Model : PC-ES-KA 1265
Category : Coffee machine