PC-KA 1300 - Coffee machine PROFICOOK - Free user manual and instructions
Find the device manual for free PC-KA 1300 PROFICOOK in PDF.

| Product type | Filter coffee machine |
| Brand | ProfiCook |
| Model | PC-KA 1300 |
| Net weight | 2.4 kg |
| Dimensions (approx.) | 25 x 20 x 30 cm |
| Power supply | 220-240 V~, 50/60 Hz |
| Power consumption | 900 W |
| Standby consumption | 0.6 W |
| Protection class | I |
| Water tank capacity | Approx. 1.2 L (estimated based on carafe capacity) |
| Carafe type | Thermal carafe (insulated) with lid |
| Filter | Filter holder for size 1×4 paper filters |
| Main functions | Direct brewing, programmable timer, aroma intensity adjustment (3 levels), automatic shut-off after 5 min |
| Display | Digital screen with 24-hour clock |
| Anti-drip protection | Yes |
| Care and cleaning | Exterior: damp cloth. Carafe and filter holder: hot water and dish soap. Descale with citric acid-based descaler. |
| Safety | Automatic shut-off, hot surfaces (caution), do not immerse appliance |
| Spare parts and repairability | Contact customer service in case of defect |
| General information | Compliant with Ecodesign Directive 2009/125/EC; tested according to EC directives |
Frequently Asked Questions - PC-KA 1300 PROFICOOK
User questions about PC-KA 1300 PROFICOOK
0 question about this device. Answer the ones you know or ask your own.
Ask a new question about this device
Download the instructions for your Coffee machine in PDF format for free! Find your manual PC-KA 1300 - PROFICOOK and take your electronic device back in hand. On this page are published all the documents necessary for the use of your device. PC-KA 1300 by PROFICOOK.
USER MANUAL PC-KA 1300 PROFICOOK
natural_image
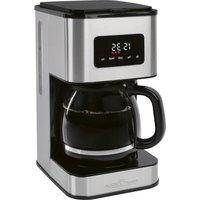
Modern coffee maker with digital display and black handle, no visible text or symbols on the device itself.Kaffeeautomat PC-KA 1300
Coffee Machine • Koffiezetapparaat • Cafetière
Cafetera • Caffettiera • Maszynka do kawy
Kávéfőző • Кофеварка • ماكينة تحضر القهوة
CE
Bedienungsanleitung......Seite 4
Instruction Manual...... Page 9
Gebruiksaanwijzing......Pagina 13
Mode d'emploi.... Page 18
Manual de instrucciones ...... Página 23
Istruzioni per l'uso....Pagina 28
Instrukcja obsługi......Strona 33
Használati utasítás .... Oldal 38
Руководство по эксплуатации ...... стр. 43
51 صفحة ____ دليل التعليمات
Be sure to read the separately enclosed safety instructions first.
Instruction Manual
Thank you for choosing our product. We hope you will enjoy using the appliance.
Read the instruction manual and the separately enclosed safety instructions very carefully before using this appliance. Keep these documents, including the warranty certificate, receipt and, if possible, the box with the inner packaging in a safe place. If you pass the appliance on to a third party, always include all the relevant documents.
Symbols in this Instruction Manual
Important information for your safety is specially marked. It is essential to comply with these instructions in order to avoid accidents and prevent damage to the appliance:

WARNING:
This warns you of dangers to your health and indicates possible injury risks.

CAUTION:
This refers to possible hazards to the appliance or other objects.
Content
Overview of the Components ....3
Unpacking the Appliance 9
Overview of the Components/Scope of Delivery .....9
Warnings for the Use of the Appliance 9
Notes for Use....9
Button Functions....10
Operation 10
Cleaning....11
De-scaling 11
Storage....11
Troubleshooting 12
Technical Data....12
Disposal....12
Unpacking the Appliance
- Remove the appliance from its packaging.
- Remove all packaging material, such as foils, filling material, cable ties and cardboard packaging.
-
Check the scope of delivery for completeness.
-
If the contents of the packaging are incomplete or if damage can be detected, do not operate the appliance. Return it to the dealer immediately.
- There may still be dust or production residues on the appliance. We recommend that you clean the appliance as described under "Cleaning".
Overview of the Components / Scope of Delivery
1 Filter holder
2 Water tank lid
3 Tab to open the water tank lid
4 Water level indicator
5 Display
6 Thermos jug with lid
7 Storage surface
8 Function buttons
Hour Hour
(press and hold for fast forward)
Min Minute
(press and hold for fast forward)
On/Off Turn appliance on and off
Prog Programming TIMER operation
Strength Adjusting aromatic strength
9 Water tank
Warnings for the Use of the Appliance
WARNING:
- Even after use, the water tank lid, the storage surface for the jug and the base of the jug still have residual heat.
• Only touch the jug by the handle.
• Never open the water tank lid during cooking. - If you want to make several pots of coffee in succession, let the appliance cool down first with the water tank open so that no hot water splashes when refilling the water.
- Only operate the appliance when the water tank is filled with water.
Notes for Use
Location
- Place the coffee maker on a stable and level surface. Place the appliance in such way that it cannot tip over.
- Do not place the appliance in close proximity to a gas or electric stove or any other heat source.
Note on the Brewing Process
Depending on the grind and quantity, the coffee powder absorbs water during the brewing process. The amount of finished coffee therefore differs from the amount of water added.
Electrical Connection
- Ensure that your mains power corresponds with the specifications of the appliance. The specifications are printed on the type label.
- Insert the mains plug into a properly installed earthed socket. The appliance is in standby mode. Readiness for operation is displayed by the time on the display.
European Regulations on Energy Saving
The European Directive 2009 / 125 / EC (Ecodesign Directive) incorporates measurements for energy saving.
For Coffee Machines where the coffee is stored in an insulated container, a maximum waiting time of 5 minutes after the last brewing process has been completed applies. The appliance then switches off automatically.
You benefit from better safety and lower energy consumption.
Initial Operation
Before brewing coffee for the first time, start the appliance twice with clean water only, without paper filter and without coffee powder. This will remove any dust that may have accumulated in the appliance during transport. Proceed as described under "Switching on the Coffee Machine Directly".
Button Functions
If no button is pressed within approx. 5 seconds, the appliance exits the setting mode. The display goes out and only the time is displayed.
On/Off
Press once: Switch on the appliance, immediate brewing process. (The indicator light lights up red.)
Press twice: Switch off the appliance. (The indicator light goes out.)
Prog
Press once: - Set the timer (indicator light flashes white.)
Press twice: - Activate timer (indicator light lights up white.)
Press three times: - Deactivate timer
Hour Set hour Min Set minute
Strength Set flavour strength
Operation
Set the Time
The appliance works in the 24-hour mode. The time "12:00" is preset.
- Press the HOUR button to set the hours.
- Press the MIN button to set the minutes.
- Holding down one of the buttons starts a fast forward.
Preparing the Coffee Machine
- Fold open the water tank lid.
- Fill the water tank with cold water according to the desired number of cups. The water level can be read off the scale.
- The jug can be used to fill the water tank.
- Do not overfill the water tank! Do not fill beyond the MAX mark.
- Insert the filter holder. Press the filter holder down until it clicks into place.
- Bend the bottom fold of the paper filter (size 1 × 4 ) and place in the filter holder. Fill the filter with coffee powder.
- Do not put too much coffee powder in the filter, otherwise there is a risk of the filter overflowing.
- Now close the lid of the water tank. It must snap into place.
- Screw the lid onto the jug so that the symbol ▲ on the handle matches the symbol ☐ on the lid.
- Place the jug on the storage surface.

CAUTION: Anti-drip protection
Your appliance is equipped with anti-drip protection. It closes when the jug is removed. This prevents coffee from dripping onto the shelf when there is still water in the filter.
• Make sure that the lid is on the jug. It opens the anti-drip protection.
- If there is still water in the water tank, put the jug back on the storage surface in good time. The filter could otherwise overflow.
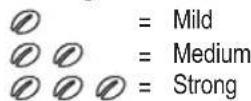
Selection of Aroma Strength
Filter coffee develops more aroma if it swells before brewing. The longer the swelling time, the stronger the aroma.
The appliance offers a choice of three different aroma strengths: mild, medium and strong. Swelling time is increased or decreased in accordance with the brewing procedure.
- Press the Strength button once. "∅" appears below the time on the display.
- Increase aroma strength by pressing the Strength button several times.
Switching on the Coffee Machine Directly
Please follow the instructions under points "Preparing the Coffee Machine".
-
Press the On/Off button once. The appliance commences operation immediately using the previously selected aroma strength. The indicator light shines red.
-
The appliance switches off automatically about 5 minutes after the brewing. The control lamp goes out. The appliance is once again in standby mode.
- If you want to switch off the appliance previously, press the On/Off button again.
Automatic Operation
Please follow the instructions under points "Preparing the Coffee Machine".
-
Press the Prog button. The indicator light flashes white.
-
Set the start time with the Hour and Min buttons. Wait until the appliance has left the setting mode. The indicator light goes out.
- Press the Prog button twice to start TIMER mode. The indicator light lights up continuously in white.
- The appliance switches on automatically at the present time. The control lamp lights up red.
- Press the Prog button once to deactivate TIMER operation. The control lamp goes out.
- If you would like to start the brewing process sooner, press the On/Off button once. The control lamp lights up red.
After the Brewing Process
- When no more coffee is flowing through the filter you can remove the jug.
- Turn the appliance off.
- The filter holder can be pulled out of the appliance by its handle. This makes it easier to dispose of the old coffee filter, for example.
Cleaning

WARNING:
- Always pull the mains plug out of the socket before cleaning and maintain until the appliance has cooled down.
- Do not immerse the appliance in water. It could cause an electric shock or fire.

CAUTION:
- Do not use a wire brush or any abrasive items.
- Do not use any acidic or abrasive detergents.
- Clean the outside of the appliance with a slightly damp cloth if necessary – without any additives.
- Use a paper towel to remove any coffee grounds that may have spilled into the inner housing. Wipe with a damp cloth.
- Clean the jug and the filter holder in warm rinsing water with a little hand dish washing liquid. If necessary, use a soft brush.
De-scaling
De-scaling becomes necessary when the preparation time increases significantly.
- Only use commercially available citric acid-based de-scaling agents for de-scaling.
- Dose as indicated on the packaging or instruction leaflet.
- Place the jug or another suitable container on the storage surface.

WARNING:
- Then boil fresh water three to four times to rinse out any residue of the descaling agent.
- Do not use coffee powder!
- Do not use this water as drinking water.
Storage
- Clean the appliance as described. Allow the accessories to dry completely.
- We recommend storing the appliance in its original packaging if you do not intend to use it for a longer period of time.
• Always store the appliance out of the reach of children in a well-ventilated and dry place.
Troubleshooting
| Malfunction Possible cause | Remedy | |
| The appliance is without function. | The appliance has no power supply. Check the socket with another appliance. | |
| The appliance is defective. Contact our service or a specialist. | ||
| Filter blockage: Coffee grounds spill over the edge of the filter. | The anti-drip protection is closed: The jug is not on the storage surface or the lid is not on the jug. | 1. Switch off the appliance. Unplug the machine from the mains.2. Place the jug with lid on the storage surface so that the filter is emptied.3. Dispose of the paper filter.4. Clean the appliance as described. |
| Too much coffee powder in the filter. | ||
| Coffee grounds in the coffee. | The paper filter is too small. Use a paper filter size “ 1 × 4 ”. | |
| Too much coffee powder in the filter. Use less coffee powder. | ||
| The brewing process takes too long. | Limescale deposits in the appliance. Decalcify the appliance as described. | |
| The appliance turns off automatically. | This isnota malfunction of the appliance. In order to comply with the Ecodesign Directive (2009 / 125 / EC), the appliance turns off automatically after max. 5 minutes after the brewing process has finished. | |
Technical Data
Model: PC-KA 1300
Power supply: 220 - 240 V\~, 50 / 60 Hz
Power consumption: 900 W
Power consumption in standby mode: 0.6 W
Switching off to standby mode: 5 minutes
Protection class:....I
Net weight: .... approx. 2.4 kg
The right to make technical and design modifications in the course of continuous product development remains reserved.
This appliance has been tested according to all applicable, current CE directives and built according to the latest safety regulations.
Disposal
Meaning of the "Dustbin" Symbol
Protect our environment: do not dispose of electrical equipment in the domestic waste.
Please return any electrical equipment that you will no longer use to the collection points provided for their disposal.
This helps avoid the potential effects of incorrect disposal on the environment and human health.
This will contribute to the recycling and other forms of re-utilisation of electrical and electronic equipment.
Information concerning where the equipment can be disposed of can be obtained from your local authority. Your dealer and contractual partner is also obliged to take back the old appliance free of charge.
BELANGRIJK:
CTC Clatronic Sp. z o.o
Ul. Brzeska 1
45-960 Opole