
DS5 - Pressure sprayer OK - Free user manual and instructions
Find the device manual for free DS5 OK in PDF.

| Brand | OK |
| Model | DS5 |
| Product type | Pressure sprayer |
| Max filling capacity | 5 litres |
| Total tank capacity | 6,5 litres |
| Flow rate | 1,07 L/min |
| Admissible operating pressure | 2,5 bar |
| Admissible operating temperature | +40°C |
| Spray nozzle angle | maxi 60° |
| Empty weight | 1,1 kg |
| Tank material | Robust plastic |
| Pump type | Manual pump with lever |
| Safety valve | Yes, activates at 2,7 bar |
| Integrated filter | Yes, integrated filler funnel |
| Spray lance | With trigger lever and adjustable head |
| Carrying strap | Included, shoulder strap |
| Use | Pesticides, herbicides, liquid fertilizers |
| Routine maintenance | Cleaning after each use, greasing seals with petroleum jelly |
| Membrane maintenance | Cleaning and greasing, replacement possible |
| Warranty | 2 years |
| Spare parts available | Yes, order with type and article number |
Frequently Asked Questions - DS5 OK
User questions about DS5 OK
0 question about this device. Answer the ones you know or ask your own.
Ask a new question about this device
Download the instructions for your Pressure sprayer in PDF format for free! Find your manual DS5 - OK and take your electronic device back in hand. On this page are published all the documents necessary for the use of your device. DS5 by OK.
USER MANUAL DS5 OK
natural_image
Diagram of a mechanical tool or device with directional arrows indicating motion (no text or symbols)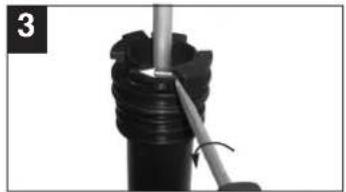
natural_image
Close-up of a mechanical component being inserted into a cylindrical rod (no text or symbols visible)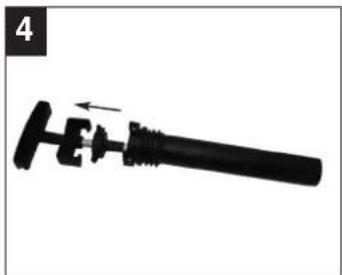
natural_image
Mechanical tool with a lever mechanism and directional arrow (no text or symbols)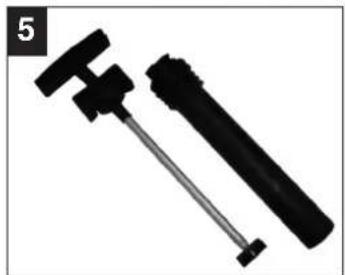
natural_image
Two black mechanical tools or sensors with metal fittings, no visible text or symbols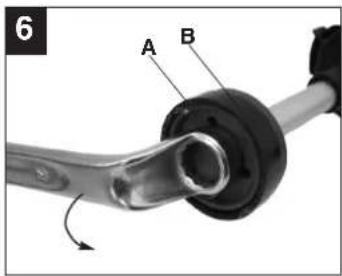
natural_image
Mechanical component with three cylindrical parts and a shaft, shown in close-up (no text or symbols visible)D
Inhaltsverzeichnis:
- Scope of use
- Safety information
- Layout
- Items supplied
- Assembly
- Technical data
- Pump diaphragm maintenance
- Ordering spare parts
Explanation of the symbols on the machine

Pull out the pump lever as far as possible and unscrew It counter-clockwise.

Read the operating instructions before use.

Hold the spray lance and do not direct the jet at other people.

Flat jet angle 60°

Do not expose pressurized tanks to constant sunlight.

Do not expose tanks filled with spray solution to temperatures below zero.

Do not place toxic sub- stances in the pressurized tank or spray them.

Depressurize the tank before starting any cleaning and maintenance work. Pull the pressure valve upwards and release the pressure.
When using equipment, a few safety precautions must be observed to avoid injuries and damage.
- Read the operating instructions carefully and comply with them. It is important to consult these instructions in order to acquaint yourself with the unit, its proper use and safety regulations.
- Keep this manual in a safe place, so that the information is available at all times.
- If you give the equipment to any other person, give them these operating instructions as well.
We accept no liability for damage or accidents which arise due to non-observance of these Instructions.
Packaging
The unit is supplied in packaging to prevent its being damaged in transit. This packaging is raw material and can therefore be reused or can be returned to the raw material system.
GB
1. Scope of use
The pressure sprayer is designed for spraying common home and garden products. This primarily includes pesticides, weed killers and liquid fertilizers.
2. Safety information
●Suitable measures must be taken to keep the unit out of the reach of children.
●The pressure sprayer is not designed to spray acidic and caustic liquids. Nor should it be used to spray impregnating agents.
●Only use a suitable nozzle wire or cleaning agent to clean clogged nozzles.
●Do not spray contents of sprayer on persons or animals.
●Always wear protective clothing when spraying pesticides and insecticides.
●Ensure that liquid sprays are not heated beyond the permitted operating temperature of 40 °C.
- When mixing and working with spray solutions, always follow the manufacturer's instructions.
●Each time the spraying unit has not been used for an extended period of time it should be checked for possible damage prior to reusing it.
- Immediately replace defective parts.
- Use only original replacement parts.
- Do not leave the unit (filled or empty) in direct sunlight.
●Before placing the unit in winter storage, thoroughly clean and dry it out so that it is not damaged by freezing temperatures.
- We will not be liable for any damage that results from improper repairs and/or improper handling of the unit (e.g. using the unit in ways for which it was not intended).
- Opening the unit or performing maintenance work on it is only permitted when the tank is depressurized.
●To relieve the pressure, pull up the funnel-shaped knob connected to the safety valve.
●Only spray pesticides that have been
approved by the German Biological Research Center for Agriculture and Forestry (BBA) or equivalent.
- Please observe the safety data sheets for chemical materials and preparations compliant with DIN 52 900, „DIN Safety Data Sheet for Chemical Materials and Preparations“.
●Pesticides include - but are not limited to - herbicides, insecticides, fungicides and growth regulators as well as materials that are intended to be used in conjunction with these agents in order to modify their properties or effects.
●Each time after using the unit and prior to performing any maintenance work on it, release the pressure by raising the pressure valve.
3. Unit description and items supplied (Fig. 1)
- Pump / carry handle
- Spray lance
- Release lever
- Tank
- Strap
- Safety pressure valve
- Integral filler neck
- Adjustable spray head
4. Items supplied
●Pressure sprayer
●Spray lance
-Strap
5. Assembly
●Screw the spray tube to the pistol grip (Figure 2).
●Do not unscrew the overpressure valve (Figure 1/6)
- Check to ensure that the screw connections for the hose at the spray gun handle
GB
and on the tank are tight!
6. Starting and filling the unit
●Before you unscrew the pump, raise the pressure valve (Fig. 1/6) and release any pressure that may be in the unit.
- Press down the pump handle as far it will go and slowly unscrew the pump (counterclockwise).
●Fill the tank up to a maximum of the 5 liter mark with the spray solution. Follow the instructions provided by the spray product manufacturer.
- Insert the pump, press down the pump handle as far it will go and screw in the pump (clockwise) until it is tight again. The pump handle will engage in the bayonet lock. Note: The bayonet lock must be properly latched whenever you transport the pressure sprayer. Also, the spray lance must be in the holder provided for it.
●Release the pump handle from the bayonet lock by turning it counter-clockwise slightly.
●Pressure is built up in the tank by pumping the pump handle (up and down).
The maximum tank pressure (operating pressure) must not exceed 2.5 bar. The pressure valve trips at a pressure of 2.7 bar and releases any pressure above this level.
●To spray, press the trigger (Fig. 1/3) on the spray gun handle.
●The spray jet will stop immediately you let go of the trigger.
●After use, clean the unit and leave it open to dry.
●The service life of the unit will be increased dramatically if you lubricate the sealing rings and sleeves with resin and acid-free grease (Vaseline).
●Important note: Heavy stresses caused by the way in which it is used (including transport to the place of use and storage during non-use), ambient influences (at the place of use and the storage place when it is not in use), poor maintenance and care may cause the unit to suffer premature wear.
You should therefore check that it is in safe and working order, but at least for obvious signs of damage before use. An expert, ideally a service outlet should check whether the unit is still safe to use, particularly after any faults have occurred that may adversely affect its safety but at least every five years.
7. Technical data
Max. filling capacity 5 l
Total filling capacity 6,51
Volumetric flow rate, Vmax = 1.07 liters/min.
Permissible operating pressure 2.5 bar
Permissible operating temperature + 40°C
Safety valve / vent valve 1
Nozzle hollow cone 1 mm
Nozzle spraying angle max. 60°
Repulsion angle at the nozzle less than 5N
Net weight 1.1 kg
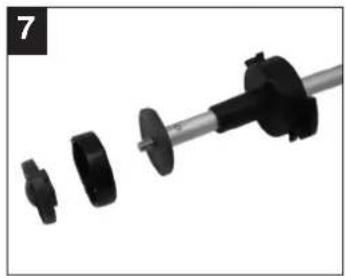
8. Maintenance of the pump diaphragms (Fig. 3-7)
Important: Before carrying out any maintenance on the unit, always release the pressure by simply pulling up on the funnel-shaped knob on the safety valve (Fig. 1/6).
- Remove the pump insert from the pump casing using a screwdriver (Fig. 3-5).
- Remove the diaphragm counter plate (Fig. 6/A).
- Remove the diaphragms (Fig. 6/B) and clean them.
- Lubricate the cleaned or new diaphragms with acid-free grease (for example Vaseline).
- Assemble in reverse order.
9. Ordering replacement parts
Please quote the following data when ordering replacement parts:
●Type of machine
●Article number of the machine
●Identification number of the machine
●Replacement part number of the part required
For our latest prices and information please go to www.isc-gmbh.info
F
The reprinting or reproduction by any other means, in whole or in part, of documentation and papers accompanying products is permitted only with the express consent of ISC GmbH.
F
The product described in these instructions comes with a 2-year warranty covering defects. This 2-year warranty period begins with the passing of risk or when the customer receives the product.
For warranty claims to be accepted, the product has to receive the correct maintenance and be put to the proper use as described in the operating instructions. Your statutory rights of warranty are naturally unaffected during these 2 years.
This warranty applies in Germany, or in the respective country of the manufacturer's main regional sales partner, as a supplement to local regulations. Please note the details for contacting the customer service center responsible for your region or the service address listed below.
① CERTIFICATO DI GARANZIA
- Technical changes subject to change