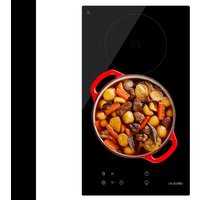
BOLERO SQUAD V 2001 - Cooker CECOTEC - Free user manual and instructions
Find the device manual for free BOLERO SQUAD V 2001 CECOTEC in PDF.


User questions about BOLERO SQUAD V 2001 CECOTEC
0 question about this device. Answer the ones you know or ask your own.
Ask a new question about this device
Download the instructions for your Cooker in PDF format for free! Find your manual BOLERO SQUAD V 2001 - CECOTEC and take your electronic device back in hand. On this page are published all the documents necessary for the use of your device. BOLERO SQUAD V 2001 by CECOTEC.
USER MANUAL BOLERO SQUAD V 2001 CECOTEC
natural_image
Two circular white circles on a dark background, no text or symbols visiblebolero
Safety instructions 8
-
Parts and components 44
-
Before use 44
-
Installation 45
-
Operation 47
-
Cleaning and maintenance 55
-
Troubleshooting 56
-
Technical specifications 57
-
Disposal of old electrical and electronic appliances 58
-
Technical support and warranty 58
-
Copyright 58
SOMMAIRE
Read these instructions thoroughly before using the device. Keep this instruction manual for future reference or new users.
- This appliance can be used by children aged 8 years and above and persons with reduced physical, sensory, or mental capabilities or lack of experience and knowledge if they have been given supervision or instruction concerning use of the appliance in a safe way and understand the hazards involved. Children must not play with the appliance. Cleaning and user maintenance should not be carried out by unsupervised children.
- This appliance is designed for domestic use only and is not intended for bars, restaurants, farmhouses, hotels, motels, and offices.
- This symbol means “caution, hot surface”. The temperature of the accessible surfaces may be high when the appliance is in operation.
- WARNING: if the surface is cracked, turn off the appliance to avoid the possibility of electric shock. Contact the official Cecotec Technical Support Service. Do not cook on a cracked or broken hob.
- Do not use harsh abrasive cleaners or sharp metal scrapers to clean the glass, as they may scratch the surface, which could result in glass breakage.
- Do not use a steam cleaner.
- The appliance is not intended to be operated by means of an external timer or separate remote-control system.
- Risk of fire: Do not store objects on the cooking surfaces.
- CAUTION: the cooking process must be supervised. A short-term cooking process must be continuously monitored.
-
WARNING: unattended cooking on a greasy or oily hob can be dangerous and could result in a fire.
-
Never try to put out the fire with water, turn off the device and cover the flame, for example, with a lid or a fireproof blanket.
- Unplug the cooking hob before carrying out any cleaning or maintenance task.
- The appliance must not be installed behind a decorative door to avoid overheating.
- Ensure that the mains voltage matches the voltage specified on the device rating label and that the plug is earthed.
- Careful: the panel edges are sharp. Failure to exercise caution may result in injury or cuts.
- Do not place any flammable material or product on this appliance at any time.
- It is recommended that a suitably qualified person installs and connects the appliance correctly.
- This appliance must be connected to a circuit fitted with an isolating switch that allows total disconnection from the mains.
- If the device is not correctly installed, any guarantee or liability claims may be voided.
- If the cable is damaged, it must be replaced by the manufacturer, the supplier, or qualified personnel to avoid hazards.
- The cookware handles may be hot to the touch after use. Check the cookware handles do not overlap other cooking areas that are on. Keep the handles out of the reach of children. Failure to follow this advice may result in burns.
- After use, always turn off the cooking areas and the hob as described in this manual.
- WARNING: the device and its accessible parts become hot during use. Be careful not to touch the heating elements. Children under 8 years old must stay away from the device, unless they are constantly supervised.
INSTRUCTIONS DE SÉCURITÉ
- Upper cooking zone
- Bottom cooking zone
- Upper cooking-zone selection icon
- Upper cooking zone display
- Bottom cooking-zone selection icon
- Bottom cooking zone display
- Timer icon
- Time display
- Increase icon
- Decrease icon
- Safety child lock icon
- Power icon
Please note
The graphics in this manual are schematic representations and may not exactly match the appliance.
2. BEFORE USE
- This appliance is packaged in a way as to protect it during transport. Take the device out of its box and remove all packaging materials. You can keep the original box and other packaging elements in a safe place. This will help you prevent damage to the device when transporting it in the future. In case the original packaging is disposed of, make sure all packaging materials are recycled accordingly.
- Make sure all parts and components are included and in good conditions. If there is any piece missing or in bad conditions, contact the official Cecotec Technical Support Service immediately.
Box content
- Ceramic hob
- Support feet
- Electrical tape
- Instruction manual
First use:
Important
The surface of the ceramic hob must be cleaned as described in the cleaning and maintenance section.
- Switch on both cooking zones for 5 minutes at maximum power, but do not switch them on simultaneously. Place a saucepan half full with cold water in each zone. This will help to eliminate any new odours and evaporate any moisture that may have formed in the heating elements during transport.
- Do not switch on both cooking zones at the same time.
3. INSTALLATION
Electrical connections
Before connecting the appliance, make sure that the supply voltage indicated on the product marking corresponds to your mains voltage.
Warning
This appliance must be connected to an earthed socket.
- If the mains cable is to be replaced, the earthing conductor (yellow/green) must always be 10 mm longer than the line conductors.
- Make sure that the temperature of the power cable does not exceed 50 °C.
- If the power cable is damaged, it must be replaced by the manufacturer or the official Cecotec Technical Support Service to avoid any potential risk.
Before installing the ceramic hob
Figure 2 shows the dimensions required for the recess in which the ceramic hob is to be installed.
Warnings
- Surfaces in direct contact with the hob must be heat resistant (min. 95 °C).
- The appliance can be installed on a worktop with a thickness between 30 and 40 mm and close to walls that are higher than the worktop, maintaining a minimum distance of 100 mm.
- Make all relevant cuts in the surface/countertop and then carefully remove any shavings or sawdust before fitting the hob.
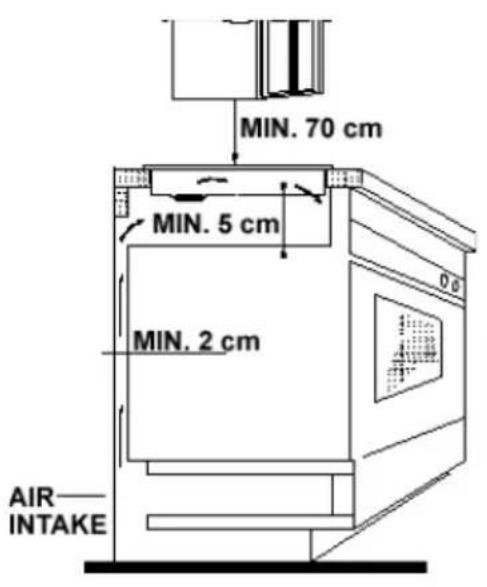
- To ensure correct ventilation of the hob, respect the dimensions indicated in figures 2 and 3.
- Make sure that the surface is level and square and that no parts interfere with the space required for installation.
- Cut as shown in figures 2 and 3.
Installation
Warning: risk of cuts!
ENGLISH
- Be careful with the edges, as you could cut yourself.
- The edges are protected with polystyrene, be careful.
- During transport they may cause minor injuries or cuts.
- Take the hob and the instruction manual out of the box.
- Before assembling and installation, carefully read this instruction manual.
Step 1:
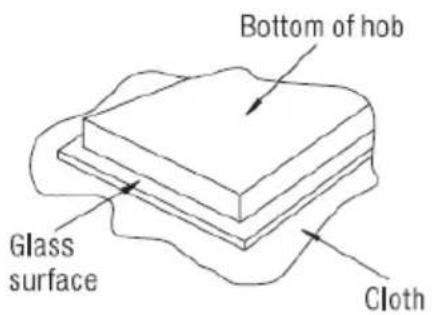
Place a towel or cloth on the worktop surface and place the hob face down on it. Fig. 4
Step 2:
- Place the sealing tape supplied with the hob to seal it on the worktop surface.
- Do not use silicone. Apply the tape to the edge of the bottom of the hob, leaving about 3 mm from the edge of the glass.
- Apply the tape all around the perimeter.
- Cut off the excess and join the two ends of the tape to match. Fig. 5
Step 3:
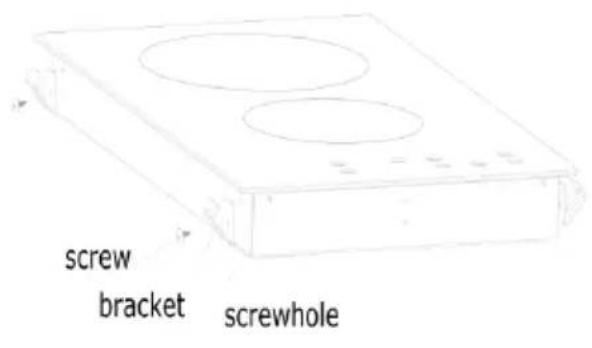
Secure the brackets (4 pieces) at the front and rear with screws. Place the hob in a well centred position on the pre-cut board or worktop. Make sure that the front edge of the hob is parallel to the side edge of the worktop. Fig. 6
Please note:
- Ventilation requirements shown in figure 7 must be respected.
- There are ventilation holes around the exterior of the hob. You must ensure these gaps are not blocked by the worktop when placing the hob.
- Do not use a silicone sealant to seal the device. This will make it difficult to remove the hob in the future, especially if maintenance work is required.
- When fitting the hob, turn it carefully and place it gently into the recess in the worktop.
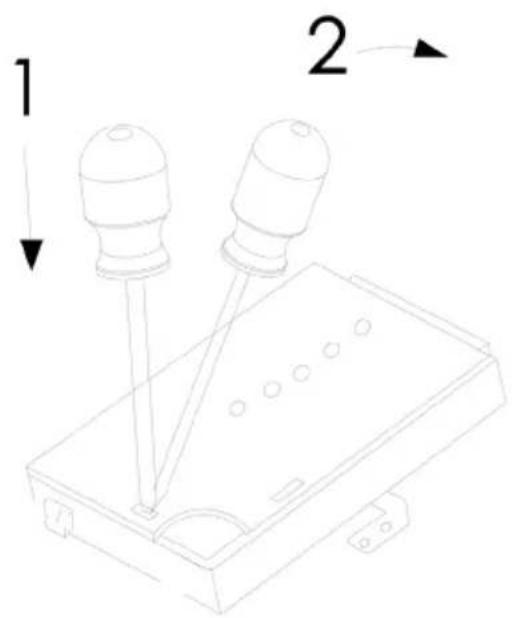
Installation guidelines. Fig. 8
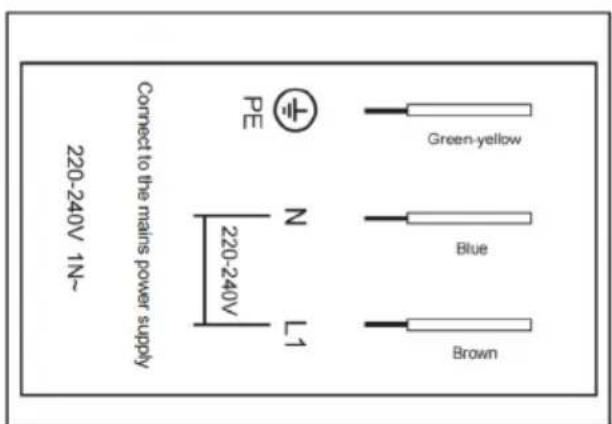
- The nominal voltage of the hob heating elements is 230 V. The ceramic hob can be adapted for single-phase operation by means of a suitable bridging in the junction box according to the wiring diagram shown in the figure. The wiring diagram can also be found on the junction-box cover. Remember that the connection cable must match the type of connection and the power rating of the ceramic hob.
- The connection cable must be fixed in a strain relief clamp.
Warning!
- Remember to connect the safety circuit to the terminal in the junction box.
- Before connecting the ceramic hob to the mains, it is important to read the information on the rating plate and the wiring diagram.
ENGLISH
- The cable connections must be made in accordance with the wiring diagram on the bottom of the hob.
- You must use a good quality screwdriver to carefully and completely tighten ALL terminal screws.
- If both zones do not work when you switch on the hob for the first time, you should double-check that all terminal screws are tightened securely. This must be done before contacting the official Cecotec Technical Support Service.
Important
- DO NOT connect the appliance to the mains using a 13 A plug and socket.
- It must be connected to a 30 A double-pole fused socket outlet, with a contact separation of 3 mm and located in an easily accessible place next to the appliance. It must not be placed above the appliance or more than 1.25 m from the appliance.
- The cable can be coiled, if necessary, but make sure that the cable is not kinked or pinched when installing the hob. Do not allow the cable to come into contact with hot parts of the appliance.
Replacing the power cable. Fig. 9
- If the power cable is damaged, it must be replaced by the manufacturer or the official Cecotec Technical Support Service to avoid any potential risk.
- The power cable must be replaced according to the following instructions:
o Switch off the appliance.
o Open the terminal block located at the bottom of the hob.
o Unscrew the terminal screws securing the cable.
o The "green, yellow" earth cable must be connected to the marked terminal. It should be about 10 mm longer than the power and neutral cables.
o The "blue" neutral cable must be connected to the terminal marked with the letter (N) - the power cable must be connected to the terminal marked with the letter (L).
4. OPERATION
Fig. 1
| Fig. 1 Icons Function | ||
3 Uppe  | ding-zone selection icon | |
| 4 | Upper cooking zone display: it indicates the power level, the high-temperature warning symbol, etc. | |
ENGLISH
| 5 Bottom cooking zone selection icon | |
| 6 | |
| 7 Timer icon: it is used to set the cooking time of each cooking zone. | |
| 8 Time display: it indicates time, child lock symbol, etc. | |
| 9 Increase icon: it is used to add time and increase power level. | |
| 10 Decrease icon: it is used to reduce time and power level. | |
| 11 Safety child lock icon: press and hold to lock or unlock the control panel. | |
| 12 Power icon: press and hold to switch on or off the ceramic hob. | |
4.1. Display. Fig. 10
1) Single digit display: shows the corresponding power level, the double cooking ring symbol, and the high temperature warning symbol in the cooking zone (H).
2) Two-digit display: shows the corresponding time settings and the safety child lock symbol.
3) Display of heating of several cooking rings: After activating the double cooking ring mode, the corresponding display of the selected cooking zone shows the inner ring or double ring symbol. The selection of inner ring or double ring is indicated by the display of each cooking zone.
1. Switch on
When the power is turned on, the hob will beep once to indicate that the power is on. Then, all indicators on the display will light up for 2 seconds. Next, the appliance will go into shutdown mode.
Please note
The corresponding decimal point indicator will light up on the display.
Switch off
The entire display will turn off except for the high temperature warning symbol. The power icon can be used by pressing and holding it. However, the rest of the icons will not be available.
2. Standby mode
- When the hob is switched off, press and hold the power icon for 3 seconds. The hob will beep and enter standby mode.
- The indicators in the cooking zone will show the “-” symbol. The high temperature symbol will be shown on the cooking zone display if there is residual heat. The time display will show “--” as well.
- If no cooking zone is activated in standby mode, the appliance will automatically switch off after 10 seconds and beep.
3. Heating control
- In standby mode, you can choose the cooking zone by pressing the cooking-zone selection icon. Then, press the △ / ▽ icons to set the power level of the corresponding cooking zone. Press and hold the / icons to continuously increase or decrease the power level.
- When the hob is heating, press and hold the power icon for 3 seconds to switch off and stop heating all cooking zones. The indicator of the corresponding cooking zone that has been previously heated will show the high temperature warning symbol.
- In standby mode, if any cooking zone still has residual heat, the display will show the high temperature symbol.
- If you need to switch off one of the cooking zones, you can select that zone first and then press the icon to power level "0" to switch off that zone, which will not affect the heating of the other cooking zone. When the power level reaches "0", the indicator of the corresponding cooking zone that has been heated up before will show the high temperature warning symbol.
- If both zones operate at the same time, the total power will be equal to the sum of the powers of all cooking zones in operation. Each cooking zone will operate according to its power modulation ratio and will not affect each other.
Note:
- During cooking, only one function can be activated or one of the icons on the hob can be selected, i.e., only one decimal point will be displayed.
- Press the ▽ icon to set the power level to "0"; the hob will automatically switch off.
4. Multi-ring heating function. Fig. 10
4.1. Double cooking ring function: The outer ring can only be switched on once the inner ring is switched on
1) Press the cooking-zone selection icon you wish to heat; the decimal point will be shown on the display of the corresponding cooking zone.
2) Press the / icon to select the desired power level.
3) Press the cooking-zone selection icon again and the corresponding cooking zone display will show the single ring symbol. Then press the cooking-zone selection icon again to activate the outer ring. Once activated, the cooking zone display will show the double ring symbol.
4.2 Triple cooking ring function: The outer ring can only be switched on once the inner ring is switched on.
ENGLISH
5) Press the cooking-zone selection icon you wish to heat; the decimal point will be shown on the display of the corresponding cooking zone.
6) Press the / icon to select the desired power level.
7) Press the cooking-zone selection icon again and the corresponding cooking zone display will show the single ring symbol. Then, press the cooking-zone selection icon again to activate the double cooking ring; the display of the corresponding cooking zone will show the double ring symbol. Finally, press the cooking-zone selection icon again and the corresponding cooking zone display will show the triple ring symbol.
8) After setting the power level of the cooking zone and starting the heating of the inner ring, only the inner ring will continue to operate when the cooking-zone selection icon is pressed once. The inner ring and the double ring will work when pressed a second time. The heating of the double and triple rings will start when the cooking-zone selection icon is pressed for the third time and will stop when pressed a fourth time (the inner ring will continue to operate).
4.3 Deactivation of the multi-ring cooking function
3) Press the desired cooking-zone selection icon; the decimal point will be shown on the display of the corresponding cooking zone.
4) Then, press the cooking-zone selection icon again to activate the outer ring. The inner ring will continue to function.
5. Setting the power level
- In standby mode, press the cooking-zone selection icon to select the desired cooking zone. The decimal point will be shown on the display of the corresponding cooking zone as well as the heating level. You can use the increase and decrease icons to adjust the desired power level.
- You can quickly increase or decrease the power level by pressing and holding either icon. Each time the icon is pressed, the power level will increase by one, up to level 9, and will be shown on the corresponding display. Each time you press the icon, the power level will be reduced by one, down to level 0 (each time you press the / icons, you will hear a short beep).
- Once the power level adjustment is completed, the decimal point on the display will stop flashing and will normally display the power level after 10 seconds of inactivity.
- When the power level of any cooking zone is changed to 0, that cooking zone will be switched off.
- If one cooking zone has been heated, the power level of all cooking zones is "0". The appliance will automatically switch off after 1 minute of inactivity.
6. Automatic heating function
6.1. Activate the automatic heating function: press the △ / ▽ icons to set the power to level 9, then press the increase icon until the power level alternately displays "A" and "9". Next, press the decrease icon to set the desired automatic heating level, e.g. level 6. In this
ENGLISH
automatic heating process, the display of the corresponding power level will alternately show "A" and "6". The alternate display time is 2.5 minutes.
6.2. Press the increase icon to adjust the power to level 9, then press the △ icon again until the power level alternately displays "A" and "9". The pre-set time has started. For example, after "A" and "9" are displayed alternately for 10 seconds, press the icon to set the power level to level 6. The "A" and "6" icons shall be displayed for 2 minutes and 20 seconds. After this time, the hob will switch to normal heating mode; the corresponding power level display will show "6".
When the automatic heating function is activated, the corresponding cooking zone will heat up on level 9 for a period of time (the heating time depends on the subsequent reduction to several levels, the heating time for each level is given below), after which it will continue to operate at the set final heating level. For example, set the heating level to 9 and activate the automatic heating function by pressing the △ icon ("A" and "9" appear alternately). Then, set the automatic heating mode level to level 6 using the icon. In this setting, the cooking zone heats up on level 9 for 2.5 minutes. The cooking zone display will alternately show "A" and "6". Then, continue heating on level 6, the display will show "6".
6.3. The tables with the data for the power level and the automatic heating time are as follows:
| Power level | 1 | 2 | 3 | 4 | 5 | 6 | 7 | 8 | 9 |
| Automatic heating time | 1 | 3 | 4.8 | 6.5 | 8.5 | 2.5 | 3.5 | 4.5 | 5 |
6.4. Automatic heating level adjustment: When entering the automatic heating mode, you can only reduce the maximum power by pressing the icon within 30 seconds. After more than 30 seconds, pressing the icon will not reduce the automatic heating level and will exit this mode.
- After more than 30 seconds, while still in the automatic heating mode and the value is lower than level 9, you can press the icon to increase the automatic heating level, and the system will remain in this mode.
- For example, after entering the automatic heating mode, press the ▽ icon within 30 seconds to set the value to level 8. The corresponding display shall show "A" and "8". Then, when reducing to level 7, the display will show "A" and "7". The hob shall remain in automatic heating mode. If more than 30 seconds elapse without level 7 being reduced to level 6, you can exit automatic heating mode and the hob will switch to normal heating mode. The display will show "6".
6.5. When changing the power level of the automatic heating mode, the elapsed time will be automatically calculated in the time corresponding to the new automatic heating level. For example, you have selected the automatic heating level to be level 1 (1 minute), and after 30 seconds you change the power to level 4 (6.5 minutes). So, the automatic heating function will work accurately for 6 minutes (6.5 minutes minus 30 seconds).
ENGLISH
6.6. Within 30 seconds of automatic heating mode operation, press the ▽ icon to adjust to a certain level, then the operating time is counted in the set level time.
For example, when the indicators "A" and "9" are displayed alternately and have been running for 20 seconds. If you press the ▽ icon to set level 6, the 20 seconds that have elapsed will be automatically counted in the 2.5 minutes of level 6; while level 6 will continue to run for 2.5 minutes minus 20 seconds, i.e. 2 minutes and 10 seconds. Afterwards, return to normal heating mode.
7. Setting the timer
After selecting the corresponding power of the cooking zone, press the timer icon, the timer display will show "00" and the right decimal point will appear.
It then enters the timer mode, and the timer time for the selected cooking zone can be set. In timer mode, the following operations are required:
- If you want to cancel the timer, you can set the timer time to zero.
- The first time the icon is pressed, the timer starts from 1 minute, after which the increase or decrease icon can be pressed to adjust the timer time.
- Each time the △ icon is pressed, the hob will beep, and the heating time will increase by 1 minute. The time will continuously change between 1 and 99 minutes. The maximum setting is 99 minutes.
- Each time the icon is pressed, the hob will beep, and the heating time will decrease by 1 minute. When the timer time is less than or equal to 30 minutes, the continuous setting timer will continuously change between 30 and 0 minutes. If the timer has been set using the icon for more than 30 minutes, press the icon to set the timer to 0, and continue to change the timer continuously between 30 and 0 using the decrease icon.
- After the timer countdown reaches 0, the hob will continue beeping for 2 minutes. You can press any icon to stop the beeping.
Please note
- If the time of a cooking zone has already been set, to change it press the timer icon again to select the corresponding cooking zone and next, set the new time by pressing the / icons.
- Once the cooking zone has been selected, the time adjustment cannot be made before adjusting the power of the cooking zone. Also, the timer icon will be disabled.
- When the timer for a certain cooking zone is set for the first time, pressing the cooking-zone selection icon corresponding to the cooking zone when the timer is not confirmed cancels the cooking zone timer.
- When one or both cooking zones are operating, the decimal point of the corresponding cooking zone is always displayed during the time setting process.
- When several cooking zones are in operation and you have set the time, the timer display shows the minimum time of the cooking zone. The decimal point of the corresponding cooking zone is always lit. The decimal point of the display goes out until the end of the countdown time.
8. Shutdown mode
In standby or heating mode, press and hold the power icon for 3 seconds, a short beep will sound and the device will switch to off mode. If the surface of the relevant cooking zone currently has residual heat, the power level indicator display will show H and indicate a residual heat warning.
9. Safety child lock icon
- The control panel can be locked by pressing and holding the child lock icon for 3 seconds while the appliance is in standby or heating mode. The safety child lock icon will show up. When the appliance is switched off, the child lock icon will turn off.
- During safety child lock, "Lo" will appear on the display and flash (1s/time). If the cooking zone has set the time, the display will show the time and "Lo" alternately. Otherwise, it will display "Lo" and "--".
- In child lock mode, you can unlock it by pressing and holding the child lock icon for about 3 seconds.
- In child lock mode, the rest of the icons are unavailable, except for the power and child lock icons.
10. Timer
The timer can be programmed separately for any cooking zone, and the timing of each cooking zone is independent of each other.
Timing of a single cooking zone
To set the countdown time for a cooking zone, first press the timer icon. The decimal point on the display of the selected cooking zone will light up. The decimal point on the timer display will be shown to indicate that the timer set has been related to the selected cooking zone. At this point, you can use the / icons to adjust the countdown time.
Timing of both cooking zones
- Each timer setting operation shall be the same as "Timing of a single cooking zone".
- Press any cooking-zone selection icon, and the timer display will show the timer value for that cooking zone.
- When both cooking zones are timed, you can change the timing independently by pressing the timer icon.
- If no cooking zone is selected, the display will show the minimum timer value of the cooking zones and the corresponding cooking zone indicator will show the decimal point.
11. Pre-set time
The cooking zones have a pre-set timer function. The relationship between the pre-set timing and the power level is shown in the table below:
| Power level | 1 | 2 | 3 | 4 | 5 | 6-9 |
| Pre-set time (h) | 6 hrs. | 6 hrs. | 5 hrs. | 5 hrs. | 4 hrs. | 1.5 hrs. |
ENGLISH
When all preset times are reached, the cooking zones will automatically switch off and enter standby mode.
12. High temperature warning
- The display of the hot cooking zone will show the residual heat warning symbol H to indicate the high temperature of the corresponding cooking surface.
- Provided that the cooking zone has been heated up before, the high temperature warning symbol will be displayed for 35 minutes continuously after the hob has been switched off.
13. Protection function
- Protection against high temperatures: The electronic temperature sensor in the control panel will transmit the temperature in real time to the chip in the control panel. The control sensor initiates protection when the electronic temperature sensor calibrates that the current temperature is above a certain value, to reduce the heating level of the cooking zone at that time and resumes the heating level once the temperature drops.
- Protection against residual heat: After heating a cooking zone, the cooking zone will display the high temperature warning symbol, indicating that the cooking surface temperature is too high, please do not touch to avoid getting burnt.
- Safety shutdown protection: For plug-in models, when switched off after one second at any time, the voltage between L/N of the plug must fall below the safe voltage range.
Guide to the use of ceramic hobs
- The first few times the hob is used, it may give off an acidic, burning smell. This odour will disappear completely with repeated use.
- The positions from which the heat will radiate are clearly marked on the hob. Cooking utensils must be placed exactly over these areas for effective heating to take place. Cooking utensils must have the same diameter as the cooking zone in which they are used.
- Do not use cookware with a rough base, as this may scratch the ceramic surface.
- Before using the cookware, make sure that the base is clean and dry.
- When cold, the bottom of the cookware should be slightly concave, as when hot it will expand and lie flat on the surface of the hob. This will allow heat to be transferred more easily.
- The best thickness for the bottom of the cookware is 2 - 3 mm for enamelled steel and 4 - 6 mm for stainless steel with sandwich bottom.
- Failure to follow these recommendations will result in a large loss of heat and energy. Heat not absorbed by the cookware will spread to the hob, frame, and surrounding cabinets.
- It is preferable to cover the cookware with a lid in order to be able to cook at a lower temperature.
- Always cook vegetables, potatoes, etc. in as little water as possible to reduce cooking time.
- Food or liquids with a high sugar content can damage the hob if they come into contact with the surface of the glass ceramic hob. Splashes should be wiped up immediately, although this will not prevent damage to the surface of the hob.
Important
The surface of the ceramic hob is resistant; however, it is not unbreakable and can be damaged. Especially if sharp or hard objects are allowed to fall on it with some force.
5. CLEANING AND MAINTENANCE
- Let the hob cool down before cleaning it.
- The appliance must be disconnected from the mains before cleaning.
- Cleaning agent residues left on the surface of the ceramic hob can damage it. Remove residues with lukewarm water mixed with a little liquid detergent.
- Abrasive cleaning agents or sharp objects damage the hob surface; clean it with lukewarm water mixed with a little liquid detergent.
- You may find it easier to clean up some food residues while the surface of the hob is still hot. However, you must be careful not to burn yourself if you wipe the surface of the hob while it is still hot.
After each use
- Wipe the hob with a damp cloth.
- Wipe the surface dry with a clean cloth.
Cleaning chart
| Type of residue | Remove immediately? | Remove when the appliance has cooled down? | What should I use to remove the residue? |
| Sugar or sugar-containing foods/ liquids | Yes No Ceramic scraper | ||
| Aluminium or plastic foil | Yes No Ceramic scraper | ||
| Oil/grease splashes No Yes | Cleaner for ceramic hobs | ||
| Metal discolouration No Yes | Cleaner for ceramic hobs | ||
| Splashes or water rings | No Yes | Cleaner for ceramic hobs | |
Important
The hob surface should only be washed with lukewarm water and a little liquid detergent.
ENGLISH
Warning
- Make sure the hob is clean: a dirty area does not transfer all the heat.
- Protect the hob against corrosion.
- Unplug the hob from the mains.
- Do not leave frying pans with fat and oil dishes unattended on the hob; hot fat can ignite spontaneously.
Important
If your appliance is not working properly, please contact Cecotec.
6. TROUBLESHOOTING
PCB fault codes and solutions
- When a fault occurs on the PCB, the timer display on the screen always shows the fault code, and all cooking zones that are heating stop heating, and automatically return to the off state after 1 minute. For cooking zones that have been in operation, the corresponding display continues to show the high temperature warning symbol. When the fault code appears, refer to the following table for troubleshooting.
| Error codes | Type of error Solution | |
| E1 | The display board is not receiving the signal from the power supply board. | Failure of the communication line of the power supply board or of the display may cause communication anomalies.Please contact the official Cecotec Technical Support Service to replace the display board. If the fault persists, the power supply board must be replaced. |
| E2 | The power supply board does not receive the signal from the display board. | |
| E3 Power board relay failure. | Please contact the official Cecotec Technical Support Service to replace the power board. | |
| E4 | 1. Open circuit of the NTC display board.2. Short-circuit of the NTC display board. | Please contact the official Cecotec Technical Support Service to replace the display board. |
| E5 | High temperature protection on the display board. | Replace the silicone insulating strip on the circuit board first.If the fault persists, please contact the official Cecotec Technical Support Service to replace the display board. |
- Do not try to repair the appliance by yourself.
- Please note that if a technician is called out while the product is under warranty and it is discovered that the problem is not due to a fault with the appliance, you may be liable for the cost.
- The appliance must be accessible so that the technician can carry out the necessary repairs. If your appliance is installed in such a way that the technician fears damage to the appliance or your kitchen, he will not carry out the repair.
7. TECHNICAL SPECIFICATIONS
Product reference: 02851
Product: Bolero Squad V 2001
Rated voltage: 220-240 V \~
Rated frequency: 50/60 Hz
Rated power: 3000 W
| Symbol Value | Unit | ||
| Model identification 02851 | |||
| Type of ceramic hob Electric hob | |||
| Number of hotplates and/or cooking zones 2 | |||
| Heating technology (induction hotplates and cooking zones, radiation hotplates, solid hotplates) | Panel heater | ||
| Symbol Value | Unit | ||
| For circular cooking spots or cooking zones: diameter of the usable area of each electric cooking spot, rounded to the nearest 5 mm | ^(1) | 20.0 cm | |
| ^(2) | 16.5 | ||
| For non-circular lamps or cooking zones: width and length of the usable surface of each lamp or electric cooking zone, rounded to the nearest 5 mm | LW | N/A cm | |
| Energy consumption per lamp or cooking zone, calculated per kg (*) | EC_electric cooking^(1) | 182.4 Wh/kg | |
| EC_electric (2) cooking | 196.5 | ||
| Energy consumption of the hob, calculated per kg (*) EC | electric hob | 0.5 Wh/kg |
(*) Calculated according to the performance measurement method (EN 60350-2).
(1) Upper cooking zone
(2) Bottom cooking zone.
Technical specifications may change without prior notification to improve product quality. Made in China | Designed in Spain
8. DISPOSAL OF OLD ELECTRICAL AND ELECTRONIC APPLIANCES
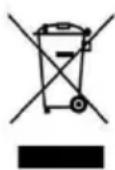
This symbol indicates that, according to the applicable regulations, the product and/or batteries must be disposed of separately from household waste. When this product reaches the end of its shelf life, you should dispose of the cells/batteries/accumulators and take them to a collection point designated by the local authorities.
Consumers must contact their local authorities or retailer for information concerning the correct disposal of old appliances and/or their batteries.
Compliance with the above guidelines will help protecting the environment.
9. TECHNICAL SUPPORT AND WARRANTY
Cecotec shall be liable to the end user or consumer for any lack of conformity that exists at the time of delivery of the product under the terms, conditions, and deadlines established by the applicable regulations.
It is recommended that repairs be carried out by qualified personnel.
If at any moment you detect any problem with your product or have any doubt, do not hesitate to contact the official Cecotec Technical Support Service at +34 963 210 728.
10. COPYRIGHT
The intellectual property rights over the texts in this manual belong to CECOTEC INNOVACIONES, S.L. All rights reserved. The contents of this publication may not, in whole or in part, be reproduced, stored in a retrieval system, transmitted, or distributed by any means (electronic, mechanical, photocopying, recording or similar) without the prior authorization of CECOTEC INNOVACIONES, S.L.
1. PIÈCES ET COMPOSANTS
Img. 1
6. PROBLEEMOPLOSSING
text_image
rear of cabinet or rear wall under countertop back edge of cutout A B A. 40mm min B. 40mm maxFig./Img./Abb./Afb./Rys. 3
text_image
Bottom of hob Glass surface Cloth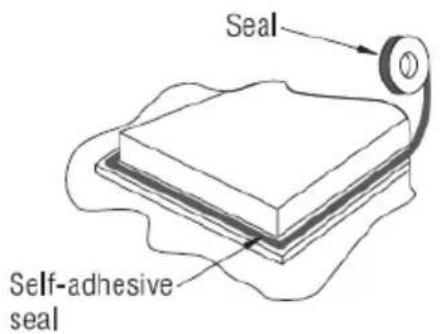
text_image
Seal Self-adhesive sealFig./Img./Abb./Afb./Rys. 4 Fig./Img./Abb./Afb./Rys. 5
text_image
screw bracket screwhole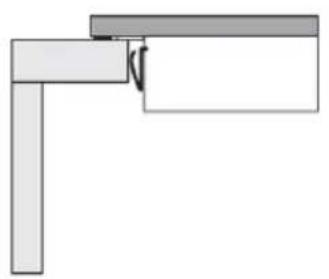
natural_image
Simple line drawing of a corner bracket with no text or symbolsFig./Img./Abb./Afb./Rys. 6
text_image
MIN. 70 cm MIN. 5 cm MIN. 2 cm AIR INTAKEFig./Img./Abb./Afb./Rys. 7
text_image
1 2Fig./Img./Abb./Afb./Rys. 8
text_image
Connect to the mains power supply 220-240V 1N~ PE N 220-240V L1 Green-yellow Blue Brown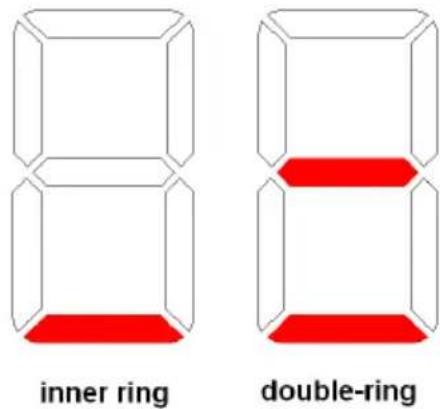
text_image
inner ring double-ringFig./Img./Abb./Afb./ Rys. 9 Fig./Img./Abb./Afb./ Rys. 10
www.cecotec.es