R2000 - Heat gun RAPID - Free user manual and instructions
Find the device manual for free R2000 RAPID in PDF.

User questions about R2000 RAPID
0 question about this device. Answer the ones you know or ask your own.
Ask a new question about this device
Download the instructions for your Heat gun in PDF format for free! Find your manual R2000 - RAPID and take your electronic device back in hand. On this page are published all the documents necessary for the use of your device. R2000 by RAPID.
USER MANUAL R2000 RAPID


natural_image
Illustration of a hand using a tool to cut a surface with wavy lines, no text or symbols present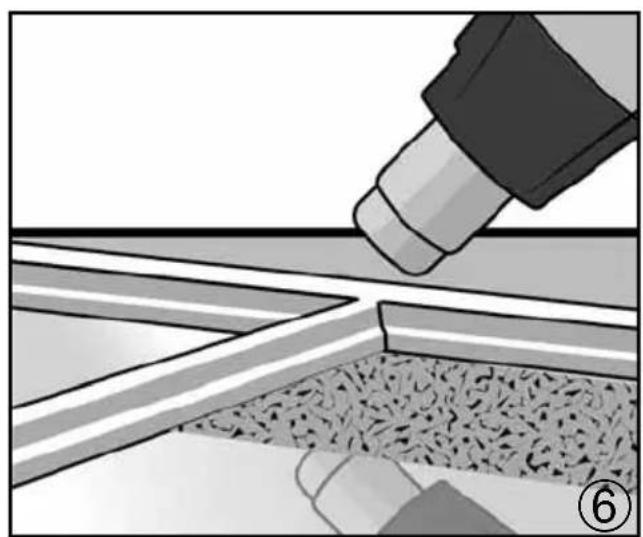
natural_image
Illustration of a container being poured into a tank, with a hand pouring liquid from a bottle (no text or symbols)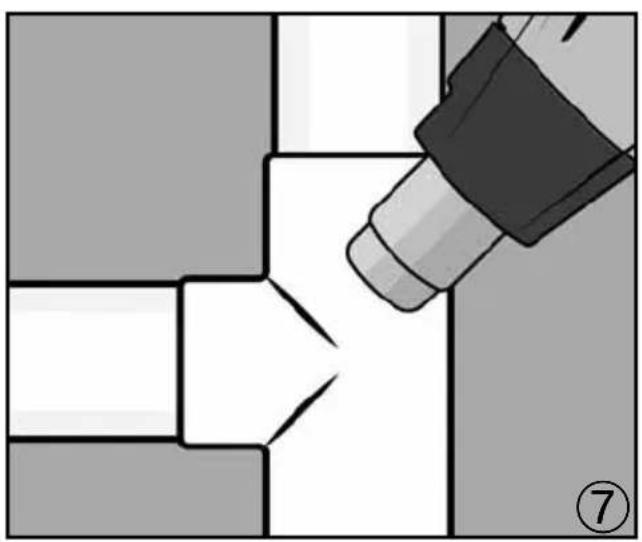
natural_image
Diagram showing a tool interacting with a mechanical component, no text or symbols present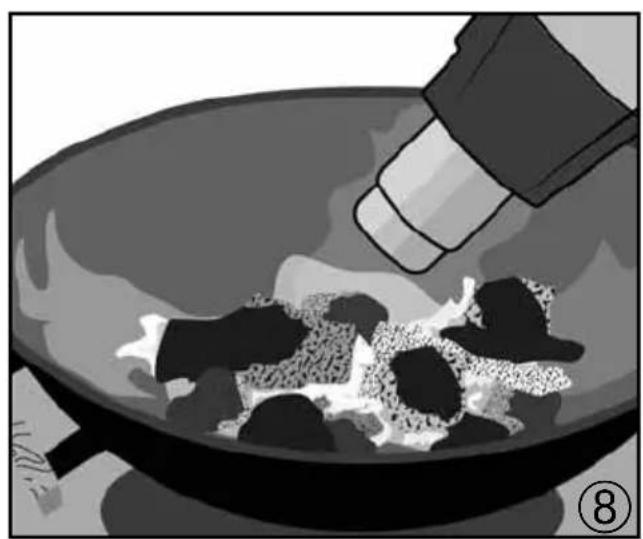
natural_image
Illustration of a cooking step showing a pan with food being stirred, no text or symbols presentGB Operating instructions - Original 5
WARNING!! Read all safety warnings and all instructions. Failure to follow all instructions listed below may result in electric shock, fi re and/or serious personal injury.

Save all warnings and instructions for future reference.
The term "power tool" in the warnings refers to your mains-operated (corded) power tool or battery-operated (cordless) power tool.
1) WORK AREA SAFETY
a) Keep your work area clean and well lit. Cluttered benches and dark areas invite accidents.
b) Do not operate power tools in explosive atmospheres, such as in the presence of fl ammable liquids, gases, or dust. Power tools create sparks which may ignite the dust or fumes.
c) Keep bystanders, children, and visitors away while operating a power tool. Distractions can cause you to lose control.
2) ELECTRICAL SAFETY
a) Power tool plugs must match the outlet. Never modify the plug in any way. Do not use any adapter plugs with earthed (grounded) power tools. Unmodified plugs and matching outlets will reduce risk of electric shock.
b) Avoid body contact with grounded surfaces such as pipes, radiators, ranges and refrigerators. There is an increased risk of electric shock if your body is grounded.
c) Do not expose power tools to rain or wet conditions. Water entering a power tool will increase the risk of electric shock.
d) Do not abuse the cord. Never use the cord for carrying, pulling or unplugging the power tool. Keep cord away from heat, oil, sharp edges or moving parts. Damaged or entangled cords increase the risk of electric shock.
e) When operating a power tool outdoors, use an extension cord suitable for outdoor use. Use of a cord suitable for outdoor use reduces the risk of electric shock.
f) If operating a power tool in a damp location is unavoidable, use a ground fault circuit interrupter protected supply. Use of a ground fault circuit interrupter reduces the risk of electric shock.
3) PERSONAL SAFETY
a) Stay alert, watch what you are doing and use common sense when operating a power tool. Do not use a power tool while you are tired or under the influence of drugs, alcohol or medication. A moment of inattention while operating power tools may result in serious personal injury.
b) Use personal protective equipment. Always wear eye protection. Protective equipment such as dust mask, non-skid safety shoes, hard hat, or hearing protection used for appropriate conditions will reduce personal injuries.
c) Prevent unintentional starting. Ensure the switch is in the off-position before connecting to power source and/or battery pack, picking up or carrying the tool. Carrying power tools with your fi nger on the switch or energizing pow- er tools that have the switch on invites accidents.
d) Remove any adjusting key or wrench before turning the power tool on. A wrench or a key left attached to a rotating part of the power tool may result in personal injury.
e) Do not overreach. Keep proper footing and balance at all times. This enables better control of the power tool in unexpected situations.
f) Dress properly. Do not wear loose clothing or jewellery. Keep your hair, clothing and gloves away from moving parts. Loose clothes, jewellery or long hair can be caught in moving parts.
g) If devices are provided for the connection of dust extraction and collection facilities, ensure these are connected and properly used. Use of dust collection can reduce dust-related hazards.
4) POWER TOOL USE AND CARE
a) Do not force the power tool. Use the correct power tool for your application. The correct power tool will do the job better and safer at the rate for which it was designed.
b) Do not use the power tool if the switch does not turn it on and off. Any power tool that cannot be controlled with the switch is dangerous and must be repaired.
c) Disconnect the plug from the power source and/or the battery pack from the power tool before making any adjustments, changing accessories, or storing power tools. Such preventive safety measures reduce the risk of starting the power tool accidentally.
d) Store idle power tools out of the reach of children and do not allow persons unfamiliar with the power tool or these instructions to operate the power tool. Power tools are dangerous in the hands of untrained users.
e) Maintain power tools. Check for misalignment or binding of moving parts, breakage of parts and any other condition that may affect the power tool's operation. If damaged, have the power tool repaired before use. Many accidents are caused by poorly maintained power tools.
f) Keep cutting tools sharp and clean. Properly maintained cutting tools with sharp cutting edges are less likely to bind and are easier to control.
g) Use the power tool, accessories and tool bits etc. in accordance with these instructions, taking into account the working conditions and the work to be performed. Use of the power tool for operations different from those intended could result in a hazardous situation.
5) SERVICE
a) Have your power tool serviced by a qualified repair person using only identical replacement parts. This will ensure that the safety of the power tool is maintained.
HOT AIR TOOL SAFETY WARNINGS

WARNING: This tool must be placed on its stand when not in use.
A fi re may result if the appliance is not used with care, therefore
- be careful when using the appliance in places where there are combustible materials;
- do not apply to the same place for a long time;
- do not use in presence of an explosive atmosphere;
- be aware that heat may be conducted to combustible materials that are out of sight;
- place the appliance on its stand after use and allow it to cool down before storage;
- do not leave the appliance unattended when it is switched on.
- This appliance can be used by children aged from 8 years and above and persons with reduced physical, sensory or mental capabilities or lack of experience and knowledge if they have been given supervision or instruction concerning use of the appliance in a safe way and understand the hazards involved.
- Children shall not play with the appliance.
- Cleaning and user maintenance shall not be made by children without supervision
TECHNICAL SPECIFICATION
| ModelFeature | R1800 R2000 R2200-E R2200-LCD | |||
| Voltage 230-240V~50-60Hz | ||||
| Power, Watt 1800 | 2000 2200 2200 | |||
| Power switchPower/Air flow | 0 OFF | |||
| - | 1 Low/Full | |||
| 1 Mid/Mid | 2 Mid/Mid | |||
| 2 High/Full | 3 High/Full | |||
| Power/Air flowLED indicator | - | - | Yes, see features | |
| Temperatureindicator screen | - | - | - | Yes, seefeatures |
| Residual HeatWarning | - | - | Yes, see features | |
FEATURES
Power switch, fig 1A
Nozzle, fig 1B
Handle, fig 1C
Stand for vertical operation with free hands or storage. Fig 4G
R1800 and R2000
Features as in technical specification
R2200-E and R2200-LCD
Power/Air flow LED indicator, fig 2D
The back 3 white LEDs show level of air flow
The front 3 red LEDs show level of power
R2200-LCD
Display, fig 3E, shows the actual and target temperature (Act/Tar)
UP/DOWN buttons (▲/▼), fig 3F
System function;
- The target temperature (Tar) can be adjusted by pressing the UP or DOWN button (▲/▼)
R2200-E and R2200-LCD residual heat warning
The front red LED flashes when the tool is turned off indicating the nozzle is hot
USAGE

WARNING!! Read all safety warnings and all instructions.
Save all warnings and instructions for future reference.
Ensure the power switch is in the OFF position before plugging into the electrical outlet.
Set the power switch/temperature control to the desired speed and temperature. Let the tool run until it reaches operating temperature.
With the stand the tool can be used in a vertical position with both hands free for work.
Keep hands away from the immediate nozzle area, it's hot.
PAINT AND VARNISH REMOVAL
Never use the heat gun in combination with chemical strippers.

WARNING! LEAD PAINT FUMES ARE VERY HARMFUL. ALWAYS PROVIDE ADEQUATE VENTILATION WHILE WORKING INDOORS.
Removal of paint and varnish requires some practice but some simple working techniques are described here. Test on a small area of paint before moving on to larger areas.
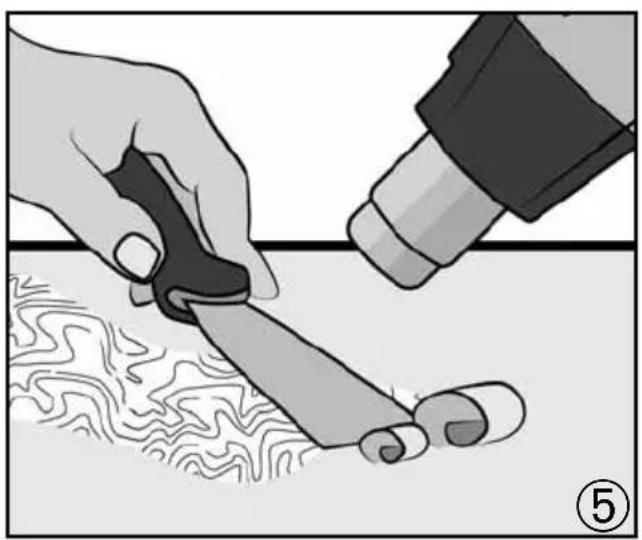
Turn on the tool and allow it to reach working temperature. Hold the nozzle 70 to 100 mm from the paint to be removed. After a short time the paint will soften and begin to bubble. Do not overheat the paint, as this will cause burning and make the paint more difficult to remove.
Begin scraping the paint off. Use accessory scrapers. Scrape with smooth, even strokes, warming the surface in front of the scraper by moving the tool slightly from side to side. If paint is warmed properly, even thick layers can be removed in a single pass. Scrape the paint as soon as it softens since it will quickly
harden again. Figure 5
Clean the edge of scraper blade often.
Shaped or profi led surface can be stripped with a wire brush after softening with the hot air tool.
Protect surfaces NOT to be heated with non fl ammable material, Figure 6. Never concentrate tool's heat on a window panel or other glass surface.
Note: The heat gun is designed to remove both oil and latex-based paints and varnishes. It will not remove stain or primer coat that have impregnated the surface of wood.
OTHER JOBS FOR THE HOT AIR TOOL
- Removing self-adhesive stickers and trim.
- Thawing frozen pipes, frozen door locks, padlocks, etc. Figure 7

WARNING: Be very careful when trying to thaw plastic pipes! Pipes may melt.
- Highlighting the natural wood grain of wooden surfaces.
- Fast drying of paints and varnishes.
- Softening old putty before removal and replacement.
- Shrinking shrink wrap sheeting for packaging protection.
- Applying ski wax.
- Shrinking shrink tubes on wire joints.
- Tin soldering of wire joints etc.
- Desoldering of wire joints, components etc.
- Barbecue light up, Figure 8
MAINTENANCE
- Unplug the tool before any maintenance
- Keep the air intake and outlet free from dust and dirt
- Clean the tool by a dry or damp cloth. NEVER use any solvent.
- DO NOT oil or grease any parts.
- Be sure the tool is not damaged. Replace or repair prior to use.

WARNING!
DO NOT alter or parts on this tool or attach
special fixtures. This can lead to personal injury. If the supply cord is damaged, it must be replaced by the manufacturer, its service agent or similarly qualified persons in order to avoid a hazard.
ENVIRONMENT

2012/19/EU
EN Waste Electrical and Electronic Equipment (WEEE)
Electrical and electronic devices contain materials and substances that can have damaging effects on human health and the environment. This symbol indicates that this device must not be treated as unsorted municipal waste but must be collected separately. Dispose of the device via a collection point for the recycling of waste electrical and electronic equipment within the EU, UK and in other European countries that operate separate collection systems for waste electrical and electronic equipment. By disposing of the device in the proper manner, you help to avoid possible hazards for the environment and public health that could otherwise be caused by improper treatment of waste equipment. The recycling of materials contributes to the conservation of natural resources.
WARRANTY
Warranty period: This product is guaranteed for 2 years from the date of purchase (original sales receipt acting as proof).
Warranty conditions: All points mentioned in this document must have been fully adhered to.
In the event of a claim under the warranty:
1 Return the product in its original packaging to the shop or outlet that supplied you with this product,
2 Accompany the returned product with the original dated receipt.
Any breach of one of these points would prevent consideration by RAPID under the manufacturer's warranty.
Heißluftgebläse
Aviso de calor residual R2200-E e R2200-LCD
ANDRE OPGAVER MED VARMLUFTSVÆRKT∅-JET
1) SIKKERHET PÅ ARBEIDSOMRÅDET
UP/DOWN (opp/ned)-knapper (▲/▼), fig. 3F
Systemfunksjon:
USUWANIE FARB I LAKIERÓW
R2200-E ir R2200-LCD
Galios / oro srauto LED indikatorius, 2D pav.
R2200-E in R2200-LCD
LED indikator za moč/pretok zraka, sl. 2D
R2200-E και R2200-LCD
R2200-E ve R2200-LCD
R2200-E si R2200-LCD
UK Importer and authorised representative:
ACCO UK Limited
Oxford House Oxford Road
Aylesbury HP21 8SZ
United Kingdom

Isaberg Rapid AB
SE-335 71 Hestra, Sweden
www.rapid.com
R1800/R2000/R2200LCD
Operating Instructions