
ES-131287 - Coffee machine Emerio - Free user manual and instructions
Find the device manual for free ES-131287 Emerio in PDF.

| Product type | Espresso coffee machine |
| Brand | Emerio |
| Model | ES-131287 |
| Power supply | 220-240 V ~ 50/60 Hz |
| Power | 1100 W |
| Main functions | Espresso preparation, hot water production, milk frothing for cappuccino |
| Water tank capacity | Removable tank (capacity not specified) |
| Automatic shut-off | Yes, after 25 minutes of inactivity |
| Maintenance | Descaling recommended every 2-3 months; drip tray and plate dishwasher safe |
| Safety | Overheat protection, automatic shut-off, secure steam button |
| Warranty | 2 years |
| Included accessories | Measuring spoon, tamper, filter, filter holder, filter retention clip |
Frequently Asked Questions - ES-131287 Emerio
User questions about ES-131287 Emerio
0 question about this device. Answer the ones you know or ask your own.
Ask a new question about this device
Download the instructions for your Coffee machine in PDF format for free! Find your manual ES-131287 - Emerio and take your electronic device back in hand. On this page are published all the documents necessary for the use of your device. ES-131287 by Emerio.
USER MANUAL ES-131287 Emerio
natural_image
Black and white photo of a modern espresso machine with handle and control panel (no visible text or symbols)Espresso machine (EN)
Espresso-Maschine (DE)
Espresso machine (NL)
Ekspres do espresso ( PL )
Cafetera expreso (ES)
Content – Inhalt – Teneur – Innehåll – Inhoud – Treść – Contenido
Instruction manual – English ...... - 2 -
Instruction manual – English
SAFETY INSTRUCTIONS
Before use make sure to read all of the below instructions in order to avoid injury or damage, and to get the best results from the appliance. Make sure to keep this manual in a safe place. If you give or transfer this appliance to someone else make sure to also include this manual.
In case of damage caused by user failing to follow the instructions in this manual the warranty will be void. The manufacturer/importer accepts no liability for damages caused by failure to follow the manual, a negligent use or use not in accordance with the requirements of this manual.
- This appliance can be used by children aged from 8 years and above if they have been given supervision or instruction concerning use of the appliance in a safe way and if they understand the hazards involved.
- Cleaning and user maintenance shall not be made by children unless they are older than 8 and supervised.
- Keep the appliance and its cord out of reach of children aged less than 8 years.
-
Appliances can be used by persons with reduced physical, sensory or mental capabilities or lack of experience and knowledge if they have been given supervision or instruction concerning use of the appliance in a safe way and understand the hazards involved.
-
Children shall not play with the appliance.
-
If the supply cord is damaged, it must be replaced by the manufacturer, its service agent or similarly qualified persons in order to avoid a hazard.
-
This appliance is intended to be used in household and similar applications such as: staff kitchen areas in shops, offices and other working environments; farm houses; by clients in hotels, motels and other residential type environment; bed and breakfast type environments.
-
Regarding the instructions for cleaning the surfaces which come in contact with food, please refer to the paragraph "cleaning and maintenance" of the manual.
-
Warning: Avoid spillage on the connector.
-
Warning: Potential risk of injuries from misuse.
-
The heating element surface is subject to residual heat after use.
-
Cleaning and user maintenance shall not be made by children without supervision.
-
Before inserting the plug into the mains socket, please check that the voltage and frequency comply with the specifications on the rating label.
-
Always plug the appliance into an earthed plug socket.
-
If an extension cord is used it must be suited to the power consumption of the appliance, otherwise overheating of the extension cord and/or plug may occur. There is a potential risk of injuries from tripping over the extension cord. Be careful to avoid dangerous situations.
-
Disconnect the mains plug from the socket when the appliance is not in use and before cleaning. Allow the appliance to cool down completely before taking off, attaching components or before cleaning.
-
Ensure that the mains cable is not hung over sharp edges and keep it away from hot objects and open flames.
-
Do not immerse the appliance or the mains plug in water or other liquids. There is danger to life due to electric shock!
-
To remove the plug from the plug socket, pull the plug. Do not pull the power cord.
-
Do not touch the appliance if it falls into water. Remove the plug from its socket, turn off the appliance and send it to an authorized service center for repair.
-
Do not plug or unplug the appliance from the electrical outlet with a wet hand.
-
Never attempt to open the housing of the appliance, or to repair the appliance yourself. This could cause electric shock.
-
Never leave the appliance unattended during use.
-
This appliance is not designed for commercial use.
-
Do not use the appliance for other than intended use.
-
Do not wind the cord around the appliance and do not bend it.
-
Fill the water tank with water only – not with any other liquids. Do not let the appliance operate without water.
-
Use the appliance on a flat, dry and heat resistance surface.
-
The use of accessory attachments not recommended by the appliance manufacturer may result in fire, electric shock or injury to persons.
-
Be careful not to get burned by the steam.
-
Do not touch the hot surface of the appliance (such as steam wand, and the filter during boiling). Use handle or knobs.
-
Do not remove the portafilter while brewing coffee or making steam. Please wait for at least 10 seconds after finishing brewing coffee to remove the portafilter to make additional coffee. Caution should also be taken while removing the portafilter since the metal parts will be hot. Please make sure to hold it by the handle and to use the filter retention clip to dispose the grounds. Caution should be taken when moving unit with hot liquids.
-
This appliance is for household use only. Do not use outdoors.
-
Insert the plug to the wall outlet before using and turn any switch off before plug is removed from the wall outlet.
-
If you do not use the appliance for a long period of time, you need to turn on the power and then release steam for 3 minutes before leaving this product.
-
If you cut off power during steam release, residual heat will make the appliance continue to release steam for a length of time; the appliance will stop releasing steam immediately once you turn off the steam knob.
-
The coffee-maker shall not be placed in a cabinet when in use.
-
Close supervision is necessary when your appliance is being used near children.
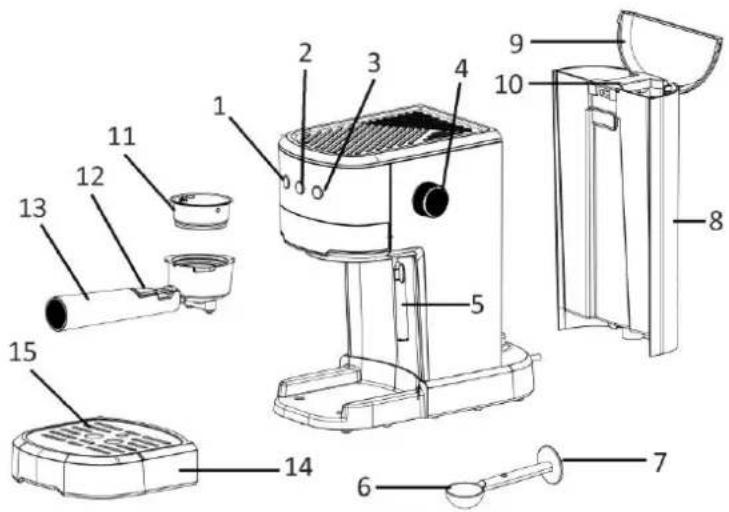
PARTS DESCRIPTION
-
On/off button with indicator light
-
Coffee button with indicator light
-
Steam button with indicator light
-
Steam knob
-
Steam wand
-
Measuring spoon
-
Tamper
-
Water tank
-
Water tank cover
-
Handle
-
Filter
-
Filter retention clip
-
Portafilter
-
Drip tray
-
Drip plate
Inserting the filter
To insert the filter in the portafilter, make sure to align the notch on the rim of the filter with the groove inside the portafilter. Turn the filter to the left or right to lock in place. This will help secure the filter in the portafilter.
Function of the filter retention clip
Turn up the filter retention clip to catch the filter in case the filter falls off from the portafilter when pouring out the coffee residue.
natural_image
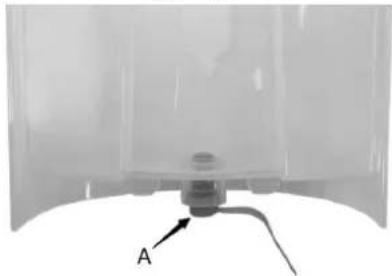
Simple line drawing of a pipe fitting with a valve (no text or symbols)BEFORE THE FIRST USE
To ensure the first cup of coffee tastes excellent, you should rinse the appliance with warm water as following. Important: there is a rubber (A) inserted in the bottom of the water tank. Please remove it before use. It is for manufacturing purpose from factory; users can throw it away after removing the packaging.
natural_image
Close-up of a transparent container with a small mechanical component and labeled point A (no text or symbols beyond label)- Pour water into the water tank; the water level should not exceed the mark "MAX" in the tank. Then replace the water tank cover.
Note: the appliance is supplied with a detachable water tank for easy cleaning; you can fill the water tank with water firstly, and then put the water tank into the appliance.
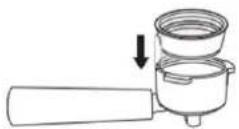
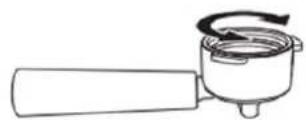
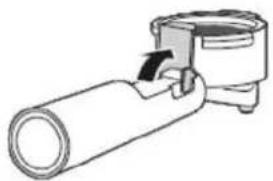
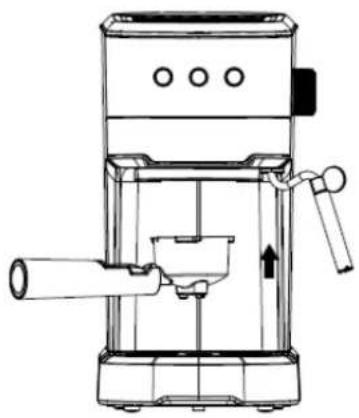
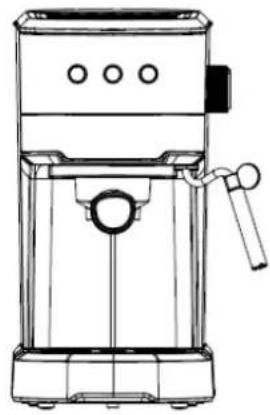
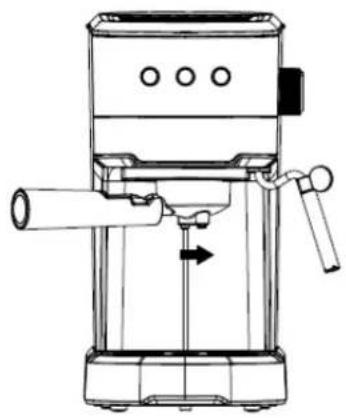
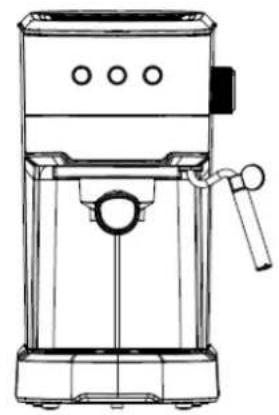
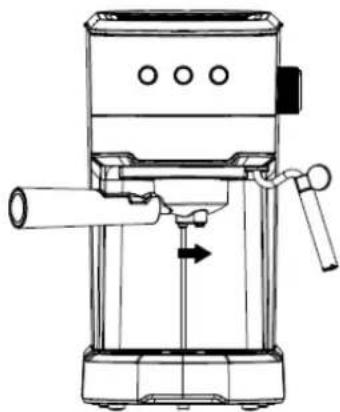
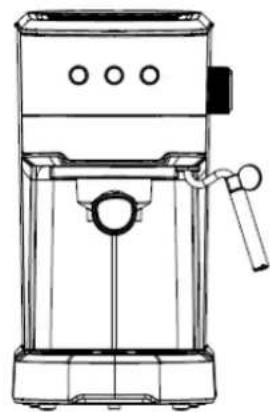
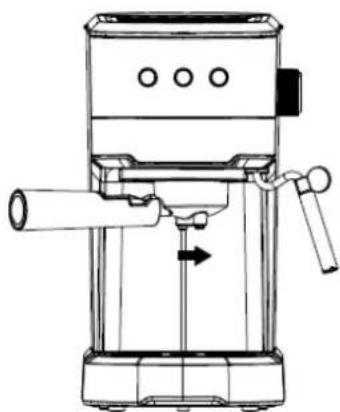
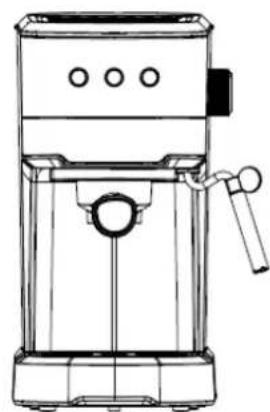
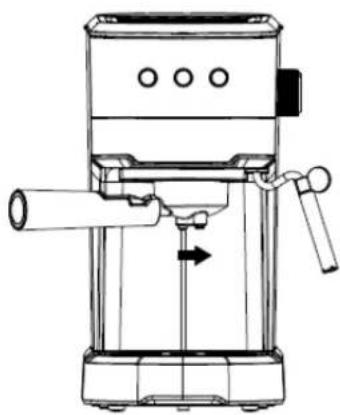
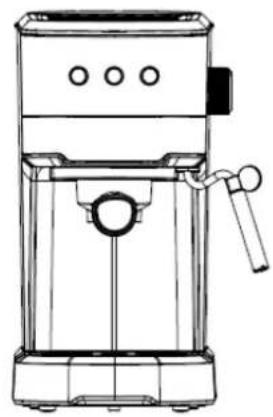
- Set the filter into the portafilter (no coffee powder inside), and then attach the portafilter onto the group head (see Fig.1). Turn the portafilter anticlockwise as far as it will go until it is locked tightly (see Fig.2 and Fig.3).
natural_image
Line drawing of a coffee maker with handle and spout (no text or symbols)Fig.1

natural_image
Line drawing of a mechanical device with no visible text or symbolsFig.2
natural_image
Line drawing of a modern coffee maker with handle and control panel (no text or symbols)Fig.3
- Place an espresso cup you have prepared on the drip plate. Make sure the steam knob is set at the off position "O".
Note: Since the appliance is not equipped with any cup or jug, please prepare your own jug or cup.
-
Plug in the appliance.
-
Press the on/off button to turn on the unit. The indicator light of the on/off button will blink.
-
Wait until the indicator light of the on/off button turns to illuminate solidly, press the coffee button to
pump water from the water tank into the housing. There will be water flowing out.
- After water has flown for approx. 30 seconds, press the coffee button again to stop pumping. Pour out the water in your cup. Now you can start brewing coffee.
Note:
1) There may be noise when pumping the water for the first time, it is normal, as the appliance is releasing the air in the appliance.
2) When the coffee button is pressed for the first-time use, its indicator light may be blinking with no water flowing out. Wait for about 20s, press the coffee button again, the pump will begin to pump water.
PREHEATING
To make a cup of good hot espresso coffee, it is recommended to preheat the appliance before making coffee, including the portafilter and cup, so that the coffee flavor will not be influenced by the cold parts.
- Please start with step 1 till 5 of the section "Before the first use", and then continue as following.
- Wait until the indicator light of the on/off turns to illuminate solidly, press the coffee button to pump water from the water tank into the housing.
- When there is water flowing out, press the coffee button again to stop pumping.
OPERATION
Make espresso coffee
- Remove the portafilter by turning it clockwise.
- Add ground coffee in to the filter with the measuring spoon. A spoon ground coffee powder can make about one cup of top-grade coffee.
- Level the ground coffee in a circular motion. Be sure to remove any crumbs lingering around the edge. Evenly tamp your ground coffee with the tamper.
- Reattach the portafilter to the group head. Make sure the steam knob is set at the off position "0".
- Place an espresso cup you have prepared on the drip plate.
- Check the indicator light of the on/off button. When the indicator light illuminates solidly, press the coffee button. Wait for a moment, there will be coffee flowing out.
- Press the coffee button again when desired coffee is obtained.
- After finishing brewing coffee, press the on/off button.
Warning: Do not leave the appliance unattended during making coffee, as you need operate manually sometimes!
Note:
1) The working time for brewing coffee is 60 seconds at most, and the water pump will stop working if the working time exceeds 60 seconds.
2) Clean the filter and portafilter thoroughly after each brewing, before continue to make coffee again.
Make hot water
- Press the on/off button, wait until the indicator light of the on/off button illuminates solidly. Place a cup under the steam wand.
- Press the steam button twice to pump water, then turn the steam knob to the positin "". The hot water will flow out of the steam wand.
- To stop making hot water, press the steam button again and then turn the steam knob to the off position "O".
- Hot water is used for warming cup, making tea or cooling down the appliance.
Make cappuccino / frothed milk
You can get a cup of cappuccino by topping a cup of espresso with frothing milk.
-
Prepare espresso first with large coffee mug, and make sure that the steam knob is set at the off position "0".
-
Press the steam button. The indicator light of the steam button will blink. Wait until the indicator light illuminates solidly.
Note: During operation, the indicator light of the steam button may cycle on and off to maintain the desired temperature.
- Fill a jug with about 100 ml of milk for each cappuccino to be prepared. It is recommended to use whole milk at refrigerator temperature (not hot!).
Note: In choosing the size of jug, it is recommend the diameter is not less than 70 ± 5mm , and bear in mind that the milk increases in volume by 2 times, make sure the height of jug is enough.
- Insert the steam wand into the milk about two centimeters. Turn the steam knob slowly anticlockwise to
position “/” and steam will come out from the steam wand. Frothed milk is produced by moving the jug round from up to down.
Note: Never touch steam outlet during steam producing and be careful not to be burnt. Never turn the steam knob rapidly, as the steam will accumulate rapidly in short time which may increase the potential risk of explosion.
- When the desired result is obtained, you can turn the steam knob to off position "0".
Note: Clean steam outlet with wet sponge immediately after steam stops generating; be careful not to be burnt!
-
Press the on/off button to cut off the power source.
-
Pour the frothed milk into the espresso prepared, now the cappuccino is ready. Sweeten if desired, sprinkle the froth with a little cocoa powder.
Warning: After finish the Steam function, press the coffee switch, if the coffee indicator and steam indicator blink fast, it means that the temperature of the appliance is too high and the appliance needs to be turned off and have a rest for more than 5 minutes, or you can activate the “Hot water function” to cool down the appliance. And the water pump will stop pumping water automatically if the temperature is normal. And the coffee will be burnt and there will be overflow at the funnel if the appliance brews coffee directly without being cooled down.
AUTOMATIC POWER OFF FUNCTION
If there is no any operation within 25 minutes, the unit will power off automatically.
CLEANING AND MAINTENANCE
-
Plug out the appliance and let it cool down completely before cleaning.
-
Clean housing of the appliance with moisture-proof sponge often. Clean water tank, drip tray and drip plate regularly and then dry them.
Note: Do not clean with alcohol or solvent cleanser. Never immerse the housing in water for cleaning.
-
Take the portafilter off by turning it clockwise, and then pour the coffee residue out. Wash the filter and portafilter with cleanser, rinse with clean water.
-
Clean all the attachments in the water and dry thoroughly. Only the drip tray and drip plate are dishwasher safe.
Note: Clean the appliance after every use in order to make it work properly.
Cleaning mineral deposits
To ensure your appliance can operate efficiently, the internal piping is clean and the peak flavor of coffee, it is suggested you clean the mineral deposits left every 2-3 months.
- Fill the water tank with water and descaler to the MAX level (the proportion of water and descaler is 4:1, details refer to the instruction of descaler.) Please use "household descaler".
- Put the portafilter (no coffee powder inside) and jug in place.
- Press the on/off button to turn on the appliance, wait unitll its indicator light illuminates solidy
- Press the coffee button and make two cups of coffee (about 2 Oz). Then press the coffee button again and wait for 5s.
- Press the steam button. Wait until the indicator light of the steam button illuminates solidly. Turn the steam knob anticlockwise for 2 minutes (Place a cup under the steam wand to collect the water.) and then turn back to off position "O" to stop making steam. Press the on/off button to turn off the unit immediately. Let the descalers deposit in the unit at least 15 minutes.
- Restart the unit and repeat the steps of 3-5 at least 3 times.
- Press the on/off button. Wait until the indicator light of the on/off button illuminates solidly. Press the coffee button to brew until no descaler is left.
- Fill the water tank with tap water in the MAX level, repeat the steps of 3-5 for 3 times (it is not necessary to wait 15 minutes in step of 5), and then brew until no water is left in the tank.
- Repeat the step of 8 at least 3 times to make sure the piping is clean.
TROUBLE SHOOTING
| Trouble | Cause | Corrections |
| Water leaks from the bottom of the appliance. | There is too much water in the drip tray. | Please clean the drip tray. |
| The appliance is in malfunction. | Please contact with the authorized service facility for repairing. | |
| Water leaks out of the outer side of the filter. | There is some coffee powder on the filter edge. | Get rid of them. |
| Acid (vinegar) taste exists in espresso coffee. | Not clean correctly after cleaning mineral deposits. | Clean the appliance according to the section “before the first use” for several times. |
| The coffee powder is stored in a hot, wet place for a long time. The coffee powder turns bad. | Please use fresh coffee powder, or store unused coffee powder in a cool, dry place. After opening a package of coffee powder, reseal it tightly and store it in a refrigerator to maintain its freshness. | |
| The appliance cannot work anymore. | The power outlet is not plugged well. | Plug the power cord into a wall outlet correctly. If the appliance still does not work, please contact with the authorized service facility for repairing. |
| The steam cannot froth. | The steam indicator is not illuminated. | Only after the steam indicator is illuminated, the steam can be used to froth. |
| The container is too big or the shape is not fit. | Use high and narrow cup. | |
| You have used skimmed milk. | Use whole milk or half-skimmed milk. |
SPECIFICATIONS
Supply voltage: 220-240V \~ 50-60Hz
Power consumption: 1100W
GUARANTEE AND CUSTOMER SERVICE
Before delivery our devices are subjected to rigorous quality control. If, despite all care, damage has occurred during production or transportation, please return the device to your dealer.
For the purchased device we provide 2 years guarantee, commencing from the day of sale. If you have a defective product, you can directly go back to the point of purchase.
Defects which arise due to improper handling of the device and malfunctions due to interventions and repairs by third parties or the fitting of non-original parts are not covered by this guarantee. Always keep your receipt, without the receipt you can't claim any form of warranty. Damage caused by not following the instruction manual, will lead to a void of warranty, if this results in consequential damages then we will not be liable.
Neither can we hold responsible for material damage or personal injury caused by improper use if the instruction manual is not properly executed. Damage to accessories does not mean free replacement of the whole appliance. In such case please contact our service department. Broken glass or breakage of plastic parts is always subject to a charge. Defects to consumables or parts subjected to wearing, as well as cleaning, maintenance or the replacement of said parts are not covered by the warranty and are to be paid.
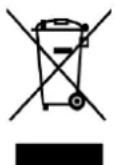
The crossed out wheelie bin symbol means that this product shall not be disposed of with normal household waste. Electronic and Electrical Equipment not included in the selective sorting process are potentially dangerous for the environment and human health due to the presence of hazardous substances. Please dispose of responsibly at an approved waste or recycling facility.
Emerio B.V.
Oudeweg 115
2031 CC Haarlem
The Netherlands
Customer service:
T: +31 (0) 23 3034369
www.emerio.eu/service
Kundeninformation:
T: +49 (0) 3222 1097 600
www.emerio.eu/service
Klantenservice:
T: +31 (0) 23 3034369
www.emerio.eu/service
Looking for spare parts? Have a look at https://spareparts.emerio.eu
CUSTOMER SERVICE

SPARE PARTS
natural_image
Diagram of a cylindrical mechanical component with an arrow indicating direction (no text or symbols)VOR DEM ERSTEN GEBRAUCH
natural_image
Close-up of a mechanical component with labeled point A, no visible text or symbolsnatural_image
Line drawing of a coffee maker with handle and spout (no text or symbols)Abb. 1
natural_image
Line drawing of a modern espresso machine with handle and spout (no text or symbols)Abb. 2

natural_image
Line drawing of a coffee maker with handle and spout (no text or symbols)Abb. 3
KUNDENDIENST

ERSATZTEILE
Insertion du filtre
natural_image
Simple line drawing of a cylindrical mechanical component with a handle and arrow indicating direction (no text or symbols)AVANT LA PREMIÈRE UTILISATION
natural_image
Close-up of a mechanical component with labeled point A, no visible text or symbolsnatural_image
Line drawing of a coffee maker with handle and spout (no text or symbols)Fig. 1

natural_image
Line drawing of a coffee maker with handle and spout (no text or symbols)Fig. 3
natural_image
Line drawing of a modern espresso machine with handle and control panel (no text or symbols)Looking for spare parts? Have a look at https://spareparts.emerio.eu
SERVICE CLIENT

PIÈCES DÉTACHÉES
Bruksanvisning – Swedish
SÄKERHETSANVISNINGAR
Sätt i filtret
natural_image
Simple line drawing of a cylindrical mechanical component with an arrow indicating direction (no text or symbols)FÖ RE FÖ RSTA ANVÄNDNING
natural_image
Close-up of a mechanical component with labeled point A, no visible text or symbols beyond the labelnatural_image
Line drawing of a coffee maker with handle and spout (no text or symbols)Bild 1
natural_image
Line drawing of a coffee maker with handle and spout (no text or symbols)Bild 2
natural_image
Line drawing of a coffee machine with handle and spout (no text or symbols)Bild 3
KUNDTJÄNST

RESERVDELAR
VEILIGHEIDSVOORSCHRIFTEN
De filter plaatsen
natural_image
Diagram of a cylindrical mechanical component with an arrow indicating force or movement (no text or symbols)VOOR INGEBRUIKNAME
natural_image
Close-up of a mechanical component with labeled point A, no visible text or symbols beyond the labelnatural_image
Line drawing of a coffee maker with handle and spout (no text or symbols)Fig.1
natural_image
Line drawing of a mechanical device with no visible text or symbolsFig.3
natural_image
Line drawing of a standard espresso machine with handle and spout (no text or symbols)KLANTENSERVICE

RESERVEONDERDELEN
INSTRUKCJE DOTYCZĄCE BEZPIECZEŃSTWA
Wkładanie filtra
natural_image
Simple line drawing of a cylindrical mechanical component with an arrow indicating rotation (no text or symbols)PRZED PIERWSZYM UŻYCIEM
natural_image
Close-up of a mechanical component with labeled point A, no visible text or symbolsnatural_image
Line drawing of a coffee maker with handle and spout (no text or symbols)Rys. 1
natural_image
Line drawing of a mechanical device with no visible text or symbolsRys. 3

natural_image
Line drawing of a modern espresso machine with handle and control panel (no text or symbols)Looking for spare parts? Have a look at https://spareparts.emerio.eu
OBSŁUGA KLIENTA

CZEŚCI ZAMIENNE
Manual de Instrucciones – Spanish
Insertar el filtro
natural_image
Simple line drawing of a cylindrical mechanical component with an arrow indicating motion (no text or symbols)ANTES DE USAR POR PRIMERA VEZ
natural_image
Close-up of a mechanical component with labeled point A, no visible text or symbolsnatural_image
Line drawing of a coffee maker with handle and spout (no text or symbols)Fig. 1

natural_image
Line drawing of a mechanical device with lever and shaft (no text or symbols)Fig. 2
natural_image
Line drawing of a standard espresso machine with handle and control panel (no text or symbols)Fig. 3
Looking for spare parts? Have a look at https://spareparts.emerio.eu
SERVICIO DE
PIEZAS DE RECAMBIO

- Content – Inhalt – Teneur – Innehåll – Inhoud – Treść – Contenido
- Instruction manual – English
- SAFETY INSTRUCTIONS
- PARTS DESCRIPTION
- Inserting the filter
- Function of the filter retention clip
- BEFORE THE FIRST USE
- Note:
- PREHEATING
- OPERATION
- Make espresso coffee
- Make hot water
- Make cappuccino / frothed milk
- AUTOMATIC POWER OFF FUNCTION
- CLEANING AND MAINTENANCE
- Cleaning mineral deposits
- SPECIFICATIONS
- GUARANTEE AND CUSTOMER SERVICE
- VOR DEM ERSTEN GEBRAUCH
- Insertion du filtre
- AVANT LA PREMIÈRE UTILISATION
- Bruksanvisning – Swedish
- SÄKERHETSANVISNINGAR
- Sätt i filtret
- FÖ RE FÖ RSTA ANVÄNDNING
- VEILIGHEIDSVOORSCHRIFTEN
- De filter plaatsen
- VOOR INGEBRUIKNAME
- INSTRUKCJE DOTYCZĄCE BEZPIECZEŃSTWA
- Wkładanie filtra
- PRZED PIERWSZYM UŻYCIEM
- Manual de Instrucciones – Spanish
- Insertar el filtro
- ANTES DE USAR POR PRIMERA VEZ
Brand : Emerio
Model : ES-131287
Category : Coffee machine