CME110279.2 - Coffee machine Emerio - Free user manual and instructions
Find the device manual for free CME110279.2 Emerio in PDF.
User questions about CME110279.2 Emerio
0 question about this device. Answer the ones you know or ask your own.
Ask a new question about this device
Download the instructions for your Coffee machine in PDF format for free! Find your manual CME110279.2 - Emerio and take your electronic device back in hand. On this page are published all the documents necessary for the use of your device. CME110279.2 by Emerio.
USER MANUAL CME110279.2 Emerio
Instructions for use
Coffee maker 900W
Gebrauchsanleitung
Kaffeeautomat 900W
text_image
AUTO PROG HOUR MIN RUN ON/OFF
text_image
Labeled diagram of a coffee maker with numbered parts for identificationBEDIENING
text_image
AUTO PROG HOUR MIN RUN ON/OFFFONCTIONNEMENT
Power consumption: 900W
SAFETY INSTRUCTIONS
Before use make sure to read all of the below instructions in order to avoid injury or damage, and to get the best results from the appliance. Make sure to keep this manual in a safe place. If you give or transfer this appliance to someone else make sure to also include this manual.
In case of damage caused by user failing to follow the instructions in this manual the warranty will be void. The manufacturer/importer accepts no liability for damages caused by failure to follow the manual, a negligent use or use not in accordance with the requirements of this manual.
- This appliance can be used by children aged from 8 years and above if they have been given supervision or instruction concerning use of the appliance in a safe way and if they understand the hazards involved.
- Cleaning and user maintenance shall not be made by children unless they are older than 8 and supervised.
- Keep the appliance and its cord out of reach of children aged less than 8 years.
-
Appliances can be used by persons with reduced physical, sensory or mental capabilities or lack of experience and knowledge if they have been given supervision or instruction concerning use of the appliance in a safe way and understand the hazards involved.
-
Children shall not play with the appliance.
-
If the supply cord is damaged, it must be replaced by the manufacturer, its service agent or similarly qualified persons in order to avoid a hazard.
-
This appliance is intended to be used in household and similar applications such as: staff kitchen areas in shops, offices and other working environments; farm houses; by clients in hotels, motels and other residential type environment; bed and breakfast type environments.
-
Regarding the instructions for cleaning the surfaces which come in contact with food, please refer to the paragraph “CLEANING AND MAINTENANCE” of the manual.
-
There is a potential risk of injuries from misuse.
-
The heating element surface is subject to residual heat after use.
-
Before inserting the plug into the mains socket, please check that the voltage and frequency comply with the specifications on the rating label.
-
Disconnect the mains plug from the socket when the appliance is not in use and before cleaning.
-
Ensure that the mains cable is not hung over sharp edges and keep it away from hot objects and open flames.
-
Do not immerse the appliance or the mains plug in water or other liquids. There is danger to life due to electric shock!
-
To remove the plug from the plug socket, pull the plug. Do not pull the power cord.
-
Do not touch the appliance if it falls into water. Remove the plug from its socket, turn off the appliance and send it to an authorized service center for repair.
-
Do not plug or unplug the appliance from the electrical outlet with a wet hand.
- Never attempt to open the housing of the appliance, or to repair the appliance yourself. This could cause electric shock.
- Never leave the appliance unattended during use.
- This appliance is not designed for commercial use.
- Do not use the appliance for other than intended use.
- Do not wind the cord around the appliance and do not bend it.
- Fill the reservoir with water only – not with any other liquids.
- If you want to make coffee several times consecutively, always switch off the device for about 5 minutes before operating again.
- Use the appliance on a flat, dry and heat resistance surface.
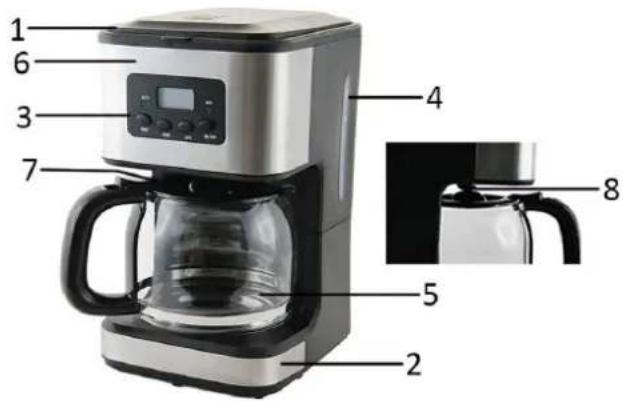
PARTS DESCRIPTION
- Lid of reservoir
- Tray
- Control Panel (see below)
- Reservoir with water level indication
- Jug
- Filter reservoir
- Lid of jug
- Anti drip function
CONTROL PANEL
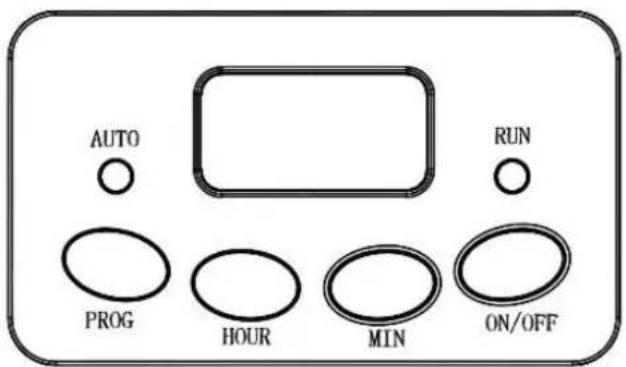
text_image
AUTO PROG HOUR MIN RUN ON/OFF
text_image
Labeled diagram of a coffee maker with numbered parts for identificationOPERATION
Before first-time use:
- Before using this device for the first time please carefully rinse all detachable components with warm water.
- Fill the reservoir with cold water to the maximum water level indication.
• Afterwards brew water twice without coffee powder.
To percolate coffee:
- Fill the reservoir with cold water.
- Open the lid of the reservoir and fill it to the desired water level indication. The maximum capacity is 1.5L (approximate 12 cups).
- Place a commercially available filter in the filter reservoir and use the measuring spoon to add the amount of coffee powder appropriate to the amount of cups you want to brew. Close the lid of the reservoir.
- Now place the jug on the tray of the appliance.
- Plug the power cord into an appropriate outlet. The LCD will display "12:00" and the colon will flash.
- Start brewing coffee by pressing the ON/OFF switch once. The "RUN" indicator light will illuminate then. The lid of the jug needs to be closed in order to unlock the drip stop function.
- If you leave the device switched on, the tray will keep the coffee warm after finishing brewing. The whole working process will last 40 minutes. After 40 minutes the unit will be automatically shut off and stop working. You can manually press the ON/OFF switch again to switch on the appliance.
Note: The appliance is designed with an Anti-drip function. You can temporarily remove the jug and pour out coffee during brewing cycle without coffee dripping from the appliance within 30 seconds.
CAUTION! When pouring coffee from the jug, pour it slowly. Do not incline the jug suddenly in a large tilting angle, in case the hot coffee flows out from the lid rim and hurt people. Do not put an empty jug back on the hot warming tray.
AUTOMATIC START FUNCTION
If you do not want the coffee maker to start operation immediately, for example now it is 5:10 pm, you hope that the coffee maker will automatically start at 8:15 in the evening, first follow steps 1 to 5 of above section, and then you can set the automatic start function as follows:
- Press PROG button one time, the word "CLOCK" is showed at the up-right corner of display.
- Press the HOUR and MIN button continuously to set the current time (real clock), that is 17:10 (see Fig. 1).
Note: the time cycle is 24 hours.
- Press PROG button again and the word TIMER shows on up-left corner of display.
- Set the delayed starting time by pressing HOUR and MIN button repetitively, that is 20:15 (see Fig. 2).
- Press the ON/OFF button twice, the indicator of AUTO will illuminate. The LCD will display the current clock. You may see the automatic start time by pressing PROG twice.
Note:
- You may cancel the automatic start function by pressing ON/OFF button once to stop machine, or pressing ON/OFF button twice to start brewing immediately.
- You can reset the present time and automatic start time by pressing the PROG button once or twice. Remember when there is a “CLOCK” displayed, you can modify the current time, and when “TIMER” is displayed, you can modify the automatic start time. If there is no word marking on top, the display shows the set current time. The coffee maker will adjust to the new time setting if you changed the time midway.
- When the time is due the indicator of AUTO will go out, while the indicator of RUN turn on and the unit starts brewing. When brewing is finished, the coffee maker will be automatically shut off after 40 minutes if it is not manually switched off.
MEMORY FUNCTION
If the power supply has been broken off during operation, the appliance will be continued previous operation automatically from the point when the disconnection occurred provided that the pause does not exceed 10 seconds, even without pressing any button. In the event the pause time exceeds 10 seconds, the display shows the default setting, and the appliance must be re-started.
DESCALING
- Regularly descale the coffee maker. The intervals of descaling depend on the water hardness and frequency of operation. In case of average water hardness we suggest descaling every 3 or 4 months. Please use a commercially available decalcification agent.
- Fill 400 ml of water into the reservoir and add the necessary amount of decalcification agent in accordance with the dosing instructions.
- Let the decalcification agent sink in the coffee maker for about one hour. Switch on the unit after one hour and let the water pass through. After that you should brew water twice and rinse all detachable components, in order to clean off any residue.
CLEANING AND MAINTENANCE
- Before cleaning remove the mains plug and let the device cool down.
- Never immerse the device in water. Please use a slightly damp cloth to clean the surfaces.
- Avoid using acrid or scrubbing cleaning agents.
- Keep the coffee maker in a dry place out of reach from children when cooled off and cleaned.
- Do not wrap the cord around the device.

Fig.1
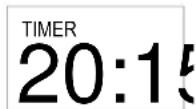
Fig.2
RECYCLING
This product bears the selective sorting symbol for waste electrical and electronic equipment (WEEE).
This means that this product must be handled pursuant to European Directive 2012/19/EU in order to be recycled or dismantled to minimize its impact on the environment.

For further information, please contact your local or regional authorities.
Electronic products not included in the selective sorting process are potentially dangerous for the environment and human heath due to the presence of hazardous substances.
QUALITY
Safety and quality is very important to HEMA. We have our own laboratory, which assesses all equipment in terms of electrical safety and ease of use, before it is included in our range. HEMA also monitors the product quality in collaboration with the manufacturer.
SECURITY
This HEMA item may be fitted with a plastic anti-theft strip. You will find the strip on the bottom of the product. This strip does not influence the quality or the operation of the product and can be removed without a problem.
FAULTS AND REPAIRS
If this device needs to be repaired, you can hand it in at a HEMA branch after packing the product securely. Do not try to repair this product yourself. For repairs that fall within the warranty period, you will need to show a proof of purchase and the warranty document. Regularly check the power cord for damage. If there is any damage to the cord set, please return the item to a HEMA branch for repair. Do not try to replace it yourself. For safety reasons we recommend that you do not carry out any repairs to an electrical device yourself.
WARRANTY
The warranty period is 2 years from the date of purchase.
WARRANTY CONDITIONS
HEMA quality guarantee
HEMA guarantees that the product you have purchased meets the standards our customers are entitled to expect in terms of quality and product properties. These warranty conditions do not affect your statutory or consumer rights and apply in all countries where there are HEMA branches.
Warranty claims
If you wish to make a warranty claim, please return the product with proof of purchase to one of our stores. The store will determine whether to replace the product (with an identical or equivalent product), accept the product for repair within a reasonable period of time or refund the price of the product.
Invalidation of warranty
The warranty on this article is invalidated if the fault or defect is caused by:
a) normal wear and tear
b) external damage (for example, damage caused by exposure to sand or moisture or due to falling of the product, etc.)
c) improper or inappropriate use
d) overdue or incorrect maintenance, including repairs that were not authorised by HEMA
The above list does not exclude other possible reasons for defects not being covered by the warranty.
Added confidence when choosing a HEMA product
You may swap or return the product within 30 days after purchase (provided it is undamaged and you have proof of purchase).
1 November 2019
HEMA BV
PO Box 37110
1030 AC Amsterdam
The Netherlands
These warranty conditions apply without prejudice to the customer's statutory rights or any other claims by the customer.
text_image
Labeled diagram of a coffee maker with numbered parts for identificationBEDIENFELD

text_image
AUTO PROG HOUR MIN RUN ON/OFFBEDIENUNG
text_image
AUTO PROG HOUR MIN RUN ON/OFF