PM129032.2 - Coffee machine Emerio - Free user manual and instructions
Find the device manual for free PM129032.2 Emerio in PDF.
User questions about PM129032.2 Emerio
0 question about this device. Answer the ones you know or ask your own.
Ask a new question about this device
Download the instructions for your Coffee machine in PDF format for free! Find your manual PM129032.2 - Emerio and take your electronic device back in hand. On this page are published all the documents necessary for the use of your device. PM129032.2 by Emerio.
USER MANUAL PM129032.2 Emerio
Before use make sure to read all of the below instructions in order to avoid injury or damage, and to get the best results from the appliance. Make sure to keep this manual in a safe place. If you give or transfer this appliance to someone else make sure to also include this manual.
In case of damage caused by user failing to follow the instructions in this manual the warranty will be void. The manufacturer/importer accepts no liability for damages caused by failure to follow the manual, a negligent use or use not in accordance with the requirements of this manual.
- This appliance can be used by children aged from 8 years and above and persons with reduced physical, sensory or mental capabilities or lack of experience and knowledge if they have been given supervision or instruction concerning use of the appliance in a safe way and understand the hazards involved.
- Children shall not play with the appliance.
- Cleaning and user maintenance shall not be made by children unless they are older than 8 years and supervised.
- Keep the appliance and its cord out of reach of children less than 8 years.
- If the supply cord is damaged, it must be replaced by the manufacturer, its service agent or similarly qualified persons in order to avoid a hazard.
- Regarding the instructions for cleaning the surfaces which come in contact with food or oil, please refer to the paragraph "CLEANING AND MAINTENANCE" of the manual.
- This appliance is not intended to be operated by means of an external timer or separate remote-control system.
- Before inserting the plug into the mains socket, please check that the voltage and frequency comply with the specifications on the rating label.
-
Always plug the appliance into an earthed plug socket.
-
If an extension cord is used it must be suited to the power consumption of the appliance, otherwise overheating of the extension cord and/or plug may occur. There is a potential risk of injuries from tripping over the extension cord. Be careful to avoid dangerous situations.
- Disconnect the mains plug from the socket when the appliance is not in use and before cleaning. Allow to cool before putting away.
- Ensure that the mains cable is not hung over sharp edges and keep it away from hot objects and open flames.
- Do not immerse the appliance or the mains plug in water or other liquids. There is danger to life due to electric shock!
- To remove the plug from the plug socket, pull the plug. Do not pull the power cord.
- Do not touch the appliance if it falls into water. Remove the plug from its socket, turn off the appliance and send it to an authorized service center for repair.
- Do not plug or unplug the appliance from the electrical outlet with a wet hand.
- Never attempt to open the housing of the appliance, or to repair the appliance yourself. This could cause electric shock.
- Never leave the appliance unattended during use.
- This appliance is not designed for commercial use.
- Do not use the appliance for other than intended use.
- Do not wind the cord around the appliance and do not bend it.
- Place the appliance on a stable, level surface from which it cannot fall off.
- The use of accessory attachment not recommended by the appliance manufacturer may cause injuries.

- Caution, hot surface.
WARNING!! Please do not touch surface while in use. The temperature of accessible surfaces may be high when the appliance is operating.
- Do not touch hot surfaces. The knobs and handles will become hot while the appliance is being heated. Please use oven mitts or gloves when opening the lid of the appliance.
- Extreme caution is needed when opening the appliance as built-up steam may be quickly released. Gloves or oven mitts are recommended when opening the appliance to ensure safety.
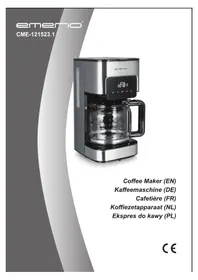
PARTS DESCRIPTION
- Temperature control knob
- Indicator light
- Timer knob
- Lid
- Handle
- Heating element
- Baking stone
- Spatulas
BEFORE USE
- Before cooking, let your appliance run for 10 minutes with the lid closed on temperature setting 4 to warm up the baking stone to approximately 320^ . In this way all the residues of the lubricants of the heating elements are eliminated.
- Never use cooking oil or water directly on the baking stone when cooking or cleaning. Place the uncooked food (pizza) directly on the stone surface for cooking.
- Do not worry about small scratches or that your stone surface has turned a darker colour. This does not affect the good performance of your baking stone. Remember never use a knife on the baking stone as this could damage the fine-grained cooking surface.
- The appliance is designed to make delicious pizzas from fresh doughs and frozen pizza bases. When using a frozen pizza base, allow the base to thaw before placing it into the appliance. This will result in a crispy cooked pizza. When cooking a fresh dough, lightly flour the baking stone before placing the dough directly onto it. If your dough is sticky, add more flour to your baking stone.
- Extreme caution is needed when opening the appliance as built-up steam may be quickly released. Gloves are recommended when opening the appliance to ensure safety.
- Tear the plastic film of the spatulas before use.
USE
- Make sure the temperature control knob is set to position "0" and have a quick check that nothing is inside your appliance other than the baking stone. Close the lid of your appliance.
- Plug in the appliance. Turn the temperature control knob to position "4". The indicator light illuminates and your appliance starts preheating. Turn the timer knob to position "10" (10 minutes). Wait until the bell rings; your appliance is now ready for use.
Note: By preheating your appliance before using, you will achieve better baking results.
- Place your pizza dough onto the spatulas and then add your favorite toppings. Important: Never over fill or mount your topping too high on your pizza. The topping should always be below the height of the top heating element to avoid burning.
- Slide your pizza onto the baking stone by the spatulas.
Warning: The baking stone and its handles will be extremely hot. Do not touch at any time until cooled down.
- Close the lid of your appliance. Turn the temperature control knob to position "5" and allow your pizza to bake for 4-5 minutes. Adjust the baking time according to the dough thickness, toppings and your taste.
Note: It is recommended to check the progress in approximately 3 minutes. Do not open the lid to check the pizza repeatedly, or the water inside will be evaporated. If your pizza is thin, turn the temperature control knob to a lower setting to reduce the cooking temperature. To raise the cooking temperature, turn the knob to a higher setting.
- If you wish to cook more pizzas (one after another), repeat above process without preheating. Take steps 3-5 for reference.
If the temperature of your appliance becomes too high, leave the lid open for a few minutes after finished one pizza and set the temperature setting back to position "4". Turn the setting to position "5" when you slide another pizza onto the baking stone for cooking again.
RECIPES
Basic pizza dough
Ingredients (Makes 1 Pizza)
- 0.25 ounce sachet dry yeast
- 1 teaspoon caster sugar
- 1/2 teaspoon salt
- 2 cups of plain flour
- 2 tablespoons olive oil
Method
- Combine 3/4 cup warm water, yeast, sugar and salt in a jug. Whisk with a fork to dissolve. Cover with plastic wrap. Set aside in a warm place for 5 minutes or until bubbles appear on the surface.
- Sift flour into a bowl. Add yeast mixture and oil. Mix to form a soft dough and have it lightly floured. Knead for 10 minutes or until elastic. Place in a lightly greased bowl. Cover with plastic wrap. Stand in a warm place for 25 to 30 minutes or until the dough has doubled in size.
- Use your fist to punch the dough down. Knead on a lightly floured surface until smooth.
Hot Salami and Basil Pizza
Ingredients
- Hot Salami slices, Sopressa of Calabrese
- Tomato paste
- Roasted red peppers
- Goats cheese
- Basil leaves
Method
- Roll out your fresh dough.
- Top with tomato paste.
- Arrange the salami and peppers.
- Crumble on the goats cheese and top with basil leaves.
- Place your pizza into the appliance. Turn the temperature control knob to position "5" and cook for around 3-4 minutes.
Seafood Pizza
Ingredients
- 4 Oz mozzarella cheese
- 4 Oz seafood mix
- Garlic oil
- Cracked pepper
Method
- You can purchase a seafood mix from the fishmonger or local fish shop. If the mix has mussels, remove these from the shells.
- Place some shredded mozzarella onto the bottom of your prepared pizza base, then arrange the seafood mix on top, some garlic oil and cracked pepper. Make sure that you don't overfill your pizza with ingredients as seafood gives off a lot of water.
- Place your pizza into the appliance. Turn the temperature control knob to position "5" and cook for around 3-4 minutes.
- Once the pizza is cooked you can add some chopped thyme.
Mediterranean Lamb Pizza
Ingredients (Makes 4 small pizzas)
- 4 small pizza bases
- 1 lamb fillet (approx. 150g )
- 1 large zucchini peeled into thick ribbons
- 8 cherry tomatoes, halved
- Jar green pesto
- 75g pizza cheese
- 80g of ricotta
- Fresh basil to garnish
Method
- Heat a frying pan on high and add in a little olive oil. Season the lamb and add it to the pan, cooking for 2-3 minutes each side. Set aside on a tin foil to rest for 3 minutes. Thinly slice across the grain.
- Add zucchini to the frying pan for 3-4 minutes until tender. Place in a bowl.
- Spread the pizza base with pesto, sprinkle with cheese and top with zucchini, tomato, lamb and ricotta.
- Bake two at a time in your appliance on setting 3 for approx. 3 minutes.
- Garnish with basil leaves.
Classic Margherita
Ingredients (Makes 2 pizzas)
- Basic pizza dough
- Basic no cook pizza sauce
- 8 cherry tomatoes, halved
- 4 pieces of bocconcini 1cm slice
- 2 tbsp of freshly grated parmesan
- Virgin olive oil to drizzle
- Handful of fresh basil leaves to garnish
Method
- Roll out your fresh dough. Top with pizza sauce leaving a 2cm border. Add bocconcini, scatter with parmesan and cherry tomatoes (cut-side up) and drizzle with olive oil.
- Place your pizza into the appliance. Turn the temperature control knob to position "5" and cook for around 3-4 minutes until cheese has melted.
- Garnish with basil leaves and add a little more olive oil if desired.
Easy Cheesy Chorizo and Olive Pizza
Ingredients (Makes 2 pizzas)
- 2 store bought pizza bases
- Basic no cook pizza sauce
- 1 garlic clove crushed and chopped
- 6 tbsp mozzarella cheese, grated
- 1 Chorizo sausage, sliced
- Fetta cheese, crumbled
- Black olives, pitted
- Fresh oregano leaves to garnish
Method
- Top base with pizza sauce and crushed garlic. Sprinkle with mozzarella and top with chorizo slices. Add olives and fetta.
- Place your pizza into the appliance. Turn the temperature control knob to position "5" and cook for around 3-4 minutes until cheese has melted.
- Garnish with oregano leaves and enjoy.
Camembert and Smoked Salmon Delight
Ingredients (Makes 2 pizzas)
- Basic pizza dough
- Basic no cook pizza sauce
- 4 tbsp mozzarella cheese, grated
-
Camembert cheese wheel, sliced
-
1 tbsp capers
- 250g smoked salmon slices (or smoked trout)
- Black pepper, ground
- Fresh chives to sprinkle
- Lemon wedges to serve
Method
- Roll out your fresh dough. Top with a small amount of pizza sauce, sprinkle with mozzarella. Top with camembert slices and a grind of fresh black pepper.
- Place your pizza into the appliance. Turn the temperature control knob to position "5" and cook for around 3-4 minutes until cheese has softened.
- Remove from the appliance and top with salmon slices, capers, chives and a squeeze of lemon juice.
CLEANING AND MAINTENANCE
- After each use, unplug your appliance and let it cool. Be careful not to touch or try to clean your appliance until all parts have cooled down to room temperature.
- To clean the outside of the appliance only use a damp cloth. Never dip or immerse your appliance into water or any other liquids. This could cause an electrical shock and/or damage to your appliance.
- To clean the baking stone, never use cooking oil, water or any detergents. Scrape off any excess food with a spatula or a stiff bristled brush and wipe clean with a paper towel or a clean dishcloth.
- To clean the spatulas, wash them in warm water and mild dish washing liquid. Never allow them to stand in water as water saturation will damage the spatulas.
- Never use the baking stone for any other purpose than intended use. Never put liquids on the baking stone, whether it is hot or cold.
- Do not put any part in a dishwasher for cleaning.
TROUBLE SHOOTING GUIDE
| Problem | Cause | Solution |
| The indicator light goes on and off. | This is an automatic thermostat light. | The light will stay on until the appliance has reached the desired temperature setting. |
| Top of the pizza burns. | Temperature of the appliance is too high. | Check the pizza. If the top is cooking quicker than the bottom, turn the temperature setting back to position “4”, leaving the pizza to continue cooking without the thermostat light on. Alternatively, leave the lid open for a couple of minutes so you can watch the pizza finish cooking. |
| Bottom of the pizza burns. | Temperature of the appliance is too high. | When cooking the first pizza, make sure the appliance is preheating on temperature setting 4. No need to wait for 10 minutes, just until the indicator light goes out and then allow a couple of minutes for the baking stone to rest before adding the pizza. When cooking more pizzas one after another, leave the lid open for a few minutes after finished one pizza and set the temperature setting back to position “4”. Turn the setting to position “5” when you slide another pizza onto the baking stone for cooking again. |
| Dirty baking stone. | Moisture on the surface of the baking stone. | Don’t worry if stone marks. The greater the marks, the better the flavor it gives to the pizza. Just scrape off any excess material with a metal spatula. |
TECHNICAL DATA
Operating voltage: 220 - 240V 50 - 60Hz
Power: 1200W
GUARANTEE AND CUSTOMER SERVICE
Before delivery our devices are subjected to rigorous quality control. If, despite all care, damage has occurred during production or transportation, please return the device to your dealer. In addition to statutory legal rights, the purchaser has an option to claim under the terms of the following guarantee:
For the purchased device we provide 2 years guarantee, commencing from the day of sale. If you have a defective product, you can directly go back to the point of purchase.
Defects which arise due to improper handling of the device and malfunctions due to interventions and repairs by third parties or the fitting of non-original parts are not covered by this guarantee. Always keep your receipt, without the receipt you can't claim any form of warranty. Damage caused by not following the instruction manual, will lead to a void of warranty, if this results in consequential damages then we will not be liable. Neither can we hold responsible for material damage or personal injury caused by improper use if the instruction manual is not properly executed. Damage to accessories does not mean free replacement of the whole appliance. In such case please contact our service department. Broken glass or breakage of plastic parts is always subject to a charge. Defects to consumables or parts subjected to wearing, as well as cleaning, maintenance or the replacement of said parts are not covered by the warranty and are to be paid.
ENVIRONMENT FRIENDLY DISPOSAL

Recycling - European Directive 2012/19/EU
This marking indicates that this product should not be disposed with other household wastes. To prevent possible harm to the environment or human health from uncontrolled waste disposal, recycle it responsibly to promote the sustainable reuse of material resources. To return your used device, please
use the return and collection systems or contact the retailer where the product was purchased. They can take this product for environmental safe recycling.
Emerio B.V.
Oudeweg 115
2031 CC Haarlem
The Netherlands
Customer service:
T: +31 (0) 23 3034369
www.emerio.eu/service
Kundeninformation:
T: +49 (0) 3222 1097 600
www.emerio.eu/service
Klantenservice:
T: +31 (0) 23 3034369
www.emerio.eu/service
SICHERHEITSHINWEISE
- Attention, surface chaude.
Ingredienser (for 1 pizza)
PROBLEEMOPISSINGSGIDS