CATRIPLEDOCKVGAPD - Dongle i-TEC - Free user manual and instructions
Find the device manual for free CATRIPLEDOCKVGAPD i-TEC in PDF.

User questions about CATRIPLEDOCKVGAPD i-TEC
0 question about this device. Answer the ones you know or ask your own.
Ask a new question about this device
Download the instructions for your Dongle in PDF format for free! Find your manual CATRIPLEDOCKVGAPD - i-TEC and take your electronic device back in hand. On this page are published all the documents necessary for the use of your device. CATRIPLEDOCKVGAPD by i-TEC.
USER MANUAL CATRIPLEDOCKVGAPD i-TEC
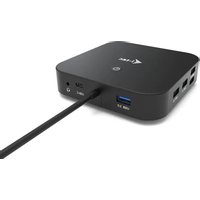
USB 3.0 USB-C/TB3, 3x 4K Docking Station + VESA + Power Delivery 70W
natural_image
Black rectangular electronic device with multiple ports and connectors (no visible text or symbols)User guide • Gebrauchsanweisung • Mode d'emploi Manual de instrucciones • Manuale • Uživatelská príručka Instrukcje obsługi • Užívatel'ská príručka • Vartotojo vadovas Handleiding
P/N: CATRIPLEDOCKPDPRO
EN Please read the entire instruction manual carefully. available on our website www.i-tec.pro in the tab „Manuals, drivers“. In case of any issues, please contact our technical support at: support@itecproduct.com
USB 3.0 USB-C/TB3, 3x 4K Docking Station + VESA + Power Delivery 70W
ENGLISH....05-19
DEUTSCH....20-35
FRANÇAIS....36-51
ESPAÑOL....52-67
ITALIANO....68-83
ČESKY....84–98
POLSKI....99-113
SLOVENSKY....114-128
LIETUVOS....129-143
NEDERLANDS....144–159
WEEE....160-161
Declaration of Conformity.... 162–163
FCC....164

GLOSSARY
- Interface / port / connector / input / slot – a place where two devices physically interconnect.
- Controller – a semi-conductor component (so-called chipset) in a laptop, tablet, PC etc. ensuring the operation of a port.
- USB-C / USB-type C – It enables faster charging, power supply, dual-role (not only host, but also guest), support for alternative modes - Alt Mode (DisplayPort, MHL, Thunderbolt 3, Power Delivery) and error notification via Billboard device.
- USB 3.1 / 3.0 / 2.0 – standard for USB interface/port for connecting various USB devices. Various USB devices can be connected to the docking station or adapter using the USB Type-A interface.
- HDMI/Display Port – A standard for a digital graphics interface/port used to connect monitors and other graphic display devices.
• LAN (Local Area Network) – local area network, now the most common is the so-called Ethernet, which for the docking station reaches theoretical transfer speeds of up to 1 Gbit/s - designation GLAN / RJ-45. - Audio – designation for an audio input (microphone) or output device (headphones/speakers).
SPECIFICATION AND DESCRIPTION
- 1x USB-C port for connection to USB-C or USB-A devices (USB-C cable and USB-C to USB 3.0 adapter included)
- Docking station technology: DisplayLink + USBC DP Alt mode + USB-C PD
• Power Delivery: 70 W
• Video Ports: 2x DisplayPort
3x
HDMI
- Resolution:
1 monitor - 1x Display Port → up to 4K/60Hz
1 monitor - 1x HDMI 1/2→ up to 4K/60Hz
1 monitor - 1x HDMI 3 → up to 4K/30Hz
1 monitor - 2x Display Port → up to 5K/60Hz
2 monitors - 2x Display Port + 1x HDMI 3 → up to 5K/60Hz * and 4K/30Hz
2 monitors - 1x Display Port/HDMI 1/2 + 1x Display Port/HDMI 1/2
→ up to 2x 4K/60Hz
2 monitors - 1x Display Port/HDMI 1/2+ 1x HDMI 3 → up to 4K/60Hz and 4K/30Hz
3 monitors - 1x Display Port/HDMI 1/2+ 1x Display Port/HDMI 1/2
+ 1x HDMI 3 → up to 2x 4K/60Hz + 4K/30Hz
• 1x USB-C port gen. 1 (data only)
- 1x USB-C port gen. 2 (data only) with Fast Charge support (BC 1.2)
- 1x USB 3.1 port gen. 2 with Fast Charge support (BC 1.2)
EN
USB 3.0 USB-C/TB3, 3x 4K Docking Station+ VESA+PD 70W
- 2x USB 3.0 port
• 1x Ethernet GLAN RJ-45 port (DisplayLink DL-6950)
• 1x 3.5mm Combo Audio port
• 1x power input (DC 24V/4A) - ON/OFF switch to turn the docking station on and off
• LED indication
• Support for Kensington lock
• Support for VESA mounting - USB-C cable (100cm)
- OS: Windows 7/8/8.1/10, macOS, Linux Ubuntu 14.04 or later, Android 5 or later, Chrome OS R51 or later
• Product Dimensions: 191 x 85 x 31 mm
• Product weight: 341 g
* 5K resolution only supports Windows
External power supply exclusively for use with CATRIPLEDOCKPDPRO.
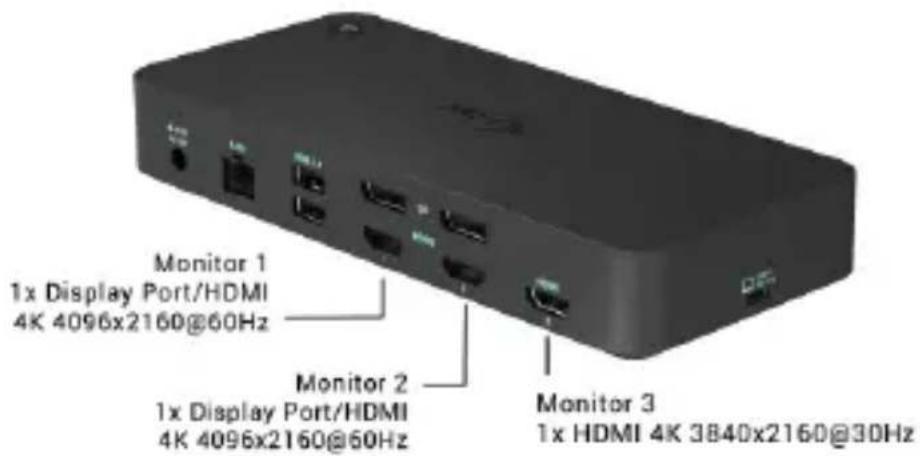
DESCRIPTION
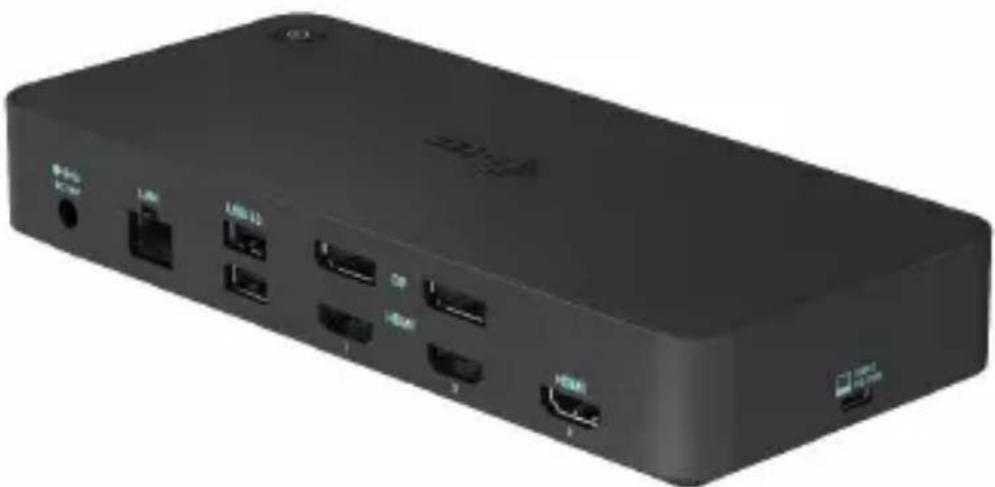
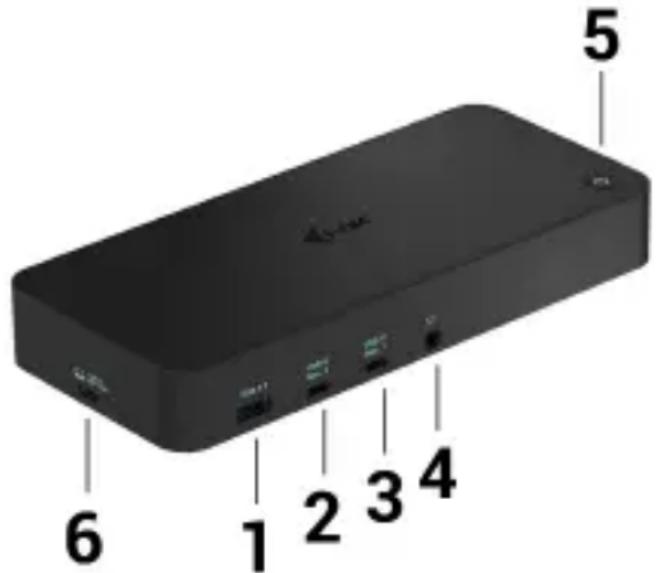
Front panel:
- USB 3.1 port gen. 2 to connect your existing USB 3.1/3.0/2.0 devices and transfer data (10 Gbps), support USB Hot Swapping and BC 1.2 fast charging
- USB-C 3.1 port gen. 2 to connect your existing USB 3.1/3.0/2.0 devices and transfer data (10 Gbps), support USB Hot Swapping and BC 1.2 fast charging
- USB-C 3.1 port gen. 1 for connecting your USB-C devices, is for data transfer only (5 Gbps)
- 3.5mm Audio combo connector
- On/Off switch to turn the dock on and off
- USB-C port for connecting the dock to a laptop with USB-C or USB-A interface (USB-C/F to USB-A/M adapter included for connection to USB-A port). When connected to your laptop's USB-C or Thunderbolt 3 port, the dock also supports Power Delivery for charging your laptop - 70W
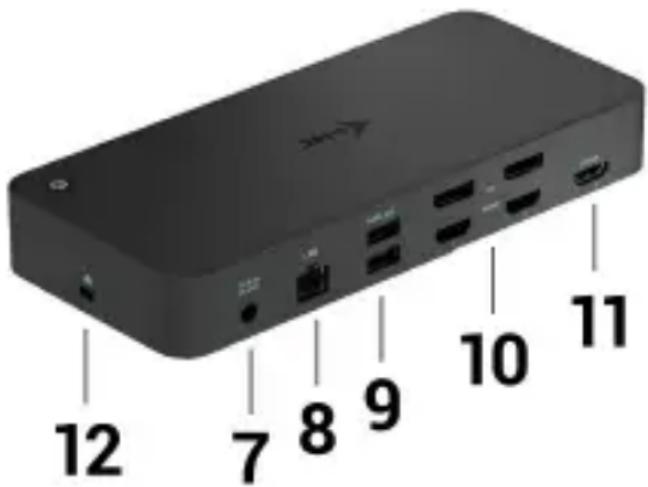
Back panel:
- Power input - external power adapter (output: DC 24V/4A)
- Ethernet GLAN RJ-45 port for high-speed network and internet access via Gigabit Ethernet, supports 10/100/1000 Mbps speeds
- USB-C 3.0 port for connecting your USB-C devices, it is for data transfer only (5 Gbps)
- 2x HDMI and 2x Display Port
- 1x HDMI
- Kensington Lock
SYSTEM REQUIREMENTS
Hardware requirements:
Device with a free USB-A, USB-C or Thunderbolt3 port
Power Delivery requirements: Device with a free USB-C or Thunderbolt 3 port with "Power Delivery" support.
HDMI 3 output requirements: Device with a free USB-C port with "DisplayPo Alternate Mode" support or a Thunderbolt 3 port.
Operating System: Windows 7/8/8.1/10, macOS, Linux Ubuntu 14.04 or later, Android 5 or later, Chrome OS R51 or later
For common multi-monitor work
- Processor: Intel Core i5 2+GHz / AMD Trinity or better
- RAM: 4GB
• GPU: Intel HD 4000, ATI Radeon HD7xxx, NVidia GeForce 5xxM or better - USB 3.0 / USB-C port
For video playback
- Processor: Intel Core i7 2+GHz / AMD Richland A10-575x / AMD Kaveri A10-7400P or better
- RAM: 8GB
• GPU: Intel HD 4000, ATI Radeon HD 8650, NVidia GeForce 7xxM or better - USB 3.0 / USB-C port
For less powerful laptops, it is true that they can handle 4K/5K video playback, but the result is not ideal (interrupting or stucking video).
DRIVER INSTALLATION IN WINDOWS 7 / 8 / 8.1 / 10 (32/64 BIT)
ATTENTION! Do not connect the docking station to your laptop / tablet until you have installed the appropriate drivers. Drivers must only be installed before first use. Before installation, make sure that your system has installed the latest drivers for your device and updated BIOS.
For Windows 7 / 8 / 8.1, download the drivers from our website www.i-tec.pro on the "Download" tab of this product. Run the installation from the downloaded file, select the installation language, and follow the instructions on the screen.
In Windows 10, the docking station can be connected directly, drivers are automatically installed from the system when connected to the Internet.
In Windows 7 / 8 / 8.1 / 10, install the drivers as the "Administrator" user. The screen may blink while the drivers are being installed, this is a standard process. Once the installation is complete, we recommend restarting the notebook / tablet.
In the environment with more than one laptops equipped with Windows 7, 8, 8.1 operating system, a single-shot corporative installation by the system administrator can be performed. For more information on a method of installation, please refer to the instructions below): http://www.displaylink.com/downloads/corporate
HARDWARE INSTALLATION (CONNECTING THE DOCKING STATION TO LAPTOP / TABLET)
- Turn on the laptop / tablet and connect the power adapter to the docking station.
- Connect the docking station power adapter to the AC 110 V / 230 V network and press the ON button.
- Connect the USB-C cable to the USB-C port on the back panel of the dock.
- Connect the other end to the free USB-C port of your laptop / tablet.
- Subsequently, the automatic installation of ports in each system starts.
- After the installation is complete, restart the laptop / tablet.
In Windows, the LAN port appears in Start → Control Panel (Show Small Icons) → Device Manager → Network Adapters as “USB Ethernet”. The docking station appears in Start → Control Panel (Show Small Icons) → Device Manager → Graphic Adapters as „USB-C Triple-4K Dock“. Audio ports can be found in Start → Control Panel (Show Small Icons) → Device Manager → Audio, Video and Game Controllers as “USB Audio”.
If any of these devices are marked with yellow ! or ?, then the docking station is not installed correctly. In this case, disconnect the docking station, uninstall
the existing drivers (see chapter "Uninstalling Drivers"), and reinstall the latest drivers available on our website www.i-tec.pro on the "Download" tab of this product. Then reconnect the docking station to the laptop / tablet. In case of problems, please contact our technical support: support@itecproduct.com.
DRIVER INSTALLATION IN MACOS X
ATTENTION! Do not connect the dock to your Mac until you install the appropriate drivers. Drivers must only be installed before first use. We recommend that you have the latest macOS operating system installed.
Download drivers from our website www.i-tec.pro on the "Download" tab of this product and run the installation:
Unpack the file on your MacBook desktop as a virtual disk, select "Drivers" and then "DisplayLink Software Installer". Then select the installation language and follow the on-screen instructions, enter the user password if necessary. The screen may blink while the drivers are being installed, this is a standard process. After the installation is complete, restart the MacBook.
HARDWARE INSTALLATION (CONNECTING THE DOCKING STATION TO MACBOOK)
- Turn on the MacBook and connect the power adapter to the docking station.
- Connect the docking station power adapter to the AC 110 V / 230 V network and press the ON button.
- Connect the USB-C cable to the USB-C port on the back panel of the docking station.
- Connect the other end to the free USB-C port of your MacBook.
- Subsequently, automatic port installations are started.
- After the installation is complete, restart the MacBook.
The installed ports are shown in macOS X as "USB-C Triple-4K Dock" in "About This Mac" → "System Profiler" → "Hardware" → "USB".
For Android, Chrome OS and Ubuntu, use the DisplayLink chipset drivers. These are available for download on our website www.i-tec.pro on the "Download" tab of this product or here: http://www.displaylink.com/downloads.
CONNECT THE HDMI / DISPLAY PORT MONITOR
Use an HDMI / DP cable to connect the monitor to the docking station. During the installation of an additional monitor, the laptop / tablet monitor may may blink, this is a normal state. The docking station offers a graphic interface: 2x Display Port and 1x HDMI (The HDMI port is only available if you connect the dock to your laptop's USB-C port). The dock supports:
EN
USB 3.0 USB-C/TB3, 3x 4K Docking Station+ VESA+PD 70W
a) Connecting up to three 4K monitors 3840x2160@30Hz and 2x Display Port/HDMI monitor 4K 4096x2160@60Hz)
b) Connect one 5K and one 4K monitor simultaneously (1x HDMI 4K 3840x2160@30Hz and 1x Display Port 5K 5120x2880@60Hz monitor). To achieve 5K resolution, you need to connect a DP monitor with two DP cables, (the graphics card in your computer may not support 5K resolution). 5K resolution is only supported by Windows

USING IN WINDOWS OS
In the hidden icons on the Start bar, click on the network connection icon:
Here you can choose:
a) DisplayLink Manager
b) Audio settings
c) Advanced Configuration
USB 3.0 USB-C/TB3, 3x 4K Docking Station+ VESA+PD 70W
EN

Options for controlling the monitor with attached docking station
Ad a) DisplayLink Manager – the software version is displayed after selecting.

Installed software version
Ad b) Audio settings – this will allow audio settings (settings similar to Control Panels → Audio). For use, select 2-channel headphones and a 3.5mm jack microphone. In audio devices, set "DisplayLink Audio" as input and output as the default device.
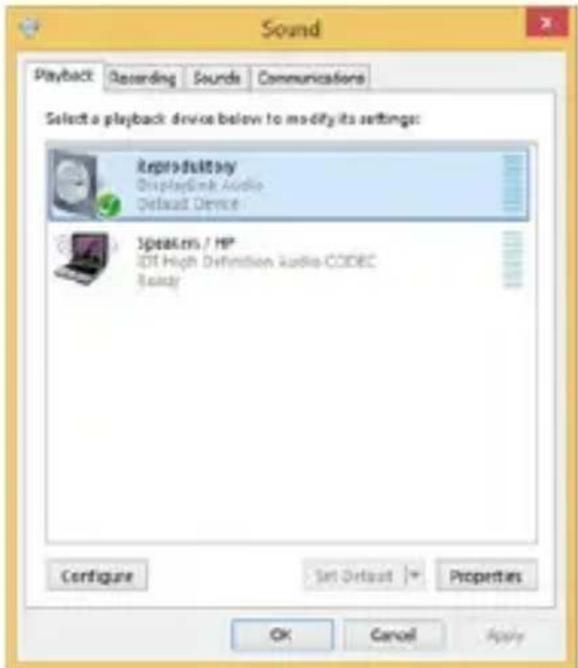
Audio settings
This can be used to set up Skype, for example.
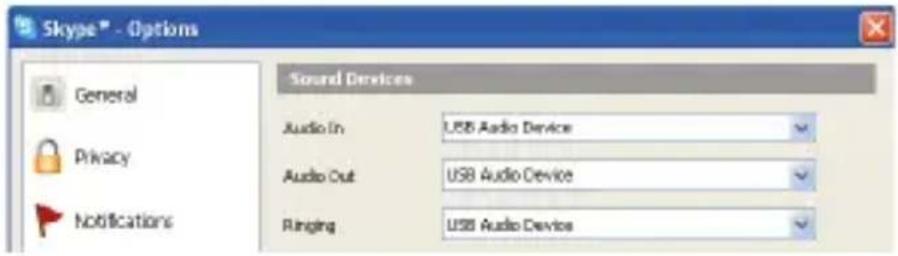
Audio settings for Skype
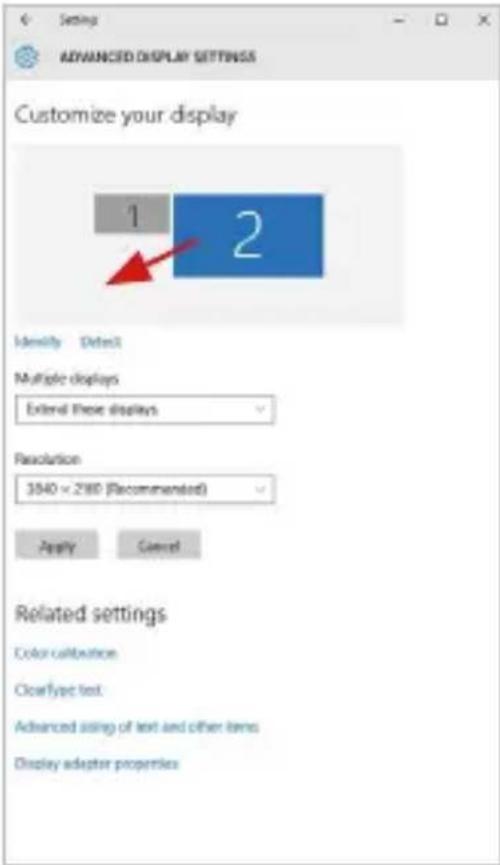
Ad c) Advanced configuration – clicks to display the Windows Display Resolution settings.
Display Resolution in Windows 10
Now you can set Extend and Mirror mode:
- Extend mode: on the monitor select the 2 Monitor, select Several monitors → Extend this display → OK.
- Mirror mode: on the monitor select Several monitors → Duplicate this display mode on two monitors of your choice → OK.
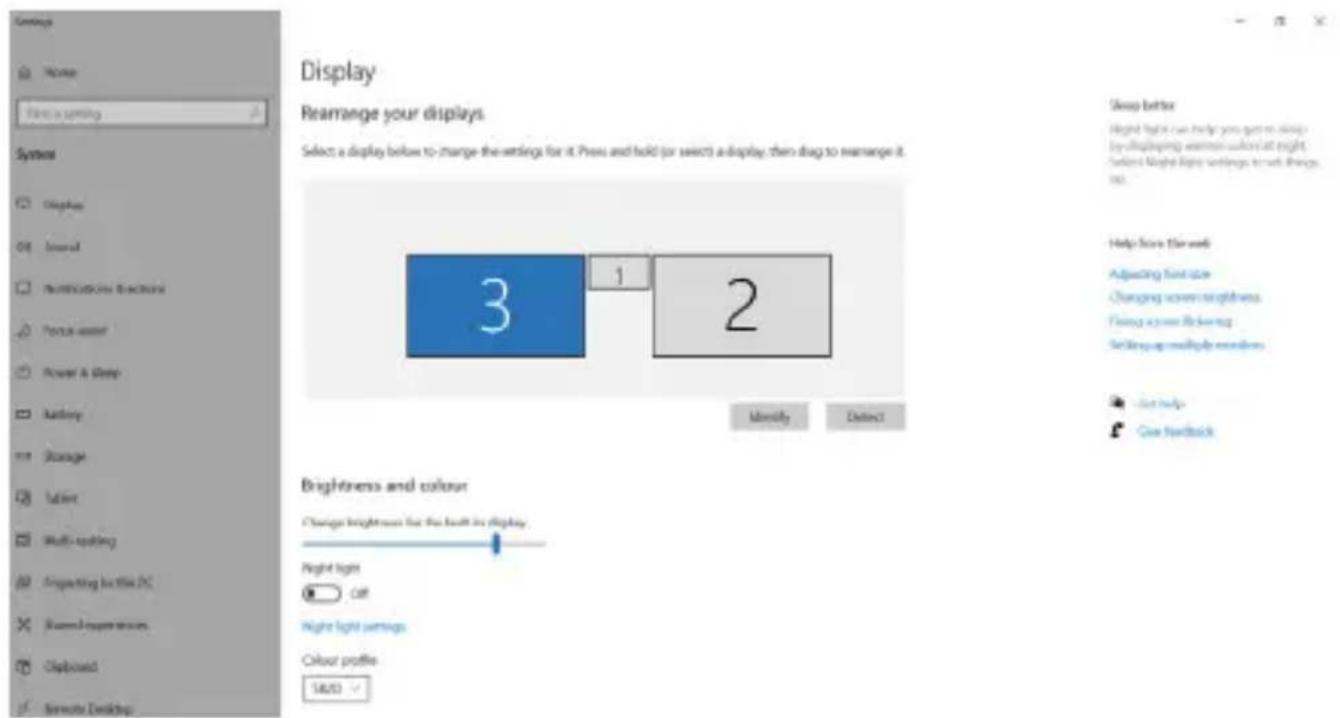
By selecting the "Set this monitor as primary" field, you select the additional monitor as the primary monitor. By clicking on the second monitor and moving it you can position this monitor as required relative to the original monitor of your laptop / tablet.
Placing one additional monitor to the original laptop / tablet monitor
The Standby / Hibernate mode and the Video port – after the activation of the laptop / tablet from the Standby / Hibernate mode the primary (original) monitor is displayed, for this reason we recommend using the monitor that is integrated with the laptop / tablet as the primary monitor, so that you can log on to the system again.
The Mirror mode – the additional monitor takes on the parameters of the original monitor in the system, i.e., if you select the Mirror mode and the original monitor resolution is e.g. 1280x1024 then the screen will be displayed on the additional monitor with a resolution of max. 1280x1024 (even if you set a higher resolution).
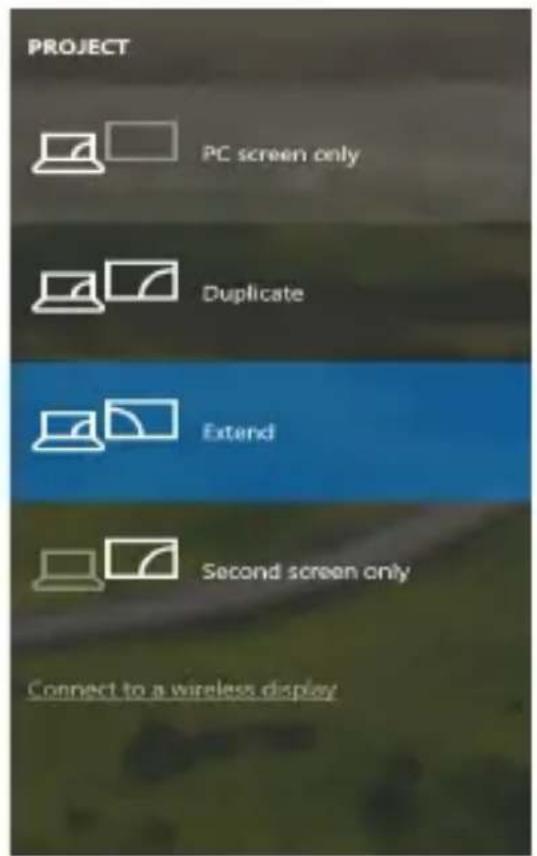
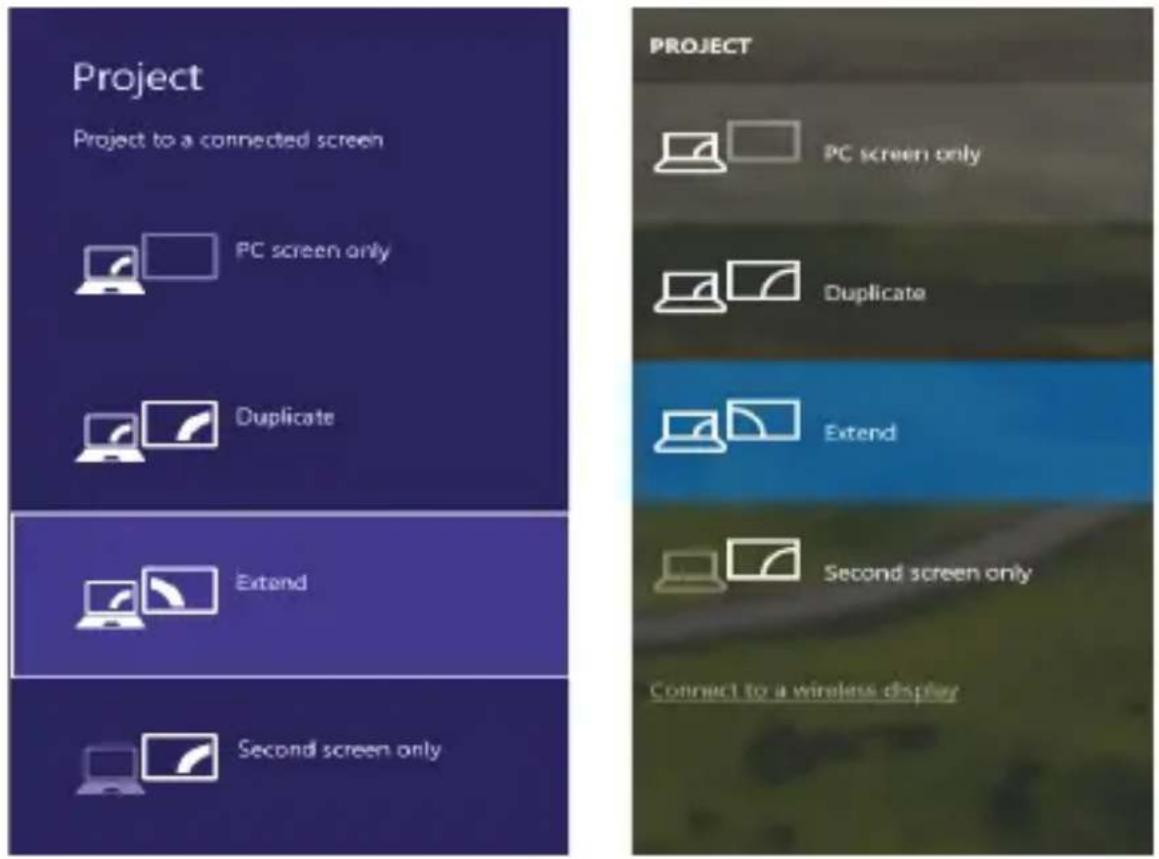
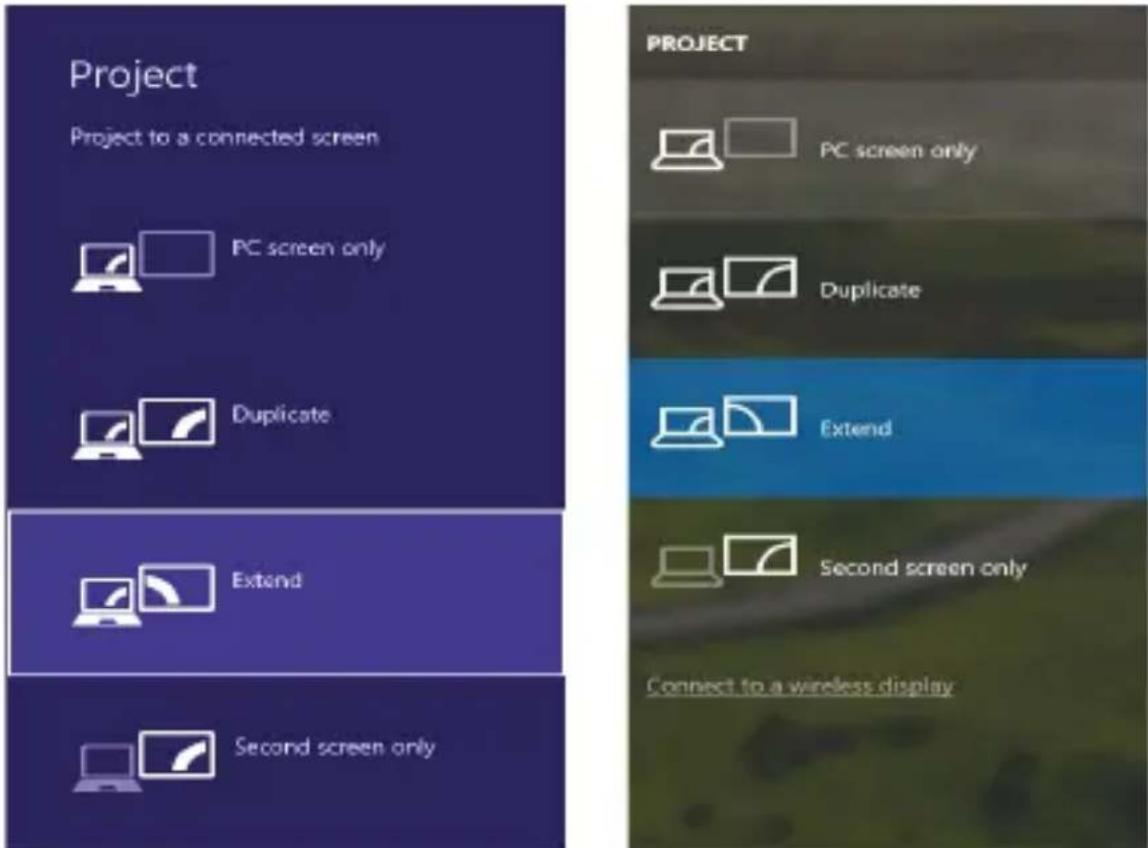
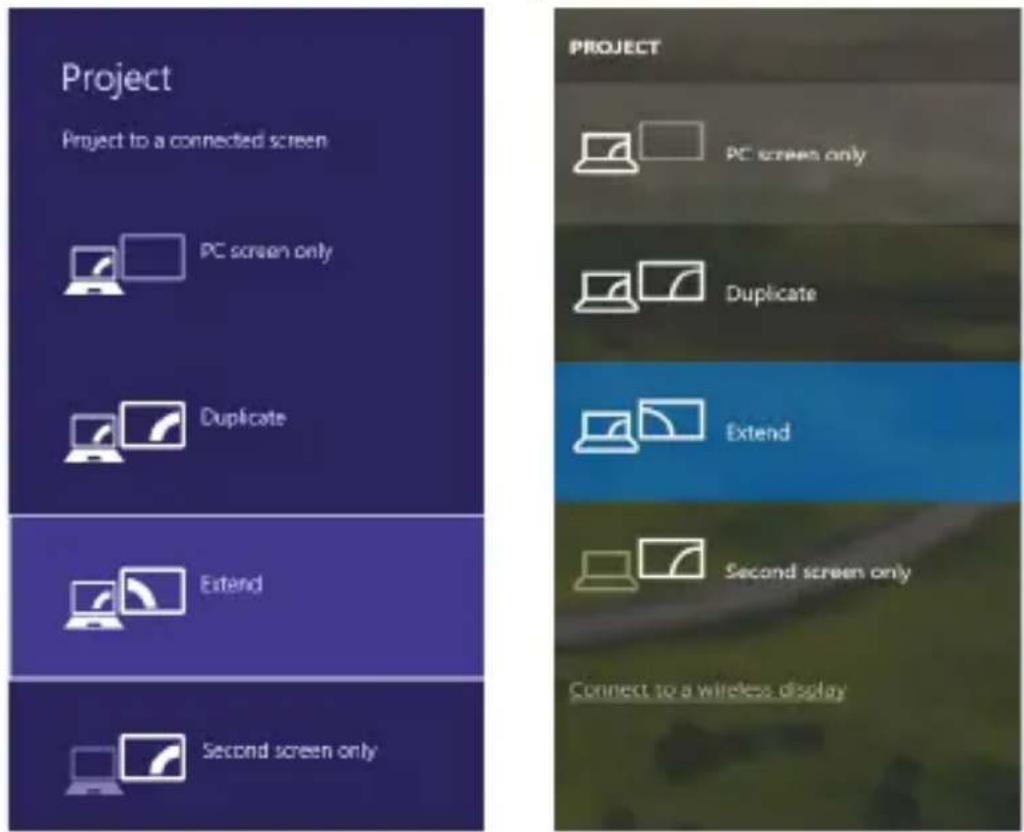
Pressing the keys „Windows“ + P you can also easily control the monitors (this keyboard shortcut works only from Windows 7 and higher). For using a monitor in Windows 7 you can select: Computer Only, Duplicate, Extend, and Projector Only. For using a monitor in Win 8 / 8.1 / 10 you can select: Computer screen only, Mirror, Extend, Second screen only.
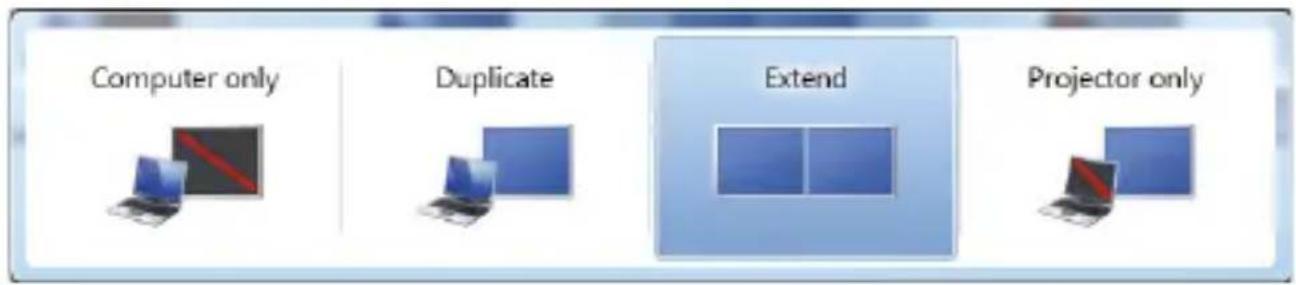
Control the monitor in Windows 7
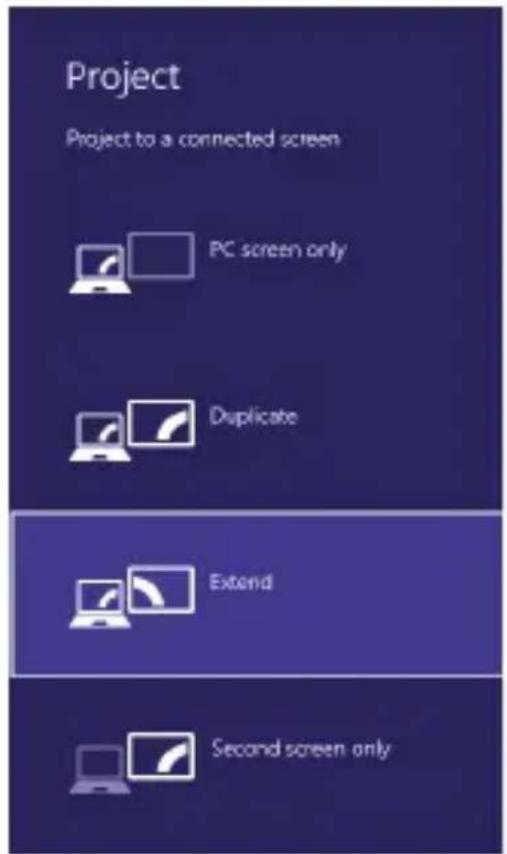
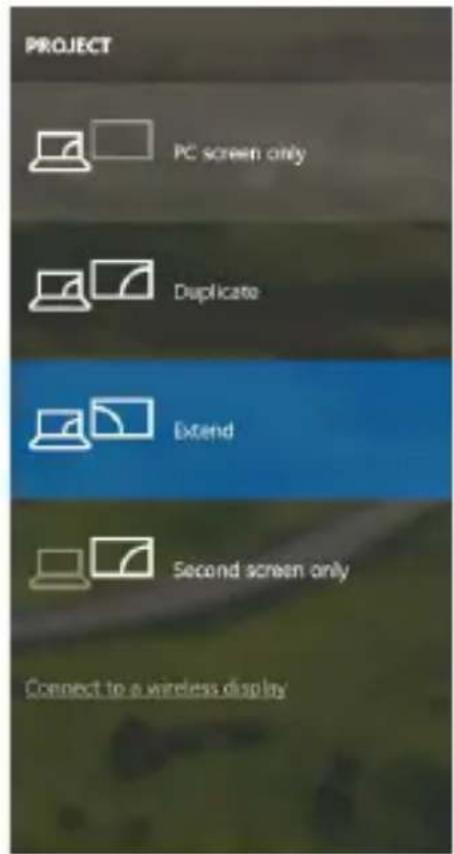
Control the monitor in Windows 8 / 8.1 and Windows 10
UNINSTALLING DRIVERS
Go to Control Panel → All Control Panel Items → Programs and Features → Remove: DisplayLink Core Software for Video drivers. During uninstalling, confirm your choices.
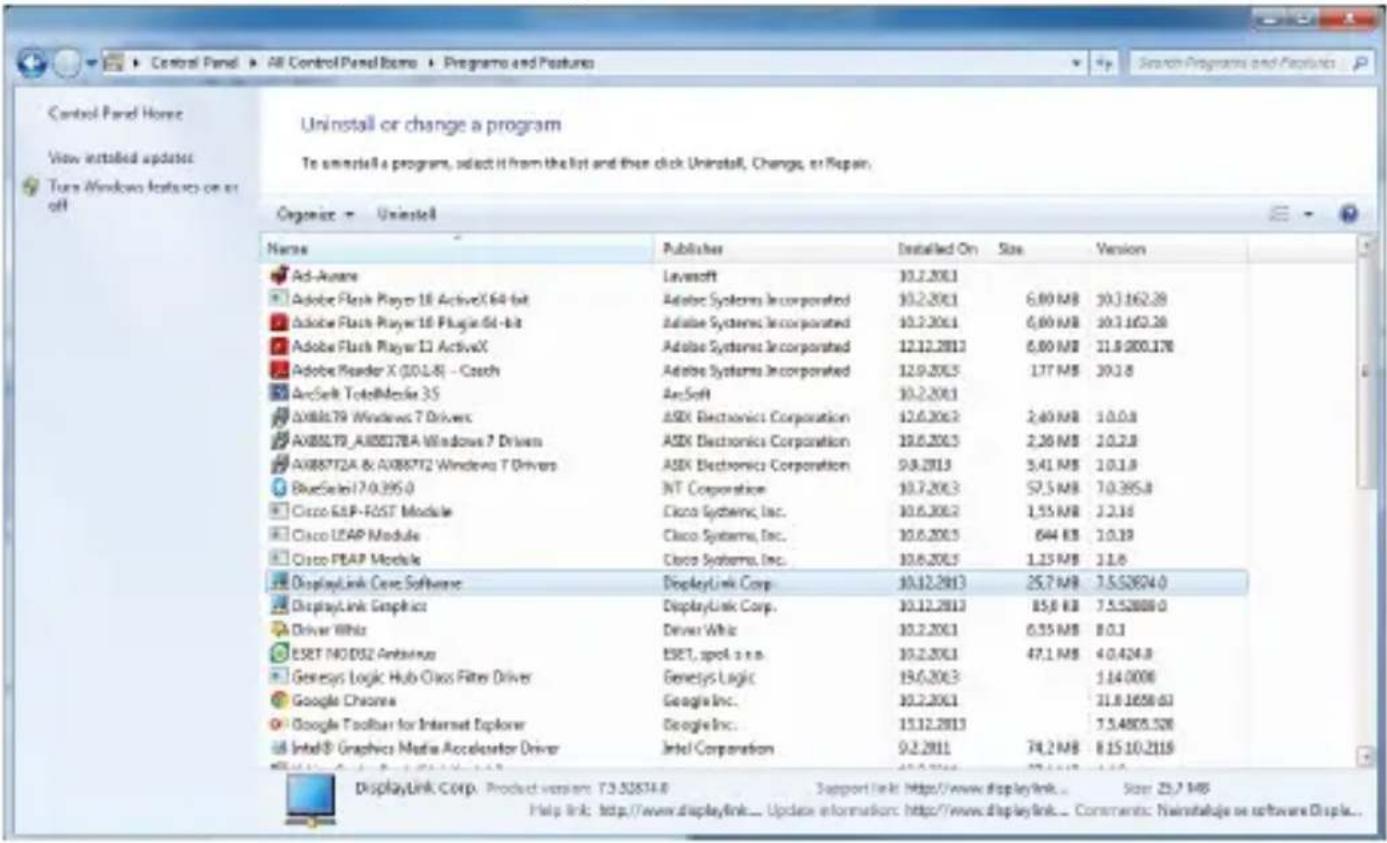
Uninstalling drivers
USING IN MACOS
After connecting the monitor, the screen on your Mac will glimmer, which is a standard condition, after stabilization it is possible to perform standard setting of the monitor here: System Preferences-Displays:
EN
USB 3.0 USB-C/TB3, 3x 4K Docking Station+ VESA+PD 70W
Click on Arrangement and in the default mode (Extended desktop) click on the new monitor and drag it as necessary vis-à-vis the Mac monitor. If you select Mirror displays the mode will change to Mirror (the resolution of the more will be automatically adjusted according to their parameters and the highest possible resolution will be set on both monitors). By displaying options you will return to the Extended desktop mode.
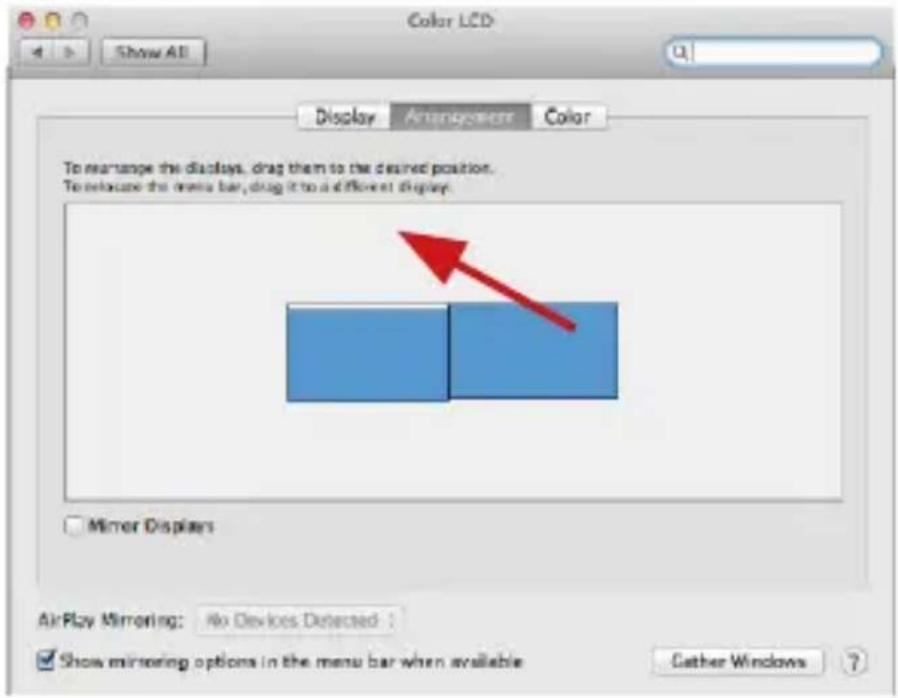
Extended mode: The arrow indicates the possible position of the connected monitor vis-à-vis the Mac monitor.

Extended mode: In this mode you can choose the Main monitor by dragging the Menu Bar.
USB 3.0 USB-C/TB3, 3x 4K Docking Station+ VESA+PD 70W
EN
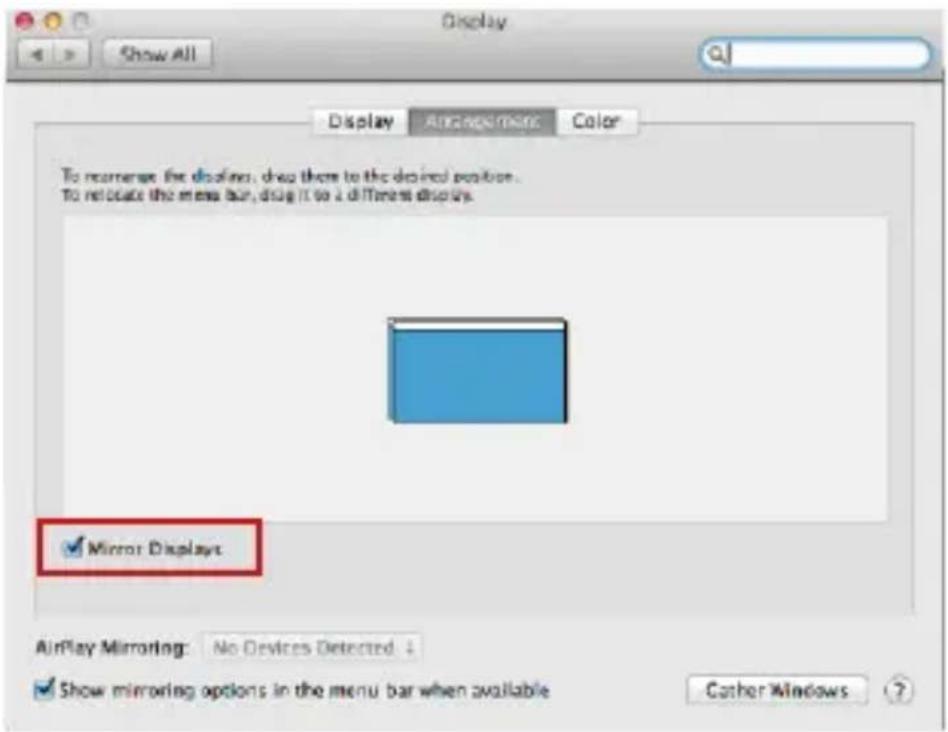
Mirror mode: This mode can only be used if supported by the Mac.
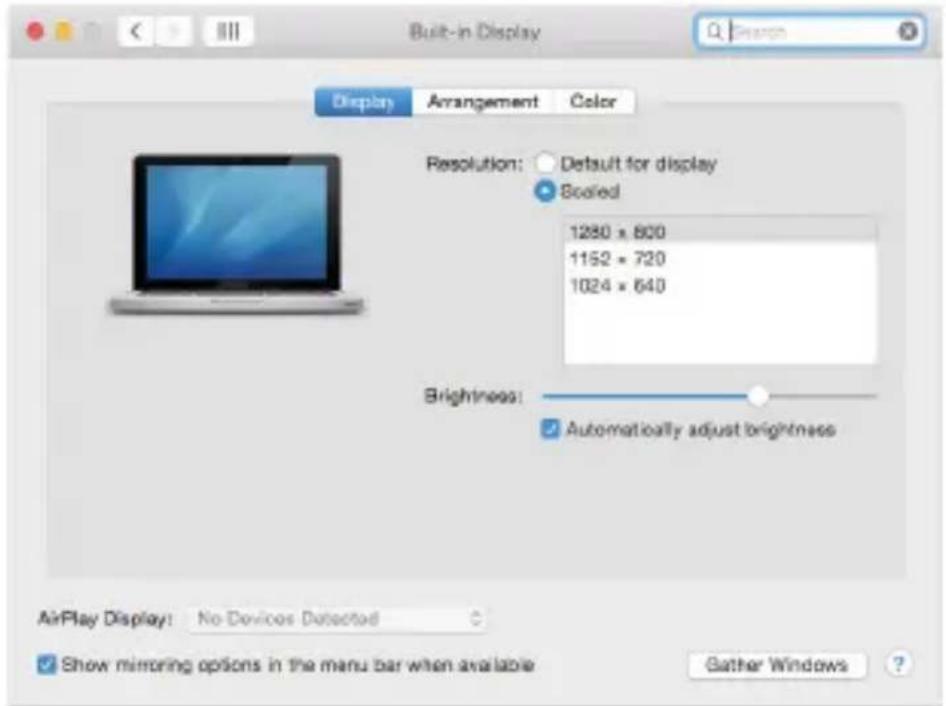
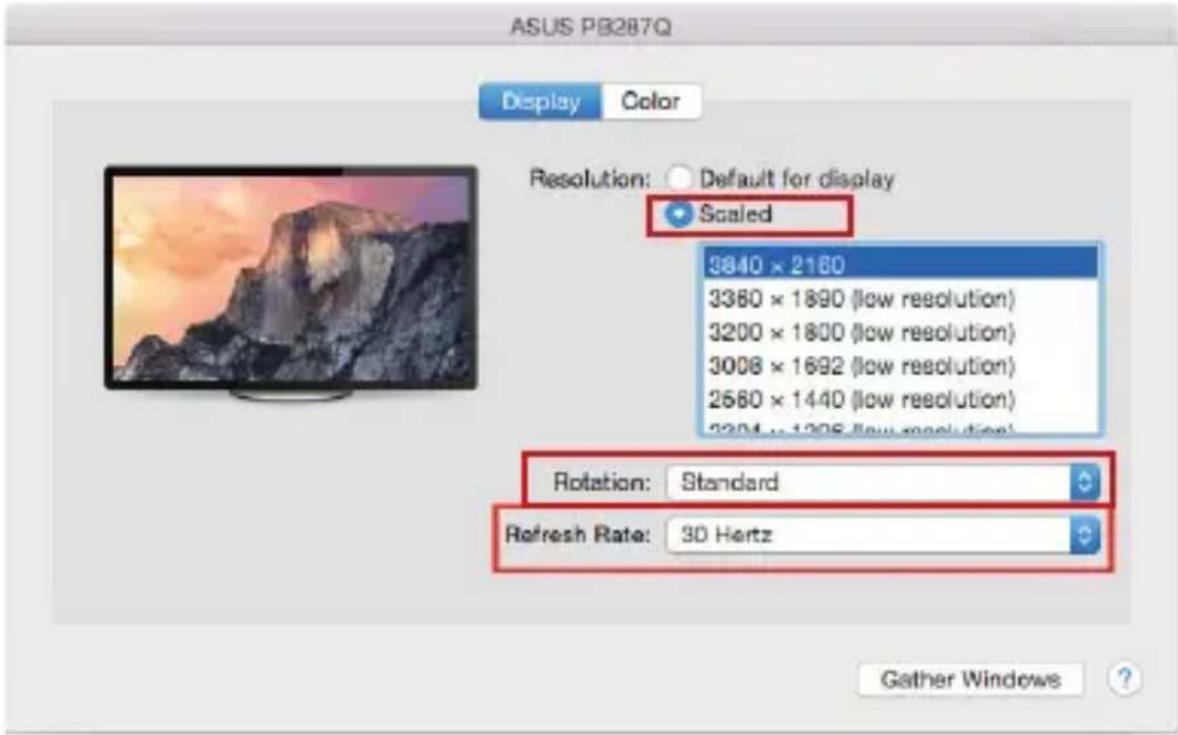
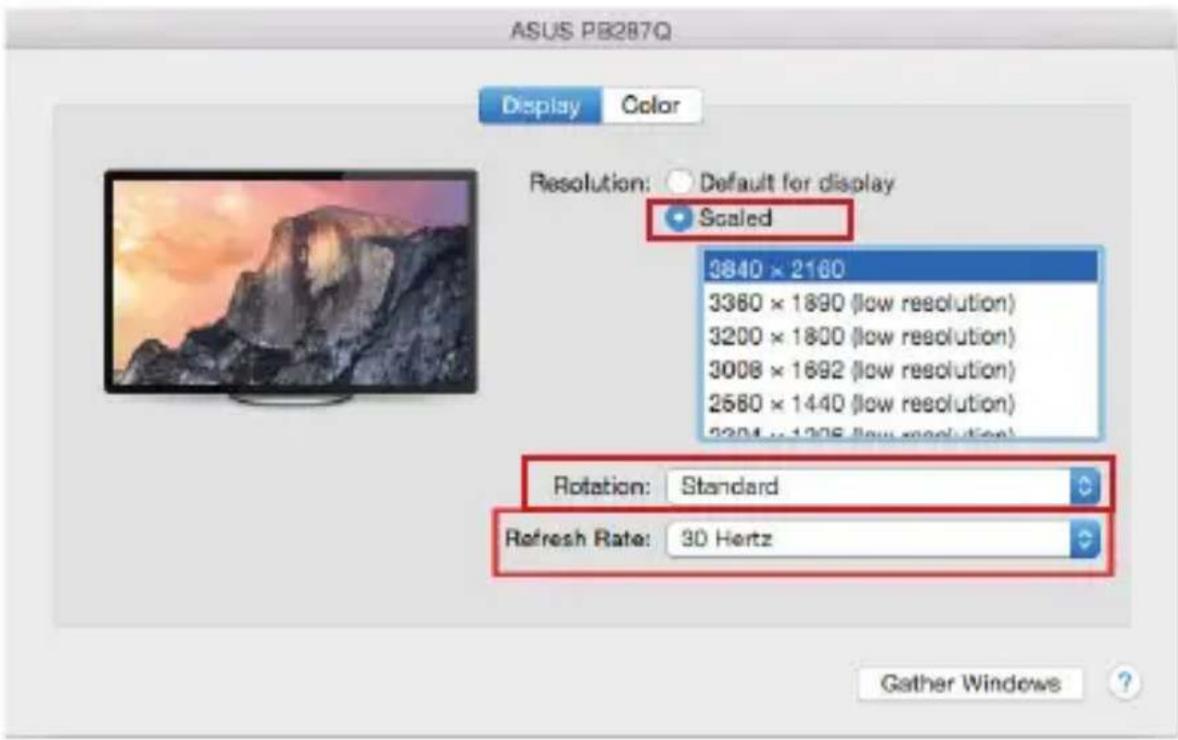
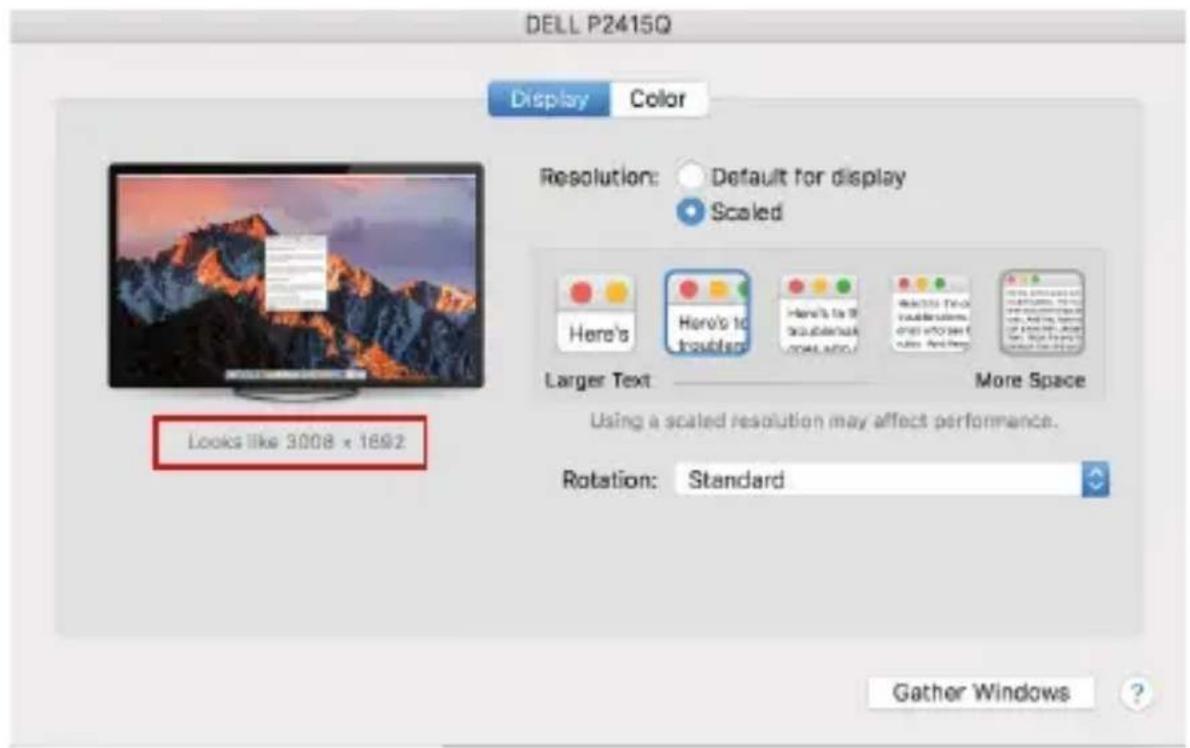
Click on Gather Windows: using this option you can choose the settings of the corresponding monitor – Scaled (offers available resolutions), Rotation (Standard, 90°, 180° and 270°) and Refresh rate (if offered). Below the following setting options are displayed. This may vary, depending on your monitor.
Display option 1

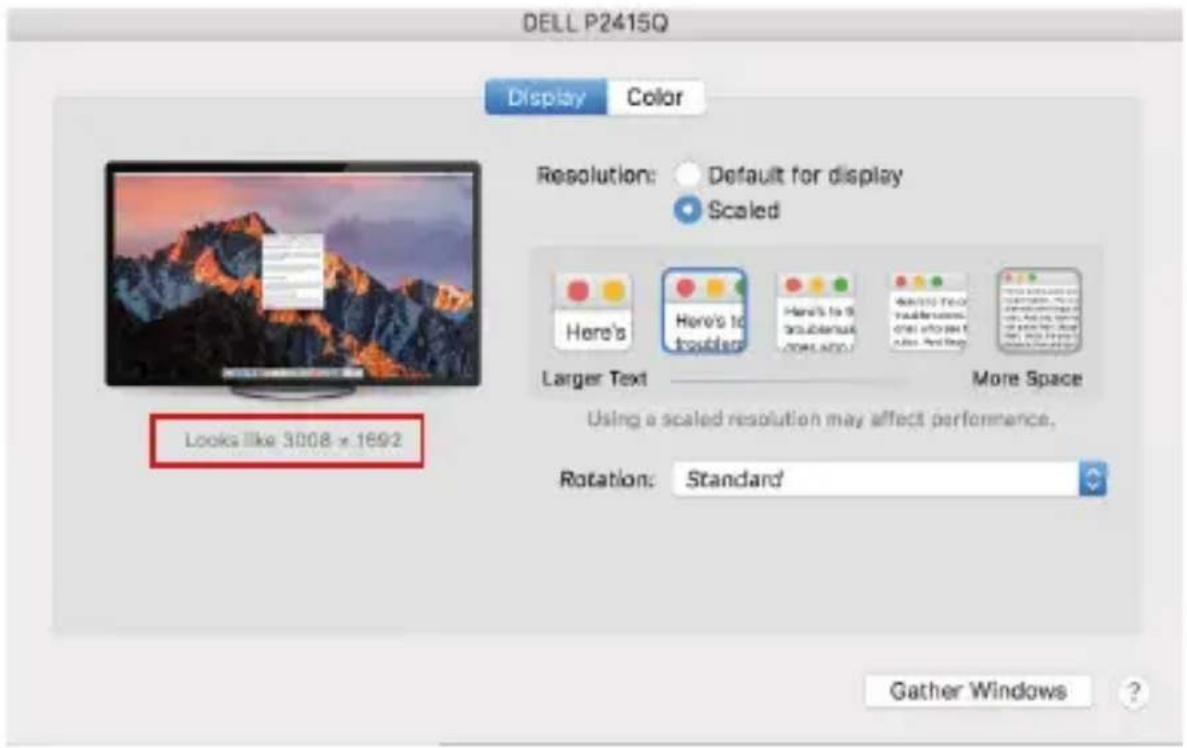
Display option 2 In Scaled mode click on the required icon, the resolution is displayed below (which looks like this, 3008x1692 = 4K@30Hz)
Closed-display mode – It is possible to work on the connected monitor when the Mac monitor is closed, but you will require power supply and mouse and keyboard connection. More information can be found here: https://support.apple.com/en-us/HT202351
Most problems with renewing the screen on the connected monitor after hibernation of the Mac, after using screensaver, after restarting the Mac, after turning the Mac off / on can be solved by turning the docking station off and turning on after approximately 10 s. Please wait for completion of connection of all peripherals.
OTHER FUNCTIONS
Connecting USB devices – after the USB device is connected to the USB 3.0 port of the docking station (USB external HDD, USB keyboard, USB mouse, USB Hub, USB graphics adapter), these devices are used in a standard way.
Charging – docking station supports charging of USB mobile devices, such as smart phones, e-book readers, multimedia players, navigation devices, and tablets. Simply connect the device that you want to charge using the original cable to the USB port of the docking station.
Audio
Audio output devices, for listening through graphic output, need to be set / verified here: System Preferences-Sound-Output – select USB Audio Device.
Setting the audio output device to both the earphones and the monitor simultaneously can be done in Open-Applications-Utilities-Audio settings MIDI.app – click on „+“ on the left at the bottom –_Create device with multiple outputs and select the desired outputs from the offered options on the Device with multiple outputs.
Note: The majority of problems with the docking station and the connected peripheral devices can be solved by turning the docking station off and turning on after approximately 10 s.
SAFETY INSTRUCTIONS
- Do not expose to extreme temperatures and air humidity.
- Use the device on flat surfaces – you will prevent it from slipping and falling to the ground.
- Save the user manual for a possible use later.
In cooperation with the service department:
- Check functionality after falling to water or to the ground.
- Check functionality when the cover is broken.
- Send the device back if it does not work in accordance with the user manual.
FREQUENTLY ASKED QUESTIONS
Available on our website www.i-tec.pro on the "FAQ" tab of this product.
BEGRIFFSWÖRTERBUCH
http://www.displaylink.com/downloads.
Toneinstellung
Abbildung 1

http://www.displaylink.com/downloads.
CONNEXION HDMI / MONITEUR DISPLAY PORT
Paramètres audio

FR
USB 3.0 USB-C/TB3, 3x 4K Docking Station+ VESA+PD 70W
http://www.displaylink.com/downloads.
Ajustes de sonido
Desinstalar controladores

Le porte installate sono mostrate in macOS X come "USB-C Triple-4K Dock" in "About This Mac" → "System Profiler" → "Hardware" → "USB".
INSTALLAZIONE DEGLI STRUMENTI DAGLI ALTRI SISTEMI OPERATIVI
Versione software installata
Impostazione audio
IT
USB 3.0 USB-C/TB3, 3x 4K Docking Station+ VESA+PD 70W
Nastavení zvuku
Ovládaní monitoru ve Windows 8 / 8.1 a Windows 10
ODINSTALOVÁNÍ OVLADAČŮ
USB 3.0 USB-C/TB3, 3x 4K Docking Station+ VESA+PD 70W CZ
https://support.apple.com/cs-cz/HT202351
Ustawienia audio
Sterowanie monitorem w systemie Windows 7
Sterowanie monitorem w systemach Windows 8 / 8.1 i Windows 10
ODINSTALOWANIE STEROWNIKÓW
PL
USB 3.0 USB-C/TB3, 3x 4K Docking Station+ VESA+PD 70W
Rozlíšenie displeja v systéme Windows 10
Teraz je možné vykonať nastavenia Extend (Rozšířit) a Mirror/Duplicate (Zrkadlít):
Ovládanie monitora v systéme Windows 7
Ovládanie monitora v systéme Windows 8 / 8.1 a Windows 10
ODINŠTALOVANIE OVLÁDAČOV
USB 3.0 USB-C/TB3, 3x 4K Docking Station+ VESA+PD 70W
SK
Možnost'zobrazenia 1
Možnost'zobrazenia 2
https://support.apple.com/sk-sk/HT202351
http://www.displaylink.com/downloads.
HDMI / EKRANO PRIEVADO MONITORIAUS PRIJUNGIMAS
Garso nustatymai
VALDIKLIŲ IŠINSTALIAVIMAS
Vaizdo variantas 1
- OS: Windows 7/8/8.1/10, macOS, Linux Ubuntu 14.04 of later, Android 5 of later, Chrome OS R51 of later
Windows 7/8.1/10, macOS, Linux Ubuntu 14.04 of later, Android 5 of later, Chrome OS R51 of later
Audio-instellingen
Monitorbesturing in Windows 7
Monitorbesturing in Windows 8 / 8.1 en Windows 10
DRIVERS VERWIJDEREN
NL
USB 3.0 USB-C/TB3, 3x 4K Docking Station+ VESA+PD 70W
Weergave Optie 2
This equipment is marked with the above recycling symbol. It means that at the end of the life of the equipment you must dispose of it separately at an appropriate collection point and not place it in the normal domestic unsorted waste stream. This will benefit the environment for all. (European Union only)
DEUTSCH
This equipment has been tested and found to comply within the limits of a Class B digital device pursuant to Part 15 of the FCC Rules. These limits are designed to provide reasonable protection against harmful interference in a residential installation.