
AHW 2500 - Pallet truck Herkules - Free user manual and instructions
Find the device manual for free AHW 2500 Herkules in PDF.

| Product type | Manual pallet truck |
| Brand | Herkules |
| Model | AHW 2500 |
| Nominal load capacity | 2500 kg |
| Total length | 1500 mm |
| Total height | 1210 mm |
| Fork length | 1150 mm |
| Total fork width | 540 mm |
| Width of a fork arm | 153 mm |
| Minimum fork height | 80 mm |
| Maximum fork height | 190 mm |
| Maximum lift | 110 mm |
| Appliance weight | 62 kg |
| Diameter of steering wheels | 180 mm |
| Diameter of rollers under forks | 80 mm |
| Recommended hydraulic oil | HLP 46 (viscosity) |
| Oil tank capacity | Approx. 0.4 liter |
| Usage | Transport of pallets on flat, hard floors |
| Lifting system | Manual hydraulic |
| Functions | Lift, move, lower |
| Safety | Do not exceed the load, wear safety gloves and shoes, do not transport people |
| Maintenance | Check oil level every 6 months, lubricate moving parts regularly |
| Cleaning | Slightly damp cloth |
| Warranty | 60 months |
| Storage | Dark, dry place, frost-free, temperature 5-30°C |
Frequently Asked Questions - AHW 2500 Herkules
User questions about AHW 2500 Herkules
0 question about this device. Answer the ones you know or ask your own.
Ask a new question about this device
Download the instructions for your Pallet truck in PDF format for free! Find your manual AHW 2500 - Herkules and take your electronic device back in hand. On this page are published all the documents necessary for the use of your device. AHW 2500 by Herkules.
USER MANUAL AHW 2500 Herkules
GB Original operating instructions Pallet Lifting Truck
-2-

-3-
DE
Gefahr!
When using the equipment, a few safety precautions must be observed to avoid injuries and damage. Please read the complete operating instructions and safety regulations with due care. Keep this manual in a safe place, so that the information is available at all times. If you give the equipment to any other person, hand over these operating instructions and safety regulations as well. We cannot accept any liability for damage or accidents which arise due to a failure to follow these instructions and the safety instructions.
1. Safety regulations
Danger!
Read all safety regulations and instructions.
Any errors made in following the safety regulations and instructions may result in an electric shock, fi re and/or serious injury.
Keep all safety regulations and instructions in a safe place for future use.
- Pay attention to the accident prevention regulations.
• Never exceed the specified payload. - Do not use the pallet lifting truck until you have familiarized yourself with its mode of operation and been trained and instructed on how to use it.
- Check the equipment for damage and make sure that it is in good working order each time before you use it.
- Do not use the pallet lifting truck on uneven ground or slopes.
- The pallet lifting truck has no brake. It is not allowed to be used on upward or downward inclines.
• Wear work gloves and safety shoes. - It is imperative to stay clear of the area under lifted loads.
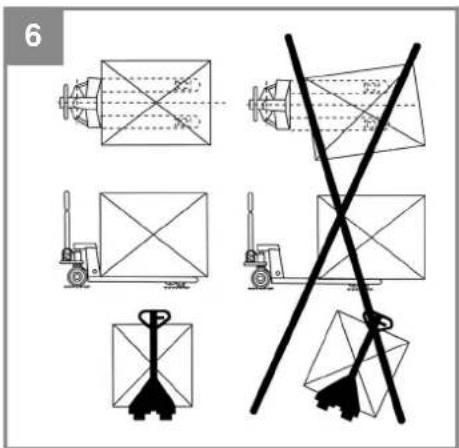
- The load you want to transport must be distributed evenly over the lifting forks.
- Never transport loosely piled loads or unstable loads.
- The pallet lifting truck is not allowed to be loaded when the lifting forks are in a raised position.
- Loads on raised lifting forks must never be left unattended.
• Do not reach into moving parts.
• Do not transport people. - Keep a minimum distance of 60 cm from
other persons when transporting loads.
• The work area must be well illuminated.
2. Layout and items supplied
2.1 Layout (Fig. 1)
1 Handle
2 Control lever
3 Drawbar
4 Hydraulic unit
5 Steering rollers
6 Lifting forks
7 Load-bearing rollers (tandem)
2.2 Items supplied
Please check that the article is complete as specified in the scope of delivery. If parts are missing, please contact our service center or the sales outlet where you made your purchase at the latest within 5 working days after purchasing the product and upon presentation of a valid bill of purchase. Also, refer to the warranty table in the service information at the end of the operating instructions.
- Open the packaging and take out the equipment with care.
- Remove the packaging material and any packaging and/or transportation braces (if available).
- Check to see if all items are supplied.
- Inspect the equipment and accessories for transport damage.
- If possible, please keep the packaging until the end of the guarantee period.
Danger!
The equipment and packaging material are not toys. Do not let children play with plastic bags, foils or small parts. There is a danger of swallowing or suff oating!
- Pallet lifting truck
Drawbar - Clamp sleeve
Bolt
• Original operating instructions
GB
3. Proper use
The equipment is designed for transporting goods on pallets with an open base or with stringer boards extending beyond the load wheels. The equipment must be used on a firm, flat surface. It is prohibited to use the equipment to pick up or transport people.
The equipment is to be used only for its prescribed purpose. Any other use is deemed to be a case of misuse. The user / operator and not the manufacturer will be liable for any damage or injuries of any kind caused as a result of this.
4. Technical data
Overall height: 1210 mm
Overall length: 1500 mm
Fork length: 1150 mm
Fork height min.: 80 mm
Fork height max.: 190 mm
Fork width single: 153 mm
Fork width total: 540 mm
Lift max.: 110 mm
Load: 2500 kg
Weight approx.: 62 kg
Steering wheels ∅: 180 mm
Load-bearing rollers ∅: 80 mm
5. Assembly
Note: The hydraulic system is secured with a bolt (M). Do not remove it until prompted in the following assembly description and keep it in a safe place for future maintenance work.
- (Fig. 1) Press down the control lever (2) as far as it will go into the lowering position (see 6. Functions).
- (Fig. 2) Pass the control chain (F) through and out of the recess at the bottom end of the drawbar.
- (Fig. 3) Insert the bolt (B) through the hole in the drawbar mount (C) and the hole in the drawbar. Make sure that the clamping sleeve passage (E) coincides with the clamping sleeve hole in the bolt (B).
- (Fig. 2) Pass the control chain (F) through the hole in the bolt (B) so that the hydraulics sys-
tem works.
- (Fig. 3) Hook the setting screw (H) with the pre-mounted hex nut (K) into the hydraulics lever (L).
- (Fig. 3) Press the drawbar (3) down a little so that the hydraulics lock bolt (M) is slackened and can be removed.
- (Fig. 4) Check whether the clamping sleeve mount of the bolt (B) coincides with the clamping sleeve passage (E) in the drawbar mount. Use a hammer and the hydraulics lock bolt (M) to hit the sleeves (A) into the bolt (B) on the left and right.
Note: The equipment can be optionally equipped with a foot-activated parking brake. If required, please contact your customer service team.
Operating the foot-activated parking brake:
Push the brake to the right as far as the stop – the wheels will be blocked.
Push the brake to the left – the wheels will be released again.
6. Functions
Important! Note the safety information (section 1.) and Figure 6.
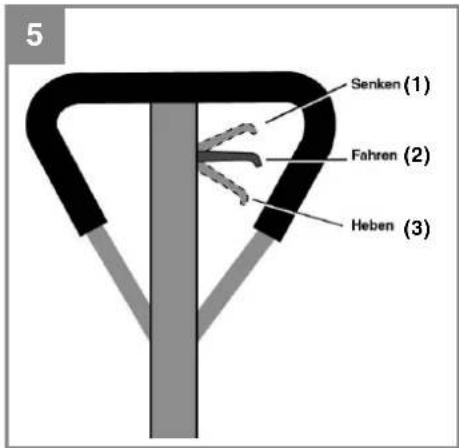
On the drawbar is a sticker showing the positions of the handle switch (Fig. 5).
1 = Lower (lowering position)
2 = Travel (traveling position)
3 = Lift (lifting position)
The pallet lifting truck is allowed to be parked only when the lifting forks are lowered.
The following functions are possible and were already set in the factory.
6.1 Lifting the load (Fig. 1)
Press down the control lever (2) (lifting position). Then pump the drawbar (3) up and down several times. The load will be lifted.
6.2 Pulling the load (Fig. 1)
Pull up the control lever (2) into the middle position (traveling position). In this position the hydraulics cannot be used for lifting or lowering.
GB
6.3 Lowering the load (Fig. 1)
With the pallet lifting truck at a standstill, pull up the control lever (2) to the very top (lowering position). The load will be lowered. When you now release the control lever (2), it will automatically return to the middle position (traveling position).
7. Setting the hydraulics control system
The functions described in section 6. will not work correctly if the hydraulics control settings are altered. In this case you must re-set the hydraulics control system.
7.1 The lifting forks rise when the control lever is in the traveling position
(Fig. 3) Turn the hex nut (K) on the setting screw (H) clockwise to the point where the lifting forks no longer rise and the traveling position works correctly.
7.2 The lifting forks descend when the control lever is in the traveling position
(Fig. 3) Turn the hex nut (K) on the setting screw (H) counter-clockwise to the point where the lifting forks no longer descend and the traveling position works correctly.
7.3 The lifting forks do not descend when the control lever is in the lowering position
(Fig. 3) Turn the hex nut (K) on the setting screw (H) clockwise to the point where the lifting forks are lowered by pulling up the control lever. Then check the operation of the traveling position in order to guarantee that the setting nut is in the correct position.
7.4 The lifting forks do not rise when the control lever is in the lifting position
(Fig. 3) Turn the hex nut (K) on the setting screw (H) counter-clockwise to the point where the lifting forks are raised when the control lever is in the lifting position. Then check the operation of the traveling position and the lowering position in order to guarantee that the setting nut is in the correct position.
8. Cleaning, maintenance and ordering of spare parts
8.1 Cleaning
Use a damp cloth to clean the casing.
8.2 Servicing
The pallet lifting truck must be regularly inspected and if necessary serviced in order to keep it in good working order. All the repair and maintenance jobs which are not listed here must be carried out by a customer service center or an authorized specialist. This applies in particular to replacing the steering and load-bearing rollers.
If malfunctions arise, the pallet lifting truck must be taken out of operation immediately and be repaired by an authorized person. Only original spare parts are allowed to be used.
The pallet lifting truck must be inspected by an expert at least once a year or more often if necessary. It is recommended to record the inspections in an inspection book.
After carrying out repair or maintenance work, ensure that all safety parts are installed and in perfect condition.
Store potentially hazardous parts out of the reach of other persons and children.
Important: In accordance with the German Product Liability Act, we are not liable for any damages if they result from improper repairs to the product or if parts are replaced by items other than genuine parts or parts approved by us. Furthermore, we are not liable for any damages if they result from improper repairs to the product. Arrange for your customer service or an authorized workshop to do the work. The same applies to accessory parts.
8.2.1 Filling up with hydraulic oil
Check the oil level every six months. When filling up with hydraulic oil or replacing it, use only hydraulic oil from the viscosity classes HLP 46 (-20 °C - +40°C). A complete filling equals approx. 0.4 liters.
GB
Important! To prevent environmental contamination from escaping oil, use absorbent materials (e.g. wood chips, dry rags) promptly to pick up any oil spills. Take soiled maintenance material and operating materials to an appropriate collection point and dispose of the soiled material correctly.
- Lower the lifting forks as far as possible
- Remove the oil filler plug and seal from the oil tank.
- Fill in hydraulic oil up to the brim
- Reinsert the oil filler plug and seal into the oil tank.
- Vent the hydraulics system with several pumping movements of the drawbar
8.3 Venting the hydraulic unit
If the lifting forks do not rise when the control lever is in the lifting position, move the control lever into the lower position and move the drawbar up and down again several times.
8.4 Lubricating the moving parts
Lubricate and grease the moving parts regularly.
8.5 Ordering replacement parts:
Please quote the following data when ordering replacement parts:
• Type of machine
• Article number of the machine
• Identification number of the machine
• Replacement part number of the part required
For our latest prices and information please go to www.isc-gmbh.info
9. Disposal and recycling
The equipment is supplied in packaging to prevent it from being damaged in transit. The raw materials in this packaging can be reused or recycled. The equipment and its accessories are made of various types of material, such as metal and plastic. Never place defective equipment in your household refuse. The equipment should be taken to a suitable collection center for proper disposal. If you do not know the whereabouts of such a collection point, you should ask in your local council offices.
10. Storage
Store the equipment and accessories in a dark and dry place at above freezing temperature. The ideal storage temperature is between 5 and 30
°C. Store the electric tool in its original packaging.
11. Troubleshooting
If the equipment is operated properly you should experience no problems with malfunctions or faults. In the event of any malfunctions or faults, please check the following before you contact your customer services.
| Fault Possible cause | Remedy | |
| The lifting forks cannot be raised to the maximum height | Too little hydraulic oil Fill in hydraulic oil | |
| The lifting forks cannot be raised | No hydraulic oilThe hydraulic oil is dirtyThe setting nut (K) is too highAir in the hydraulic unit | Fill in hydraulic oilChange the hydraulic oilSet the setting nut (K) (see section 7.)Vent the hydraulic unit (see section 8.) |
| The lifting forks cannot be lowered | The piston rod or pump housing has been damaged by overloading or an uneven load distributionThe piston is stuckThe setting nut (K) is set wrongly | Replace the piston rod or pump housing*Replace the piston*Set the setting nut (K) (see section 7.) |
| Leaks The seals are worn or damagedThe hydraulic module is defective | Replace the seals*Replace the hydraulic module* | |
| The lifting forks descend without the relief valve working | The hydraulic oil is dirtyThe hydraulic module is defectiveAir in the hydraulic unitThe seals are worn or damagedThe setting nut (K) is set wrongly | Change the hydraulic oilReplace the hydraulic module*Vent the hydraulic unit (see section 8.)Replace the seals*Set the setting nut (K) (see section 7.) |
Important!
* This work must be performed by qualified and approved specialists.
The reprinting or reproduction by any other means, in whole or in part, of documentation and papers accompanying products is permitted only with the express consent of the iSC GmbH.
Subject to technical changes
GB
Warranty certifi cate
Dear Customer,
All of our products undergo strict quality checks to ensure that they reach you in perfect condition. In the unlikely event that your device develops a fault, please contact our service department at the address shown on this guarantee card or the sales outlet from where you bought the device. Please note the following terms under which guarantee claims can be made:
-
These warranty terms regulate additional warranty services, which the manufacturer mentioned below promises to buyers of its new products in addition to their statutory rights of guarantee. Your statutory guarantee claims are not affected by this guarantee. Our guarantee is free of charge to you.
-
The warranty services cover only defects due to material or manufacturing faults on a product which you have bought from the manufacturer mentioned below and are limited to either the rectification of said defects on the product or the replacement of the product, whichever we prefer.
Please note that our devices are not designed for use in commercial, trade or professional applications. A guarantee contract will not be created if the device has been used by commercial, trade or industrial business or has been exposed to similar stresses during the guarantee period.
- The following are not covered by our guarantee:
- Damage to the device caused by a failure to follow the assembly instructions or due to incorrect installation, a failure to follow the operating instructions (for example connecting it to an incorrect mains voltage or current type) or a failure to follow the maintenance and safety instructions or by exposing the device to abnormal environmental conditions or by lack of care and maintenance.
- Damage to the device caused by abuse or incorrect use (for example overloading the device or the use or unapproved tools or accessories), ingress of foreign bodies into the device (such as sand, stones or dust, transport damage), the use of force or damage caused by external forces (for example by dropping it).
- Damage to the device or parts of the device caused by normal or natural wear or tear or by normal use of the device.
-
The guarantee is valid for a period of 60 months starting from the purchase date of the device. Guarantee claims should be submitted before the end of the guarantee period within two weeks of the defect being noticed. No guarantee claims will be accepted after the end of the guarantee period. The original guarantee period remains applicable to the device even if repairs are carried out or parts are replaced. In such cases, the work performed or parts fitted will not result in an extension of the guarantee period, and no new guarantee will become active for the work performed or parts fitted. This also applies if an on-site service is used.
-
Please report the defective device on the following internet address to register your guarantee claim: www.isc-gmbh.info. If the defect is covered by our guarantee, then the item in question will either be repaired immediately and returned to you or we will send you a new replacement device.
Also refer to the restrictions of this warranty concerning wear parts, consumables and missing parts as set out in the service information in these operating instructions.
FR
Danger!
X 2006/42/EC
Annex IV
Notified Body:
Notified Body No.:
Reg. No.
□ 2000/14/EC_2005/88/EC
□ Annex V
Annex VI
P = KW; L/∅ = cm
Notified Body:
2004/26/EC
Emission No.:
Noise: measured L_ = dB (A); guaranteed L_ = dB (A)
Standard references: EN ISO 3691-5
Subject to change without notice
Archive-File/Record: NAPR013161
Documents registrar: Landauer Josef
Wiesenweg 22, D-94405 Landau/Isar


EH 10/2015 (01)

- DE
- Gefahr!
- Safety regulations
- Danger!
- Layout and items supplied
- Layout (Fig. 1)
- Items supplied
- GB
- Proper use
- Technical data
- Assembly
- Operating the foot-activated parking brake:
- Functions
- Lifting the load (Fig. 1)
- Pulling the load (Fig. 1)
- Lowering the load (Fig. 1)
- Setting the hydraulics control system
- The lifting forks rise when the control lever is in the traveling position
- The lifting forks descend when the control lever is in the traveling position
- The lifting forks do not descend when the control lever is in the lowering position
- The lifting forks do not rise when the control lever is in the lifting position
- Cleaning, maintenance and ordering of spare parts
- Cleaning
- Servicing
- Filling up with hydraulic oil
- Venting the hydraulic unit
- Lubricating the moving parts
- Ordering replacement parts:
- Disposal and recycling
- Storage
- Troubleshooting
- Important!
- Warranty certifi cate
- FR
- Standard references: EN ISO 3691-5
Brand : Herkules
Model : AHW 2500
Category : Pallet truck