
Lavender i-Size - Car seat Lionelo - Free user manual and instructions
Find the device manual for free Lavender i-Size Lionelo in PDF.

| Product type | i-Size car seat with 5-point harness and integrated booster |
| Brand | Lionelo |
| Model | Lavender i-Size |
| Safety standard | R129/03 (i-Size) |
| Size groups | Group 1: 76-105 cm (max 18 kg) - Group 2/3: 100-150 cm (max 36 kg estimated) |
| Recommended age | From 15 months (76 cm) up to about 12 years (150 cm) |
| Installation | ISOFIX + Top Tether, forward-facing only |
| Number of recline positions | 5 adjustable positions |
| Headrest adjustment | Yes, height adjustable with integrated shoulder belt adjustment |
| Harness | 5-point harness removable for booster use |
| Seat weight | Approximately 10 kg (not specified in the manual) |
| Dimensions (L x W x H) | Not specified |
| Cover | Hand washable fabric at 30°C, do not tumble dry or expose to sunlight |
| Cleaning of plastic parts | Damp cloth with mild detergent, no harsh products |
| Included accessories | Belt protection cushions, seat liner, manual storage |
| Harness storage | Possible for switching to booster mode (group 100-150 cm) |
| Lifespan | 6 years from date of manufacture (general recommendation) |
Frequently Asked Questions - Lavender i-Size Lionelo
User questions about Lavender i-Size Lionelo
0 question about this device. Answer the ones you know or ask your own.
Ask a new question about this device
Download the instructions for your Car seat in PDF format for free! Find your manual Lavender i-Size - Lionelo and take your electronic device back in hand. On this page are published all the documents necessary for the use of your device. Lavender i-Size by Lionelo.
USER MANUAL Lavender i-Size Lionelo
natural_image
Line drawing of a car seat with 'lionelo' branding, no text or symbols present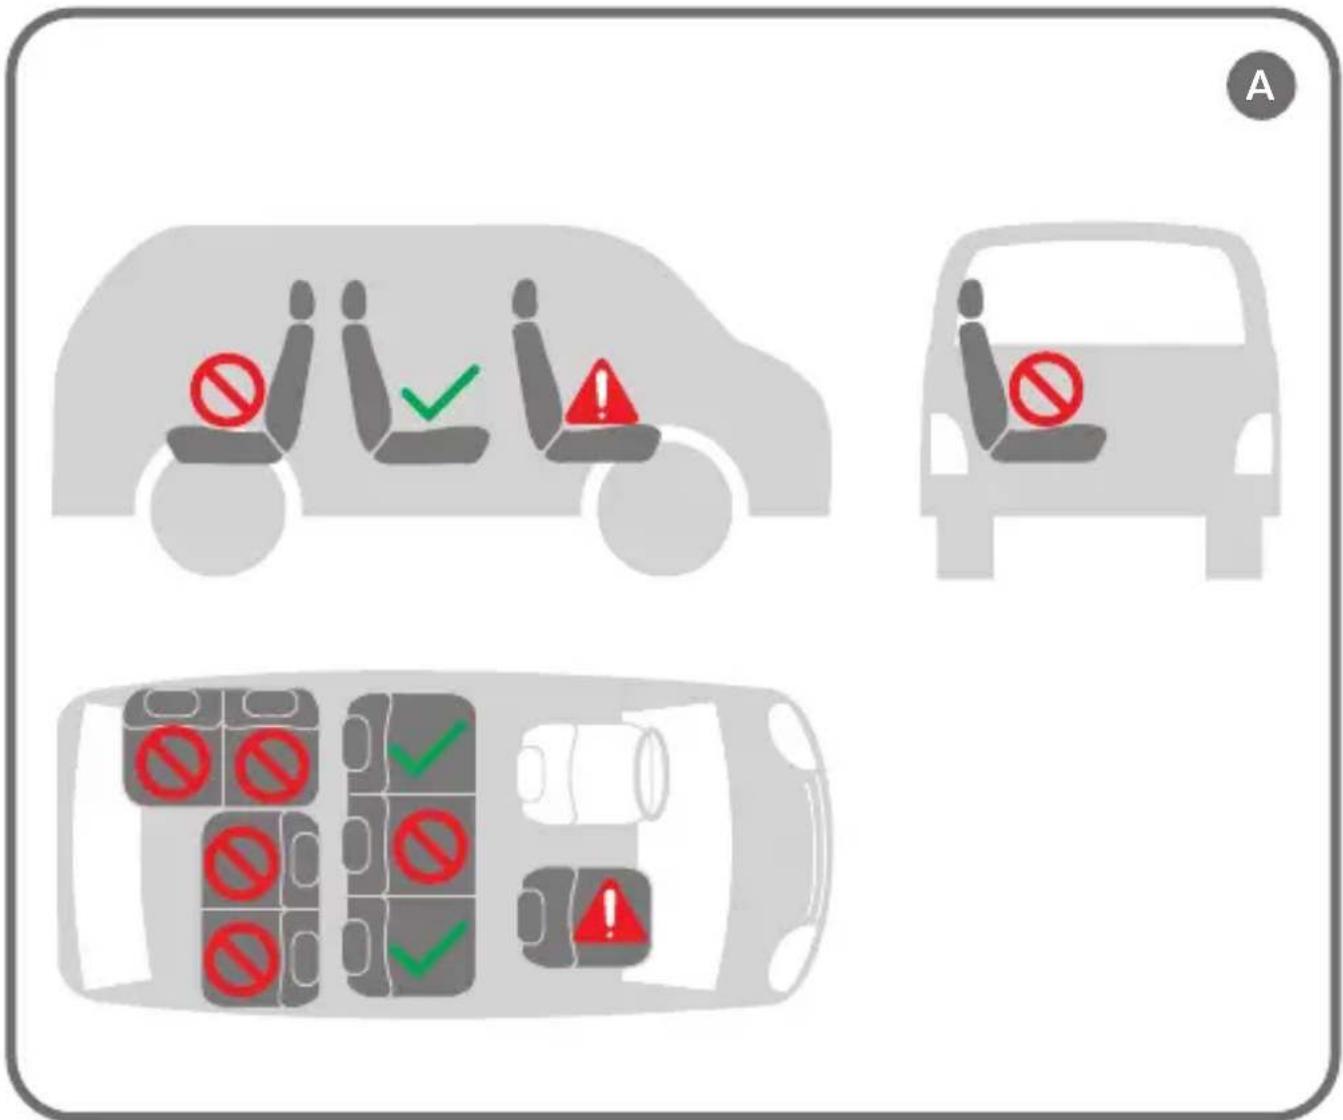
B
natural_image
Technical line drawing of a mechanical component with no visible text or symbols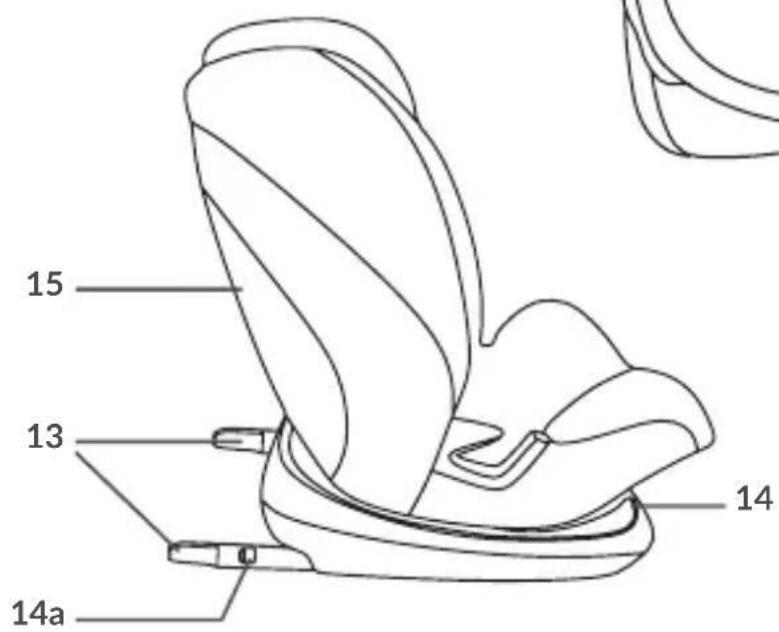
natural_image
Line drawing of a baby car seat with blue arrows indicating motion or force, no text or symbols present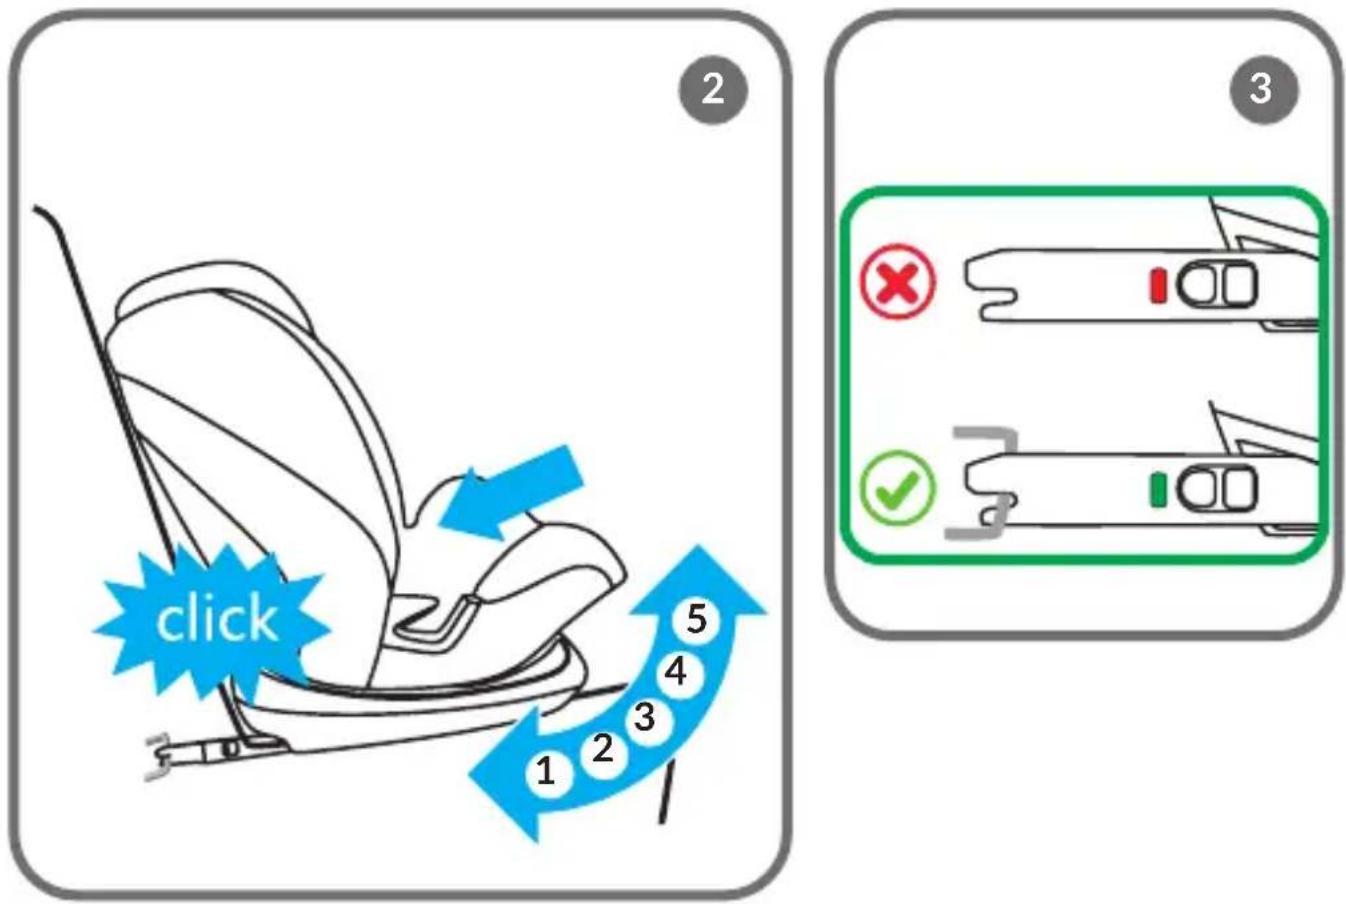
natural_image
Diagram of a car interior showing a yellow cable being inserted into a seatbelt, with no text or symbols present.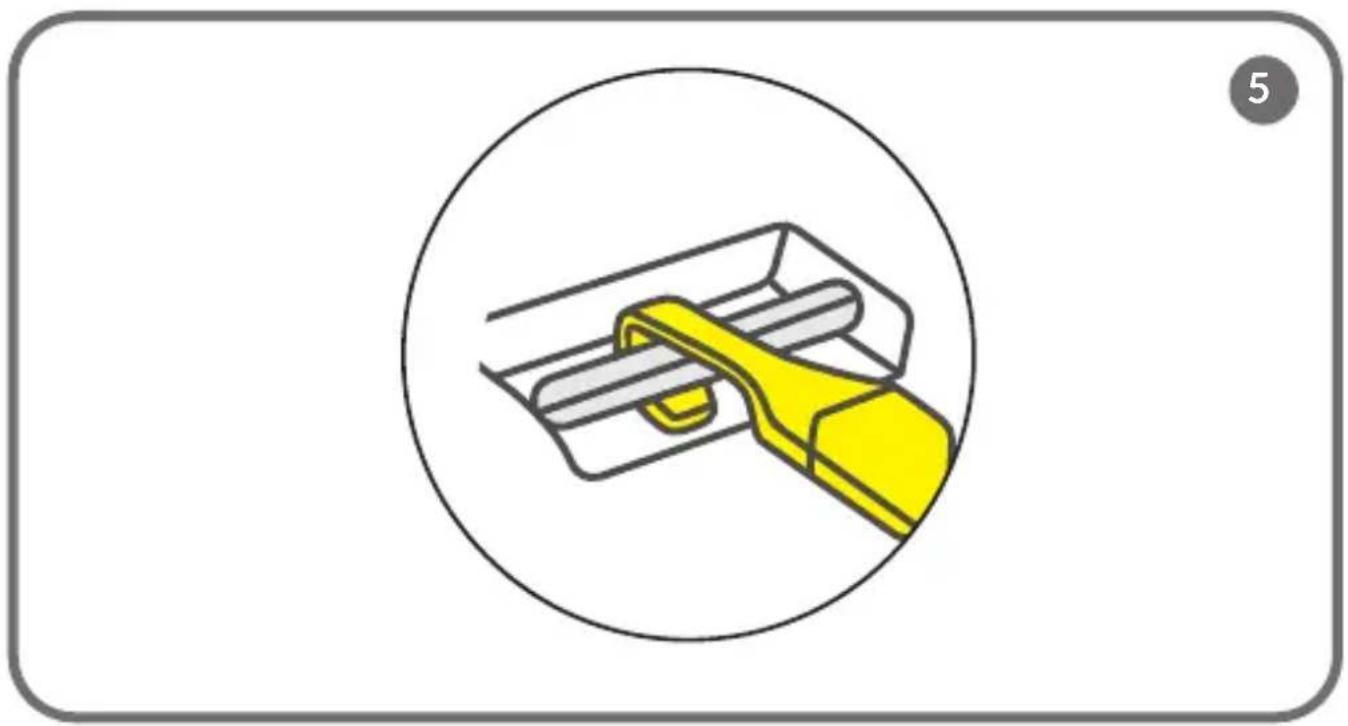
natural_image
Illustration of a yellow tool interacting with a white object, enclosed in a circle (no text or symbols)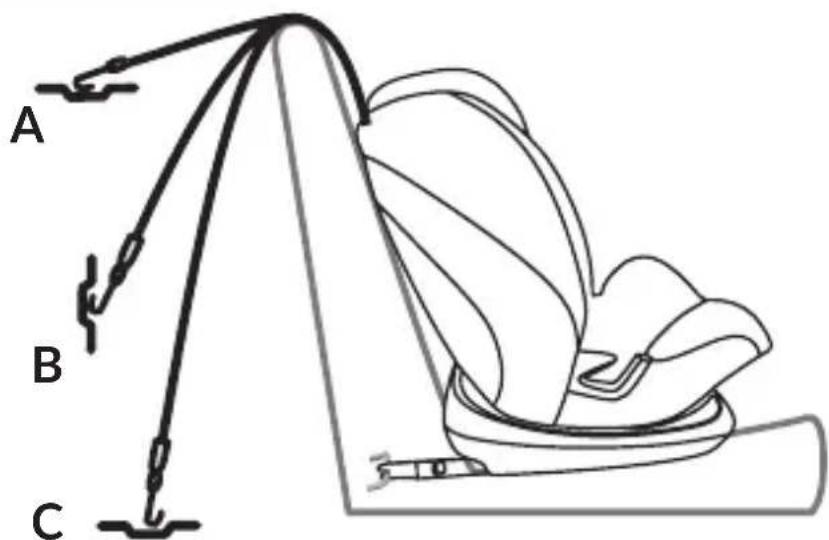
6

natural_image
Line drawing of a car seat assembly with blue arrows indicating specific parts (no text or symbols)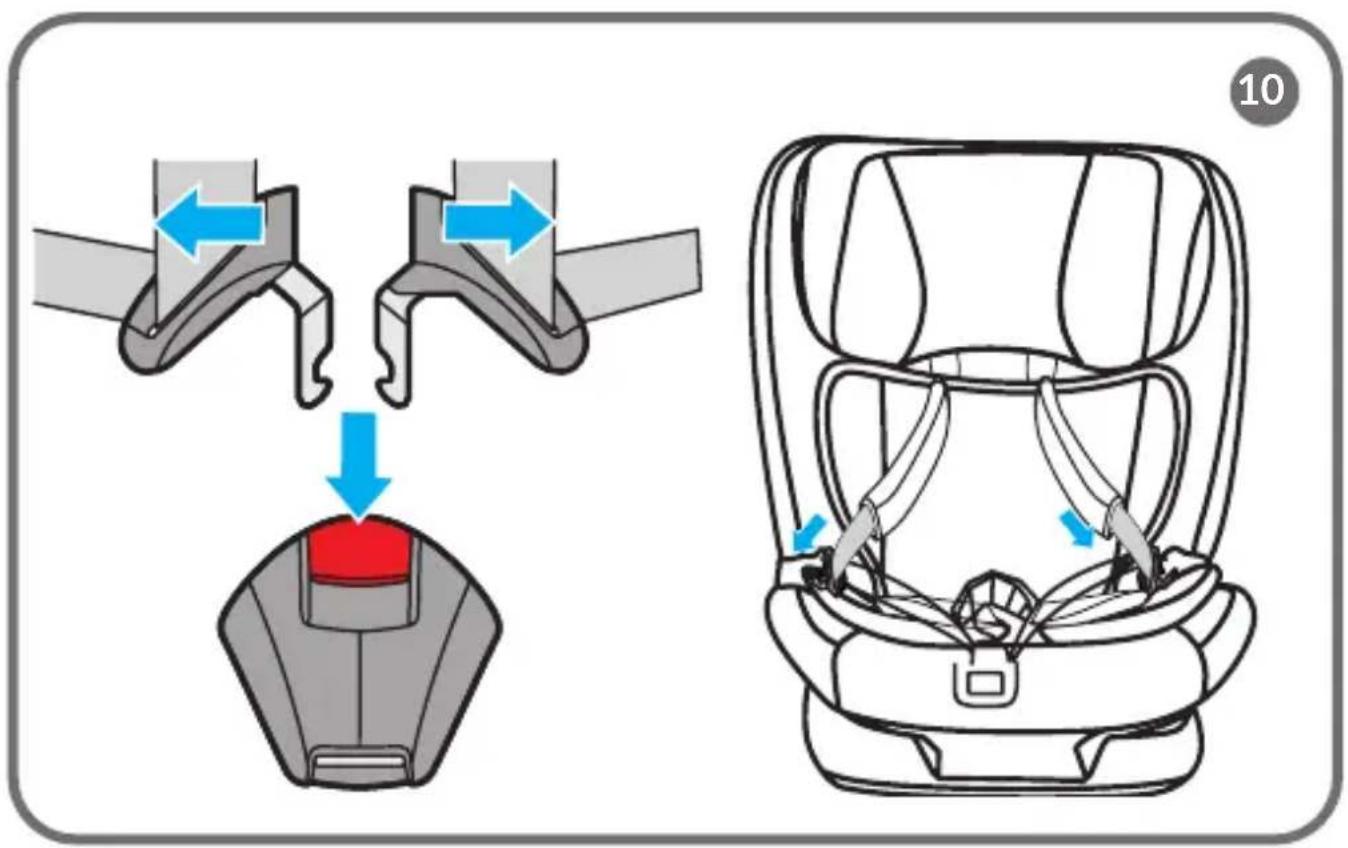
natural_image
Line drawing of a mechanical component with a blue double-headed arrow indicating a motion or force (no text or symbols)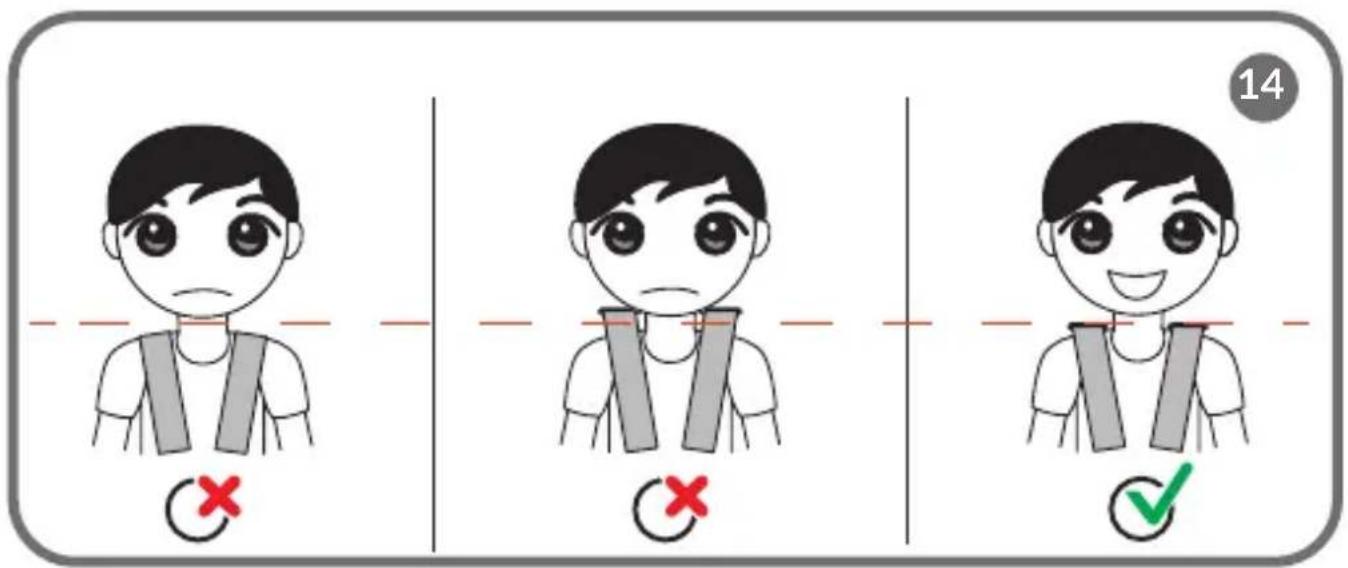

natural_image
Illustration of a car seat assembly showing two steps: one with yellow belt and blue arrow indicating motion, the other with gray seat cover and blue arrow indicating motion (no text or symbols)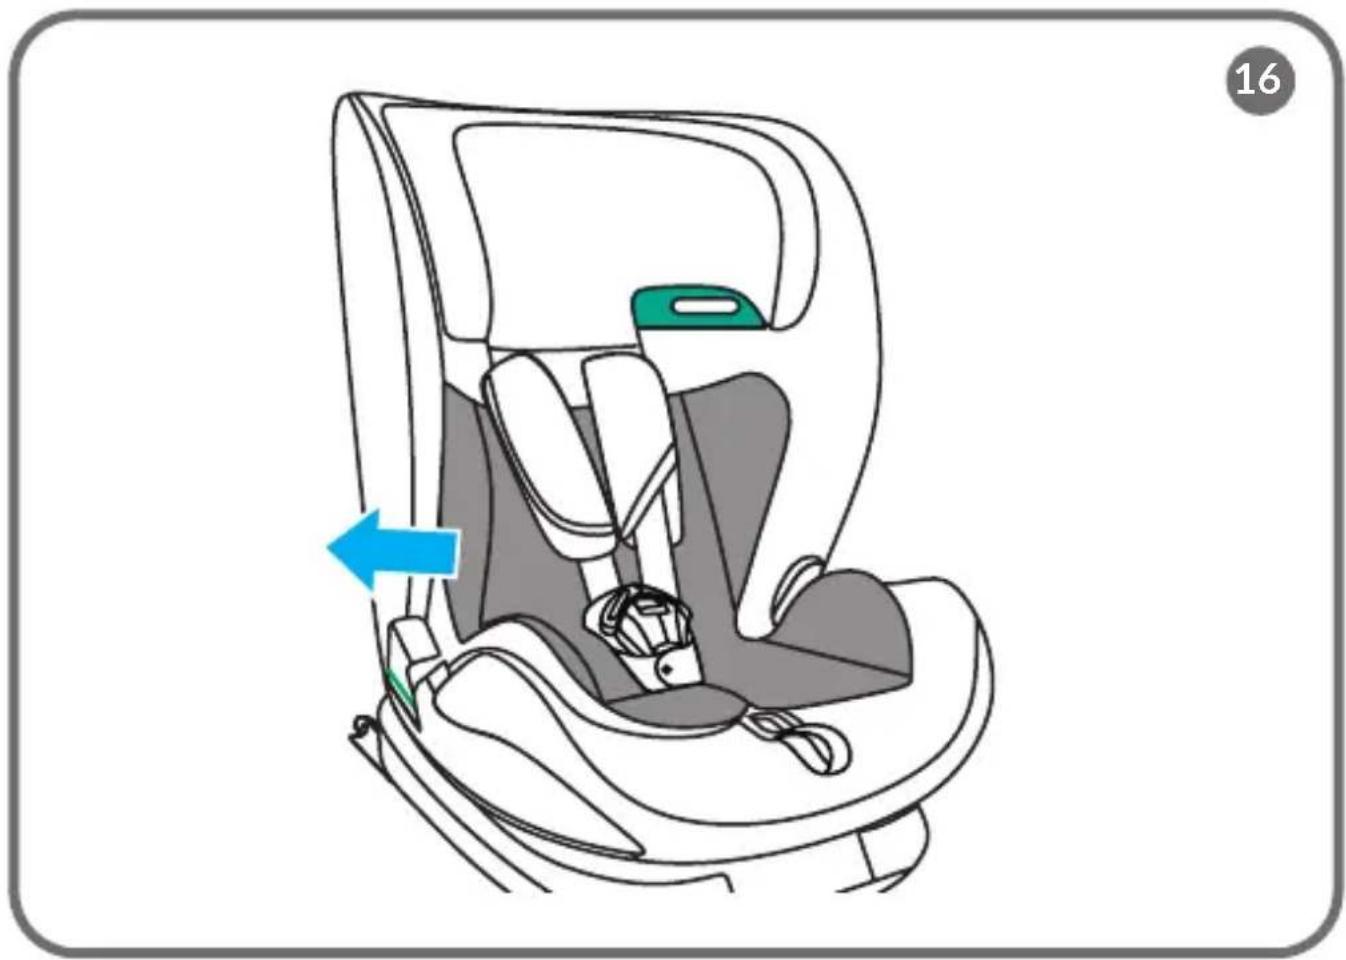
natural_image
Line drawing of a baby car seat with a blue arrow indicating the left side (no text or symbols present)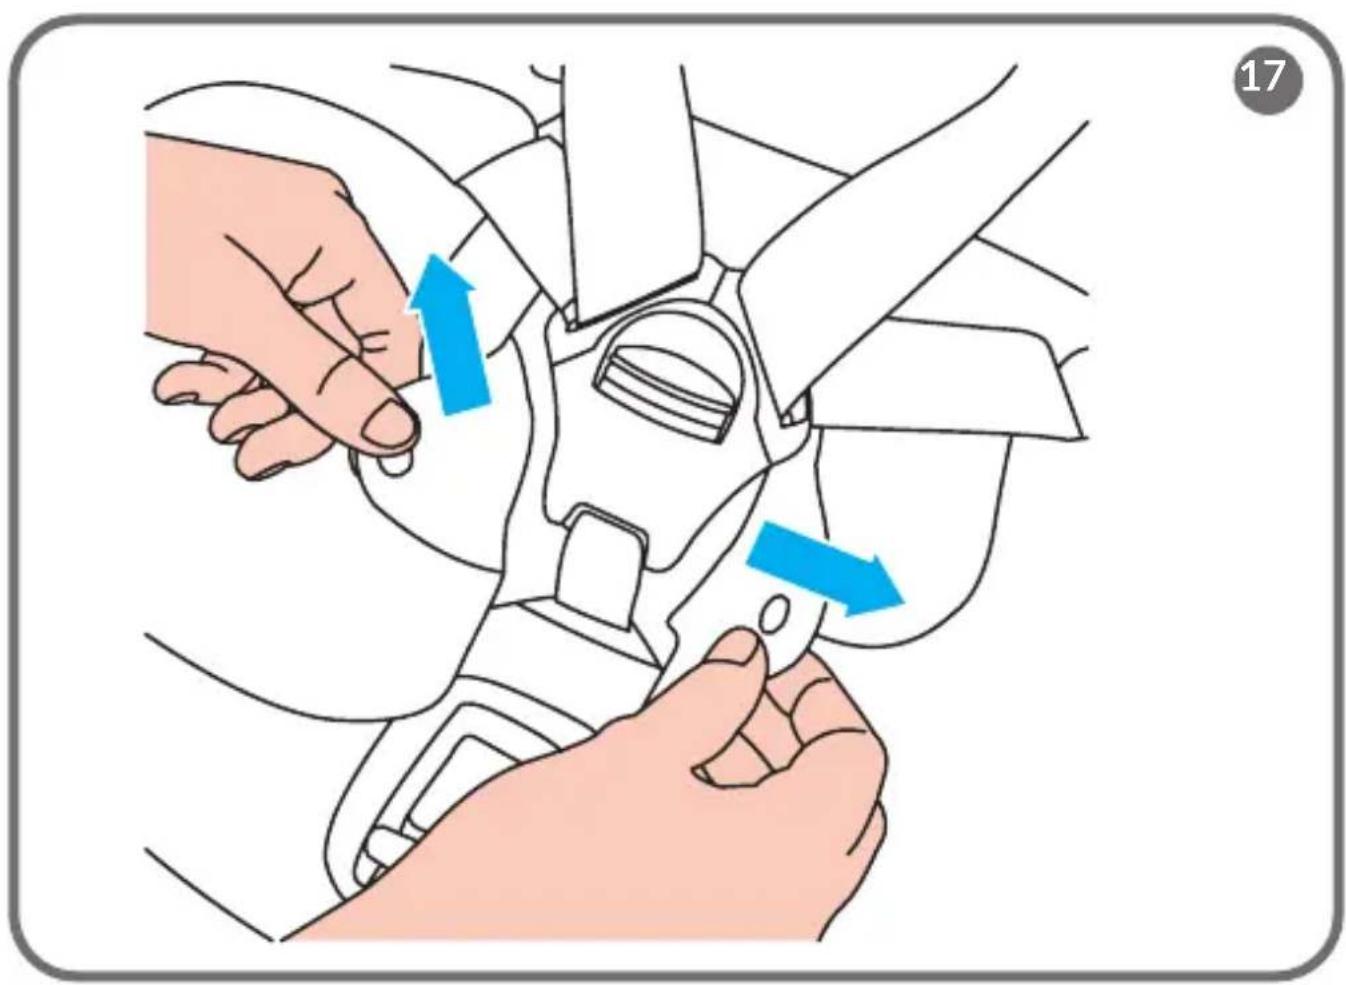
natural_image
Illustration of a hand using a tool to adjust or install a mechanical component, with blue arrows indicating direction (no text or symbols present)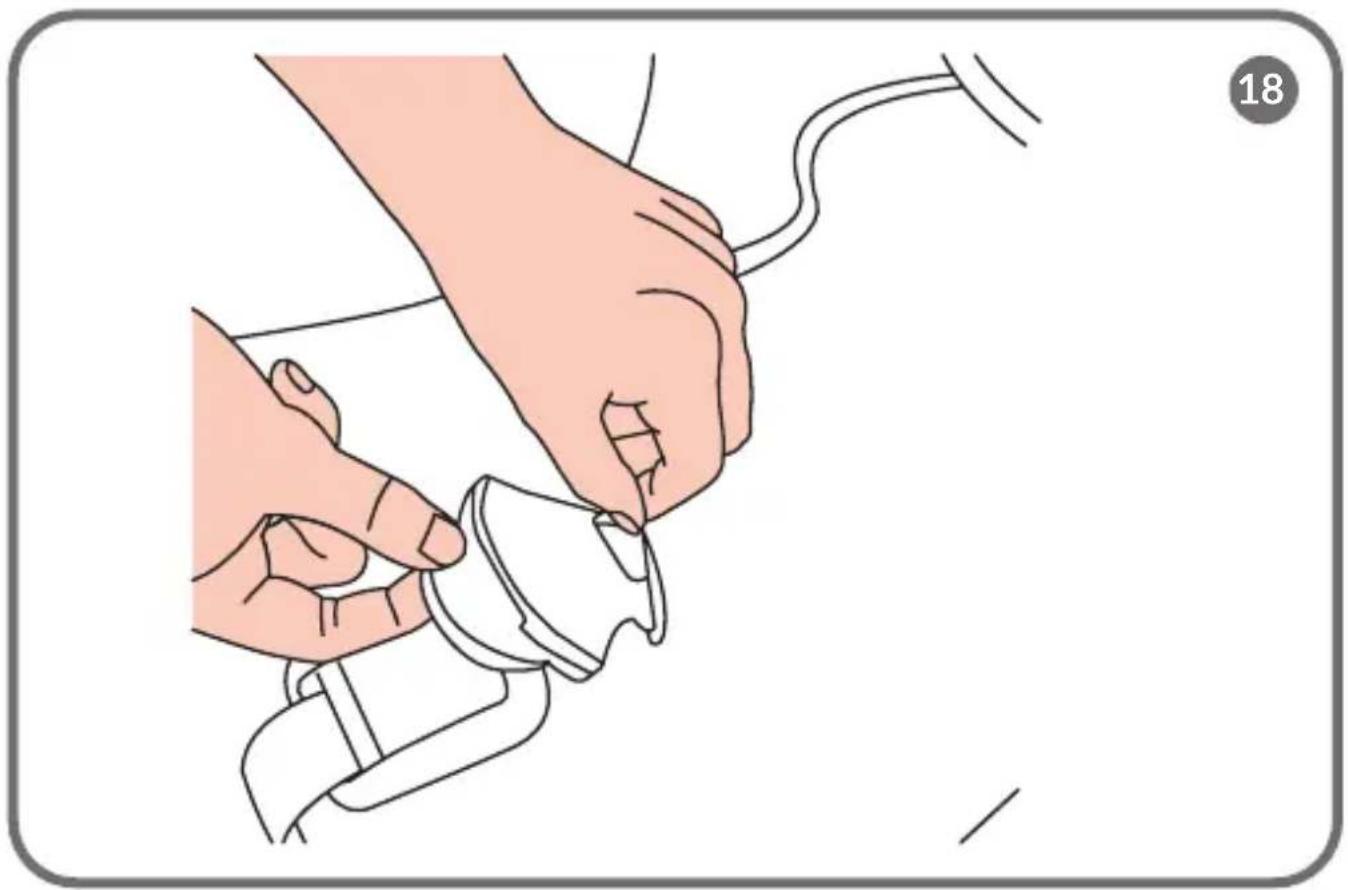
natural_image
Illustration of a hand holding a medical device with a cable, no text or symbols present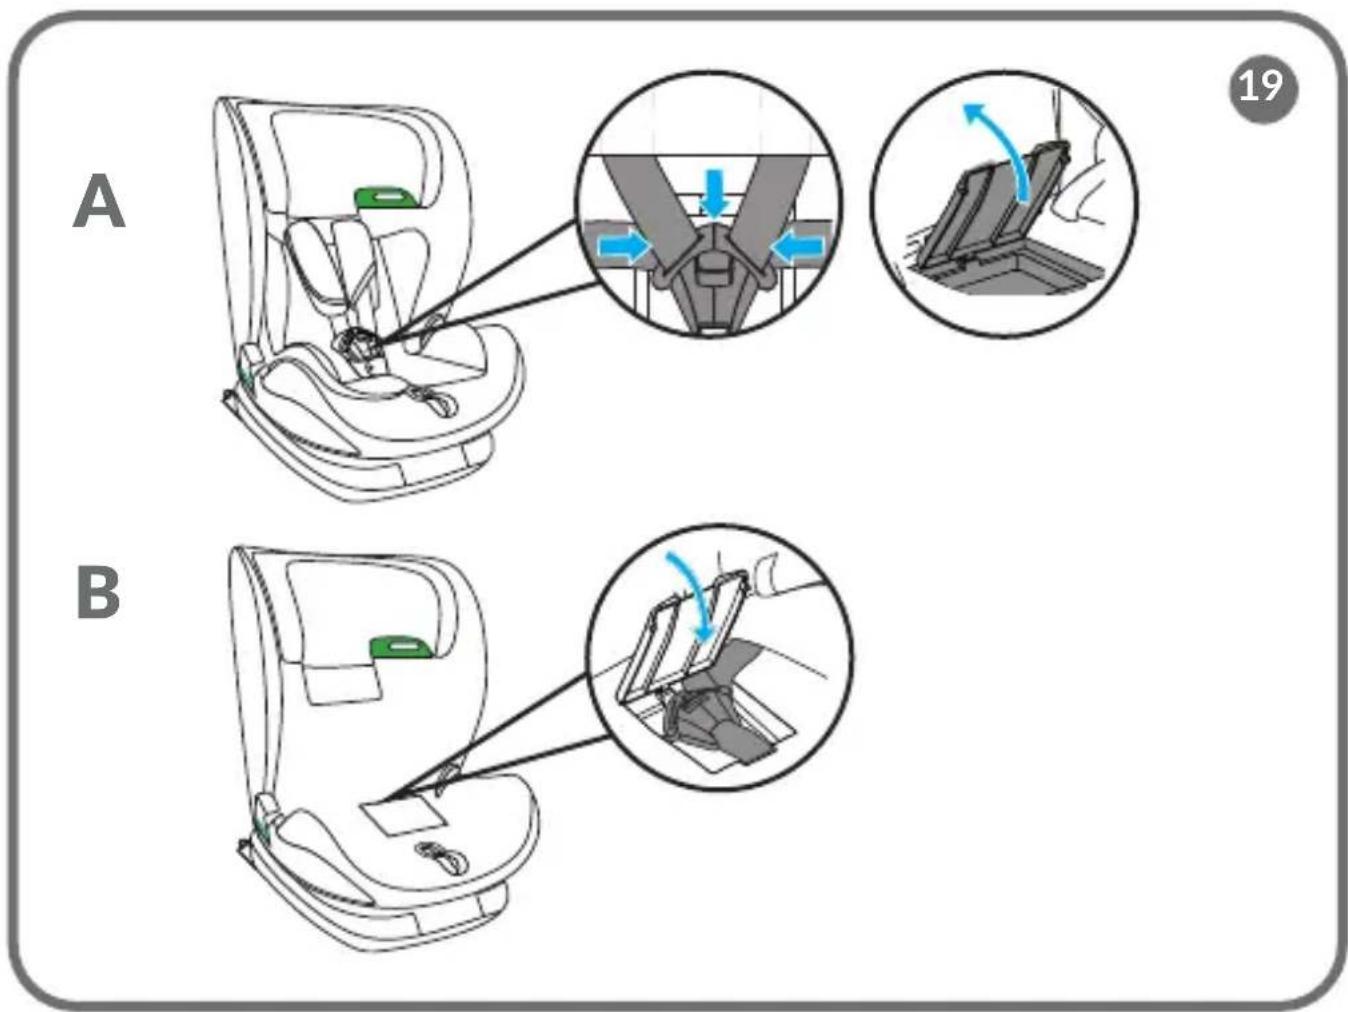
Dear customer!
Should you have any remarks or questions concerning the product, please do not hesitate to contact us: help@lionelo.com
Producer:
BrandLine Group Sp. z o. o.
The product meets the requirements of the standard: R129/03.
Information for the 76 to 105 cm height group
NOTE
This is an improved child restraint system for the “i-Size” category. It has been approved, in accordance with UN Regulation 129, for use in seating positions of the “i-Size” category as indicated by the vehicle manufacturers in the vehicle owner's manual.
If in doubt, consult the manufacturer or retailer of the enhanced child restraint system.
Information for the 100 to 150 cm height group
NOTE
This is an improved child restraint system of the "i-Size category booster seat" type.
It has been approved in accordance with UN Regulation No. 129, for use primarily in the seating positions for “i-Size” as indicated by vehicle manufacturers in the vehicle owner's manual.
If in doubt, consult the manufacturer or retailer of the enhanced child restraint system.
The product is only suitable for installation on the locations marked with the symbol

in fig. A, marked i-Size.
The product is only suitable for installation in the seat marked with the symbol ✗ in fig. A forward-facing and with the airbag deactivated. It is recommended that the seat should only be installed in the rear seats of the car.
WARNINGS:
- The product is designed for children between 76 and 150 cm in height.
-
Important! Do not use the seat if your child's age is less than 15 months.
-
The hard parts and plastic parts of the child restraint must be positioned and installed in such a way that they cannot be trapped by a sliding seat or vehicle door under normal vehicle operating conditions.
- Any child restraint belts must be snugly fitted to the size of the child. Belts must not be twisted.
- The straps securing the restraint to the vehicle must be tight.
- Ensure lap belts run low to adequately secure the pelvis.
- If the product has been exposed to strong factors (such as impact), it must be replaced.
- Do not make any changes to the seat or add any new components without the approval of the approval authority. To ensure maximum safety for your child, the equipment must be secured and used as recommended in the instruction manual.
- The plastic parts of this seat can heat up in the sun and cause burns on the child's skin.
- Never leave a child alone in a seat in a vehicle.
- Luggage and other similar items should be secured so that they do not cause any injury in a collision situation.
- Do not use the seat without its fabric cover.
- The cover cannot be replaced with an item from another set. It is an integral part of the set and affects the operation of the restraint system.
- Always carry this instruction manual with you.
- Refer to the vehicle manufacturer's owner's manual.
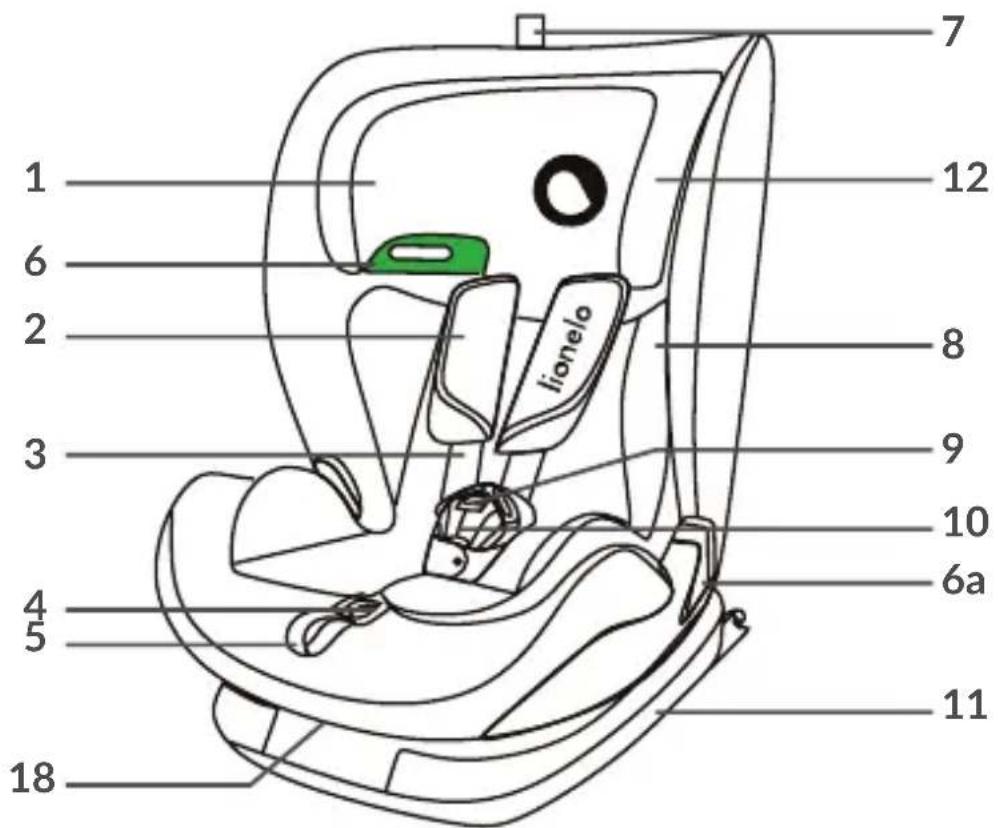
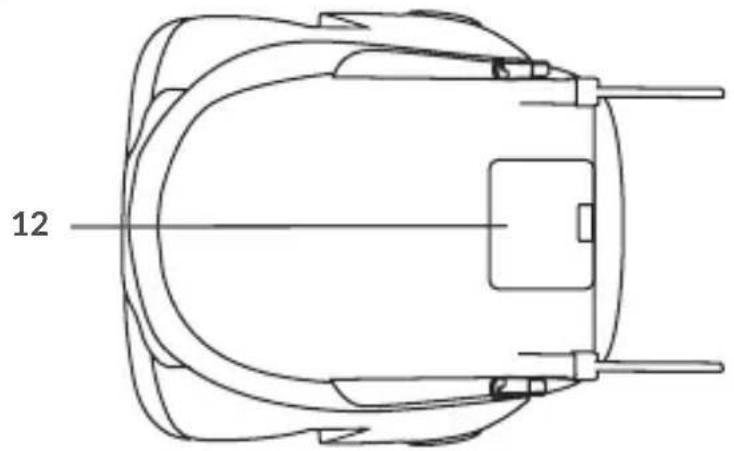
PARTS LIST (FIG. B)
- Headrest
- Protective cushions for the seat belts
- Seat shoulder belts
- Belt tension adjustment button
- Seat belt adjustment strap
- Shoulder belt guide
6a. Lap belt guide - Headrest adjustment lever
- Reduction pad
-
Seat belt buckle
-
Buckle cover
- Base
- Instruction manual compartment
- ISOFIX connectors
- ISOFIX lever
14a. ISOFIX removal button - Top Tether belt
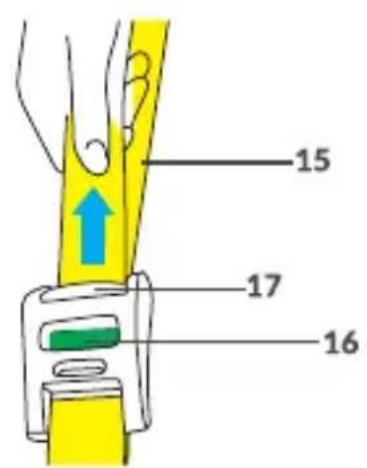
- Top Tether indicator
- Top Tether belt length adjuster
- Backrest tilt adjustment lever
INSTALLATION IN THE CAR
| Seat installation Seat | orientation | Seat position Child's | measurements |
| - Installation using ISOFIX and Top Tether belt- Child restrained by seat beltPosition the seat in one of the 5 available positions (see: Seat tilt adjustment). | Forward-facing | 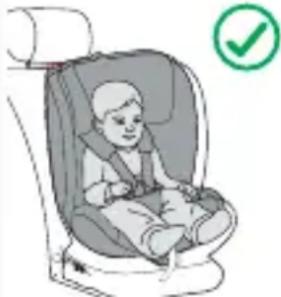 | From 76 to 105 cmChild's weight: maximum 18 kg |
| - Installation using ISOFIX and car belts - Installation using car belts onlyPosition the seat in one of the 5 available positions (see: Seat tilt adjustment). | Forward-facing | 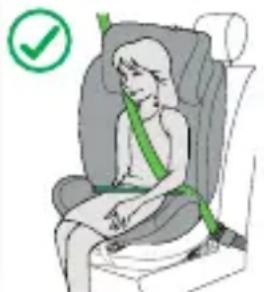 | From 100 to 150 cm |
FORWARD-FACING (76 - 105 CM)
- Place the seat on the vehicle's seat in the position designated for installation.
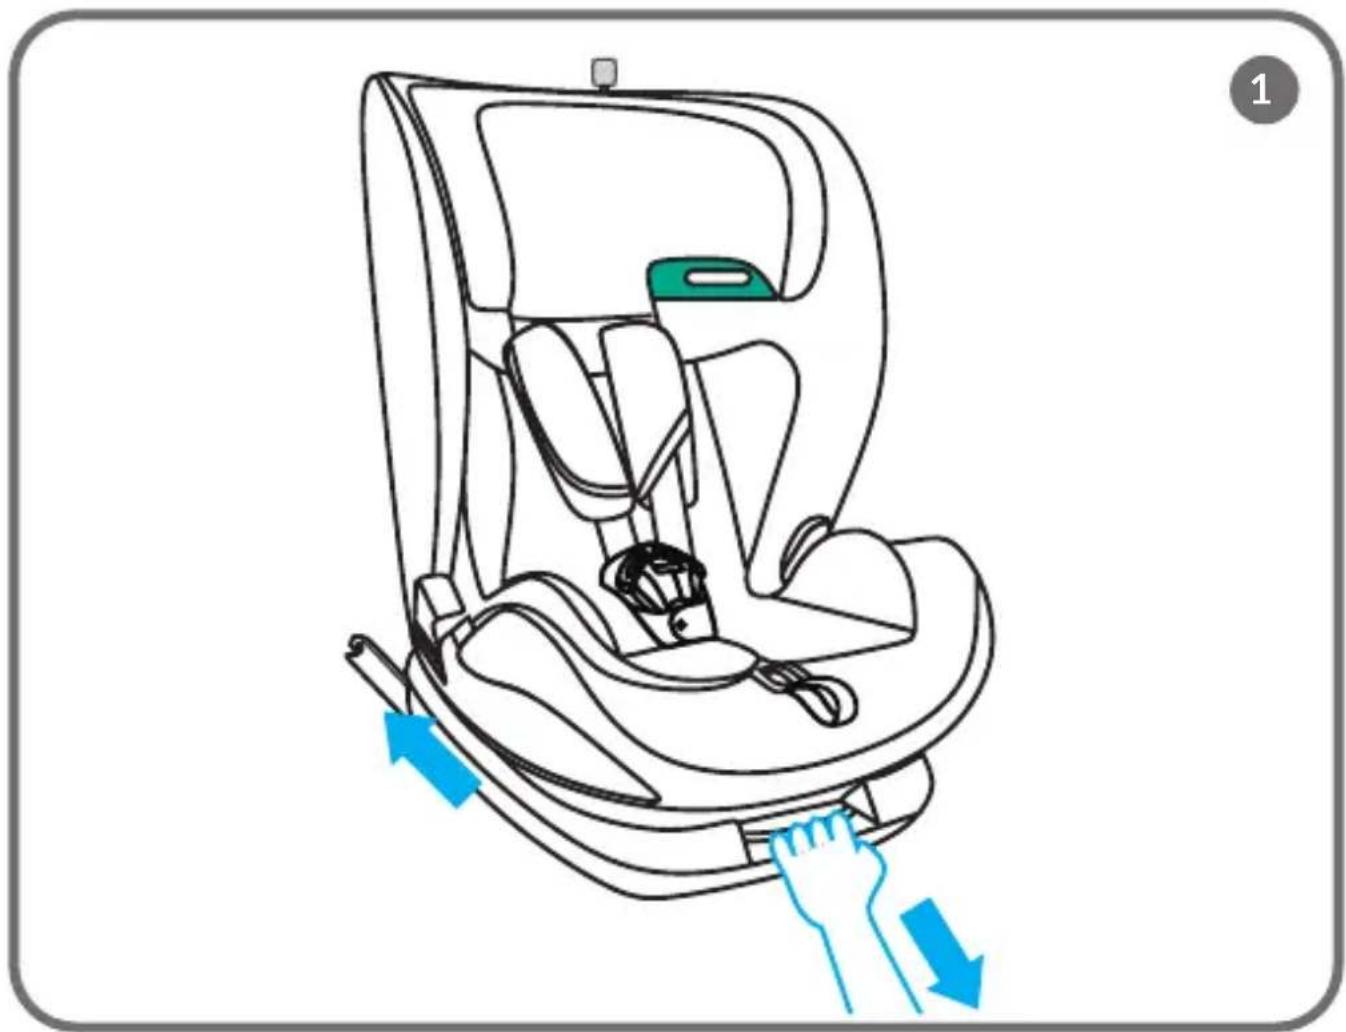
- Push the ISOFIX lever (14, fig. B) and the ISOFIX arms extend automatically (fig. 1). Anchor the ISOFIX arms in the attachments located in the car seat. The arms will interlock and you will hear a characteristic click (fig. 2).
- The green indicator on the ISOFIX button must be visible on both sides (fig. 3).
- Push the ISOFIX lever (14, fig. A) and press the seat against the backrest of the car seat. Push the base with a left-right movement towards the backrest to make sure it is pushed as tight as possible against the car seat.
- Adjust the seat angle to one of the 5 available positions (see: Seat tilt adjustment).
NOTE! Any change in the tilt of the backrest during use of the seat requires readjustment of the length of the Top Tether belt.
- Unbuckle the Top Tether belt, then press the length adjuster (17, fig. B) to adjust the belt length and move the buckle and hook to the end of the belt.
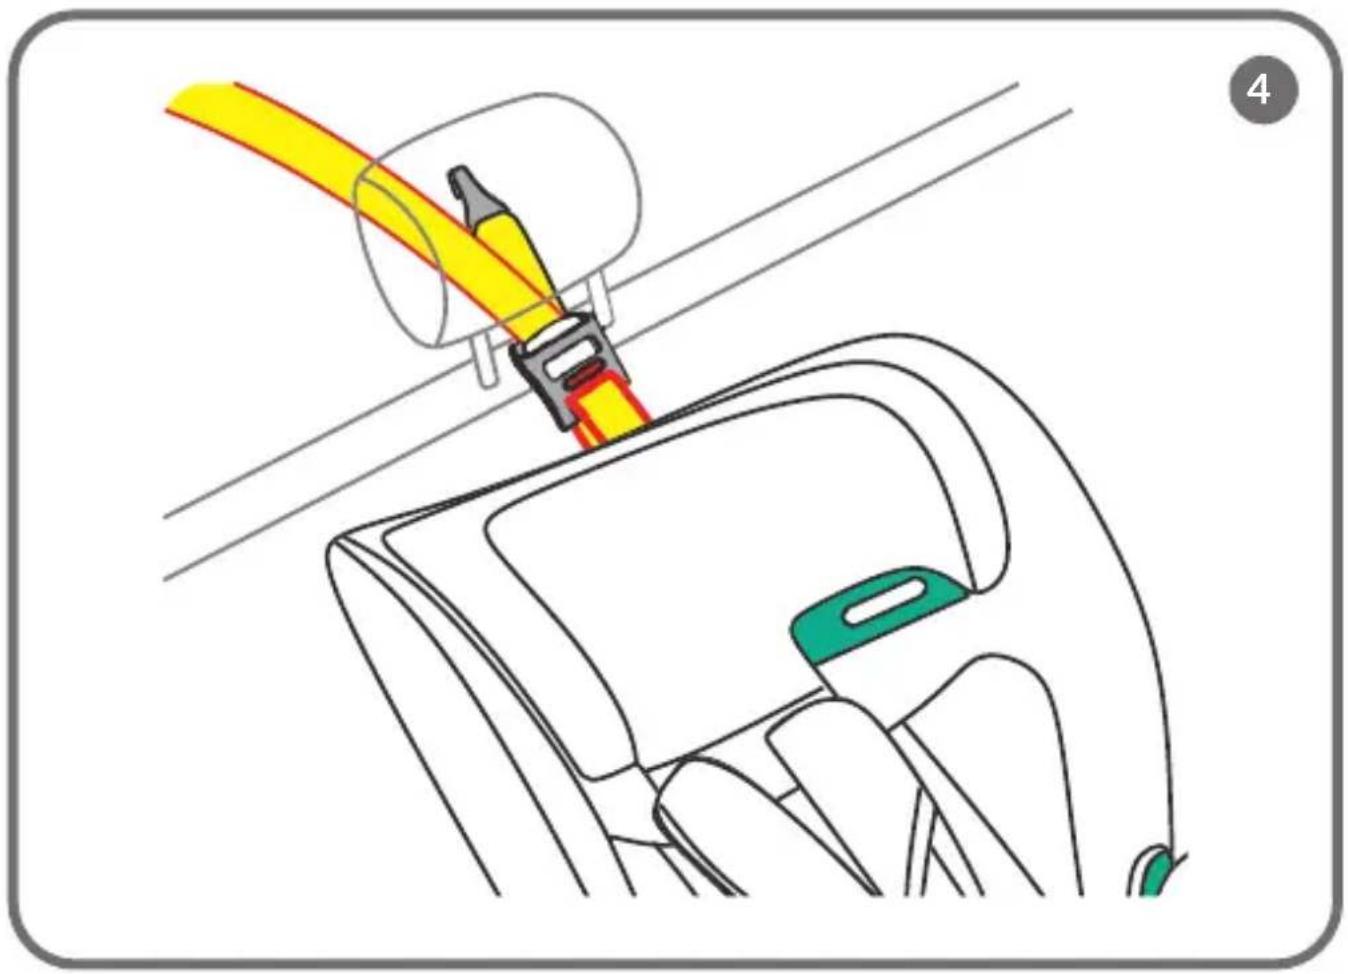
- Route the Top Tether belt under the headrest of the car seat (fig. 4).
- Attach the Top Tether belt to an anchor point in the car (fig. 5). The anchor points may be in different locations depending on the vehicle (fig. 6).
-
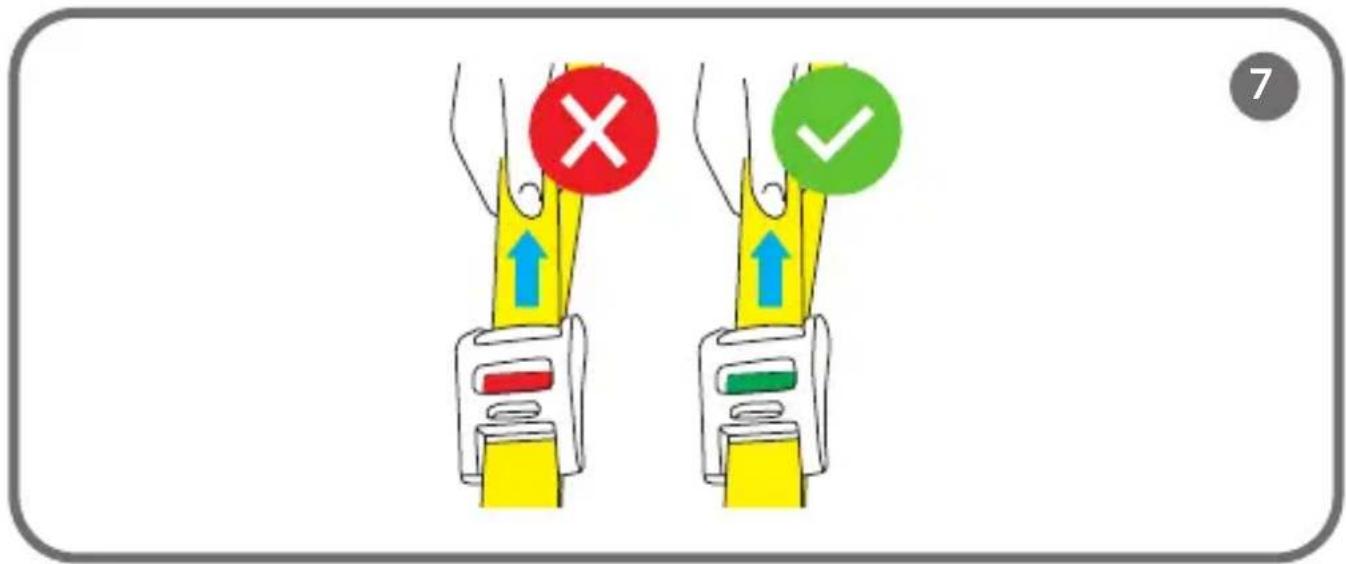
Tighten the Top Tether belt as tight as possible and make sure the indicator is green (fig. 7). The seat is now correctly installed in the car.
-
Place your child in the seat and adjust the headrest (see: Headrest adjustment).
- Fasten the seat belts (see: Fastening and unfastening the child in the seat).
FORWARD-FACING (100 - 150 CM)
- Retract the Top Tether belt (see: Retracting the Top Tether belt).
- Retract the seat belts (see: Retracting the 5-point seat belts).
- Place the seat on the vehicle's seat in the position designated for installation.
- Adjust the tilt of the seat in the sitting position (see: Seat tilt adjustment).
Note! If installing without ISOFIX system, skip steps 5 to 7.
- Push the ISOFIX lever (14, fig. B) and the ISOFIX arms extend automatically (fig. 1). Anchor the ISOFIX arms in the attachments located in the car seat. The arms will interlock and you will hear a characteristic click (fig. 2).
- The green indicator on the ISOFIX button must be visible on both sides (fig. 3).
- Push the ISOFIX lever (14, fig. A) and press the seat against the backrest of the car seat. Push the base with a left-right movement towards the backrest to make sure it is pushed as tight as possible against the car seat.
- Place your child in the seat and adjust the headrest (see: Headrest adjustment).
- Remove the car seat belt.
- Guide the shoulder belt through the shoulder belt guide, which is located at the bottom of the seat headrest (A, fig. 8). Guide the lap belt through the lap belt guide (B, fig. 8).
- Fasten the seat belt. You will hear a characteristic click.
- Make sure the belts are not twisted.
- Make sure the belts are correctly positioned in the guides and tightened, and that the buckle is not too close to the lap belt guide (fig. 8).
FASTENING AND UNFASTENING THE SEAT BELTS
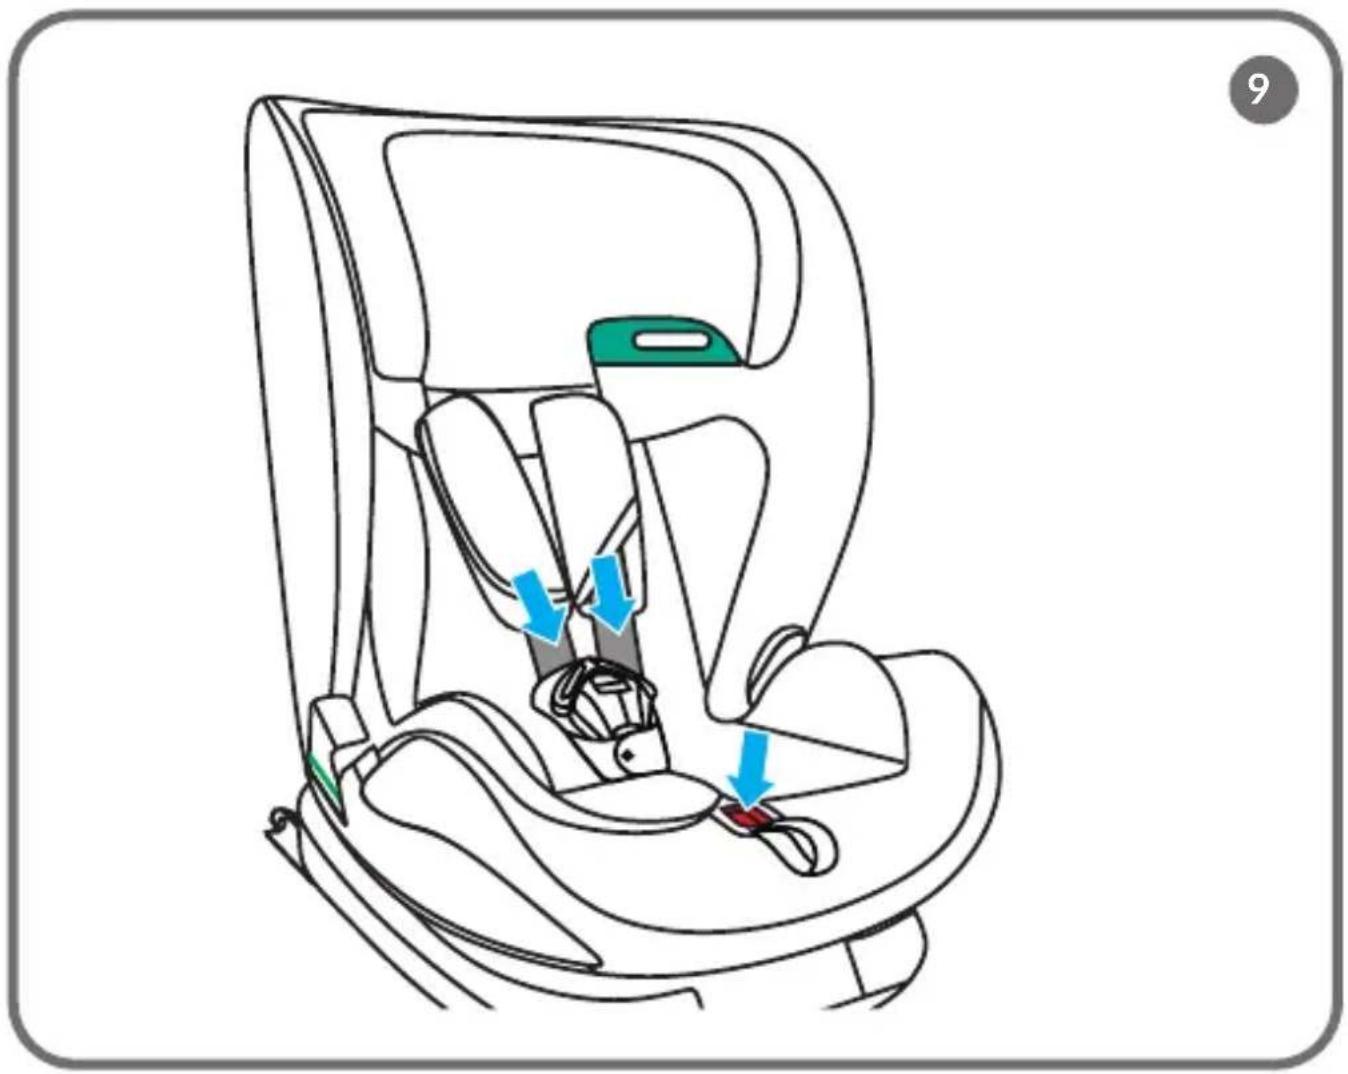
- Loosen the seat belts by pressing the tension adjustment button (4, fig. B) and pulling the seat belts (fig. 9).
- Unbuckle the belts by pressing the red button on the buckle (fig. 10).
- Put your child in the seat.
- Adjust the headrest (see: Headrest adjustment).
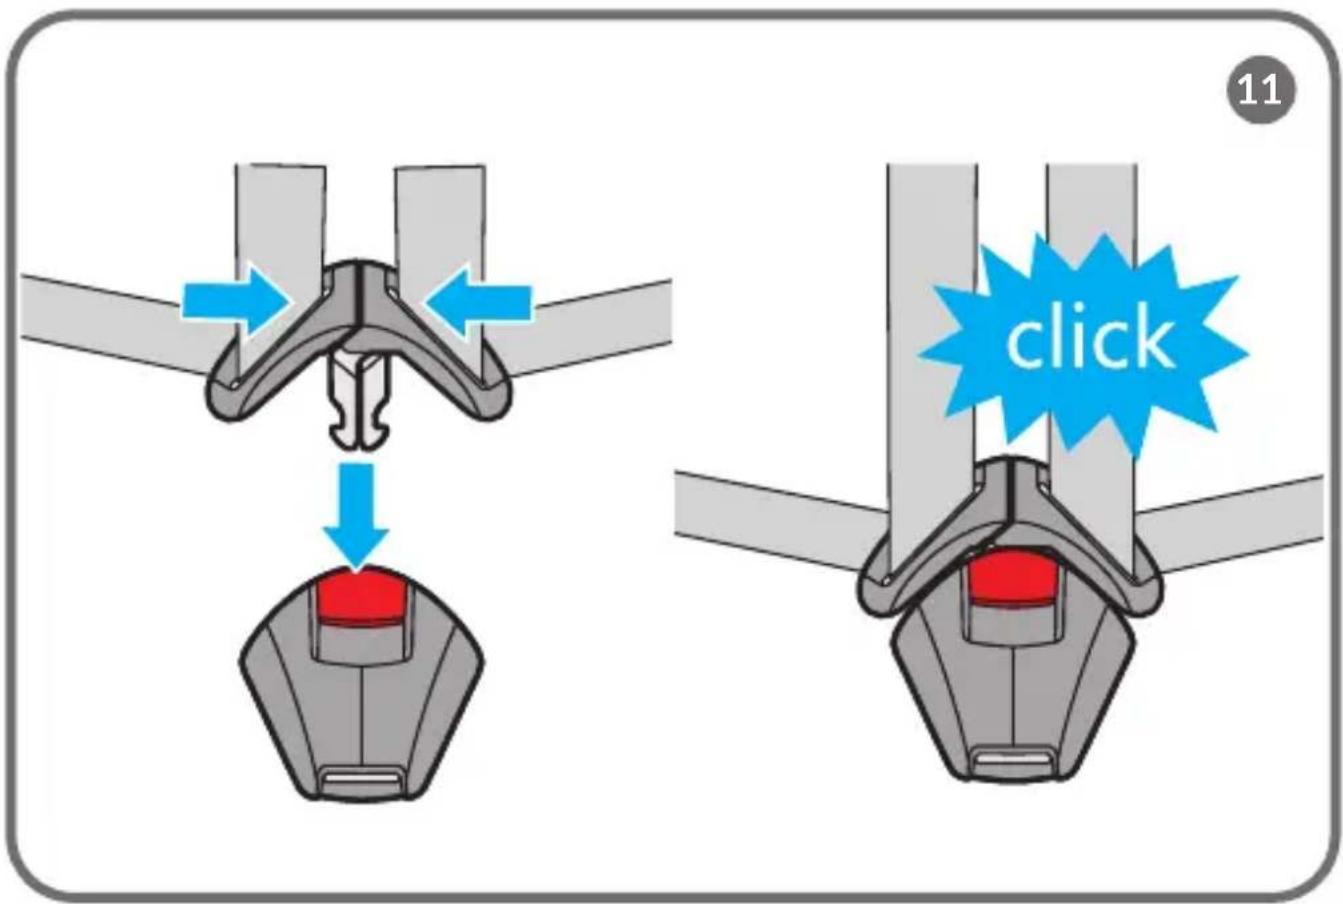
- Connect the belt connectors (fig. 11) and then insert them into the buckle. You will hear a characteristic click. The seat belts are now fastened.
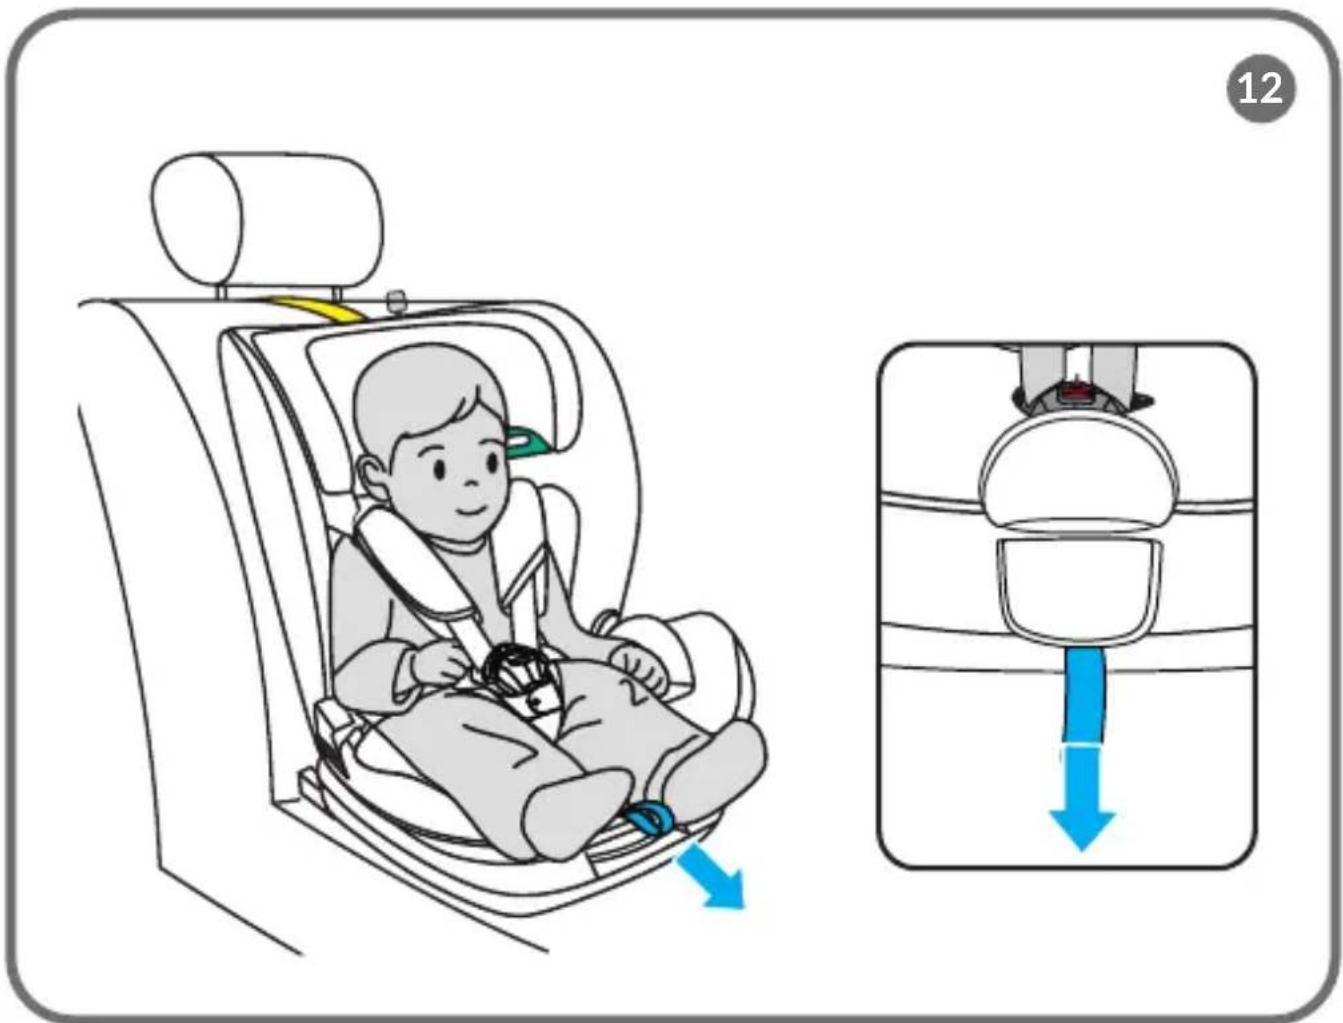
- To tighten the belts, pull the belt tension adjustment strap (fig. 12). To loosen the
belts, press the belt adjustment button and pull on the shoulder belts.
Note! Make sure the seat belts are taut, close to the child's body and not twisted. Make sure the lap belts run low and protect the child's pelvis. The belts should be tight against the child's body, but should not be too tight and cause discomfort.
Note! Children under 87 cm in height may only use the seat with a reduction pad.
HEADREST ADJUSTMENT
To change the height of the headrest:
- Unbuckle and loosen the seat belts by holding down the seat belt tension adjustment button (4, fig. B). This will allow you to adjust the height of the headrest more freely.
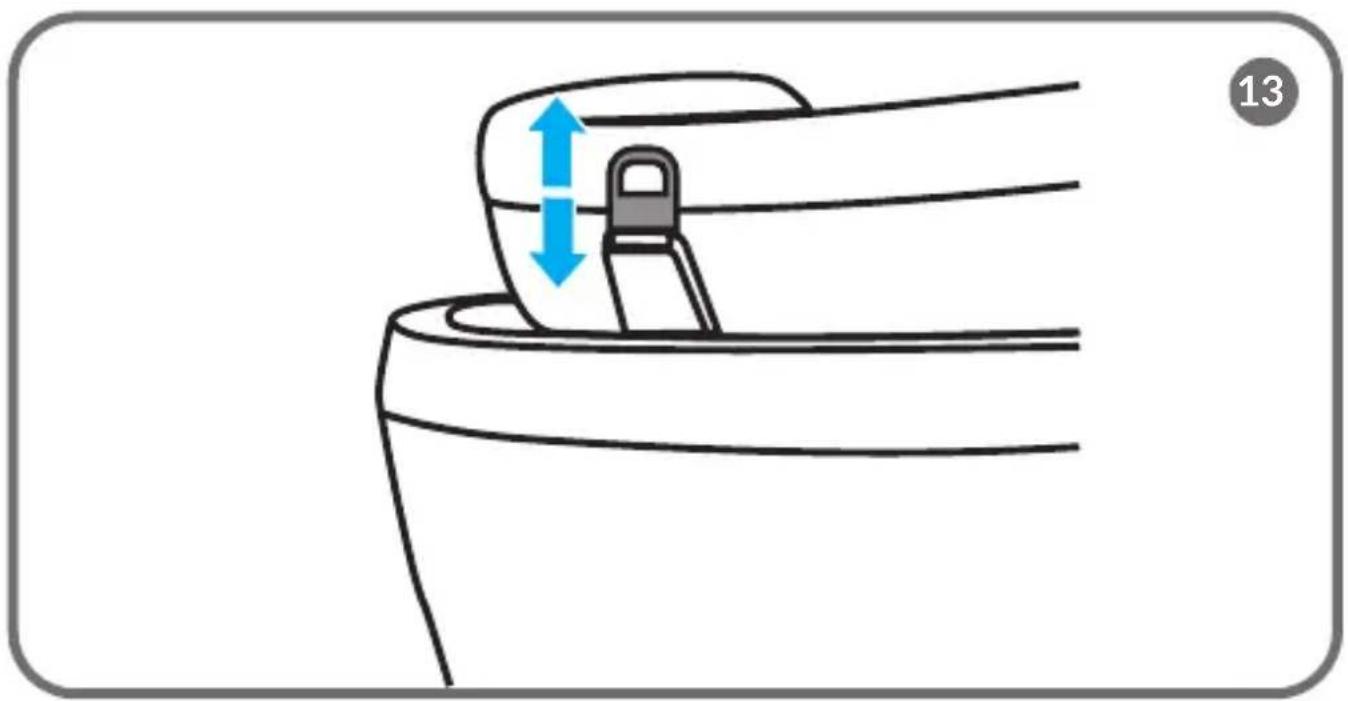
- Pull the headrest adjustment lever (fig. 13).
The shoulder belt height setting is integrated into the headrest height setting. By adjusting the height of the headrest, the height of the shoulder belts will be set automatically.
Note! The headrest should be adjusted so that the shoulder belts are not too high, for example at or above the ear line, nor too low, for example behind the child's back. The shoulder belts should be at child's shoulder height (fig. 14).
RETRACTING THE TOP TETHER BELT
Unfasten and retract the Top Tether belt and place it, together with the length adjuster, in the storage compartment located in the rear outer part of the seat (fig. 15).
RETRACTING 5-POINT SEAT BELTS
NOTE! The following information is valid for the 100 - 150 cm group.
- Unbuckle the seat belts by pressing the red button on the buckle (fig. 10).
- Remove the reduction pad (fig. 16) and take off the cover of the seat belt buckle (fig. 17).
- Unfasten the metal clasps on the upper part of the backrest cover and lift this part upwards.
- Pull the seat belt buckle through the corresponding hole in the seat cover (fig. 18) and release the crotch belt by pulling the metal buckle through the hole in the seat.
- Unfasten the metal clasps on the lower part of the backrest cover.
- Connect the belt connectors and then insert them into the buckle (A, fig. 19). You will hear a characteristic click.
- Place the fastened seat belt buckle in the storage compartment located in the
seat under the seat cover. Close the compartment (B, fig. 19).
- Unfasten the metal clasps located on the lower backrest cushion, then place all the seat belt components in the space under the lower backrest cover.
- Lower the upper part of the backrest cover and fasten the metal clasps again.
REMOVING THE SEAT - ISOFIX
To detach the ISOFIX arms, push in the ISOFIX lever (14, fig. B). The arms will slide out of the base. Then press the ISOFIX removal buttons (14a, fig B) on each side – the arms will disengage. The indicator on the ISOFIX button will turn red. Press the ISOFIX lever (14, fig B) again and retract the arms by sliding them into the seat base on one side.
REMOVING THE SEAT - TOP TETHER
Loosen the belt. Unbuckle the Top Tether belt from the anchor points in the car. The indicator will turn red.
SEAT TILT ADJUSTMENT
To adjust the seat tilt, push the seat tilt adjustment lever (18, fig. B) and move the seat to the desired position. A click signals the correct setting.
The seat has 5 levels of backrest tilt adjustment forward and rearward facing.
REMOVING AND ATTACHING THE COVER
The cover must be unzipped and slid completely off the seat body. To do this:
- Adjust the headrest to the highest available position (see: Headrest adjustment).
- Unbuckle the seat belts (see: Fastening and unfastening the seat belts).
- Unfasten and remove the seat belt protection cushions.
- Start the removal from the cover located on the headrest.
- Unfasten the metal clasps and then remove the rest of the cover.
To reinstall the cover on the seat, follow the above steps in reverse order.
CLEANING AND MAINTENANCE
The cover can be washed by hand at a maximum temperature of 30^ C. Do not use tumble dryers when drying. The cover should not be exposed to sunlight for drying.
Plastic parts can be cleaned with a damp cloth and mild detergent.
Note! Do not use strong detergents or bleaching agents.
PL
Drogi Kliencie!
BrandLine Group Sp. z o.o.
A TOP TETHER ÖV ELREJTÉSE
DEMONTAREA SCAUNULUI - TOP TETHER
JUSTERING AV NACKSTÖDET
- Dear customer!
- Producer:
- The product meets the requirements of the standard: R129/03.
- Information for the 76 to 105 cm height group
- NOTE
- Information for the 100 to 150 cm height group
- WARNINGS:
- PARTS LIST (FIG. B)
- INSTALLATION IN THE CAR
- FORWARD-FACING (76 - 105 CM)
- NOTE! Any change in the tilt of the backrest during use of the seat requires readjustment of the length of the Top Tether belt.
- FORWARD-FACING (100 - 150 CM)
- Note! If installing without ISOFIX system, skip steps 5 to 7.
- FASTENING AND UNFASTENING THE SEAT BELTS
- HEADREST ADJUSTMENT
- RETRACTING THE TOP TETHER BELT
- RETRACTING 5-POINT SEAT BELTS
- REMOVING THE SEAT - ISOFIX
- REMOVING THE SEAT - TOP TETHER
- SEAT TILT ADJUSTMENT
- REMOVING AND ATTACHING THE COVER
- CLEANING AND MAINTENANCE
- PL
- Drogi Kliencie!
- A TOP TETHER ÖV ELREJTÉSE
- DEMONTAREA SCAUNULUI - TOP TETHER
- JUSTERING AV NACKSTÖDET
Brand : Lionelo
Model : Lavender i-Size
Category : Car seat