USER MANUAL TORSBODA IKEA
Restriction on user group.... 5
Safe installation.... 5
Safe use .... 6
Damaged appliance....7
Risk to children....7
Preventing material damage.... 9
Safe installation....9
Safe use 9
Environmental protection and saving energy.... 9
Disposing of packaging....9
Saving energy 9
Aqua sensor 9
Automatic door opening 10
Installation and connection.... 10
Scope of supply .... 10
Installing and connecting the appliance .... 10
Drainage connection.... 10
Drinking water connection 10
Electrical connection.... 10
Product description 11
Appliance.... 11
Control panel .... 12
Overview of programmes 14
Information for test institutes.... 14
Additional functions 15
Features.... 15
Top basket 15
Bottom basket.... 16
Cutlery drawer 16
Etagere 17
Folding prongs 17
Basket heights.... 18
Before first use 18
Performing the initial configuration.... ... 18
Water softening system.... 18
Overview of water hardness settings 18
Setting the water softening system.... 18
Special salt 19
Switching off the water softening system.... 19
Regeneration of the water softening system .... 19
Rinse aid system 19
Rinse aid .... 19
Setting the amount of rinse aid .... 20
Switching the rinse aid system off .... 20
Detergent 20
Suitable detergents 20
Unsuitable detergents 21
Information on detergents .... 21
Adding detergent .... 21
Tableware 22
Damage to glass and tableware.... 22
Arrange tableware .... 22
Removing tableware .... 23
Basic operation .... 23
Switching on the appliance.... 23
Setting a programme.... 23
Setting additional functions.... 23
Setting timer programming.... 23
Starting the programme .... 23
Interrupting programme.... 23
Terminate programme.... 23
Switching off appliance .... 23
Basic settings.... 24
Overview of basic settings.... 24
Changing basic settings 25
Cleaning and servicing.... 25
Cleaning the tub 25
Cleaning products.... 25
Tips on appliance care.... 25
Machine Care 25
Filter system.... 26
Cleaning spray arms 27
Troubleshooting.... 28
Appliance safety 28
Error code / Fault display / Signal.... 28
Washing results.... 30
Information on display panel.... 34
Malfunctions 34
Mechanical damage.... 35
Noise 35
Clean wastewater pump.... 36
Transportation, storage and disposal .... 36
Removing the appliance.... 36
Protect appliance from frost.... 36
Transporting the appliance .... 36
Disposing of old appliance .... 37
Technical specifications .... 37
Information regarding free and open source software... ... 37
Declaration of Conformity .... 37
IKEA guarantee 38
After-sales service.... 39

Safety
Observe the following safety instructions.
- Read this instruction manual carefully.
- Keep the instruction manual and the product information safe for future reference or for the next owner.
- Do not connect the appliance if it has been damaged in transit.
Intended use
Only use this appliance:
- For cleaning household tableware.
- in private households and in enclosed spaces in a domestic environment.
- Up to an altitude of 4000 m above sea level.
Restriction on user group
This appliance may be used by children aged 8 or over and by people who have reduced physical, sensory or mental abilities or inadequate experience and/or knowledge, provided that they are supervised or have been instructed on how to use the appliance safely and have understood the resulting dangers.
Do not let children play with the appliance.
Cleaning and user maintenance must not be performed by children unless they are being supervised.
Keep children under the age of 8 years away from the appliance and power cable.
Safe installation

WARNING – Risk of injury!
- Improper installation may cause injury.
- When installing and connecting the appliance, follow the instructions in the manual and installation instructions.

WARNING – Risk of electric shock!
- Incorrect installation is dangerous.
- Connect and operate the appliance only in accordance with the specifications on the rating plate.
• Always use the supplied power cable for the new appliance.
- Connect the appliance to a power supply with alternating current only via a properly installed socket with earthing.
- The protective conductor system of the domestic electrical installation must be properly installed.
- Never equip the appliance with an external switching device, e.g. a timer or remote control.
- When the appliance is installed, the mains plug of the power cord must be freely accessible. If free access is not possible, an isolating switch must be integrated into the permanent electrical installation according to the installation regulations.
- When installing the appliance, check that the power cable is not trapped or damaged.
- Cutting through the supply hose or immersing the Aqua-Stop valve in water is dangerous.
- Never immerse the plastic housing in water. The plastic housing on the supply hose contains an electric valve.
- Never cut through the supply hose. The supply hose contains electric power cables.
⚠ WARNING – Risk of fire!
- It is dangerous to use an extended power cord and non-approved adapters.
- Do not use extension cables or multiple socket strips.
- Only use adapters and power cords approved by the manufacturer.
- If the power cord is too short and a longer one is not available, please contact an electrician to have the domestic installation adapted.
- Contact between the appliance and installation lines may lead to a defect in these lines, e.g. gas pipes and power lines. Gas from a corroded gas pipe can ignite. A damaged power line can cause a short circuit.
- Check that there is a distance of at least 5 cm between the appliance and installation lines.
⚠ WARNING – Risk of injury!
- Hinges move when opening and closing the appliance door and can cause injury.
- If built-under or integrable appliances are not in a cavity so that one side is accessible, the hinge area must be covered at the side. Covers are available from IKEA or Customer Service.
⚠ WARNING – Risk of tipping!
- Improper installation may cause the appliance to tip up.
- Only install built-under or integrable appliances under a continuous worktop that is securely connected to adjacent cabinets.
Safe use
⚠ WARNING – Risk of serious harm to health!
- Failure to comply with safety instructions and directions for use on packagings of detergent and rinse aid products may cause serious harm to health.
- Follow the safety instructions and directions for use on the packagings of detergent and rinse aid products.
⚠ WARNING – Risk of explosion!
- Adding solvents to the interior of the appliance may cause explosions.
- Never add solvents to the interior of the appliance.
- Highly caustic alkaline or highly acidic cleaning agents in conjunction with aluminium parts in the interior of the appliance may cause explosions.
- Never use highly caustic alkaline or highly acidic cleaning agents, in particular commercial or industrial products, in conjunction with aluminium parts (e.g. grease filters of extractor hoods or aluminium pans), e.g. for the Machine Care programme.
⚠ WARNING – Risk of injury!
• Leaving the appliance door open may result in injury.
- Only open the appliance door to load or unload tableware in order to prevent accidents, e.g. through tripping.
- Do not sit or stand on the appliance door when open.
- Knives and utensils with sharp points can cause injuries.
- Arrange knives and utensils with sharp points in the cutlery basket with the points downwards, on the knife shelf or in the cutlery drawer.
⚠ WARNING – Risk of scalding!
- If you open the appliance door while the programme is running, hot water may splash out of the appliance.
- Open the appliance door carefully if the programme is still running.
⚠ WARNING – Risk of electric shock!
- An ingress of moisture can cause an electric shock.
- Only use the appliance in enclosed spaces.
- Never expose the appliance to intense heat or humidity.
- Do not use steam- or high-pressure cleaners to clean the appliance.
- If the insulation of the power cord is damaged, this is dangerous.
- Never let the power cord come into contact with hot appliance parts or heat sources.
- Never let the power cord come into contact with sharp points or edges.
- Never kink, crush or modify the power cord.
Damaged appliance
⚠ WARNING – Risk of electric shock!
- If the appliance or the power cord is damaged, this is dangerous.
- Never operate a damaged appliance.
- Never operate an appliance with a cracked or fractured surface.
- Never pull on the power cord to unplug the appliance. Always unplug the appliance at the mains.
- If the appliance or the power cord is damaged, immediately unplug the power cord or switch off the fuse in the fuse box and turn off the water tap.
- Call customer services.
- Incorrect repairs are dangerous.
• Repairs to the appliance should only be carried out by trained specialist staff.
- Only use genuine spare parts when repairing the appliance.
- If the power cord or the appliance power cable of this appliance is damaged, it must be replaced with a special power cord or special appliance power cable, which is available from the manufacturer or its Customer Service.
Risk to children
⚠ WARNING – Risk of suffocation!
- Children may put packaging material over their heads or wrap themselves up in it and suffocate.
- Keep packaging material away from children.
- Do not let children play with packaging material.
• Children may breathe in or swallow small parts, causing them to suffocate.
- Keep small parts away from children.
- Do not let children play with small parts.
• Children may become trapped in the appliance and suffocate.
- Use the childproof lock if fitted.
- Never let children play with or operate the appliance.
⚠ WARNING – Risk of harm to health!
• Children can lock themselves in the appliance, thereby putting their lives at risk.
- With redundant appliances, unplug the power cord. Then cut through the cord and damage the lock on the appliance door beyond repair so that the appliance door will no longer close.
⚠ WARNING – Risk of crushing!
- With higher-level appliances, children can become crushed between the appliance door and cabinet doors underneath.
- Keep an eye on children when opening and closing the appliance door.
⚠ WARNING – Risk of chemical burns!
- Rinse aid and detergent may cause chemical burns to the mouth, throat and eyes.
- Keep children away from detergent and rinse aid products.
- Keep children away from the appliance when open. The water in the interior of the dishwasher is not drinking water. It may contain residues of detergents and rinse aid.
⚠ WARNING – Risk of injury!
- Children may get their fingers caught in the slots of the tablet collecting tray and injure themselves.
- Keep children away from the appliance when open.
Preventing material damage
Safe installation
ATTENTION!
- Improper installation of the appliance may cause damage.
- If the dishwasher is installed above or below other domestic appliances, follow the information on installation in combination with a dishwasher in the installation instructions for the individual appliances.
- If there is no information or if the installation instructions do not include the relevant information, contact the manufacturer of these appliances to check that the dishwasher can be installed above or below these appliances.
- If no information is available from the manufacturer, the dishwasher should not be installed above or below such appliances.
- To ensure the safe operation of all domestic appliances, continue following the installation instructions for the dishwasher.
- Do not install the dishwasher under a hob.
- Do not install the dishwasher near heat sources, e.g. radiators, heat storage tanks, ovens or other appliances that generate heat.
- Contact between the appliance and water pipes may lead to corrosion of these pipes, possibly causing them to leak.
- Check that there is a distance of at least 5 cm between the appliance and the water pipe. The pipes supplied for the drinking water and waste water connections are not affected here.
- Modified or damaged water hoses may result in material damage and damage to the appliance.
- Never kink, crush, modify or cut through water hoses.
- Only use the water hoses supplied with the appliance or genuine spare hoses.
- Never re-use water hoses that have been used before.
- If the water pressure is too high or too low, the appliance may not be able to operate properly.
- Make sure that the water pressure in the water supply system is min. 50 kPa (0.5 bar) and max. 1000 kPa (10 bar).
- If the water pressure exceeds the maximum value specified, a pressure-reducing valve must be installed between the drinking water connection and the hose set of the appliance.
Safe use
ATTENTION!
- Escaping water vapour can damage fitted units.
- When the programme ends, leave the appliance to cool down for a while before opening the door.
- Special salt for dishwashers can damage the tub due to corrosion.
- To make sure that any special salt that escapes is washed out of the tub, add the special salt to the dispenser for special salt immediately before the programme starts.
- Detergent may damage the water softening system.
- Only fill the dispenser of the water softening system with special dishwasher salt.
• Unsuitable cleaning agents may damage the appliance.
- Do not use a steam cleaner.
- So as not to scratch the finish on the appliance, do not use sponges with a rough surface or abrasive cleaning agents.
- To prevent corrosion, do not use sponge cloths on dishwashers with a stainless steel front or rinse such cloths thoroughly several times before using them for the first time.
Environmental protection and saving energy
Disposing of packaging
The packaging materials are environmentally compatible and can be recycled.
- Sort the individual components by type and dispose of them separately.
Information about current disposal methods is available from IKEA or your local authority.
Saving energy
If you follow these instructions, your appliance will use less electricity and less water.
Use the Eco 50° programme.
+ The Eco 50 ° programme is energy-efficient and environmentally friendly.
If you do not have much tableware to wash, use the additional Half Load function. ^1
The programme will adjust to a lower load and consumption will be reduced.
→ "Additional functions", Page 15
Aqua sensor
The aqua sensor is an optical measuring device (light barrier) which measures the turbidity of the washing water. You can save water with the aqua sensor.
Use of the aqua sensor depends on the programme. If the soiling level is high, the rinsing water is drained off and replaced with fresh water. If the soiling level is lower, the rinsing water is used in the next wash cycle, so reducing water consumption by 3-6 litres. In the automatic programmes the temperature and running time are additionally adjusted to the level of soiling.
Automatic door opening
The appliance door opens automatically during the drying phase. This ensures a particularly economical drying result.
For best drying results wait until the end of programme before unloading the tableware. The programme has ended when the display shows "0h:00m".
If automatic door opening is deactivated, energy consumption increases and the drying phase is usually shortened.
→ "Overview of basic settings", Page 24
Installation and connection
To ensure proper operation, connect the appliance to the power and water supply correctly. Observe the specified criteria and the installation instructions.
Scope of supply
After unpacking all parts, check for any damage in transit and completeness of the delivery.
If you have any complaints, contact IKEA or our Customer Service.
Note: The appliance has been tested at the factory to check it is in working order. It is possible that water has left marks on the appliance. These marks will disappear after the first wash cycle.
The delivery consists of the following:
- Dishwasher
- Operating instructions
• Installation Instructions
• Installation material
- Steam protection
- Salt filling aid funnel
- Mains cable
Installing and connecting the appliance
You can position your built-under or integrable appliance in a fitted kitchen between wooden and plastic walls. If you subsequently install your dishwasher as a free-standing appliance, you must stop it from tipping over, e.g. by screwing it to the wall or installing it under a continuous worktop that is securely connected to adjacent cabinets.
- "Follow the safety instructions." → Page 5
- "Follow the instructions for electrical connection." Page 10
- Check the Scope of supply and the condition of the appliance.
- Consult the installation instructions for the installation dimensions required.
- Make the appliance level using the height-adjustable feet. Make sure that the appliance is standing on the floor securely.
- "Install the drainage connection." → Page 10
- "Install the drinking water connection." → Page 10
- Connect the appliance to the power supply.
Drainage connection
Connect your appliance to drainage connection so dirty water is discharged via the wash cycle.
Installing the drainage connection
- Consult the installation instructions supplied for the steps required here.
-
Connect the wastewater hose to the outlet connection of the siphon using the enclosed parts.
-
When doing so, check that the wastewater hose is not kinked, crushed or twisted.
- Also check that there is no cover in the drainage system preventing the wastewater from being discharged.
Drinking water connection
Connect your appliance to a drinking water connection.
Installing the drinking water connection
Note
- If you are replacing the appliance, you must use a new water supply hose.
- Consult the installation instructions supplied for the steps required here.
- Connect the appliance to the drinking water connection using the enclosed parts.
Observe the Technical data.
- When doing so, check that the drinking water connection is not kinked, crushed or twisted.
Electrical connection
Connecting the appliance to the electricity supply
Notes
- Please follow the "Safety instructions" Page 5.
- Connect the appliance to alternating current only, in the range of 220 - 240 V and 50 Hz or 60 Hz.
- Please note that the water safety system is only functional if there is a power supply.
- Insert the non-heating appliance plug of the power cable into the appliance.
- Insert the mains plug of the appliance into a nearby socket.
The connection data for the appliance can be found on the rating plate.
- Check that the mains plug is inserted properly.
Product description
Appliance
You can find an overview of the parts of your appliance here.
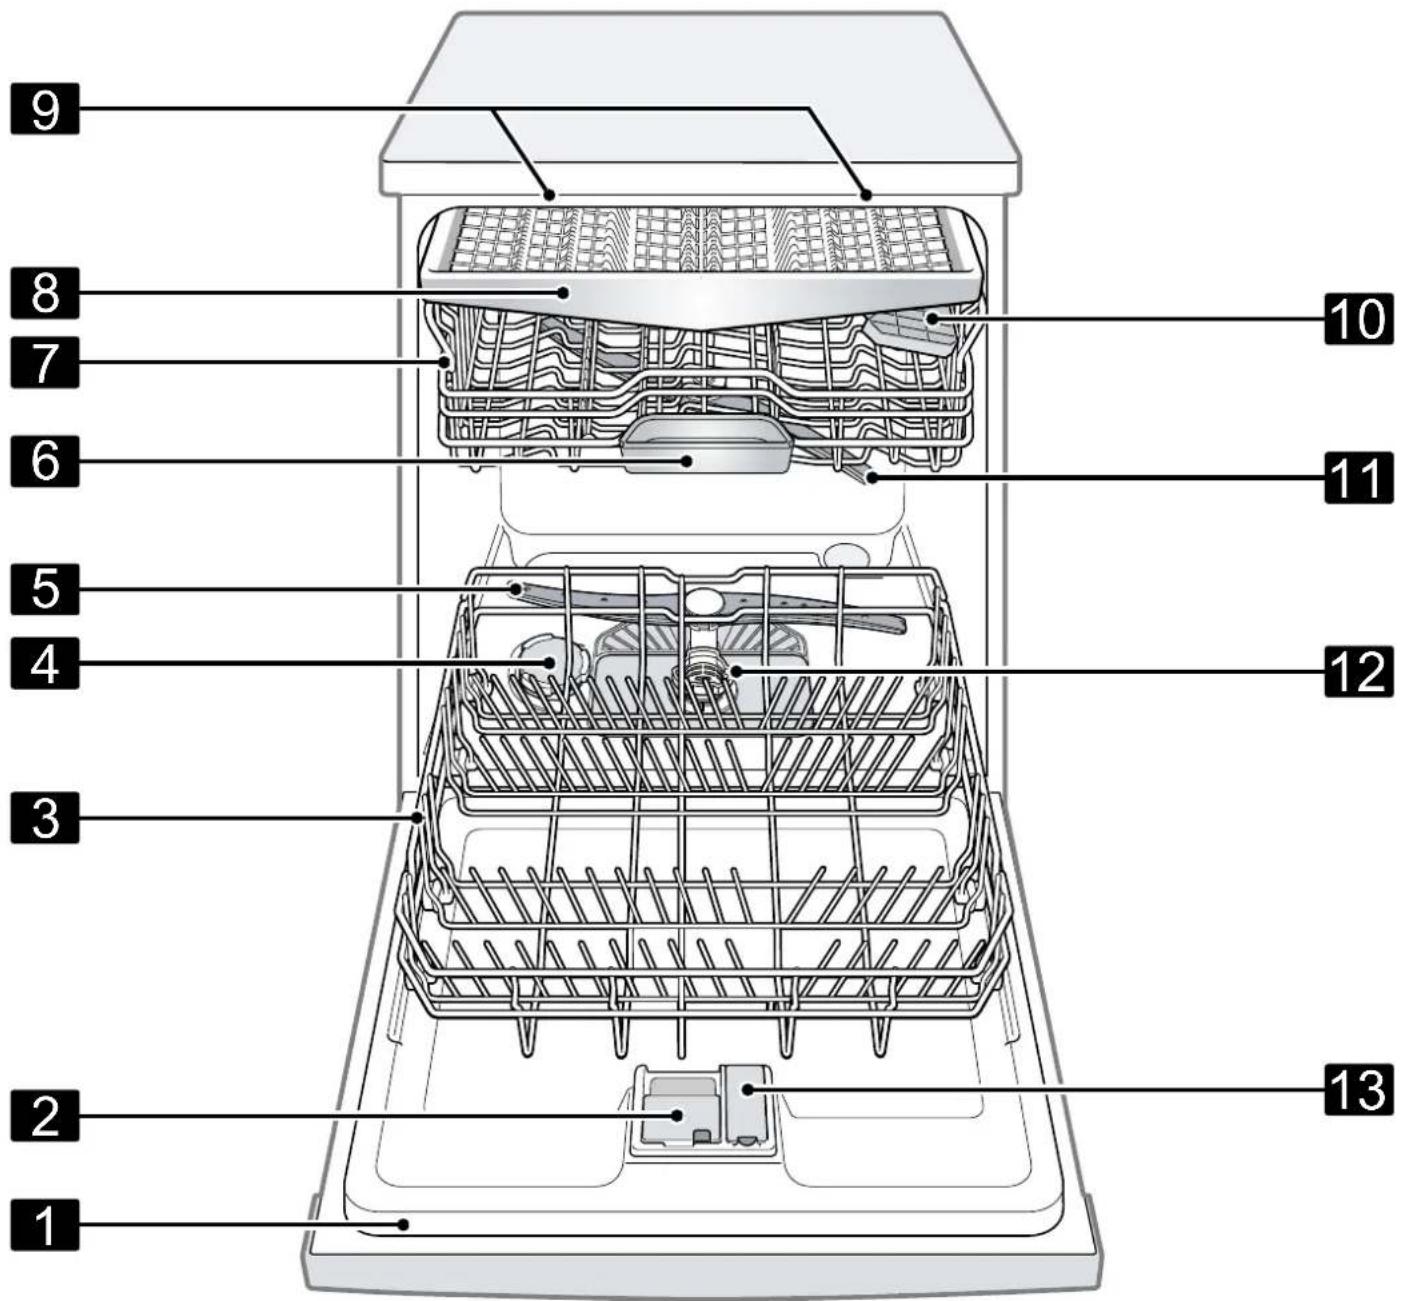
| 1 | Rating plate Rating plate with E number and FD number.The data you need for Customer Service. |
| 2 | Detergent dispenser Add detergent to the detergent dispenser. "Detergent", Page 20 |
| 3 | Bottom basket "Bottom basket" Page 16 |
| 4 | Dispenser for special salt Add special salt to the dispenser for special salt. "Water softening system", Page 18 |
^1 Depending on the appliance specifications
| 5 | Lower spray arm The lower spray arm washes the tableware in the bottom basket.If the tableware has not been washed properly, clean the spray arms.→ "Cleaning spray arms", Page 27 |
| 6 | Tablet collecting tray During the wash cycle tablets automatically fall out of the detergent dispenser into the tablet collecting tray where they can fully dissolve. |
| 7 | Top basket "Top basket" → Page 15 |
| 8 | Cutlery drawer "Cutlery drawer" → Page 16 |
| 9 | EmotionLight Interior lighting of the appliance.→ "Overview of basic settings", Page 24 |
| 10 | Cutlery shelf"Cutlery shelf" → Page 17 |
| 11 | Upper spray arm The upper spray arm washes the tableware in the top basket.If the tableware has not been washed properly, clean the spray arms.→ "Cleaning spray arms", Page 27 |
| 12 | Filter system "Filter system" → Page 26 |
| 13 | Dispenser for rinse aid Add rinse aid to the dispenser for rinse aid.→ "Rinse aid system", Page 19 |
^1 Depending on the appliance specifications
Control panel
You can use the control panel to configure all functions of your appliance and to obtain information about the operating status.
With some buttons you can perform different functions.
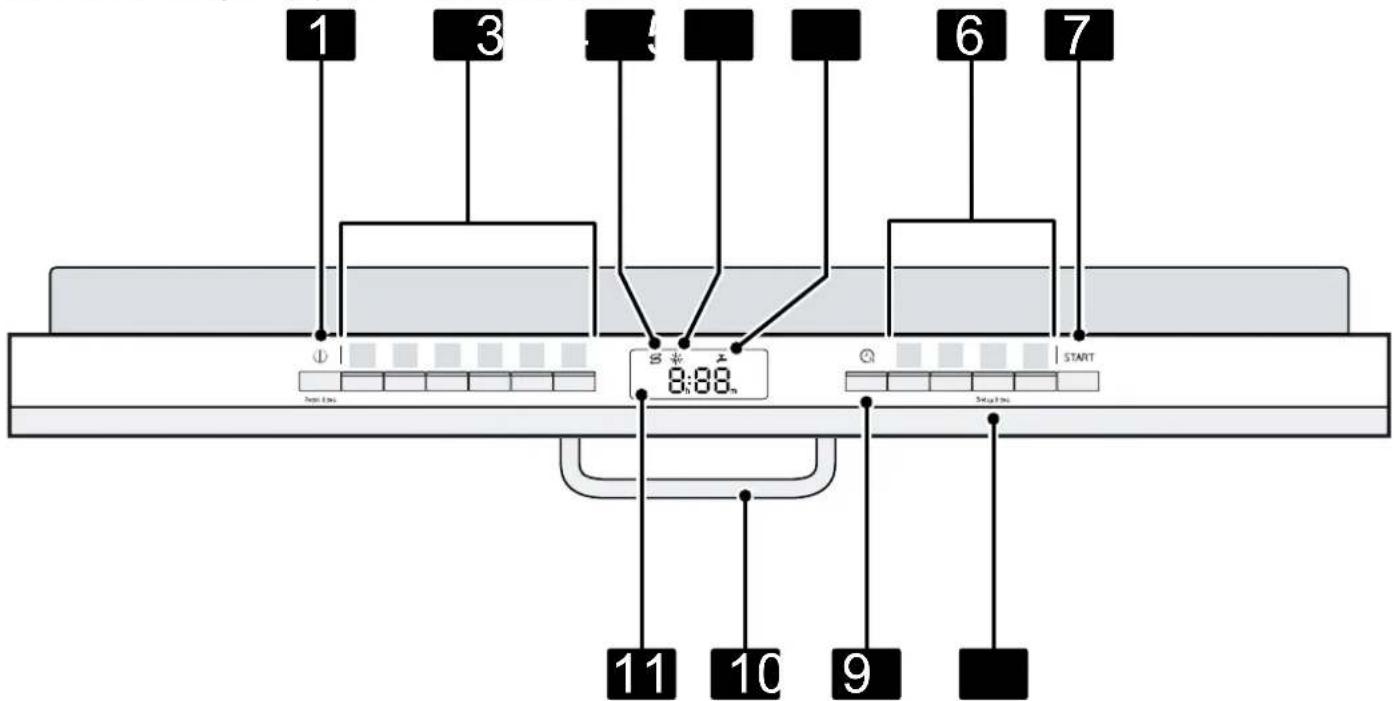
| 1 | ON/OFF button ⏻ and reset button Reset 4 sec. | "Switching on the appliance" → Page 23"Switching off the appliance" → Page 23"Terminating the programme" → Page 23 |
| 2 | Programme buttons | "Programmes" → Page 14 |
| 3 | Special salt refill indicator | Water softening system→ "Adding special salt", Page 19 |
| 4 | Rinse aid refill indicator | Rinse aid system→ "Adding rinse aid", Page 19 |
| 5 | Water supply display | Display for water supply |
^1 Depending on the appliance specifications
| 6 | Programme buttons and additional functions Programmes→ "Overview of programmes", Page 14Additional functions→ "Additional functions", Page 15 |
| 7 | Start button Start"Starting the programme" → Page 23 |
| 8 | Setup 3 sec. button If you press for approx. 3 seconds, you can open the basic settings.→ "Changing basic settings", Page 25 |
| 9 | Timer programming "Setting timer programming" → Page 23 |
| 10 | Door handle'Open the appliance door. |
| 11 | Display The display shows information about the remaining running time or the basic settings. You can change the basic settings via the display and the setting buttons.→ "Changing basic settings", Page 25 |
^1 Depending on the appliance specifications
Symbols on the display ^1
The display shows the following symbols depending on the model. See here for an explanation.
| SYMBOL DESCRIPTION | |
 | | If the symbol for machine care lights up on the display, run machine care.→ "Machine Care", Page 25 |
 | | If the rinse aid refill indicator lights up on the display, top up with rinse aid.→ "Adding rinse aid", Page 19 |
| [XZ62] | | If the special salt refill indicator lights up on the display, add special salt to the dispenser for special salt just before the programme starts.→ "Adding special salt", Page 19 |
| [W022] | | When using for the first time, the symbol lights up on the display and then goes out again. The appliance has no WiFi capability ^1 . |
 | | If the water inflow or drainage malfunctions, the symbol lights up or flashes on the display. |
| ^1 Wi-Fi is a registered trademark of the Wi-Fi Alliance. |
Overview of programmes
You can find an overview of the programmes that can be selected here. Different programmes, which can be found on the control panel of your appliance, are available depending on the appliance configuration.
The running time may vary depending on the programme selected. The running time depends on the water temperature, the quantity of tableware, the level of soiling and the
Additional function selected. The running time will change if the rinse aid system is switched off or rinse aid needs to be added.
The consumption values can be found in the quick reference guide. The consumption values relate to normal conditions and a water hardness of 16 - 20 °E. Different influencing factors such as water temperature or pipe pressure may result in deviations.
| PROGRAMME USE PROGRAMME SEQUENCE | | |
| Intensive 70° | Tableware:Pots and pans, non-fragile tableware and cutleryLevel of soiling:Stubborn, burned or dried-on food remnants containing starch and protein | Intensive:Pre-RinseCleaning 70 °CIntermediate rinseFinal rinse 69 °CDry |
| AUTOAuto 45-65° | Tableware:Mixed tableware and cutleryLevel of soiling:Common household food remnants lightly dried on | Sensor-controlled:Optimised by sensors depending on the soiling of the washing water. |
| ECOEco 50° | Tableware:Mixed tableware and cutleryLevel of soiling:Common household food remnants lightly dried on | Most economical programme:Pre-RinseCleaning 50 °CIntermediate rinseFinal rinse 48 °CDrying |
| Quiet 50° | Tableware:Mixed tableware and cutleryLevel of soiling:Common household food remnants lightly dried on | Reduced noise:Pre-RinseCleaning 50 °CIntermediate rinseFinal rinse 63 °CDry |
| 1hQuick 1h 65° | Tableware:Mixed tableware and cutleryLevel of soiling:Common household food remnants lightly dried on | Time-optimised:Cleaning 65 °CIntermediate rinseFinal rinse 69 °CDry |
| Quick 45° | Tableware:Delicate tableware, cutlery, temperature-sensitive plastics and glassesLevel of soiling:Lightly adhering fresh food remnants | Time-optimised:Cleaning 45 °CIntermediate rinseFinal rinse 55 °C |
| PreRinse | Tableware:All types of dishesLevel of soiling:Cold rinsing, intermediate cleaning | Cold rinsing:Pre-Rinse |
| Machine Care | Use only if appliance is unloaded. Machine Care 70 °C | |
Note: The relatively long running time in the Eco 50° programme is due to longer soaking and drying times. This results in optimal consumption values.
Test institutes are provided with information for comparability tests, e.g. according to EN60436.
These are the conditions for conducting the tests, however they are not the results or consumption values.
Request by e-mail to:
dishwasher@test-appliances.com
The product number (E-Nr.) and the production number (FD) are required here. They can be found on the rating plate on the appliance door.
Additional functions
You can find an overview of the additional functions that can be selected here. Different additional functions, which can be found on the control panel of your appliance, are available depending on the appliance configuration.
| ADDITIONAL FUNCTION USE | |
| 12 Half Load | Switch on with small loads.It is recommended adding less detergent to the detergent dispenser than for a full machine load.The run time is shortened.Energy and water consumption are reduced. |
| ADDITIONAL FUNCTION USE | |
| IntensiveZone | Switch on with mixed loads containing tableware with different soiling levels, e.g. place very soiled pots and pans in the bottom basket and normally soiled tableware in the upper basket.The spray pressure in the bottom basket is increased and the maximum programme temperature held longer. This will increase the run time and energy consumption. |
| ExtraDry | For a better drying result the final rinse temperature is increased and the drying phase extended.Especially suitable for drying plastic parts.There is a slight increase in energy consumption and the run time is extended. |
Features
You can find an overview of the possible features of your appliance and how to use them here. These features depend on the model of your appliance.
Top basket
Arrange cups, glasses and small items of tableware in the top basket.
natural_image
Illustration of a basket filled with various food items including radishes, peaches, and eggs (no text or symbols)
You can adjust the height of the top basket to make room for larger items of tableware.
Adjusting top basket with side levers
To wash large items of tableware in the baskets, adjust the shelf position of the top basket.
- Pull out the top basket.
- To prevent the basket from suddenly dropping down, hold the side of the basket by the top edge.
- Press in the levers on the right and left on the outside of the basket.
natural_image
Diagram of a car chassis with a blue screen and black arrow pointing to a vehicle (no text or symbols present)
- Raise or lower the basket evenly to the right level.

Check that the basket is level on both sides.
- Release the levers.
√ The basket clicks into position.
- Slide the basket back in.
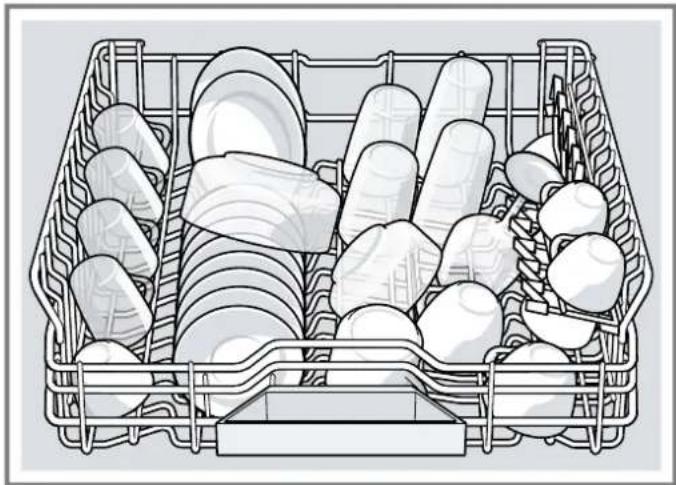
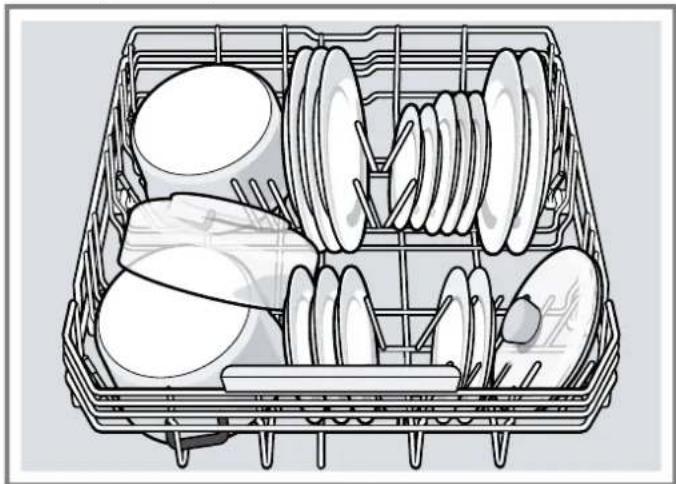
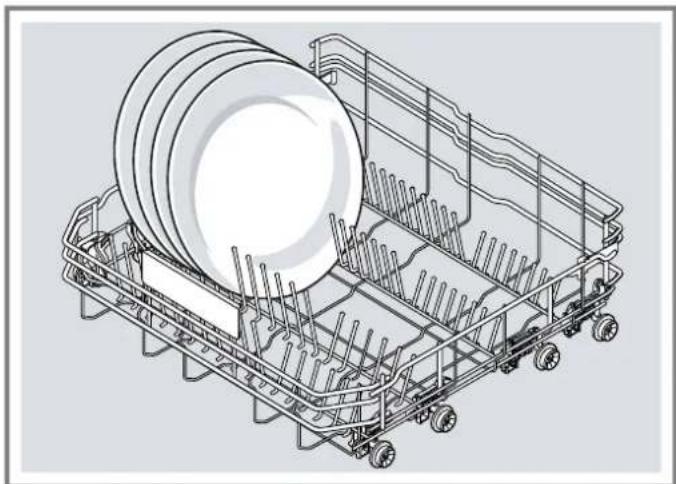
Bottom basket
Arrange pans and plates in the bottom basket.
natural_image
Line drawing of a basket containing various kitchen utensils and dishes (no text or symbols)
Large plates up to a diameter of 34 cm can be arranged in the bottom basket as shown.
natural_image
Technical line drawing of a mechanical assembly with rollers and mounting brackets (no text or symbols)
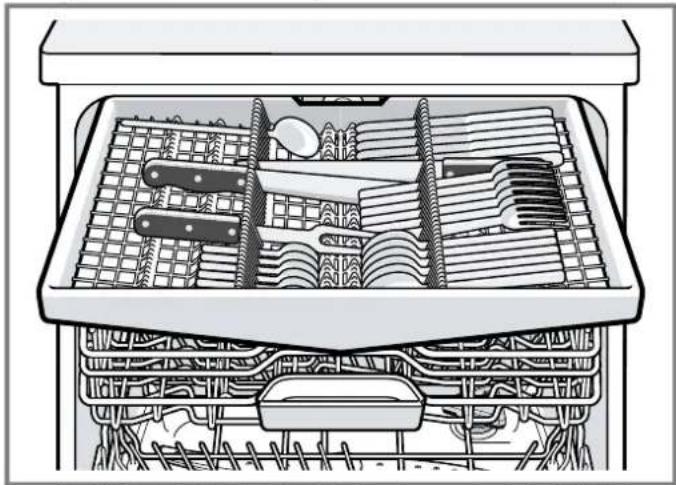
Cutlery drawer
Arrange cutlery in the cutlery drawer.
natural_image
Interior view of a kitchen drawer with open compartments containing cutlery, utensils, and household items (no text or symbols visible)
Arrange cutlery with the points and sharp edges downwards.
You can reorganise the cutlery drawer to make more space for longer/wider items of cutlery.
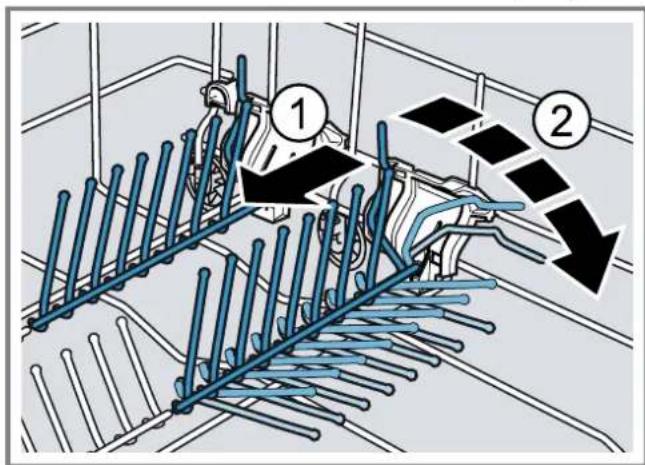
Reorganising cutlery drawer
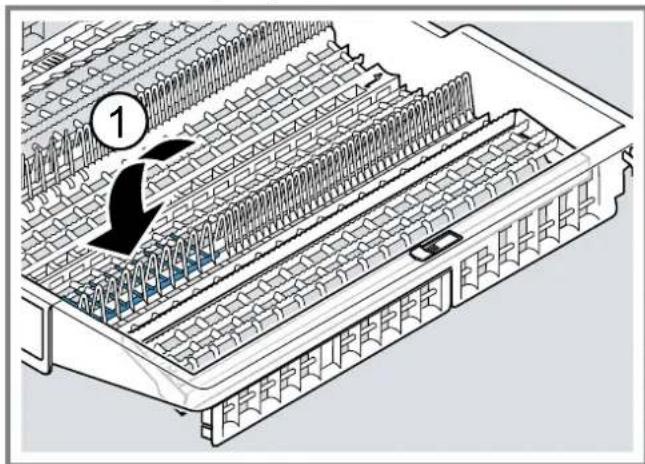
You can fold down the side shelves and front prongs to make more space for longer/wider items of cutlery.
- To fold down a side shelf, push the lever forwards ① and fold down the side shelf ②.
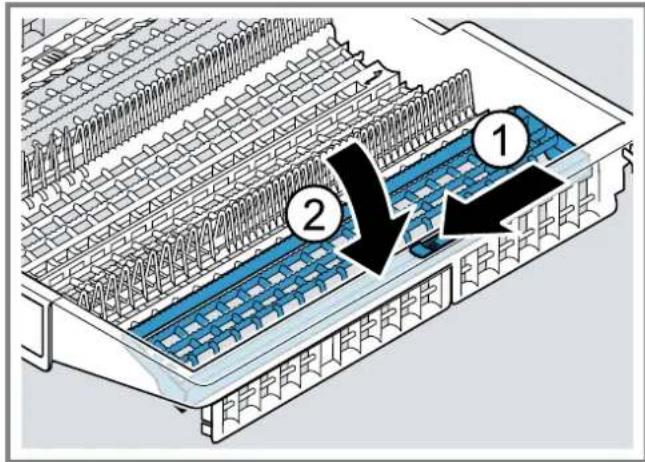
- To fold down the front prongs, push the lever forwards and fold down the prongs ①.
Tip
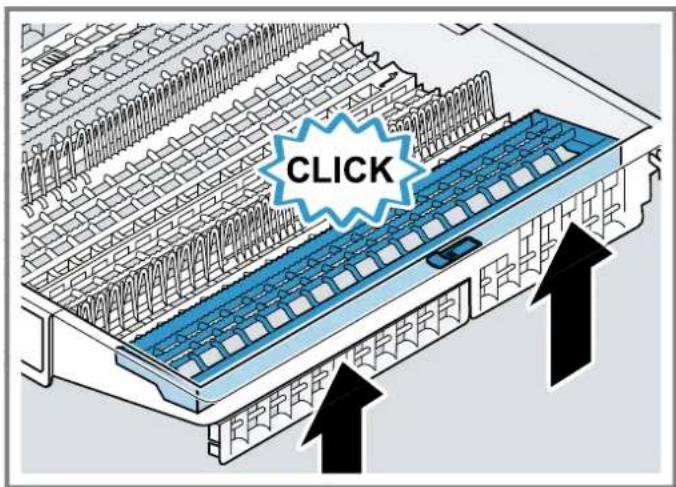
If you want to return the cutlery drawer to the original position, fold the side shelf back up until it clicks into position.
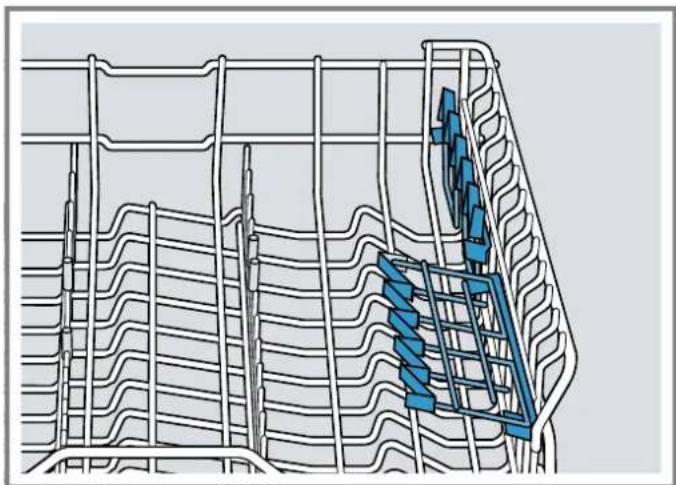
Etagere
Use the cutlery shelf and space underneath for small cups and glasses or for large items of cutlery, e.g. cooking spoons or serving cutlery.
natural_image
Technical line drawing of a mechanical component with grid lines and blue structural elements (no text or symbols)
If you do not need the cutlery shelf, you can fold it up.
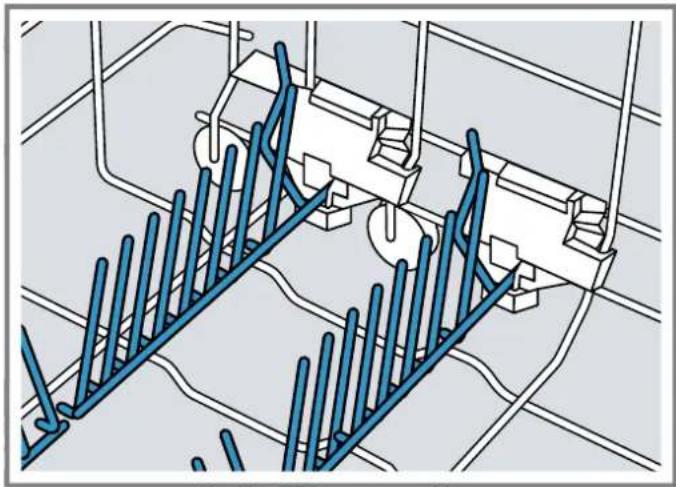
Folding prongs
Use the folding prongs to position tableware securely, e.g. plates.
natural_image
Technical line drawing of a mechanical assembly with blue structural elements and grid lines (no text or symbols)
You can fold the prongs down to position pans, bowls and glasses better. ^1
Folding down prongs ^1
If you do not need the prongs, fold them down.
- Push the lever forwards ① and fold down the prongs ②
- To use the prongs again, fold them back up.
√ The prongs audibly click into position.
Basket heights
Set the baskets at the right height.
Appliance height 86.5 cm with cutlery drawer
| LEVEL TOP BASKET BOTTOM BASKET | | |
| 1 max. ø 18 cm 33 cm/"34 cm" → Page 16 | | |
| 2 max. ø 20.5 cm 30.5 cm | | |
| 3 max. ø 23 cm 28 cm | | |
Before first use
On initial start-up or after a reset to the factory settings, you will need to make settings.
Requirement: "The appliance has been installed and connected." → Page 10
- "Add special salt." → Page 19
- "Add rinse aid." → Page 19
-
"Switch on the appliance." → Page 23
-
"Setting the water softening system." → Page 18
- "Set the amount of rinse aid to be dispensed." → Page 20
- "Add detergent" → Page 20.
- Start the Programme with the highest cleaning temperature without tableware.
To remove any marks from water or other residues, we recommend you operate the appliance without tableware before using it for the first time.
Tip: You can change these settings and other Basic settings at any time.
Water softening system
Hard water leaves limescale on the tableware as well as the washing tank, and parts of the appliance may become blocked.
To ensure good dishwashing results, you can treat the water with special salt and the water softening system. To avoid damage to the appliance, water with a hardness above 9 °E must be softened.
Overview of water hardness settings
You can find an overview of the water hardness values that can be selected here.
You can find out how hard your water is from your local water company or by using a water hardness tester.
| WATER HARDNESS °E HARDNESS RANGE | MMOL/L SETTING VALUE | | |
| 0 - 8 Soft 0 - 1.1 H00 | | | |
| 9 - 10 | Soft 1.2 - 1.4 | H01 | |
| 11 - 12 Medium | 1.5 - 1.8 | H02 | |
| 13 - 15 | Medium | 1.9 - 2.1 | H03 |
| 16 - 20 | Medium | 2.2 - 2.9 | H04 |
| 21 - 26 | Hard | 3.0 - 3.7 | H05 |
| 27 - 38 Hard | 3.8 - 5.4 | H06 | |
| 39 - 62 | Hard | 5.5 - 8.9 | H07 |
Note: Set the water hardness determined on your appliance.
→ "Setting the water softening system", Page 18
With a water hardness of 0 - 8 °E you can dispense with special salt for dishwashers and switch off the water softening system.
→ "Switching off the water softening system", Page 19
Setting the water softening system
Set the water hardness on your appliance.
- Determine the water hardness and the appropriate setting value.
→ "Overview of water hardness settings", Page 18
-
Press ⏻.
-
To open the basic settings, press Setup 3 sec. for 3 seconds.
√ The display shows Hxx.
√ The display shows set
- Press Start repeatedly until the right water hardness has been set.
The value H04 is set at the factory.
- To save the settings, press Setup 3 sec. for 3 seconds.
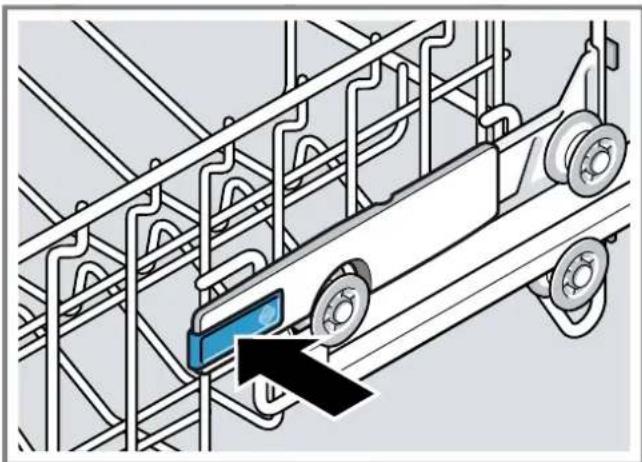
Special salt
You can use special salt to soften water.
Adding special salt
If the special salt refill indicator lights up, add special salt to the dispenser for special salt just before the programme starts. The consumption of special salt depends on the water hardness. The higher the water hardness, the greater the consumption of special salt.
ATTENTION!
• Detergent may damage the water softening system.
- Only fill the dispenser of the water softening system with special dishwasher salt.
- Special salt for dishwashers can damage the tub due to corrosion.
- To make sure that any special salt that escapes is washed out of the tub, add the special salt to the dispenser for special salt immediately before the programme starts.
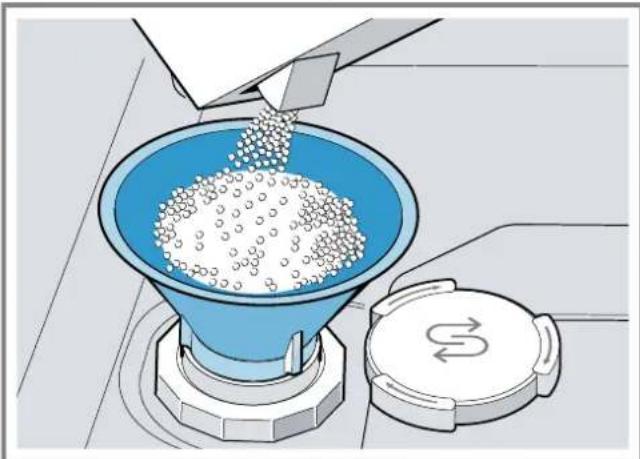
- Unscrew the lid of the dispenser for special salt and remove.
- On initial start-up: Fill the dispenser right up with water.
- Note: Only use special salt for dishwashers. Do not use salt tablets.
Do not use table salt.
Add the special salt to the dispenser.
natural_image
Illustration of a funnel pouring granular material into a blue container with a lid, no text or symbols present
Fill the dispenser right up with special salt. The water in the dispenser is displaced and forced out.
- Place the lid back on the dispenser and turn to close.
Switching off the water softening system
If you find the special salt refill indicator irritating, e.g. when using combined detergents with salt replacement substances, you can switch the indicator off.
Note
To avoid damage to the appliance, only switch off the water softening system in the following cases:
- The water hardness is max. 26 °E and you are using a combined detergent with salt replacement substances. According to the manufacturers, combined detergents with salt replacement substances can generally only be used up to a water hardness of 26 °E without adding special salt.
-
The water hardness is 0 - 8 °E. You do not need to use special salt.
-
Press ⏻.
-
To open the basic settings, press Setup 3 sec. for 3 seconds.
√ The display shows Hxx.
√ The display shows set
-
Press Start repeatedly until the display shows H00.
-
To save the settings, press Setup 3 sec. for 3 seconds.
√ The water softening system is switched off and the salt refill indicator is deactivated.
Regeneration of the water softening system
In order to obtain fault-free function of the water softening system, the appliance performs regeneration of the water softening system at regular intervals.
Regeneration of the water softening system takes place before the end of the main rinse cycle in all programmes. It will increase the run time and consumption values, e.g. water and electricity.
Overview of consumption values with regeneration the water softening system
Here you can find an overview of the maximum additional running time and consumption values during regeneration of the water softening system.
| Regeneration of the water softening system after x washing programmes | 6 |
| Additional running time in minutes 7 | |
| Additional water consumption in litres 5 | |
| Additional power consumption in kWh 0.05 | |
The consumption values specified are laboratory measurements determined in accordance with the currently applicable standard using the Eco 50° programme and with the factory value of the water hardness set to 16 - 20 °E.
Rinse aid system
Rinse aid
For optimum drying results, use rinse aid.
Only use rinse aid for domestic dishwashers.
Adding rinse aid
If the rinse aid refill indicator lights up, top up with rinse aid.
Only use rinse aid for domestic dishwashers.
- Press the catch on the lid of the dispenser for rinse aid ① and lift ②
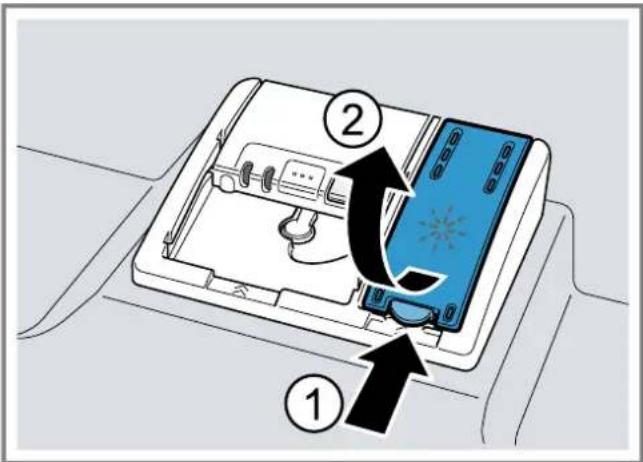
- Add rinse aid up to the max mark.

- If rinse aid spills out, remove it from the tub.
Spilled rinse aid can cause excessive frothing during the wash cycle.
- Close the lid of the dispenser for rinse aid.
√ The lid clicks into position.
Setting the amount of rinse aid
If there are streaks or water marks on tableware, change the amount of rinse aid.
-
Press ⏻.
-
To open the basic settings, press Setup 3 sec. for 3 seconds.
√ The display shows Hxx.
√ The display show set
-
Press Setup 3 sec. repeatedly until the display shows the value r05 set at the factory.
-
Press Start repeatedly until the right amount of rinse aid has been set.
- A low setting adds less rinse aid during the wash cycle and reduces streaking on tableware.
- A higher setting adds more rinse aid during the wash cycle, reduces water marks and improves the drying result.
- To save the settings, press Setup 3 sec. for 3 seconds.
Switching the rinse aid system off
If you find the rinse aid refill indicator irritating, e.g. when using combined detergents with a rinse aid component, you can switch the rinse aid system off.
Tip: The function of rinse aid is limited with combined detergents. You will generally get better results using rinse aid.
-
Press ⏻.
-
To open the basic settings, press Setup 3 sec. for 3 seconds.
√ The display shows Hxx.
√ The display shows set
-
Press Setup 3 sec. repeatedly until the display shows the value r05 set at the factory.
-
Press Start repeatedly until the display shows r00.
-
To save the settings, press Setup 3 sec. for 3 seconds.
√ The rinse aid system is switched off and the rinse aid refill indicator is deactivated.
Detergent
Suitable detergents
Only use detergents that are suitable for dishwashers. Both separate and combined detergents are suitable.
For optimum washing and drying results, use separate detergent, adding "Special salt" → Page 19 and "Rinse aid"
→ Page 19 separately.
Modern, powerful detergents mainly use a low-alkaline formulation with enzymes. Enzymes break down starch and remove protein. Oxygen-based bleaching agents are generally used to remove coloured marks, e.g. tea or ketchup.
Note: Follow the manufacturer's instructions for each detergent.
Tabs
Tabs are suitable for all cleaning functions and do not need to be measured out.
With shorter programmes tabs sometimes do not dissolve entirely and leave residues of detergent. This may impair the cleaning effect.
Powder detergent
Powder detergent is recommended for shorter programmes.
The dosage can be adjusted to the level of soiling.
Liquid detergent
Liquid detergent works faster and is recommended for shorter programmes without PreRinse.
Sometimes liquid detergent may leak out despite the detergent dispenser being closed. This is not a fault and is non-critical if you remember the following:
- Only choose a programme without PreRinse.
- Do not select timer programming for starting the programme.
The dosage can be adjusted to the level of soiling.
Separate detergents
Separate detergents are products that do not contain components other than detergent, e.g. powder detergent or liquid detergent.
With powder and liquid detergent the dosage can be individually adjusted to the level of soiling of the tableware. For better washing and drying results and to avoid damage to the appliance, please additionally use "Special salt" → Page 19 and "Rinse aid" → Page 19.
Combined detergent
Besides conventional separate detergents, a number of products are available with additional functions. These products contain not only detergent but also rinse aid and salt replacement substances (3in1) and, depending on the combination (4in1, 5in1, ...), additional components such as glass protection or stainless steel cleaner.
According to the manufacturers, combined detergents generally only function up to a water hardness of 26 °E. With a water hardness above 26 °E you will need to add special salt and rinse aid. For the best washing and drying results we recommend using special salt and rinse aid from a water hardness of 17 °E. If you are using combined detergent, the washing programme is adjusted automatically to ensure the best possible washing and drying result.
Unsuitable detergents
Do not use detergent which could cause damage to the appliance or present a risk to health.
Hand washing-up liquid
Hand washing-up liquid can cause increased frothing and damage the appliance.
Detergent containing chlorine
Chlorine residue on tableware may present a risk to health.
Follow the instructions on detergents in everyday use.
- Detergents marked as "organic" or "ecological" (environmentally friendly) generally contain lower levels of active agents or completely dispense with certain substances. The cleaning effect may be restricted here.
- Set the rinse aid and the water softening system to the separate detergent or combined detergent in use.
- According to the manufacturers, combined detergents with salt replacement substances can only be used up to a certain water hardness, usually 26 °E, without adding special salt. For the best washing and drying results we recommend using special salt from a water hardness of 17 °E.
- To prevent sticking, only touch detergents in a water-soluble pouch with dry hands and only ever place them in a dry detergent dispenser.
- Even if the rinse aid and special salt refill indicators light up, washing programmes will run properly with combined detergents.
- The function of rinse aid is limited with combined detergents. You will generally get better results using a separate rinse aid.
- Use tablets with a special drying performance.
Adding detergent
- To open the detergent dispenser, press the locking latch.
- Add the detergent to the dry detergent dispenser.
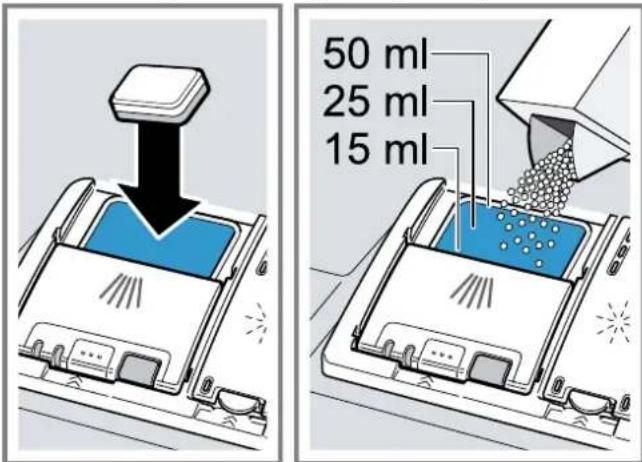
If you are using tablets, one is enough. Insert the tablets in a horizontal position.
If you are using powder or liquid detergent, follow the manufacturer's instructions and quantities for dosage in the detergent dispenser.
20 ml - 25 ml detergent is sufficient for normal soiling. If tableware is only lightly soiled, slightly less than the amount of detergent specified is usually sufficient.
- Close the lid of the detergent dispenser.

√ The lid clicks into position.
√ The detergent dispenser will open automatically at the optimum time during the programme. Powder or liquid detergent will spread around the washing tank and dissolve there. Tablets will fall into the tablet collecting tray and dissolve in the right dosage. In order to ensure that tablets can dissolve evenly, do not place any other objects in the tablet collecting tray.
Tip: If you use powder detergent and select a program with pre-rinse, you can also add a little detergent to the interior door of the appliance.
Tableware
Only clean tableware that is suitable for dishwashers.
Note: Decorated glassware and parts made of aluminium or silver may fade or discolour with dishwashing. Delicate types of glass may turn cloudy after a few washing cycles.
Damage to glass and tableware
Only put glasses and china in the dishwasher if it is marked as dishwasher-safe by the manufacturer. Avoid damage to glass and tableware.
| CAUSE RECOMMENDATION | |
| The following tableware is not dishwasher-safe:Items of cutlery and tableware made from woodDecorated glassware, antique and hand-crafted tablewarePlastic parts not resistant to heatTableware made from copper or tinTableware soiled with ash, wax, lubricating grease or paintVery small items of table-ware | Only put tableware in the dishwasher if it is marked as dishwasher-safe by the man-ufacturer. |
| The chemical composition of detergent causes damage. | Use a detergent marked by the manufacturer as gentle on tableware. |
| Highly caustic alkaline or highly acidic cleaning solutions, in particular commercial or industrial cleaners, are not safe to use in the dishwasher with aluminium. | If you are using highly caustic alkaline or highly acidic cleaning agents, in particular commercial or in-dustrial cleaning agents, do not put aluminium parts in the dishwasher interior. |
| The water temperature of the programme is too high. | Select a programme with lower temperatures. After the programme has ended, take glassware and cutlery out of the appliance without delay. |
Arrange tableware
Arrange tableware correctly to optimise the dishwashing result and prevent damage to both the appliance and tableware.
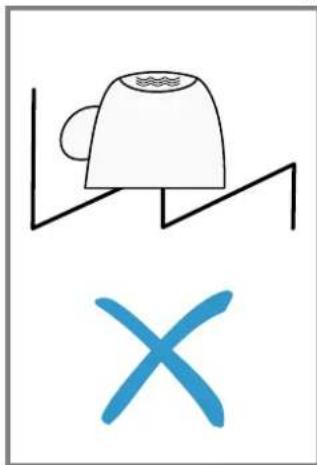
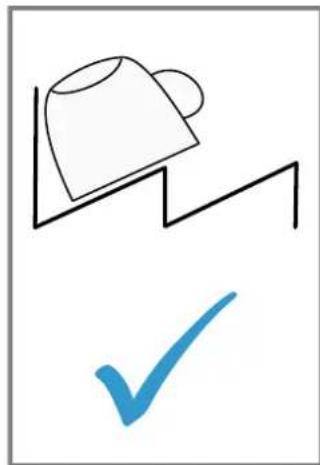
Tips
- Using the appliance allows you to save energy and water compared to washing-up by hand.
- To save energy and water, load the machine with the number of place settings specified (standard load with tableware and cutlery).
- For better washing and drying results, position items with curves or recesses at an angle so water can run off.
natural_image
Simple line drawing of a lamp on a stand above a blue X symbol (no text or labels)
natural_image
Simple line drawing of a megaphone and a blue checkmark (no text or symbols)
- Remove large remnants of food from tableware.
To save resources, do not pre-rinse tableware under running water.
- Observe the following when arranging tableware:
- Put heavily soiled tableware in the bottom basket, e.g. pans. The more powerful the spray jet, the better the dishwashing result will be.
- To prevent damage to tableware, arrange it so it is stable and cannot tip over.
- To prevent injury, arrange cutlery with the points and sharp edges facing down.
- Position containers with the openings facing down so no water can collect in them.
- Do not block the spray arms - make sure that they can turn freely.
- Do not place small parts in the tablet collecting tray and do not block it with tableware so as not to obstruct the lid of the detergent dispenser.

natural_image
Illustration of a kitchen tray with cleaning tools and a blue X symbol (no text or labels)
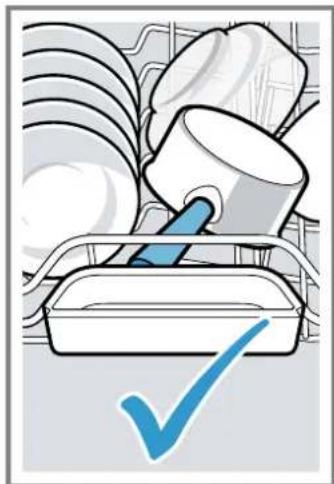
natural_image
Illustration of a kitchen utensil with a blue checkmark (no text or symbols)
Removing tableware
WARNING Risk of injury!
- Hot tableware can cause burns to the skin. When hot, tableware is sensitive to shock, may crack and can result in injury.
-
When the programme has ended, do not empty the appliance until the tableware has cooled down for a while.
-
To prevent water dripping on the tableware, unload it starting at the bottom and working up.
- Check the washing tank and accessories for soiling and clean if necessary.
→ "Cleaning and servicing", Page 25
Basic operation
Switching on the appliance
- Press ⏻.
The Eco 50° programme is set by default.
The Eco 50° programme is especially environmentally friendly and ideal for normally soiled tableware. It is the most efficient programme for the combination of energy/water consumption for this type of tableware and evidences conformity with the EU Ecodesign Directive. If you do not perform any actions on the appliance for 10 minutes, the appliance will automatically switch off.
Setting a programme
To adjust the washing programme to the soiling level of the tableware, select a suitable programme.
- Press the right programme button.
√ The programme is set and the programme button flashes.
√ The remaining running time of the programme appears on the display.
Setting additional functions
You can set additional functions to complete the washing programme selected.
Note: The additional functions which can be used depend on the programme selected.
- Press the button for the relevant additional function. → "Additional functions", Page 15
√ The additional function is set and the additional function button flashes.
Setting timer programming
You can delay the start of the programme by up to 24 hours.
- Press Ⓛ.
▼ "h:01" appears in the display.
- Use Ⓜ to set the required start time for the programme.
- Press Start.
√ This activates timer programming.
Tip: To deactivate timer programming, press Ⓛ repeatedly until "h:00" appears in the display.
Starting the programme
- Press Start.
√ The programme has ended when the display shows "0h:00m".
Notes
- If you want to add more tableware while the appliance is running, do not use the tablet collecting tray as a handle for the top basket. You might touch the partially dissolved tablet.
- You can only change a programme when running if you cancel it.
→ "Terminate programme", Page 23
- The appliance switches off automatically 1 minute after the end of the programme to save energy. If you open the appliance door immediately after the programme has ended, the appliance will switch off after 4 seconds.
Interrupting programme
Note: When you open the appliance door once the appliance has heated up, leave the door slightly ajar for a few minutes and then close it. This will help prevent excess pressure building up in the appliance and stop the appliance door bursting open.
-
Open the appliance door carefully.
-
Press ⏻.
√ The programme is saved and the appliance switches off.
-
Press ⏻ to resume the programme.
-
Close the appliance door.
Terminate programme
To end a programme early or to switch from a programme that has already started, you will need to cancel it first.
- Open the appliance door.
- Press Reset 4 sec. for approx. 4 seconds.
- Close the appliance door.
√ The programme is cancelled and ends after approx. 1 minute.
Switching off appliance
-
Please note the information on "Safe use" → Page 9.
-
Press ⏻.
Tip: If you press ⏻ during the wash cycle, the programme currently running will be interrupted. When you switch the appliance back on, the programme continues automatically.
Basic settings
You can configure the basic settings for your appliance to meet your needs.
Overview of basic settings
The basic settings depend on the features of your appliance.
| BASIC SETTING DISPLAY TEXT SELECTION DESCRIPTION | | |
| Water hardness H04 | 1 | H00 - H07 Set the water so | softening system to your water hardness.Level H00 switches the water softening sys-tem off. |
| Rinse aid dispensing r05 | 1 | r00 - r06 Set the amount of rinse aid to be dispensed.Switch the rinse aid system off with level r00. | |
| Intensive drying d00 | 1 | d00 - d01 The temperature is increased during the final rinse, which improves the drying result. This may increase the run time slightly.Note: Not suitable for delicate items of table-ware.Switch Extra Dry on "d01" or off "d00". | |
| Hot water A00 | 1 | A00 - A01 Set cold water or hot water connection. Only set the appliance to hot water if this can be prepared with little energy and a suitable in-stallation is available, e.g. solar heating sys-tem with circulation line. The water tempera-ture should be at least 40 °C and max. 60 °C.Switch hot water on "A01" or off "A00". | |
| Interior lighting E02 | 1 | E00 - E02 Interior light.With the setting "E00"m the interior light is switched off.With the setting "E01", the interior light can be activated via the ON/OFF button.With the setting "E02", the interior light goes on when you open the appliancedoor.When the appliance door is opened, the in-terior lighting switches off automatically after 10 minutes. | |
| Time-beam-on-floor S01 | 1 | S00 - S01 Switch Time-beam-on-floor on or off.While the programme is running, status in-formation is projected onto the floor below the appliance door relating to timer program-ming, the programme or the time remaining.If the base panel is pulled forwards or if the appliance is installed at eye level with the cab-inet front fitted flush, the display is not vis-ible.Level "S00" switches the Time-beam-on-floor of. | |
| Tone volume b02 | 1 | b00 - b03 | Adjustment of tone volume.Level "b00" switches the signal tone off.If the Eco drying function is activated, the end of the programme is not indicated by an aud-ible signal tone. |
| 1 Factory setting (may vary according to model) |
| Automatic door opening o02 | 1 | o00 - o02 Activate or deactivate automatic opening of the appliance door during the drying phase. If the function has been activated, the running time may increase.The following settings are possible:With the setting "o00" automatic door opening is deactivated in all programmes.With the setting "o01" automatic door opening is activated in all programmes.With the setting "o02" automatic door opening is activated only in the Eco 50°C programme.→ "Automatic door opening", Page 10 |
| Factory setting rE | | Start with Start YES Confirm with Start | Restore changed settings to the factory settings.The settings for initial start-up must be configured. |
| 1 Factory setting (may vary according to model) |
Changing basic settings
- Open the appliance door.
- Press ⏻.
- To open the basic settings, press Setup 3 sec. for 3 seconds.
√ The display shows Hxx.
√ The display showset.
- Press Setup 3 sec. repeatedly until the display shows the required setting.
- Press Start repeatedly until the display shows the right value.
You can change several settings.
- To save the settings, press Setup 3 sec. for 3 seconds.
- Close the appliance door.
Cleaning and servicing
To keep your appliance working efficiently for a long time, it is important to clean and maintain it carefully.
Cleaning the tub

WARNING
Risk of harm to health!
Machine Care
Deposits, e.g. from remnants of food and limescale, can cause your appliance to malfunction. To avoid such faults and reduce odours, we recommend cleaning your appliance at regular intervals.
Machine Care combined with machine care products and machine cleaners is the right programme for the care of your appliance.
Cleaning products
Only use suitable cleaning products to clean your appliance. → "Safe use", Page 9
Tips on appliance care
Follow the tips on appliance care to make sure your appliance functions properly at all times.
| ACTION BENEFIT | |
| Wipe the door seals, the front of the dishwasher and the control panel regularly using a damp cloth and washing-up liquid. | This ensures the parts of the appliance will remain clean and hygienic. |
| If the appliance is not going to be used for a while, leave the door slightly ajar. | This will prevent unpleasant odours. |
Machine Care is a programme which removes various deposits in one washing cycle. Cleaning takes place in two phases:
| PHASE REMOVAL OF | DETERGENT PLACEMENT | | |
| 1 | Grease and limescale | Liquid machine care product or machine descaler in powder form. | Appliance interior, e.g. bottle hung in the cutlery basket or powder in the interior. |
| 2 Food remnants and deposits Machine cleaner Detergent dispenser | |
To ensure optimum cleaning performance, the programme doses the detergents independently of each another during the relevant cleaning phase. Correct placement of the detergents is necessary here.
Run Machine Care without tableware if the indicator for Machine Care lights up on the control panel or if advised to do so by the display. The indicator will go out after you have run Machine Care. If your appliance does not have a reminder function, we recommend performing Machine Care every 2 months.
Running Machine Care
Notes
- Run the Machine Care programme without any tableware in the dishwasher.
- Only use machine care products and machine cleaners specially designed for dishwashers.
- Make sure that there are no aluminium parts, e.g. extractor hood grease filters or aluminium pans, in the interior of the appliance.
- If you have not run Machine Care after 3 washing cycles, the indicator for Machine Care will go out automatically.
- For optimum cleaning performance, ensure the correct placement of cleaners.
- Follow the safety instructions given on the packagings of the machine care products and machine cleaners.
- Remove any coarse soiling in the interior with a damp cloth.
- Clean the filters.
- Place the machine care product in the appliance interior. Only use machine care products specially designed for dishwashers.
- Pour the machine cleaner into the detergent dispenser until it is filled completely.
Do not place any additional machine cleaner in the appliance interior.
- Press
- Press Start.
√ Machine Care is run.
√ Once the programme has ended, the indicator for Machine Care goes out.
Filter system
The filter system removes coarse soiling from the dishwashing cycle.
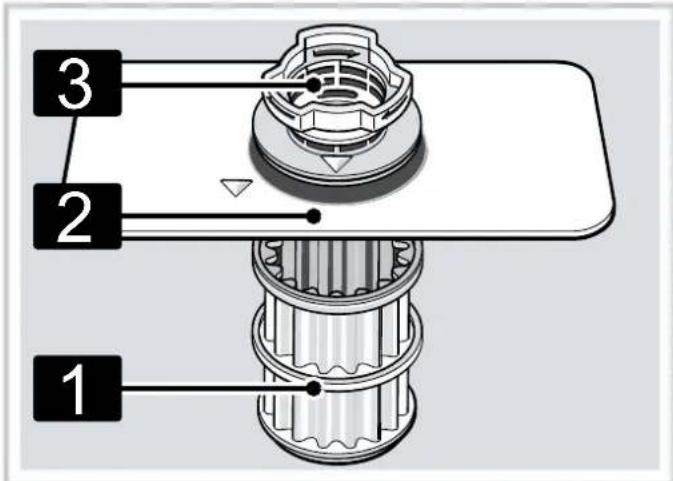
| 1 | Micro filter |
| 2 | Fine filter |
| 3 | Coarse filter |
Cleaning filters
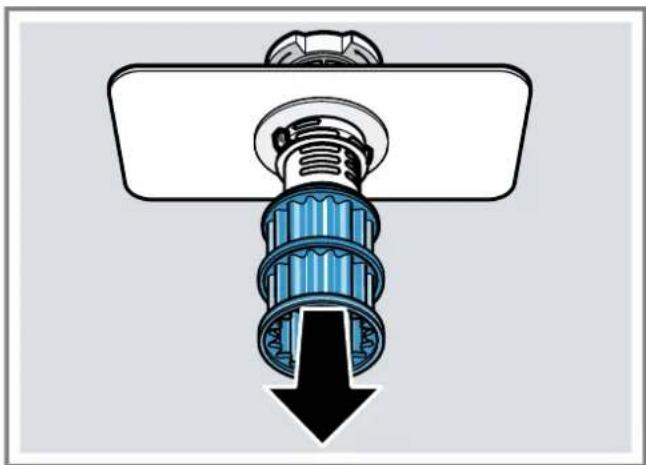
Soiling in the dishwashing water may block the filters.
- After each wash check the filters for residue.
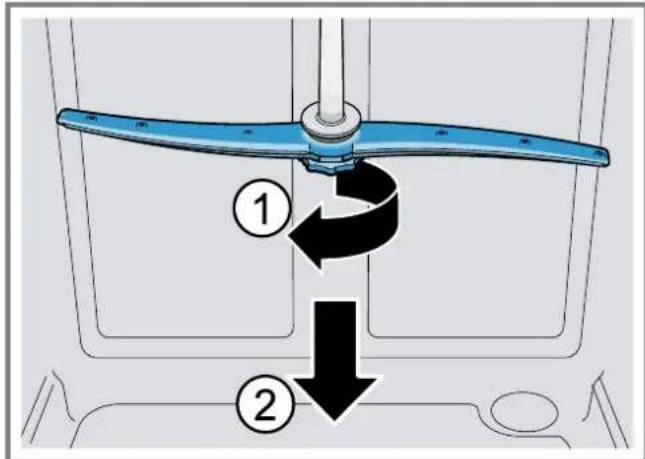
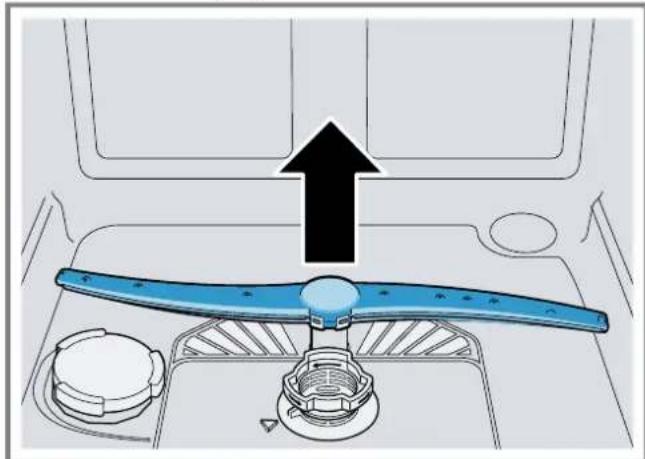
- Turn the coarse filter anticlockwise ① and remove the filter system ②.
- Check that no foreign objects fall into the sump.
- Pull down the micro filter to remove.
natural_image
Cross-sectional diagram of a mechanical component with a downward arrow indicating force or direction (no text or symbols present)
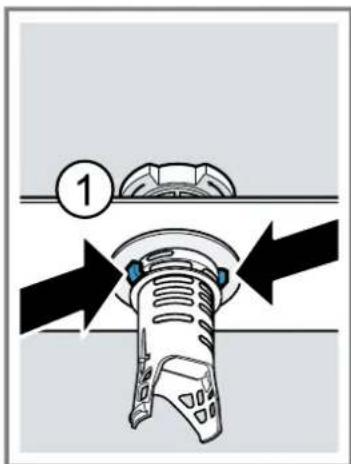
- Press the locking catches ① together and lift the coarse filter out ②.

- Clean the filter elements under running water.
Carefully clean the rim of dirt between the coarse and the fine filter.
- Re-assemble the filter system.
Make sure that the locking catches on the coarse filter click into position.
- Insert the filter system into the appliance and turn the coarse filter clockwise.
• Make sure that the arrow markings match up.

natural_image
Technical diagram of a mechanical component with no visible text or symbols
Cleaning spray arms
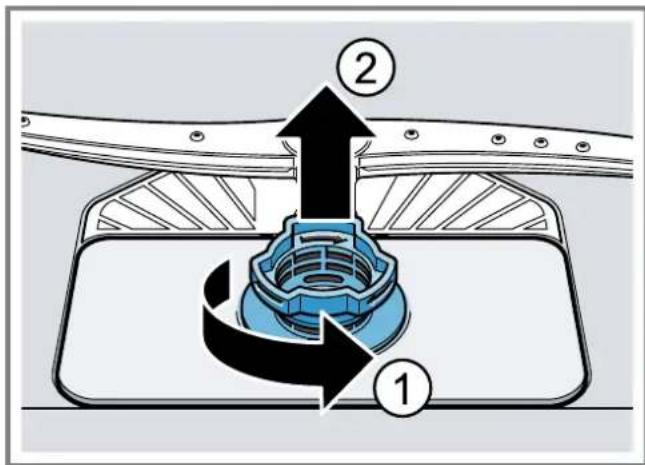
Limescale and soiling in the dishwashing water may block the nozzles and bearings on the spray arms. Clean the spray arms regularly.
- Unscrew the upper spray arm ① and pull down to remove ②.
- Pull up the lower spray arm to remove.
natural_image
Top-down diagram of a car interior showing a blue propeller and fan with an upward arrow, no text or symbols present.
- Check the outlet nozzles on the spray arms for blockages under running water and remove any foreign bodies.
- Insert the lower spray arm.
√ The spray arm clicks into position.
- Insert the upper spray arm and screw it firmly in place.
Troubleshooting
You can rectify minor faults on your appliance yourself. Read the troubleshooting information before contacting after-sales service. This will avoid unnecessary costs.

WARNING
Risk of electric shock!
• Incorrect repairs are dangerous.
• Repairs to the appliance should only be carried out by trained specialist staff.
- Only use genuine spare parts when repairing the appliance.
- If the power cord or the appliance power cable of this appliance is damaged, it must be replaced with a special power cord or special appliance power cable, which is available from the manufacturer or its Customer Service.
Appliance safety
| FAULT CAUSE TROUBLESHOOTING | | |
| Appliance door does not open at the end of the programme. | Automatic door opening is not activated. | Activate the automatic door opening.→ "Overview of basic settings", Page 24 |
| Door is not correctly adjusted. • Adjust the appliance door as described in the installation instructions.The door gap must be at least 70 mm - 100 mm. |
| Appliance door and door seal are soiled. | Clean the appliance door and door seal with a damp cloth and a little washing-up liquid. |
| Wrong screws used to adjust the door gap. | Use size 4X30 bolts to adjust the door gap.The bolts are included in the scope of supply.If you use bolts that are too long, this can de-activate the function of automatic door open-ing. |
| The safety device switches off automatic door opening. | Call Customer Service. |
| Appliance door brushes against the appliance or kitchen cabinets | Install the appliance correctly as described in the installation instructions and align. |
| Appliance door opens too wide at the end of the programme. | Door is not correctly adjusted. • Adjust the appliance door as described in the installation instructions.The door gap must be at least 70 mm - 100 mm. |
| Wrong screws used to adjust the door gap. | Use size 4X30 bolts to adjust the door gap.The bolts are included in the scope of supply.If you use bolts that are too long, this can de-activate the function of automatic door open-ing. |
Error code / Fault display / Signal
| FAULT CAUSE TROUBLESHOOTING | | |
| E:20-60 lights up alternately. Appliance has detected calcified heating element. | 1. Descale the appliance.2. Operate the appliance with the "water softening system" → Page 18.1 |
| E:30-00 will light up alternately. Water protection system is activated. | 1. Turn off the water tap.2. Call Customer Service. |
| E:31-00 will light up alternately. Water protection system is activated. | 1. Turn off the water tap.2. Call Customer Service. |
| E:32-00 will light up alternately or indicator for water supply lights up. | Supply hose is kinked. • Install the s | supply hose without kinks. |
| Water tap is turned off. • Turn on the water tap. |
| Water tap is jammed or furred up. • | Turn on the water tap. |
| E:32-00 will light up alternately or indicator for water supply lights up. | | The flow rate must be at least 10 l/min when the water supply is open. |
| The filters in the water connection of the supply or AquaStop hose are blocked. | Switch off the appliance.Pull out the mains plug.Turn off the water tap.Unscrew the water connection.Remove the filter from the supply hose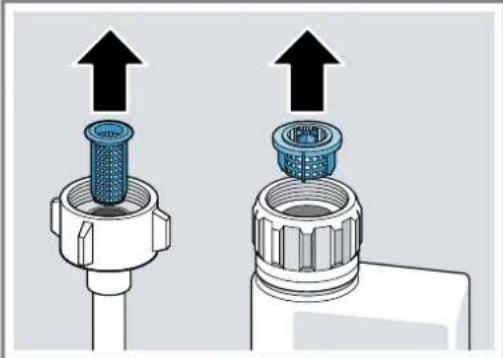 Clean the filter.Re-insert the filter in the supply hose.Screw the water connection back on.Check the water connection for leaks.Restore the power supply.Switch the appliance on. Clean the filter.Re-insert the filter in the supply hose.Screw the water connection back on.Check the water connection for leaks.Restore the power supply.Switch the appliance on. |
| E:34-00 will light up alternately. Water is continuously running into the appliance. | Turn off the water tap.Call Customer Service. |
| E:61-02 will light up alternately. | Wastewater pump is blocked. | Clean the wastewater pump. "Clean wastewater pump", Page 36 |
| Cover of the wastewater pump is loose | Secure the cover of the "Wastewater pump" Page 36 so it clicks into position. |
| E:61-03 will light up alternately. Water is not drained. | Wastewater hose is blocked or kinked. | Reposition the wastewater hose without kinks.Remove residues. |
| Siphon connection is still sealed. | Check the connection to the siphon and open if necessary. |
| Cover of the wastewater pump is loose. | Secure the cover of the "Wastewater pump" Page 36 so it clicks into position. |
| E:90-01 will light up alternately. Main voltage is too low. This is not a fault on the appliance. |
|
| E:92-40 will light up alternately. Filters are soiled or blocked. Clean the filters. "Cleaning filters", Page 26 |
| A different error code appears in the display window.E:01-00 to E:90-10 | A technical fault is present. 1. | Press ⏻.2. Unplug the appliance or switch off the fuse.3. Wait at least 2 minutes.4. Insert the mains plug of the appliance in a socket or switch on the fuse.5. Switch the appliance on.6. If the problem occurs again:Press ⏻.Turn off the water tap.Pull out the mains plug.Contact Customer Service and give the error code. |
Washing results
| FAULT CAUSE TROUBLESHOOTING | | |
| Tableware is not dry. No rinse aid used or dosage set too low. | 1. Add "Rinse aid" → Page 19.2. Set the amount of rinse aid to be dispensed. → "Setting the amount of rinse aid", Page 20 |
| Programme or programme option has no drying phase, or the drying phase is too brief. | Select a programme with drying, e.g. intensive, strong or ECO programme. Some option buttons decrease the drying result, e.g varioSpeed. |
| Water collects in recesses of the tableware or cutlery. | Position tableware at an angle where possible.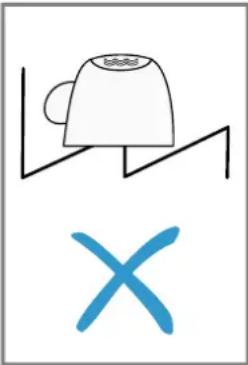 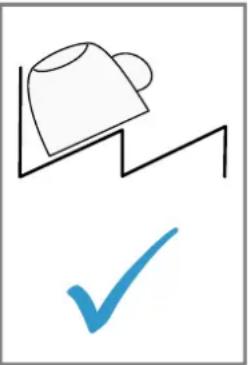 |
| The combined detergent used has a poor drying performance. | Use rinse aid to improve drying performance.2. Use a different combined detergent with a better drying performance. |
| Extra Dry not activated to improve drying performance. | Activate Extra Dry. |
| Tableware removed too early or drying process not yet ended. | Wait until the programme ends.2. Only remove tableware 30 minutes after the programme has ended. |
| Rinse aid used has a limited drying performance. | Use a name-brand rinse aid.Eco products may have limited effectiveness. |
| Appliance door does not open automatically at the end of the programme | Adjust the appliance door as described in the installation instructions.The door gap must be at least 70 mm - 100 mm. |
| Plastic tableware is not dry. Not a fault. As plastic does not store heat so well, it also does not dry as well. | No remedial action possible. |
| FAULT CAUSE TROUBLESHOOTING | |
| Cutlery is not dry. Cutlery not arranged properly in the cutlery basket or cutlery drawer. | Droplets can form on the cutlery contact points.1. "Arrange cutlery individually where possible."→ Page 222. Avoid points of contact. |
| Appliance interior still wet after wash cycle. | Not a fault. The condensation drying principle causes water droplets in the tub - they are indeed desirable here. The moisture in the air condenses on the inside walls, runs off and is pumped out. | No action required. |
| Remnants of food on tableware. Tableware is placed too close together or basket is overfilled. | 1. Arrange tableware with sufficient space in between.The spray jets must reach the surfaces of the tableware.2. Avoid points of contact. |
| Spray arm rotation of the lower spray arm is blocked. |
| Spray arm nozzles are blocked. |
| Filters are soiled. Clean the filters. |
| Filters are inserted incorrectly and/or not engaged. |
| Washing programme selected too weak. |
| Tableware has been precleaned too intensely. The sensors chose a weaker programme. Stubborn soil-ing cannot be entirely removed. |
| Tall narrow receptacles in corner areas are not rinsed adequately. |
| Top baskets on right and left are not set to same height. |
| Detergent residue in the appliance Ltd of the detergent dispenser is blocked by items of tableware parts and will not open. | 1. Arrange tableware in the top basket tableware so the tab collecting tray is not obstructed by tableware.→ "Arrange tableware", Page 22Items of tableware are blocking the dispenser lid.2. Do not place tableware or fragrance dispensers in the tablet collecting tray. |
| The lid of the detergent dispenser is blocked by the tab and will not open. |
| Tabs are used in the quick or short programme. Dissolving time of the tab is not attained. |
| Washing effect and dissolving performance are reduced after a prolonged storage time or detergent is very lumpy. |
| FAULT CAUSE TROUBLESHOOTING | | |
| Water marks on plastic parts. Due to | laws of physics droplet formation on plastic surfaces is unavoidable. After drying water marks are visible. | Select a more intensive programme.→ "Overview of programmes", Page 14Position tableware at an angle.→ "Arrange tableware", Page 22Use rinse aid.→ "Rinse aid", Page 19Set the water softening system higher.→ "Setting the water softening system", Page 18 |
| Wipeable or water-soluble coatings are present inside the appliance or on the door. | Detergent substances are deposited there. These coatings cannot generally be removed with chemicals. | Change your "detergent" → Page 20.Clean the appliance mechanically. |
| White coating is deposited in the appliance interior. | Set the water softening system correctly.→ "Setting the water softening system", Page 18In most cases you will need to increase the setting.Change your detergent if required. |
| Special salt dispenser is not screwed tight. | Screw the special salt dispenser tight. |
| Stubborn white coatings are present on tableware, inside the appliance or the door. | Detergent substances are deposited there. These coatings cannot generally be removed with chemicals. | Change your "detergent" → Page 20.Clean the appliance mechanically. |
| Hardness range is set incorrectly or the water hardness is too high.→ "Overview of water hardness settings", Page 18 | Set the Water softening system to the water hardness or add special salt. |
| 3in1/organic/eco detergent is not effective enough. | Set the Water softening system to the water hardness and use separate detergents (proprietary detergent, special salt, rinse aid). |
| Too little detergent is being used. | Increase the amount of detergent used or change "Detergent" → Page 20. |
| Washing programme selected too weak. | Select a more intensive washing programme.→ "Overview of programmes", Page 14 |
| Tea residue or lipstick marks on tableware. | Washing temperature is too low. | Select a programme with a higher washing temperature.→ "Overview of programmes", Page 14 |
| Too little detergent is being used or is unsuitable. | Use a suitable "Detergent" → Page 20 and follow the manufacturer's instructions for the amount to be used. |
| Tableware has been precleaned too intensely. The sensors chose a weaker programme. Stubborn soil-ing cannot be entirely removed. | Only remove large remnants of food and do not prerinse tableware. |
| Coloured coatings (blue, yellow, brown) that are difficult or impossible to remove are present inside the appliance or on stainless steel tableware. | The formation of films is due to substances contained in vegetables (cabbage, celery, potatoes, noodles, etc.) or tap water (manganese). | Clean the appliance.You can remove deposits with "Mechanical cleaning" → Page 25 or a machine cleaning product. It may not always be possible to completely remove deposits but they are harmless to health. |
| The formation of films is due to metal components on silver or aluminium tableware. | Clean the appliance.You can remove deposits with "Mechanical cleaning" → Page 25 or a machine cleaning product. It may not always be possible to completely remove deposits but they are harmless to health. |
| Coloured deposits (yellow, orange, brown) that are easy to remove are present inside the appliance (mainly at the bottom). | The formation of films is due to ingredients of food remnants and tap water (limescale) "soaplike". | 1. Check the setting of the water softening system.→ "Setting the water softening system", Page 182. Add special salt.→ "Adding special salt", Page 193. If you are using combined detergents (tabs), activate the water softening system.Follow the information on detergents.→ "Information on detergents", Page 21 |
| Plastic parts inside the appliance are discoloured. | Plastic parts inside the appliance may become discoloured during the life of the dishwasher. | Discolouration can come about and will not impair functioning of the appliance. |
| Plastic parts are discoloured. | Washing temperature is too low. | Select a programme with a higher washing temperature.→ "Overview of programmes", Page 14 |
| Tableware has been precleaned too intensely. The sensors chose a weaker programme. Stubborn soil-ing cannot be entirely removed. | Only remove large remnants of food and do not prerinse tableware. |
| Removable streaks are present on glasses, glassware with a metallic appearance and cutlery. | Amount of rinse aid to be dispensed is set too high. | Set the rinse aid system to a lower setting.→ "Setting the amount of rinse aid", Page 20 |
| No rinse aid has been added. Add rinse aid.→ "Adding rinse aid", Page 19 |
| Detergent residue is present in the final rinse. Lid of the detergent dispenser is blocked by tableware items and will not open fully. | Arrange tableware in the top basket table-ware so the tab collecting tray is not obstruc-ted by tableware.→ "Arrange tableware", Page 22Items of tableware are blocking the dispenser lid.Do not place tableware or fragrance dis-pensers in the tablet collecting tray. |
| Tableware has been precleaned too intensely. The sensors chose a weaker programme. Stubborn soil-ing cannot be entirely removed. | Only remove large remnants of food and do not prerinse tableware. |
| Irreversible clouding of glassware. Glasses are not dishwasher-proof, only suitable for dishwashers. | Use dishwasher-proof glasses.Glasses are usually only suitable for use in a dishwasher, i.e. long-term wear or long-term changes must be expected.Avoid a lengthy steam phase (standing time after wash cycle ends).Use a programme with a lower temperature.→ "Overview of programmes", Page 14Set the softening system to the water hard-ness.→ "Setting the water softening system", Page 18Use detergent with a glass protection com-ponent. |
| Rust spots on cutlery. Cutlery is not sufficiently rust-resistant. Knife blades are often more severely affected. | Use rust-resistant tableware. |
| Cutlery may also rust if washed to-gether with rusting items. |
| Salt content in washing water is too high. |
| Detergent residue is present in the detergent dispenser or the tablet collecting tray. | Spray arms were blocked by table-ware so detergent was not rinsed out. | Check that the spray arms are not blocked and can rotate freely. |
| Detergent dispenser was damp when detergent was added. | Only add detergent to a detergent dispenser when dry. |
| Excessive formation of foam occurs. | Hand washing-up liquid is present in dispenser for rinse aid. | Immediately add rinse aid to the dispenser. → "Adding rinse aid", Page 19 |
| Rinse aid has been spilled. Remove the rinse aid with a cloth. |
| Detergent or appliance care product used causes excessive foaming. | Change the brand of detergent. |
Information on display panel
| FAULT CAUSE TROUBLESHOOTING | | |
| Special salt refill indicator lights up. | Insufficient special salt. | Add "Special salt" → Page 19. |
| Sensor does not detect special salt tablets. | Do not use special salt tablets. |
| Refill indicator for special salt does not light up. | Water softening system is switched off. | Set the water softening system.→ "Setting the water softening system", Page 18 |
| Refill indicator for rinse aid lights up. | Insufficient rinse aid. | Add "Rinse aid" → Page 19.Set the amount of rinse aid to be dispensed.→ "Setting the amount of rinse aid", Page 20 |
| Refill indicator for rinse aid does not light up. | Rinse aid system is switched off. | Set the amount of rinse aid to be dispensed.→ "Setting the amount of rinse aid", Page 20 |
Malfunctions
| FAULT CAUSE TROUBLESHOOTING | | |
| Water is left in the appliance at the end of the programme. | Filter system or area under the filters is blocked. | 1. Clean the "Filters" → Page 26.2. Clean the "Wastewater pump" → Page 36. |
| Programme has not yet ended. • Wait until the programme ends or cancel the programme with Reset.→ "Terminate programme", Page 23 |
| Appliance cannot be switched on or operated. | Appliance functions have failed. | 1. Pull out the mains plug or switch off the fuse.2. Wait at least 2 minutes.3. Connect the appliance to the power supply.4. Switch the appliance on. |
| Appliance does not start. The mains fuse has tripped. • Check the relevant fuse. |
|
|
|
| Programme starts automatically. | You did not wait until programme ended. | • → "Terminate programme", Page 23 |
| Appliance stops during the programme or cuts out. | Appliance door is not closed properly. | • Close the appliance door. |
| Power and/or water supply has been interrupted. | 1. Check the power supply.2. Check the water supply. |
| Top basket is pressing against inner door and preventing appliance door from being closed securely. | • Check whether the rear panel of the appliance is being pressed in by a socket or hose holder that has not been removed.· Arrange the tableware so that no parts pro-ject beyond the basket and prevent the appli-ance door from closing properly. |
| Appliance stops during the pro-gramme or cuts out. | | |
| All LEDs lit up or flashing. | Electronics have detected a fault. | 1. Press the main switch button for approx. 4 seconds.The appliance is reset and restarted.2. If the problem occurs again:· Switch off the appliance.· Pull out the mains plug or switch off the fuse in the fuse box.· Wait at least 2 minutes.· Switch on the fuse in the fuse box or in-sert the mains plug.· Switch the appliance on.3. If the problem occurs again:· Contact customer service. |
Mechanical damage
| FAULT CAUSE TROUBLESHOOTING | | |
| Appliance door cannot be closed. | Door lock has been activated. | • Close the appliance door with greater force. |
| Door cannot be closed due to installation method. | • Check whether the appliance has been installed properly.When closed, the appliance door, its decor or attached parts should not knock against adjacent cabinets or the worktop. |
| Lid on the detergent dispenser can-not be closed. | Detergent dispenser or lid are blocked by sticky detergent residue. | • Remove detergent residue. |
Noise
| FAULT CAUSE TROUBLESHOOTING | | |
| Filling valves making knocking noises. | Caused by the domestic installation. No appliance fault present. Does not affect functioning of the appliance. | Can only be remedied in the domestic installation. |
| Knocking or rattling noise. | Spray arm is striking tableware. | Arrange tableware so that the spray arms do not strike tableware. |
| With a small load the water jets directly strike against the tub. | Distribute the tableware evenly.Load the appliance with more tableware. |
| Light items of tableware move about during the wash cycle. | Position light items of tableware securely. |
Clean wastewater pump
Large remnants of food or foreign bodies can block the waste water pump. As soon as the rinsing water no longer drains properly, the waste water pump must be cleaned.

WARNING
Risk of injury!
- Sharp and pointed objects or fragments of glass may block the waste water pump and cause injury.
- Remove any foreign bodies carefully.
- Disconnect the appliance from the power supply.
- Remove the top and bottom basket.
- Remove the filter system.
- Scoop out any water.
Use a sponge if necessary.
- Prise off the pump cover using a spoon and grip it by the crosspiece.
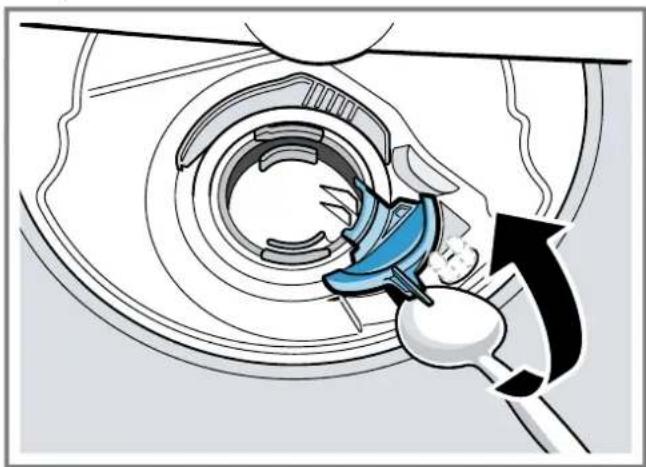
natural_image
Mechanical assembly diagram showing a blue tool interacting with a circular component (no text or symbols visible)
- Lift the pump cover inwards at an angle and remove.
√ You can now reach the impeller with your hand.
- Remove any remnants of food and foreign bodies in the area of the impeller.
- Insert the pump cover ① and press down ②
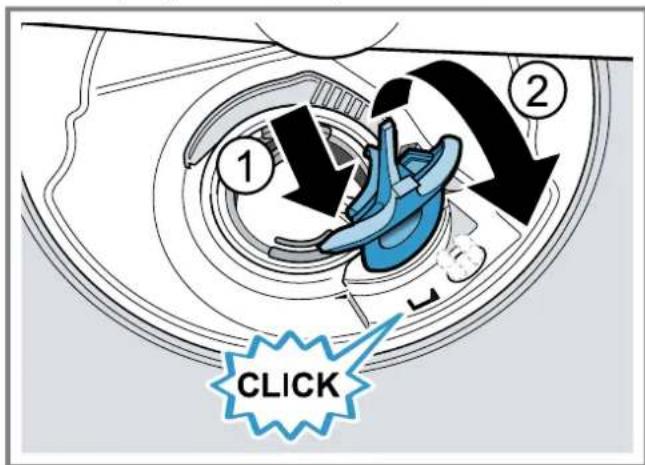
√ The pump cover clicks into position.
9. Install the filter system.
10. Insert the top and bottom basket.
Transportation, storage and disposal
Removing the appliance
- Disconnect the appliance from the mains power supply.
- Turn off the water tap.
- Detach the drainage connection.
- Detach the drinking water connection.
- Loosen any screws fastening the appliance to cabinet parts.
- Remove the base panel if fitted.
- Pull the appliance out carefully, along with the hose behind it.
Protect appliance from frost
If there is a risk of frost where the appliance will be standing, e.g. in a holiday home, empty the appliance completely.
• Empty the appliance.
→ "Transporting the appliance", Page 36
Transporting the appliance
To avoid damage to the appliance, empty it before transporting.
Note: Always transport the dishwasher upright to prevent residual water getting into the machine's controls and damaging the appliance.
- Remove tableware from the appliance.
- Secure loose parts.
- "Switch on the appliance." → Page 23
- Select the programme with the highest temperature.
→ "Overview of programmes", Page 14
- "Start the programme." → Page 23
- To drain the appliance, terminate the programme after approx. 4 minutes.
→ "Terminate programme", Page 23
- "Switch off the appliance." → Page 23
- Turn off the water tap.
- To empty the residual water out of the appliance, detach the supply hose and let the water drain out.
Disposing of old appliance
Valuable raw materials can be reused by recycling.

WARNING
Risk of harm to health!
- Children can lock themselves in the appliance, thereby putting their lives at risk.
-
With redundant appliances, unplug the power cord. Then cut through the cord and damage the lock on the appliance door beyond repair so that the appliance door will no longer close.
-
Unplug the appliance from the mains.
-
Cut through the power cord.
- Dispose of the appliance in an environmentally friendly manner.
Information about current disposal methods are available from your specialist dealer or local authority.
| This appliance is labelled in accordance with European Directive 2012/19/EU concerning used electrical and electronic appliances (waste electrical and electronic equipment - WEEE).The guideline determines the framework for the return and recycling of used appliances as applicable throughout the EU. |
Technical specifications
| Weight Max.: 60 kg | |
| Voltage 220 - 240 V, 50 Hz or 60 Hz |
| Power rating 2000 - 2400 W | |
| Fuse 10 - 16 A | |
| Water pressure • Min. 0.05 MPa (0.5 bar)• Max. 1 MPa (10 bar) |
| Inlet rate Min. 10 l/min | |
| Water temperature Cold water.Hot water max.: 60 °C |
| Capacity 13 place settings | |
More information about your model can be found online at https://eprel.ec.europa.eu/qr/1391367 ^1 . This web address is linked to the official EU EPREL product database.
This product includes software components that are licensed by the copyright holders as free or open source software.
This licence information can be downloaded via our home page www.ikea.com. Alternatively, you can request relevant information from se.hfb70.running.range@inter.ikea.com.
The source code will be made available to you on request. Please send your request to the above address. Subject: "FOSS"
IKEA of Sweden AB hereby declares that the appliance conforms to the essential requirements and other relevant provisions of Directive 2014/53/EU.
A detailed RED Declaration of Conformity can be found online at www.ikea.com among the additional documents on the product page for your appliance.

Hereby, IKEA of Sweden AB declares that the appliance is in compliance with relevant statutory requirements. ^2
A detailed Declaration of Conformity can be found online at www.ikea.com among the additional documents on the product page for your appliance. ^2

2.4 GHz band (2400–2483.5 MHz): Max. 100 mW
5-GHz band (5150–5350 MHz + 5470–5725 MHz): max. 150 mW
| BE | BG | CZ | DK | DE | EE | IE | EL | ES |
| FR | HR | IT | CY | LI | LV | LT | LU | HU |
| MT | NL | AT | PL | PT | RO | SI | SK | FI |
| SE | NO | CH | TR | IS | UK (NI) |
5 GHz WLAN (Wi-Fi): For indoor use only.
5 GHz WLAN (Wi-Fi): For indoor use only.
IKEA guarantee
FAQs about the warranty:
How long is the IKEA warranty valid?
This warranty is valid for five (5) years from the original date of purchase of your appliance at IKEA. The original sales receipt, is required as proof of purchase. If service work is carried out under warranty, this will not extend the warranty period for the appliance.
Who will execute the service?
IKEA service provider will provide the service through its own service operations or authorised service partner network.
What does this warranty cover?
This warranty only applies to domestic use of the relevant product. The exceptions are specified under the headline "What is not covered under this warranty?" Within the warranty period, the costs to remedy the fault e.g. repairs, spare parts, labour and travel will be covered, provided that the appliance is accessible for repair without special expenditure. The respective local regulations are applicable. Replaced parts become the property of IKEA.
What will IKEA do to correct the problem?
The IKEA-appointed service provider will examine the product and decide, at its sole discretion, if it is covered under this warranty. If considered covered, the IKEA-appointed service provider or its authorised service partner through its own service operations will then, at its sole discretion, either repair the defective product or replace it with the same or a comparable product.
What is not covered under this warranty?
• Normal wear and tear.
- Deliberate or negligent damage, damage caused by failure to observe the user manual, incorrect installation or by connection to the wrong voltage, damage caused by chemical or electrochemical reaction, rust, corrosion or water damage including but not limited to water damage caused by excessive lime in the water supply, and damage caused by abnormal environmental conditions.
- Consumable parts including batteries and bulbs.
- Non-functional and decorative parts which do not affect normal use of the appliance, including any scratches and possible differences in colour.
- Accidental damage caused by foreign objects or substances and damage associated with cleaning or unblocking of filters, drainage systems or soap drawers.
- Damage to the following parts: ceramic glass, accessories, crockery and cutlery baskets, inlet and outlet hoses, seals, lamps and lamp covers, displays, knobs, panels, housing covers and parts of housings. Unless such damage can be proved to have been caused by production faults.
- Cases where no damage could be found during a technician's visit.
- Repairs not carried out by our appointed service providers and/or an authorised contractual service partner, or where non-original spare parts have been used.
- Repairs caused by installation which was improper or not according to specification.
- Use of the appliance in a non-domestic environment, i.e. professional use.
- Transport damage: Where the product is transported by customers themselves either to their home or to another address, IKEA shall not be liable for any damage which
may occur during such transport. However, if IKEA delivers the product to the customer's delivery address, then damage to the product that occurs during this delivery will be covered by IKEA.
- Cost of carrying out initial installation of the IKEA appliance. However, if an IKEA-appointed service provider or its authorised service partner repairs or replaces the appliance under the terms of this warranty, the appointed service provider or its authorised service partner will reinstall the repaired appliance or install the replacement, if necessary.
How country law applies
The IKEA warranty gives you specific legal rights, which cover or exceed all the local legal demands. However these conditions do not limit in any way consumer rights described in the local legislation.
Scope of applicability
For appliances which are purchased in one EU country and taken to another EU country, the services will be provided in the framework of the warranty conditions normal in the new country. An obligation to carry out services under the warranty exists only if the appliance complies and is installed in accordance with:
- the technical specifications of the country in which the warranty claim is made;
- the installation instructions and safety information in the user manual.
Customer Service for IKEA appliances
Please don't hesitate to contact the IKEA-appointed authorised service centre:
• to make a service request under this warranty;
• to ask for clarification about functions of IKEA appliances.
To ensure that we provide you with the best assistance, please read the installation instructions and/or the user manual before contacting us.
How to reach us if you need our service

On the final page of this user manual you will find a full list of authorised service centres selected by IKEA, together with the relevant national telephone numbers.
To provide you with faster service, please use the telephone numbers listed in this user manual.
When calling us, make sure that you have the details of the relevant appliance to hand. These are:
• Appliance number (E-Nr = 1)
• Production number ( FD = 2 )
- IKEA article number (8 digit code located on the line below the appliance number (E-Nr))
- IKEA manufacturing date (located on the care label on the side of the inner door)
This information can be found on the "rating plate"
→ Page 11 on the appliance door.
SAVE THE SALES RECEIPT!
Note: It is your proof of purchase and required for the warranty to apply. The sales receipt also shows the IKEA designation and article number (8-digit code) for each of the appliances you have purchased.
For any further questions not related to customer service for your appliance, please contact the hotline of your nearest IKEA store. Before contacting us, please read the appliance documentation carefully.
After-sales service
You can find an overview of the telephone numbers for customer service and information on spare parts availability at the end of this document.
Function-relevant genuine spare parts according to the corresponding Ecodesign Order can be obtained from Customer Service for a period of at least 10 years from the date on which your appliance was placed on the market within the European Economic Area.
Availability of spare parts:
Door hinges and door seals, other seals, spray arms, strainer filters, inner support and plastic accessories, such as baskets and lid. As well as other spare parts, e.g. cutlery drawers, handles, inserts, holders, fixing sets, insulating plates, locks, child-proof door locks, rails, housing side parts, Aquastop, cable connections, Aquastop valves, hinge belts, bearings, power cords, protective covers, rubber forming parts, ventilation ducts, water storage tanks, actuators, hoses, hose clamps, display modules, panel boxes, handle strips, perspex doors, sump seals, basket rollers, clamps, cutlery baskets, clamps, fixing parts, cup racks, heat exchangers, threaded screws, flow-through sensors, drain hoses, water softening systems, regeneration valves, pump sumps, screws, water switches, heating pumps, drain pumps, pipes, upper and lower spray arms, fine filters, micro filters, dosing containers, doors and much more...
Inhaltsverzeichnis
Sicherheit 41
natural_image
Illustration of a basket filled with various food items including radishes, peaches, and lettuce (no text or symbols)
natural_image
Diagram of a car chassis with overhead wiring and a blue screen icon pointing to a component (no text or symbols)
natural_image
Line drawing of a basket containing various kitchen utensils and dishes (no text or symbols)
natural_image
Technical line drawing of a mechanical assembly with rollers and frame (no text or symbols)
Besteckschublade
natural_image
Interior view of a kitchen drawer with open compartments containing kitchen utensils and utensils (no text or labels)
Tipp
natural_image
Technical line drawing of a mechanical component with grid lines and blue structural elements (no text or symbols)
natural_image
Pure electrical circuit lines without any symbols
natural_image
Illustration of a conveyor belt pouring granular material into a blue funnel on a stovetop, with a circular inset showing a directional arrow (no text or symbols)
natural_image
Diagram of a printer or printer with a paper feeding into a tray, showing a black arrow pointing downward (no text or symbols present)
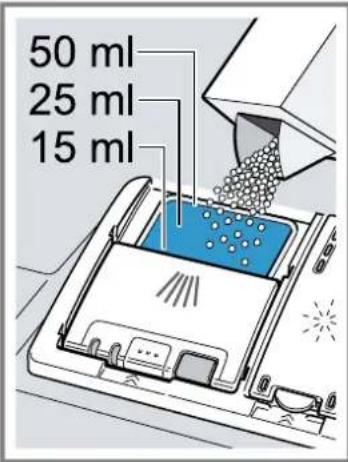
natural_image
Simple line drawing of a coffee cup on a stand above a blue 'X' symbol (no text or labels)

natural_image
Simple line drawing of a bucket with a checkmark below (no text or symbols)
Geschirr ausräumen
WARNING
Verletzungsgefahr!
natural_image
Cross-sectional diagram of a mechanical component with a downward arrow indicating force or direction (no text or symbols present)
natural_image
Technical diagram of a mechanical component with a central hub and base plate (no text or symbols)
Sprüharme reinigen
natural_image
Top-down diagram of a car interior showing a blue propeller and fan assembly with an upward arrow (no text or symbols)
natural_image
Mechanical assembly diagram showing a blue tool interacting with a circular component, with an arrow indicating motion (no text or symbols present)
natural_image
Illustration of a basket filled with various food items, including eggs, tomatoes, and vegetables (no text or symbols)
natural_image
Diagram of a car chassis with conveyor systems and a blue screen icon pointing to a vehicle (no text or symbols present)
natural_image
Line drawing of a basket filled with various kitchen utensils (no text or symbols)
natural_image
Technical line drawing of a mechanical assembly with rollers and frame structure (no text or symbols)
Tiroir à couverts
natural_image
Interior view of a kitchen drawer with open compartments containing kitchen utensils and utensils (no text or labels visible)
Conseil
natural_image
Technical line drawing of a mechanical component with blue structural elements and mesh grid (no text or symbols)
natural_image
Pure technical diagram of a mechanical assembly with blue structural elements and grid lines (no text or symbols)
natural_image
Illustration of a conveyor belt pouring granular material into a blue funnel with a lid, no text or symbols present
natural_image
Diagram of a printer's internal structure with a paper lid and blue cover, showing no text or symbols.
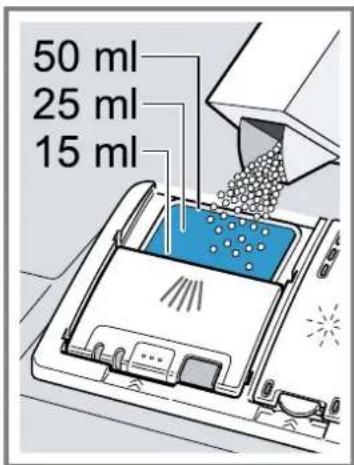
natural_image
Cross-sectional diagram of a mechanical component with a downward arrow indicating force or direction (no text or symbols present)
natural_image
Technical line drawing of a mechanical component with no visible text or symbols
natural_image
Diagram of a blue propeller inside a vehicle cabin with an upward arrow indicating motion or direction (no text or symbols)
natural_image
Mechanical assembly diagram showing a blue tool interacting with a circular component (no text or symbols visible)
⚠ WAARSCHUWING – Kans op letsel!
⚠ WAARSCHUWING – Kans op brand!
⚠ WAARSCHUWING – Kans op letsel!
⚠ WAARSCHUWING – Kantelgevaar!
⚠ WAARSCHUWING – Kans op explosie!
⚠ WAARSCHUWING – Kans op letsel!
⚠ WAARSCHUWING – Kans op verstikking!
⚠ WAARSCHUWING – Kans op letsel!
natural_image
Illustration of a basket filled with various food items including radishes, peaches, and eggs (no text or symbols)
natural_image
Diagram of a car conveyor system with a blue indicator light and black arrow pointing to the component (no text or symbols present)
natural_image
Line drawing of a basket filled with various kitchen utensils (no text or symbols)
natural_image
Technical line drawing of a mechanical assembly with rollers and guide rails (no text or symbols)
Besteklade
natural_image
Interior view of a kitchen appliance drawer with cutlery and utensils (no text or symbols)
natural_image
Technical line drawing of a mechanical component with blue structural elements and mesh grid (no text or symbols)
natural_image
Pure technical line drawing of a mechanical assembly without any text, numbers, or symbols
natural_image
Illustration of a funnel pouring granular material into a blue container with a rotating knob (no text or symbols)
natural_image
Diagram of a printer's internal structure with a paper feeding into a tray (no text or symbols)

natural_image
Technical diagram of a mechanical component with a central hub and base plate (no text or symbols)
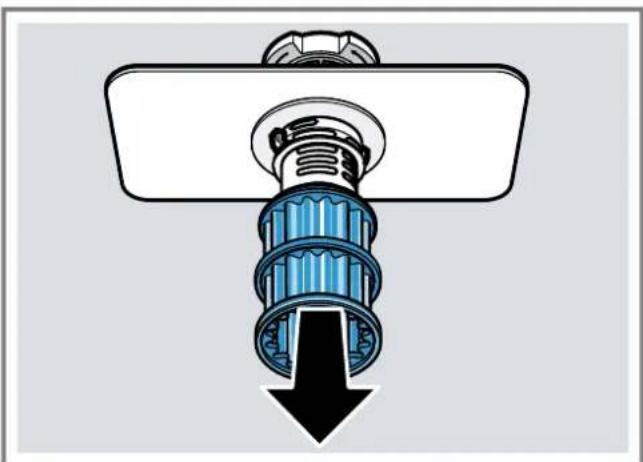
natural_image
Diagram of a mechanical assembly with a blue gear-like component and a black downward arrow (no text or symbols)
natural_image
Top-down diagram of a car interior showing a blue propeller and fan with an upward arrow indicating motion (no text or symbols)
natural_image
Diagram of a mechanical device with a blue tool interacting with a circular component, showing motion or assembly (no text or symbols present)
natural_image
Illustration of a basket filled with various food items, including eggs, tomatoes, and vegetables (no text or symbols)
natural_image
Diagram of a car chassis with a blue control panel and black arrow pointing to it (no text or symbols present)
natural_image
Line drawing of a basket containing various kitchen utensils and dishes (no text or symbols)
natural_image
Technical line drawing of a mechanical assembly with rollers and guide rails (no text or symbols)
Cassetto posate
natural_image
Interior view of a kitchen drawer with open compartments containing kitchen utensils and utensils (no text or labels visible)
Consiglio
natural_image
Technical line drawing of a mechanical component with blue components and mesh structure (no text or symbols)
natural_image
Technical line drawing of a mechanical assembly with blue structural elements and grid lines (no text or symbols)
natural_image
Illustration of a conveyor belt pouring granular material into a blue funnel with a lid, no text or symbols present
natural_image
Illustration of a kitchen tray with cleaning tools and a blue X mark (no text or symbols)

natural_image
Illustration of a cleaning or cleaning tool with a blue checkmark overlay (no text or symbols)
natural_image
Technical line drawing of a mechanical component with no visible text or symbols
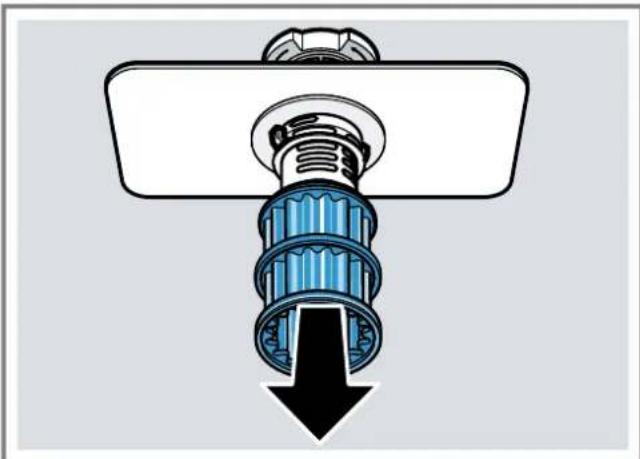
natural_image
Diagram of a mechanical assembly with a blue gear and black downward arrow (no text or symbols)
natural_image
Diagram of a blue propeller inside a vehicle cabin with an upward arrow indicating motion (no text or symbols)
natural_image
Mechanical assembly diagram showing a blue tool interacting with a circular component (no text or symbols visible)
natural_image
Illustration of a plastic basket filled with various items including eggs, tomatoes, and radishes (no text or symbols)
natural_image
Diagram of a car chassis with conveyor systems and a blue indicator light pointing to a vehicle (no text or symbols present)
natural_image
Line drawing of a basket filled with various kitchen utensils (no text or symbols)
natural_image
Technical line drawing of a mechanical assembly with rollers and frame structure (no text or symbols)
natural_image
Interior view of a kitchen drawer with open compartments containing cutlery, utensils, and dishware (no text or symbols visible)
Συμβουλή
natural_image
Technical line drawing of a mechanical component with grid lines and blue structural elements (no text or symbols)
natural_image
Technical line drawing of a mechanical assembly with blue structural elements and grid lines (no text or symbols)
natural_image
Illustration of a conveyor belt pouring granular material into a blue funnel with a rotary switch (no text or symbols)
natural_image
Illustration of a food sorting tray with plastic cups and a blue X symbol (no text or labels)
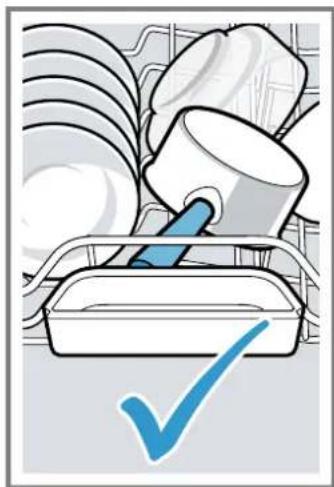
natural_image
Illustration of kitchen utensils and a checkmark (no text or symbols)
Αφαίρεση των σκευών

ΠΡΟΕΙΔΟΠΟΙΗΣΗ
natural_image
Diagram of a mechanical assembly with a blue gear and black downward arrow (no text or symbols)
natural_image
Technical line drawing of a mechanical component with no visible text or symbols
natural_image
Diagram of a car interior showing a blue propeller and dashboard with an upward arrow indicating motion (no text or symbols)
natural_image
Mechanical assembly diagram showing a blue tool interacting with a circular component (no text or symbols)
natural_image
Illustration of a basket filled with various food items, including eggs, tomatoes, and vegetables (no text or symbols)
natural_image
Diagram of a car chassis with railings and a blue screen, no text or symbols present
natural_image
Line drawing of a basket containing various kitchen utensils and dishes (no text or symbols)
natural_image
Technical line drawing of a multi-wheeled cart with rollers and structural supports (no text or symbols)
natural_image
Interior view of a kitchen drawer with open compartments containing kitchen utensils and utensils (no text or symbols visible)
Consejo
natural_image
Technical line drawing of a mechanical component with blue components and mesh structure (no text or symbols)
natural_image
Technical line drawing of a mechanical assembly with blue structural elements and grid lines (no text or symbols)
natural_image
Illustration of a funnel pouring granular material into a blue container with a hand holding a circular component (no text or symbols)
natural_image
Diagram of a printer's internal structure with a paper lid and blue cover, showing no text or symbols.


ADVERTENCIA
Riesgo de lesiones!
natural_image
Diagram of a mechanical assembly with a blue gear and black downward arrow (no text or symbols)
natural_image
Technical diagram of a mechanical component with a central gear and base plate (no text or symbols)
natural_image
Top-down diagram of a car interior showing a blue propeller and engine compartment with an upward arrow (no text or symbols)
natural_image
Diagram of a mechanical device with a blue tool interacting with a circular component, showing motion direction (no text or symbols)
natural_image
Illustration of a basket filled with various items including tomatoes, peppers, and radishes (no text or symbols)
natural_image
Technical illustration of a car chassis with conveyor systems and a blue indicator light (no text or symbols)
natural_image
Line drawing of a basket filled with various kitchen utensils (no text or symbols)
natural_image
Isometric line drawing of a multi-wheeled cart with rollers and structural supports (no text or symbols)
natural_image
Interior view of a kitchen appliance drawer with cutlery and utensils (no text or symbols)
Dica
natural_image
Technical line drawing of a mechanical component with blue components and mesh structure (no text or symbols)
natural_image
Pure electrical circuit lines without any symbols
natural_image
Illustration of a funnel pouring granular material into a blue container with a lid, no text or symbols present
natural_image
Diagram of a printer's internal structure with a paper lid and blue cover, showing no text or symbols.

Retirar a loiça

AVISO
natural_image
Diagram of a mechanical assembly with a blue gear and black downward arrow (no text or symbols)
natural_image
Technical line drawing of a mechanical component with no visible text or symbols
natural_image
Top-down diagram of a car interior showing a blue propeller and dashboard with an upward arrow indicating motion (no text or symbols)
natural_image
Mechanical assembly diagram showing a blue tool interacting with a circular component (no text or symbols visible)
natural_image
Illustration of a basket filled with various items including radishes, beans, and nuts (no text or symbols)
natural_image
Diagram of a car chassis with conveyor systems and a blue indicator light, no text or symbols present
natural_image
Line drawing of a basket containing various kitchen utensils and dishes (no text or symbols)
natural_image
Technical line drawing of a mechanical assembly with rollers and mounting brackets (no text or symbols)
Bestickläda
Lägg bestick i besticklädan.
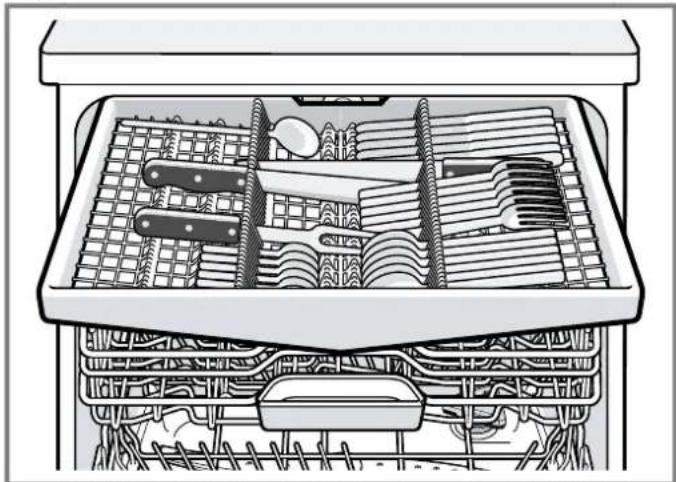
natural_image
Interior view of a kitchen drawer with open compartments containing cutlery, utensils, and kitchen utensils (no text or labels)
Tips!
natural_image
Technical line drawing of a mechanical component with blue structural elements and mesh grid (no text or symbols)
natural_image
Pure electrical circuit lines without any symbols
natural_image
Illustration of a conveyor belt pouring white particles into a blue funnel with a lid, no text or symbols present
natural_image
Illustration of a kitchen appliance with a blue X mark, no text or symbols present

natural_image
Illustration of a kitchen utensil with a blue checkmark (no text or symbols)
natural_image
Cross-sectional diagram of a mechanical component with a downward arrow indicating force or direction (no text or symbols present)
natural_image
Technical diagram of a mechanical component with no visible text or symbols
natural_image
Interior view of a vehicle dashboard with a blue propeller and fan, showing a black upward arrow indicating direction (no text or symbols)
natural_image
Mechanical assembly diagram showing a hand operating a tool to adjust a circular component (no text or symbols visible)
Sette inn oppvask 367
Hente ut oppvasken.... 368
⚠ ADVARSEL – Veltefare!
⚠️ ADVARSEL – Fare for skålding!
natural_image
Illustration of a basket filled with various food items, including radishes and beans (no text or symbols)
natural_image
Diagram of a car chassis with a blue screen and black arrow pointing to the vehicle (no text or symbols present)
natural_image
Line drawing of a basket containing various kitchen utensils and dishes (no text or symbols)
natural_image
Technical line drawing of a mechanical assembly with rollers and frame structure (no text or symbols)
Bestikkskuff
natural_image
Interior view of a kitchen appliance drawer with cutlery and utensils (no text or symbols)
Tips
natural_image
Technical line drawing of a mechanical component with grid lines and blue structural elements (no text or symbols)
natural_image
Technical line drawing of a mechanical assembly with blue structural elements and grid lines (no text or symbols)
natural_image
Illustration of a funnel pouring white granules into a blue container with a lid, next to a gas stove (no text or symbols)
natural_image
Diagram of a printer or printer with a paper feeding into a cover, showing a downward arrow and no text or symbols.
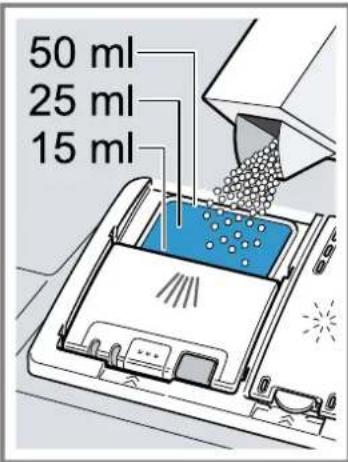
natural_image
Simple line drawing of a coffee cup on a table with a blue 'X' symbol below (no text or labels)

natural_image
Simple line drawing of a mug on a staircase with a blue checkmark below (no text or symbols)
natural_image
Illustration of a kitchen tray with food items and a blue X symbol (no text or labels)
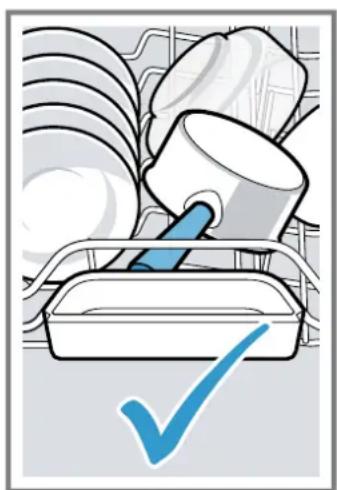
natural_image
Illustration of a food tray with a blue checkmark and a pen, surrounded by plastic containers (no text or symbols)
Hente ut oppvasken

ADVARSEL
Fare for personskade!
natural_image
Cross-sectional diagram of a mechanical component with a downward arrow indicating force or direction (no text or symbols)
natural_image
Technical diagram of a mechanical component with no visible text or symbols
natural_image
Diagram of a blue propeller inside a vehicle cabin with an upward arrow indicating motion or direction (no text or symbols)
- Kontroller under rennende vann om spylearmenes dyser er tilstoppet, og fjern fremmedlegemer ved behov.
- Sett inn den nedre spylearmen.
√ Spylearmen går hørbart i inngrep.
- Sett inn den øvre spylearmen og skru den fast.
Utbedring av feil
Du kan selv utbedre små feil på apparatet. Benytt deg av informasjonen om feilsøking før du tar kontakt med kundeservice. På den måten unngår du unødige kostnader.

ADVARSEL
natural_image
Mechanical assembly diagram showing a blue tool interacting with a circular component (no text or symbols visible)
natural_image
Illustration of a basket filled with various items, including eggs, tomatoes, and radishes (no text or symbols)
natural_image
Diagram of a car chassis with overhead railings and a blue indicator light pointing to a vehicle (no text or symbols present)
natural_image
Line drawing of a basket containing various kitchen utensils and dishes (no text or symbols)
natural_image
Technical line drawing of a mechanical assembly with rollers and guide rails (no text or symbols)
Ruokailuvälinetaso
natural_image
Interior view of a kitchen drawer with open compartments containing kitchen utensils and utensils (no text or labels visible)
Ohje
natural_image
Technical line drawing of a mechanical component with blue components and mesh grid (no text or symbols)
natural_image
Technical line drawing of a mechanical assembly with blue structural elements and grid lines (no text or symbols)
natural_image
Illustration of a conveyor belt pouring granular material into a blue funnel with a lid, no text or symbols present
natural_image
Diagram of a printer or printer with a black arrow pointing downward to a blue cover, indicating compression or print (no text or symbols present)
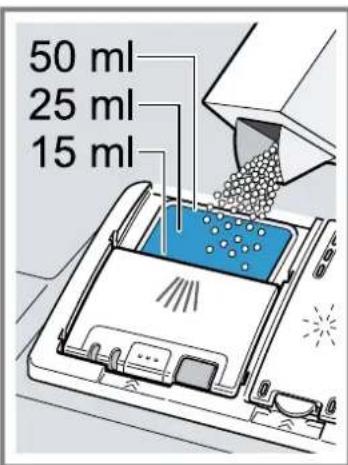
natural_image
Simple line drawing of a coffee cup on a stand above a blue 'X' symbol (no text or labels)

natural_image
Simple line drawing of a mug on a staircase with a blue checkmark below (no text or symbols)
natural_image
Cross-sectional diagram of a mechanical component with a downward arrow indicating force or direction (no text or symbols present)
natural_image
Technical diagram of a mechanical component with a central gear and base plate (no text or symbols)
natural_image
Diagram of a blue propeller inside a vehicle cabin with an upward arrow indicating motion or force (no text or symbols)
natural_image
Mechanical assembly diagram showing a blue tool interacting with a circular component (no text or symbols)
Sikker installation 424
Sikker brug.... 425
Beskadiget apparat.... 426
Sikker installation 428
Sikker brug.... 428
ADVARSEL – Brandfare!
⚠️ ADVARSEL – Fare for skoldning!
⚠️ ADVARSEL – Fare for klemning!
natural_image
Illustration of a basket filled with various food items including tomatoes, lettuce, and radishes (no text or symbols)
natural_image
Diagram of a car chassis with conveyor systems and a blue indicator light pointing to a component (no text or symbols present)
natural_image
Line drawing of a basket containing various kitchen utensils and dishes (no text or symbols)
natural_image
Isometric line drawing of a multi-wheeled cart with rollers and structural supports (no text or symbols)
Bestikskuffe
Placér bestik i bestikskuffen.

natural_image
Interior view of a kitchen appliance drawer with cutlery and utensils (no text or symbols)
natural_image
Technical line drawing of a mechanical component with blue structural elements and mesh grid (no text or symbols)
natural_image
Technical line drawing of a mechanical assembly with blue structural elements and grid lines (no text or symbols)
De klapbare stave kan klappes ned for bedre at kunne place-re gryder, skåle og glas. ^1
Nedklapning af de klapbare stave ^1
- Klap de klapbare stave op for at bruge dem igen.
natural_image
Illustration of a funnel pouring granular material into a blue container with a lid, no text or symbols present
natural_image
Simple line drawing of a coffee cup on a table with a blue 'X' symbol below (no text or labels)
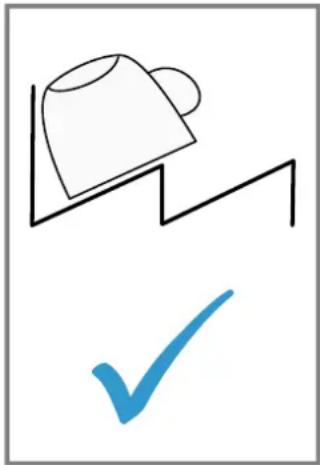
natural_image
Simple line drawing of a mug on a staircase with a blue checkmark below (no text or symbols)
natural_image
Illustration of a kitchen appliance with a blue X mark, no text or symbols present
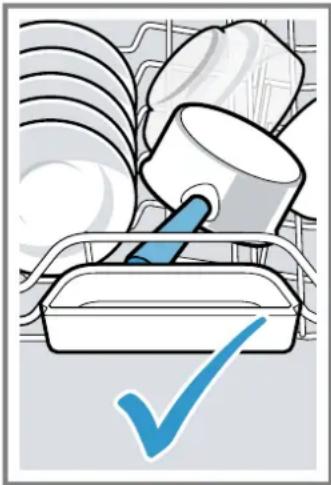
natural_image
Illustration of a cleaning or cleaning tool with a blue checkmark inside a container (no text or symbols)
√ I displayet vises "h:01".
natural_image
Cross-sectional diagram of a mechanical component with a downward arrow indicating force or direction (no text or symbols present)
- Tryk låsetapperne sammen ①, og tag grovsien opad og ud ②.

- Rengør sielementerne under rindende vand.
natural_image
Technical diagram of a mechanical component with no visible text or symbols
natural_image
Top-down diagram of a car interior showing a blue propeller and fan assembly with an upward arrow (no text or symbols)
natural_image
Mechanical assembly diagram showing a blue tool interacting with a circular component (no text or symbols visible)
- Løft pumpeafdækningen skråt indad, og tag den af.
- Nu kan vingehjulet nås med hånden.
natural_image
Illustration of a basket filled with various food items, including tomatoes and vegetables (no text or symbols)
natural_image
Diagram of a car chassis with a blue indicator light and black arrow pointing to the vehicle (no text or symbols present)
natural_image
Line drawing of a basket filled with various kitchen utensils (no text or symbols)
natural_image
Isometric line drawing of a multi-wheeled cart with rollers and guide rails (no text or symbols)
natural_image
Interior view of a kitchen appliance drawer with cutlery and utensils (no text or symbols)
ipucu
natural_image
Technical line drawing of a mechanical component with blue components and mesh structure (no text or symbols)
natural_image
Pure technical line drawing of a mechanical assembly without any text, numbers, or symbols
natural_image
Illustration of a conveyor belt pouring white particles into a blue funnel with a lid, no text or symbols present
natural_image
Simple line drawing of a coffee cup on a table with a blue 'X' symbol below (no text or labels)
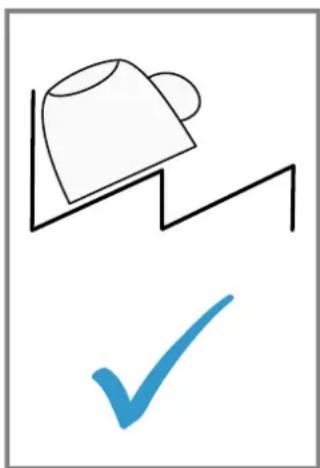
natural_image
Simple line drawing of a mug on a staircase with a blue checkmark below (no text or symbols)
natural_image
Illustration of a kitchen tray with cleaning tools and a blue X symbol (no text or labels)
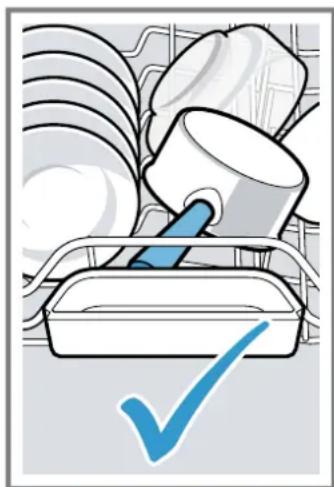
natural_image
Illustration of a kitchen utensil with a blue checkmark (no text or symbols)
natural_image
Cross-sectional diagram of a mechanical component with a downward arrow indicating force or direction (no text or symbols present)
natural_image
Technical diagram of a mechanical component with no visible text or symbols
natural_image
Top-down diagram of a car interior showing a blue propeller and fan, with an upward arrow indicating motion or direction (no text or symbols)
natural_image
Mechanical assembly diagram showing a tool interacting with a circular component (no text or symbols visible)
natural_image
Line drawing of a basket filled with various food items (no text or symbols)
natural_image
Illustration of a car chassis with overhead railings and a blue screen icon pointing to a component (no text or symbols)
natural_image
Line drawing of a basket containing various kitchen utensils and dishes (no text or symbols)
natural_image
Technical line drawing of a mechanical assembly with rollers and guide rails (no text or symbols)
Příborová zásuvka
natural_image
Interior view of a kitchen drawer with open compartments filled with kitchen utensils and utensils (no text or labels visible)
Tip
natural_image
Technical line drawing of a mechanical component with blue structural elements and mesh grid (no text or symbols)
natural_image
Technical line drawing of a mechanical assembly with blue structural elements and grid lines (no text or symbols)
natural_image
Illustration of a funnel pouring granular material into a blue container with a lid, no text or symbols present
natural_image
Diagram of a printer with a paper feeding into a tray, showing a downward arrow and no text or symbols.

natural_image
Illustration of a kitchen utensil with a blue X mark, no text or symbols present

natural_image
Illustration of a cleaning or cleaning tool with a blue checkmark (no text or symbols)
Vyklízení nádobí

VÝSTRAHA
Nebezpečí zranění!
natural_image
Cross-sectional diagram of a mechanical component with a downward arrow indicating force or direction (no text or symbols present)
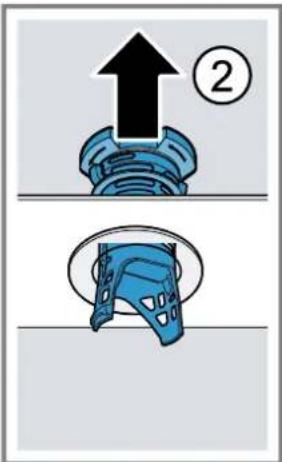
natural_image
Technical line drawing of a mechanical component with no visible text or symbols
natural_image
Diagram of a blue propeller inside a vehicle cabin with an upward arrow indicating motion or force (no text or symbols)
natural_image
Mechanical assembly diagram showing a tool interacting with a circular component (no text or symbols visible)
ÚČTENKU PROSÍM USCHOVEJTE!
natural_image
Illustration of a basket filled with various food items including tomatoes, potatoes, and condiments (no text or symbols)
natural_image
Diagram of a car chassis with a blue monitor and black arrow pointing to a vehicle (no text or symbols present)
natural_image
Line drawing of a basket filled with various kitchen utensils (no text or symbols)
natural_image
Technical line drawing of a mechanical assembly with rollers and mounting brackets (no text or symbols)
Szuflada na sztućce
natural_image
Interior view of a kitchen drawer with open compartments containing kitchen utensils and utensils (no text or labels visible)
Wskazówka
natural_image
Technical line drawing of a mechanical component with grid lines and blue structural elements (no text or symbols)
natural_image
Pure technical line drawing of a mechanical assembly without any text, numbers, or symbols
natural_image
Illustration of a conveyor belt pouring white granular material into a blue funnel (no text or symbols)
natural_image
Diagram of a printer with a paper feeding into a tray, showing liquid level (no text or symbols)
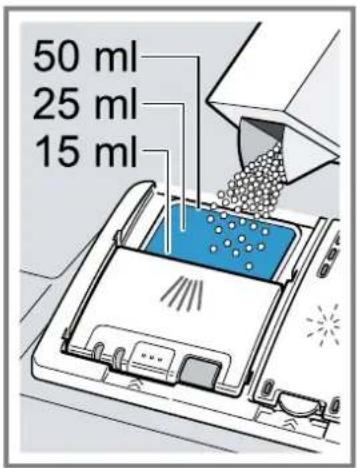
natural_image
Simple line drawing of a lamp on a seesaw and a blue X symbol (no text or labels)
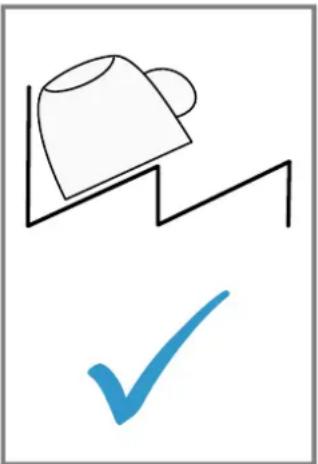
natural_image
Simple line drawing of a mug and a checkmark (no text or symbols)
natural_image
Illustration of a kitchen tray with kitchen utensils and a blue X symbol (no text or labels)
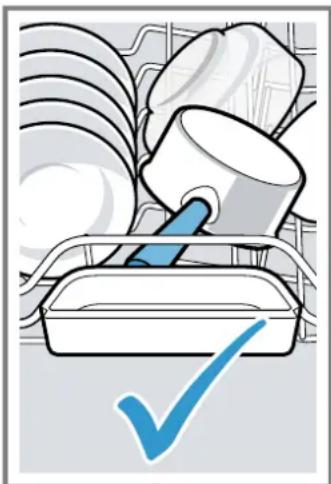
natural_image
Illustration of kitchen utensils and a blue checkmark on a tray (no text or symbols)
Wyjmowanie naczyń

OSTRZEŻENIE
natural_image
Diagram of a mechanical assembly with a blue gear and black downward arrow (no text or symbols)
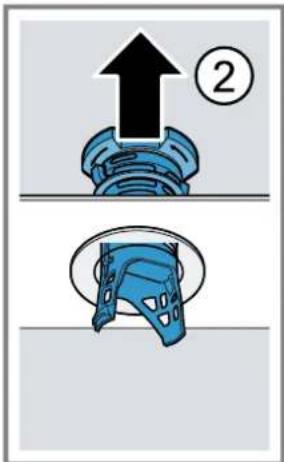
natural_image
Technical diagram of a mechanical component with a central hub and base plate (no text or symbols)
natural_image
Diagram of a blue propeller inside a vehicle cabin with an upward arrow indicating motion or force (no text or symbols)
natural_image
Mechanical assembly diagram showing a tool interacting with a circular component (no text or symbols visible)
natural_image
Line drawing of a basket filled with various food items including tomatoes, potatoes, and condiments (no text or symbols)
natural_image
Diagram of a car chassis with conveyor systems and a blue indicator light pointing to a vehicle (no text or symbols present)
natural_image
Line drawing of a basket filled with various kitchen utensils (no text or symbols)
natural_image
Technical line drawing of a mechanical assembly with rollers and mounting brackets (no text or symbols)
Evőeszköztartó fiók
natural_image
Interior view of a kitchen drawer with open compartments containing kitchen utensils and utensils (no text or labels visible)
Tipp
natural_image
Technical line drawing of a mechanical component with blue structural elements and mesh grid (no text or symbols)
natural_image
Pure technical line drawing of a mechanical assembly without any text, numbers, or symbols
natural_image
Illustration of a funnel pouring granular material into a blue container with a rotating arrow, next to a circular component (no text or symbols)
natural_image
Illustration of a kitchen utensil with a blue X mark, no text or symbols present
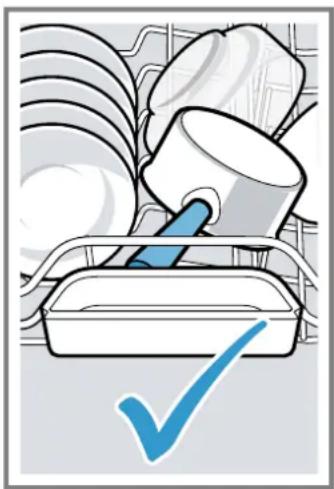
natural_image
Illustration of a kitchen utensil with a blue checkmark (no text or symbols)
Az edények kivétele
natural_image
Cross-sectional diagram of a mechanical component with a downward arrow indicating force or direction (no text or symbols present)
natural_image
Technical diagram of a mechanical component with a central housing and mounting base (no text or symbols)
natural_image
Diagram of a blue propeller inside a vehicle cabin with an upward arrow indicating motion (no text or symbols)
natural_image
Mechanical assembly diagram showing a blue tool interacting with a circular component (no text or symbols)
natural_image
Illustration of a basket filled with various food items, including eggs, tomatoes, and vegetables (no text or symbols)
natural_image
Diagram of a car chassis with conveyor systems and a blue screen icon pointing to a component (no text or symbols)
natural_image
Line drawing of a basket containing various kitchen utensils and dishes (no text or symbols)
natural_image
Technical line drawing of a mechanical assembly with rollers and guide rails (no text or symbols)
Ladica za pribor za jelo
Pospremite pribor za jelo u ladicu za pribor za jelo.

natural_image
Interior view of a kitchen appliance drawer with open compartments filled with kitchen utensils and cutlery (no text or labels)
Savjet
Ako ladicu za pribor za jelo želite vratiti u originalni položaj, preklopite bočne police prema gore dok se čujno ne uglave.

Etažeri
Etažer i prostor ispod njega možete koristiti za manje šalice i čaše i za veće komade pribora za jelo, npr. kuhače ili poslužni pribor.

natural_image
Technical line drawing of a mechanical component with grid lines and blue structural elements (no text or symbols)
Ako vam etažeri više nisu potrebni, možete ih preklopiti prema gore.
Sklopljive bodlje
natural_image
Technical line drawing of a mechanical assembly with blue structural elements and grid lines (no text or symbols)
natural_image
Illustration of a funnel pouring granular material into a blue container with a lid, no text or symbols present
Napunite spremnik do kraja specijalnom soli. Voda će se potisnuti iz spremnika i isteći.
- Postavite i pritegnite poklopac na spremnik.
natural_image
Simple line drawing of a mug on a ladder and a blue X symbol below (no text or labels)
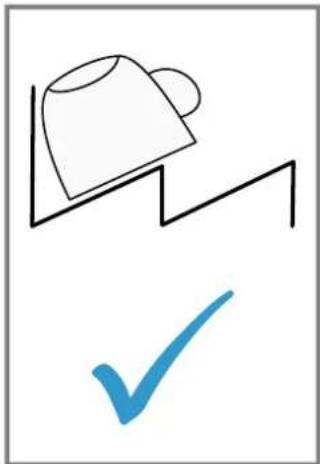
natural_image
Simple line drawing of a bucket on a ramp and a blue checkmark (no text or symbols)
- Uklonite veće ostatke hrane s posuđa.
Pospremanje posuđa
natural_image
Cross-sectional diagram of a mechanical component with a downward arrow indicating force or direction (no text or symbols present)
- Očistite elemente sita pod mlazom tekuće vode.
natural_image
Technical diagram of a mechanical component with no visible text or symbols
Čišćenje prskalica
Kamenac i nečistoća iz sapunice mogu blokirati sapnice i ležajeve prskalica. Redovito čistite prskalice.
- Donju prskalicu skinite prema gore.
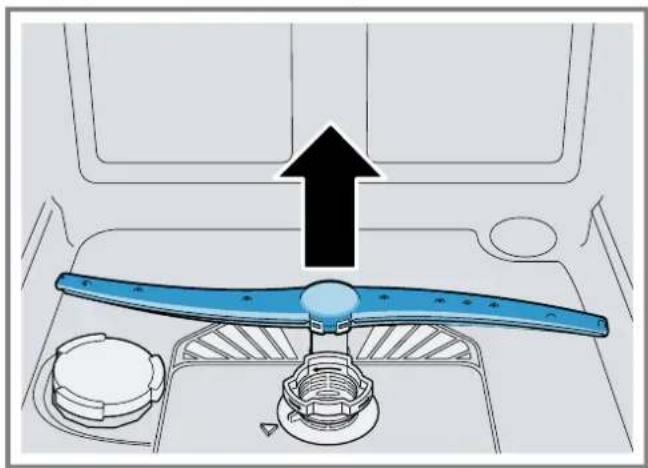
natural_image
Diagram of a blue propeller inside a vehicle cabin with an upward arrow indicating motion (no text or symbols)
- Pod mlazom tekuće vode provjerite ima li zaprljanja u izlaznim mlaznicama prskalica i po potrebi ih uklonite.
- Umetnite donju prskalicu.
√ Prskalica se čujno uglavljuje.
- Umetnite i čvrsto pritegnite gornju prskalicu.
Uklanjanje smetnji
Manje smetnje na svom uređaju možete samostalno ukloniti. Iskoristite informacije za uklanjanje smetnji prije nego što se obratite servisnoj službi. Tako ćete izbjeći nepotrebne troškove.

UPOZORENJE
natural_image
Mechanical assembly diagram showing a blue tool interacting with a circular component (no text or symbols)
- Zaštitni poklopac pumpe podignite koso prema unutra i izvedite.
√ Sad možete rukom dohvatiti krilno kolo.
- Uklonite ostatke hrane i strane predmete u području krilnog kola.
- Stavite zaštitni poklopac pumpe ① i pritisnite ga prema natrag ②.
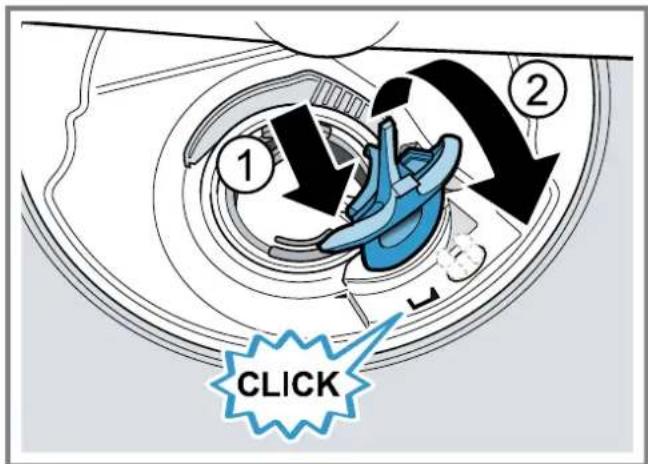
Zaštitni poklopac pumpe čujno se uglavljuje.
-
Postavite sustav sita.
-
Vratite donji i gornju košaru za posuđe.
Transport, skladištenje i zbrinjavanje
Demontaža uređaja
- Isključite uređaj iz električne mreže.
- Zavrnite slavinu za vodu.
- Odvojite priključak za odvodnu vodu.
- Otpustite priključak za vodu za piće.
- Ako postoje, odvrnite vijke za učvršćenje za namještaj.
- Demontirajte donji zaklopac ako je dostupan.
- Oprezno izvucite uređaj i povucite crijevo.
Osiguravanje uređaja protiv smrzavanja
Ako je uređaj postavljen u prostoriji u kojoj postoji opasnost od smrzavanja, npr. vikendici, ispraznite uređaj u potpunosti.
natural_image
Illustration of a basket filled with various food items, including eggs, tomatoes, and vegetables (no text or symbols)
natural_image
Diagram of a car chassis with a blue screen and black arrow pointing to the vehicle (no text or symbols present)
- Enakomerno spustite ali dvignite košaro na primerno višino.

Prepričajte se, da košara za posodo na obeh straneh leži na isti višini.
- Izpustite ročici.
√ Košara za posodo se zaskoči.
- Košaro potisnite v stroj.
natural_image
Line drawing of a basket containing various kitchen utensils and dishes (no text or symbols)
natural_image
Technical line drawing of a mechanical assembly with rollers and guide rails (no text or symbols)
Predal za jedilni pribor
Jedilni pribor zložite v predal za jedilni pribor.
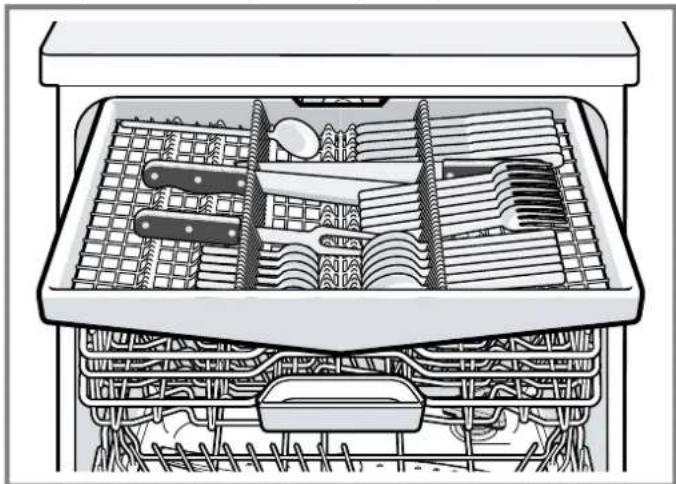
natural_image
Interior view of a kitchen drawer with open compartments containing cutlery, utensils, and dish items (no text or labels)
Nasvet
Če želite predal za jedilni pribor namestiti v originalno lego, stranski predal preklopite navzgor, da slišno zaskoči.

Etažera
natural_image
Technical line drawing of a mechanical component with grid lines and blue structural elements (no text or symbols)
natural_image
Pure technical diagram of a mechanical assembly with blue structural elements and no visible text or symbols
Višine košar za posodo
Košare za posodo nastavite na ustrezno višino.
Višina stroja 86,5 cm s predalom za jedilni pribor
natural_image
Illustration of a funnel pouring granular material into a blue container with a lid, no text or symbols present
Prekat za sol popolnoma napolnite s soljo za pomivalne stroje. Pri tem se voda izrine iz prekata in odteče.
- Na prekat namestite pokrov in ga privijte.
- Sredstvo za izpiranje nalijte do oznake 'max'.
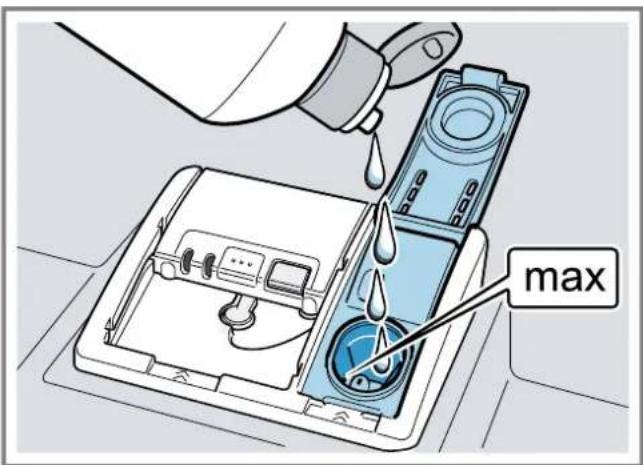
- S posode odstranite grobe ostanke jedi.
Jemanje posode iz stroja
OPOZORILO
Nevarnost poškodb!
natural_image
Cross-sectional diagram of a mechanical component with a downward arrow indicating force or direction (no text or symbols)
- Zaskočni sponki stisnite skupaj ① in sito za grobo umazanijo odstranite navzgor ②.
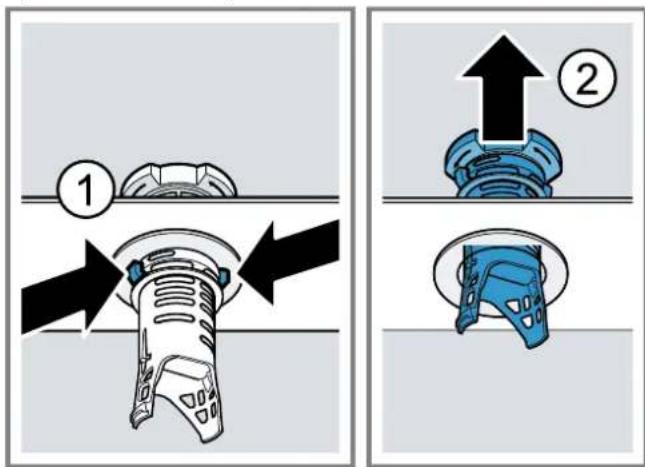
- Elemente sit operite pod tekočo vodo.
Umazan rob med sitom za grobo in sitom za drobno umazanijo temeljito očistite.
- Sestavite sistem sit.
Pazite, da so na situ za grobo umazanijo zaskočni nastavki zataknjeni.
- Sistem sit vstavite v stroj in sito za grobo umazanijo zavrtite v smeri urnega kazalca.
natural_image
Technical diagram of a mechanical component with no visible text or symbols
Čiščenje brizgalk
natural_image
Top-down diagram of a car interior showing a blue propeller and dashboard with an upward arrow indicating motion (no text or symbols)
natural_image
Mechanical assembly diagram showing a blue tool interacting with a circular component (no text or symbols visible)
Pas 5 GHz (5150–5350 MHz + 5470–5725 MHz): maks.
150 mW
| BE | BG | CZ | DK | DE | EE | IE | EL | ES |
| FR | HR | IT | CY | LI | LV | LT | LU | HU |
| MT | NL | AT | PL | PT | RO | SI | SK | FI |
| SE | NO | CH | TR | IS | UK (NI) |
natural_image
Illustration of a basket filled with various food items, including eggs, tomatoes, and vegetables (no text or symbols)
natural_image
Diagram of a car chassis with a blue screen and black arrow pointing to the vehicle (no text or symbols present)
- Ravnomerno spustite ili podignite korpu za posuđe na odgovarajući stepen.
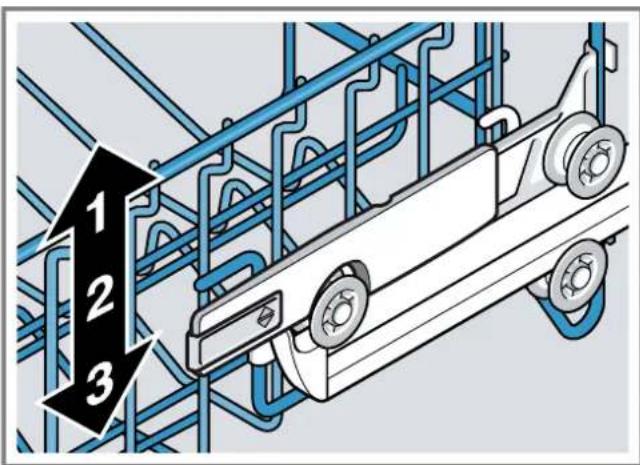
Uverite se da se obe strane gornje korpe za posuđe nala-
ze na istoj visini.
natural_image
Line drawing of a basket filled with various kitchen utensils (no text or symbols)
Velike tanjire prečnika do 34 cm možete da rasporedite na donjoj korpi za posuđe na način opisan na slikama.
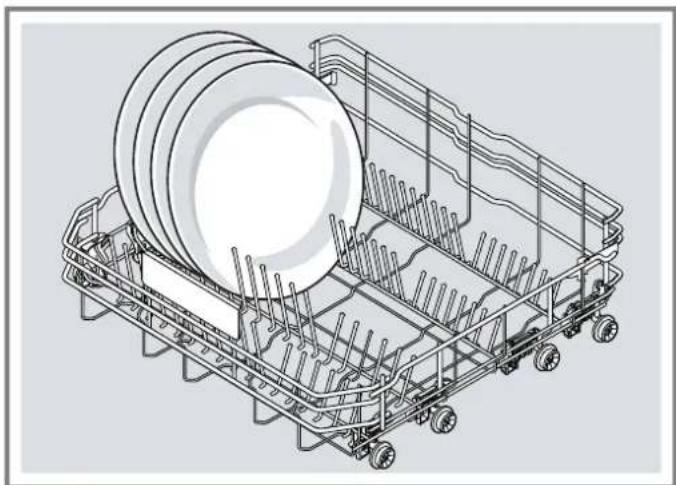
natural_image
Isometric line drawing of a multi-wheeled cart with rollers and structural supports (no text or symbols)
Fioka za pribor za ručavanje
Stavite pribor za ručavanje u fioku za pribor za ručavanje.
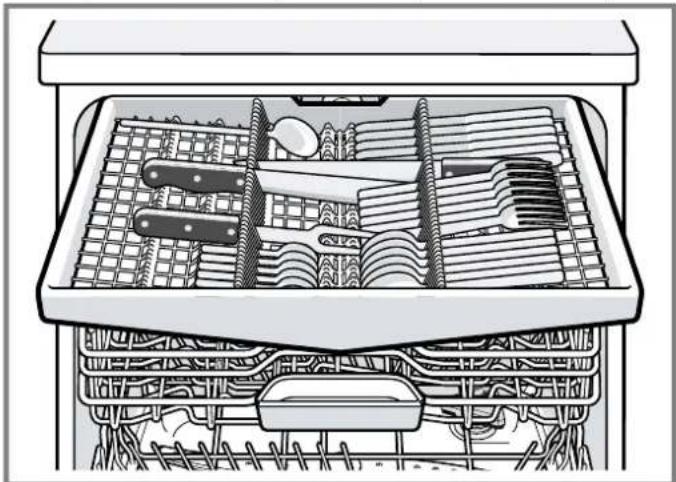
natural_image
Interior view of a kitchen drawer with open compartments containing kitchen utensils and utensils (no text or labels visible)
- Da biste preklopili prednje redove sa bodljama, pritisnite unapred polugu, a zatim preklopite preklopne bodlje ①.
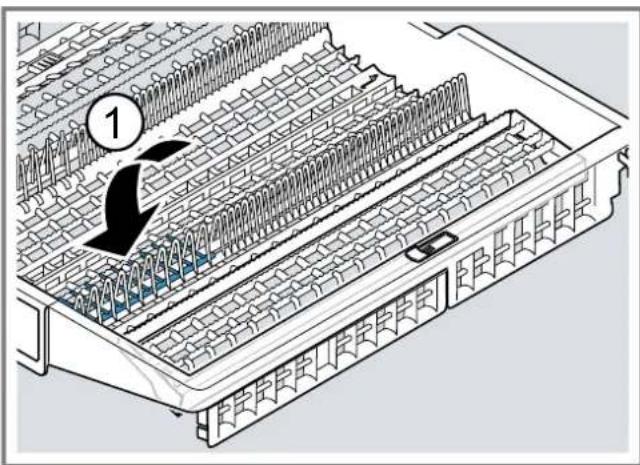
Savet
natural_image
Technical line drawing of a mechanical component with blue structural elements and mesh grid (no text or symbols)
Ako vam ne treba, etažer možete da preklopite.
Preklopne bodlje
natural_image
Pure electrical circuit lines without any symbols
- Otklopite preklopne bodlje ako želite ponovo da ih koristite.
natural_image
Illustration of a funnel pouring granular material into a blue container with a lid, no text or symbols present
Rezervoar do kraja napunite specijalnom solju. Voda se potiskuje u rezervoaru i otiče.
- Postavite poklopac na rezervoar i zavrnite ga.
- Ulijte sredstvo za ispiranje do oznake max.

natural_image
Diagram of a printer with a paper feeding into a tray, showing a downward arrow (no text or symbols present)

U slučaju upotrebe tableta dovoljna je jedna tableta. Tablete postavite popreko.
Ako upotrebljavate praškasta ili tečna sredstva za pranje posuđa, poštujte napomene proizvođača u pogledu doziranja, kao i raspodelu doza u komori za sredstvo za pranje.
U slučaju normalnog zaprljanja dovoljno je od 20 do 25 ml sredstva za pranje posuđa. U slučaju manje zaprljanog posuđa dovoljna je nešto manja količina sredstva za pranje nego što je navedeno.
- Zatvorite poklopac komore za sredstvo za pranje.
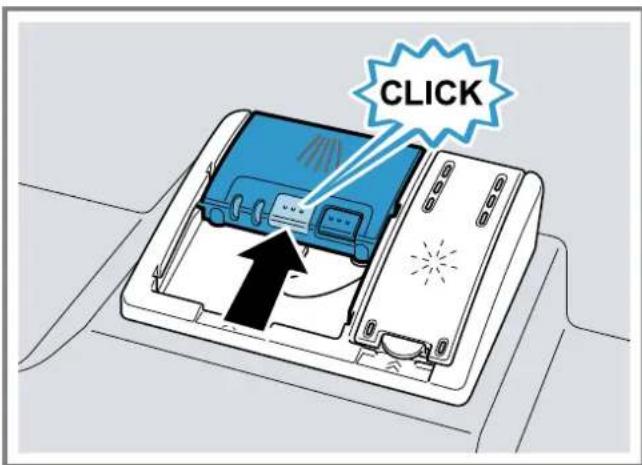
√ Poklopac će se čujno učvrstiti.
Komora za sredstvo za pranje posuđa se, zavisno od programa, otvara automatski u optimalnom trenutku u toku programa. Praškasta ili tečna sredstva za pranje posuđa raspoređuju se u posudi za pranje i rastvaraju. Tablete padaju u prihvatnu posudu za tablete i tamo se dozirano rastvaraju. Nemojte da postavljate predmete u prihvatnu posudu za tablete kako bi tableta mogla ravnomerno da se rastvori.
Savet: Ako koristite praškasto sredstvo za pranje posuđa i odaberete program sa pretpranjem, malo sredstva za pranje sipajte i na unutrašnja vrata uređaja.
Posuđe
Vađenje posuđa

UPOZORENJE
Opasnost od povrede!
- Vruće posuđe može da uzrokuje opekotine. Vruće posuđe je osetljivo na udare, može da se polomi i da uzrokuje povrede.
- Ostavite posuđe da se još malo prohladi nakon završetka programa pa ga tek potom izvadite.
- Skinite mikrosito povlačeći ga nadole.

natural_image
Cross-sectional diagram of a mechanical component with a downward arrow indicating force or direction (no text or symbols present)
- Očistite elemente sita pod mlazom tekuće vode.
Pažljivo očistite ivice između sita sa velikim otvorima i sita sa malim otvorima.
- Sklopite sistem sita.
Vodite računa da jezičci za učvršćivanje na situ sa velikim otvorima uskoče u ležišta.
- Umetnite sistem sita u uređaj, a zatim sito sa velikim otvorima okrenite u smeru kretanja kazaljke na satu.
- Vodite računa da se oznake u obliku strelica nalaze jedna naspram druge.

natural_image
Technical diagram of a mechanical component with no visible text or symbols
Čišćenje prskalica
Kamenac i nečistoća iz sapunice mogu blokirati mlaznice i ležajeve prskalica. Redovno čistite prskalice.
- Odvrnite gornju prskalicu ① i skinite je povlačenjem na-dole ②.

natural_image
Diagram of a blue propeller inside a vehicle cabin with an upward arrow indicating motion or force (no text or symbols present)
- Proverite da li na izlaznim mlaznicama prskalica ima zače-pljenja tako što ćete ih postaviti pod mlaz tekuće vode i po potrebi uklonite strana tela.
- Umetnite donju prskalicu.
Prskalica će se čujno učvrstiti.
- Umetnite gornju prskalicu i zavrnite je.
Otklanjanje smetnji
Manje smetnje na uređaju možete sami da otklonite. Pre nego što se obratite korisničkom servisu, pogledajte informacije za otklanjanje smetnji. Tako ćete izbeći nepotrebne troškove.

UPOZORENJE
natural_image
Mechanical assembly diagram showing a blue tool interacting with a circular component (no text or symbols)
- Podignite poklopac pumpe ukoso prema unutra i skinite ga.
natural_image
Illustration of a basket filled with various food items including eggs, tomatoes, and radishes (no text or symbols)
natural_image
Diagram of a car chassis with a blue screen and black arrow pointing to a vehicle (no text or symbols present)
natural_image
Line drawing of a basket containing various kitchen utensils and dishes (no text or symbols)
natural_image
Technical line drawing of a mechanical cart with rollers and guide rails (no text or symbols)
natural_image
Interior view of a kitchen appliance drawer with cutlery and utensils (no text or symbols)
Nõuanne
natural_image
Technical line drawing of a mechanical component with blue components and mesh structure (no text or symbols)
natural_image
Pure technical line drawing of a mechanical assembly without any text, numbers, or symbols
natural_image
Illustration of a funnel pouring granular material into a blue container with a lid, next to a hand holding a circular object (no text or symbols)
natural_image
Illustration of a kitchen appliance with a blue X mark, no text or symbols present
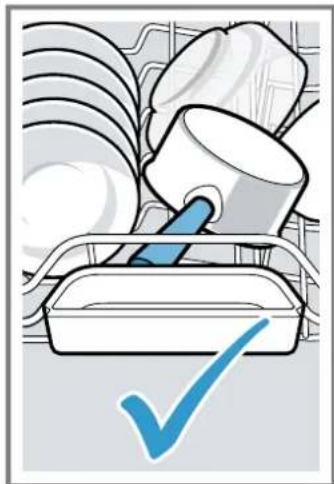
natural_image
Illustration of a kitchen utensil with a blue checkmark (no text or symbols)
Nõude väljavõtmine

HOIATUS
Vigastusoht!
natural_image
Diagram of a mechanical component with a blue gear and black downward arrow, no text or symbols present
natural_image
Technical line drawing of a mechanical component with no visible text or symbols
Pihustitorude puhastamine
natural_image
Diagram of a blue propeller inside a vehicle cabin with an upward arrow indicating motion or direction (no text or symbols)
natural_image
Diagram of a mechanical device with a blue tool interacting with a circular component, showing motion direction (no text or symbols)
natural_image
Illustration of a basket filled with various food items including radishes, peaches, and vegetables (no text or symbols)
natural_image
Diagram of a car conveyor system with a blue indicator light and black arrow pointing to the component (no text or symbols present)
natural_image
Line drawing of a basket filled with various kitchen utensils (no text or symbols)
natural_image
Technical line drawing of a mechanical assembly with rollers and wheels (no text or symbols)
natural_image
Interior view of a kitchen appliance drawer with cutlery and utensils (no text or symbols)
Patarimas
natural_image
Technical line drawing of a mechanical component with blue components and mesh structure (no text or symbols)
natural_image
Pure technical line drawing of a mechanical assembly without any text, numbers, or symbols
natural_image
Illustration of a funnel pouring granular material into a blue container with a lid, no text or symbols present
natural_image
Diagram of a printer with a paper feeding into a tray, showing a downward arrow and no text or symbols.

natural_image
Illustration of a kitchen tray with cleaning tools and a blue X symbol (no text or labels)

natural_image
Illustration of a cleaning or cleaning tool with a blue checkmark (no text or symbols)
Indų iškraustymas
! SPÉJIMAS
Sužeidimų pavojus!
natural_image
Cross-sectional diagram of a mechanical component with a downward arrow indicating force or direction (no text or symbols present)
natural_image
Technical diagram of a mechanical component with no visible text or symbols
Purkštukų valymas
natural_image
Diagram of a blue propeller inside a vehicle cabin with an upward arrow indicating motion (no text or symbols)
natural_image
Mechanical assembly diagram showing a blue tool interacting with a circular component (no text or symbols)
BRĪDINĀJUMS – Traumu risks!
⚠️ BRĪDINĀJUMS – Traumu risks!
⚠️ BRĪDINĀJUMS – Traumu risks!
⚠️ BRĪDINĀJUMS – Traumu risks!
natural_image
Illustration of a basket filled with various food items, including eggs, tomatoes, and vegetables (no text or symbols)
natural_image
Diagram of a car chassis with wheels and overhead railings, showing a blue control panel (no text or symbols)
natural_image
Line drawing of a basket containing various kitchen utensils and dishes (no text or symbols)
natural_image
Technical line drawing of a mechanical assembly with rollers and guide rails (no text or symbols)
Galda piederumu atvilkte
natural_image
Interior view of a kitchen drawer with open compartments containing kitchen utensils and cutlery (no text or labels)
Padoms
natural_image
Technical line drawing of a mechanical component with grid lines and blue structural elements (no text or symbols)
Ja etažere nav nepieciešama, to var pacelt uz augšu.
Atvāžamie balsteņi
natural_image
Technical line drawing of a mechanical assembly with blue structural elements and grid lines (no text or symbols)
- Lai atkal lietotu atvāžamos balstenus, paceliet tos.
natural_image
Illustration of a funnel pouring granular material into a blue container with a lid, no text or symbols present
natural_image
Illustration of a kitchen tray with cleaning tools and a blue X symbol (no text or labels)

natural_image
Illustration of a kitchen utensil with a blue checkmark (no text or symbols)
Trauku iznemšana

BRĪDINĀJUMS
Traumu risks!
- Uz leju nonemiet mikrosietu.

natural_image
Cross-sectional diagram of a mechanical component with a downward arrow indicating force or direction (no text or symbols)
natural_image
Technical diagram of a mechanical component with no visible text or symbols
natural_image
Diagram of a blue propeller inside a vehicle cabin with an upward arrow indicating motion (no text or symbols)
natural_image
Mechanical assembly diagram showing a blue tool interacting with a circular component (no text or symbols)
| 1 | Typový štítok Typový štítok s číslom E a číslom FD. Tieto údaje potrebujete pri komunikácii so zákazníckym servisom. |
| 2 | Zásobník na umývací prostriedok Naplňte zásobník umývacím prostriedkom. → "Umývací prostriedok", Strana 845 |
| 3 | Dolný kôš na riad "Dolný kôš na riad" → Strana 840 |
| 4 | Zásobník na špeciálnu sol' Zásobník na špeciálnu sol' naplňte špeciálnou sol'ou. → "Zmäkčovacie zariadenie", Strana 842 |
natural_image
Illustration of a basket filled with various food items, including eggs, tomatoes, and vegetables (no text or symbols)
natural_image
Diagram of a car chassis with overhead railings and a blue screen icon pointing to a vehicle (no text or symbols present)
natural_image
Line drawing of a basket containing various kitchen utensils and dishes (no text or symbols)
natural_image
Technical line drawing of a mechanical assembly with rollers and guide rails (no text or symbols)
Zásuvka na príbor
natural_image
Interior view of a kitchen appliance drawer with open compartments containing cutlery, utensils, and household items (no text or symbols visible)
Tip
natural_image
Technical line drawing of a mechanical component with grid lines and blue structural elements (no text or symbols)
natural_image
Technical line drawing of a mechanical assembly with blue structural elements and grid lines (no text or symbols)
- Ak chcete sklápacie držiaky znovu použit, vyklopte ich.
natural_image
Illustration of a funnel pouring granular material into a blue container with a lid, next to a hand holding a circular object (no text or symbols)
- Pridajte leštiaci prostriedok až po značku max.
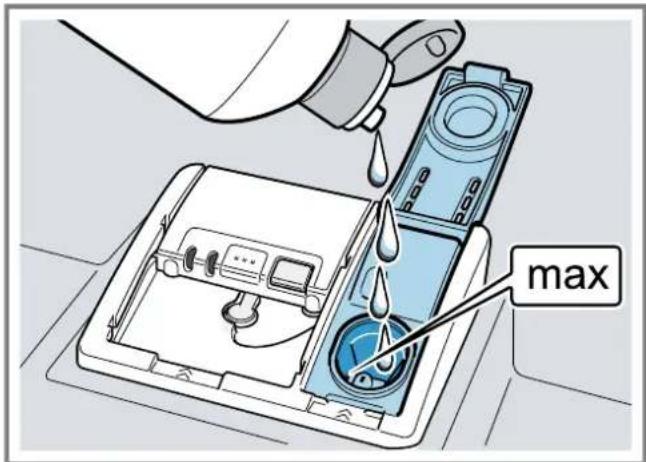
natural_image
Diagram of a printer's internal structure with a paper lid and blue cover, showing no text or symbols.

Vyberanie riadu

VAROVANIE
Riziko poranenia!
- Vytiahnite mikrositko nadol.
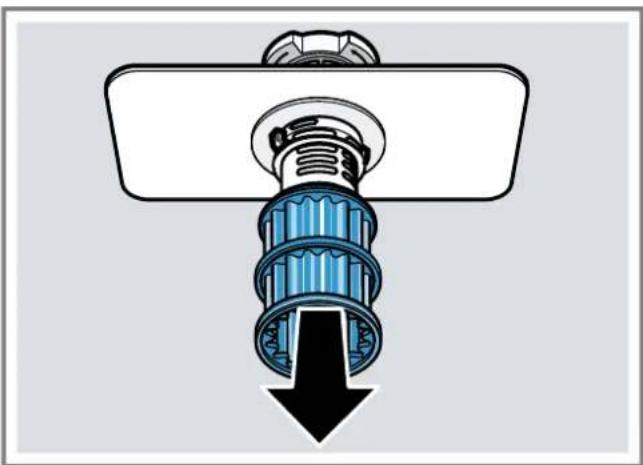
natural_image
Cross-sectional diagram of a mechanical component with a downward arrow indicating force or direction (no text or symbols present)
- Vyčistite časti sitka pod tečúcou vodou.
natural_image
Technical diagram of a mechanical component with a central gear and base plate (no text or symbols)
- Dolné rameno vytiahnite smerom nahor.

natural_image
Diagram of a blue propeller inside a vehicle cabin with an upward arrow indicating motion or direction (no text or symbols)
natural_image
Mechanical assembly diagram showing a hand operating a tool to adjust a circular component (no text or symbols visible)
USCHOVAJTE SI DOKLAD O KÚPE!
natural_image
Illustration of a basket filled with various food items including tomatoes, potatoes, and condiments (no text or symbols)
natural_image
Diagram of a car chassis with conveyor systems and a blue screen icon pointing to a vehicle (no text or symbols present)
natural_image
Line drawing of a basket containing various kitchen utensils and dishes (no text or symbols)
natural_image
Isometric line drawing of a multi-wheeled cart with rollers and guide rails (no text or symbols)
natural_image
Interior view of a kitchen appliance drawer with cutlery and utensils (no text or symbols)
Recomandare
natural_image
Technical line drawing of a mechanical component with blue components and mesh structure (no text or symbols)
natural_image
Pure technical line drawing of a mechanical assembly without any text, numbers, or symbols
natural_image
Illustration of a funnel pouring granular material into a blue container with a lid, next to a hand holding a circular object (no text or symbols)
natural_image
Diagram of a printer's internal structure with a paper lid and blue cover, showing no text or symbols.

natural_image
Two-panel illustration showing a container with blue plastic cups and a 'X' mark, and a checkmark inside a tray (no text or symbols)
natural_image
Cross-sectional diagram of a mechanical component with a downward arrow indicating force or direction (no text or symbols present)
natural_image
Technical diagram of a mechanical component with no visible text or symbols
natural_image
Top-down diagram of a car interior showing a blue propeller and fan assembly with an upward arrow (no text or symbols)
natural_image
Mechanical assembly diagram showing a blue tool interacting with a circular component (no text or symbols)
natural_image
Illustration of a basket filled with various food items, including radishes and beans (no text or symbols)
natural_image
Diagram of a car chassis with a blue control panel and black arrow pointing to it (no text or symbols present)
natural_image
Line drawing of a basket containing various kitchen utensils and dishes (no text or symbols)
natural_image
Technical line drawing of a mechanical assembly with rollers and frame structure (no text or symbols)
Чекмедже за прибори
natural_image
Interior view of a kitchen drawer with cutlery and utensils (no text or symbols)
Съвет
natural_image
Technical line drawing of a mechanical component with grid lines and blue structural elements (no text or symbols)
Ако етажерката не ви е необходима, можете да я прибе-
рете нагоре.
Подвижни щифтове
natural_image
Diagram of a mechanical or electrical component with blue vertical rods and connecting lines, no visible text or symbols
natural_image
Illustration of a funnel pouring granular material into a blue container with a lid, no text or symbols present
natural_image
Diagram of a printer or printer with a paper feeding into a tray, showing a downward arrow (no text or symbols present)
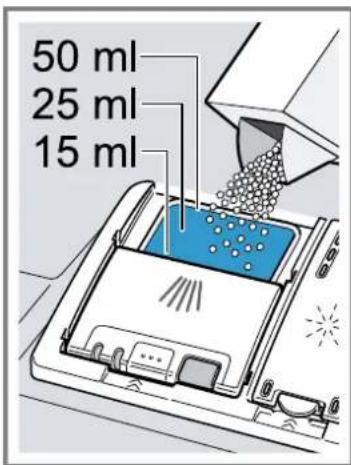
natural_image
Simple line drawing of a coffee cup on a ladder and a blue 'X' symbol below (no text or labels)

natural_image
Simple line drawing of a mug on a staircase with a blue checkmark below (no text or symbols)
natural_image
Illustration of a kitchen tray with cleaning tools and a blue X mark (no text or symbols)
natural_image
Illustration of a cleaning or cleaning tool with a blue checkmark (no text or symbols)
natural_image
Diagram of a mechanical assembly with a blue gear and black downward arrow (no text or symbols)
natural_image
Technical diagram of a mechanical component with a central gear and base plate (no text or symbols)
natural_image
Interior view of a vehicle showing a blue propeller with an upward arrow indicating motion or direction (no text or symbols)
natural_image
Mechanical assembly diagram showing a blue tool interacting with a circular component (no text or symbols)
natural_image
Line drawing of a basket filled with various food items including eggs, tomatoes, and vegetables (no text or symbols)
natural_image
Diagram of a car chassis with a blue screen and black arrow pointing to the vehicle (no text or symbols present)
natural_image
Line drawing of a basket containing various kitchen utensils and dishes (no text or symbols)
natural_image
Technical line drawing of a mechanical assembly with rollers and guide rails (no text or symbols)
natural_image
Interior view of a kitchen drawer with cutlery and utensils (no text or symbols)
Рекомендация
natural_image
Technical line drawing of a mechanical component with grid lines and blue structural elements (no text or symbols)
natural_image
Technical line drawing of a mechanical assembly with blue structural elements and grid lines (no text or symbols)
natural_image
Illustration of a conveyor belt pouring granular material into a blue funnel (no text or symbols)
natural_image
Diagram of a printer with a paper lid and blue cover, showing a downward arrow indicating compression or disassembly (no text or symbols present)

natural_image
Illustration of a kitchen tray with cleaning tools and a blue X symbol (no text or labels)

natural_image
Illustration of a kitchen utensil with a blue checkmark (no text or symbols)
Выгрузка посуды
⚠️ ПРЕДУПРЕЖДЕНИЕ
natural_image
Technical diagram of a mechanical component with no visible text or symbols
natural_image
Cross-sectional diagram of a mechanical component with a blue gear and black downward arrow (no text or symbols)
natural_image
Diagram of a blue propeller inside a vehicle cabin with an upward arrow indicating motion or direction (no text or symbols)
natural_image
Mechanical assembly diagram showing a blue tool interacting with a circular component (no text or symbols visible)
natural_image
Illustration of a basket filled with various food items, including eggs, tomatoes, and vegetables (no text or symbols)
natural_image
Diagram of a car chassis with a blue screen and black arrow pointing to the vehicle (no text or symbols present)
natural_image
Line drawing of a basket containing various kitchen utensils and dishes (no text or symbols)
natural_image
Technical line drawing of a mechanical cart with rollers and guide rails (no text or symbols)
Hnífapararekki
natural_image
Line drawing of a kitchen drawer with open compartments containing kitchen utensils and cutlery (no text or symbols)
Ráð
natural_image
Technical line drawing of a mechanical component with grid lines and blue structural elements (no text or symbols)
natural_image
Technical line drawing of a mechanical assembly with blue structural elements and no visible text or symbols
Hæð leirtausrekka
natural_image
Illustration of a funnel pouring granular material into a blue container with a lid, next to a mechanical device (no text or symbols)