Malbork Connect 900 - Air Conditioning TAURUS - Free user manual and instructions
Find the device manual for free Malbork Connect 900 TAURUS in PDF.


User questions about Malbork Connect 900 TAURUS
0 question about this device. Answer the ones you know or ask your own.
Ask a new question about this device
Download the instructions for your Air Conditioning in PDF format for free! Find your manual Malbork Connect 900 - TAURUS and take your electronic device back in hand. On this page are published all the documents necessary for the use of your device. Malbork Connect 900 by TAURUS.
USER MANUAL Malbork Connect 900 TAURUS
natural_image
Line drawing of a portable electric heater with wheels and control panel (no text or symbols)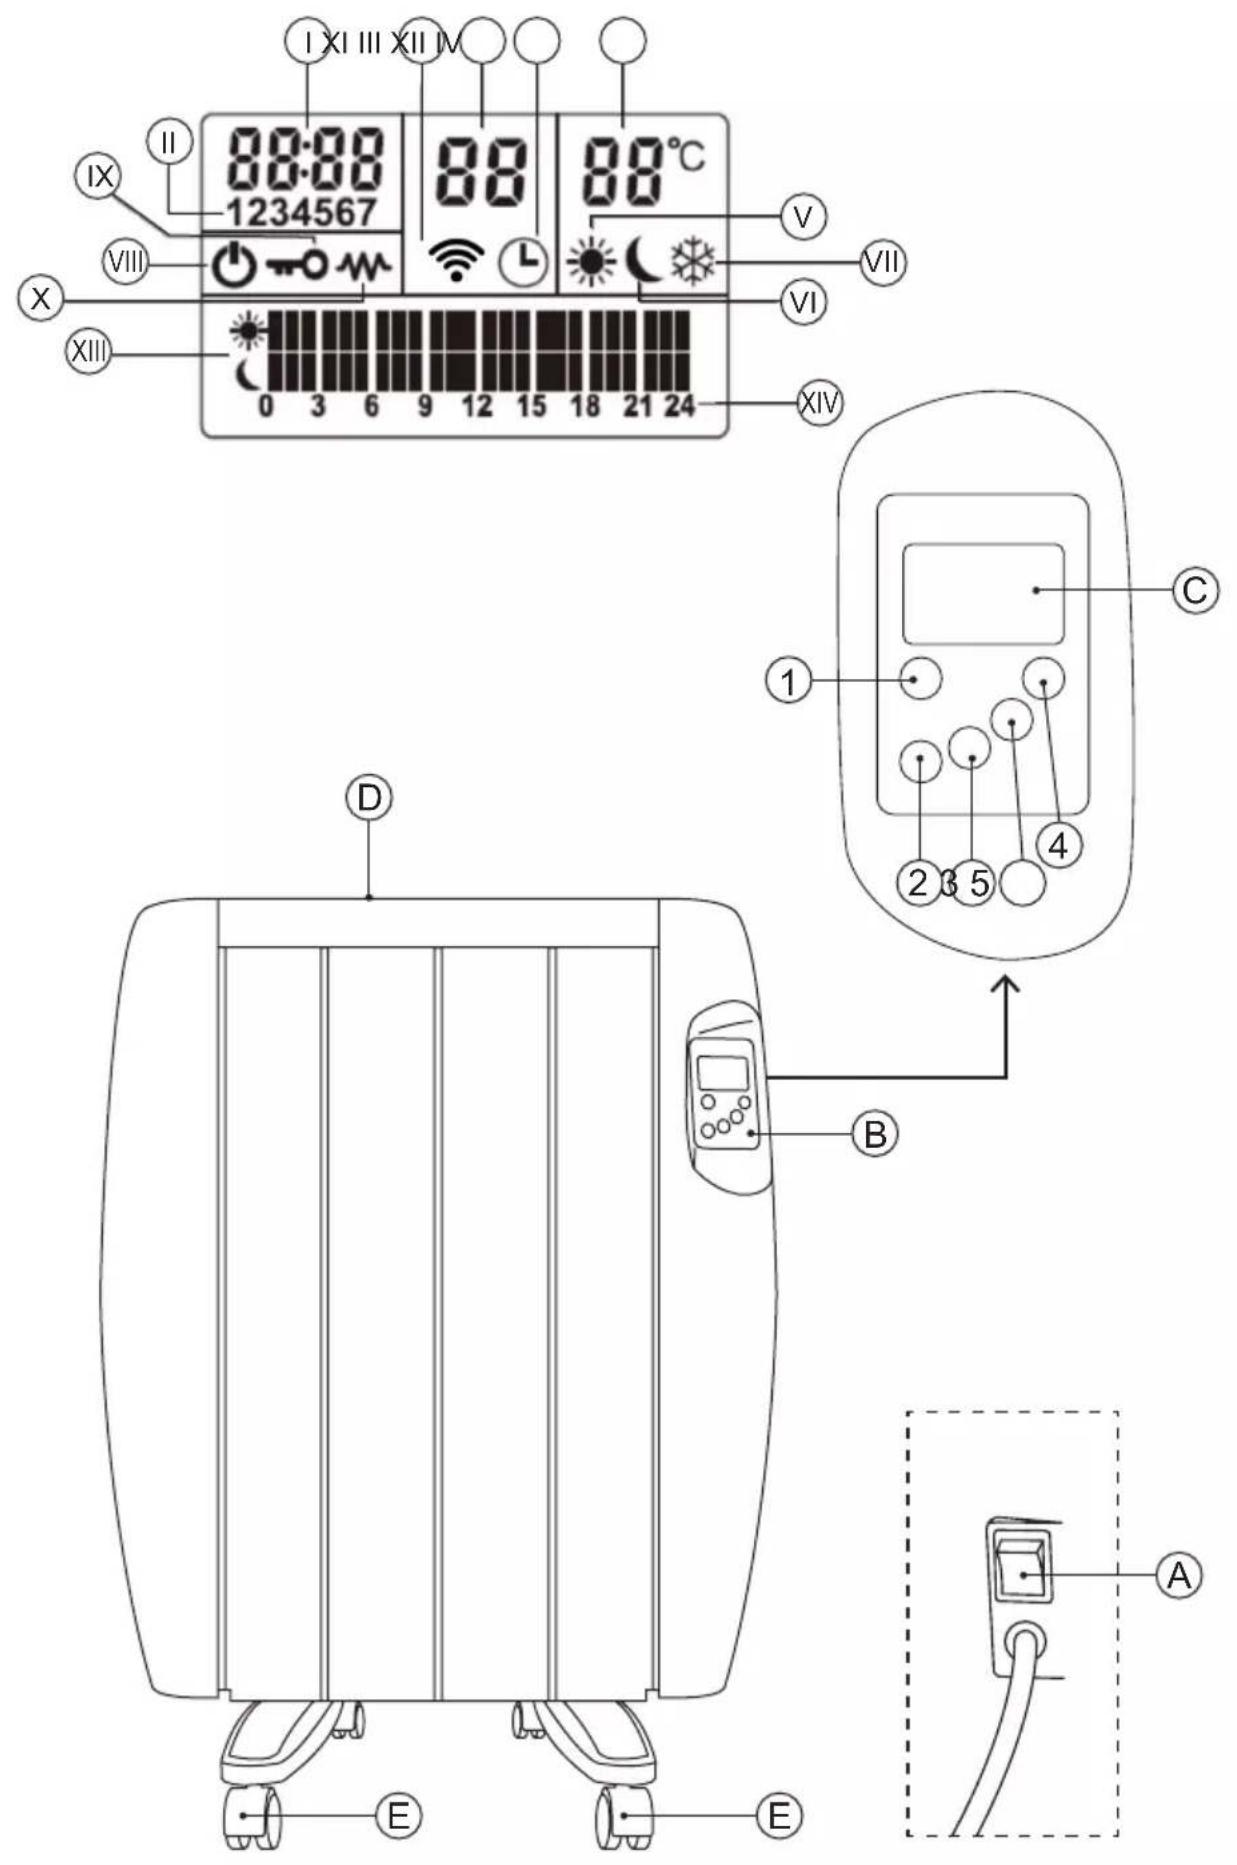
Fig. 2
text_image
Technical diagram of a mechanical assembly with labeled components and an inset view showing internal components.Fig. 1
text_image
Hull 3 & 4 Hull 1 & 2 A B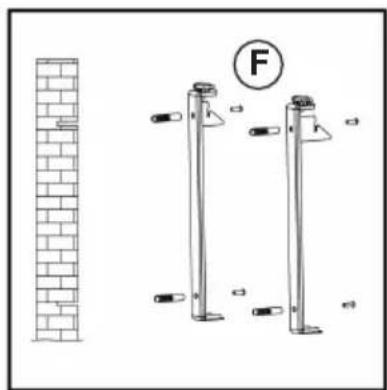
natural_image
Diagram showing two vertical outdoor structures with labeled components and a circular symbol F, alongside a brick wall (no text or symbols on the structures themselves)
natural_image
Diagram showing a brick wall and a vertical column with a circular inset detail (no text or symbols)Español
EMISOR TÉRMICO MALBORK CONNECT 600/900/1200/1500/2000
DESCRIPCIÓN
2 Program set / Confirm / WiFi reset
3 Mode selector / Clock
4 Increase button
5 Decrease button
LCD SCREEN
I Clock
II Day
III Program / Mode
IV Target temperature
V Comfort
VI Economic
VII Anti-frost
VIII Stand by
IX Child lock
X Heating status
XI WiFi
XII Timer
XIII Weekly program mode
XIV Weekly program time
- If the model of your appliance does not have the accessories described above, they can also be bought separately from the Technical Assistance Service.
USE AND CARE:
- Fully extend the appliance's power cable before each use.
- Do not use the appliance if the on/off switch does not work.
- Do not use the appliance if it is tipped up and do not turn it over.
- Do not turn the appliance over while it is in use or connected to the mains.
- If you use the appliance in a bathroom or similar place, unplug the appliance from the mains when it is not in use, even if it is only for a short while, as proximity to water involves a risk, even if the appliance is disconnected.
- Disconnect the appliance from the mains when not in use and before undertaking any cleaning task.
- Store this appliance out of reach of children and/or persons with physical, sensory or reduced mental or lack of experience and knowledge.
- Do not store the appliance in a vertical position.
- Do not store the appliance if it is still hot.
- Keep the appliance in a dry, dust-free place, out of direct sunlight.
- Never leave the appliance unattended while in use.
- Never leave the appliance connected and unattended if is not in use. This saves energy and prolongs the life of the appliance.
- Do not use the appliance to dry textiles of any kind.
INSTALLATION
- Be sure to remove all packaging material from inside the appliance.
- Do not remove the support feet or wheels from the appliance.
- Ensure that the appliance is level with respect to the floor.
- Install the appliance away from flammable material such as textiles, cardboard or paper, etc.
- Install the appliance a minimum distance of 50cm away from combustible materials, such as curtains, furniture ...
- Ensure that neither the air access nor exit become either totally or partially covered by drapery, clothing, etc., as this increases the risk of fire.
- In the event that the appliance is mounted on a bathroom wall, position it in such a way that the socket, power supply cable, switches or other controls are not within the reach a person in the bath, shower or at the wash-hand basin.
- The appliance requires suitable ventilation in order to work properly. Leave a space of 30cm between walls or other obstacles and 10cm from the floor.
- Do not cover or obstruct any of the openings of the appliance.
- The plug must be easily accessible so it can be disconnected in an emergency.
- To achieve the highest efficiency from the appliance it should be situated in a place where the atmospheric temperature is between 12 and 32°C.
- To achieve the highest efficiency from the appliance and so as to be able to install the appliance on a cold wall (an exterior wall) and below a window. But never obstructing or covering a ventilation area.
- The appliance should work well with its wall support attached or with its wheels attached.
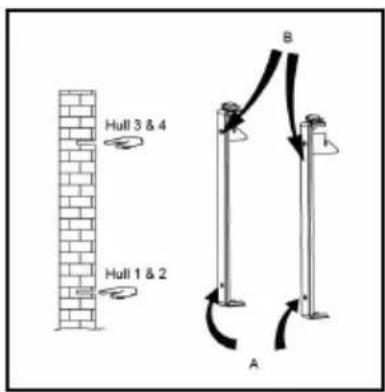
- The appliance has a wall bracket (F) which must be fixed to the wall.
- Ensure that the appliance is properly and safely fixed in his working position with screws. To avoid damaging the appliance, on recommend to use only the holes specifically made by the manufacturer.
ASSEMBLING THE WALL BRACKET:
- The appliance has a wall bracket (F) on which it can be supported.
- Taking into account the separation distances mentioned above, place the wall support in the required position and mark the drilling points on the wall (Fig.1).
- Drill into the wall where you marked and insert the rawlplugs.
- Place the support by matching the holes with the rawlplugs and screw them in firmly.
- Make sure that the bracket is firmly fixed; it should be able to support twice the weight of the appliance.
- Fit the appliance into the wall support.
FITTING THE BASE WHEELS:
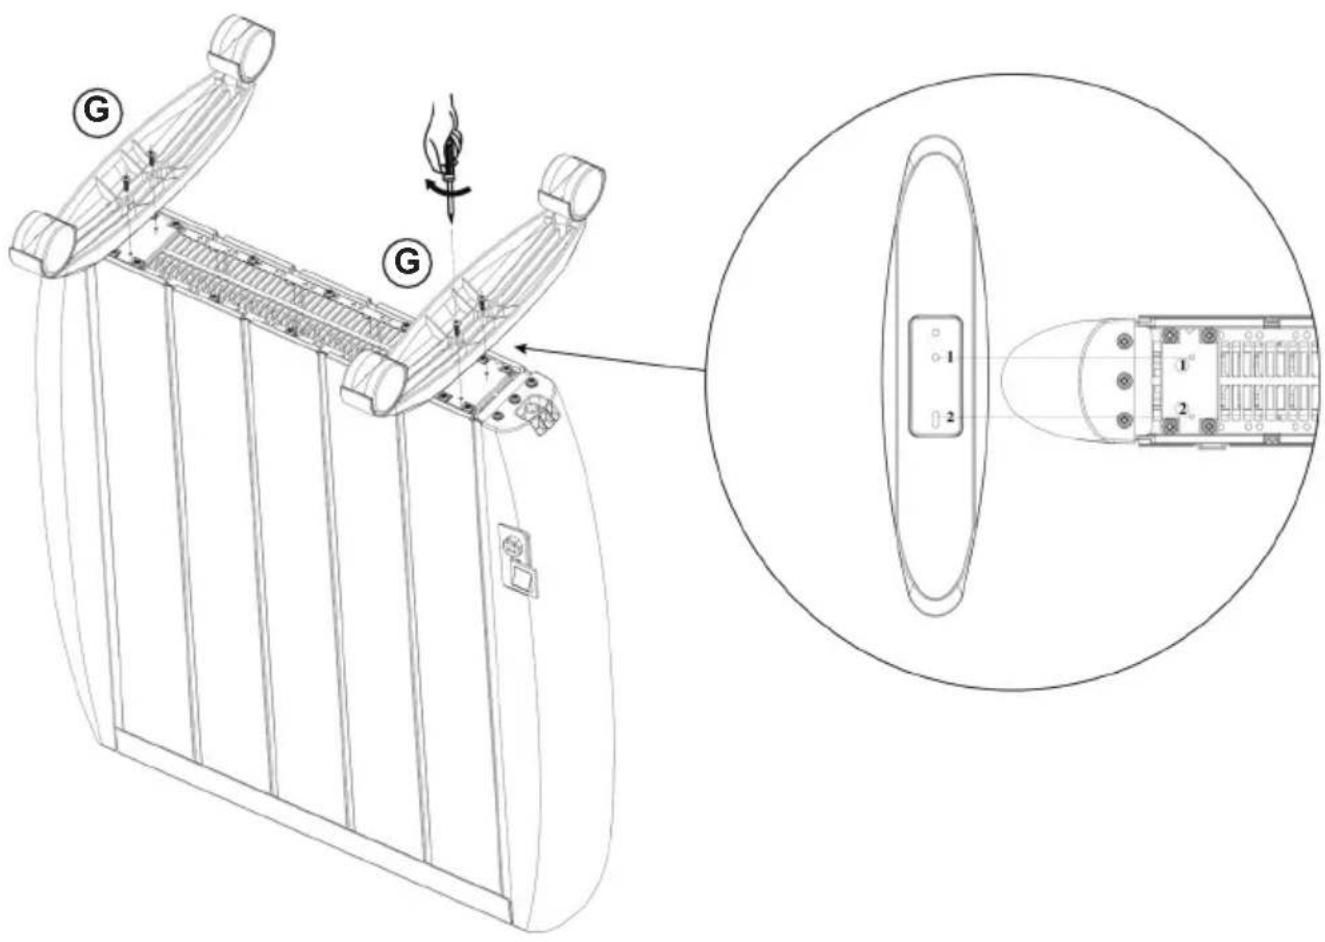
- To assemble the base wheels, place the appliance face down.
- Position the wheels' support on the base of the body using the screws provided (G)(Fig.2)
- Stand the appliance up again so as to check that the wheels work properly.
INSTRUCTIONS FOR USE
BEFORE USE:
- Make sure that all products' packaging has been removed.
- Some parts of the appliance have been lightly greased. Consequently, the first time the appliance is used a light smoke may be detected. After a short time, this smoke will disappear.
- To eliminate the smell given off by the appliance when used for the first time, it is recommended to have it on at full power for 2 hours in a well-ventilated room.
- Prepare the appliance according to the function you wish to use.
WIFI CONNECTION & DOWNLOADING THE APP:
- To be able to use the thermal transmitter Malbork Connect from anywhere, the Taurus Connect App has to be downoalded.
SET UP:
- Download the Taurus Connect App form the App Store or Google Play.
- Sign up using your email address and password.
- Confirm the registration using the verification code that will be sent to your email account.
- Create your home, name it, establish the geographical location and select the room where you are going to place this smart appliance.
- Add Malbork Connect by following the steps described in THE QUICK GUIDE.
IMPORTANT
- The device only supports 2.4GHz Wi-Fi network.
- If the connection fails again, check the following possible causes
- Malbork Connect is too far away from the router.
- The Wi-Fi password is incorrect.
- The Wi-Fi network is not 2.4GHz
USE:
- Extend the cable completely before plugging it in.
- Connect the appliance to the mains.
- Power the appliance on, by using the power switch (A).
- Turn the appliance on, by using the on/off button (1)
- For a first-time use, the screen will show as follows:
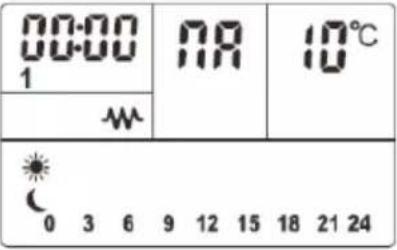 |
CLOCK SETTING:
- If the appliance is connected to the App, the clock will be set automatically.
- In manual setting, the hour will blink at first. Use the "+" and "-" buttons to set the right time (0-23h). Then press the confirm button (2) to set up the minutes (0-59min). Press the confirmation button (2) and set the date from 1-7. Press the confirmation button once more to finish the settings.
| 1 Monday |
| 2 Tuesday |
| 3 Wednesday |
| 4 Thursday |
| 5 Friday |
| 6 Saturday |
| 7 Sunday |
- To modify the clock after it has been set for the first time, long press the clock button (3), and follow the same process explained above.
FUNCTIONS
- Press the mode button (3) to choose the mode or the program:
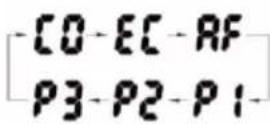
- Comfort mode:[0]
- ECO mode:EC
- Anti-Frost mode: RF
- Press the "+" and "-" buttons to select the desired temperature
- Comfort mode: Temperature can be set from 5°C to 35°C.
- ECO mode: Temperature can be set from 1°C to 31°C
- Anti-Frost mode: It works on a standard setting of 7^ C without the possibility of being changed.
PROGRAMMING
- P1 – PRESET PROGRAM 1: This program operates the same preset time and heat mode shown below from Monday to Sunday:
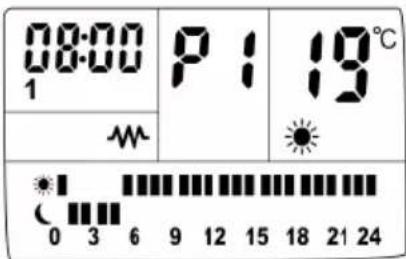
text_image
08:00 1 P: 19°C - - - - 0 3 6 9 12 15 18 21 24- P2 – PRESET PROGRAM 2: This program operates the same preset time and heat mode from Monday to Friday and the same preset time and heat mode from Saturday to Sunday:
- Monday - Friday
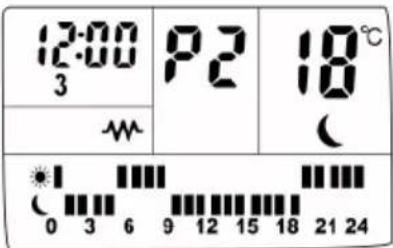
text_image
12:00 3 P2 18°C W C 0 3 6 9 12 15 18 21 24Saturday – Sunday
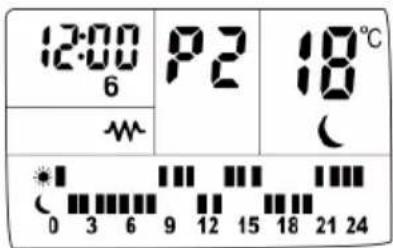
text_image
12:00 6 P2 18°C W C 0 3 6 9 12 15 18 21 24- P3 – PRESET PROGRAM 3: This program lets you set the time and mode for each individual day.
P3 - PROGRAMING:
- When in mode P3, press the program setting button (2) until P3 and the first hour bar and modes *start to flash.
- Press the mode button (3) to chose the desired mode:
- Top bar means Comfort mode;
Bottom bar means ECO mode;
- No bar means Anti-Frost mode
- Once the mode is selected press the "+" button to move to the next hour, or "-" if you want to move back to the previous hour.
- Repeat this process for the 24h for each of the 7 days. After you finish Sunday, press the the program button (2), to complete the P3 programming.
TIMER:
- Long press the clock button (3) until the display shows "00h" and the timer pilot light appears.
- Press the “+” or “-” to set the timer from 0-24h.
OPEN WINDOW FUNCTION
- When the radiator is working press the program button (2) and mode button (3) at the same time. The screen will display press "+" or "-" to turn on "or off the open window function.
- When the open window function is on, it will detect sudden changes in the room's temperature. If the room temperature decreases 2 degrees within 2 minutes, the heater will stop working and the icon will start blinking.
BACKLIT SCREEN
- The appliance has a backlit LCD screen to make it easier to use.
SAFETY LOCK:
- After a minute without pressing any buttons, the use of the control panel will be blocked.
- The moon will show on the screen.
- To unlock it, press the “+” and “-”.
ONCE YOU HAVE FINISHED USING THE APPLIANCE:
- Power the appliance off, using the on/off switch.
- Let the appliance cool.
- Unplug the appliance from the mains.
- Clean the appliance.
SAFETY THERMAL PROTECTOR:
- The appliance has a safety device, which protects the appliance from overheating.
- When the appliance switches itself on and off repeatedly, for reasons other than the thermostat control, check to ensure that there are no obstacles that impede correct air entry or expulsion.
- If the appliance turns itself off and does not switch itself on again, disconnect it from the mains supply, and wait for approximately 15 minutes before reconnecting. If the machine does not start again seek authorised technical assistance.
CLEANING
- Disconnect the appliance from the mains and allow it to cool before undertaking any cleaning task.
- Clean the equipment with a damp cloth with a few drops of washing-up liquid and then dry.
- Do not use solvents, or products with an acid or base pH such as bleach, or abrasive products, for cleaning the appliance.
- Do not let water or any other liquid get into the air vents to avoid damage to the inner parts of the appliance.
- Never submerge the appliance in water or any other liquid or place it under running water.
- If the appliance is not in good condition of cleanliness, its surface may degrade and inexorably affect the duration of the appliance's useful life and could become unsafe to use.
Français
RADIATEUR À INERTIE MALBORK CONNECT 600/900/1200/1500/2000
DESCRIPTION
to App Store ή to Google Play.
This product enjoys the recognition and protection of the legal guarantee in accordance with current legislation. To enforce your rights or interests you must go to any of our official technical assistance services.
You can find the closest one by accessing the following web link: http://taurus-home.com/
You can also request related information by contacting us.
You can download this instruction manual and its updates at http://taurus-home.com/
Français
GARANTIE ET ASSISTANCE TECHNIQUE
COUNTRY ADDRESS PHONE
| Algeria Zone d'Activite, N° 62, Constantine 213770777756 | ||
| Argentina Av. del Libertador 1298,(B1638BEY), Vicente López (Pcia. Buenos Aires) | 541153685223 | |
| Belgium Mariëndonkstraat 5, 5154 EG, Elshout 31620401500 | ||
| Bulgaria | 265,Okolovrasten Pat, Mladost 4, 1766, Sofia | 35929211120 / 35929211193 |
| Congo (Republic of) 98 Blvd General Charles de Gaulle, Pointe Noire 242066776656 | ||
| Cyprus 20, Bethlehem Str. / P.O.Box 20430, 2033, Strovolos | 35722711300 | |
| Czech Republic Milady Horakove 357/4, 568 02, Svitavy 420 461 540 130 | ||
| Equatorial Guinea | SN Av Patricio Lumumba y C/ Jesus B, Bata | 00240 333 082958 / 00240 333 082453 |
| Equatorial Guinea | Calle de las Naciones Unidas, PO box 762, Malabo | 240333082958 / 240333082453 |
| España | Avda Barcelona, S/N, 25790 Oliana (Lleida) atencioncliente@taurus.es | 902 118 050 |
| France | Za les bas musats 18, 89100, Malay-le-Grand | 03 86 83 90 90 |
| Ghana | Ederick Place, Accra-Ghana | 302682448 / 302682404 |
| Gibraltar | 11 Horse Barrack Lane, 54000, Gibraltar | 00350 200 75397 / 00350 200 41023 |
| Greece Sapfous 7-9, 10553, Athens | +30 21 0373 7000 | |
| Hong Kong | Unit H,13/F., World Tech Centre, Hong kong | (852) 2448 0116 / 9197 3519 |
| Hungary Késmárk utca 11-13, 1158, Budapest +36 1 370 4519 | ||
| India C-175, Sector-63, Noida, Gautam Budh Nagar - 201301, Delhi | (+91) 120 4016200 | |
| Ivory Coast 01 Rue Des Carrossiers-Zone 3, B.P 3747, Abidjan 01 (RCI) | 22521251820 / 225 21 353494 | |
| Luxembourg Mariëndonkstraat 5, 5154 EG, Elshout 31620401500 | ||
| Marruecos Big distribution society 4 Rue 13 Lot. Smara Oulfa, Casablanca | (+212) 522 89 40 21 | |
| Mauritania 134 Avenue Gamal Abdener Ilot D, Nouakchott 2225254469 / 2225251258 | ||
| Mexico Rosas Moreno N° 4-203 Colonia de San Rafael C.P. 06470 – Delegación Cuauhtémoc, Ciudad de México | (+52) 55 55468162 | |
| Montenegro Rastovac bb, 81400, Niksic +382 40 217 055 | ||
| Netherlands Mariëndonkstraat 5, 5154 EG, Elshout 31620401500 | ||
| Nigeria 8, Isaac; John Str,G.R.A Ikeja Lagos 23408023360099 | ||
| Paraguay | Denis Roa 155 c/ Guido Spano, Asunción | 21665100 |
| Peru | Calle los Negocios 428, Surquillo, Lima | (511) 421 6047 |
| Portugal Avenida Rainha D. Amélia, n°12-B, 1600-677, Lisboa | +351 210966324 | |
| Romania | Dudesti Pantelimon 23, 410554, Bucharest | 031.805.49.58 |
| Serbia | Rastovac bb, 81400, Niksic +382 40 217 055 | |
| Slovakia Milady Horakove 357/4, 568 02, Svitavy | 420 461 540 130 | |
| Southafrica | Unit 25 & 26, San Croy Office Park, Die Agora Road, Croydon, Kempton Park, 1619, Johannesburg | (+27) 011 392 5652 |
| Tunisia | 2, Rue de Turquie, Tunis | 21671333066 |
| Ukraine | Block 6, Ap Housing Estate Topol-2, B, 49000, Dnepropetrovsk | 380563704161 / 380563704161 |
| Uruguay | Luis Alberto de Herrera 3468, 11600, Montevideo | 598 2209 28 00 |
| Vietnam | Lot 7 Ind. Zone for, Ha Noi | 84437658111 / 84437658110 |
taurus
Avda. Barcelona, s/n
25790 Oliana
Spain