Ultra Mirage II - Respiratory medical device ResMed - Free user manual and instructions
Find the device manual for free Ultra Mirage II ResMed in PDF.

User questions about Ultra Mirage II ResMed
0 question about this device. Answer the ones you know or ask your own.
Ask a new question about this device
Download the instructions for your Respiratory medical device in PDF format for free! Find your manual Ultra Mirage II - ResMed and take your electronic device back in hand. On this page are published all the documents necessary for the use of your device. Ultra Mirage II by ResMed.
USER MANUAL Ultra Mirage II ResMed
natural_image
Medical device with CT scan and head-mounted device, shown in profile view (no text or symbols visible)
Manufacturer:
ResMed Pty Ltd 1 Elizabeth Macarthur Drive Bella Vista NSW 2153 Australia
See www.resmed.com for other ResMed locations worldwide.
For patent information, see www.resmed.com/ip
Ultra Mirage, Mirage and AutoSet T are trademarks of ResMed Pty Ltd and Mirage and AutoSet T are Registered in U.S. Patent and Trademark Office.
Velcro is a registered trademark of Velcro Industries B.V.
© 2020 ResMed. 168166/2 2020-09
CE 0123

flowchart
graph TD
    A["E-1"] --> B["Hand positioning"]
    B --> C["E-2"]
    C --> D["E-3"]
    D --> E["E-4"]
    E --> F["E-5"]
ILLUSTRATIONS SHEET / ILLUSTRATIONSBLATT / FICHE D'ILLUSTRATIONS / FOGLIO DELLE ILLUSTRAZIONI / HOJA DE FIGURAS / FOLHETO DE ILLUSTRACÕES / ILLUSTRATIONSBLAD / ILLUSTRATIEBLAD
Picta de la production instructions, read the test section in accordance with the illustration of this sheet. (Hirales, Vol. 32) Are you again fine for it. I am at school visit and in the middle of the course. In our room, B.R. Penerque, your own instructions complete, you can be an exercise, to test and/or members of these fields. (Hira, Fats, duration complete, begins to see them as a time inside all information, or appropriate fields). (Nata, Fats, instructions detailed, show that all items are necessary for information between these fields. (Hira, Fats, other items are completed, etc., see scope of text to write me to us in Australiae what is uncertain. Note: Values are not available.) (One, One, Four, five times that there are more, but less than one, but less than one, but less than one). Open Booking water can lead back carrying the telephone wire and cableboarder.
line
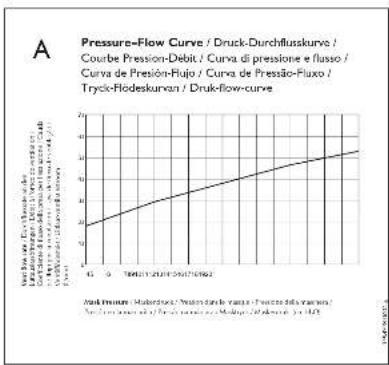
Pressure-Flow Curve / Druck-Durchflusskurve / Curbe Pression-Debit / Curva di pressione e flusso / Curva de Presión-Rujo / Curva de Pressão-Fluxo / Tryck-Flodeskuran / Druck-flow-curve | X-axis | Pressure (mPa) | Pressure (mPa) | |---|---|---| | 0 | 20 | 20 | | 1 | 25 | 25 | | 2 | 30 | 30 | | 3 | 35 | 35 | | 4 | 40 | 40 | | 5 | 45 | 45 | | 6 | 50 | 50 | | 7 | 55 | 55 | | 8 | 60 | 60 | | 9 | 65 | 65 | | 10 | 70 | 70 | | 11 | 75 | 75 | | 12 | 80 | 80 | | 13 | 85 | 85 | | 14 | 90 | 90 | | 15 | 95 | 95 | | 16 | 100 | 100 | The chart displays a single line representing the pressure distribution across different pressure levels. The x-axis represents the pressure values in mPa (mPa), and the y-axis represents the corresponding pressure values. There is no additional data series or legend present.Component of 1881642-2003-09
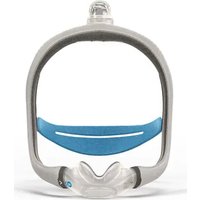
Ultra Mirage™ II Nasal Mask
Thank you for choosing ResMed's ULTRA MIRAGE™ II NASAL MASK.
This mask is similar to the original ULTRA MIRAGE™ NASAL MASK and the two masks are equivalent in performance. The new upgraded mask includes an improved forehead support with flexible pads that conform to the shape of your forehead. This user's guide provides you with the information you need for the correct use of your mask.
INTENDED USE
The ULTRA MIRAGE II NASAL MASK is intended for multipatient use for adult patients prescribed continuous positive airway pressure (CPAP) or bilevel therapy in hospital, clinic and/or home environments.
MEDICAL INFORMATION
Note: The mask system does not contain latex materials. If you have ANY reaction to any part of the mask system, discontinue use and consult your sleep therapist.
! WARNINGS AND CAUTIONS
•This mask should be used only with CPAP or bilevel systems recommended by your physician or respiratory therapist. A mask should not be used unless the CPAP or bilevel system is turned on and operating properly. The exhaust vent should never be blocked.
Explanation of the Warning: CPAP and bilevel systems are intended to be used with special masks with connectors which may have vent holes or separate exhaust vents to allow continuous flow of air out of the mask. When the CPAP or bilevel device is turned on and functioning properly, new air from the flow generator flushes the exhaled air out through the attached mask exhaust vent. However, when the CPAP or bilevel device is not operating, enough fresh air will not be provided through the mask, and exhaled air may be rebreathed. Rebreathing of exhaled air for longer than several minutes can in some circumstances lead to suffocation. This warning applies to most models of CPAP or bilevel systems.
- At low CPAP pressures, the flow through the exhaust vent may be inadequate to clear all exhaled gas from the tubing. Some rebreathing may occur.
Explanation of the Warning: The exhaust vent flow is lower at lower mask pressures (see Pressure-Flow Curve in section A on the illustrations sheet). To avoid rebreathing it is recommended that a mask pressure of 4 cm H₂O or more be used.
- The mask must be cleaned and disinfected/sterilized if it is used between patients. Refer to the section "Cleaning the Mask between Patients" for details.
- If oxygen is used with the CPAP or bilevel device, the oxygen flow must be turned off when the flow generator is not operating.
Explanation of the Warning: When the CPAP or bilevel device is not in operation, and the oxygen flow is left on, oxygen delivered into the ventilator tubing may accumulate within the flow generator enclosure. Oxygen accumulated in the CPAP or bilevel device enclosure will create a risk of fire. This warning applies to most types of CPAP or bilevel flow generators.
- Please refrain from smoking while oxygen is in use.
- Using a mask may cause tooth, gum or jaw soreness or aggravate an existing dental condition. If symptoms occur, consult your physician or dentist.
Note: At a fixed rate of supplemental oxygen flow, the inhaled oxygen concentration will vary, depending on the pressure settings, patient breathing pattern, mask selection and leak rate.
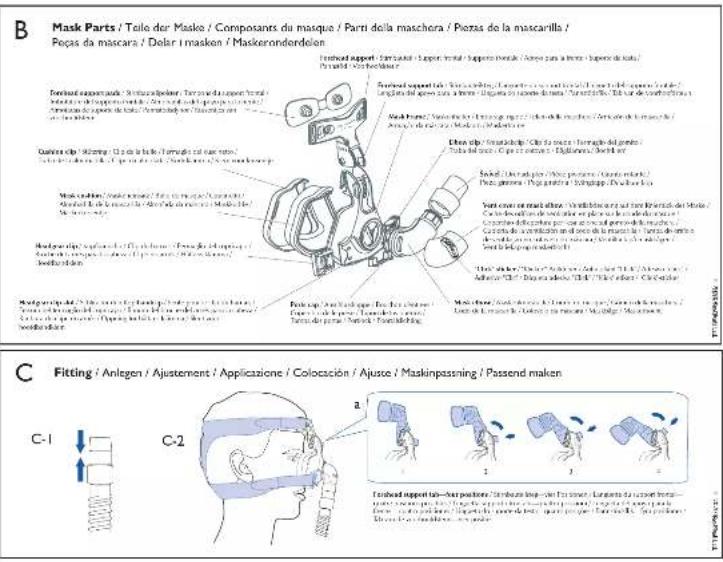
PARTS OF THE MASK
See section B on the illustrations sheet.
FITTING THE MASK
See section C on the illustrations sheet.
Note: Before fitting the mask, refer to the section "Cleaning the Mask in the Home".
I Push the air tubing all the way onto the swivel. The end of the air tubing and the ridge of the swivel must completely meet (Fig. C-1). Connect the other end of the air tubing to your flow generator.
2 Place the cushion over your nose, pull the headgear over your head and make the straps pass below your ears. Connect the other headgear clip to the mask frame.
Use the Velcro ^® straps to adjust the fit of the headgear. Do not overtighten the straps (Fig. C-2).
3 The pads of the forehead support should lightly touch your forehead when the mask is in place.
Adjust the forehead support if required, by moving it to one of the other tab positions (Fig. C-2a). There are four tab positions (1–4). To change a tab position, first, loosen the headgear straps. Then, press the forehead support tab and move it upwards to the next position (eg from position 1 move it to position 2). Once again, gently tighten the headgear straps.
4 Grasp the edges of the vent cover on both sides of the "Click" sticker at the same time. Firmly push the vent cover onto the mask elbow to make sure it is clicked securely in place.
5 Turn the flow generator on. Lie down and check that the mask is comfortable and there are no air leaks. If there are air
leaks, you may need to readjust the Velcro straps (see Step 2) or forehead support (see Step 3).
Notes:
- If you are unable to resolve any leaks you may need to try another cushion size.
- Select "Ultra" as the mask option when using the ULTRA MIRAGE II with ResMed flow generators that have mask setting options.

CAUTION
This mask is not compatible with those AutoSet T ^™ flow generators that have an internal pressure sensor line. It is compatible with all other ResMed AutoSet ^™ flow generators.
REMOVING THE MASK
To remove the mask, depress the tabs of the headgear clips. This releases the headgear clips from the mask frame. Pull the mask and headgear away from your head.
Notes:
- Do not pull the headgear off your head without releasing the headgear clips first.
- Check that you can remove the headgear clips or the headgear unaided.
DISASSEMBLING FOR CLEANING
See section D on the illustrations sheet.
I Detach and separate the main air tubing, headgear, headgear clips, swivel, forehead pads, cushion clip, cushion and ports cap.
2 Use your thumb on the side of the vent cover to remove it from the mask elbow.
3 Depress the forehead support tab and move it past the top tab position. This
allows you to remove the forehead support from the mask frame (Fig. D-1).
4 From the inside of the mask frame, hold one side of the elbow clip in place and release the other side of the clip
(Fig. D-2). Remove the clip and mask elbow from the mask frame.
CLEANING THE MASK IN THE HOME
Notes:
- Wash the headgear before first time use, as the dye may run. It is important to always handwash the headgear.
•The headgear may be washed without being disassembled.
DAILY/AFTER EACH USE
Handwash the mask components in lukewarm, soapy water. Use pure soap.
Rinse the components well and allow them to air dry out of direct sunlight.
WEEKLY
Handwash the headgear in warm, soapy water. Use pure soap. Rinse well and allow it to air dry out of direct sunlight.

CAUTIONS
- Do not use solutions containing bleach, chlorine, alcohol, aromatics, moisturisers, antibacterial agents, or scented oils to clean any part of the mask system or air tubing. These solutions may cause damage and reduce the life of the product.
- Do not expose any part of the mask system or tubing to direct sunlight as it may deteriorate.
- If any visible deterioration of a mask component is apparent (cracking, crazing, tears etc), the mask component should be discarded and replaced.
CLEANING THE MASK BETWEEN PATIENTS
The mask system is validated for multipatient use. Clinicians should refer to the Ultra Mirage II Nasal Mask Disinfection Guide for details.
To clean the headgear between patients use the method described in the previous section “Cleaning the Mask in the Home”.
REPROCESSING THE MASK BETWEEN PATIENTS
The mask should be reprocessed when used between patients.
Cleaning, disinfection and sterilisation instructions are available from the ResMed website, www.resmed.com/masks/sterilization.
If you do not have Internet access, please contact your ResMed representative.
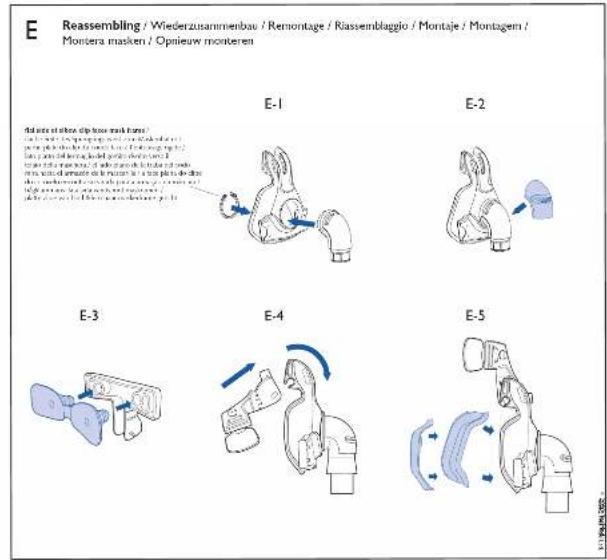
REASSEMBLING THE MASK
See section E on the illustrations sheet.
I Insert the ports cap into the ports. Make sure the tabs of the ports cap face away from the mask.
2 Insert the mask elbow into the mask frame and secure it with the elbow clip on the inside of the frame (Fig. E-1). The flat side of the elbow clip must face the mask frame. If you have fitted the mask elbow correctly, it should not move when you try to firmly pull it away from the frame.
3 Grasp the edges of the vent cover on both sides of the "Click" sticker at the same time. Firmly push the vent cover onto the mask elbow to make sure it is clicked securely in place (Fig. E-2).
4 Push the swivel onto the end of the mask elbow.
5 Attach the forehead pads to the forehead support by inserting the pad plugs into the two holes on the back of the forehead support (Fig E-3). Push the pads firmly against the forehead support to ensure that the pads fit securely into the forehead support.
6 Reconnect the forehead support to the mask frame. Depress the tab and move the forehead support into one of the four tab positions (Fig. E-4).
7 Fit the grooved edge of the nasal cushion to the mask frame. Fit the top section first, then work your way around the mask, pushing the cushion onto the frame, ensuring a good seal has been achieved. Push the cushion clip over the cushion onto the mask frame, ensuring it clicks into place in all locations (Fig. E-5).
8 Connect the headgear clips to the mask frame. Thread the headgear straps through the slots on the forehead support and the headgear clips. The ULTRA MIRAGE headgear label should face outwards and be near your neck when fitted. Fasten the Velcro straps.
TECHNICAL SPECIFICATIONS
PRESSURE-FLOW CURVE
See section A on the illustrations sheet.
DEAD SPACE INFORMATION
Dead space is the empty volume of the mask up to the swivel.
The dead space of the mask varies according to cushion sizes but is less than 135 mL.
Note: The manufacturer reserves the right to change these specifications without notice.
REPLACEMENT PARTS
| Part No. | Item |
| 16563 | Cushion clip |
| 16557 | Cushion, Large |
| 16558 | Cushion, Shallow |
| 16735 | Cushion, Shallow-wide |
| 16556 | Cushion, Standard |
| 16566 | Elbow assembly |
| 16572 | Elbow clip (1 pk.) |
| 16573 | Elbow clip (10 pk.) |
| 60123 | Forehead pads (1 pk.) |
| 60124 | Forehead pads (10 pk.) |
| 16590 | Forehead support with pads |
| 16595 | Frame assembly |
| 16733 | Headgear, Standard |
| 16118 | Headgear, Small |
| 16119 | Headgear, Large |
| 16569 | Headgear clip (2 pk.) |
| 16734 | Headgear clip (10 pk.) |
| 16560 | Mask frame |
| Part No. | Item |
| 16570 | Ports cap/s (2 pk.) |
| 16571 | Ports cap/s (10 pk.) |
| 16565 | Swivel |
| 16575 | Vent cover |
LIMITED WARRANTY
ResMed warrants that your ResMed mask system, including its components: mask frame, cushion, headgear, tubing and other accessories (“Product”) shall be free from defects in material and workmanship for a period of ninety (90) days from the date of purchase by the initial consumer.
For further details refer to the Warranty.
Ultra Mirage™ II Nasenmaske
BESCHRÄNKTE GARANTIE
INFORMATIONS MEDICALES
16735 Bulle, Shallow-large
16556 Bulle, Standard
16566 Coude
16118 Copricapo, Small
16119 Copricapo, Large