USER MANUAL A 750 STIGA
Autonomous robot mower
EN Instruction manual
natural_image
Stylized black-and-white graphic of a robotic arm with gear and wheel (no text or symbols)

Download full manual stiga.com


natural_image
Icon of a download over a closed book (no text or symbols)

Install Stiga.GO App

Available on the App Store

GET IT ON
Google Play


Register your product now!
stiga.com/int/product-registration
III
natural_image
Illustration of a robotic device with a hand pressing it, showing a close-up of the handle and part of the lock (no text or symbols present)
V

Install Stiga.GO App

Available on the App Store

GET IT ON
Google Play


flowchart
graph TD
    A["Person"] --> B["Robot Agent"]
    B --> C["Mobile Device"]
    C --> D["Route to Device"]
    D --> E["Device Icon"]
    style A fill:#f9f,stroke:#333
    style B fill:#ccf,stroke:#333
    style C fill:#cfc,stroke:#333
    style D fill:#fcc,stroke:#333
    style E fill:#cff,stroke:#333
VII


natural_image
Illustration of a robotic lawn mower on grass (no text or symbols)

EN ENGLISH 1
FR FRANÇAIS 10
DE DEUTSCH 19
IT ITALIANO 28
NL NEDERLANDS 37
ES ESPAÑOL 46
PT PORTUGUÊS 55
NO NORSK 64
SV SVENSKA 73
DA DANSK 82
FI SUOMI 91
CS ČESKY 100
PL POLSKI 109
HU MAGYAR 118
ET EESTI 127
HR HRVATSKI 136
LT LIETUVIŠKAI 145
LV LATVIEŠU 154
SL SLOVENŠČINA 163
RU РУССКИЙ 172
The complete instruction Manual is available:
▷ on the website stiga.com
▷ on the STIGA.GO App, available on the App Store and Google Play
▷ by scanning the QR code


Download full manual
stiga.com
NOTE: the instructions in this manual apply to all independent robot lawn mower models. All illustrations, unless otherwise indicated, refer to the SRSA01 platform.
NOTE: This manual contains basic instructions, mainly related to safety. For correct installation, the complete instruction manual (see above) must be read and followed carefully.
1. SAFETY
OBLIGATION: Read carefully before use and store for future reference.
1.1. SAFE OPERATING PROCEDURES
Training
a. Read the instructions carefully, learn the controls and the correct use of the machine.
b. Never allow children, persons with reduced physical, sensory or mental capabilities, or lack of experience and knowledge, or persons unfamiliar with these instructions, to operate the machine. Local regulations may limit the age of the operator.
c. The operator, or user, is to be held responsible for accidents or hazards involving third parties or third party equipment.
Preparation
a. Make sure that the automatic system of perimeter delimitation is programmed correctly as indicated.
b. Periodically check the area where the machine is used and remove stones, sticks, cables and any other foreign objects that may interfere with its operation.
c. Periodically carry out a visual inspection of the blades, blade bolts and of the cutting unit to check that they are not worn out or damaged. Replace worn out or damaged blades and bolts in pairs to maintain the balance of the machine.
d. Warning signs must be placed around the working area of the machine if it is used in public areas or areas open to the public. Signs must read as follows: "Warning! Automatic lawn mower! Keep away from the machine! Children must be supervised!"
1.1.1. OPERATION
a. Do not operate the machine with defective guards or safety devices that are not present, for example without protections.
b. Do not put hands or feet near or under the rotating parts. Always keep away from the drain opening.
c. Do not touch any moving parts of the machine until they have come to a complete stop.
d. Always wear sturdy shoes and long trousers when operating the machine.
e. Never lift or transport the machine when the motor is running.
f. Remove the disabling device from the unit:
- Before removing an obstruction;
- Before checking, cleaning or working on the machine;
- If hit by a foreign object, to check for possible damage to the machine;
- If the machine starts to vibrate abnormally, check for damage before restarting it.
g. Do not leave the machine in operation unattended in the presence of pets, children or other people nearby.
Maintenance and storage
a. Tighten all nuts, bolts and screws securely for safe operation of the machine.
b. Frequently check the robot lawn mower for wear or deterioration.
c. For safety reasons it is necessary to replace worn out or damaged parts.
EN
d. Make sure that the blades are replaced only with suitable spare parts.
e. Make sure the batteries are recharged using the correct charger recommended by the manufacturer. Incorrect use can cause electric shock, overheating or leakage of corrosive liquid from the battery.
f. In case of electrolyte leaks, wash with water / neutralizing agent and consult a doctor in case of contact with eyes, etc.
g. Machine maintenance must be carried out in accordance with the manufacturer's instructions.
Residual Risks
- Although the product complies with all safety requirements, additional risks may still exist due to improper installation and/or unforeseeable situations. Therefore, it is necessary to keep the area on which the product operates free of objects, persons and animals, and to inform everyone who may have access even if only occasionally, to the work area, of the possible hazards.
- In the event of thunderstorms with risk of lightning and in anticipation of bad weather conditions in general, it is recommended not to use the product and to disconnect all peripheral devices from the mains. To use the product, reconnect peripherals to the mains following the manual's instructions.
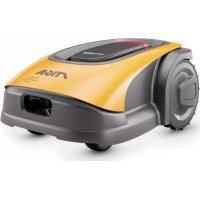
1.2. PRODUCT DESCRIPTION
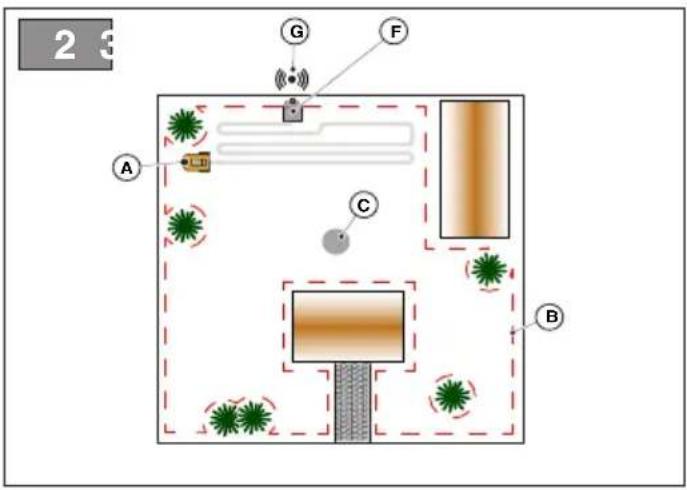
The robot lawn mower (Fig. 2.A) is designed and built to automatically cut garden grass at any time of day and night. According to the different characteristics of the surface to be cut, the robot lawn mower can be programmed to work on several areas delimited by a virtual perimeter and connected by virtual transition routes.
When operating, the robot lawn mower mows the area delimited by the virtual perimeter (Fig. 2.B). When the robot lawn mower is close to the virtual perimeter (Fig. 2.B) or encounters an obstacle (Fig. 2.C) changes trajectory according to the selected navigation strategy:
The robot lawn mower mows the delimited lawn automatically and completely.
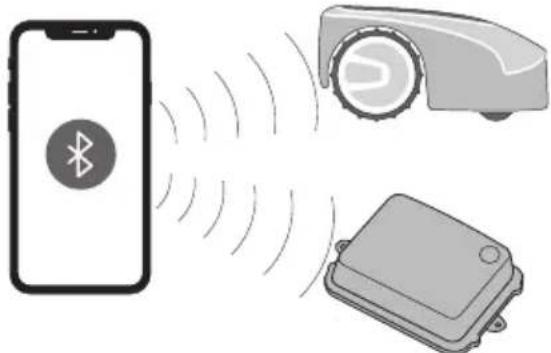
The product operates via satellite signals and requires the installation of a charging base (Fig. 2.F, 2.G) and an integrated satellite reference station (Fig. 3.C), that can be installed separately. The robot lawn mower and the satellite reference station communicate with each other via 3G/4G modules fitted with SIM cards. The robot lawn mower operating technology
is based on the communication of data between the STIGA Cloud and the robot itself. The subscription fee is mandatory in order to operate the robot lawn mower and is based on the amount of data required. A smartphone is also required for the product to be used.
Any other usage may be hazardous and harm persons and/or damage things. Improper use includes (for example, but not limited to): transporting people, children or animals on the machine; being transported by the machine; using the machine to pull or push loads; using the machine for cutting non-grass vegetation.
NOTE: The subscription fee is mandatory in order to operate the robot lawn mower and is based on the amount of data required.
1.3. SYMBOLS AND NAMEPLATES

WARNING:
Read the user instructions before starting the product.
WARNING:
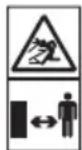
Danger of projections of objects against the body.
Keep an adequate safe distance from the machine while it is running.
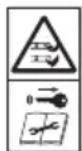
WARNING:
Do not put hands and feet near or under the opening of the cutting means.
Remove the disabling device before operating on the machine or before lifting it.
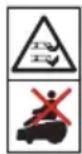
WARNING:
Do not put hands and feet near or under the opening of the cutting means.
Do not stand on the machine.

BAN:
Make sure that there are no people (especially children, elderly or disabled) and pets in the working area during the operation of the machine.
Keep children, pets and other people at a safe distance when the machine is functioning.
BAN:
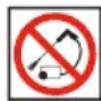
Do not use high pressure cleaners on the machine to clean or wash it.

Appliance with insulation class III, powered by battery (Robot Lawn mower) or special power supply unit (Charging Base and Reference Station).
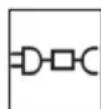
Use the original power supply with the specifications on the rating plate.
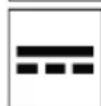
DC power supply symbol.
IPXX
Protection rating against the ingress of solids and water.
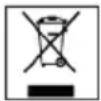
Electrical and Electronic Equipment Waste, to be taken to designated facilities for recycling and disposal.
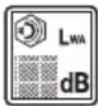
Guaranteed sound power level
1.4. STOPPING AND TURNING OFF THE ROBOT LAWN MOWER IN SAFE CONDITIONS

OBLIGATION:
Always switch off the robot lawn mower in safe conditions before any cleaning, transport or maintenance operation.
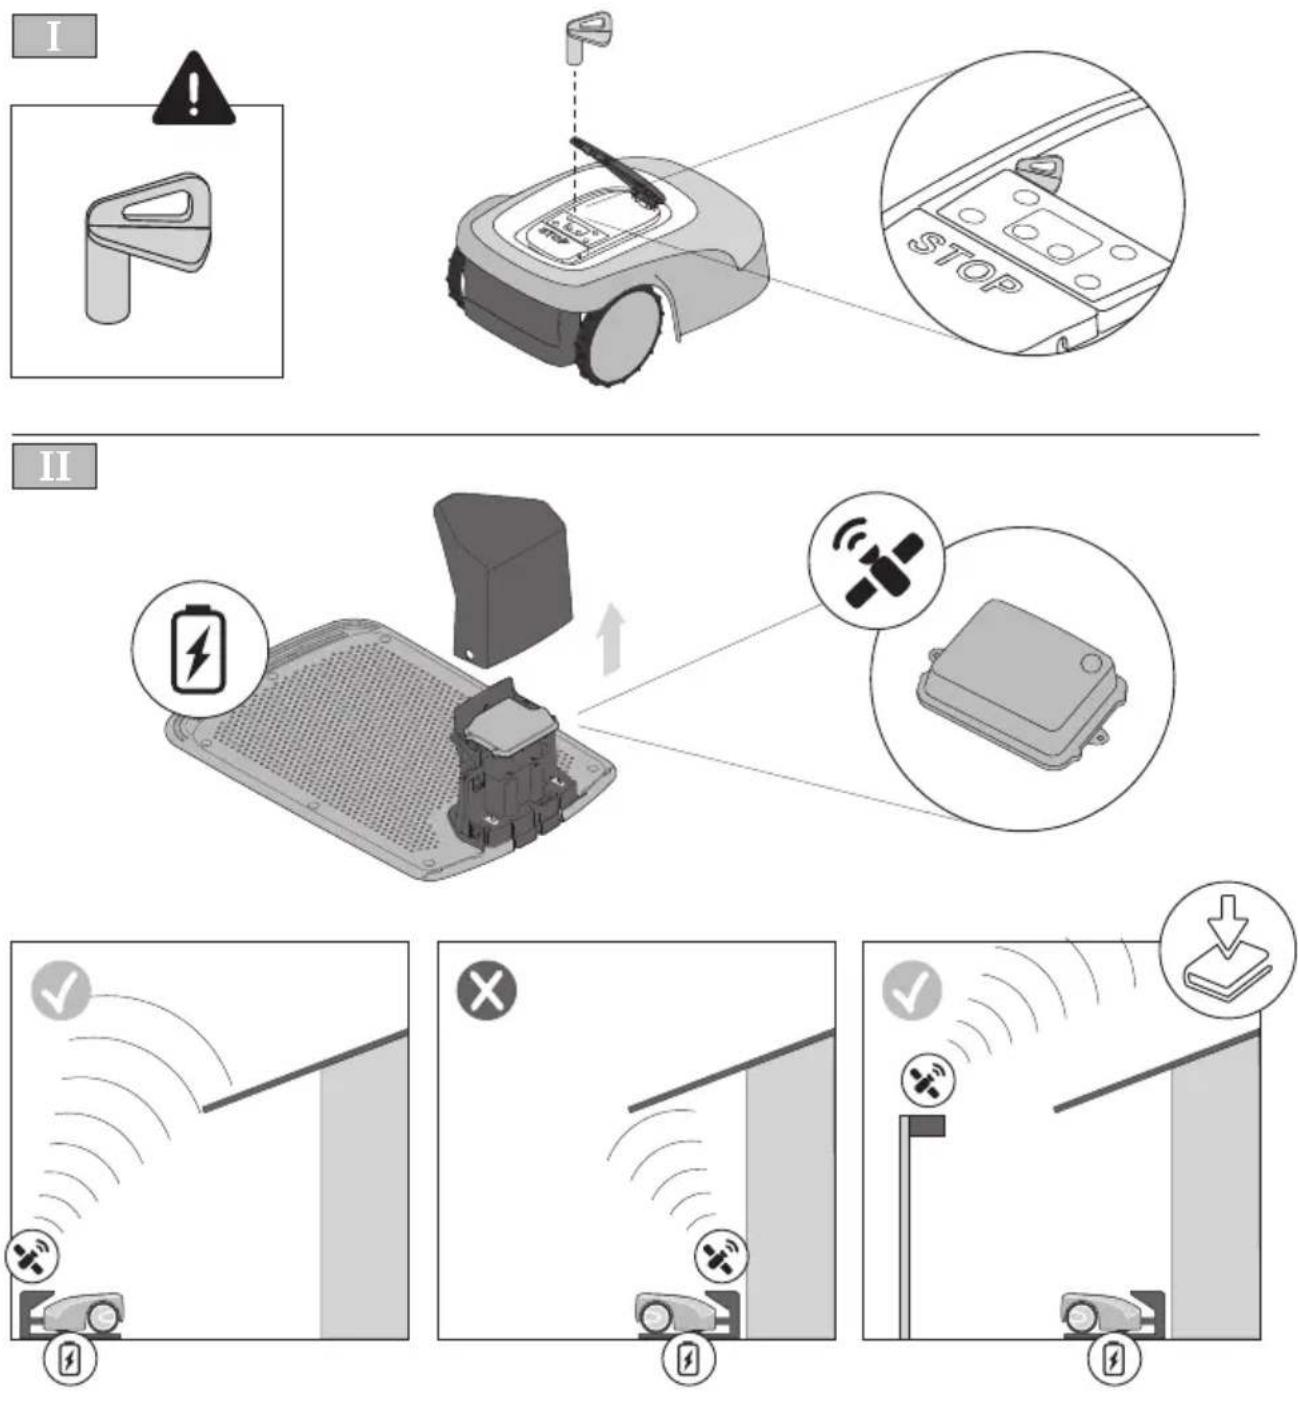
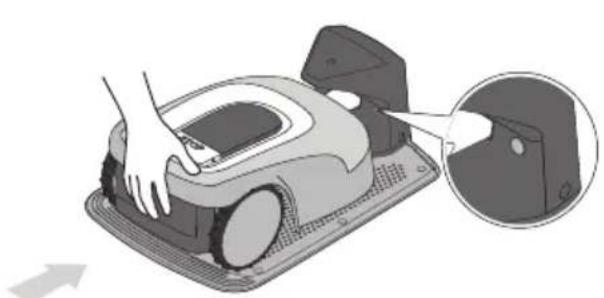
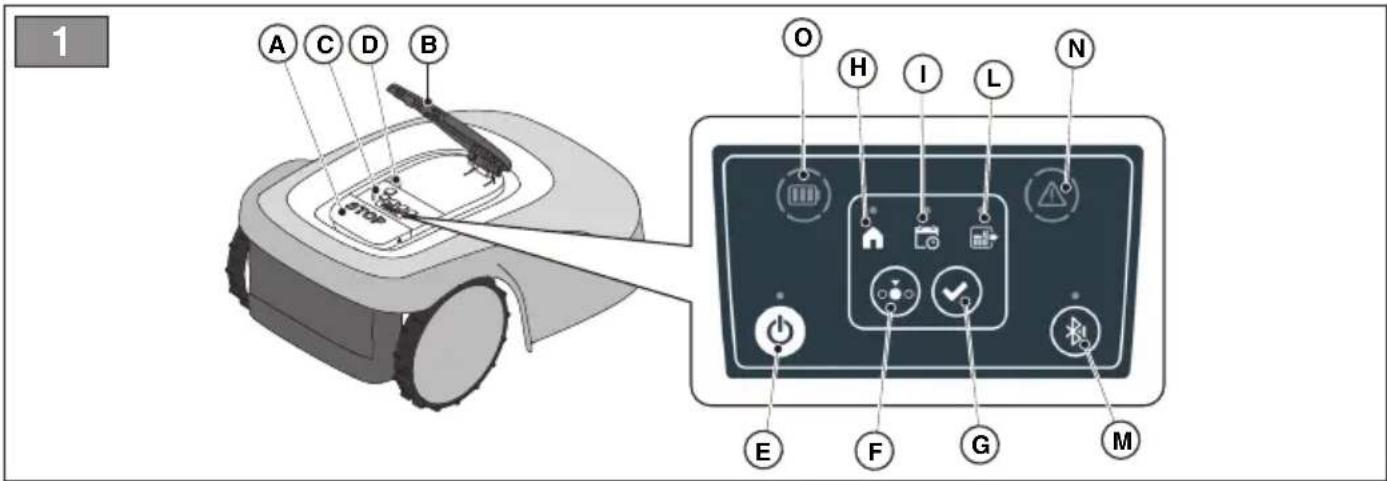
- Press the "STOP" button (Fig. 1.A) to stop the robot lawn mower safely and open the protective cover (Fig. 1.B).
- Press the off button (Fig. 1.E) for a few seconds and wait for the LED on the same button to go out.
- Only after the LED has gone out (Fig. 1.E), remove the safety key (Fig. 1.D) to switch off the robot lawn mower in safe conditions.
- Close the protective cover (Fig. 1.B).
- The robot lawn mower is stopped or switched off in a safe condition.
2. INSTALLATION

WARNING:
Do not modify, tamper with, elude or eliminate the safety devices installed.
NOTE: For further clarification on the installation of the product please contact a STIGA dealer.
INSTALLATION COMPONENTS (Fig. 3)
(A) Charging base, (B) Charging base Power Supply Unit, (C) Satellite reference station, (D) Charging base fixing screws (E) Separate Satellite Reference Station Installation Bracket, (F) Separate Satellite Reference Station Installation Power Supply (optional), (G) 5 m or 15 m extension cords, (H) Mobile device (not included).
2.1. VERIFICATION OF THE INSTALLATION REQUIREMENTS
2.1.1. GARDEN ASSESSMENT:
- Assess your garden for virtual perimeters, obstacles, and areas to be excluded.
- Level the ground to prevent puddles from forming after a rainfall.
2.1.2. CHECKS FOR THE INSTALLATION OF THE CHARGING BASE, THE POWER SUPPLY UNIT AND THE SATELLITE REFERENCE STATION:
ELECTRICAL HAZARD:
It is absolutely necessary to provide an electrical outlet that complies with the relevant laws of the country.
ELECTRICAL HAZARD:
The circuit provided must be protected by a residual current device (RCD) with an activation current not exceeding 30 mA.
ELECTRICAL HAZARD:
Do not connect the power supply to an electrical outlet if the plug or the cable is damaged.
Do not connect or touch a damaged cable before it is disconnected from the power supply.
A damaged cable can lead to contact with live parts.
- Provide a flat surface at the edge of the lawn to position the charging base. The charging base must be installed in a location that can be reached by the satellite signal, preferably in an area of the garden where the sky is fully visible.
- In the area in front of the charging base there must be a stretch of land at least 2 m wide and at least 3 m long without obstacles.
- If the sky is not completely visible from the charging base installation point, the satellite reference station must be installed in another area
NOTE: The sky is considered fully visible when clear at an angle of at least 120 degrees in all directions.

WARNING:
The power cable, power supply unit, extension cord and all other electric cables which do not belong to the product must remain outside the cutting area to maintain their distance from hazardous moving parts and prevent damage to cables which may come into contact with live parts.
- Set up the installation area of the power supply unit in such a way as to prevent it from being submerged by water under all weather conditions. Preferably install in a closed room and protected from weather conditions, in a location not easily accessible by unauthorised persons.
2.1.3. CHECKSTO DEFINETHE VIRTUAL PERIMETERS:
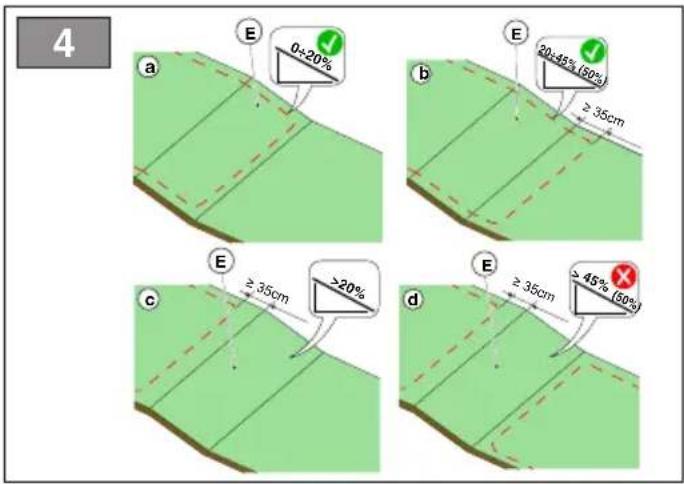
- Check that the maximum slope of the work area is less than or equal to 45% or 50% depending on the model (see Par. 7 TECHNICAL DATA). When defining the virtual perimeters, observe the rules shown in Fig. 4.

WARNING:
The robot can mow surfaces with a maximum slope of 45% or 50% depending on the model. In case of non-compliance with the instructions, the robot may slip and exit the work area

WARNING:
Areas with slopes higher than allowable slopes cannot be mowed. Position the virtual perimeter before the slope, excluding that area of lawn from the mowing.
- Check the entire work surface: assess the obstacles and areas to be excluded from the work area which must be programmed as areas to be avoided.
2.2. CRITERIA FOR DELIMITING WORK AREAS AND TRANSITION ROUTES
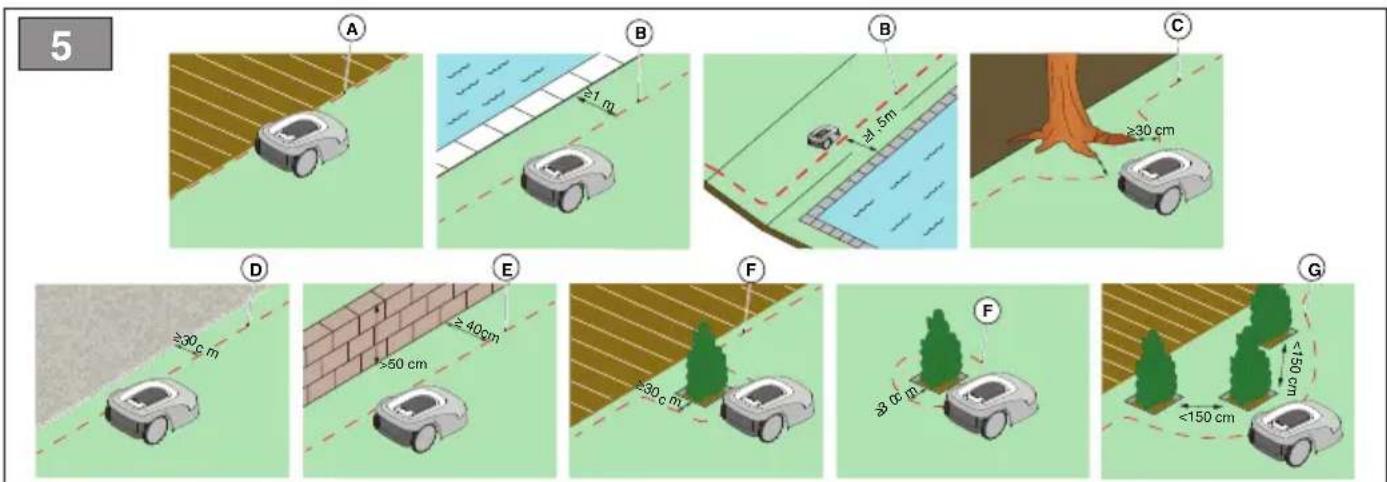
- If there is a pavement or path at the same level as the lawn, the virtual perimeter can coincide with the edge of the pavement (Fig. 5.A).
- In the presence of a swimming pool, pond or excavated areas, the virtual perimeter must be programmed at a distance of at least 1 meter. If the pool, pond or excavated area are positioned at the end of a slope, the virtual perimeter must be programmed at a distance of at least 1.5 meters (Fig. 5.B).
- In the case of trees with protruding roots, the virtual perimeter must be programmed to prevent the robot lawn mower from passing over such uneven surfaces (Fig. 5.C).
- The virtual perimeter must be programmed so that the robot lawn mower is kept at a distance of at least 30 cm from areas with gravel or small stones (Fig. 5.D).
- In the case of sloping areas, follow the instructions provided in Par. 2.1.3.
- In the case of continuous structural elements (walls, fences, hedges, etc.) higher than 50 cm, the virtual boundary must be programmed at a minimum distance of 40 cm from them (Fig. 5.E).
- In all other cases, the virtual boundary must allow a minimum distance of 30 cm between the robot lawn mower and the obstacle (Fig. 5.F).
- In the case of delimitation of obstacles less than 150 cm apart, delimit them as a single obstacle respecting the distances indicated above (Fig. 5.G).

CAUTION:
The operating area and more generally the area in which the robot lawn mower can travel must be cordoned off by fencing.
2.2.1. NARROW PASSAGES
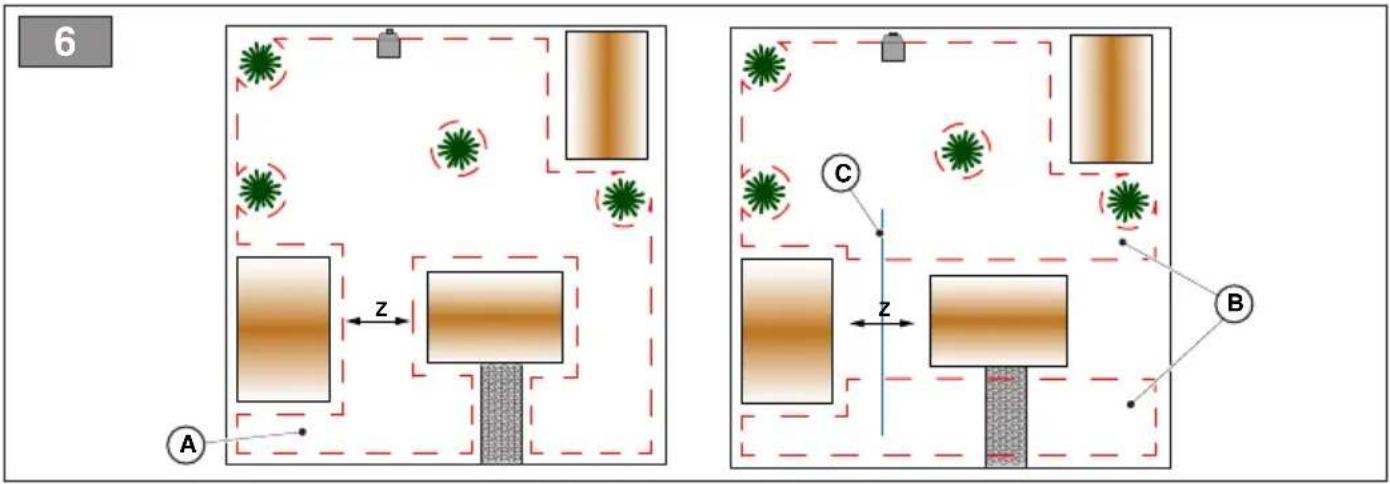
- In the case of narrow passages, the distance between two different virtual perimeters must be Z ≥ 2 m (Fig. 6.A).
- In the case of a passage where the distance between the virtual boundaries would be <2m, the part of the area beyond the bottleneck (Fig. 6.A) may not be reached by the robot lawn mower automatically. In this case, two separate virtual cutting zones must be programmed (Fig. 6.B) and connected with a virtual transition route (Fig. 6.C). Refer to the Comprehensive Manual.
2.2.2. TRANSITION ROUTES
Areas of the garden that include areas which are not to be mowed must be connected by transition routes. Transition routes must respect the maximum slope limit of 20%.
- Assess the possible routes and choose the easiest transition route that allows the robot to maintain the furthest distance from any obstacles and that does not cross areas usually used for parking or the transit of vehicles or pedestrians.
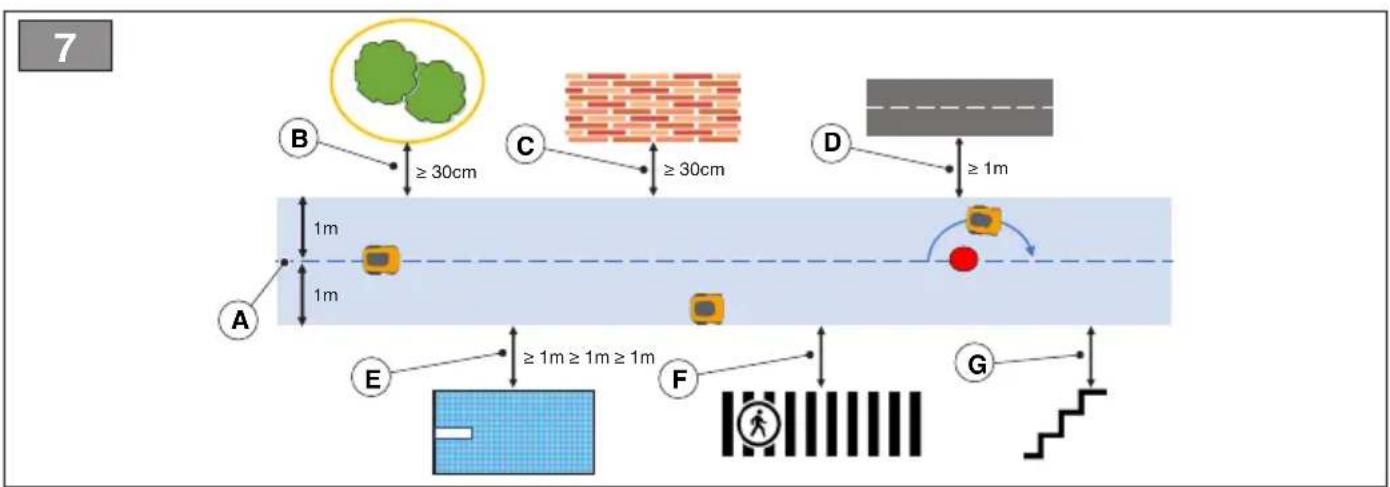
- The transition route includes a manoeuvring zone extending 1 m to the right and 1 m to the left of the programmed route (Fig. 7.A). The following minimum distances between the manoeuvring area and the various garden elements must be observed: 30 cm from obstacles delimited by virtual perimeters or no-cut zones (Fig. 7.B), 30 cm from fixed obstacles without confines or continuous structural elements (Fig. 7.C), 1m from public roads (Fig. 7.D), 1m from pools (Fig. 7.E), 1m from footpaths (Fig. 7.F), 1m from cliffs or steep slopes (Fig. 7.G).
- In the case of narrow passages where the above distances cannot be met, the passage must be cordoned off by fending, if not already present.
NOTE: Transition paths programmed within narrow passages may have inadequate satellite signal reception, affecting the robot lawn mower's operating accuracy.
2.3. COMPONENTS INSTALLATION
ELECTRICAL HAZARD:
Only use the battery charger and power supply provided by the manufacturer. Improper use may cause electric shock and/or overheating.

CAUTION:
Danger of cutting hands.
Use protective gloves to avoid cutting your hands.

CAUTION:
Danger of dust in the eyes.
Use safety glasses to avoid the danger of dust in the eyes.
ELECTRICAL HAZARD:
Connect the power supply only at the end of all the installation operations. If necessary during the installation, turn off the general power supply.
2.3.1. CHARGING BASE INSTALLATION
The charging base can be installed inside the work area or in an area connected to it by a transition route.
- Check the installation requirements as indicated in Par. 2.1.2.
-
If necessary, prepare the ground so that the surface of the charging base (Fig. 8.L) is at the same level as the lawn, the ground must be perfectly flat and compact in order to avoid deformation of the surface of the charging base.
-
Fix the charging base (Fig. 8.L) to the ground with the fixing screws (Fig. 8.M).
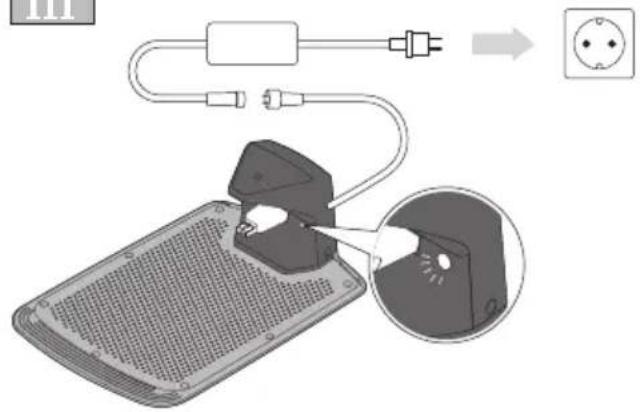
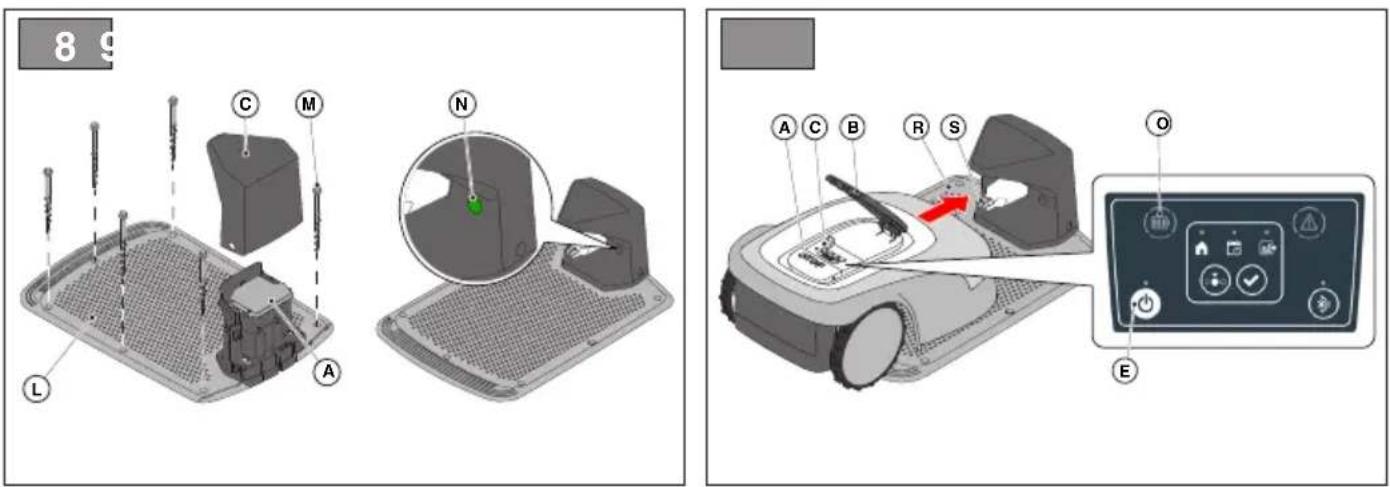
- Check that the satellite reference station connector (Fig. 8.A) is connected to the charging base.
- Connect the power supply unit to the charging base and screw in the connector.
- Connect the power supply plug to the electrical outlet.
- Make sure that when the robot lawn mower is not in the charging base, the warning light on the charging base (Fig. 8.N) is lit (see Par. 3.3).
2.3.2. INSTALLING THE SATELLITE REFERENCE STATION
The satellite reference station (Fig. 8.A) requires full visibility of the sky. It is supplied with the charging base and is installed under the protective cover (Fig. 8.C).
If the charging base (Fig. 8.L) is not placed in an area where the sky is completely visible, it is necessary to remove the satellite reference station (Fig. 8.A) from the charging base and install it in an area where there is full visibility of the sky. The sky is considered fully visible when clear at an angle of at least 120 degrees in all directions.
Refer to the Comprehensive Manual. for instructions on the separate installation of the satellite reference station.

CAUTION:
For safety reasons, the satellite reference station must never be moved after the programming of the virtual perimeters, transition routes and areas to be avoided. The robot lawn mower could exit the programmed work area. If the reference station is moved, the programming must be repeated.
2.3.3. CHARGING THE ROBOT LAWN MOWER AFTER INSTALLATION
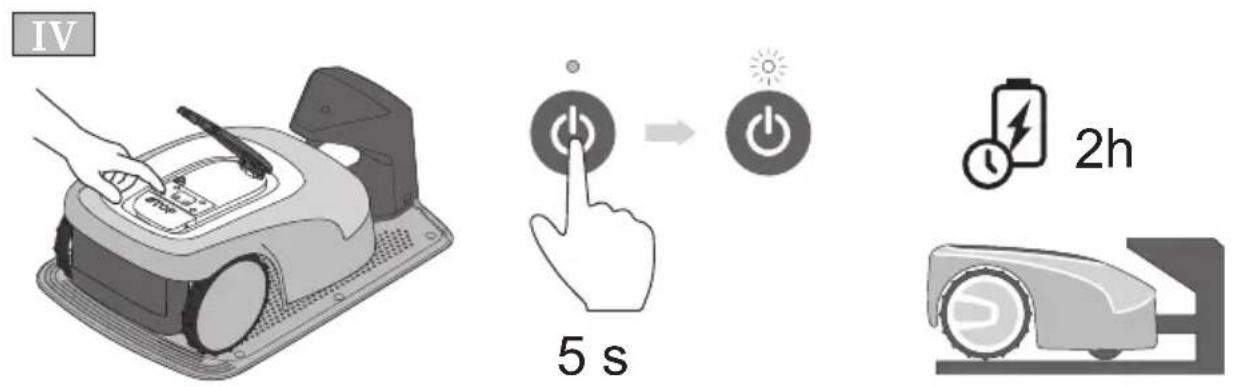
Recharge the batteries for at least 2 hours before using the product for the first time.
2.4. PROGRAMMING VIRTUAL PERIMETERS, TRANSITION ROUTES AND AREAS TO BE AVOIDED
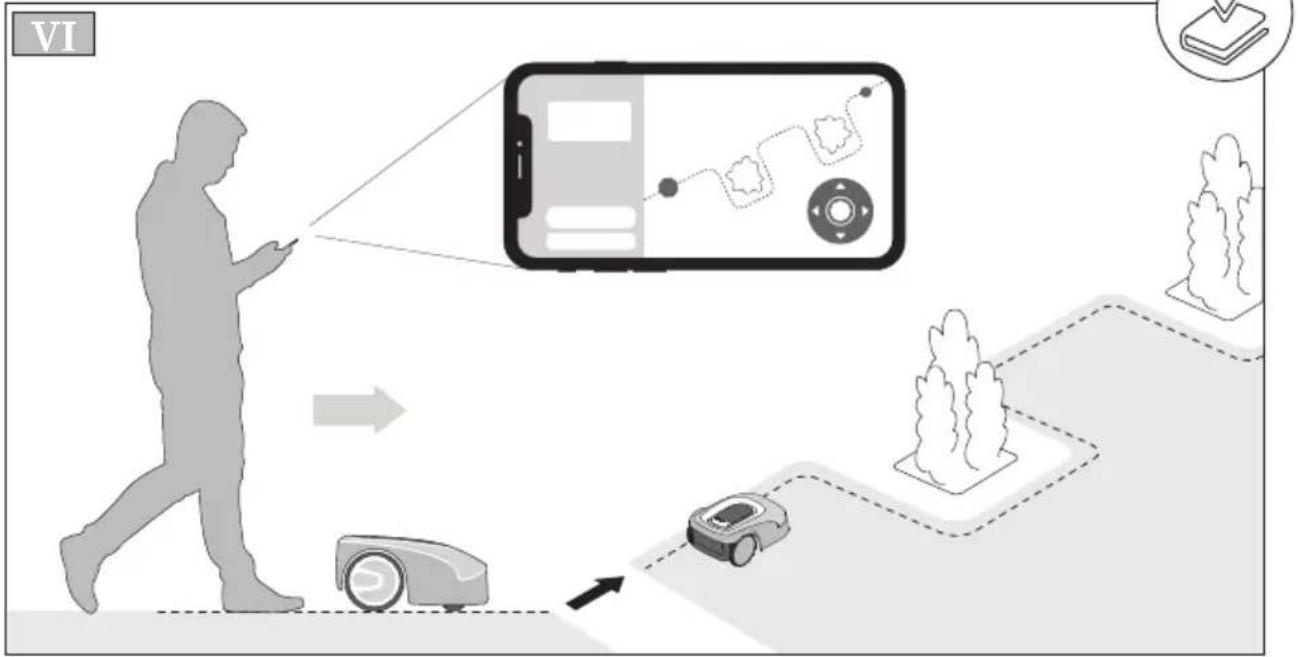
The programming of the virtual perimeters, transition routes and areas to be avoided is performed using the respective "STIGA.GO APP" wizards. The procedure requires you to guide the robot lawn mower manually by walking alongside it according to the general instructions provided in Par. 2.2.

CAUTION:
The operating area or transition routes used by the machine must be set so as not to include public spaces, areas usually used for parking, transit of vehicles or pedestrian routes to avoid damage to persons, property or vehicle accidents.

CAUTION:
For your own safety and to prevent damage to persons, animals or things, the operator must already be acquainted with the area in which the robot lawn mower is manually guided. When guiding the robot, walk carefully to avoid tripping.

CAUTION:
The operating area and more generally the area in which the robot lawn mower can travel must be cordoned off by fencing.
Make the fence suitable or supervise the robot lawn mower during its operation.
3. OPERATION
3.1. MANUAL FUNCTIONING OF THE ROBOT LAWN MOWER
The robot lawn mower can also be used without using the work schedule programme. In this mode the robot lawn mower carries out a work cycle, returns to the charging base and remains there until the next manual start.
In order to use the machine in this mode, it is still however necessary to programme the virtual perimeters, transition routes and areas to be avoided. (See Par. 2.4)
- Place the robot lawn mower on the charging base or within the perimeter of the installation.
- Press the "STOP" button (Fig. 1.A) to open the cover (Fig. 1.B) and access the control panel (Fig. 1.C).
- Press the "ON/OFF" button (Fig. 1.E) for 5 seconds to switch on the robot lawn mower.
- Press the "SELECT MODE" push button (Fig. 1.F) until only the "SINGLE WORK CYCLE" is flashing (Fig. 1.L).
- Press the "CONFIRM" push button (Fig. 1.G). The icon (Fig. 1.L) is lit with a fixed light to confirm the operation.
- Close the cover (Fig. 1.B). The robot lawn mower will start operating.
NOTE: this mode may not guarantee adequate coverage of the garden, both in terms of time required and in terms of uniformity of the cutting result, especially if the garden has an irregular shape. To achieve the maximum efficiency of the robot lawn mower, it is recommended to programme the work schedule.
3.2. DESCRIPTION OF THE CONTROLS ON THE ROBOT LAWN MOWER
List of controls, indicators and their function:
- Press the "STOP" push button (Fig. 1.A): it is used to stop the robot lawn mower safely.
- "SAFETY KEY" (Fig. 1.D): it is used to stop the robot lawn mower safely.
- "ON/OFF" button (Fig. 1.E) is used to turn the robot lawn mower on and off and to reset the alarms.
- "SELECT MODE" push button (Fig. 1.F): it is used to select the operating mode of the robot lawn mower and to force it to return to the charging base.
- "CONFIRM" push button (Fig. 1.G): it is used to confirm the set operating mode.
- "SCHEDULED PROGRAMME" luminous icon (Fig. 1.1): it is used to display the scheduled programme settings.
- "SINGLE WORK CYCLE" luminous icon (Fig. 1.L): it is used to display the settings of the single work cycle.
- "RETURN TO BASE" luminous icon (Fig. 1.H): it is used to display the settings of the forced return of the robot lawn mower to the charging base.
- "BLUETOOTH" button (Fig. 1.M) is only used by the service centre for diagnostic purposes.
EN
- "ALARM" luminous icon (Fig. 1.N): it is used to display alarm statuses.
- "BATTERY" luminous icon (Fig. 1.O): it is used to display the battery charge level.
NOTE: For a more detailed description of the commands listed above, please refer to the Comprehensive Manual.
The charging base is equipped with a warning light (Fig. 8.N) which lights up as shown below:
- Warning light off: the charging base is powered off or the robot is on the base.
- Fixed warning light: the robot lawn mower is not connected to the charging base and the antenna signal is correctly transmitted.
- Flashing light: the charging base is not set up correctly, or a charging base fault has been detected. Refer to the Comprehensive Manual.
3.4. BATTERY CHARGING
The "BATTERY CHARGING" procedure allows to recharge the robot lawn mower manually.
- Position the robot lawn mower on the charging base (Fig. 9.R).
- Slide the robot lawn mower onto the charging base, until the charging connector is engaged (Fig. 9.S).
- Press the "STOP" button (Fig. 9.A) to open the cover (Fig. 9.B) and access the control panel (Fig. 9.C).
- Turn the robot lawn mower on with the "ON/OFF" button (Fig. 9.E).
- The "BATTERY" luminous icon (Fig. 9.O) flashes blue, the robot lawn mower is charging.
- Close the cover (Fig. 9.B).
- Leave the robot lawn mower to charge for at least the time shown in Par. 2.3.3.
NOTE: Charging the battery before winter storage should be carried out as shown in Par. 4.3.
Follow APP wizard to adjust the cutting height.

CAUTION:
Do not touch the cutting means when adjusting the cutting height.
NOTE: The length of the grass cut by the robot lawn mower must not exceed 10 mm.
4. MAINTENANCE

CAUTION:
Only use original spare parts.

CAUTION:
Do not modify, tamper with, elude or eliminate the safety devices installed.

CAUTION:
Danger of cutting hands.
Use protective gloves to avoid cutting your hands.

CAUTION:
Danger of dust in the eyes.
Use safety glasses to avoid the danger of dust in the eyes.

WARNING:
Too much water can filter in and damage electrical parts.

BAN:
Do not use pressurized water jets.

BAN:
To avoid irreversible damage to the electrical and electronic components, do not immerse the robot lawn mower, partially or completely, in water.

BAN:
Do not wash the internal parts of the robot lawn mower to avoid damaging the electrical and electronic components.

BAN:
Do not use solvents or petrol so as not to damage varnished surfaces and plastic parts.
4.1. SCHEDULED MAINTENANCE
For a better operation and longer life, be sure to clean the product regularly and replace worn parts.
Perform the interventions following the frequency indicated in the table.
| FREQUENCY COMPONENT TYPE OF | INTERVENTION |
| Weekly Blade Clean and check blade | efficiency (See Par. 4.2) |
| If the blade is bent due to impact or if it's worn, replace it. (See Par. 4.2) |
| Recharging contacts |
| Monthly Robot lawn | mower | Carry out cleaning. (See Comprehensive Manual) |
| Charging base and power cables | Check for wear or deterioration and replace if necessary. (See Comprehensive Manual) |
| At the end of the mowing season or every six months if the robot lawn mower is not used | Battery Perform the | pre-storage charging of the battery. (See Par. 4.3) |
| Annual or at the end of the cutting season | Robot lawn mower | Carry out the servicing at an authorized service centre. (See Par. 4.1) |
It is necessary to carry out a maintenance servicing annually at an authorized service centre to keep the robot lawn mower in good working conditions.
NOTE: any malfunction due to not having carried out the annual servicing will not be recognized under warranty.
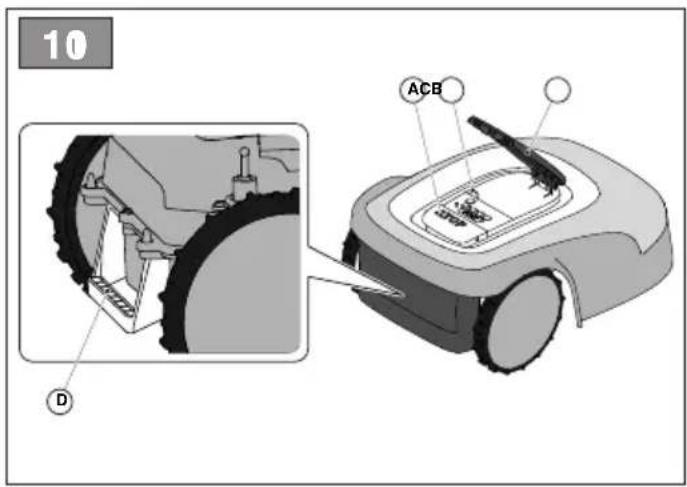
4.2. REPLACEMENT OF THE CUTTING BLADES
- Switch off the robot lawn mower in safety conditions (see Par. 1.4).
- Turn the robot lawn mower upside down, taking care not to damage the floating cover.
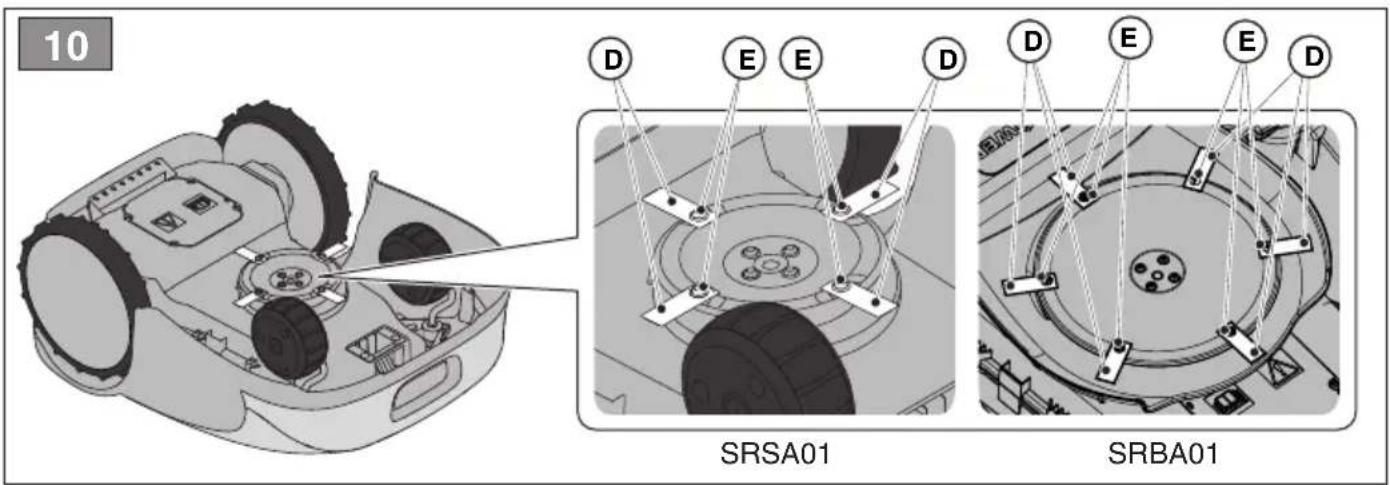
- Unscrew the fixing screws (Fig. 10.E).
- Replace the cutting blades (Fig. 10.D) and the fixing screws (Fig. 10.E).
- Tighten the fixing screws (Fig. 10.E).
4.3. WINTER BATTERY MAINTENANCE AND STORAGE
- Charge the battery according to the APP wizard, accessible from the "Settings" page.
- Clean the robot lawn mower (See the Comprehensive Manual).
- Check the robot lawn mower is switched off and store in a dry place, protected from icy conditions.
NOTE: For more detailed information on the winter charging procedure, please refer to the Comprehensive Manual.
NOTE: Registering the charge through the app procedure is required for the battery warranty to be valid.
4.4. BATTERY REPLACEMENT
Battery replacement is the sole responsibility of the STIGA TECHNICAL ASSISTANCE STAFF.
If the battery needs to be replaced, contact a service centre or your retailer.
5. TRANSPORT, STORAGE AND DISPOSAL
5.1. TRANSPORT
NOTE: We recommend using the original packaging for transport over long distances.
- Switch off the robot lawn mower in safety conditions (see Par. 1.4).
- Clean the robot lawn mower (See the Comprehensive Manual).
- Lift the robot lawn mower by its handle (Fig. 11.D) and carry it, making sure you keep the cutting blade away from the body.
5.2. STORAGE
The robot lawn mower must be stored horizontally in a dry and frost-free place after cleaning and charging the battery in the winter (see Chapter 4). During long periods of inactivity, disconnect the charging base and the satellite reference station from the mains.
5.3. DISPOSAL

CAUTION:
To remove the battery from the robot lawn mower, contact an authorized service centre.
- Dispose of the product packaging in a sustainable way in the appropriate collection containers or at special centres authorized for collection.
- Dispose of the robot lawn mower in accordance with local legal requirements.
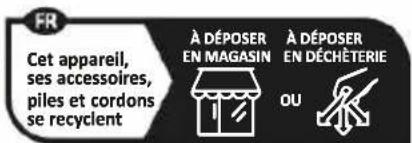
- Contact appropriate facilities for recycling and disposal as the robot lawn mower is classified as WEEE (Waste Electrical and Electronic Equipment).
- Dispose of old or used batteries in a sustainable way in collection containers or at authorized collection centres.
6. TROUBLESHOOTING

CAUTION:
Stop the robot lawn mower and bring it back to safety conditions (See Par. 1.4).
Below there is the list of any anomalies that may arise during the work phase.
| PROBLEM CAUSES SOLUTION$ | |
| Abnormal vibrations. The robot lawn mower is noisy. | Damaged cutting disc or blades Replace the dam | maged components (See Par. 4.2). |
| Cutting device blocked by residues (tapes, ropes, plastic fragments, etc.). | Switch off the robot lawn mower in safety conditions (See Par. 1.4). Unlock the cutting blade. |
| The robot lawn mower was started in the presence of unexpected obstacles (fallen branches, forgotten objects, etc.). | Switch off the robot lawn mower in safety conditions (See Par. 1.4). Remove the obstacles and restart the robot lawn mower. |
| Electric motor failure Replace the motor, contact a service centre. |
| Grass too tall Increase the cutting height (See Par. 3.5). |
|
|
| The robot lawn mower does not position itself properly inside the charging station. | Problem with the charging base antenna. If the problem persists, contact a service centre. |
| Land subsidence in the vicinity of the charging base. | Restore the correct positioning of the charging base. (See Par. 2.3.1). |
| The charging base has not been calibrated correctly, or electromagnetic interferences may be present in the vicinity of the base. | After eliminating the source of disturbance, calibrate the charging base using the app. Refer to the Comprehensive Manual. |
| The charging base light does not turn on when the robot is out of the charging base. | The supply voltage is missing or there is a fault in the charging base. | Check that the power supply unit is plugged in correctly. Check the integrity of the power supply connection cable. |
| The charging base light is flashing. | There is a fault in the charging base. Refer to the Comprehensive Manual. | Turn off the charging base and turn it on again after a few minutes. If the problem persists, contact a service centre. |
| The charging base is not set up correctly. | Set up the charging base using the app. Refer to the Comprehensive Manual. |
| The warning icon is on on the keyboard | It indicates anomaly / failure conditions. | For more information consult the app or refer to the Comprehensive Manual. |
| The robot lawn mower stops temporarily in the work area. | Weak GPS signal If the problem persists, contact a service centre |
- TECHNICAL DATA
| SPECIFICATIONS TYPE: SR$A01 (see product label) TYPE: SRBA01 (see product label) |
| Dimensions (WxHxD) 413 x 252 x 560 [mm] 529 x | 299 x 695 [mm] | |
| Weight of the robot lawn mower | Depending on the model: 8.1 [kg]; 8.4[kg] (*) (uncertainty+/-0.1 [kg]) | Depending on the model: 12,7 [kg]; 13,4[kg]; 13,5 [kg] (*) (uncertainty+/-0.1 [kg]) |
| Cutting height (Min-Max) 20-60 [mm] 20-65 [mm] | | |
| Blade diameter 180 [mm] 260 [mm] | | |
| Cutting speed 2850+/-50 [rpm] 2400+/-50 [rpm] | | |
| Speed of movement | 22 [m/min] Depending on the model: 24 [m/min]; 28[m/min] (*) |
| Maximum slope | 45% | 50% |
| Maximum slope along the perimeter | 20% |
| Type of cutting system | 4 pivoting cutting blades | 6 pivoting cutting blades |
| Cutting device code | 322104105/0 |
| Sound power level detected | 57 [dB] (A) | Depending on the model: 56 [dB] (A); 60 [dB] (A) (*) |
| Uncertainty of noise emissions, KWA | 1.47 [dB] (A) | Depending on the model: 0.56 [dB] (A); 0.65 [dB] (A) (*) |
| Sound power level guaranteed | 59 [dB] (A) | Depending on the model: 57 [dB] (A); 60 [dB] (A) (*) |
| Acoustic level audible by the operator | 46.3 [dB] (A) | Depending on the model: 45.2 [dB] (A); 48.6 [dB] (A) (*) |
| IP rating of the robot lawn mower | IPX5 |
| IP rating of the charging station | IPX1 |
| IP rating of the power supply | IP67 |
| Robot lawn mower operating ambient temperature[°C] | 0 ÷ 50 |
| Charging station operating ambient temperature[°C] | -10 ÷ 50 |
| Power supply ambient operating temperature [°C] | -10 ÷ 50 |
| Work capacity | Depends on model (*) | Depends on model (*) |
| Power supply | Input: 100-240 Vac, 1.2 A; Output: 30 VDC, 2 AUse one of the original codes below or subsequent updates (consult an authorised STIGA dealer)118204158/0 (UE)118204161/0 (UK)118204163/0 (CH) | Depending on the model: Input: 200-240 Vac, 0.8 A; Output: 30 VDC, 4 AUse one of the original codes below or subsequent updates (consult an authorised STIGA dealer)118204159/0 (UE)118204162/0 (UK)118204164/0 (CH)OrInput: 100-240 Vac, 1.2 A; Output: 30 VDC, 2 AUse one of the original codes below or subsequent updates (consult an authorised STIGA dealer)118204158/0 (UE)118204161/0 (UK)118204163/0 (CH)(*) |
| 30 VDC extension cables permitted | Use one of the original codes below or subsequent updates (consult an authorised STIGA dealer)Code: 1127-0010-01, Length 5 mCode: 1127-0020-01, Length 15 m |
| Battery model | Depending on the model: 25.2V - 2Ah; 25.2V - 2.5Ah; 25.2V - 5Ah; 25.2V - 6Ah (*) | Depending on the model: 25.2V - 5Ah; 25.2V - 2x5Ah; 25.2V - 2x6Ah (*) |
| Charging time | Depending on the model: 40 [min]; 60 [min]; 80 [min]; 150 [min] (*) | Depending on the model: 150 [min]; 180 [min] (*) |
| Operating time | Depending on the model: 40 [min]; 60 [min]; 90 [min]; 150 [min] (*) | Depending on the model: 150 [min]; 270 [min]; 330 [min] (*) |
| Connectivity: | Bluetooth®, 4G, 3G, GSM |
| Navigation technology | AGS, GNSS-RTK |
(*) For further details on the specific model, please consult the complete Manual available online (see QR code on the first page of this booklet).

Download full manual
stiga.com

Download full manual stiga.com

Download full manual
stiga.com
ATTENZIONE:

Download full manual
stiga.com

Download full manual
stiga.com

Download full manual
stiga.com

Download full manual
stiga.com
Symbol for likestrømforsyning.
IPXX
4.1. PLANLAGT VEDLIKEHOLD

Download full manual
stiga.com

Download full manual
stiga.com
for at sikre maskinens drift.
Symbol for jævnstrømsforsyning.

2.2.2. OMLAGT STRÆKNING

Download full manual stiga.com
1.3. SYMBOLIT JA KILVET
VAROITUS:

Download full manual
stiga.com

Download full manual
stiga.com
2.1. WERYFIKACJA WYMAGAŃ INSTALACYJNYCH
2.1.1. WERYFIKACJA OGRODU:

Download full manual stiga.com

Download full manual
stiga.com

Download full manual
stiga.com
NAPOMENA: upute koje se navode u ovom priručniku vrijede za sve modele autonomne robotske kosilice. Ako nije naznačeno, slike se odnose na platformu SRSA01.
NAPOMENA: ovaj priručnik sadrži osnovne upute koje se uglavnom odnose na sigurnost. Za pravilno postavljanje potrebno je pažljivo pročitati i pridržavati se cjelokupnog priručnika s uputama (vidi gore).
1. SIGURNOST
OBVEZA:

Download full manual
stiga.com

Download full manual
stiga.com

Download full manual
stiga.com
OPOMBA: Navodila v tem priročniku veljajo za vse modele samostojnih robotskih kosilnic. Slike se nanašajo na platformo SRSA01, će ni drugače navedeno.
2.2.2. PREMOSTITVENE POTI

Download full manual
stiga.com
(Supply of Machinery (Safety) Regulations 2008, S.I. 2008 No. 1597, Annex II, part A)
- The company: ST. S.p.A. – Via del Lavoro, 6 – 31033 Castelfranco Veneto (TV) – Italy
- Hereby declares under its own responsibility that the machine:
Robotic lawnmower
a) Homologation type: SRSA01
c) Serial number: 22A••RMO000001 ÷ 99L••RMO999999
d) Engine: battery-operated
- Conforms to UK Regulations:
• S.I. 2008/1597 - Supply of Machinery (Safety) Regulations 2008
• S.I. 2016/1091 - Electromagnetic Compatibility Regulations 2016
• S.I. 2012/3032 - The Restriction of the Use of Certain Hazardous Substances in Electrical and Electronic Equipment Regulations 2012
• S.I. 2017/1206 - Radio Equipment Regulations 2017
- Reference to harmonised standards and/or to technical standards:
EN 60335-1:2012 / AC:2014 / A11:2014 / A13:2017 /
A1:2019 / A2:2019 / A14:2019
EN 50636-2-107:2015 / A1:2018 / A2:2020 / A3:2021
ETSI EN 300 328 V2.2.2
ETSI EN 301 489-1 (V1.9.2)
ETSI EN 301 489-1 V2.2.3
ETSI EN 301 489-17 V3.2.4
ETSI EN 301 489-19 V2.1.1
ETSI EN 301 489-52 V1.1.2
ETSI EN 301 908-1 V15.1.1
ETSI EN 301 908-13 V13.1.1
ETSI EN 303 413 V1.1.1
EN 61000-3-2:2014
EN IEC 61000-3-2:2019 / A1:2021
EN 61000-3-3:2013 / A1:2019
EN 55014-1:2017 / A11:2020
EN IEC 55014-1:2021
EN 55014-2:1997 / A1:2001 / A2:2008 / AC:1997
EN IEC 55014-2:2021
EN 62233:2008
EN 62311:2008
i) Cutting width:
18 cm
n) Person authorised to compile the technical file:
ST. S.p.A.
Via del Lavoro, 6
31033 Castelfranco Veneto (TV) - Italia
o) Castelfranco Veneto, 07/02/2024
CEO Stiga Group
Sean Robinson

UK Importer:
STIGA LTD
Unit 8, Bluewater Estate Plympton,
Devon, PL7 4JH, England


(Supply of Machinery (Safety) Regulations 2008, S.I. 2008 No. 1597, Annex II, part A)
- The company: ST. S.p.A. – Via del Lavoro, 6 – 31033 Castelfranco Veneto (TV) – Italy
- Hereby declares under its own responsibility that the machine:
Robotic lawnmower
a) Homologation type: SRBA01
c) Serial number: 22A••RMO000001 ÷ 99L••RMO999999
d) Engine: battery-operated
- Conforms to UK Regulations:
• S.I. 2008/1597 - Supply of Machinery (Safety) Regulations 2008
• S.I. 2016/1091 - Electromagnetic Compatibility Regulations 2016
- S.I. 2012/3032 - The Restriction of the Use of Certain Hazardous Substances in Electrical and Electronic Equipment Regulations 2012
• S.I. 2017/1206 - Radio Equipment Regulations 2017
- Reference to harmonised standards and/or to technical standards:
EN 60335-1:2012 / AC:2014 / A11:2014 / A13:2017 /
A1:2019 / A2:2019 / A14:2019
EN 50636-2-107:2015 / A1:2018 / A2:2020 / A3:2021
ETSI EN 300 328 V2.2.2
ETSI EN 301 489-1 (V1.9.2)
ETSI EN 301 489-1 V2.2.3
ETSI EN 301 489-17 V3.2.4
ETSI EN 301 489-19 V2.1.1
ETSI EN 301 489-52 V1.1.2
ETSI EN 301 908-1 V15.1.1
ETSI EN 301 908-13 V13.1.1
ETSI EN 303 413 V1.1.1
EN 61000-3-2:2014
EN IEC 61000-3-2:2019 / A1:2021
EN 61000-3-3:2013 / A1:2019
EN 55014-1:2017 / A11:2020
EN IEC 55014-1:2021
EN 55014-2:1997 / A1:2001 / A2:2008 / AC:1997
EN IEC 55014-2:2021
EN 62233:2008
EN 62311:2008
i) Cutting width:
26 cm
n) Person authorised to compile the technical file:
ST. S.p.A.
Via del Lavoro, 6
31033 Castelfranco Veneto (TV) - Italia
o) Castelfranco Veneto, 07/02/2024
CEO Stiga Group
Sean Robinson

UK Importer:
STIGA LTD
Unit 8, Bluewater Estate Plympton,
Devon, PL7 4JH, England

| FR (Traduction de la notice originale)Déclaration CE de Conformité (Directive Machines 2006/42/CE, Annexe II, partie A)1. La Société2. Déclare sous sa propre responsabilité que la machine : Robot-tondeusea) Type / Modèle de Basec) Série d) Moteur: batterie3. Est conforme aux prescriptions des directives :4. Renvoi aux Normes harmonisées et/ou à des normes techniquesi) Largeur de coupen) Personne habilitée à établir le Dossier Technique :o) Lieu et Date | DE (Übersetzung der Originalbetriebsanleitung)EG-Konformitätserklärung (Maschinenrichtlinie 2006/42/EG, Anhang II, Teil A)1. Die Gesellschaft2. Erklärt auf eigene Verantwortung, dass die Maschine: Mährobotera) Typ / Basismodellc) Seriennummerd) Motor: Batterie3. Den Anforderungen der folgenden Richtlinien entspricht:4. Bezugnahme auf die harmonisierten Normen und/oder technische Normeni) Schnittbreiten) Zur Verfassung der technischen Unterlagen befugte Person:o) Ort und Datum | NL (Vertaling van de oorspronkelijke gebruiksaanwijzing)EG-verklaring van overeenstemming (Richtlijn Machines 2006/42/CE, Bijlage II, deel A)1. Het bedrijf2. Verklaart onder zijn eigen verantwoordelijkheid dat de machine: Robotmaaiera) Type / Basismodelc) Serienummerd) Motor: accu3. Voldoet aan de specificaties van derichtlijnen:4. Verwijzing naar de Geharmoniseerde normen en/of technische normeni) Snijbreedten) Bevoegd persoon voor het opstellen van het Technisch Dossiero) Plaats en Datum |
| ES (Traducción del Manual Original)Declaración de Conformidad CE (Directiva Máquinas 2006/42/CE, Anexo II, parte A)1. La Empresa2. Declara bajo su propia responsabilidad que la máquina: Robot cortacéspeda) Tipo / Modelo Basec) Matrículad) Motor: bateria3. Cumple con las especificaciones de las directivas:4. Referencia a las Normas armonizadas y/o normas técnicasi) Amplitud de corten) Persona autorizada a realizar el Manual Técnico:o) Lugar y Fecha | PT (Tradução do manual original)Declaração CE de Conformidade (Diretiva de Máquinas 2006/42/CE, Anexo II, parte A)1. A Empresa2. Declara sob a própria responsabilidade que a máquina: Robot corta-relvaa) Tipo / Modelo Basec) Matrículad) Moto: Bateria3. É conforme às especificações das diretivas:4. Referência às Normas harmonizadas e/ou normas técnicasi) Amplitude de corten) Pessoa autorizada a elaborar o Caderno Técnicoo) Local e Data | NO (Oversettelse av orginal bruksanvisning)EF- Samsvarserklæring (Maskindirektiv 2006/42/EF, Vedlegg II, del A)1. Firmaet2. Erklærer på eget ansvar at maskinen: Robotgressklippera) Type / Modellc) Serienummerd) Motor: batteri3. Oppfyller kravene i direktivene:4. Henvisning til harmoniserte standarder og/eller tekniske standarderi) Klippebredden) Person som har fullmakt til å utferdige teknisk dokumentasjon:o) Sted og dato |
| SV (Översättning av bruksanvisning i original)EG-försäkran om överensstämmelse (Maskindirektiv 2006/42//EG, bilaga II, de la)1. Företaget2. Försäkrar på eget ansvar att maskinen: Gräsklipparrobota) Typ / Basmodellc) Serienummerd) Motor: batteri3. Överensstämmer med föreskrifterna i direktivet4. Referens till harmoniserade standarder och/eller tekniska standarderi) Skärbreddn) Auktoriserad person för upprättandet av den tekniska dokumentationen:o) Ort och datum | DA (Oversættelse af den originale brugsanvisning)EF-overensstemmelseserklæring (Maskindirektiv 2006/42/EF, bilag II, del A)1. Firmaet2. Erklærer på eget ansvar, at maskinen: Robotplæneklippera) Type / Modelc) Serienummerd) Motor: batteri3. Er i overensstemmelse med specifikationerne ifølge direktiverne:4. Henvisning til harmoniserede standarder og/eller tekniske standarderi) Klippebredden) Person, der har bemyndigelse til at udarbejde det tekniske dossier:o) Sted og dato | FI (Alkuperäisten ohjeiden käännös)EY-VAATIMUSTENMUKAISUUSVAKUUTUS (Konedirektiivi 2006/42/EY, Liite II, osa A)1. Yritys2. Vakuuttaa omalla vastuullaan, että kone: Robottiruohonleikkuria) Typppi / Perusmallic) Sarjanumerod) Moottori : akku3. On yhdenmukainen seuraavien direktiivien asettamien vaatimusten kanssa:4. Viittaus harmonisoituihin standardeihin ja/tai teknisiin standardeihini) Leikkuuleveysn) Teknisten asiakirjojen laatimiseen valtuutettu henkilö:o) Paikka ja päivämäärä |
| SL (Prevod izvirnih navodil)ES izjava o skladnosti(Direktiva 2006/42/ES), priloga II, del A)1. Družba2. pod lastno odgovornostjo izjavlja, da je stroj: Robotska kosilnicaa) Tip / osnovni modelc) Serijska številkad) Motor: baterija3. Skladen je z določili direktiv :4. Sklicevanje na usklajene predpise in/ali tehnične standardei) Obseg košnjen) Oseba, pooblaščena za sestavo tehnične knjižice:o) Kraj in datum | LT (Originalių instrukcijų vertimas)EB atitikties deklaracija(Mašinų direktyva 2006/42/CE, Priedas II, dalis A)1. Bendrovė2. Prisiima atsakomybę, kad įrenginys:Žolės pjovimo robotasa) Tipas / Bazinis Modelisc) Serijos numerisd) Variklis: baterija3. Atitinka direktyvose pateiktas specifikacijas:4. Nuoroda j suderintas Normas ir (arba) techninius normasi) Pjovimo plotisn) Autorizuotas asmuo sudaryti Techninę Dokumentaciją:o) Vieta ir Data | LV (Instrukciju tulkojums no originálvalodas)EK atbilstības deklarācija(Direktīva 2006/42/EK par mašinām, pielikums II, daļa A)1. Uznēmums2. Uzņemoties par to pilnu atbildību, paziņo, ka mašina: Robotizēta plaujmašinaa) Tips / Bāzes modelisc) Sērijas numursd) Motors: akumulators3. Atbilst šādu direktīvu prasībām:4. Atsauce uz harmonizētiem standartiem un/vai tehniskajiem standartiemi) Plaušanas platumsn) Pilnvarotais darbinieks, kas sagatavoja tehnisko dokumentāciju:o) Vieta un datums |
| CS (Překlad původního návodu k používání)ES – Prohlášení o shodě(Směrnice o Strojních zařízeních 2006/42/ES, Přiloha II, část A)1. Společnost2. Prohlášuje na vlastní odpovědnost, že stroj: Robotická sekačkaa) Typ / Základní modelc) Výrobní číslod) Motor: akumulátor3. Je ve shodě s nařízeními směrnic:4. Odkazy na Harmonizované normya/nebo technické normyi) Šiřka řezánín) Osoba autorizovaná pro vytvoření Technického spisu:o) Misto a Datum | PL (Tlumaczenie instrukcji oryginalnej)Deklaracja zgodności WE(Dyrektywa maszynowa 2006/42/WE, Załącznik II, część A)1. Spółka2. Oświadcza na własną odpowiedzialność, že maszyna: Kosiarka trawnikowaa) Typ / Model podstawowyc) Numer seryjnyd) Silnik: akumulator3. Spełnia podstawowe wymogi następujących Dyrektyw:4. Odniesienie do Norm zharmonizowanych i/lub norm technicznychi) Szerokość cięcia n) Osoba upoważniona do zredagowania Dokumentacji technicznej:o) Miejscowość i data | ET (Algupārase kasutusjuhendi tõlge)EÜ vastavusdeklaratsioon(Masinadirektiiv 2006/42/EÜ, Lisa II, osa A)1. Firma2. Kinnitab omal vastutusel, et masin: Robotniiduka) Tüüp / Põhimudlc) Matrikkeld) Mooter: aku3. Vastab direktiivide nõuetele:4. Viide ühtlustatud standarditele ja/või tehnilistele standarditelei) Lõikelaiusn) Tehnilise Lehe autoriseeritud koostaja:o) Koht ja Kuupäev |
| HU (Eredeti használati utasítás fordítása)EK-megfelelőségi nyilatkozata(2006/42/EK gépirányelv, II. melléklet "A" rész)1. Alulírott Vállalat2. Felelősségének teljes tudatában kijelentí, hogy az alábbi gép: Robotfünyíróa) Tipus / Alaptípusc) Gyártási számd) Motor: akkumulátor3. Megfelel az alábbi irányelvek előírásainak:4. Hivatkozás a harmonizált szabványokra és/vagy műszaki szabványokrai) Vágási szélessęgn) Műszaki Dosszié szerkesztésérefelhatalmazott személy:o) Helye és ideje | RU (Перевод оригинальных инструкций)Декларация соответствия нормам EC(Директива о машинном оборудовании 2006/42/EC, Приложение II, часть A)1. Предприятие2. Заявляет под собственную ответственность, что машина: Робот-газонокосилкаa) Тип / Базовая модельc) Паспортd) Двигатель: батарея сгорания3. Соответствует требованиям следующих директив:4. Ссылки на гармонизированные нормы и/или технические стандартыi) Амплитуда кошенияn) Лицо, уполномоченное на подготовку технической документации:o) Место и дата | HR (Prijevod originalnih uputa)EK Izjava o sukladnosti(Direktiva 2006/42/EZ o strojevima, dodatak II, dio A)1. Tvrtka:2. pod vlastitom odgovornošću izjavljuje da je stroj: Robotska kosilicaa) Vrsta / Osnovni modelc) Matični brojd) Motor: baterija3. sukladan s temeljnim zahtjevimadirektiva:4. Primijenjene su slijedeće harmonizirane norme i/ili tehnički norme:i) Širina rezanjan) Osoba ovlaštena za pravljenje Tehničke datoteke:o) Mjesto i datum |
STIGA
STIGA LTD (UK Importer)
Unit 8, Bluewater Estate Plympton, Devon, PL7 4JH, England
STIGA S.p.A.
Via del lavoro, 6
31033 Castelfranco Veneto (TV)
Italy
stiga.com