
Fiorina 74-2 S-Line - Pan QLIMA - Free user manual and instructions
Find the device manual for free Fiorina 74-2 S-Line QLIMA in PDF.

| Brand | Qlima |
| Model | Fiorina 74-2 S-Line |
| Product type | Wood pellet stove |
| Energy efficiency class | A+ |
| Nominal thermal power | 7.8 kW |
| Useful efficiency (nominal / reduced) | 90.2% / 91.3% |
| Electrical supply | 230 V / ~50 Hz |
| Power consumption | 300 W (ignition) / 100 W (operation) |
| Net weight | 81 kg |
| Hopper capacity | 13 kg |
| Autonomy (min - max) | 7 to 18 hours |
| Recommended fuel | Wood pellets ∅6 mm, max length 30 mm, standard DIN+/Ö-norm+/EN+ |
| Number of power levels | 5 |
| Adjustable room temperature | 7 °C to 40 °C |
| Main functions | Remote control, timer, economic mode (SAVE), Turbo mode, Auto mode, optional Wi-Fi |
| User maintenance | Daily cleaning of the heat exchanger, before each start: cleaning the burner, ash drawer and glass |
| Maintenance by authorized technician | Inspection 2 times per season, chimney sweeping, seal check |
| Safety devices | Safety thermostat, pressure sensor, child safety, automatic shutdown in case of failure |
| Warranty | 24 months on materials and manufacturing defects |
| Spare parts | Original Qlima parts available from authorized centers |
Frequently Asked Questions - Fiorina 74-2 S-Line QLIMA
User questions about Fiorina 74-2 S-Line QLIMA
0 question about this device. Answer the ones you know or ask your own.
Ask a new question about this device
Download the instructions for your Pan in PDF format for free! Find your manual Fiorina 74-2 S-Line - QLIMA and take your electronic device back in hand. On this page are published all the documents necessary for the use of your device. Fiorina 74-2 S-Line by QLIMA.
USER MANUAL Fiorina 74-2 S-Line QLIMA
Abbildung 1

Abbildung 2
- BITTE LESEN SIE DIE ANWEISUNGEN VOR DER NUTZUNG.
- BEI ZWEIFELN WENDEN SIE SICH BITTE AN IHREN HÄNDLER.
9. PRODUKTDATENBLATT
natural_image
Symbol of a trash bin with crossed lines indicating no waste, and a solid black rectangle below (no text or labels)figur 1

figur 2
- LÆS F∅RST BETJENINGSVEJLEDNINGEN
- I TVIVLSTILFÆLDE HENVEND DEM TIL DERES FORHANDLER
DK
Kære kunde,
LED 12: Til/fra-indikation.
Varmeafgivelse 1 (on1)
Varmeafgivelse 2 (on2)
Varmeafgivelse 3 (on3)
Varmeafgivelse 4 (on4)
Varmeafgivelse 5 (on5)

natural_image
Symbol of a trash bin with crossed lines indicating no waste or restriction, and a solid black rectangle below (no text or labels)Figura 1
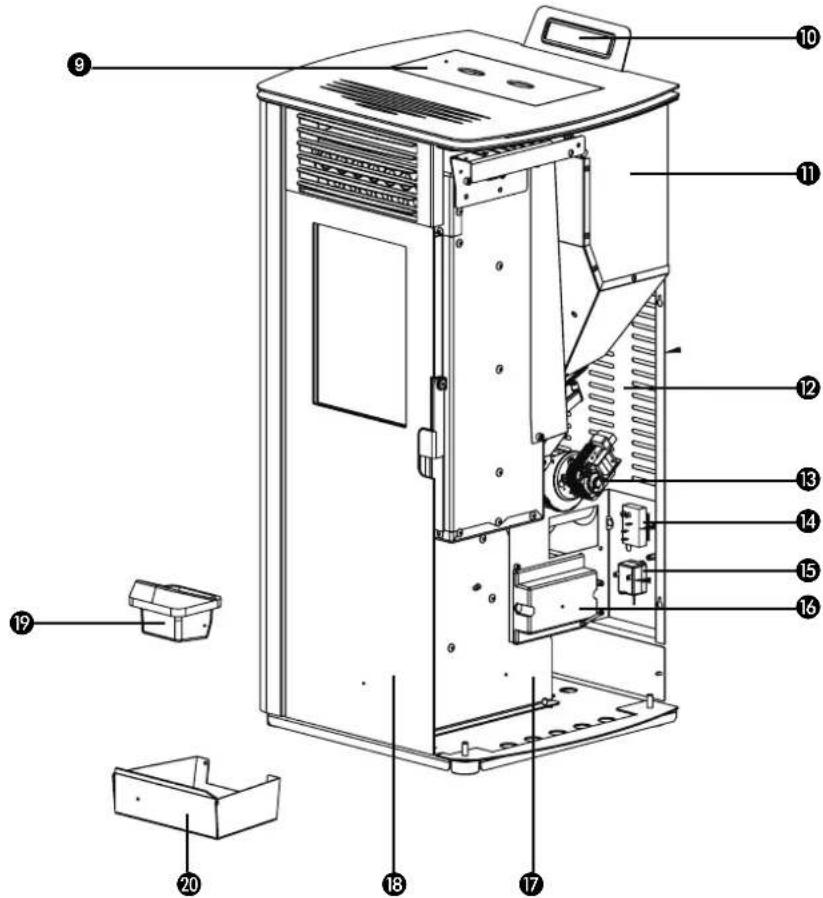
Figura 2
- LLENAR EL EMBUDO CON PELLETS
PROGRAMA 2 (ON2 Y OFF2)
natural_image
Symbol of a trash bin crossed with a diagonal line and a horizontal bar below (no text or labels)illustration 1

illustration 2
- LISEZ PRÉALABLEMENT LE MANUEL D'UTILISATION
- EN CAS DE DOUTE, CONTACTEZ VOTRE REVENDEUR.
Madame, Monsieur,
-
FICHE PRODUIT
-
CONDITIONS DE GARANTIE

natural_image
Symbol of a trash bin with crossed lines indicating no waste or discharge, and a solid black rectangle below (no text or labels)απεικόνιση 1

απεικόνιση 2
6.1 XEIPISMOI SYNTHPHSHA ANO TO XPHETH

① Viewing window
② Auger gear unit
3 Auger
④ Combustion air intake pipe
⑤ Flue gas temperature sensor
6 Smoke sensor
7 Pressure switch
8 Smoke extractor
9 Fuel hopper cover
10 Control panel
⑪ Fuel hopper/Pellet hopper
12 Maintenance access panel
13 Recirculation blower
14 On/Off switch
15 Safety thermostat manual reset
16 Circuit board
17 Smoke chamber
18 Stove door
19 Brazier with ash drawer
20 Ash drawer
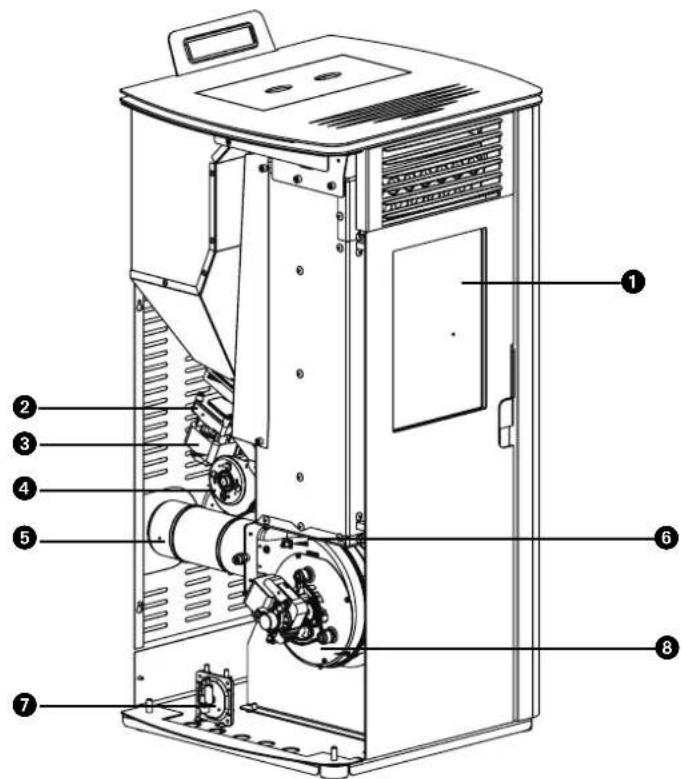
Figure 1

Figure 2
- PLEASE READ THE INSTRUCTIONS BEFORE USE.
- IF YOU ARE UNSURE OF ANYTHING, PLEASE CONTACT YOUR DEALER.
Dear Sir/Madam,
Congratulations on buying the Qlima stove. This is a high quality product which, if operated properly and responsibly, will give you many years of comfort and enjoyment.
To ensure maximum service life and safe operation of this Qlima heating appliance, read this manual carefully. Then store the manual in a safe place for future reference.
On behalf of the manufacturer, we can give you a 24-month warranty against defects in materials and workmanship.
Enjoy your Qlima!
Yours faithfully,
PVG Holding b.v.
Customer service department.
-
SAFETY INSTRUCTIONS
-
WHAT TO DO IN THE EVENT OF AN EMERGENCY OR FLUE FIRE
-
FIRST USE
3.1 Actions before and during initial start-up
- NORMAL USE OF THE STOVE
4.1 Display information
4.2 Standard start-up procedure
4.3 Non-standard start-up procedure
4.4 Setting the temperature
4.5 Changing the heat output of the stove
4.6 Save mode
4.7 Standard shut-down
4.8 Remote control
4.9 Replacing the remote control batteries
4.10
Wifi connection
- FILLING THE PELLET HOPPER WITH PELLETS
5.1 Fuel type
5.2 Filling the pellet hopper
- MAINTENANCE
6.1 Maintenance to be performed by the end user
6.2 Cleaning the exterior of the stove
6.3 Cleaning the window
6.4 Cleaning the brazier and ash drawer
6.5 Cleaning the heat exchanger
6.6 Cleaning the hearth
6.7 Check the seal on the fire door
6.8 Cleaning the pellet hopper and auger
6.9 Cleaning the pellet supply pipe
6.10 Maintenance to be performed by an authorised technician
-
TECHNICAL SERVICE AND ORIGINAL PARTS
-
TROUBLESHOOTING
8.1 Resetting an error
8.2 Error list
-
PRODUCT SHEET
-
WARRANTY PROVISIONS

All figures referred to can be found in the back of this manual.
1. SAFETY INSTRUCTIONS:

CAUTION! All illustrations in this manual and on the packaging are intended solely to be explanatory and indicative and may vary slightly from the appliance you have bought. Only the actual shape is important.

Not following the requirements set out in this manual can result in dangerous situations and render the warranty invalid.
Only install this appliance if it complies with local/national legislation, directives and standards. This stove is intended to heat spaces in dwellings and is only suitable for indoor use in living rooms, kitchens and garages in dry places under normal domestic conditions. Do not install the stove in bedrooms or bathrooms.
The correct installation of this stove is extremely important to its correct operation and for your personal safety. As such, the following instructions apply:
- This stove must be installed by a professional (preferably a Qlima authorised) heating or installation engineer, otherwise the warranty will be invalidated. If the instructions set out in this manual deviate from local and/or national legislation, the more stringent condition must be applied. The manufacturer and distributor cannot be held liable in any way whatsoever if the installation does not comply with local laws and regulations and/or in the event of incorrect aeration and/or ventilation and/or im-
proper use.
- The stove may only be installed in a room whose location, construction and use do not impede its safe operation.
If there are any problems with your stove or if you are having difficulty reading or (fully) understanding this manual, always contact your dealer or installation engineer at once.
- The combustion of pellets requires oxygen, therefore air.

Ensure the combustion air pipe is able to draw in fresh air from outside at all times.
- Never cover air intakes or outlets and regularly check to see whether the air intake is free from contamination.
Transport the stove using the right equipment. If the right equipment is not used then personal injury or damage to the stove may result.
- Do not place any combustible objects or materials within 200 mm of the sides or rear of the stove, nor within 800 mm of its front.
- The stove has been designed for free-standing installation and is therefore not suitable for recessed fitting. Keep a 200 mm space between the walls and the sides and rear of the stove.
- The stove can become very hot during use. NEVER leave children unattended near the stove. Supervise children to prevent them playing with the stove.
• This appliance is not intended for use by per-
sons (including children) with reduced physical, sensory or mental capabilities, or lack of experience and knowledge, unless they have been given supervision or instruction concerning use of the appliance by a person responsible for their safety.
Children of less than 3 years should be kept away unless continuously supervised.
- Children aged from 3 years and less than 8 years shall only switch on/off the appliance provided that it has been placed or installed in its intended normal operating position and they have been given supervision or instruction concerning use of the appliance in a safe way and understand the hazards involved.
- Children aged from 3 years and less than 8 years shall not plug in, regulate and clean the appliance or perform user maintenance."
- The stove can become very hot during use. When operating the stove, always use appropriate personal protection such as heat-resistant gloves.
- When installing or maintaining the stove, always use appropriate personal protection gear such as safety glasses, gloves etc.
- Take care when filling or topping up the hopper with pellets if the stove is still hot. Make sure the bag of pellets cannot catch fire.
Take care with inflammable clothing; it can catch fire if you get too close to the fire in the stove. - Do not work with inflammable solutions in the same room as the stove is being used. Avoid risks; remove inflammable solutions and other combustible materials from the room.
- The stove is heavy; have the strength of the floor tested by an authorised expert.
- Only use dry, good quality wooden pellets without any glue, resin or additive residue. Diameter 6 mm maximum length 30 mm.
- Do not use any fuel other than the specified wooden pellets. Other fuels such as wood waste with glue and/or solvents, waste wood in general, cardboard, liquid fuel, alcohol, petroleum, petrol, waste material, refuse etc. are prohibited.
- Poor, wet, impregnated or painted fuel causes a build-up of condensation and/or soot in the flue or in the stove. This will reduce the stove's performance and may create dangerous situations.
- Have the flue cleaned and swept regularly according to local laws and regulations and/or the rules of your insurance policy. In the absence of local laws and regulations and/or insurance rules: have your entire stove system - including flue - checked and serviced at least twice a year (the first of which at the beginning of the stoking season) by an authorised specialist. If the stove is used intensively, the whole system, including flue, must be cleaned more frequently.
- Do not use the stove as a barbecue.

Only connect one stove to each flue. Connecting more than one stove to the same flue can cause dangerous situations.
This stove also requires an electrical power supply. Be sure to read the following cautions and notes carefully:
- Do not use if the power cord is damaged.
- A damaged power cord may only be replaced by the supplier, an authorised person or service point.
- Do not pinch or bend the power cord.
- Make sure the power cord cannot come into contact with the hot parts of the stove.
- NEVER connect the appliance with an extension cable. If a suitable, earthed power socket is not available, you will need to have one fitted by a qualified electrician.
- Check the mains voltage. This appliance is only suitable for earthed sockets - connection voltage 230 Volt/ \~50 Hz.

The appliance MUST always be earthed. If the power supply is not earthed, you must NOT connect the appliance.
- The plug must remain easily accessible at all times when the appliance is plugged in.
- Do not place the appliance directly under a power socket.
Before connecting the appliance, check whether:
- The connection voltage corresponds with the value on the rating plate.
- The power socket and the power supply are suitable for the appliance.
• The plug on the cord fits in the power socket.

Have an authorised expert check the electrical system if you are uncertain as to whether everything is working correctly.
- Never cover air intakes or outlets.
- Do not insert any objects into the openings of the appliance.
- Do not allow the appliance to come into contact with water. Never spray water over the appliance and do not immerse it in water as this may cause a short circuit.
- Always remove the plug from the socket before cleaning the appliance or replacing one of its parts.
• Always remove the plug from the socket before carrying out maintenance on the stove.
• Always remove the plug from the socket when the appliance is not in use. - Do not make any modifications to the appliance as doing so may cause life-threatening situations. In addition, the warranty will be invalidated.
- Store the installation instructions and user manual in a safe place.
- In an emergency, always follow the fire brigade's instructions.
2. WHAT TO DO IN THE EVENT OF AN EMERGENCY OR FLUE FIRE (FIRE OUTSIDE THE COMBUSTION CHAMBER)
- Turn the stove off immediately by removing the plug from the socket.
- Put the fire in the stove out using a CO _2 extinguisher, sand, soda or salt to minimise smoke emissions. Never use water to extinguish the fire.
- In the event of a flue fire: Close the choke valve (refer to local/national rules, regulations, directives and norms as to whether a choke valves is permitted) or close off the flue with a wet cloth.

CAUTION: the flue can get very hot. When sealing, always wear heat-resistant gloves.
- Alert the fire brigade immediately.
- Ventilate the room by opening all windows and doors due to the possible build-up of carbon monoxide.
3. FIRST USE
A qualified Qlima service technician must fire up the stove for the first time. The first time the stove is fired up, it must be adjusted to ensure the correct air/fuel ratio at each of the five combustion levels. The correct ratio strongly depends on the type of flue duct fitted and can only be set after the stove has been installed. An incorrect air/fuel ratio can seriously damage the stove. The fuel consumption will also increase.

Never change the service parameters in the service menu. This may seriously damage the stove and invalidate the warranty. The stove may only be set up by a Qlima-approved service technician.
3.1 ACTIONS BEFORE AND DURING INITIAL START-UP

In the case of new build or refurbishment: allow the building to dry out thoroughly before using the stove for the first time. It is well understood that walls, ceilings and/or floors take a long time to dry completely. Soot, ash particles etc. can easily stick to walls that have not fully dried.
- Check whether the stove has been installed according to the installation manual.
- Remove all items such as the manual, stove tools etc. from in and around the stove before putting it into operation.
- Fill the pellet hopper with pellets. See section 5 of this manual, "Filling the pellet hopper with pellets", for details about which pellets to use and how to fill the hopper.
- Put the plug into an earthed mains socket and turn the power switch on. This is located at the rear of the stove.

Check section 9 "Electrical connection" in the installation manual before connecting the appliance to the mains.
- Read section 4 "Normal use of the stove" for more information about how to use the remote control (if supplied) and the start-up procedure.
- Make sure the room is adequately ventilated. The stove is made from high quality steel with a protective coating. During the first few stoking sessions, the coating will continue to harden and the steel will settle. This process takes time. During the initial use, it is normal for there to be an unpleasant smell and smoke coming from the stove's coat of paint.
- Never operate the appliance while the stove door is open. Always keep the door closed while the stove is in use and make sure the latch is properly fastened.
- Light the stove and select combustion level 1.

To prevent permanent damage to the stove, it should be 'run in' gradually and on a low flame. Keep the flame low for the first four or five hours, after which the heating output can gradually be increased. Allow the stove to run constantly for at least three to four hours.
-
Check that no combustion fumes are escaping into the room. If this is the case, switch the stove off immediately and repair the leak.
-
Check that the room blower is running by feeling whether any air is coming out of the air grille on the front of the stove. This blower only starts when the stove is hot enough (after approx. 15-20 minutes after the stove has been lit). If the room blower does not start running, turn off the stove to prevent it being damaged. Fix the problem before lighting the stove again.

This stove is fitted with a blower that circulates air in the room. When the blower is running, air is sent along the hot surfaces inside the stove, heated up and blown back into the room as warm air. Never allow the stove to burn if the room blower is not running.
-
Make sure the stove has the correct air/fuel ratio at each of the five combustion levels by checking the flame pattern at each one. See figure 1. Adjust the air/fuel ratio if necessary. Only a Qlima service technician may set the air/fuel ration.
-
Check the flue draught with a pressure gauge. Set the flue choke valve if installed.

After adjusting the flue choke valve, the position of the valve may only be changed in the event of an emergency such as a chimney fire.
- Check that flue gas temperature remains below 220^ C at each of the five combustion levels. If the flue gas temperature at any of the five combustion levels is higher than 220^ C, the stove must be reset at the level in question by reducing the pellet feed in conjunction with the speed of the flue gas blower and/or increasing the speed of the room blower.

Having the stove commissioned by an approved Qlima technician carries the following benefits:
- There will be less soot build-up so the flue and the stove will stay cleaner for longer.
• The stove will consume less fuel. - The stove will work at optimum efficiency.
- The stove's components will be put under less stress, which will extend its life.
-
The stove will require fewer services and less maintenance.
-
Once set, the stove is ready for use.
4. NORMAL USE OF THE STOVE

The ash drawer and brazier must be cleaned before every start-up. See section 6.4. In addition, the stove door must be closed.

The stove may not be used in conjunction with an air extractor system, hot air heating or other appliances that have an effect on the air pressure in the room. Such appliances must be switched off when the pellet-burning stove is in use.
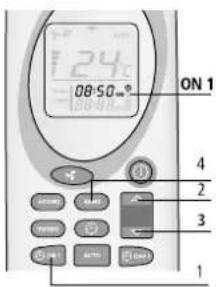
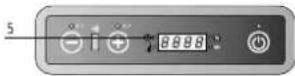
4.1 DISPLAY INFORMATION
2.
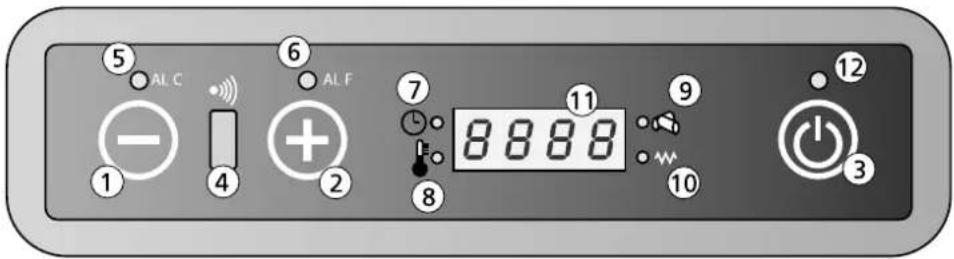
Button 1: Lowers the room temperature desired by the user. Button 1 can also be used to show and alter the level of heat output.
Button 2: Raises the room temperature desired by the user. Button 2 can also be used to show and alter the level of heat output.
Button 3: Is used to turn the stove on and off.
Receiver 4: Remote control receiver.
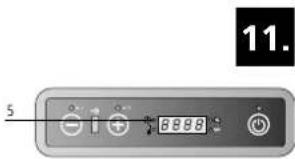
LED 5: Indicates an Alarm C (C stands for temperature) error. For more information, see section 8.2 "error list".
LED 6: Indicates an Alarm F (F stands for flue gases) error. For more information, see section 8.2 "error list".
LED 7: The stove features a clock for setting the start-up and switch-off times. When this LED is lit, the clock mode is active.
LED 8: Indicates that the set temperature has been reached. The text ECO and the set temperature will also be shown on the display.
LED 9: Indicates that the pellet feed auger is active.
LED 10: Indicates that the hot rod igniter is active.
Display 11: Indicates the room temperature and the heat output In the event of a fault, the error code is displayed.
LED 12: ON/OFF indicator.
| Off | The stove is off or switching off. |
| Fan | The stove is in preheating mode. |
| Load | The pellet supply is operating. LED 9 is also on (see figure 2) |
| Fire On | The stove is in the ignition phase. |
| On 1 | The stove is on and burning at the lowest heat output level 1. |
| Eco | The stove has reached the set temperature. |
| StoP | The stove is in automatic brazier-cleaning mode. The flue blower is running at maximum speed and the pellet supply motor is running at its lowest speed. |
| Atte | This alert appears when an attempt is being made to start the stove while it is cooling down. |
4.2 STANDARD START-UP PROCEDURE

The brazier must be cleaned before each start-up. If the timer mode is being used, the brazier must be cleaned before the automatic start-up.
The normal start-up and operating procedure is as follows:
- Make sure the combustion chamber is empty and clean.
- Make sure the stove door is closed.
- Fill the fuel hopper with good quality pellets.
- Push button 3 and hold for 2 seconds. The flue gas blower will start and the hot rod igniter will come on. FAN ACC will appear on the display and LED 10 will light up to indicate that the igniter is in operation.
- After approx. 1 minute the display will show Load Wood. During this phase the auger will transport the pellets from the fuel hopper to the combustion chamber. The heat from the hot rod igniter will ignite the pellets.
- When the stove's required surface temperature has been reached, FIRE ON will appear on the display. LED 10 will go out.
- The recirculation fan will start running and suck air in from the space behind the stove. This will then be blown through the heat exchanger and heated up. The heated air is blown into the space in front of the stove.
- During standard operation, the display shows the heat output level (1, 2, 3, 4 or 5) and the temperature of the room.
- When the required room temperature has been reached, ECO and the room temperature will appear in the display. The stove will continue to burn at its lowest heating level. If the SAVE mode is in operation, the stove will go out automatically when the set temperature has been reached. See section 4.6 for further explanation of the operation and setting of Save mode.
4.3 NON-STANDARD START-UP PROCEDURE
When the stove starts at a room temperature that is lower than around 0^ C or when the combustion air is lower than 0^ C, the start-up procedure may be different.
When the combustion procedure at these lower temperatures does not result in a properly burning fire, the display will show "ALAr No FirE".
To light the fire, place "firelighters" on the bottom of the brazier. Light the fire-lighter with a match and wait 1 minute before lighting the stove using the "standard start-up procedure" as described in section 4.2.
If this does not result in a properly burning fire, the stoves setup parameters will need to be changed by a professional. Contact a Qlima-approved fitter.
4.4 SETTING THE TEMPERATURE
3.
- Push button 1 to go to the temperature setting menu. The display will show "set" and the desired temperature.
- Press button 1 to reduce the desired temperature. The display will show set temperature.
- Press button 2 to raise the desired temperature. The display will show set temperature.
- The desired temperature has now been set. After 3 seconds, the display will automatically return to normal operating mode.
- The procedure for changing the temperature is now complete.
- The desired temperature can also be set using the remote control. See section 4.8 for instructions on using the remote control.

The desired temperature can be set anywhere between 7^ C and 40^ C.
4.5 CHANGING THE HEAT OUTPUT OF THE STOVE
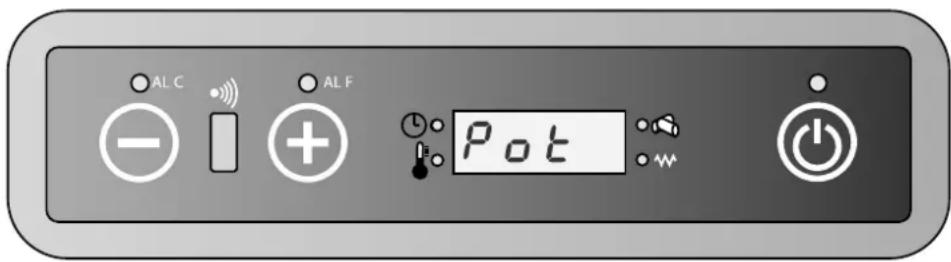
- Push button 2 once. The display will show "pot" and one of the 5 heat output levels.
- Push button 1 to reduce the heat output setting. The display will show the new output setting.
- Push button 2 to raise the heat output setting. The display will show the new output setting.
- Once the display has shown the new output setting, 3 seconds later the display will automatically return to normal operating mode.
- The procedure for changing the heat output setting is now complete.
- The desired heat output can also be set using the remote control. See section 4.8 for instructions on using the remote control.
4.6 SAVE MODE
When this mode is active, the stove will automatically switch off as soon as the room temperature - plus the set differential temperature - has been reached. The stove will automatically switch itself off as soon as the room temperature - plus the set differential temperature - has been reached.

The Save mode can only be used when the stove is not in timer mode.
SWITCHING ON SAVE MODE
- Switch the stove off.
- Push button 1 and then repeatedly push button 3 until UT04 appears in the display.
- Push button 2. The value 1 will appear in the display. Now hold down button 2 until the value A9 appears in the display.
- By pushing on button 3 again, the display will show Pr01. Push button 3 repeatedly until Pr28 appears in the display, alternating with the text "OFF" or a numeric value between 1 and 15.
- If "OFF" is shown on the display, then SAVE MODE is off. This can be switched on with buttons 1 or 2. By pushing buttons 1 or 2 the differential temperature, which can be set from 1^ to 15^ , will appear in the display.
- Select the desired differential value and then push button P3 to save the setting.
- The stove is now in Save mode and can be started up again.
DIFFERENTIAL TEMPERATURE
The differential temperature is the difference in degrees Celsius in relation to the set temperature. Example: The set temperature is 20^ C and the set differential temperature is 2^ C. The stove will now go out at a room temperature of 22^ C and start up again at a temperature of 18^ C.
SWITCHING OFF SAVE MODE
- Switch the stove off and repeat the above actions until "OFF" appears in the display.
- Then push button 3.
- Save mode is now switched off.
To prevent excessive start-ups and shut-downs and extra wear on various parts, it is recommended not to set the differential temperature at less than 2^ C or higher than 4^ C.
4.7 STANDARD SHUT-DOWN
The stove can be switched off by pressing button 3 until "OFF" appears in the display. During the shutdown phase, the supply of wood pellets to the combustion chamber is stopped and the room air circulation blower is switched off. The smoke extraction blower will continue to run for a short time, switching off after the cooling-down phase.
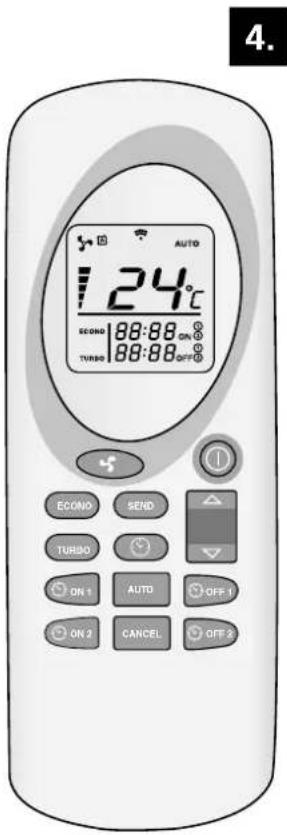
4.8 REMOTE CONTROL
How to use the remote control:
- Point the remote control at the stove's control panel.
- Check that there are no obstacles between the remote control and the signal sensor on the stove.
- Each mode that can be selected using the remote control must be confirmed with the button. An acoustic signal will sound after each selection to confirm the selected option.

ON/OFF: Use this mode to switch the stove and the remote control on or off. Hold the button down for at least 2 seconds to switch the system on or off. Press 📁 to confirm.

UP / DOWN: Use these buttons to set the desired temperature. The temperature can be set between 7°C and 40°C.

FAN: Select the desired speed
A = Automatic mode
Speed 1 (on1)
Speed 2 (on2)
Speed 3 (on3)
Speed 4 (on4)
Speed 5 (on5)
SEND: Use this button to confirm the selected mode and send it to the stove.
ECONO: Use this button to activate/deactivate the ECONO mode. Hold the button down for at least 2 seconds to activate/deactivate this mode.
TURBO: Use this button to activate/deactivate the TURBO mode. Hold the button down for at least 2 seconds to activate/deactivate this mode.
CLOCK: To set the clock mode on the remote control, proceed as follows:
- Press
- The symbol appears and the time flashes.
- Use the buttons to set the hours and minutes.
- Press the again to confirm and press

ON1: Use this button to set a schedule for switching the stove on automatically (programme 1).
OFF1: Use this button to set a schedule for switching the stove off automatically (programme 1).
ON2: Use this button to set a schedule for switching the stove on automatically (programme 2).
OFF2: Use this button to set a schedule for switching the stove off automatically (programme 2).
AUTO: Use this button to repeat the set timer programmes (1 and 2) daily. Hold the button down for at least 2 seconds to activate/deactivate this mode. The display shows AUTO.
CANCEL: Use this button to cancel the programmed switch-on or switch-off times.
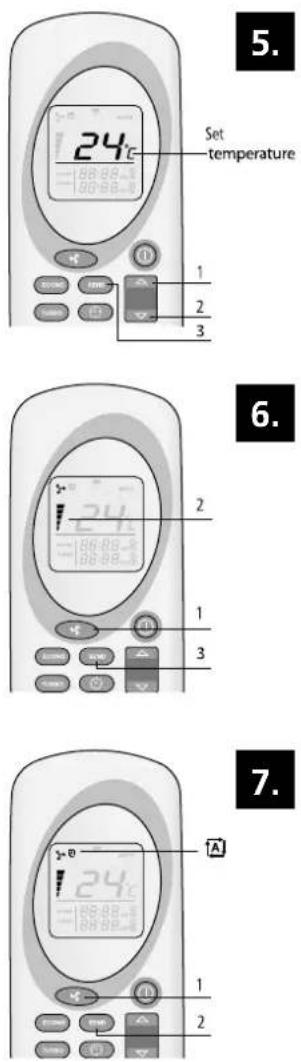
SETTING THE TEMPERATURE
Use the △ and ▽ buttons (1&2) to set the desired temperature (from 7°C to 40°C). When the desired temperature has been selected, press ⚪ (3). See figure 5.
SETTING THE HEAT OUTPUT
Use the button (1) to select the desired heat output setting. Then push (3). The text on 1-on2-on3-on4 or on5 will appear on the stove. The power (2) will also be shown on the remote control. You can also select Auto mode. See figure 6.
AUTO MODE
In this mode, the stove uses the difference between the desired temperature and the room temperature itself to calculate the required output. To select auto mode, press (1) until the symbol appears. Press (2) to confirm your choice. To end auto mode, press (1) again, select the desired output and confirm with (2). See figure 7.
8.
9.
10.
12.

TURBO MODE
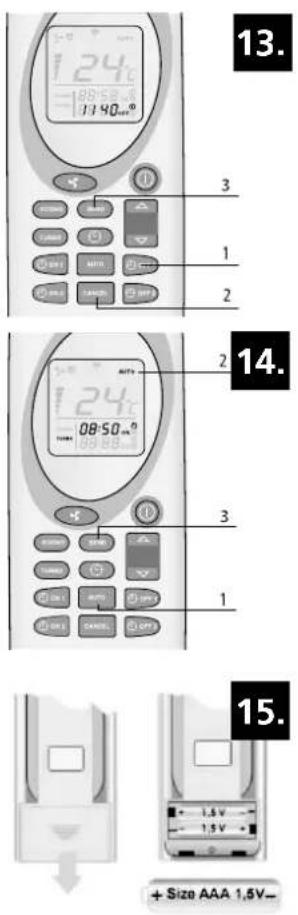
In Turbo mode, the stove operates at maximum power for 30 minutes. In Turbo mode the temperature is pre-set to 30^ C. After 30 minutes, the stove returns to the mode before the Turbo mode was activated. To select Turbo mode, hold down the button (1) for more than 2 seconds, and then push (3). To deactivate this mode, hold down the button (1) for at least 2 seconds. The word Turbo (2) will disappear from the remote control display and be replaced by the output level and the set temperature. Press (3) to confirm your choice. See figure 8.
ECONO MODE
In Econo mode, the temperature remains constant. Every 10 minutes the stove adjusts the power until heat output level 1 is reached. To select Econo mode, hold down the 📊 button (1) for more than 2 seconds, until Econo appears in the display (2) and then push 📊 (3). To deactivate this mode, hold down the 📊 button (1) for at least 2 seconds. The word Econo will disappear from the remote control display (2). Press 📊 (3) to confirm your choice. See figure 9.
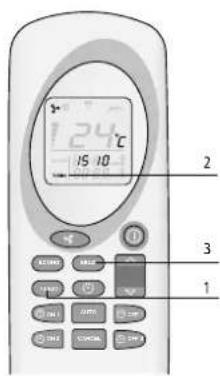
PROGRAMME 1 (ON1 AND OFF1)

-
The desired switch-on and switch-off timer must be set when the remote control is switched off.
-
The stove retains the temperature and heat output settings it had before being switched off.
-
The minimum period of time between switching off and switching on is 20 minutes. This is the time needed for the stove to complete the cooling-down phase.
-
After a brief power interruption, the timer mode will have to be set again.
ACTIVATE AUTOMATIC MODE (ON1)
Press button (1) to switch on the stove according to programme 1. The time and ON1 symbol will flash on the remote control. Use the buttons △ and ▽ (2&3) to select the desired time (10-minute intervals). To confirm, choose (1). The desired activation time is shown in the remote control. Press (4) to confirm. The display (5) on the stove will show Chrono. See figures 10 and 11.
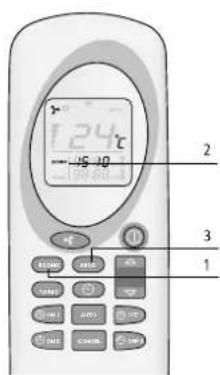
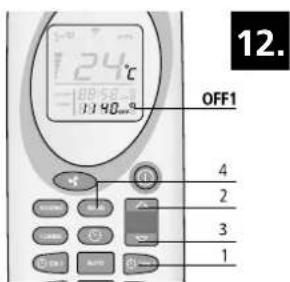
DEACTIVATE AUTOMATIC MODE (OFF1)
Press button (1) to switch off the stove according to programme 1. The time and OFF1 symbol will flash on the remote control. Use the buttons △ and ▼ (2&3) to select the desired time (10-minute intervals). To confirm, choose ▶ (1). The desired deactivation time is shown in the remote control. Press ▶ (4) to confirm. The display on the stove will show Chrono. This text will disappear when the set switch-on time and switch-off time have elapsed. See figure 12.
PROGRAMME 2 (ON2 AND OFF2)
As above but use buttons 📄 (1) and 📄 (2).
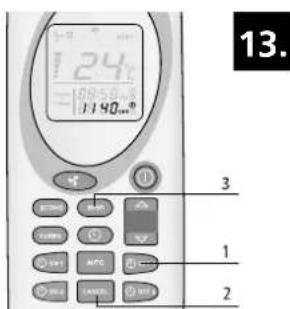
CANCELLING SET TIMER PROGRAMMES
Press the corresponding ON or OFF button of the programme you wish to cancel. The hours and minutes and the corresponding symbol appears in the remote control display. Press the CANCEL (2) button to cancel the stove's automatic switch-on and switch-off schedule. Press SEND (3) to confirm. See figure 13.
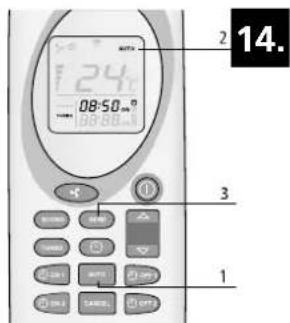
DAILY REPETITION
The AUTO mode allows the set switch-on and switch-off timer to be repeated every day. To activate this mode, hold down the button (1) for at least 2 seconds. (2) will appear on the remote control display. Press (3) to confirm. The display on the stove will show Chrono. To deactivate this mode, hold down the button (1) for at least 2 seconds then press (3). See figure 14.

Always clean the brazier before the stove starts up automatically. This will prevent damage to the stove and the area around it.
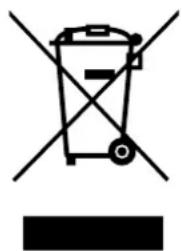
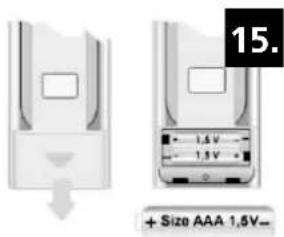
4.9 REPLACING BATTERIES IN THE REMOTE CONTROL
If the remote control batteries need replacing, remove the battery holder cover on the rear of the unit as shown in figure 15. Replace the old batteries with new ones, making sure they are inserted the right way. Only use AAA 1.5V batteries. Do not throw batteries into the fire as they could explode or release hazardous substances. If you are replacing or destroying the remote control, remove the batteries and dispose of them in accordance with current legislation as they can harm the environment.
4.10 WIFI CONNECTION
The stove can be connected to an optional WiFi module. With this WiFi module, the stove can be started or switched off. The timer of the stove can also be operated very easily and conveniently. In addition, the temperature can be read remotely. For the connection of the special WiFi module for this stove, a connection plug is provided at the back side of the unit. For more information, please contact your local reseller.
5. FILLING THE PELLET HOPPER WITH PELLETS
5.1 FUEL TYPE

Do not use any fuel other than the specified wooden pellets. Other fuels such as wood waste with glue and/or solvents, waste wood in general, cardboard, liquid fuel, alcohol, petroleum, petrol, waste material, refuse etc. are prohibited.
There are various pellets on the market which vary in quality and have different properties. Poor quality pellets will have a negative effect on the efficiency of the combustion, contaminate the stove and in extreme cases create dangerous situations.

Using the wrong type of pellets (poor quality or a different diameter than specified) can cause damage to your stove. Damage caused by using the wrong type of pellets is not covered by the warranty.
Only use good quality wooden pellets with a 6 mm diameter and a maximum length of 30 mm. There are different kinds of wooden pellets with different properties and varying quality available on the market. Good quality pellets can be recognised as follows:
- diameter 6 mm.
- maximum length 30 mm.
- wooden pellets comply with 6mm DIN+ / Ö-norm+ / EN+ or equivalent.
- properly compressed, no residual adhesive, resin or additives.
- smooth, shiny surface
- uniform length and low dust content
- residual water content: <10%
- ash content: <0.5%
- good quality pellets sink when placed in water
Poor quality fuel can generally be recognised as follows:
- different diameter than the required 6 mm and/or various diameters
- varying lengths, higher percentage of shorter pellets
- the surfaces exhibit vertical and/or horizontal cracks
- high dust content
- dull surface
- floats in water
Poor fuel may result in:
- poor combustion
- frequent blocking of the combustion chamber
- increased pellet consumption
- low heat output and low efficiency
- soot on glass
- more ash and unburnt granules
- higher maintenance costs

Even when good, standardised pellets are used, it is not unusual for there to be differences in the combustion speed, ash production and build-up of debris. If a different type of pellet is used to the ones used during commissioning, the stove must be set up again by a Qlima-approved service technician.

Store and transport the pellets in absolutely dry conditions. Wooden pellets can expand considerably when they come into contact with water.
Contact the Qlima sales person or approved Qlima fitter for more information about pellets.
5.2 FILLING THE PELLET HOPPER
Open the cover of the pellet hopper on top of the stove and carefully empty the pellets into it to until 3/4 full. Make sure that no pellets fall into the stove. Close the cover again.

Never touch any rotating parts in the pellet hopper. To avoid the risk of coming into contact with rotating parts in the pellet hopper, it is recommended that you always completely switch off the stove by removing the plug from the power socket.

If the hopper needs refilling during operation, make sure the pellets and/or pellet bag cannot come into contact with the hot parts of the stove as this could lead to dangerous situations. Make sure never to touch any rotating parts in the pellet hopper.
Clean the burner pot, the stove glass and the ash tray before each start. This is very important for proper and safe operation. Especially if you use the timer programming or WiFi control, this is something that must be kept in mind as it can easily be forgotten.
6. MAINTENANCE
The heat, ash and residue resulting from burning the fuel means regular cleaning and servicing by both the end user and an authorised technician are required. Thorough and regular cleaning of the stove is important for safety and the efficient operation of the appliance as well as increasing its lifespan. Do not use steel wool, hydrogen chloride or other corrosive, aggressive or abrasive products to clean either the interior or exterior of the stove. Especially after extended periods of non-use the stove and the flue system must be checked for blockages.
Clean the burner pot, the stove glass and the ash tray before each start. This is very important for proper and safe operation. Especially if you use the timer programming or WiFi control, this is something that must be kept in mind as it can easily be forgotten.
6.1 MAINTENANCE TO BE PERFORMED BY THE END USER

Only carry out maintenance on the stove after checking that it has completely cooled off both inside and out!

Unplug the stove at the mains socket before carrying out any maintenance.
| Task Frequency* | |
| Clean the exterior of the stove Every two weeks | |
| Clean the window Before every start-up. Also before start-up when in timer mode | |
| Clean the brazier Before every start-up. Also before start-up when in timer mode | |
| Clean the ash drawer When the drawer is full and before every start-up. Also before start-up when in timer mode | |
| Clean the heat exchanger Daily | |
| Clean the hearth Every 2 weeks | |
| Check the seal on the fire door Twice a year; first at the start of the season and/or when 2,500 kg of pellets have been burnt | |
| Clean the pellet hopper and auger Once a month and/or when 2,500 kg of pellets have been burnt | |
| Clean the pellet supply pipe Once a week | |
6.2 CLEANING THE EXTERIOR OF THE STOVE
Clean the surface of the stove with hot water and soap. Do not use any abrasive or solvent-based detergents as these could damage the stove's finish.
6.3 CLEANING THE WINDOW

The window in the stove door should be cleaned before every start-up to prevent soot and ash particles from burning into the glass.
The glass is heat resistant but can crack due to rapid temperature changes. Therefore allow the window to cool down completely before cleaning it. Use ordinary glass-cleaning spray and cleaning cloths.

Only clean the glass window when the stove has completely cooled off!
6.4 CLEANING THE BRAZIER AND ASH DRAWER

The brazier and ash drawer must be cleaned before each start-up.
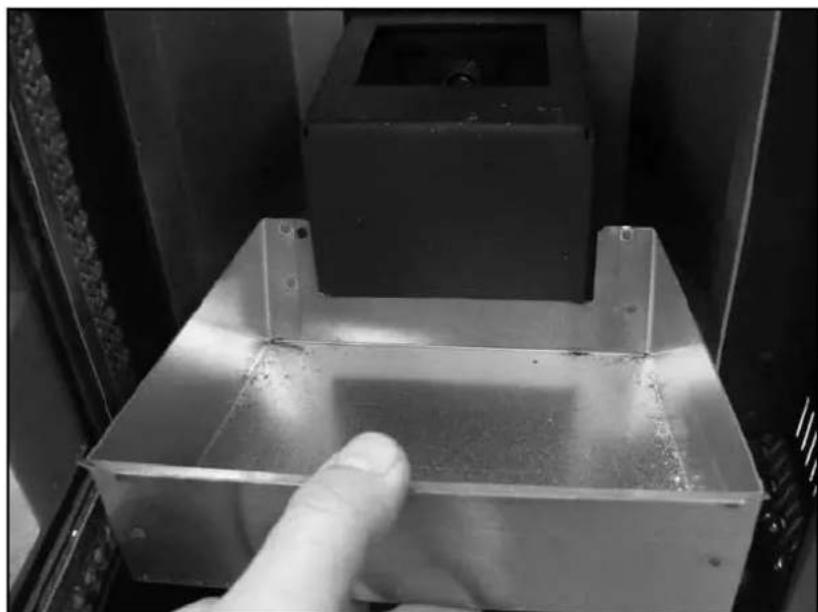
- Remove the brazier and the ash drawer from the combustion chamber. See figures 16 & 17.
- Clean the ash drawer.
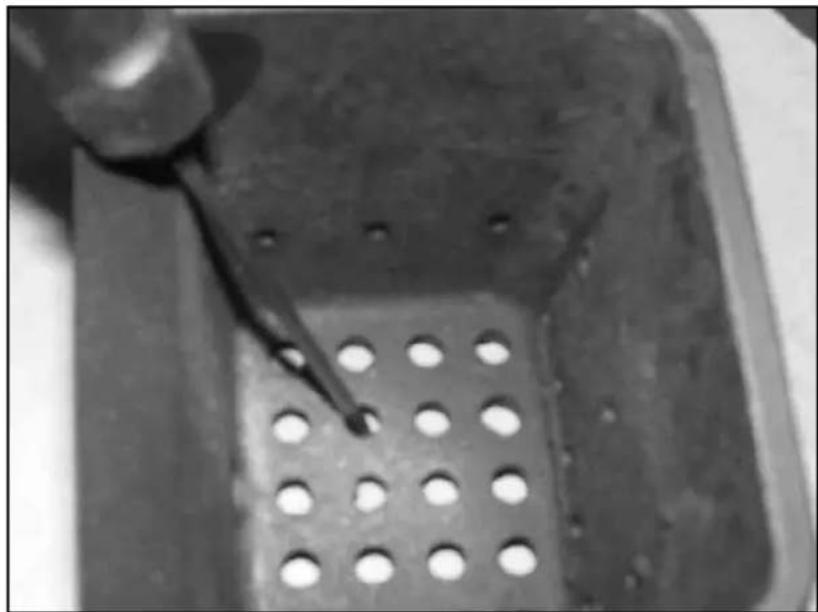
- Clean the brazier and its grate with a brush or vacuum cleaner. If the slots in the grate are blocked, use a pointed instrument to clear them (see figure 18).
- Clean the space beneath the brazier and the space under the ash drawer with a vacuum cleaner.

Open slots and a clean grille in the combustion chamber are of key importance to the proper burning of the pellets.
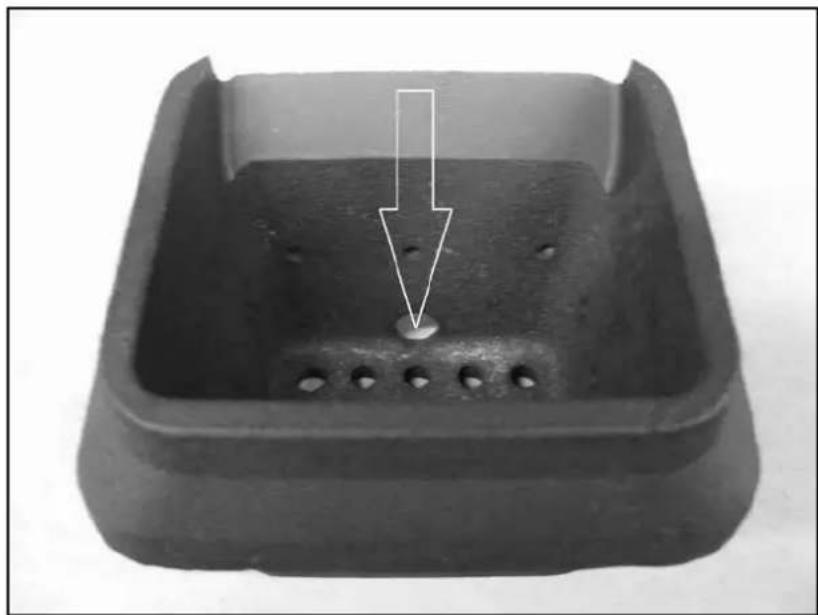
- Put the brazier and the ash drawer back into the stove. Make sure the brazier is refitted correctly. Make sure the large opening is near the ignition rod (as indicated in figures 19 & 20). If the brazier is refitted incorrectly, the stove will not be lit.
6.5 CLEANING THE HEAT EXCHANGER
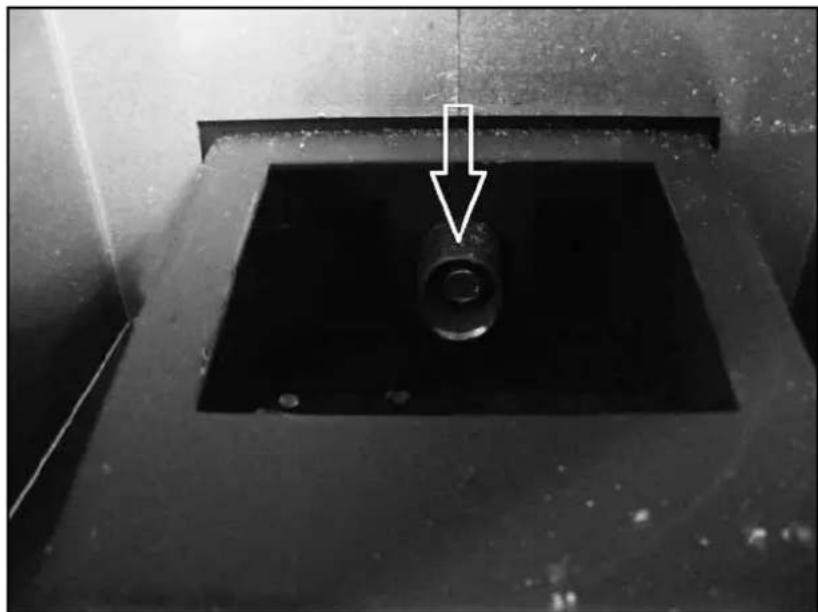
The heat exchanger needs to be cleaned daily with the help of a scraper. Make sure the unit is switched off and the stove door closed. Move the scraper handle, which is mounted on the outlet grille (see figure 21) forwards and then back. Repeat this action 5 or 6 times until you no longer feel any resistance from the scraper.
6.6 CLEANING THE HEARTH
First clean the heat exchanger (see section 6.5, Cleaning the heat exchanger).
- Remove the brazier and ash drawer. See section 6.4
- Remove the heat shield located at the top of the stove.
a. Push the front of the heat shield upwards (figure 22) to release the fixing points 2 (figure 23). Then pull the heat shield forwards to release fixing point 1 (figure 23).
b. Push the rear of the heat shield down (figure 24).
c. Push the left side up in the direction of arrow 1 (figure 25) and turn the right side downwards in the direction of arrow 2 (figure 25).
d. Then remove the heat shield from the combustion chamber.
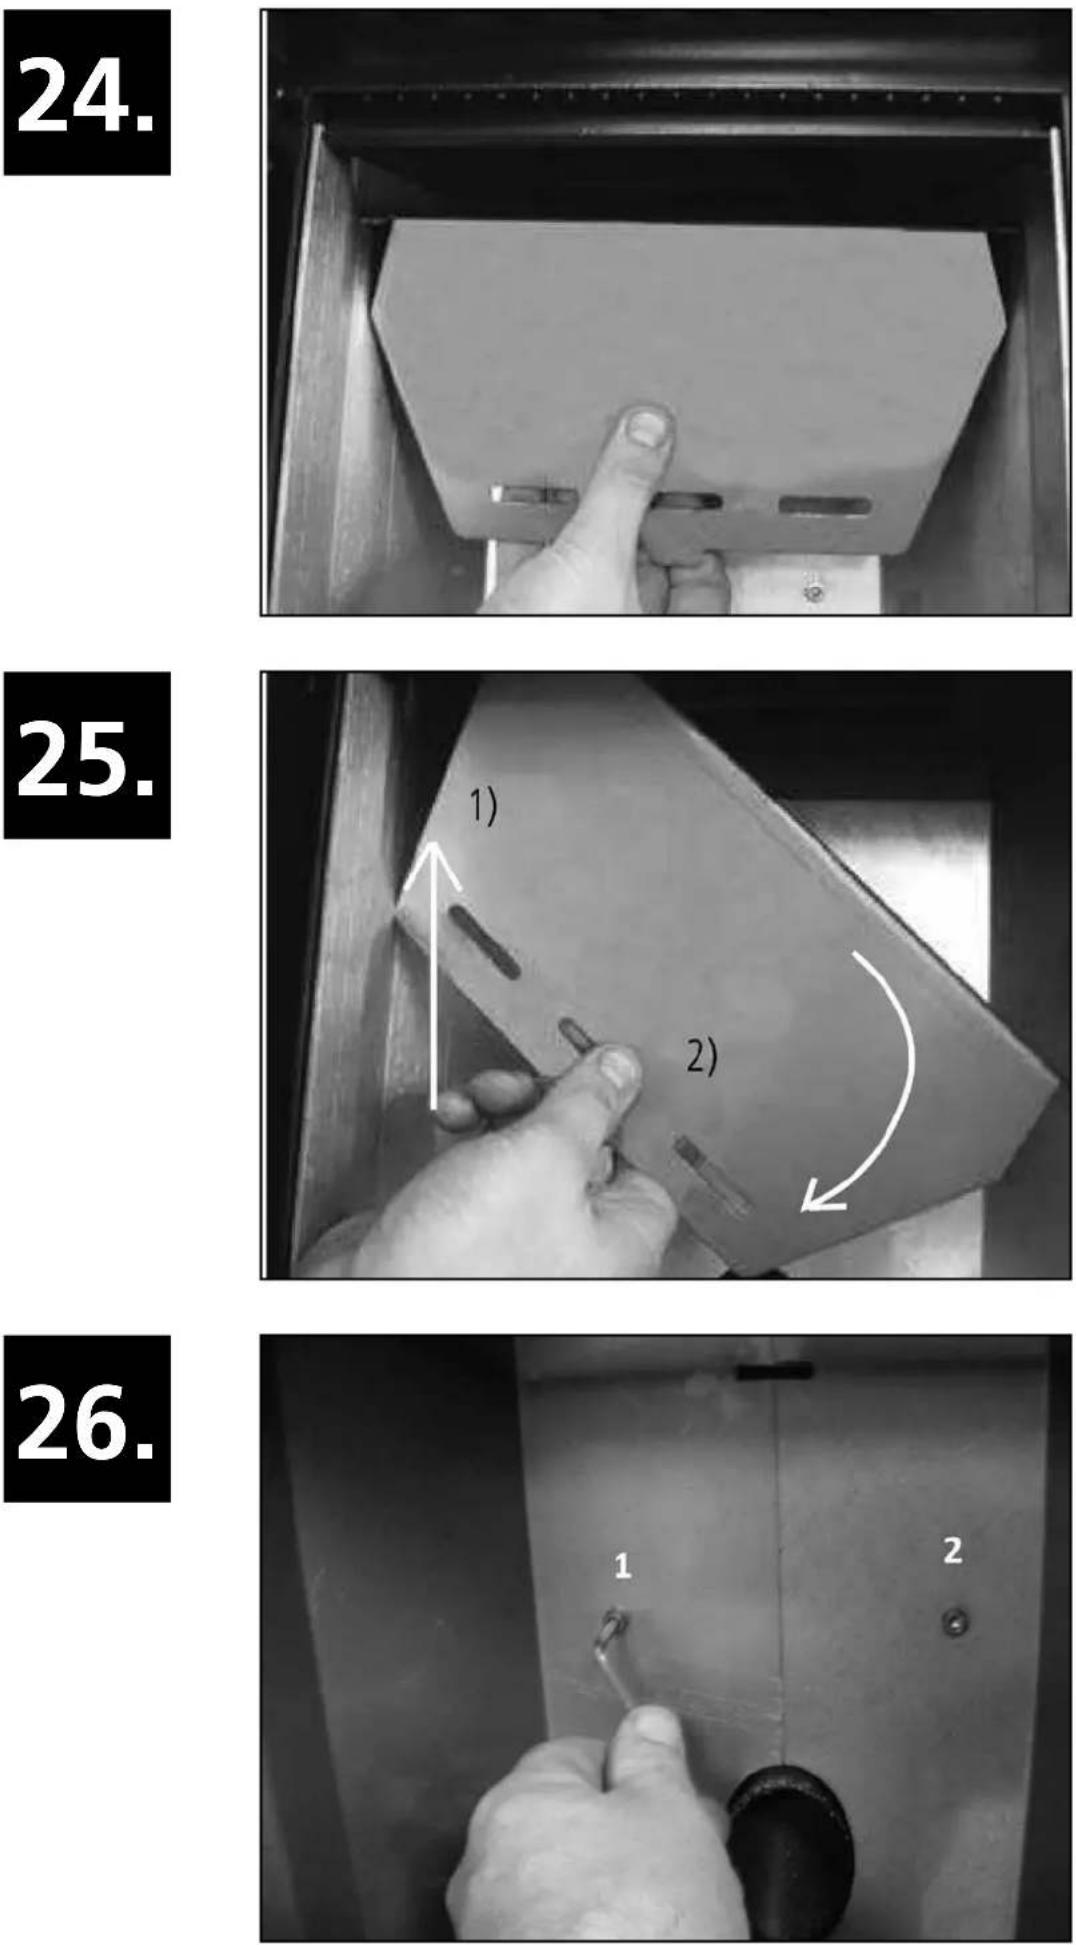
- Now remove the inner plates from the hearth.
a. Remove screws 1 and 2 (figure 26).
b. Use a screwdriver to pry the plating loose (figure 27).
c. Pull the plating forwards towards the door and remove it from the hearth.
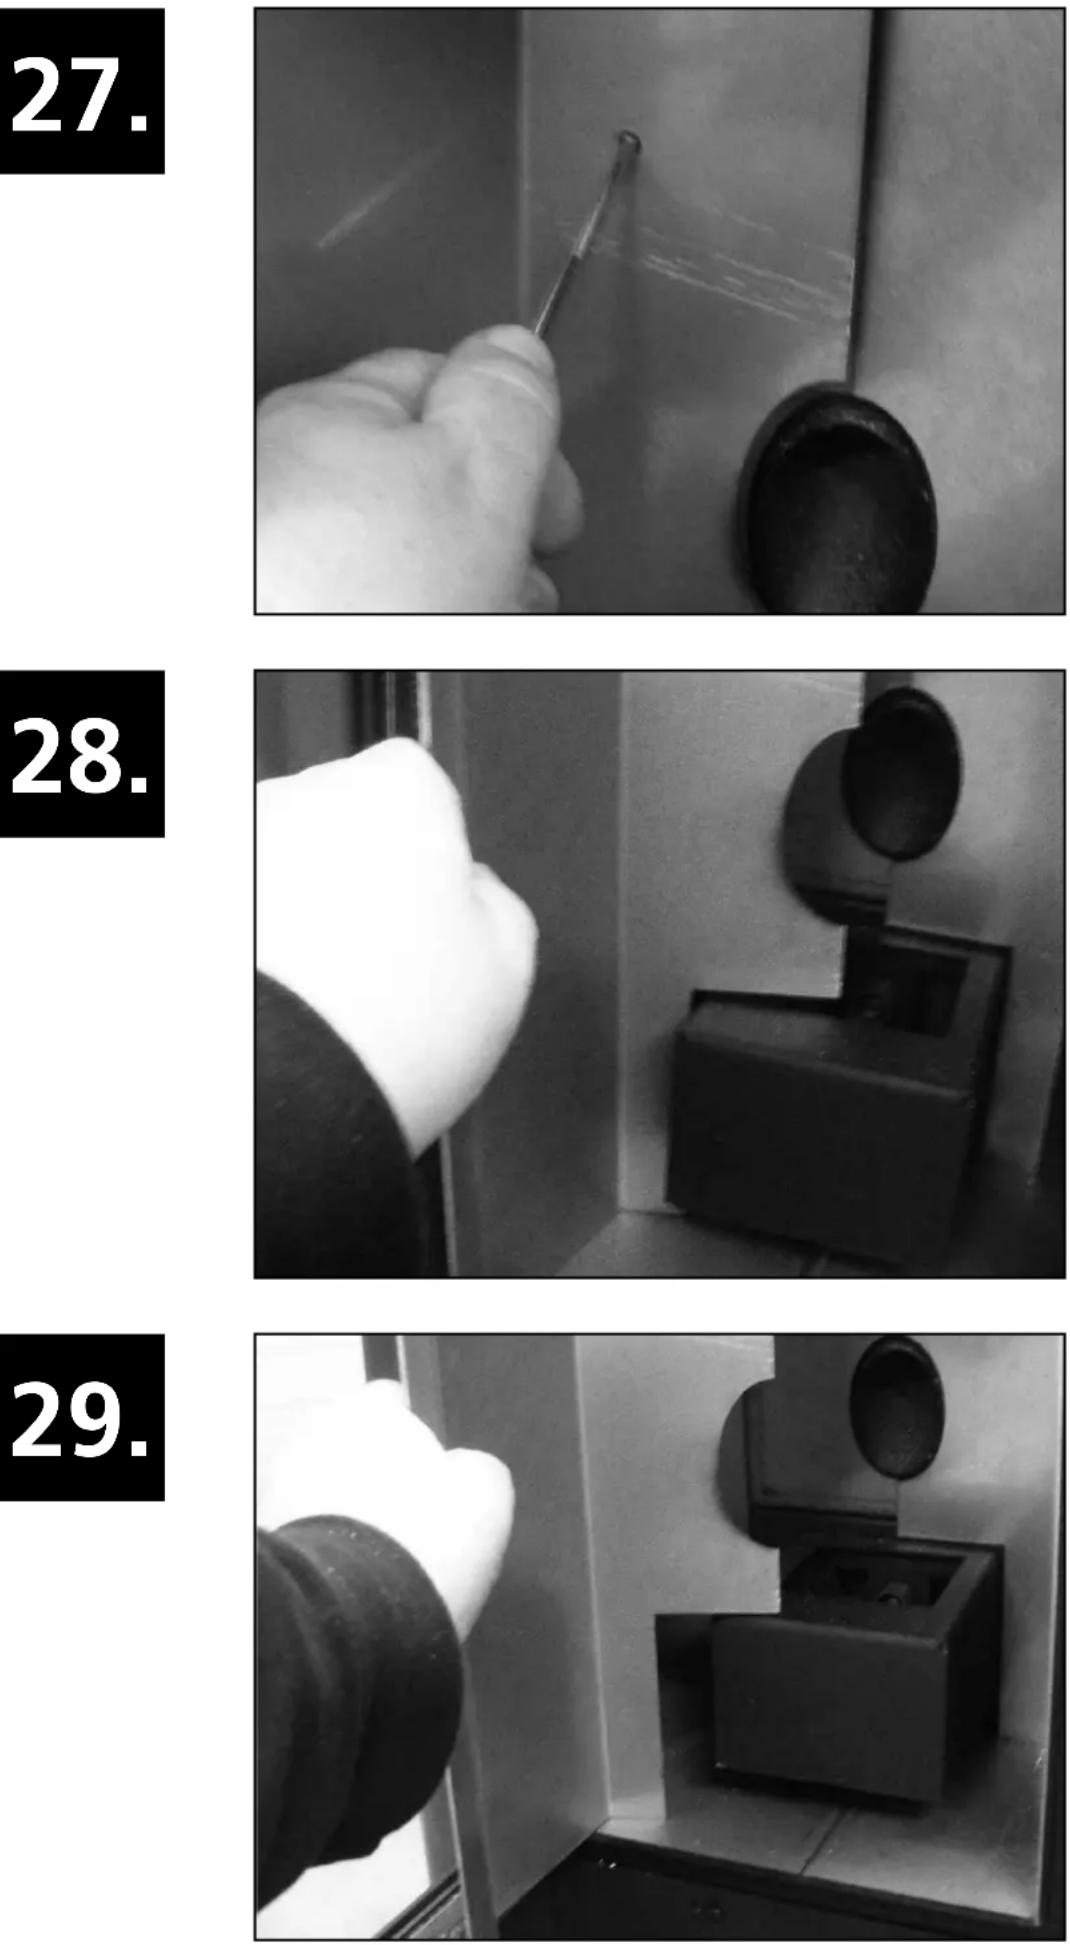
Repeat for the plating on the right side (figures 28 and 29).
d. Remove the panel at the rear of the hearth by pulling it forward. Use a screwdriver if necessary. Remove the panel from the stove (figure 30).
e. Remove the panels on the left and right sides. Slide the side panel about 2 cm forwards towards the door past the part marked with the arrow (figure 31).
f. Now pull the top of the panel to the middle of the hearth and remove it from the stove. Repeat this procedure to remove the panel on the right side of stove from the hearth (figure 32).
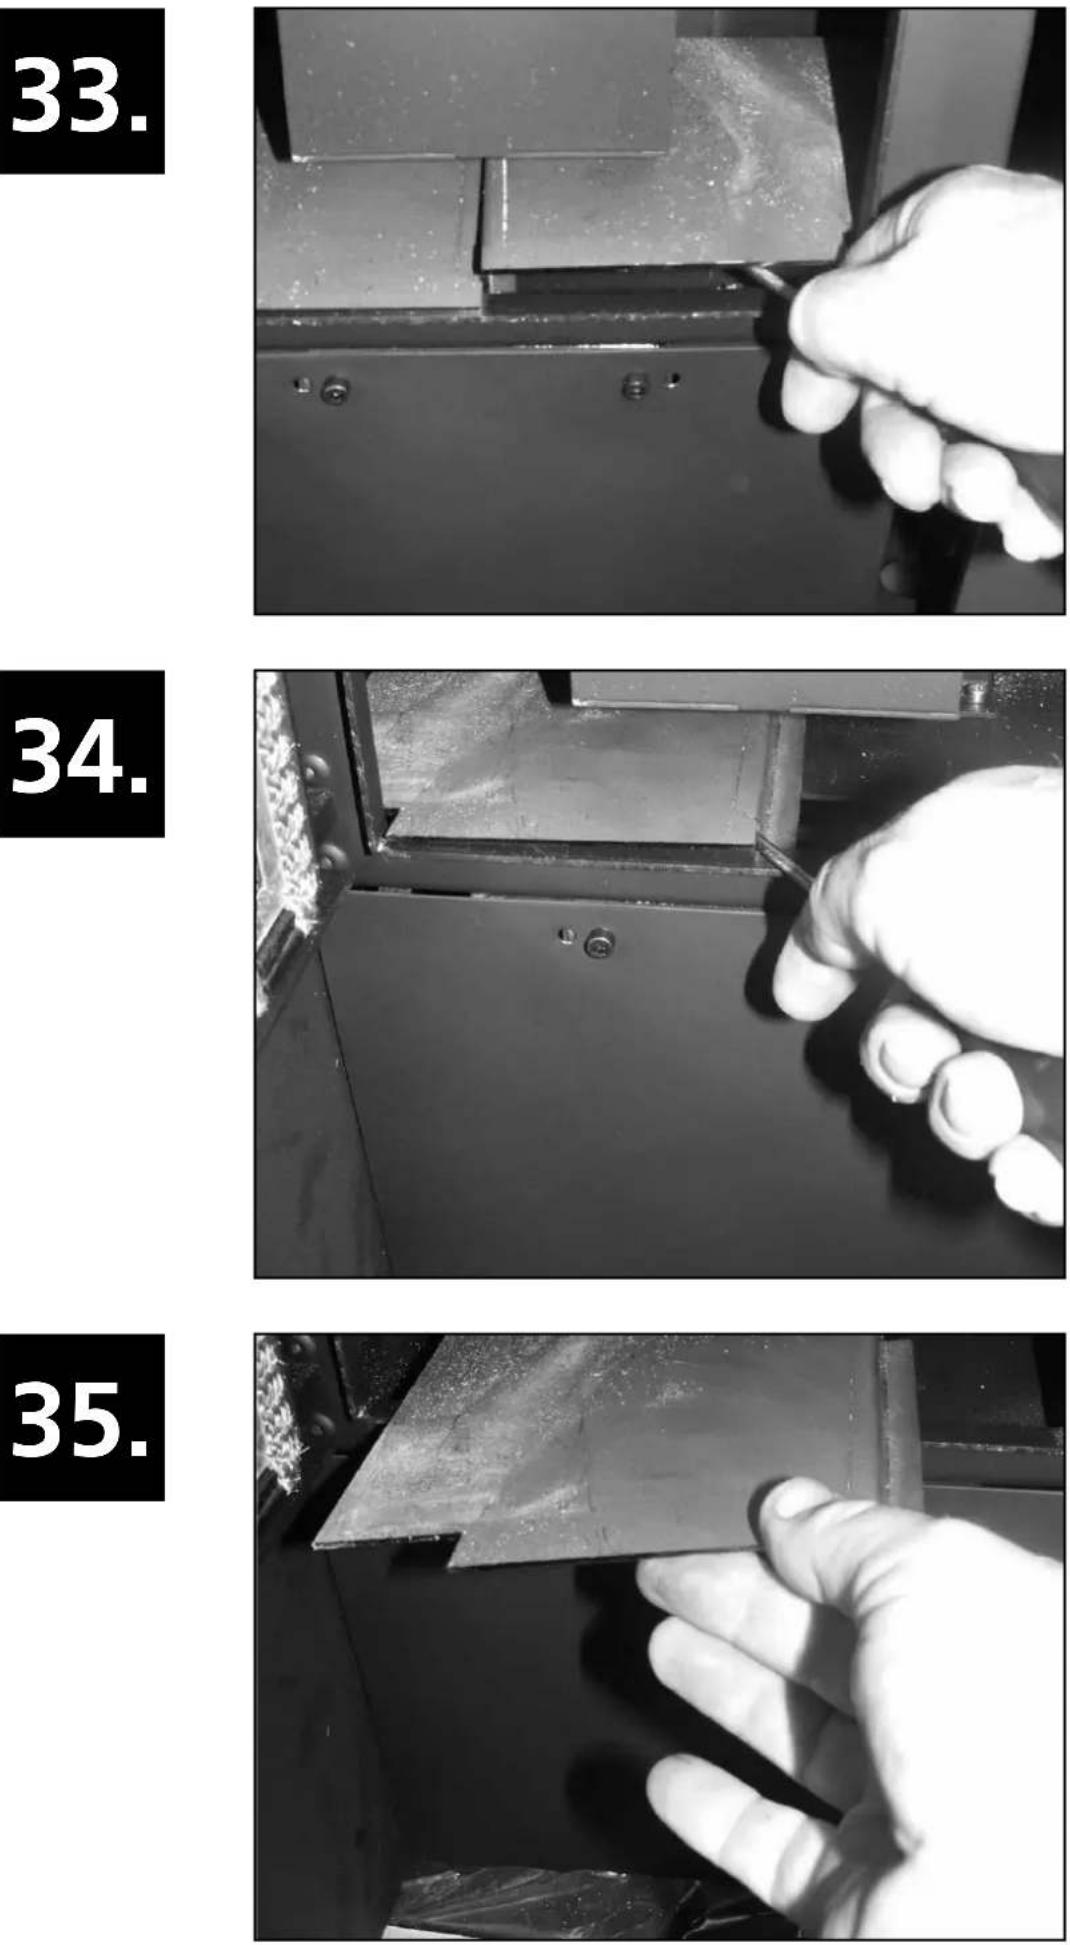
g. Remove the base plate on the right. Pry it upwards with the aid of a screwdriver and remove it from the stove (figure 33).
h. Remove the base plate on the left by sliding it horizontally 3 cm to the right and then lifting it out of the hearth (figures 34 and 35).
- Clean the hearth, the area beneath the brazier and the plating with a brush and a vacuum cleaner.
- After cleaning all the parts that have been removed, fit them back into the hearth in reverse order.
6.7 CHECK THE SEAL ON THE FIRE DOOR
Check the door seal for leaks and damage at least twice a year; the first time before the season starts. If necessary, have the door seal replaced by a Qlima-approved technician. Only use original Qlima spare parts.
6.8 CLEANING THE PELLET HOPPER AND AUGER
Clean the pellet hopper and auger once a month.
- Remove the protective grille from the pellet hopper.
- Empty the pellet hopper.
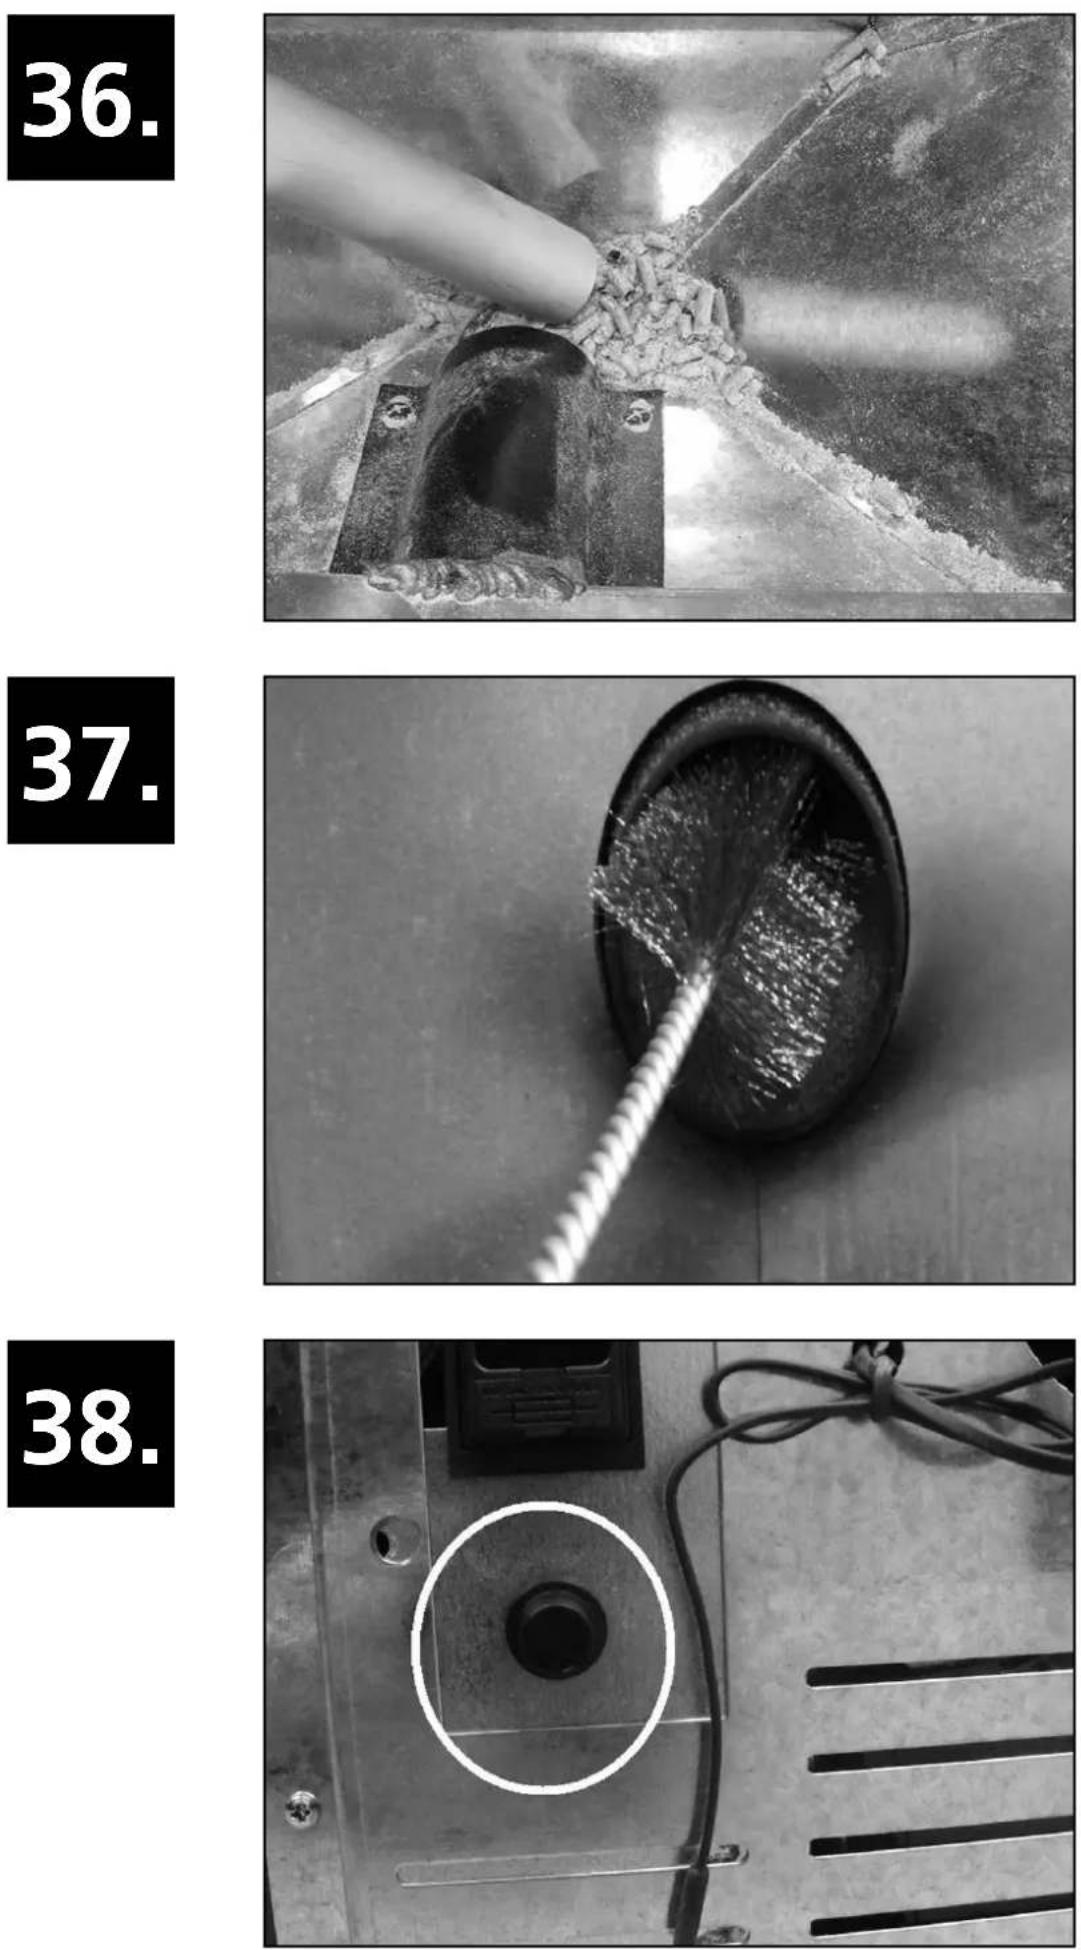
- Clean the pellet hopper and the visible part of the auger with a vacuum cleaner (figure 36).
- Refit the protective grille.
- Fill the hopper with pellets.
6.9 CLEANING THE PELLET SUPPLY PIPE
Clean the pellet supply pipe once a week with a stiff round brush (figure 37). The pellet supply pipe is located in the stove's combustion chamber. Creosote can build up in the supply pipe and contaminate it to such an extent that it can get blocked by pellets.
6.10 MAINTENANCE TO BE PERFORMED BY AN AUTHORISED TECHNICIAN
| Task Frequency* | |
| General professional inspection and servicing of the stove (& the flue) | Twice a season; the first time at the start of the season and/or after 900 combustion hours, when the stove displays SERV |
| Clean/sweep the flue gas system Twice a season; the first time at the start of the season | |
| Replacement of parts that are not mentioned in this manual | When damage is identified |
| Check the connection between the stove and chimney/the flue | Twice a season; the first time at the start of the season and/or after 900 combustion hours, when the stove displays SERV |
| All other service work not specifically mentioned in this manual. | Once a season at the start of the season |
| Clean the room blower/flue blower | Twice a season; the first time at the start of the season and/or after 900 combustion hours, when the stove displays SERV |
| Cleaning the stove inside and out Once a season or after 900 combustion hours when the stove displays SERV | |
| Lubricate the pellet auger gear unit | Once a season at the end of the season |
| Clean the smoke chamber Once a season; at the end of the season or after 900 combustion hours when the stove displays SERV | |
| Check the ignition element Once a season | |
| Clean the air side of the heat exchanger | Once a season or after 900 combustion hours when the stove displays SERV |
| Clean the flue side of the heat exchanger | Once a season or after 900 combustion hours when the stove displays SERV |
| Check the electrical parts such as the PCB, the wiring, the sensors and safety devices. | Once a season or after 900 combustion hours when the stove displays SERV |
| Check the silicon hoses on the pressure sensor | Once a season or after 900 combustion hours when the stove displays SERV |
| Check the door seal and replace if necessary. | Twice a season; the first time at the start of the season or after 900 combustion hours when the stove displays SERV |
| Test the stove at all 5 combustion levels | Once a season or after 900 combustion hours when the stove displays SERV |
| Test the safety devices Once a season or after 900 combustion hours when the stove displays SERV | |
(*) The specified frequency is a minimum. Local law and/or your insurance contract may prevail depending on which is stricter. If the stove is used intensively, the flue must be cleaned more frequently.
7. TECHNICAL SERVICE, ORIGINAL SPARE PARTS
Before any stove leaves the factory, it is first thoroughly tested and started up. Any repairs or commissioning work that proves necessary during or after installation must be carried out by a Qlima-approved heating technician. Original spare parts are available exclusively from our Technical Service Centres and authorised sales outlets.
Before contacting your dealer, the Technical Service Centre or the authorised heating technician make sure you have the model and serial number ready.
Only use original Qlima spare parts. The use of anything other than Qlima spare parts will invalidate the warranty.
8 TROUBLESHOOTING
8.1 RESETTING AN ERROR
Before resetting an error, consult the error list (section 8.2) and follow the instructions. Reset the stove by pushing button 3 (see figure 2) on the display and holding it down for 3 seconds.
If the error message reappears after resetting, consult your supplier.
8.2 ERROR LIST
| PROBLEM CAUSE SOLUTION | |||
| Control panel will not start | No power supply to the stove | Check that the stove is plugged in | |
| Printed circuit fuse has blown | Replace the fuse. Only to be done by a Qlima-approved technician | ||
| Control panel is defective | Replace control panel. Only to be done by a Qlima-approved technician | ||
| Ribbon cable is defective | Replace the ribbon cable Only to be done by a Qlima-approved technician | ||
| Printed circuit board is defective | Replace the printed circuit board Only to be done by a Qlima-approved technician | ||
| Main switch is not turned on | Turn the main switch on | ||
| Stove goes out, alarm “AlAr no FirE” is displayed | The pellet hopper is empty | Fill the pellet hopper with pellets | |
| The brazier is dirty Clean the brazier | |||
| The auger motor is defective | Replace the auger motor Only to be done by a Qlima-approved technician | ||
| Electronic printed circuit board is defective | Replace the printed circuit board Only to be done by a Qlima-approved technician | ||
| The temperature sensor has not detected the minimum temperature threshold to initiate start-up | Empty the combustion chamber and start again if the problem recurs. Contact a Qlima-approved technician if the problem persists. | ||
| Not enough combustion air is reaching the fire | Check the following (can be done by end-user):- Possible obstruction of the combustion air inlet pipe at the rear of the stove.Clean the fresh air inlet pipe.- Combustion chamber grate slots blocked and/or too much ash or dirt in combustion chamber and requires cleaning. Only to be done by a Qlima-approved technician.- Heat exchanger in the stove is dirty.Clean the heat exchanger. | ||
| Wooden pellets are not of a good quality | Try better quality pellets | ||
| Auger is blocked Unplug the stove at the mains socket. Remove the protective grill from the hopper and clean the hopper. Carefully clean the visible parts of the auger. Refit the protective grille and start again. Contact a Qlima-approved technician if the problem persists. | |||
| 15 minutes after starting, the stove displays the "ALARM NO ACC" alert | The ignition mechanism is defective. | Replace the ignition mechanism. Only to be done by a Qlima-approved technician | |
| The temperature sensor has not detected the minimum temperature threshold to initiate start-up | Empty the combustion chamber and start again if the problem recurs. Contact a Qlima-approved technician if the problem persists. | ||
| Outdoor temperature is too low. | Empty the combustion chamber and start again. Contact a Qlima-approved technician if the problem persists. | ||
| Wooden pellets are damp | Only use fry wooden pellets. | ||
| Temperature sensor is defective | Replace the sensor. Only to be done by a Qlima-approved technician | ||
| Electronic printed circuit board is defective | Replace the electronic printed circuit board. Only to be done by a Qlima-approved technician | ||
| The hopper is empty Fill the pellet hopper. | |||
| Wooden pellets are not reaching the combustion chamber | Auger is blocked Unplug the stove at the mains socket. Remove the protective grill from the hopper and clean the hopper. Carefully clean the visible parts of the auger. Refit the protective grille and start again. Contact a Qlima-approved technician if the problem persists. | ||
| Auger motor is damaged Replace the motor. Only to be done by a Qlima-approved technician | |||
| The hopper is empty Fill the pellet hopper. | |||
| The fire has a weak, orange flame, pellets are not burning properly and/or the glass becomes black too quickly. | The exhaust/flue/chimney is blocked | Have the exhaust/flue/chimney cleaned immediately by an approved chimney sweep. Contact an approved chimney sweep. | |
| The brazier is dirty Clean the brazier | |||
| There are internal obstructions in the stove. | The stove requires maintenance. Only to be done by a Qlima-approved technician | ||
| Smoke extractor is damaged. | Wooden pellets are able to burn thanks to the natural draw of the flue. Have the blower replaced immediately as it can be detrimental to your health. Only to be done by a Qlima-approved technician. | ||
| Wooden pellets are not of a good quality. | Try better quality pellets | ||
| The stove has not been set up properly. | Set up the stove. Only to be done by a Qlima-approved technician | ||
| Room air recirculation blow-er continues to run when the stove is cold. | Electronic printed circuit board is defective. | Replace the printed circuit board Only to be done by a Qlima-approved technician | |
| Ash on the floor around the stove | Flue pipes are not air-tight | Only to be done by an approved flue fitter: Flues that are not airtight can harm your health. Seal the pipe fitting immedi-ately (use Loctite 598 or equivalent prod-uct) and/or replace the pipes. | |
| Broken, worn or dam-aged door seal | Replace the seal. Only to be done by a Qlima-approved technician | ||
| Stove in con-stant mode, the display shows: "Eco" | The room temperature desired by the user has been reached | This is not an error. The stove is working in eco mode. This mode can be changed with the remote control | |
| Display shows "SERV" | No error. The stove re-quires a service every 900 hours of operation. The stove will simply continue to work. | The stove requires a service. Contact a Qlima-approved service technician. The technician will carry out a service on the stove and reset the notification. | |
| Display shows "Atte" | An attempt is being made to start the stove while it is still in the cool-ing-down phase. | Wait until the cooling down phase has been completed before trying to reignite the stove. | |
| Stove goes out. The alert shown is “AlAr dEp” and one or both of the LEDs ALF and ALC on the control panel are lit. | Pressure sensor/switch is defective | Replace the pressure switch. Only to be done by a Qlima-approved technician | |
| The exhaust/flue/chimney is blocked | Have the exhaust/flue/chimney cleaned im-mediately by an approved chimney sweep. Contact an approved chimney sweep. | ||
| Electronic printed circuit board is defective. | Replace the electronic printed circuit board. Only to be done by a Qlima-ap-proved technician | ||
| Excessive flue length Consult a flue specialist to check whether the flue complies with the law. Consult a Qlima-approved technician to check whether the flue is suitable for the stove. | |||
| Unfavourable weather conditions | Strong winds can cause negative pressure in the flue. Check and restart the stove. | ||
| Stove is overheating Room temperature too low. Open doors to other rooms. If the problem persists, contact a Qlima-approved technician. | |||
| Stove goes out. "AlAr Sond" is shown in the display | Flue gas temperature sensor is defective. | Replace the sensor. Only to be done by a Qlima-approved technician | |
| The wiring to the flue gas sensor is loose. | Fix the wiring. Only to be done by a Qli-ma-approved technician | ||
| Display shows "Cool Fire" | The stove has been switched off manually, by the timer mode or the save mode. The stove is in cooling down phase. | This is not an error; the cooling down phase stops automatically when the stove has cooled down sufficiently. | |
| Power failure After the electricity supply has been re-stored, the stove will start in the cooling down phase. The stove can then be started up again. | |||
| Display shows "Alar fan fail" | The flue blower is defective or the printed circuit board cannot measure its speed. | Either the flue blower, the printed circuit board or the speed sensor is defective, or the wiring is damaged or loose. Fix the defect. Only to be done by a Qlima-approved technician | |
- PRODUCT SHEET
| Supplier's name or trademark Qlima Qlima Qlima | ||||
| Model Fiorina 74-2 S-line Fiorina 90-2 S-line | Thelma 74 S-line | |||
| Energy efficiency class A+ A+ A+ | ||||
| Type of stove Wooden pellets Wooden pellets | Wooden pellets | |||
| Direct heat output (*) kW 7.8 8.7 7.8 | ||||
| Indirect heat output (*) 0.0 0.0 0.0 | ||||
| Energy efficiency index 126 126 126 | ||||
| Power consumption (ignition/normal operation) | W | 300 / 100 | 300 / 115 | 300 / 100 |
| Power supply | V/Hz | 230/~50 | 230/~50 | 230/~50 |
| Usefull energy efficiency at nominal output / reduced output (*) | % | 90,2 / 91,3 | 89,5 / 91,3 | 90,2 / 91,3 |
| Other precautions related to assembly, installation or maintenance of local space heating | Consult manual | Consult manual | Consult manual | |
| CO level at 13% O_2 nominal/reduced capacity (*) | % | 0,005 / 0,015 | 0,004 / 0,015 | 0,005 / 0,015 |
| Dust at nominal heat output (13% O_2 ) | mg/Nm3 | 12 | 12 | 12 |
| For rooms up to** | m3 | 200 240 | 200 | |
| Flue diameter | mm | 80 | 80 | 80 |
| Flue gas temperature at nominal/reduced capacity | °C | 135 / 84,4 | 145,9 / 84,4 | 135 / 84,4 |
| Required chimney draught | Pa | 10 | 12 | 10 |
| Required flue choke valve | Possible*** | Possible*** | Possible*** | |
| Can be used on a chimney combination with flue | No No No | |||
| Type of fuel (****) | Ø 6 mmDin+/Önorm+/EN+ | Ø 6 mmDin+/Önorm+/EN+ | Ø 6 mmDin+/Önorm+/EN+ | |
| Nominal length/diameter of fuel | mm | 30 / 06 | 30 / 06 | 30 / 06 |
| Pellet hopper volume | kg | 13 | 13 | 13 |
| Autonomy (min-max) | h | 7 - 18 | 6,5 - 18 | 7 - 18 |
| Main air vent | Yes | Yes | Yes | |
| Recirculation blower | Yes | Yes | Yes | |
| Air filter | No No No | |||
| Net weight | kg | 81 | 91 | 81 |
(*) Meets EN14785:2006
(**) only indicative, varies per country/region
(***) To be determined by authorised professional fitter
(****) Use only recommended fuel
10. WARRANTY PROVISIONS
Your stove is guaranteed for a period of 24 months from the date of purchase. Within this period, all material or production faults will be repaired free of charge in accordance with the following conditions:
- We expressly reject all other claims for compensation, including consequential damage.
- Any repair or replacement of parts within the warranty period shall not lead to an extension of the warranty period.
- The warranty will be invalidated if any changes are made to the stove, if non-original factory parts are used or if the stove is repaired by a third party.
- Parts that are subject to normal wear and tear or with a shorter lifespan than the abovementioned warranty period, e.g. packing, seals fire-resistant linings, glass*/pane* painted details and ceramic etc. are not covered under the warranty.
- The warranty is only valid on presentation of the original proof of purchase, with date, provided no changes may have been made to it.
- The warranty does not apply to damage caused by actions that do not conform with the operating instructions in this manual, negligence or the use of a wrong type of fuel. The use of the wrong type of fuel may even be dangerous**.
- The shipping costs and the risks that arise during transport of the stove or its parts shall always be payable by the buyer.
- The warranty is only valid if the stove is installed by a professional (preferably a Qlima authorised) installer and when the signed commissioning protocol can be presented.
To avoid any unnecessary costs, we recommend that you first read this manual carefully. If you are unable to find a solution in it, please contact your dealer or fitter.
The stove window is heat-resistant and can withstand higher temperatures than those that can occur in the stove. This means that damage to the window can only be caused under circumstances that are not within the scope of responsibility of the manufacturer/distributor. For this reason, damage to the stove window is not covered by the warranty.
** Highly flammable substances may lead to uncontrollable combustion resulting in flames coming out of the stove. Should this occur, never attempt to move the stove. Switch it off immediately. In case of emergency, use a type B (CO2 or powder) fire extinguisher.
natural_image
Symbol of a trash bin crossed with no text or labels, accompanied by a black rectangular block below (no readable text or symbols)Do not dispose of electrical appliances as unsorted municipal waste, use separate collection facilities. Contact your local government for information regarding the collection systems available. If electrical appliances are disposed of in landfills or dumps, hazardous substances can leak into the groundwater and get into the food chain, damaging your health and well-being. When replacing old appliances with new once, the retailer is legally obligated to take back your old appliance for disposal at least for free of charge. Do not throw batteries into the fire as they may explode or emit hazardous liquids. If you are replacing or destroying the remote control, remove the batteries and dispose of them in accordance with current legislation as they are harmful to the environment.
COMPONENTI IMPORTANTI
Figura 1

Figura 2
- LEGGERE DAPPRIMA LE INSTRUZIONI D'USO.
- IN CASO DI DUBBI RIVOLGERSI AL RIVENDITORE DELL'APPARECCHIO.
Gentile Cliente,
10.
11.
PROGRAMMA 2 (ON2 E OFF2)
natural_image
Symbol of a trash bin with crossed lines indicating no waste or discharge (no text or labels)Afbeelding 1

Afbeelding 2
natural_image
Symbol of a trash bin crossed with no text or numbers, representing waste sorting or disposal (no text present)Figura 1

Figura 2
- LEIA AS INSTRUÇÕES ANTES DE UTILIZAR.
- EM CASO DE DÚVIDA, CONTACTE O SEU REVENDEDOR.
Caro utilizador,
4.9 Trocar as pilhas do controlo remoto
4.10 Ligação WI-FI
- ABASTECER O DEPÓSITO DE PELLETS COM PELLETS
PROGRAMA 2 (ON2 E OFF2)
natural_image
Symbol of a trash bin with crossed lines indicating no waste or discharge, and a solid black rectangle below (no text or labels)Bild 1

Bild 2
- LÄS FÖRST IGENOM BRUKSANVISNINGEN.
- OM DU UNDRAR ÖVER NÅGOT, KONTAKTA DIN QLIMA-ÅTERFÖRSÄLJARE.
Bästa kund,
- FYLLA PÅ PELLETSMAGASINET MED PELLETS
5. FYLLA PÅ PELLETSMAGASINET MED PELLETS
5.1 BRÄNSLET

natural_image
Symbol of a trash bin with crossed lines indicating no waste or restriction, and a solid black rectangle below (no text or labels)Slika 1

Slika 2
-
PRED PRVO UPORABO PREBERITE TA NAVODILA ZA UPORABO
-
V PRIMERU DVOMA SE POSVETUJTE S POOBLAŠČENIM SERVISERJEM
Spoštovani,
Kot Program 1 le, z gumbi in .
RESETIRANJE PROGRAMIRANEGA ČASA
5347 Km Oss, The Netherlands
Marke / Marca / Marque / Trademak / Marchio / Merk QLIMA
Beschreibung / Descripción / Description / Description / Descrizione / Beschrijving Einzelraumheizgeräte / Estufa
de pellet sin agua / Dispositifs de chauffage décentralisés sans eau / air stove without water fired by wood pellet / stufa a pellet senza acqua / Toestellen voor lokale ruimteverwarming
Modellkennung / Identificador del modelo / Référence du modèle / Model Identifier / Identificativo del modelo / Typeaanduiding van het model
Fiorina 74-2, Thelma 74
Test report / Test report / Test report / Based test report / Test report base / Test report K 3054 2021 T1
Indirekte Heizfunktion / Functionalidad de calefacción indirecta / Function de chauffage indirect / Indirect heating functionality / Funzionalità di riscaldamento indiretto / Indirecteverwarmingsfunctionaliteit
[nein] / [no] / [non] / [no] / [no] / [nee]
Direkte Wärmeleistung / Potencia calorifica directa / Puissance thermique directe / Direct heat output (space heat output) / Potenza termica diretta / Directe warmteafgifte
7.8 kW
Indirekte Wärmeleistung / Potencia calorifica indirecta / Puissance thermique indirect / Indirect heat output (water heat output) / Potenza termica indireta / Indirecte warmteaf gifte
Normative Zahl / Normativa de referencia / Numéro normatif / CPR harmonised standard / Normativa di riferimento / Normatief nummer
EN 14785:2012
Benannte Stelle / Organismo notificado / Organisme notifié / Notified Body / Ente notificato / Aangemelde instantie
natural_image
Hand inserting a plastic container into a metal enclosure (no text or symbols visible)17.
natural_image
Close-up of a hand pointing at a metal enclosure with a small inset box (no text or symbols visible)18.
natural_image
Close-up of a metal plate with circular holes and a pipette inserted into it (no text or symbols visible)19.
natural_image
Black plastic container with a downward arrow pointing to a small hole, no text or symbols visible.20.
natural_image
Close-up of a mechanical component with a cylindrical shaft and a downward arrow pointing to it (no text or symbols visible)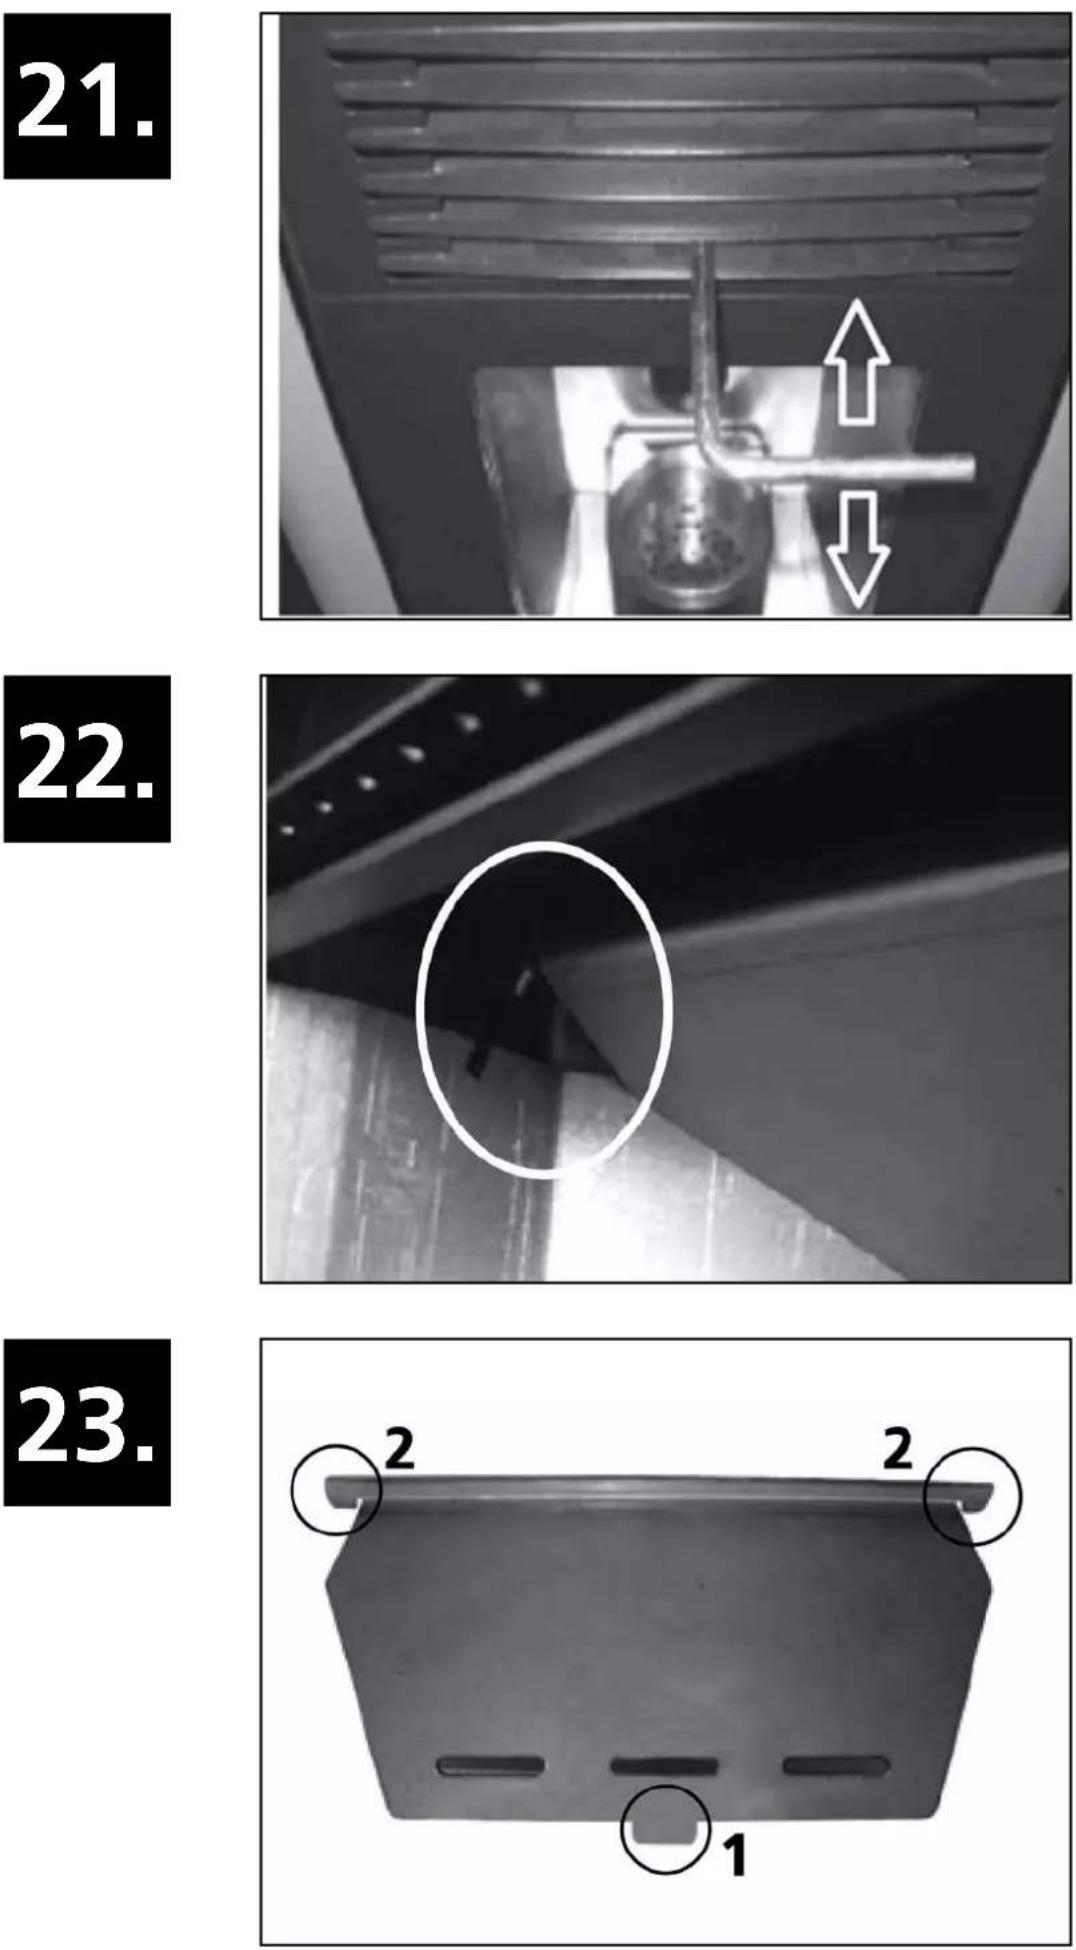

39.
natural_image
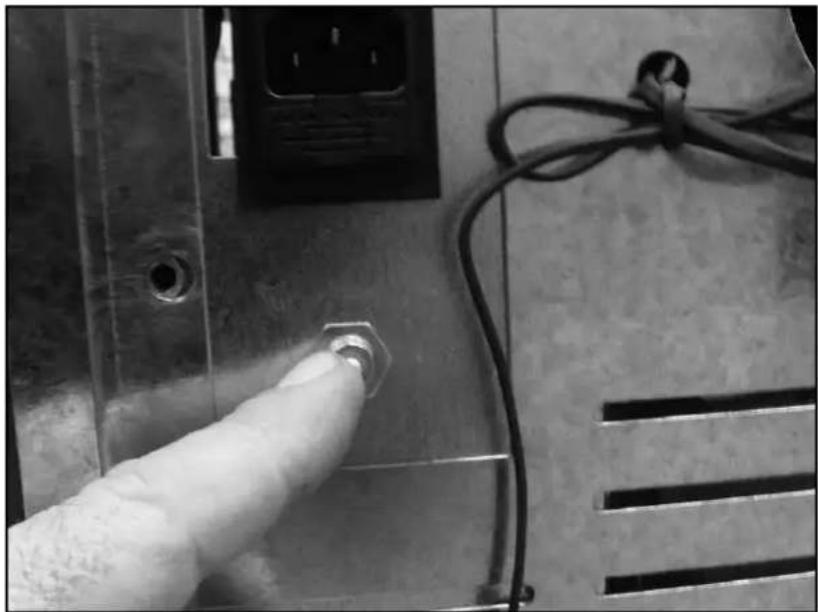
Close-up of a hand pointing at a button on a metal panel with a cable and wiring (no visible text or symbols)
Distributed in Europe by PVG Holding B.V.
Benötigen Sie weitere Informationen oder treten Probleme auf, besuchen Sie bitte unsere Website www.qlima.com, oder setzen Sie sich mit unserem Kundendienst in Verbindung (T: +31 412 694 694).
For alle yderligere oplysninger eller ved eventuelle problemer med apparatet henvises til www.qlima.com eller det lokale Kundecenter (T: +45 77 34 33 30).
ES Si necesita información o si tiene algún problema, visite nuestra página Web www.qlima.es, o póngase en contacto con el servicio cliente (T: +34 916 113 113).
(F) Si vous souhaitez obtenir des informations supplémentaires ou si vous rencontrez un problème, rendez-vous sur notre site Web (www.qlima.fr / www.fr.qlima.be) ou contactez notre service client (T : +33 2 32 96 07 47 / +32 (0)3 326 39 39).
FHN Jos haluat huoltoapua, lisätietoja tai laitteen kanssa tulee ongelmia, tutustu verkkosivustoon osoitteessa www.qlima.com tai kysy neuvoa PVG kuluttajapalvelukeskuksesta (T: +45 77 34 33 30).
(68) If you need information or if you have a problem, please visit the our website (www.qlima.com) or contact our sales support (T: +31 412 694 694).
① Per informazioni e in caso di problemi, visitate il sito Web www.qlima.it oppure contattate il Centro Assistenza Clienti (T: +39 0571 628 500).
Hvis du trenger informasjon, eller hvis du har et problem med produktet, kan du gå til nettsidene www.qlima.com. Alternativt kan du kontakte med PVG' forbrukertjeneste (T: +45 77 34 33 30).
NL Als u informatie nodig hebt of als u een probleem hebt, bezoek dan de onze website (www.qlima.nl / www.qlima.be) of neem contact op met de afdeling sales support (T: +31 412 694 694 / +32 (0)3 326 39 39).
Se necessitar de informações ou se tiver problemas, visite o Web site www.qlima.es ou contacte o Centro de Assistência (T: +34 916 113 113).
W przypadku problemów i w celu uzyskania szczegółowych informacji odwiedź stronę internetową Qlima dostępną pod adresem www.qlima.com lub skontaktuj się z Centrum kontaktów Qlima (T: +48 48 613 00 70)
Om du behöver service eller information eller har problem med apparaten kan du besöka www.qlima.com eller kontakta Qlima kundtjänst (T: +45 77 34 33 30).
⑥BČe želite dodatne informacije, obiščite spletno mesto podjetja na naslovu www.qlima.si ali pokličite na telefonsko (T: +386 (0)41 674 139).

natural_image
Empty gray square with four corner brackets (no text or symbols)PVG Holding BV – Kanaalstraat 12 C - 5347 KM Oss – the Netherlands
P.O. Box 96 – 5340 AB Oss – the Netherlands

- PRODUKTDATENBLATT
- PROGRAMA 2 (ON2 Y OFF2)
- XEIPISMOI SYNTHPHSHA ANO TO XPHETH
- SAFETY INSTRUCTIONS:
- WHAT TO DO IN THE EVENT OF AN EMERGENCY OR FLUE FIRE (FIRE OUTSIDE THE COMBUSTION CHAMBER)
- FIRST USE
- ACTIONS BEFORE AND DURING INITIAL START-UP
- NORMAL USE OF THE STOVE
- DISPLAY INFORMATION
- STANDARD START-UP PROCEDURE
- NON-STANDARD START-UP PROCEDURE
- SETTING THE TEMPERATURE
- CHANGING THE HEAT OUTPUT OF THE STOVE
- SAVE MODE
- SWITCHING ON SAVE MODE
- DIFFERENTIAL TEMPERATURE
- SWITCHING OFF SAVE MODE
- STANDARD SHUT-DOWN
- REMOTE CONTROL
- SETTING THE TEMPERATURE
- SETTING THE HEAT OUTPUT
- AUTO MODE
- 8.
- 9.
- 10.
- 12.
- TURBO MODE
- ECONO MODE
- PROGRAMME 1 (ON1 AND OFF1)
- ACTIVATE AUTOMATIC MODE (ON1)
- DEACTIVATE AUTOMATIC MODE (OFF1)
- PROGRAMME 2 (ON2 AND OFF2)
- CANCELLING SET TIMER PROGRAMMES
- DAILY REPETITION
- REPLACING BATTERIES IN THE REMOTE CONTROL
- WIFI CONNECTION
- FILLING THE PELLET HOPPER WITH PELLETS
- FUEL TYPE
- FILLING THE PELLET HOPPER
- MAINTENANCE
- MAINTENANCE TO BE PERFORMED BY THE END USER
- CLEANING THE EXTERIOR OF THE STOVE
- CLEANING THE WINDOW
- CLEANING THE BRAZIER AND ASH DRAWER
- CLEANING THE HEAT EXCHANGER
- CLEANING THE HEARTH
- CHECK THE SEAL ON THE FIRE DOOR
- CLEANING THE PELLET HOPPER AND AUGER
- CLEANING THE PELLET SUPPLY PIPE
- TECHNICAL SERVICE, ORIGINAL SPARE PARTS
- TROUBLESHOOTING
- RESETTING AN ERROR
- WARRANTY PROVISIONS
- COMPONENTI IMPORTANTI
- 11.
- PROGRAMMA 2 (ON2 E OFF2)
- PROGRAMA 2 (ON2 E OFF2)
- FYLLA PÅ PELLETSMAGASINET MED PELLETS
- BRÄNSLET
- RESETIRANJE PROGRAMIRANEGA ČASA
- 39.
- Distributed in Europe by PVG Holding B.V.
Brand : QLIMA
Model : Fiorina 74-2 S-Line
Category : Pan