
SRE301 - Frying Pan QLIMA - Free user manual and instructions
Find the device manual for free SRE301 QLIMA in PDF.


| Product type | Pellet stove |
| Brand | Qlima |
| Model | SRE301 |
| Dimensions (H x W x D) | 85 x 52 x 48 cm |
| Weight | 45 kg |
| Power supply | 230 V / 50 Hz |
| Power consumption | 150 W |
| Thermal output | 6 - 11 kW |
| Energy efficiency | 85 % |
| Hopper capacity | 15 kg |
| Autonomy | Up to 30 h (at minimum power) |
| Flue pipe diameter | 80 mm |
| Main functions | Weekly programming, remote control, room thermostat |
| Maintenance and cleaning | Weekly burner cleaning, monthly ash pan emptying |
| Safety | Automatic shutdown in case of overheating, thermal safety, smoke sensor |
| Spare parts and repairability | Available from the manufacturer (probe, heating element, fan) |
| Energy class | A+ |
| Fuel type | Wood pellets (Ø 6 mm) |
| Sound level | 45 dB |
| Warranty | 2 years |
Frequently Asked Questions - SRE301 QLIMA
User questions about SRE301 QLIMA
0 question about this device. Answer the ones you know or ask your own.
Ask a new question about this device
Download the instructions for your Frying Pan in PDF format for free! Find your manual SRE301 - QLIMA and take your electronic device back in hand. On this page are published all the documents necessary for the use of your device. SRE301 by QLIMA.
USER MANUAL SRE301 QLIMA
natural_image
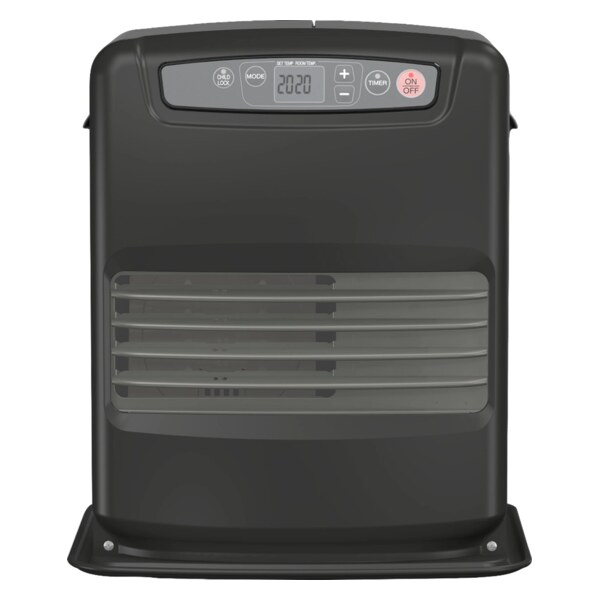
Black rectangular device with a recessed ventilation grille (no visible text or symbols)
F MANUEL D'UTILISATION 2
D GEBRAUCHSANWEISUNG 14
DK BRUGSANVISNING 26
E INSTRUCCIONES DE USO 38
GB OPERATING MANUAL 50
ISTRUZIONI D'USO 62
N BRUKSANVISNING 74
NL GEBRUIKSAANWIJZING 86
PL INSTRUKCJA OBSŁUGI 98
P MANUAL DE INSTRUÇÕES 110
S BRUKSANVISNING 122

FR CONSEILS POUR UN USAGE EN TOUTE SÉCURITÉ
- This appliance is not intended for use by persons (including children) with reduced physical, sensory or mental capabilities, or lack of experience and knowledge, unless they have been given supervision or instruction concerning use of the appliance by a person responsible for their safety.
- Do not move the heater when it is burning or still hot. Do not refill nor service the heater when it is burning or still hot.
- Position the front of the heater at a distance of minimum 1.5 metres from walls, curtains, and furniture.
- Do not use the heater in dusty rooms or places with strong draughts. In either situation you will not have optimum burning. Do not use the heater in the immediate surrounding of a bath, a shower or a swimmingpool.
- Switch off the heater, before you leave or go to sleep. Unplug the heater as well, when you go away for a longer period of time (e.g. holidays).
• Store and move fuel only in suitable tanks and jerrycans.
• Make sure that the fuel is not exposed to heat or extreme temperature changes. Always store the fuel in a cool, dry and dark place (sunlight will affect the quality). - Never use the heater in places where harmful gasses or fumes may be present (e.g. exhaust gasses or paint fumes).
- Beware that the grid of the heater becomes hot. If the appliance is covered there is a risk of fire.
• Always make sure that there is sufficient ventilation. - This appliance is not intended for use by persons (including children) with reduced physical, sensory or mental capabilities, or lack of experience and knowledge, unless they have been given supervision or instruction concerning use of the appliance by a person responsible for their safety.
- This appliance can be used by children aged from 8 years and above and persons with reduced physical, sensory or mental capabilities or lack of experience and knowledge if they have been given supervision or instruction concerning use of the appliance in a safe way and understand the hazards involved.
• Children shall not play with the appliance.
• Cleaning and user maintenance shall not be made by children without supervision.
DANGER
• Do not immerse the appliance in water and do not let water run into it.
• Never open the appliance to prevent electric shock.
WARNING
- The installation must be completely in accordance with local regulations, ordinances and standards.
- Check if the voltage indicated on the type plate corresponds to the local mains voltage before you connect the appliance.
• The appliance is suitable for mains voltages ranging from \~230 V.
• If the mains cord is damaged, you must have it replaced by a service centre authorised by Zibro or similarly qualified persons in order to avoid a hazard.
• Always return the appliance to a service centre authorised by Zibro for examination or repair.
• Repair by unqualified people could cause an extremely hazardous situation for the user. - Do not attempt to repair the appliance yourself, otherwise your guarantee becomes invalid.
- Keep the mains cord away from hot surfaces.
- This appliance is not intended for use by persons (including children) with reduced physical, sensory or mental capabilities, or lack of experience and knowledge, unless they have been given supervision or instruction concerning use of the appliance by a person responsible for their safety.
• Children should be supervised to ensure that they do not play with the appliance.
• The plug must be accessible at all times.
• Do not insert objects into the openings of the device.
• The device must not be located immediately below a socket outlet.
• In order to avoid overheating, do not cover the device.
- Do not use this heater in the immediate surroundings of a bath, a shower or a swimming pool.
- The heater is to be installed so that switches and other controls cannot be touched by a person in the bath or shower.
- This appliance can be used by children aged from 8 years and above and persons with reduced physical, sensory or mental capabilities or lack of experience and knowledge if they have been given supervision or instruction concerning use of the appliance in a safe way and understand the hazards involved.
• Children shall not play with the appliance.
• Cleaning and user maintenance shall not be made by children without supervision.
• Children of less than 3 years should be kept away unless continuously supervised.
• Children aged from 3 years and less than 8 years shall only switch on/off the appliance provided that it has been placed or installed in its intended normal operating position and they have been given supervision or instruction concerning use of the appliance in a safe way and understand the hazards involved.
• Children aged from 3 years and less than 8 years shall not plug in, regulate and clean the appliance or perform user maintenance.
- CAUTION — Some parts of this product can become very hot and cause burns. Particular attention has to be given where children and vulnerable people are present.
CAUTION
- Switch off the appliance and disconnect it from the mains immediately if it produces a strange smell or an abnormal noise. Take the appliance to an authorised Zibro service centre.
- Switch off the appliance and unplug it according to the user instructions before you move or clean it.
• Make sure the appliance and the mains cord are always out of reach of babies (at least one metre away). - Do not use the appliance if not IPX4 protection class (see type plate) in damp places or close to water. Only IPX4 class appliances are suitable for these circumstances.
• Do not use the appliance in places where the humidity level exceeds 95%.
• Do not expose the appliance to extreme heat or cold or to direct sunlight.
• Do not use the appliance outdoors.
• Never tilt or move the appliance while it is operating.
• Do not use any extension cords or multi-socket adapters.
• Always take the plug out of the socket when the device is not in use.

① CONSIGLI PER UN USO SICURO

ÉLÉMENTS IMPORTANTS
LE COMBUSTIBLE APPROPRIÉ
natural_image
Hand inserting a plug into a device labeled B, with no visible text or symbols on the device itself.
natural_image
Line drawing of a water safety device with labeled components and wiring (no text or symbols)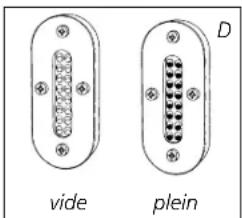
MANUEL D'UTILISATION

A INSTALLATION DE L'APPAREIL

F REGLAGE DE LA TEMPERATURE DE VOTRE CHOIX
natural_image
Hand cleaning a window with a tool (no text or symbols visible)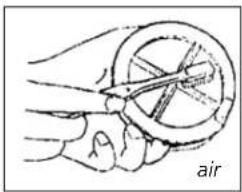
natural_image
Illustration of a hand holding a circular object with internal markings, labeled 'air' (no text or symbols on the object itself)
natural_image
Hand using a tool to adjust or install a device into a vent (no text or symbols visible)natural_image
Technical diagram of a mechanical device with a screwdriver and no visible text or symbolsnatural_image
Illustration of a hand pouring liquid into a cup inside a container, with a small inset showing a cup (no text or symbols)Bouchon de transport
Q TRANSPORT
natural_image
Simple line drawing of a hand pouring liquid into a container (no text or symbols)R SPÉCIFICATIONS TECHNIQUES
| A LLUMAGE | ÉLECTRIQUE |
| C OMBUSTIBLE | COMBUSTIBLE LIQUIDE POUR APPAREILS MOBILES DE CHAUFFAGE |
| C ONSEILLER POUR DES PIÈCES MIN-MAX | 48 - 120 m ^1 |
| PUISSANCE CALORIFIQUE MIN-MAX | 1,5 kW (125 g/h) 3,0 kW (250 g/h) |
| TENSION SECTEUR 230 V~ / 50 Hz | |
| CONSOMMATION ÉLECTRIQUE CONTINU | 22 W |
| CONSOMMATION ÉLECTRIQUE ALLUMAGE | 660 W |
| CONSOMMATION ÉLECTRIQUE ALLUMAGE RAPIDE | 100 W (l'appareil ne brûle pas) |
| POIDS | 10 kg |
| VALEUR NOMINALE DE FUSIBLE 5 A / AC 250 V / 5 X 20 mm | |
| DIMENSIONS (HXLXP) 45,5 x 40 x 30,7 cm | |
| A CCESSOIRES | BOUCHON DE TRANSPORT |
| CONENANCE DU RÉSERVOIR AMOVIBLE 5,8 L | |
| AUTONOMIE DU RÉSERVOIR(100% CAPACITÉ) | 18,7 h |
S CONDITIONS DE GARANTIE
natural_image
Line drawing of a hand inserting a plug into a device labeled B, with no visible text or symbols.
natural_image
Line drawing of a fire extinguisher with labeled components and a gas delivery bag (no text or symbols)
natural_image
Two identical oval-shaped electronic components with pins, labeled 'leer volt' below (no additional text or symbols)GEBRAUCHSANWEISUNG

A DIE INSTALLATION DES KAMINOFENS

natural_image
Hand cleaning a window with a wooden handle (no text or symbols visible)
natural_image
Illustration of a hand holding a circular object with a tool, no text or symbols present
natural_image
Hand using a tool to adjust or install an electronic device component (no visible text or symbols)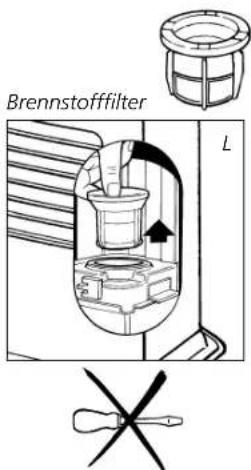
O WARTUNG
natural_image
Illustration of a hand pouring liquid into a container with a downward arrow (no text or symbols)
Transportverschluß

natural_image
Illustration of a hand pouring liquid into a container using a stand mixer (no text or symbols)
HOVEDDELE
natural_image
Line drawing of a hand inserting a plug into a device labeled B (no text or symbols on the device itself)
natural_image
Line drawing of a water safety device with a cylindrical container and connected tubing (no text or symbols)
natural_image
Two identical oval-shaped electronic components with pins, labeled 'Tom Fuld' below (no additional text or symbols)VEJLEDNING

A INSTALLATION AF KAMINEN

G BRUG AF TIMEREN
J INFORMATIONSDISPLAYET
natural_image
Hand cleaning a window with a tool (no text or symbols visible)
natural_image
Illustration of a hand holding a circular mechanical component with internal blades, labeled 'air' (no text or symbols on the diagram itself)
natural_image
Hand inserting a component into an air vent (no text or symbols visible)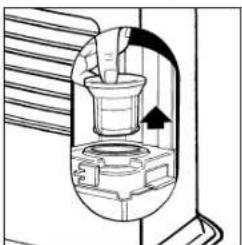
natural_image
Technical line drawing of a mechanical device with a cylindrical component and an arrow indicating direction (no text or symbols)Brændstofffilter

N JUSTERING FOR STORE H∅JDER
natural_image
Illustration of a hand inserting a small container into a device (no text or symbols visible)Transportprop

natural_image
Illustration of a hand pouring liquid into a container using a stand mixer (no text or symbols)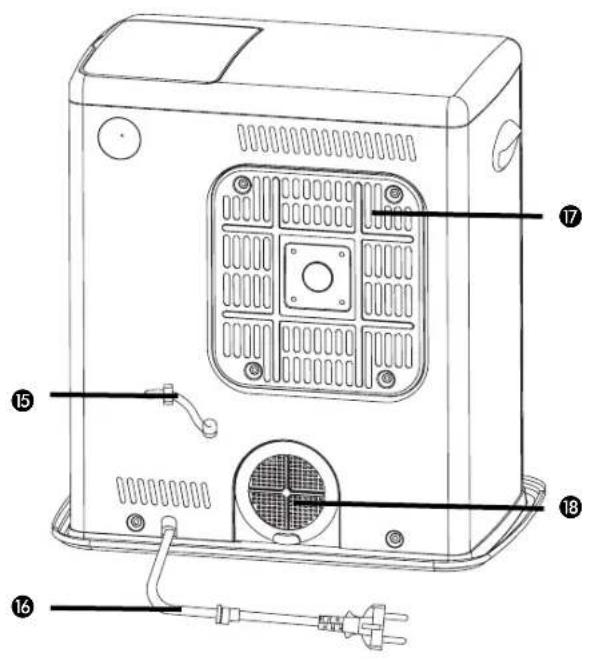
PIEZAS IMPORTANTES

natural_image
Line drawing of a hand inserting a plug into a device labeled B, with no visible text or symbols on the device itself.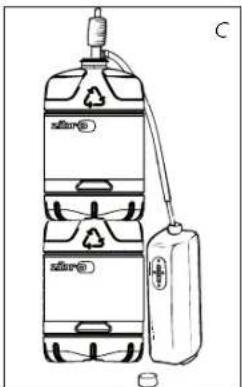
natural_image
Line drawing of a water purifier with labeled components and a gas bag attached (no text or symbols)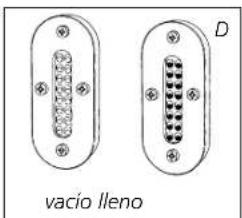
MANUAL

A INSTALACION DE LA ESTUFA


F PROGRAMACION DE LA TEMPERATURA
natural_image
Hand cleaning a window with a cloth (no text or symbols visible)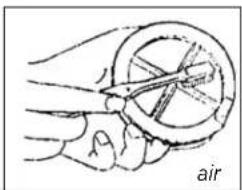
natural_image
Hand holding a circular object with internal blades, labeled 'air' (no other text or symbols)
natural_image
Hand using a tool to adjust or install a device labeled 'vent' (no other text or symbols visible)
AVISO
natural_image
Technical line drawing of a mechanical component with an arrow indicating direction (no text or symbols)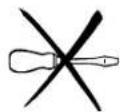
natural_image
Illustration of a hand pouring liquid into a cup inside a container with an arrow indicating direction (no text or symbols)
Tapón de transporte

natural_image
Simple line drawing of a hand pouring liquid into a container using a stand mixer (no text or symbols)Q TRANSPORTE
For safety reasons, please read the safety instructions (page IX) carefully before operating.
Dear Sir, Madam,
Congratulations with your purchase of a portable domestic heater. You have purchased a quality product, which will serve you for many years to come. This, of course, if you use the heater correctly. Please read this user manual first, to ensure maximum lifetime for your heater.
Your heater comes with a 24-month manufacturer's warranty on all defects in materials or workmanship.
We wish you a warm and comfortable time with your heater.
Yours sincerely,
PVG Holding B.V.
Customer Service Department
1 READ THE OPERATION MANUAL FIRST.
2 IN CASE OF ANY DOUBT, CONTACT YOUR DEALER.
GB
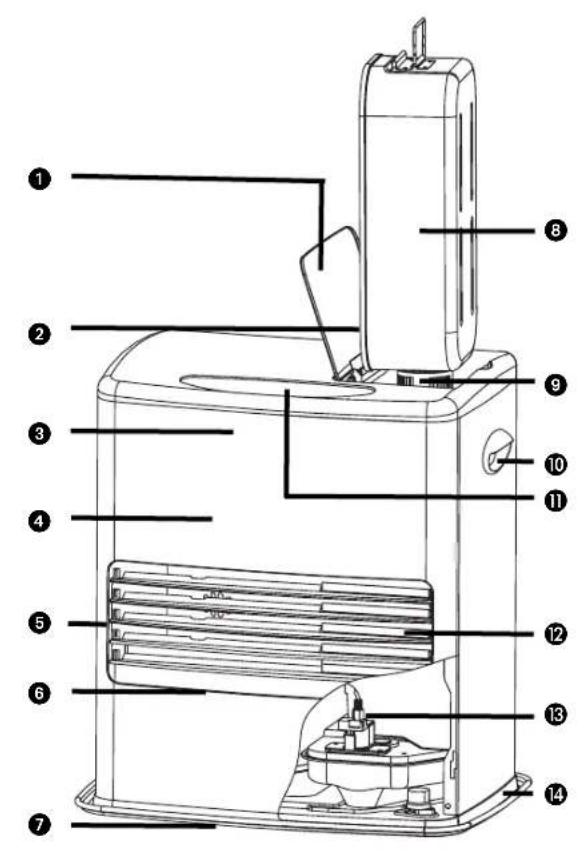

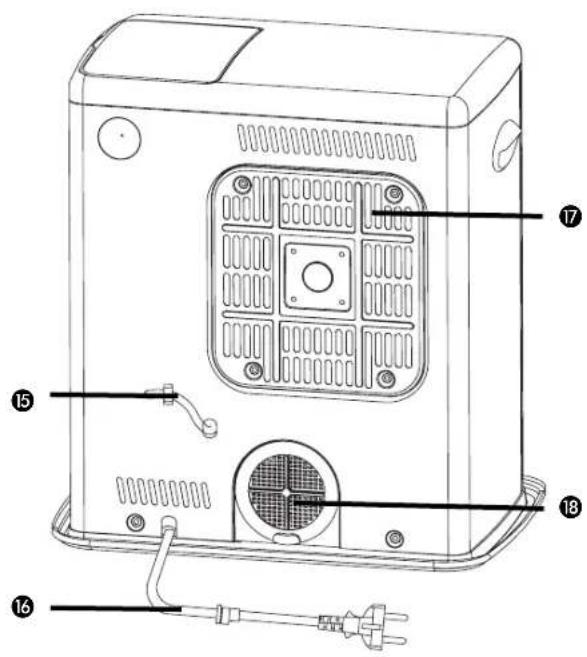
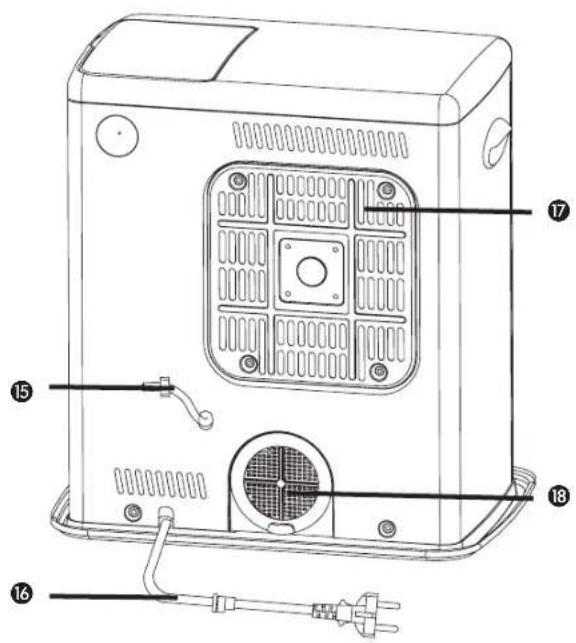
MAIN COMPONENTS
① Tank cover
② Fuel gauge (back)
③ Overheat protection device
4 Front panel
⑤ Inspection window
6 Warm air outlet
⑦ Fixed tank
8 Removable tank
9 Fuel cap
10 Handle
Control panel
⑫ Fuel filter
13 Fuel pump
14 Base plate
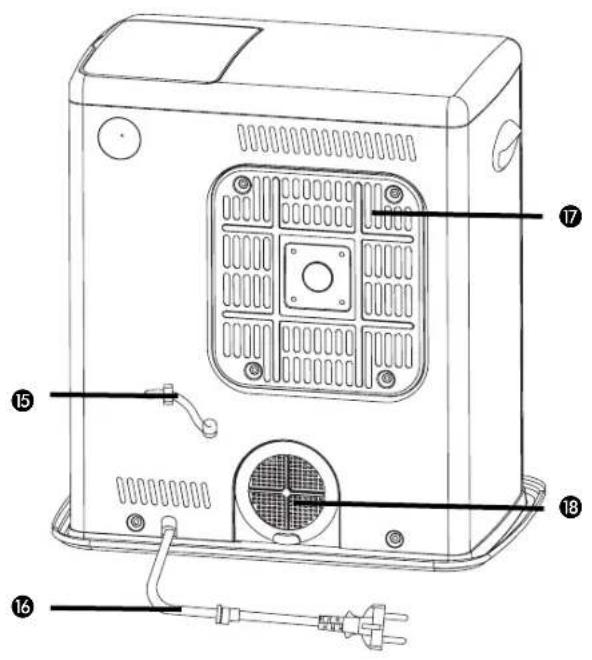
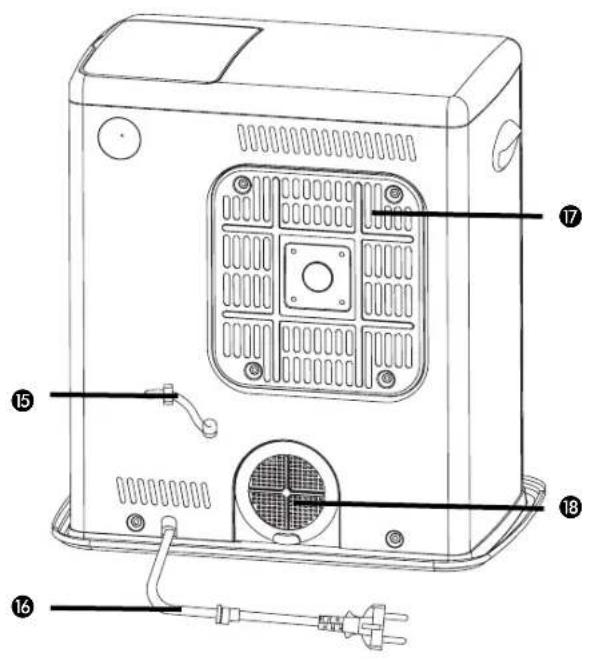
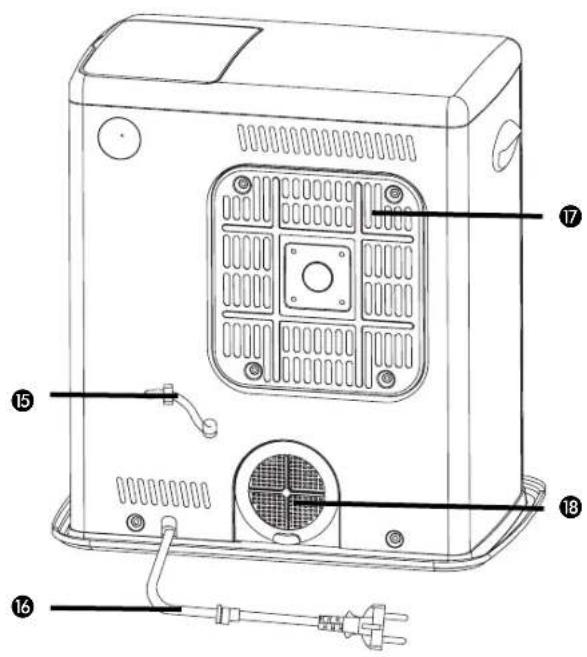
15 Room thermistor
16 Power cord
⑰ Vent filter
18 Air filter
GENERAL DIRECTIONS FOR USE
Below you will find the main steps to be taken for using your heater. For more details, please refer to Section A.
1 Remove all packaging materials (refer to Section A).
2 Fill the removable tank (refer to Section B).
3 Insert the plug into the wall-socket.
4 Ignite the heater using the key (refer to Section D).
5 If required, change the temperature using the adjustment buttons (refer to Section F).
6 Switch off the heater by pressing the key. (refer to Section H).
- As a fire precaution, the tank must be filled either when the heater has been switched off or in another room than the room where the heater is installed.
• Always ensure that the tank is closed properly after filling it at a safe distance from all sources of heat and open flames (see chapter B). - The first time the heater is ignited it will smell like "new" for a short time.
- Store all fuel containers with their original caps and seals in a cool and dark place.
- Fuel ages. Use new fuel at the start of every heating season.
- The use of Zibro Premium Quality Fuels / PTX as a heating fuel assures you that you have a good quality fuel.
- Before changing brands and/or types of fuel make sure that the mobile heater first completely empties all of the remaining fuel inside the heater.
- Prevent all contact with the grill, since it can become very hot.

Only the use of the correct fuel will ensure safe, efficient, and comfortable use of your heater.

WHAT YOU NEED TO KNOW IN ADVANCE
VENTILATE SUFFICIENTLY
Read this user manual carefully before using the appliance and keep it for future reference. Install this device only when it complies with local/national legislation, ordinances and standards. This product is intended to be used as a heater in residential houses and is only suitable for use in dry locations, in normal household conditions, indoors in living room, kitchen and garage.
Regardless of the model, you must always make sure that the heater is used in a room large enough to enable the heater to be used safely without extra ventilation. If the room is smaller than required, you must always open a door or window slightly (ensuring an opening of approx. 2.5 cm). It is important that every room where the heater is used has sufficient air intake and efficient air outflow (both openings must have a minimum cross section of 50 cm ^-2 ). No modifications to the safety system are allowed, as that will invalidate the guarantee that the air probe will work properly. Consult your dealer in case of doubt.
Especially for France: Your heater was designed to operate exclusively on fuel for liquid fuel-operated mobile heaters in accordance with the Decrees of 18-07-2002 and 25-06-2010. The use of other fuels is forbidden.
Ask your dealer or check our website for the addresses of our retailers.
The liquid fuel-operated mobile heater is intended as an extra heater, and not as a continuous source of heat.
Especially for United Kingdom: Only use Class C1 paraffin fuel in accordance with BS2869; Part 2, or equivalent.
The user must comply with the following instructions for proper use:
DO NOT
- use the liquid fuel-operated mobile heater in caravans, boats, and vehicle cabins;
- use the liquid fuel-operated mobile heater in insufficiently ventilated rooms (consult the table of properties for the minimum dimensions of the room to be heated), underground rooms and / or at a height of over 1500 metres;
- modify the heater safety features.
The use of this type of heating in public rooms is subject to prior regulatory permission. Obtain proper information on this in advance.
THE RIGHT FUEL
Your heater has been designed for use with high-quality water-free pure paraffin oil, such as Zibro Premium Quality Fuels / PTX. Only fuels of this kind will ensure clean and proper burning. Lower quality fuel may result in:
▶increased possibility of malfunctioning
▶incomplete combustion
▶reduced heater lifetime
▶ smoke and/or fumes
▶ deposits on the grid or mantle
Using the right fuel is therefore essential for safe, efficient, and comfortable use of your heater.
Damage and/or malfunctions of the heater due to the use of other than high-quality water-free pure parafine oil is not covered by the warranty.
Always refer to your local dealer for the right fuel for your heater.

This transportation cap is packed separately in the box. Only this cap ensures trouble-free transportation of the heater after use. Store it well!

natural_image
Line drawing of a hand inserting a plug into a device labeled B (no text or symbols on the device itself)
natural_image
Line drawing of a multi-stage water tank with a connected gas cylinder and a smaller container (no text or symbols)
natural_image
Two identical oval-shaped electronic connectors with pins, labeled 'empty full' below (no text on connectors)MANUAL

A INSTALLING THE HEATER
1 Carefully remove your heater from the box and check the contents. In addition to the heater you also need to have:
▶ a transportation cap
▶ this operating manual
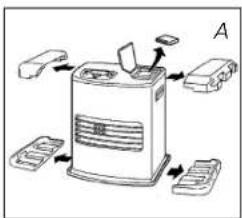
Keep the box and the packaging materials (Fig. A) for storage and/or transportation.
2 Open the lid of the removable tank and remove the piece of cardboard.
3 Fill the removable tank as indicated in Section B.
4 The floor should be firm and completely level. Reposition the heater, when it is not level. Do not try to correct the situation by placing books or other goods under the heater.
5 Insert the plug into the wall-socket (230 Volts - AC 50 Hz) and set the correct time using the adjustment buttons (refer to Section C).
6 Your heater is now ready for use.
B FILLING FUEL
Fill the removable tank in a suitable place since there can always be some spillage. Follow the procedure below:
1 Make sure that the heater is switched off (refer to Section H).
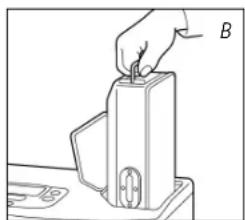
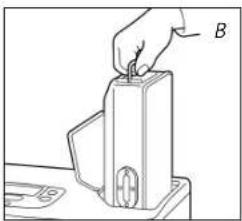
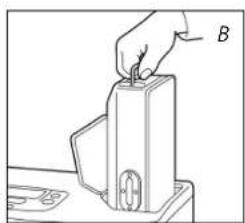
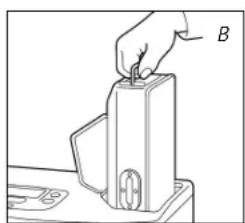
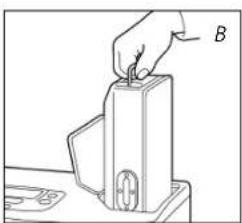
2 Open the upper lid and lift the removable tank out of the heater (Fig. B). Note: Some drops may leak from the tank. Put down the removable tank (cap pointing upwards, handle on floor and screw off the fuel cap.
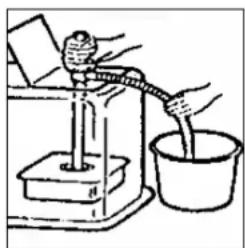
3 Fill the removable tank using a fuel pump (refer to fuel pump operation instructions.) Make sure that it is in a higher position than the removable tank (Fig. C). Insert the ribbed hose into the opening of the removable tank.
4 Check the removable tank fuel gauge while filling the tank (Fig. D). Stop filling once the gauge indicates that the tank is full. Never overfill the tank, especially not when the fuel is very cold (fuel expands when it heats up).
5 Let the remaining fuel in the pump flow back into the jerrycan and carefully remove the pump. Carefully screw the fuel cap back on the tank. Clean off any spilled fuel.


6 Check whether the fuel cap is straight and tightened properly. Reinstall the removable tank in the heater (cap down). Close the lid.
C SETTING THE CLOCK
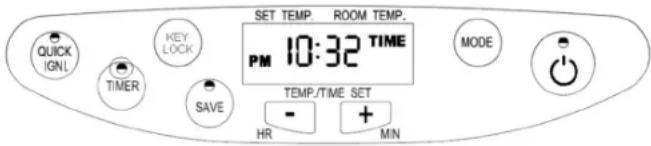
It is only possible to set the correct time, when the heater is connected to mains. Press the mode key once and the word TIME will appear on the display. Use the + and - buttons to enter the actual time.

When the heater has been unplugged (or after a power failure), the time needs to be set again.
D IGNITING THE HEATER (Auto restart)
When used for the first time, a new heater may give out some fumes for a short while. You therefore have to provide extra ventilation.

Always ignite the heater with the button. Never use matches or a cigarette lighter.
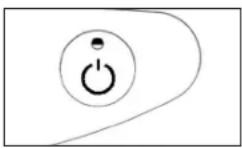
A little white smoke and smell during ignition is normal. Just press the button to ignite the heater. The green power lamp inside the button will start to blink, indicating that the ignition procedure is running. This will take about 2 or 3 minutes. Once the heater is really burning, the power lamp will light continuously. This heater will restart automatically after a power cut when the heater was in "on" position prior to power cut. This makes it possible to switch the appliance on / off by interrupting / enabling the power supply (for instance through a mobile phone switch).

E QUICK IGNITION
Sometimes you may know in advance that you will be manually switching on the heater within 12 hours, but you do not want to wait 2-3 minutes (see chapter D) at that particular moment. For these occasions this heater is equipped with the "quick ignition" function. This function will prepare the heater such that at the moment you want to switch on the heater that upon pressing the ⏻ button the heater will start within 5 seconds. To start the "QUICK IGNI." function press the quick ignition button.
In quick ignition mode: - the electrical power consumption is 100 Watt
- the air at the outlet is slightly warmed
- is automatically cancelled when timer function is set
- is automatically switched off after 12 hours
- can be cancelled by pressing the QUICK IGNI. button again. (The light will now be off).
The quick ignition mode has to be enabled for at least 2-3 minutes before the heater can be started.

F SETTING THE REQUIRED TEMPERATURE
The temperature setting can only be adjusted when the heater is burning. Use the buttons + and – to adjust the temperature. The available temperature range is +6^ minimum to +30^ maximum. The desired temperature is stored in the memory and remains after a restart or power failure.

G USING THE TIMER
The timer allows you to activate the heater at a certain time. In order to use the timer, the correct actual time must have been set (refer to section C).
To set the timer:
Press the mode button twice and the word TIMER will appear on the display. Use the buttons + and - to set the time at which the heater has to start. Press the button first, then press the TIMER button within 1 sec. The TIMER lamp switches on and the heater is ready to start at the desired time.
H SWITCHING OFF THE HEATER
Press the button. The green lamp inside the button will switch off and the heater stops within approximately 1 minute. A little white smoke and smell during the extinguish period is normal.

I SAVE MODE
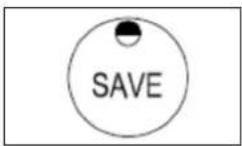
In the save mode the heater will switch off when the room temperature, as sensed by the heater, rises 3°C above the set temperature. The save mode can be activated with the button SAVE. The lamp in the button will switch on and the heater will now switch off when the room temperature rises 3°C above the set temperature. The heater will start again when the room temperature drops below the set temperature.
The save mode can be cancelled by pushing the SAVE button again, the lamp switches off.
J THE INFORMATION DISPLAY
The information display not only serves as an indicator of the (set) time and temperature, it also indicates any malfunctioning of the heater. The code on the information display tells you what is the matter:
CODE CAUSES WHAT TO DO
E - O No flame during ignition. Check fuel, restart the heater.
Read section Q point 5.
Use correct fuel (see section "The right fuel").
E - 1 Flame sensor failure Check fuel, restart the heater.
Read section Q point 5.
Use correct fuel (see section "The right fuel").
E - 2 No flame after ignition. Check fuel, restart the heater.
Read section Q point 5.
Use correct fuel (see section "The right fuel").
E - 4 Poor flame during normal burning. Check fuel, ventilate the room,
GB
restart the heater. Read section Q point 5. Use correct fuel (see section "The right fuel").
E - S Ignition temperature too low. Disconnected the mains plug and restart.
E - 5 Ignition temperature too high. Cool down, disconnect the mains plug and restart.
E - 7 Wrong blower speed. Disconnect the mains plug and restart.
E - 9 Tilt switch. Avoid shocks. The heater must be levelled.
E - R Room temperature > 35°C Ventilate the room and restart the heater.
E - H Electronics temperature > 60°C Ventilate the room and restart the heater.
KLKEY LOCK. Push the button KEY LOCK 3 times to unlock the heater.
FUELOut of fuel. Refill the removable tank. Check if the fuel filter contains water.
TIMEThe heater shows the actual time Push the – and + buttons to adjust the time.
TIMER The heater shows the set time for timer Push the – and + buttons to adjust the set time when the heater has to start.
48 Hr The heater has been operating Switch the heater on again. continuously for a period of 48 hours and has switched itself off (refer to section K).
Always contact your dealer for any malfunctioning not listed above and/or when the error keeps occurring after taking the corrective measure as described above.
K AUTOMATIC DEACTIVATION
This heater is equipped with a safety system that ensures that it switches off automatically after 48 hours of continuous operation. The display will show: 48 Hr. Switch on the heater by pressing the ⏻ button.
L KEY LOCK
The key lock can be used to prevent children accidentally starting the heater. Press the button KEY LOCK 3 times when the heater is off. The characters KL will appear in the display. All keys are blocked now, the heater will not respond to any pressing of the buttons. Press the button KEY LOCK again 3 times to release the key lock. The status of the KEY LOCK is memorized and remains after a power interrupt.
M THE 'FUEL' INDICATOR
When low on fuel level the display will show "FUEL". The heater will stop within 10-15 minutes. It will take some time after a refill before the heater is ready for use again when the heater has used all its fuel.


GB

Factory setting: switch 1 & 2 are in OFF position (down).

natural_image
Hand cleaning a window with a tool (no text or symbols visible)
natural_image
Illustration of a hand holding a circular object with internal components, labeled 'air' at bottom (no other text or symbols)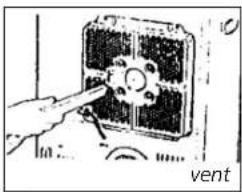
natural_image
Hand inserting a component into a device labeled 'vent' (no other text or symbols visible)
natural_image
Technical line drawing of a mechanical device with a central component and directional arrow (no text or symbols)Fuel filter
N HIGH ALTITUDE ADJUSTMENT
The factory setting is for 0 – 500 meters above sea level. This setting needs to be changed for higher altitudes to increase the blower speed and keep the combustion correct.

Before changing the high altitude setting always remove the main's plug!
Remove the two screws beside the front panel. A small block with 4 switches on the main electronics board becomes visible. Always leave switch 3 and 4 in the original position.
| Altitude (m) Switch 1 Switch 2 | ||
| 0 - 500 OFF OFF | ||
| 501 - 1000 | OFF | ON |
| 1001 -1500 | ON | OFF |

WARNING
Never insert the mains plug when fixed front panel is not fixed!
O MAINTENANCE
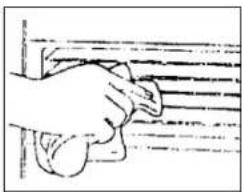
Switch off the heater, disconnect the plug from the mains and let it cool down, before you start any maintenance work. Your heater needs hardly any maintenance. It is, however, important that you clean the air filter and the vent filter with a vacuum cleaner and a brush and the grid with a damp cloth, both on a weekly basis. Remove the air filter occasionally and clean it with soapy water or with a vacuum cleaner. Prior to reinstallation, make sure that the air filter cap has fully been dried.
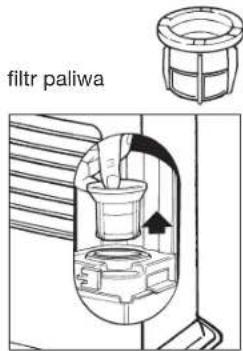
Regularly inspect the fuel filter as well:
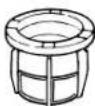
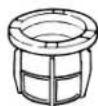
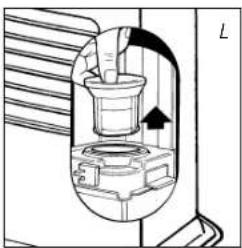
1 Remove the removable tank from the heater and remove the fuel filter Some drops may leak from the filter; keep a cloth at hand.
2 Remove the dirt and water by gently tapping the fuel filter upside-down against a hard surface. (Never clean it with water!)
3 Reinstall the fuel filter into the heater.
We recommend to remove dust and stains on the outside of the heater from time to time with a damp cloth, otherwise these may cause stains that are hard to remove.

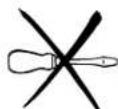
Do not remove any components yourself. Always contact your dealer for repairs. When the power cord is damaged, it may only be replaced by an authorised engineer. Use a new original cord.

natural_image
Illustration of a hand inserting a small container into a device (no text or symbols visible)transportation cap

natural_image
Illustration of a hand pouring liquid into a container using a stand mixer (no text or symbols)P STORAGE (END OF THE HEATING SEASON)
At the end of the heating season, store the heater in a dust-free place in its original packaging. Any unused fuel cannot be used the next heating season. We therefore recommend that you burn up all fuel prior to storing. If there is still some fuel left, do not throw it away, but dispose of it in accordance with the local regulations for the disposal of domestic chemical waste.
Always start the new heating season with fresh fuel. When you start re-using the heater follow the instructions again (starting from section A and as specified).
Q TRANSPORTATION
Take the following measures to avoid fuel leakage during the transportation of the heater:
1 Let the heater cool down.
2 Remove the removable tank from the heater and remove the fuel filter. Some drops may leak from the filter; keep a cloth at hand. Store the fuel filter and the removable tank outside the heater.
3 Place the transportation cap into the position of the fuel filter. Press it tight. The transportation cap will, as much as possible, prevent oil leakage from the heater during transport.
4 Always move the heater in an upright position.
5 Make the fixed tank empty with a fuel pump before transportation or in case of wrong or dirty fuel. First remove the fuel filter and then insert the fuel pump into the empty fixed tank. Follow the same procedure if the fuel tank contains water.
R SPECIFICATIONS
| IGNITION ELECTRICAL | |
| FUEL PARAFFIN | |
| SUITABLE SPACE MIN-MAX 48 - 120 m | 3 |
| HEATING CAPACITY MIN-MAX 1,5 kW (125 g/h) 3.0 kW | (250 g/h) |
| MAINS 230 V~ / 50 Hz | |
| ELECTRIC CONSUMPTION BURNING 22 W | |
| ELECTRIC CONSUMPTION IGNITION | 660 W |
| ELECTRIC CONSUMPTION QUICK IGNITION MODE | 100 W (heater not burning) |
| WEIGHT | 10 kg |
| FUSE RATING | 5 A / AC 250 V / 5 X 20 mm |
| DIMENSIONS (HxWxD) | 45.5 x 40 x 30.7 cm |
| ACCESSORIES | TRANSPORTATION CAP |
| REMOVABLE TANK CAPACITY | 5,8 LITRES |
| BURNING TIME PER TANK (100% CAPACITY) | 18,7 h |
Specified values are indicative

S W WARRANTY PROVISIONS
Your heater comes with a 24-month warranty starting on the date of purchase. Within this period all defects in material or workmanship will be repaired without any charge. The following provisions shall apply regarding this warranty:
1 We expressly dismiss all other claims for damages, including consequential damages.
2 Any repairs or replacements of components within the term of warranty will not result in an extension of the term of warranty.
3 The warranty shall no longer apply, when the heater has been modified, non-original parts have been used, or when it is repaired by third parties.
4 The warranty shall not apply to parts that are subject to normal wear.
5 The warranty shall only apply, when you present the original, dated proof of purchase, provided no changes have been made to it.
6 The warranty shall not apply to damages caused by actions not in compliance with this operating manual, neglect, and the use of an incorrect type of fuel, or fuel past its use-by date. The use of incorrect fuel can even be dangerous*.
7 Transportation costs and the risks involved during the transportation of the heater or heater components shall always be at the expense of the purchaser.
In order to avoid unnecessary costs, we recommend that you always read this operating manual carefully first. In case they offer no solution, please take the heater to your dealer for repair.
* Highly inflammable substances may induce uncontrollable burning, causing flames to break out. Should this happen, never try to move the heater, but always switch off the heater immediately. In case of emergency you may use a fire extinguisher, but only a type B extinguisher: a carbon dioxide or powder extinguisher.

Waste electrical products should not be disposed with household waste. Please recycle where facilities exist. Check with your local authority or retailer for recycling advice.

SICUREZZA
COMPONENTI PRINCIPALI

natural_image
Hand inserting a small component into a rectangular device (no text or symbols visible)
natural_image
Line drawing of a multi-stage water tank with a connected gas bag and connector (no text or symbols)
D ACCENSIONE DELLA STUFA

natural_image
Hand cleaning a wooden structure with visible rebar and handle (no text or symbols)
natural_image
Illustration of a hand holding a circular object with a handle, labeled 'air' at the bottom (no other text or symbols)
natural_image
Hand inserting a component into a device labeled 'vent' (no other text or symbols visible)
Filtro del combustibile
natural_image
Technical diagram of a mechanical device with a central component and directional arrow (no text or symbols)M LA SPIA 'FUEL'
natural_image
Illustration of a hand pouring liquid into a container with a small inset showing a small cup (no text or symbols)natural_image
Illustration of a hand pouring liquid into a container using a stand mixer (no text or symbols)R SPECIFICHE
| ACCENSIONE | ELETTRICA |
| COMBUSTIBLE | PETROLIO |
| SPAZIO ADATTO MIN-MAX 48 - 120 m | 3 |
| CAPACITÀ MIN-MAX | 1,5 kW (125 g/h) 3,0 kW (250 g/h) |
| TENSIONE DI RETE 230 V~ / 50 Hz | |
| CONSUMO ELETTRICA CONTINUO | 22 W |
| CONSUMO ACCENSIONE ELETTRICA | 660 W |
| CONSUMO ELETTRICAACCENSIONE RAPIDA | 100 W (stufa non in funzione) |
| PESO | 10 kg |
| AMPERAGGIO FUSIBILE | 5 A / AC 250 V / 5 X 20 mm |
| DIMENSIONI (AXLXP) | 45.5 x 40 x 30.7 cm |
| ACCESSORI TAPPO PER IL TRASPORTO | |
| VOLUME SERBATOIO ESTRAIBILE 5,8 lt | |
| DURATA DEL COMBUSTIBILE PER SERBATOIO(100% CAPACITÀ) | 18,7 h |
HOVEDKOMPONENTER
natural_image
Diagram of a portable air conditioner unit with multiple ports and a fan, no text or symbols present
natural_image
Hand holding a small object inserted into a device, with no visible text or symbols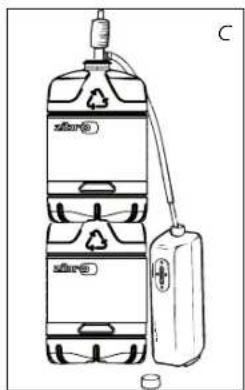
natural_image
Line drawing of a water safety device with labeled components and a gas cylinder attached (no text or symbols)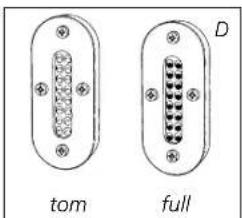
HÅNDBOK

A INSTALLERE OVNEN
G BRUKE TIMEREN
Ved hjelp av timeren kan varmeovnen slås på automatisk på et forhåndsinnstilt tidspunkt. For å kunne aktivere timeren må du ha stilt tiden riktig (se avsnitt C) og varmeovnen må være slått av.
Følg fremgangsmåten nedenfor:
I SPAREFUNKSJONEN (SAVE)
Fabrikkinnstiling: Bryter 1 og 2 står i stilling OFF (av) (ned).
natural_image
Hand cleaning a window frame with a cloth (no text or symbols visible)
natural_image
Illustration of a hand holding a circular object with a pointer, labeled 'luft' at the bottom (no other text or symbols)
natural_image
Hand inserting a component into an electrical enclosure labeled 'ventilasjon' (no other text or symbols visible)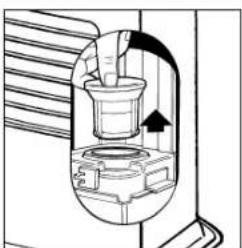
natural_image
Technical line drawing of a mechanical device with an arrow indicating direction (no text or symbols)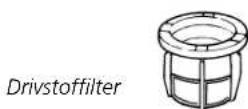
N JUSTERING I STOR H∅YDE OVER HAVET
natural_image
Diagram of a hand inserting into a container with a small pot, showing mechanical components (no text or symbols)Transportdeksel


natural_image
Illustration of a hand pouring liquid into a container using a stand mixer (no text or symbols)
BELANGRIJKE ONDERDELEN
WAT U VOORAF MOET WETEN
ALTIJD VOLDOENDE VENTILEREN
natural_image
Hand inserting a pin into a mechanical component labeled B, with no visible text or symbols on the component itself.
natural_image
Line drawing of a gas cylinder connected to a battery, showing internal compartments and wiring (no text or symbols)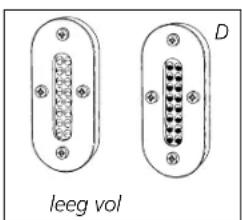
HANDLEIDING

A HET INSTALLEREN VAN DE KACHEL


G HET BENUTTEN VAN DE TIMER
N HOGE HOOGTE AANPASSING
natural_image
Hand cleaning a window frame (no text or symbols visible)
natural_image
Hand holding a circular mechanical component with a pointer, labeled 'lucht' at the bottom (no other text or symbols)


WAARSCHUWING
natural_image
Illustration of a hand pouring liquid into a container with an arrow indicating direction (no text or symbols)Transportdop

natural_image
Illustration of a hand pouring liquid into a container using a stand mixer (no text or symbols)Q VERVOER
ISTOTNE CZEŚCI
ZAPEWNIĆ ODPOWIEDNIA WENTYLACJE,

PL
102
INSTRUKCJA OBSŁUGI
A INSTALACJA GRZEJNIKA
J WYŚWIETLACZ INFORMACYJNY
natural_image
Hand cleaning a wooden window with a cloth (no text or symbols visible)
PL
M LAMPKA KONTROLNA 'FUEL'
natural_image
Illustration of a hand pouring liquid into a container with an arrow indicating flow (no text or symbols)natural_image
Illustration of a hand pouring liquid into a container using a stand mixer (no text or symbols)R PARAMETRY TECHNICZNE
| ZaPŁON eleKTRYCZNY | |
| PallWO NaFTa | |
| KUBaTURa POmleSZCZeNla | 48 - 120 m^3 |
| mOC GRZeWCZa mIN-maX | 1,5 kW (125 g/h) 3,0 kW (250 g/h) |
| NaPięCle SleCIOWe | 230 V~ / 50 Hz |
| CIĄGłe ZUŻYCle eNeRGII | 22 W |
| eleCTRICAL ZaPaleNle ZUŻYCle | 660 W |
| ZUŻYCle eNeRGII eleKTRYCZNeJSZYBKI ZaPŁON | 100 W (KUCheNKa Nle JeST) |
| CieżaR | 10 kg |
| BeZPIeCZNIKI | 5 A / AC 250 V / 5 X 20 mm |
| WYmlaRY (hXWXD) | 45,5 x 40 x 30,7 cm |
| aKCcSORIa KOReK TRaNSPORTOWY | |
| POJemNOść ZBIORNIKa | 5,8 LITRY |
| CZaS śWleCeNla Na ZBIORNIK(100% POJemNOŚCI) | 18,7 u |
S WARUNKI GWARANCJI
PEÇAS IMPORTANTES
natural_image
Hand inserting a pin into a rectangular device labeled B, with no visible text or symbols on the device itself.
natural_image
Line drawing of a gas storage device with a cylindrical container and connected tubing (no text or symbols)
MANUAL DE INSTRUÇÕES

natural_image
Hand cleaning a window with a cloth (no text or symbols visible)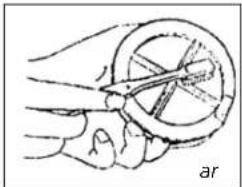
natural_image
Illustration of a hand holding a circular mechanical component with internal blades (no text or symbols)

natural_image
Diagram of a hand pouring liquid into a container with a downward arrow, above a small bowl (no text or symbols)Tampa de transporte
Q TRANSPORTE
natural_image
Illustration of a hand pouring liquid into a container using a stand mixer (no text or symbols)R ESPECIFICAÇÕES
| IGNIÇÃO ELÉCTRICA | |
| COMBUSTÍVEL PETRÓLEO | |
| ESPAÇO APROPRIADO MIN –MAX | 48 - 120 m ^1 |
| CAPACIDADE (KW) MIN-MAX 1,5 kW (125 g/h) 3,0 kW | (250 g/h) |
| TENSÃO DE REDE | 230 V~ / 50 Hz |
| CONSUMO DE ELECTRICIDADE CONTÍNUO | 22 W |
| CONSUMO DE ELECTRICIDADE IGNICÇÃO 660 W | |
| CONSUMO DE ELECTRICIDADE QUICK IGNITION 100 W | (aquecedor não queimando) |
| PESO | 10 kg |
| FUSÍVEIS 5 A / AC 250 V / 5 X 20 mm | |
| DIMENSÕES (L X P X A) 45.5 x 40 x 30.7 cm | |
| ACESSÓRIOS | TAMPA DE TRANSPORTE |
| CONTEÚDO DO TANQUE REMOVÍVEL 5,8 LITRO | |
| HORAS DE COMBUSTÃO POR TANQUE (EM AJUSTE N A POSIÇÃO MÁXIMA) | 18,7 HORA |
Dados indicativos
S CONDIÇÕES DE GARANTIA

VIKTIGA DELAR
SE ALLTID TILL ATT DET FINNS TILLRÄCKLIG VENTILATION
natural_image
Line drawing of a hand inserting a plug into a device labeled B (no text or symbols on the device itself)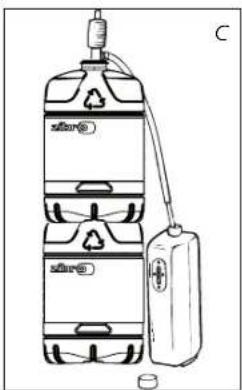
natural_image
Line drawing of a water purifier with labeled components and a gas bag attached (no text or symbols)
natural_image
Two identical oval-shaped electronic components with pins, labeled 'empty full' below (no text or symbols on the components themselves)MANUAL

A INSTALLATION


F TEMPERATURINSTÄLLNING
natural_image
Hand cleaning a window with a tool (no text or symbols visible)
natural_image
Illustration of a hand holding a circular object with intersecting lines (no text or symbols)
natural_image
Hand using a tool to adjust or install an electronic device component (no visible text or symbols)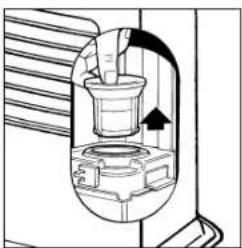
natural_image
Technical line drawing of a mechanical device with an arrow indicating direction (no text or symbols)Bränsle filter

M 'FUEL'-INDIKERINGEN
natural_image
Diagram of a hand pressing a small component into a container with an arrow indicating motion (no text or symbols)Transportskydd

P FÖRVARING (SLUT PÅ UPPVÄRMNINGSSÄSONGEN)
natural_image
Simple line drawing of a hand pouring liquid into a container using a stand mixer (no text or symbols)R SPECIFICATIONS


- FR CONSEILS POUR UN USAGE EN TOUTE SÉCURITÉ
- DANGER
- WARNING
- CAUTION
- ① CONSIGLI PER UN USO SICURO
- ÉLÉMENTS IMPORTANTS
- LE COMBUSTIBLE APPROPRIÉ
- MANUEL D'UTILISATION
- A INSTALLATION DE L'APPAREIL
- F REGLAGE DE LA TEMPERATURE DE VOTRE CHOIX
- Q TRANSPORT
- S CONDITIONS DE GARANTIE
- GEBRAUCHSANWEISUNG
- A DIE INSTALLATION DES KAMINOFENS
- O WARTUNG
- HOVEDDELE
- VEJLEDNING
- A INSTALLATION AF KAMINEN
- G BRUG AF TIMEREN
- J INFORMATIONSDISPLAYET
- N JUSTERING FOR STORE H∅JDER
- PIEZAS IMPORTANTES
- MANUAL
- A INSTALACION DE LA ESTUFA
- F PROGRAMACION DE LA TEMPERATURA
- AVISO
- Q TRANSPORTE
- MAIN COMPONENTS
- GENERAL DIRECTIONS FOR USE
- WHAT YOU NEED TO KNOW IN ADVANCE
- VENTILATE SUFFICIENTLY
- The user must comply with the following instructions for proper use:
- DO NOT
- THE RIGHT FUEL
- A INSTALLING THE HEATER
- B FILLING FUEL
- C SETTING THE CLOCK
- D IGNITING THE HEATER (Auto restart)
- E QUICK IGNITION
- F SETTING THE REQUIRED TEMPERATURE
- G USING THE TIMER
- H SWITCHING OFF THE HEATER
- I SAVE MODE
- J THE INFORMATION DISPLAY
- CODE CAUSES WHAT TO DO
- K AUTOMATIC DEACTIVATION
- L KEY LOCK
- M THE 'FUEL' INDICATOR
- N HIGH ALTITUDE ADJUSTMENT
- O MAINTENANCE
- P STORAGE (END OF THE HEATING SEASON)
- Q TRANSPORTATION
- S W WARRANTY PROVISIONS
- SICUREZZA
- COMPONENTI PRINCIPALI
- D ACCENSIONE DELLA STUFA
- M LA SPIA 'FUEL'
- HOVEDKOMPONENTER
- HÅNDBOK
- A INSTALLERE OVNEN
- G BRUKE TIMEREN
- I SPAREFUNKSJONEN (SAVE)
- N JUSTERING I STOR H∅YDE OVER HAVET
- BELANGRIJKE ONDERDELEN
- WAT U VOORAF MOET WETEN
- ALTIJD VOLDOENDE VENTILEREN
- HANDLEIDING
- A HET INSTALLEREN VAN DE KACHEL
- G HET BENUTTEN VAN DE TIMER
- N HOGE HOOGTE AANPASSING
- WAARSCHUWING
- Q VERVOER
- ISTOTNE CZEŚCI
- ZAPEWNIĆ ODPOWIEDNIA WENTYLACJE,
- INSTRUKCJA OBSŁUGI
- A INSTALACJA GRZEJNIKA
- J WYŚWIETLACZ INFORMACYJNY
- M LAMPKA KONTROLNA 'FUEL'
- S WARUNKI GWARANCJI
- PEÇAS IMPORTANTES
- MANUAL DE INSTRUÇÕES
- S CONDIÇÕES DE GARANTIA
- VIKTIGA DELAR
- SE ALLTID TILL ATT DET FINNS TILLRÄCKLIG VENTILATION
- A INSTALLATION
- F TEMPERATURINSTÄLLNING
- M 'FUEL'-INDIKERINGEN
- P FÖRVARING (SLUT PÅ UPPVÄRMNINGSSÄSONGEN)
Brand : QLIMA
Model : SRE301
Category : Frying Pan