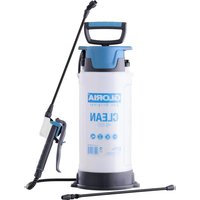
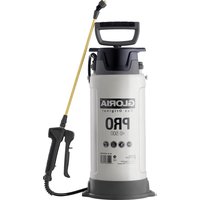
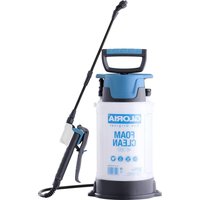
Pro 1300 - Backpack sprayer GLORIA - Free user manual and instructions
Find the device manual for free Pro 1300 GLORIA in PDF.

| Product type | Piston backpack sprayer |
| Brand | GLORIA |
| Model | Pro 1300 |
| Tank capacity | 13 liters |
| Empty weight | 4.00 kg |
| Tank material | Polyethylene |
| Pump material | Brass |
| Nozzle type | Hollow cone nozzle (55° angle) |
| Operating pressure | 1.5 to 2.5 bar |
| Spray flow rate | 0.42 to 0.50 l/min (depending on pressure) |
| Optimal spray distance | 40 to 50 cm |
| Max operating temperature | +40 °C |
| Transport system | Padded carrying frame with chest strap |
| Pump handle | Ergonomic, adjustable left/right |
| Integrated pressure gauge | Yes, on quick-closing valve |
| Lance | Brass, with hollow cone nozzle |
| Extension included | 0.5 m tube |
| Filter | Filling strainer 1 mm, valve filter 0.9 mm |
| Residual quantity | < 150 ml |
| Maintenance and cleaning | Clean with water after use, grease seals |
| Safety | Do not use flammable/explosive liquids, wear PPE |
| Spare parts | Available, use only genuine GLORIA parts |
| Repairability | Have repairs done by GLORIA service or authorized professional |
Frequently Asked Questions - Pro 1300 GLORIA
User questions about Pro 1300 GLORIA
0 question about this device. Answer the ones you know or ask your own.
Ask a new question about this device
Download the instructions for your Backpack sprayer in PDF format for free! Find your manual Pro 1300 - GLORIA and take your electronic device back in hand. On this page are published all the documents necessary for the use of your device. Pro 1300 by GLORIA.
USER MANUAL Pro 1300 GLORIA
GB User manual Origin operating instructions
natural_image
Simple icon set with a magnifying glass and paper airplane, no text or symbols present| DE | 8 - 16 |
| GB | 17 - 25 |
| FR | 26 - 34 |
| NL | 35 - 43 |
| 44 - 52 | |
| ES | 53 - 61 |
| PT | 62 - 70 |
| DK | 71 - 79 |
| SV | 80 - 88 |
| NO | 89 - 97 |
| FI | 98 - 106 |
| GR | 107 - 115 |
| TR | 116 - 124 |
| CZ | 125 - 133 |
| RU | 134 - 143 |
SERVICE-HOTLINE
natural_image
Blank white page with a curled corner corner, no text or symbols present.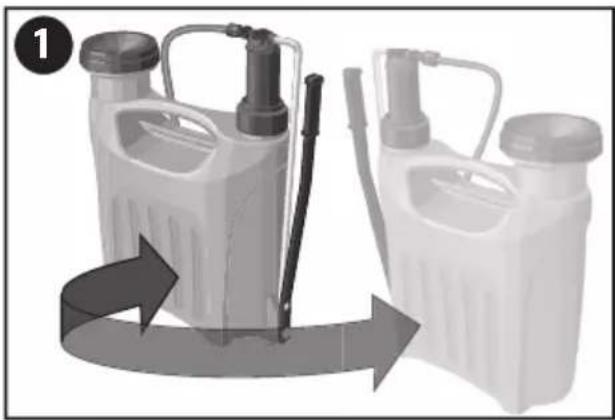
natural_image
Two plastic water purifiers with different sizes and handles, shown in grayscale and gray tones (no text or symbols visible)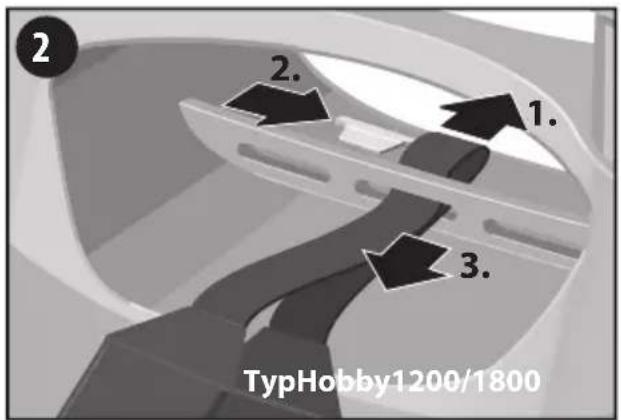
natural_image
Mechanical component diagram showing a belt drive mechanism with arrows indicating motion (no text or symbols)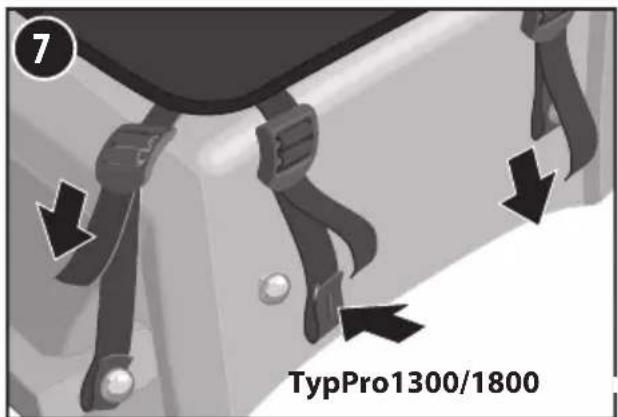
natural_image
Close-up of car seatbelt components with no visible text or symbols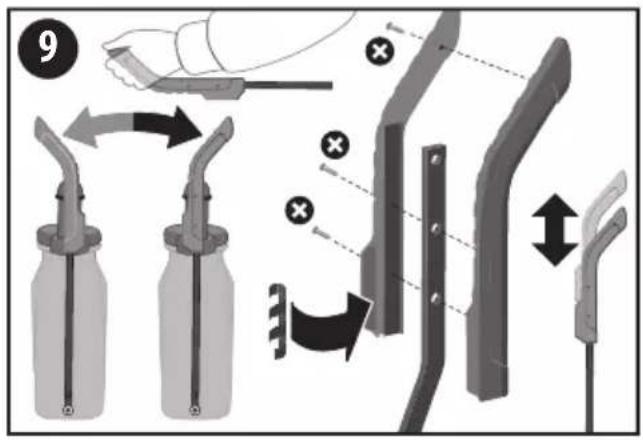
natural_image
Mechanical device with lever and adjustment arrows, no visible text or symbols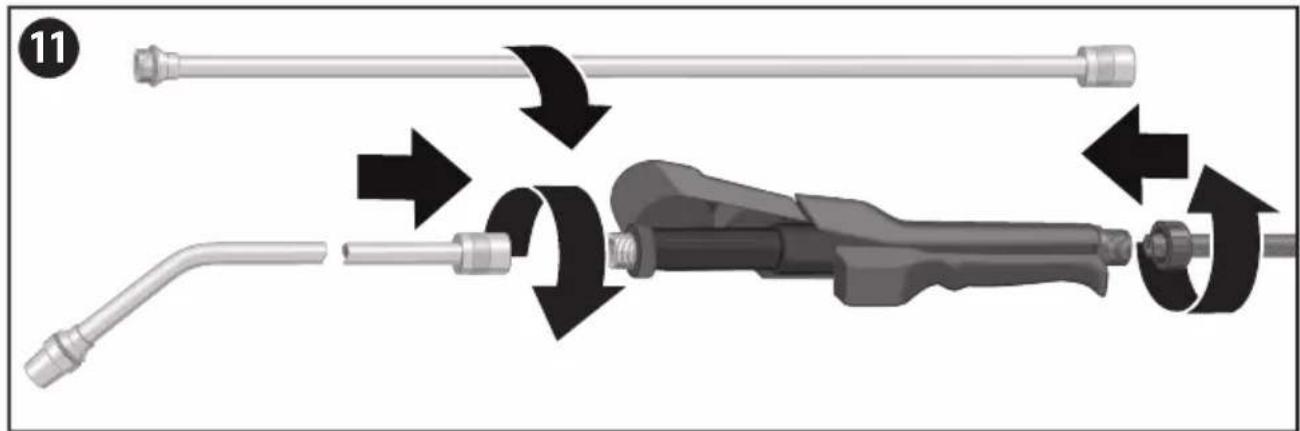
natural_image
Mechanical device with rotating components and directional arrows indicating motion (no text or symbols)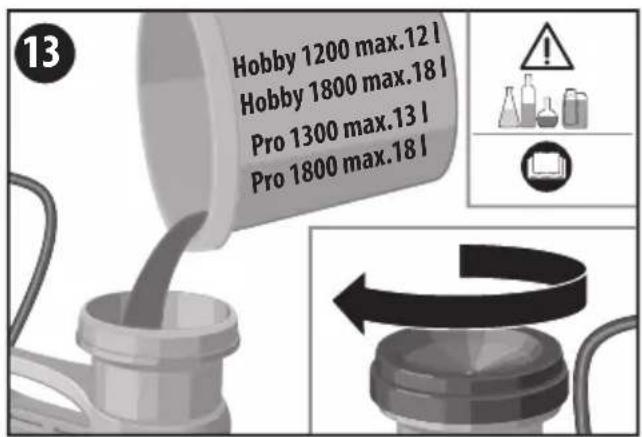
natural_image
Illustration showing a person carrying a backpack and a bag, with arrows indicating movement or posture (no text or symbols)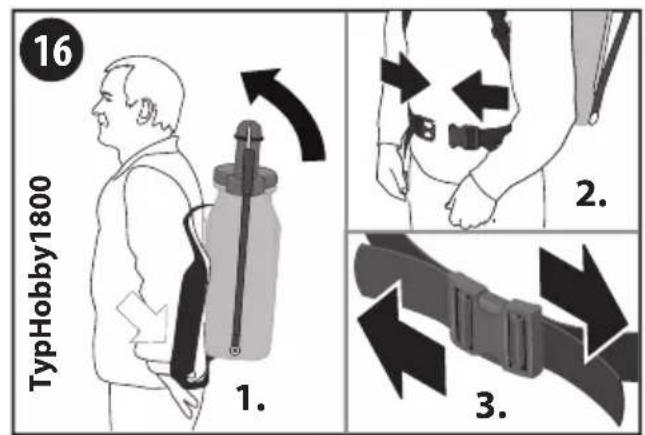

natural_image
Illustration of a hand spraying water from a plastic spray can into a bucket, with icons indicating hand and up (no text or symbols on the diagram itself)
INHALTSVERZEICHNIS
1.2 Intended use....18
1.3 Foreseeable misuse 18
1.4 Residual hazards 18
1.5 Limits of liability 18
2 For your safety 19
2.1 Basic safety information....19
2.2 Health hazards....19
2.3 Danger due to damage to equipment
3 Before the device can be used. . . . . . . . . . . . . . . . . . . . . .
3.1 Delivery condition 20
4 Technical data.
5 Assembly 21
5.1 Shoulder strap/carrier system 21
5.2 Pump grip 22
5.3 Quick closure valve/hose/spraying lance.
6 Starting up . . . . . . . . . . . . . . . . . . . . . . . . . . . . . . . . . .
6.1 Filling the device....22
6.2 Correctly fitting the shoulder strap / carrier system to the body ..... 22
6.3 Spraying....23
7 Shutting down . . . . . . . . . . . . . . . . . . . . . . . . . . . . . . . . . .
7.1 Emptying 23
7.2 Maintenance....24
7.3 Storage....24
8 Problems with the device . . . . . . . . . . . . . . . . . . . . . . . . . .
8.1 Troubleshooting 24
9 Accessories
10 Disposal & Legislation . . . . . . . . . . . . . . . . . . . . . . . . . . . . .
10.1 Environmental protection & disposal of the device 25
10.2 Disposal of packaging 25
1 General information about this user manual
This user manual is part of the GLORIA device and must be kept available at a with or close to the device.
The user manual provides you with important safety instructions and information required to operate the device properly!
The user manual must be read in full by every person who is authorized to opt/use/maintain the device.
Keep the user manual safe and pass on to the next owner!
All safety instructions are always intended for your own safety!
1.1 Warnings

CAUTION
A warning of this hazard classification indicates a potentially hazardous situation which, if not avoided, may result in injuries. Follow the instructions indicated in this warning to prevent the risk of injury.
ATTENTION
A warning of this hazard classification indicates possible damage to equipment which, if not avoided, may result in damage.
Follow the instructions indicated in this warning to avoid damaging equipment.
i NOTE!
A note indicates additional information or illustrations which will help you operate and understand the device.
1.2 Intended use
This GLORIA device is a plant protection device that is solely intended for the application of BVL-approved liquid pesticides [BVL: German Federal Office of Consumer Protection and Food Safety].
Compliance with the enclosed manufacturer's user manual is a prerequisite for the correct use of the device. The user manual also contains the operating, maintenance and servicing conditions.
Always comply with the safety information/safety measures of the spray product manufacturer when applying the pesticides.
CAUTION
Danger if not used as intended!
Dangers can arise from the device if not used as intended. For this reason, obse the following safety instructions:
■ The device must only be used for the designated purpose.
■ Comply with all instructions and information in this user manual.
1.3 Foreseeable misuse
■ Only the pesticides named by the manufacturer may be sprayed.
- For safety-technical reasons, the following may not be sprayed: explosive, combustible media, aggressive corrosive liquids, disinfection and impregnating media or any media above 40°C.
1.4 Residual hazards
This device is in compliance with the generally accepted technical rules and the relevant safety regulations! Nevertheless, using the device can result in:
■ Danger to life and limb of the user or other persons.
■ Damage to the device.
■ Damage to other property.
1.5 Limits of liability
We expressly point out that, in accordance with the product liability law, we are not liable for any damages caused by our device if they are due to non-compliance with the user manual, improper use, improper repair or if parts replaced are not original parts, and if repair was not performed by our customer service or authorised specialist. This also applies to accessories.
2 For your safety
This chapter contains important warning and safety instructions that you must comp with when handling and using the device.
2.1 Basic safety information
Comply with the following basic safety instructions for safe handling and safe utilisation of the device:
i NOTE!

- Repairs to equipment for household and garden use may only be implemented by the service points. Spare parts should be ordered from your authorised dealer. If not in stock, he can get them quickly.
- This device is in compliance with the generally accepted technical rules and the relevant safety regulations!
This device is not intended for use by persons (including children) with limited physical, sensory or mental abilities, or who lack experience and/or know-how, unless they are under supervision of a person responsible for their safety, or received according instruction by that person on how to operate the device.
■ Use the device as intended! - Keep spraying equipment and media away from children and young persons under 16.
- To avoid damage and hazards due to improper use, comply with and keep the user manual in a safe place!
■ When passing the device on to other persons, the user manual must also be included! - Only use original GLORIA spare parts and accessories for the device. Never use worn, modified or defective spare parts/accessories!
■ Always place the device on an even, flat surface.
■ Never mix more spray solution than is required. Do not dispose of residues in the drains, but dilute 1:10 and spread over vegetation.
2.2 Health hazards
CAUTION
You may be exposed to hazards that could injure you when handling the device the pesticides. Always comply with the safety information/safety measures of the spray product manufacturer and the following safety instructions:
- Eating, drinking and smoking are only permitted, when handling plant protection products and pesticides, after protective clothing has been removed and the hands and face thoroughly cleaned (rinse out mouth).

■ Wear protective clothing according to the pesticides in use.
■ Never point the spray jet at people or animals.
■ Never use solvent-based or oily substances.
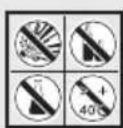
- For safety-technical reasons, the following may not be sprayed: explosive media, aggressive corrosive liquids, disinfection and impregnating media or any media above 40°C.
- Do not blow out blocked nozzles using the mouth.
- Do not point the end of the spraying lance at yourself when unscrewing it.
■ Changes or improvements to the device are not permitted without the agreement of the manufacturer! Never bypass, modify or remove the safety equipment.
2.3 Danger due to damage to equipment
ATTENTION
Improper use can cause damage to the device!
For this reason, observe the following safety instructions:
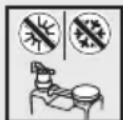
- Protect the device against long exposure to the sun and frost.
- Do not store the device in livestock buildings due to the ammonia vapours (danger of brass cracking), do not fill with solutions containing nitrogen or phosphates.
3 Before the device can be used
This chapter contains information about the delivery condition.
3.1 Delivery condition
The standard device is delivered as follows:
- Plastic quick closure valve with integrated pressure gauge
- Brass spraying lance with hollow cone nozzle
- Extension tube 0.5 m (Type Hobby 1800, Pro 1300/1800)
- Two adjustable carrying straps with pads for pump lever which can be operated left or right-handed (Type Hobby 1200)
- Two adjustable carrying straps with pads, and a lap belt, for pump lever which can be operated left or right-handed (Type Hobby 1800)
- Padded carrier system for pump lever which can be operated left or right-handed, and mountable handle (Type Pro 1300/1800)
- Pump lever with spraying lance seat
- Container with transparent viewing stripes (fill level checking)
- 1 x user manual and product information
Any accessories will be included individually packed.
4 Technical data
Piston knapsack sprayer Type Hobby 1200/1800 Type Pro 1300/1800
Max. filling capacity in litres: 12/18 13/18
Permissible operating pressure: + 40°C + 40°C
Empty weight: 3,45 kg / 4,30 kg 4,00 kg / 4,90 kg
Hollow cone nozzle, spraying angle 55^ 55^
Delivery volume at
1.5 bar spraying pressure: 0.42 l/min 0.42 l/min
2.0 bar spraying pressure: 0.49 l/min 0.49 l/min
2.5 bar spraying pressure: 0.50 l/min 0.50 l/min
| Container material: | Polyethylene | Polyethylene |
| Pump material: | Polyethylene | Brass |
| Mesh size of filter in quick closure valve: | 0.9 mm | 0.9 mm |
| Mesh size of filling strainer: | 1 mm 1 mm | |
| Residual quantity after horizontal emptying: | < 150 ml | < 150 ml |

5 Assembly
5.1 Shoulder strap/carrier system
Figures 1 - 8
Depending on the model, your device is equipped with a padded shoulder strap or a carrying frame.
1 Depending on the required operating position of the pump lever (right or left-hand side), the shoulder straps can be mounted for right or left-handed persons on all model types. The pump lever should be on the left for right-handed persons.
Type Hobby 1200/1800: Padded shoulder strap
2 Pass upper loop through the middle slot. Insert the mounting element into the loop. Pull the strap back until it is caught in place.
3 Pass the two lower strap ends as shown through the metal strap buckles.
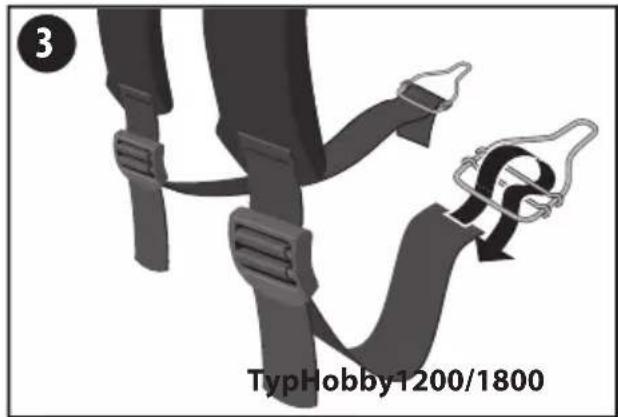
Type Hobby 1800: Additional lap belt
4 Mount the lower holding points as shown for the lap belt.
5 Pass the upper straps through the left and right slots and then pull through the strap buckles as shown.
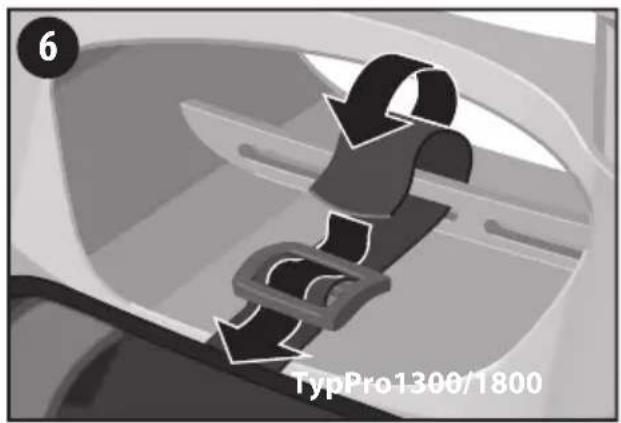
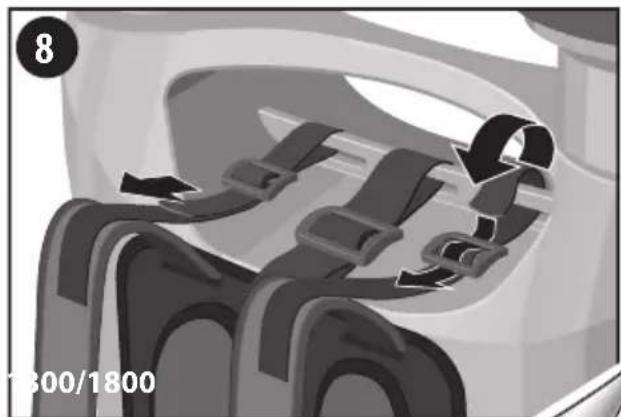
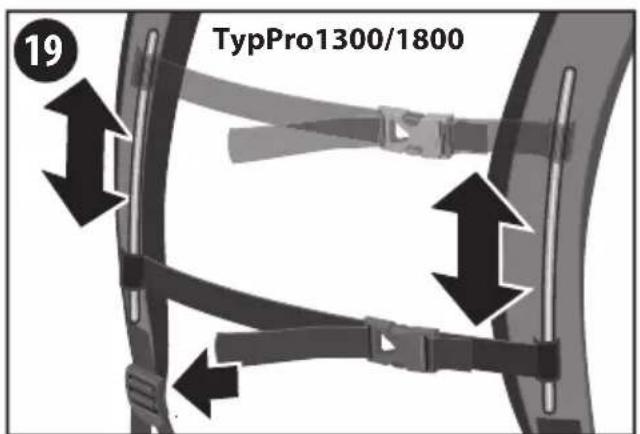
Type Pro 1300/1800: Carrier system with chest strap (model Pro 1800 includes a la belt)
6 Pass the upper middle strap through the middle slot and pull through the strap buckle as shown.
7 Then mount the lower 4 holding points (2 outside / 2 inside) for the carrier system as shown.
8 Pass the upper outer straps respectively through the left and right slots and then pull through the strap buckles as shown.
5.2 Pump grip
Figure 9
The device types Pro 1300/1800 are equipped with an ergonomic handle which must be mounted appropriately for left or right-hand use.
9 Mount the handle facing the left or right-hand side on the pump lever. Insert the handle sections on the pump lever as shown.
i NOTE!
- You can choose between 2 insert positions which will shorten or extend the lever arm of the pump lever according to the mounted handle position.
Insert the holding clip for the spraying lance as shown.
Then attach the second handle section and screw both handle sections to the pump lever as shown.
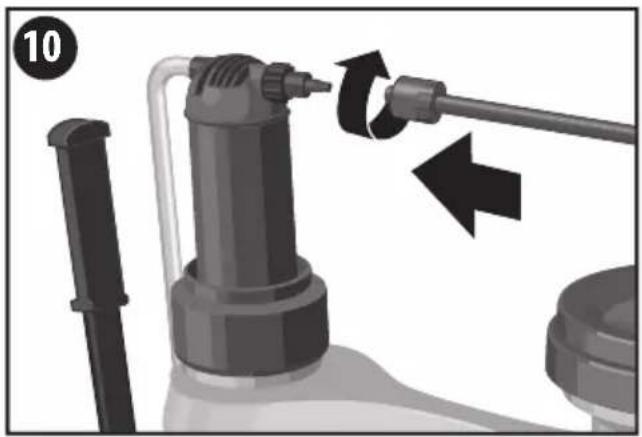
5.3 Quick closure valve/hose/spraying lance
Figures 10 - 11
10 Push the hose up to the stop on the connection sleeve of the pump housing and screw down tight with the coupling nut.
11 Push the hose up to the stop on the connection sleeve of the quick closure valve and screw down with the coupling nut. Screw the spraying lance onto the quick closure valve. Mount an extension if required (except type Hobby 1200).
6 Starting up
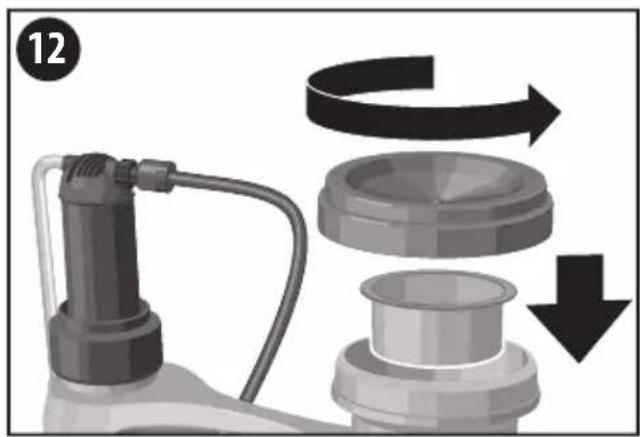
6.1 Filling the device
Figures 12 - 13
12 Remove the container cap and fill the device through the filling strainer. Close the container with the container cap.
CAUTION
- Note maximum fill level (see technical data), safety instructions and permissible materials.
- Check fill quantity.
■ Comply with the data of the spray product manufacturer!
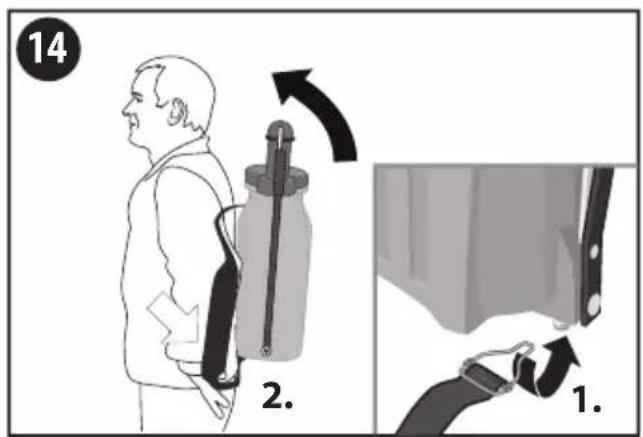
6.2 Correctly fitting the shoulder strap / carrier system to the body
Figures 14 - 23
You can adjust your shoulder strap/carrier system (type-dependent) accurately to ensure optimal load distribution and fatigue-free working. The device must be worn as close to the body as possible and parallel to the spine.
TypeHobby1200/1800:Paddedshoulderstrap
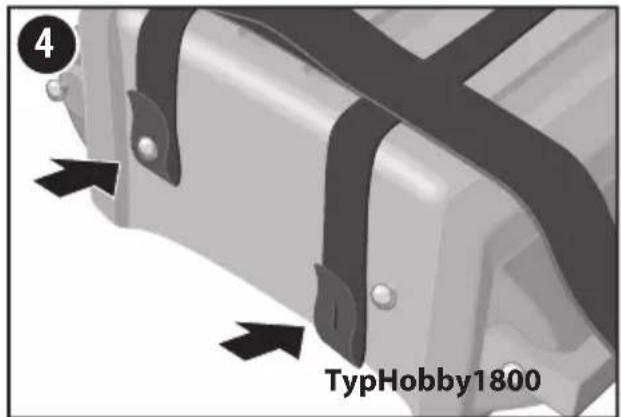
14 Fasten the shoulder straps as shown to the lower left and right outer strap buttons and position the device on your back.
15 Tighten the carrying straps over the shoulders by pulling the lower strap ends. The carrying straps can be lengthened or shortened by adjusting the strap buckles.
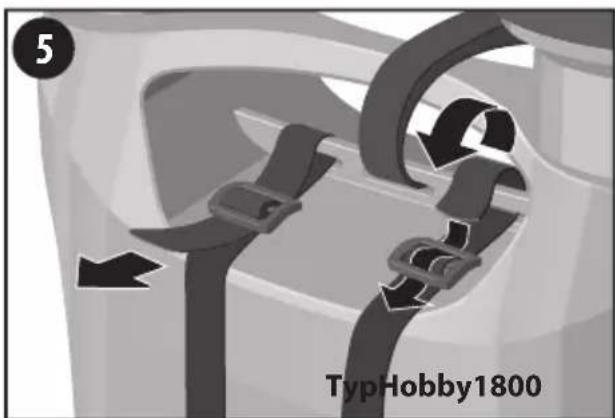
Type Hobby 1800: includes lap belt
16 Before the strap lengths are adjusted, it is first necessary to clip on and tighten the lap belt of this device.
17 Then tighten the carrying straps of the shoulder straps.
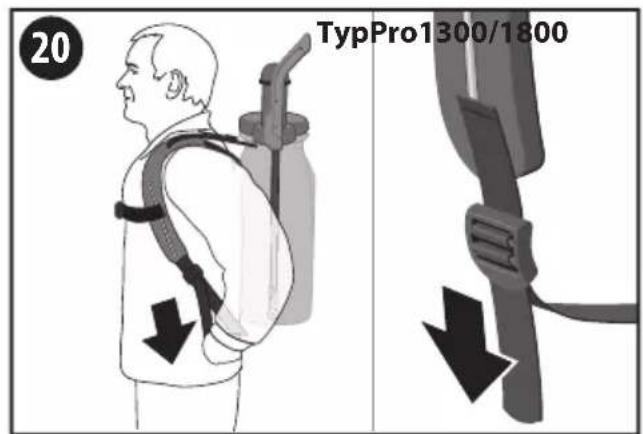
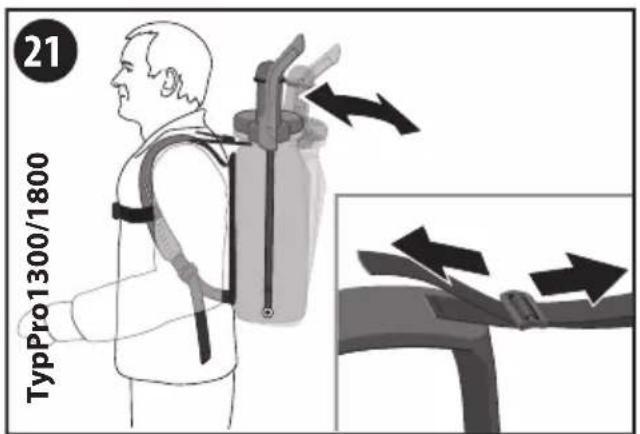
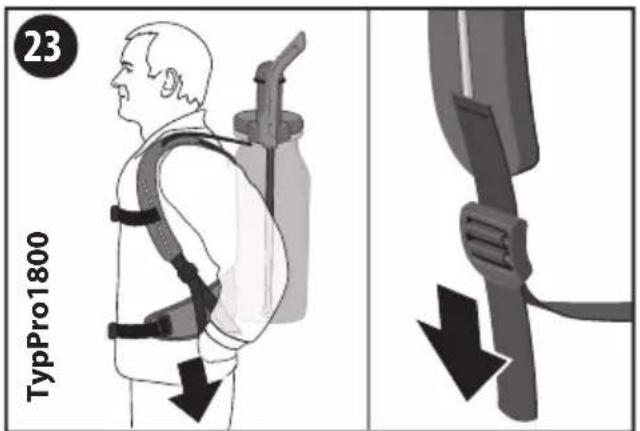
Type Pro 1300/1800: Carrier system with chest strap (Pro 1800 includes a lap belt)
18 Place the device on your back.
19 Clip on the chest strap and adjust height and width as shown.

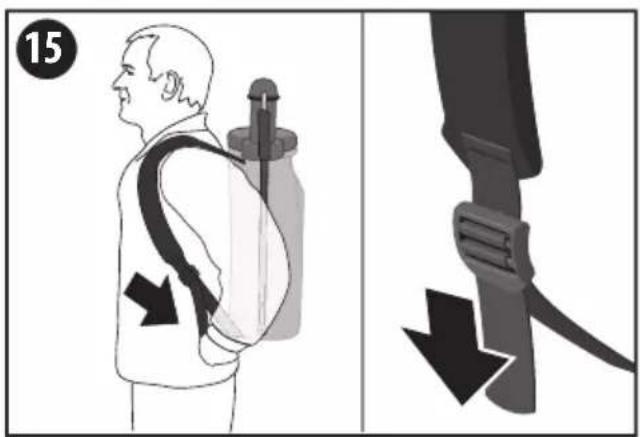
20 Tighten the shoulder straps by pulling the lower strap ends as shown.
21 Adjust the carrying straps of the shoulder straps by pulling the upper strap buckles as shown until the device lies parallel on the back. Adjustment is only possible when the device is off the shoulders.
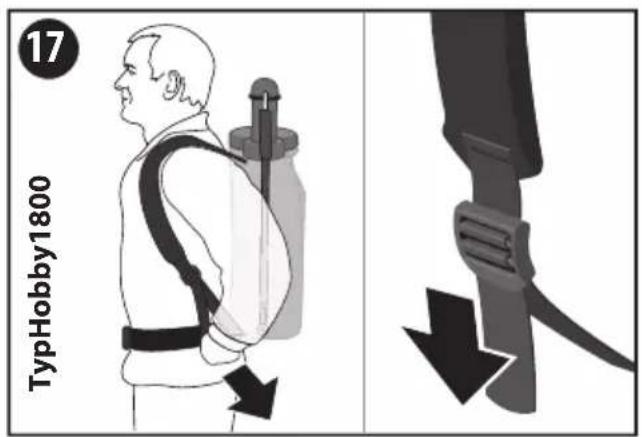
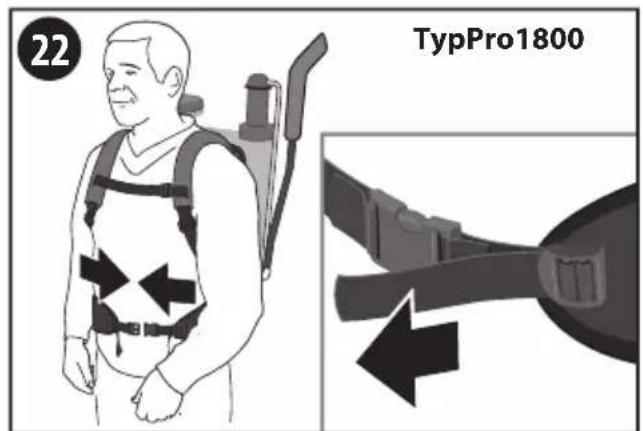
Type Pro 1800: includes lap belt
22 The lap belt must be clipped in and tightened on this device before the lower straps ends are pulled to tighten the straps.
23 Tighten the shoulder straps by pulling the lower strap ends as shown.
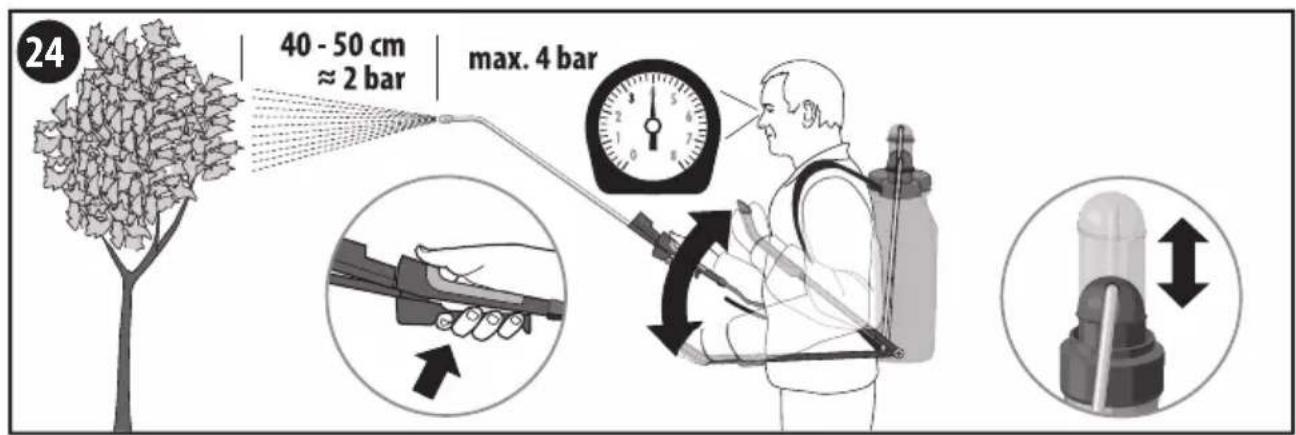
6.3 Spraying
Figures 24 - 25
24 Move the pump lever maximum 3-4 times up and down. This fills the air vessel and the spraying line with spray product and produces the operating pressure required for spraying. Pressing the actuation lever down on the quick closure valve initiates the spraying process. This can be interrupted immediately by releasing the actuation lever. The spray pressure at the nozzle is influenced by the pumping process. The pressure can be read off on the pressure gauge. The optimal spraying pressure is always dependent on the nozzle used. It lies between 1.5 and 2.5 bar for the hollow cone nozzle mounted at the factory.
The optimal distance between the nozzle and object for spraying is 40-50 cm.
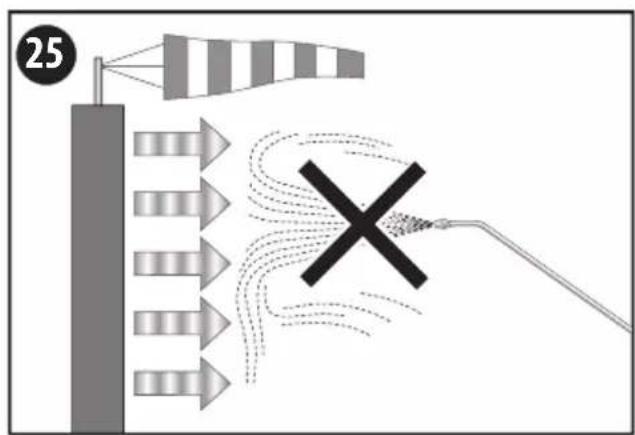
CAUTION
25 Note wind direction! Do not spray into the wind. Ensure uniform wetting of the object when spraying.
7 Shutting down
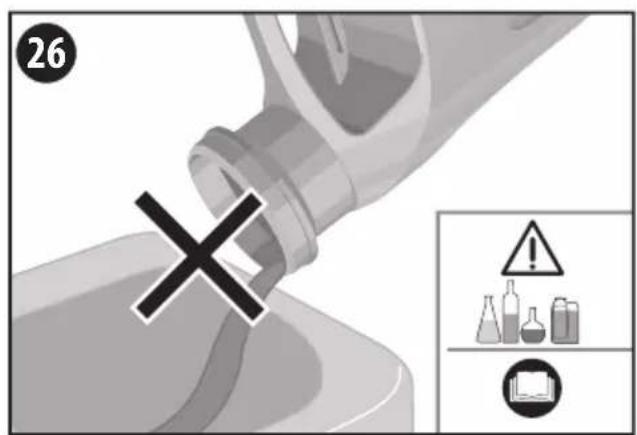
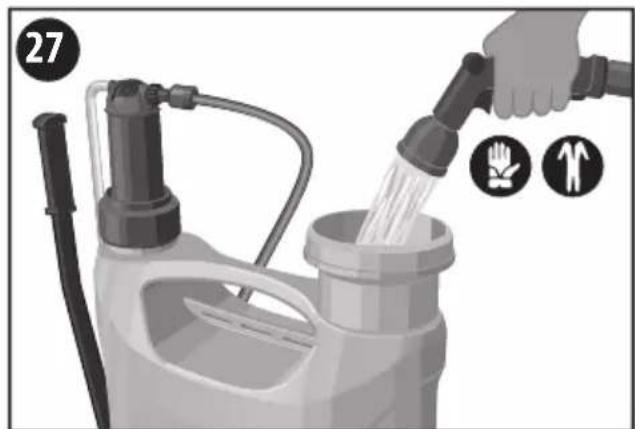
7.1 Emptying
Figures 26 - 27
26 Do not dispose of residues in the drains, but dilute 1:10 and spread over vegetation.
27 Clean the device and hose system thoroughly with water after each use (rinse several times), actuating the pump and actuation lever on the quick closure valve several times whilst doing so. Collect the discharge and apply as described above diluted 1:10 onto vegetation. Leave the device to dry opened, hanging it up if possible with the opening facing downwards.
7.2 Maintenance
Figure 28
28 Cleaning the sieve tube in the quick closure valve: Unscrew the hose connection from the quick closure valve and remove from the quick closure valve with the sieve. Unscrew the sieve tube from the hose connection and wash thoroughly with water. Mount in reverse sequence after cleaning. Hand-tighten all screw connections.

CAUTION
You may be exposed to hazards that could injure you when cleaning the sieve t Wear safety gloves and protective clothing, if necessary.
- Completely depressurise the hose line by pulling the actuation lever on the quick closure valve, even if the device is empty, and dispose of any remaining liquid in the system onto vegetation.
- The sealing ring in the container cap and all other moving parts must be regularly greased with resin- and acid-free grease.
■ Only use original GLORIA spare parts for repairs.
■ Repairs must be carried out by a GLORIA service point.

NOTE!
■ To ensure optimal cleaning of the spraying device, the use of the GLORIA spraying device cleaner, Art. No. 1100.0000 is recommended.
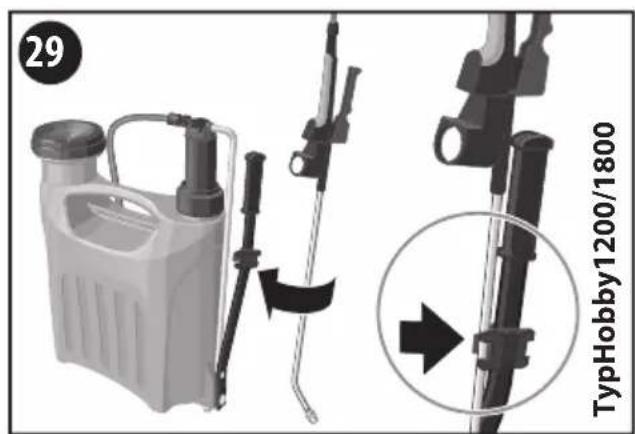
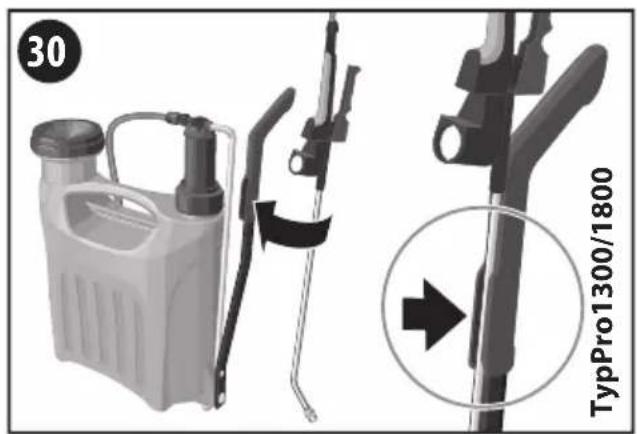
7.3 Storage
Figures 29 - 30
Empty and clean the device as described in the chapters Emptying and Maintenance.
29 30 Loosen the container cap - Clip spraying lance onto the spraying lance holder - Store the device without pressure and frost-free.

CAUTION
You may be exposed to hazards that could injure you when handling the device and the pesticides. You must therefore store the device and the pesticides away from children.
8 Problems with the device
8.1 Troubleshooting
| Fault Cause Remedy | ||
| Deviceisleakingatthe screwconnection | Hoseloose | Tightencouplingnutand carryoutpressuretestwith water |
| Spraypatternofnozzlenot OK | NozzlepartiallyblockedCleanfilterornozzle | |
9 Accessories
Flat spray nozzle: Art. No. 111.0000
Spray shield, type 260: Art. No. 260.0000
Spray shield, type 270: Art. No. 270.0000
Brass extension tube 0.5 m: Art. No. 124.0000
Brass extension tube 1.0 m: Art. No. 110.0000
Spraying device cleaner: Art. No. 1100.0000
Further accessories can be found at www.gloriagarten.de

10 Disposal & Legislation
10.1 Environmental protection & disposal of the device
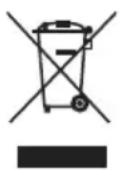
This symbol on the product, user manual or packaging indicates that this product must not be disposed of in regular household waste at the end of its service life. The device must be disposed off at a recycling collection point. The materials can be recycled according to their designations. You will make an important contribution to the protection of our environment by the correct end-of-life product recycling, material recycling or other form of re-use.
i NOTE!
- Please check with your local government to find the appropriate disposal point.
■ Empty the device before disposal and render it unusable.
10.2 Disposal of packaging

The packaging materials have been selected according to environmentally-suitable and disposal-related aspects and are therefore recyclable. Returning the packaging to the material circulation saves raw materials and reduces the level of waste.
Please dispose of unwanted packaging materials according to applicable local regulations.
SOMMAIRE
Type Hobby 1800: extra heupgordel
Prolunga in ottone 1,0 m: cod. art. 110.0000
INNEHÅLLSFÖRTECKNING
Pirinç uzatma borusu 1,0 m: Katalog No. 110,0000