CA 1730 - Rangefinder CHAUVIN ARNOUX - Free user manual and instructions
Find the device manual for free CA 1730 CHAUVIN ARNOUX in PDF.


User questions about CA 1730 CHAUVIN ARNOUX
0 question about this device. Answer the ones you know or ask your own.
Ask a new question about this device
Download the instructions for your Rangefinder in PDF format for free! Find your manual CA 1730 - CHAUVIN ARNOUX and take your electronic device back in hand. On this page are published all the documents necessary for the use of your device. CA 1730 by CHAUVIN ARNOUX.
USER MANUAL CA 1730 CHAUVIN ARNOUX
4.7.Addition/Soustraction....12
text_image
2 3 4 MEAS 1 6 5 8 Unit 7natural_image
Diagram showing light rays reflecting off a surface with a conical object, no text or symbols present4.3.MESURE DE SURFACE
text_image
1 3 2 2 E? figure 2 1 3Thank you for purchasing this CA 1730 Rangefinder.
For best results from your instrument:
- Read these operating instructions carefully,
- Comply with the precautions for use.
MEANING OF THE SYMBOLS USED
 | WARNING, risk of DANGER! The operator must refer to this user's manual whenever this danger symbol appears. |
 | WARNING! Class 2 laser radiation. Do not look at the LASER beam. |
 | The CE marking indicates compliance with the European Low Voltage Directive (2014/35/EU), Electromagnetic Compatibility Directive (2014/30/EU), and Restriction of Hazardous Substances Directive (RoHS, 2011/65/EU and 2015/863/EU). |
 | The rubbish bin with a line through it indicates that, in the European Union, the product must undergo selective disposal in compliance with Directive WEEE 2012/19/EU. This equipment must not be treated as household waste. |
 | The UKCA marking certifies that the product is compliant with the requirements that apply in the United Kingdom, in particular as regards Low-Voltage Safety, Electromagnetic Compatibility, and the Restriction of Hazardous Substances. |
If this instrument is damaged or a part is missing, please contact your seller immediately. Failure to observe the instructions or precautions of use may impair the protection provided by the instrument.
To avoid exposure to laser radiation, injury, or damage to this instrument, and make sure that you are using the rangefinder safety, observe the safety tips given below:
- Do not aim the laser sight at anyone's eyes,
- Do not place the rangefinder on or near objects of which the temperature is >65^ / 150^ ,
- If the rangefinder is exposed to large variations of ambient temperature, wait for the temperature to stabilize, then wait 30 minutes before resuming the measurement, to attain the specified accuracy,
- Let any condensation that might form on the lens of the measurement orifice of the rangefinder evaporate before resuming the measurement,
- Do not expose the rangefinder to strong electric or magnetic fields, which can cause measurement errors (avoid, for example, induction heaters, arc welding equipment, etc.),
- Comply with the climatic environmental conditions (see § 4),
- Keep the lens perfectly clean.
CONTENTS
1.PRESENTATION 19
1.1.Delivery condition 19
1.2. Inserting the battery.... 19
1.3.General 19
2.DESCRIPTION....20
3. CONFIGURATION....22
3.1.Switching ON / OFF 22
3.2.Effacement 22
3.3.Reference level 22
3.4. Lighting of the display unit....22
3.5. Changing the units....23
4.MEASUREMENT 23
4.1.Simple distance measurement....23
4.2.Continuous measurement (Minimum / Maximum) 23
4.3.Measurement of area....24
4.4.Measurement of volume 24
4.5.Indirect measurement - two-point Pythagorean 24
4.6.Indirect measurement - three-point Pythagorean 25
4.7.Addition / Subtraction....26
4.8.Measurements log 26
5.CHARACTERISTICS 27
5.1.Specifications 27
5.2.Environmental conditions 27
5.3.Physical characteristics....27
5.4.Compliance with international standards 27
6.WARRANTY....28
7.MAINTENANCE....28
7.1.Operating problems ......28
7.2.Cleaning the measurement lens 29
7.3.Cleaning the housing 29
1.1.DELIVERY CONDITION
The instrument is delivered in a cardboard box with 1 carrying bag, 2 AAA batteries, and these operating instructions.
1.2. INSERTING THE BATTERY
- Swing the ruler clear of the battery compartment.
- Use a screwdriver to remove the screw
- Remove the battery compartment cover with the help of the screwdriver,
- Insert the batteries, with the correct polarities,
- Put the battery compartment cover back on and make sure that it is correctly and completely closed.
- Screw the screw back in and put the ruler back in place.
Spent primary and storage batteries must not be treated as ordinary household waste. Take them to the appropriate collection point for recycling.
Remove the batteries if the instrument will be left unused for an extended period.
1.3.GENERAL
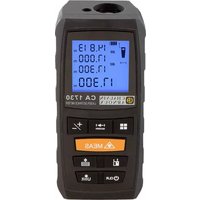
The CA 1730 LASER rangefinder is a non-contact distance measurement instrument that can also calculate areas and volumes. It works by emitting a brief pulse that is reflected from the target and received by a photodetector. The distance between the rangefinder and the target can be computed from the elapsed time between the emission and reception of the signal.
2. DESCRIPTION
text_image
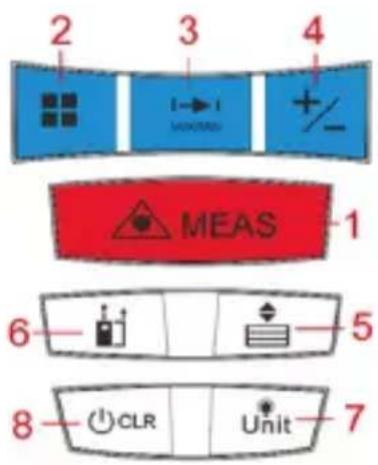
2 3 4 MEAS 1 6 5 8 Unit 71: Switching on / Activation of LASER / Measurement
2: Area / Volume
3: Continuous measurement
4: Addition / Subtraction
5: Measurement log
6: Measurement reference
7: Backlighting / Units
8: Clear / Stop
text_image
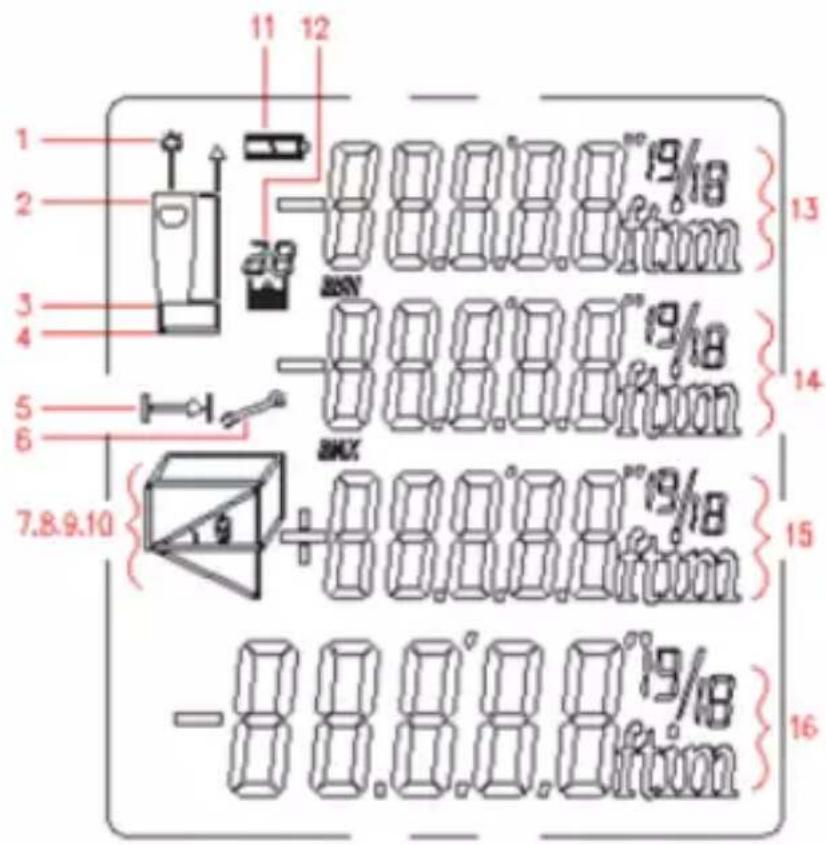
1 2 3 4 5 6 7.8.9.10 11 12 0.0.0.0"19/8" 0.0.0.0"19/8" 0.0.0.0"19/8" 0.0.0.0"19/8" 0.0.0.0"19/8" -0.0.0.0"19/8" -0.0.0.0"19/8" 13 14 15 161: Activation of the LASER
2: Reference level (front)
3: Reference level (back)
4: Reference level (offset)
5: Continuous measurement
6: Error message
7, 8, 9, 10: Measurement functions:

Measurement of area
Measurement of volume
Two-point Pythagorean
Three-point Pythagorean
11: Battery charge levels
12: Measurements log
13: Display of the first value
14: Display of the second value / Minimum
15: Display of the third value / Maximum
16: Display of the last measurement or of the calculation result
3. CONFIGURATION
3.1.SWITCHING ON / OFF

MEAS
To switch the instrument on (by a long press), activate the LASER, and make a measurement.

CLR
A long press on this key turns the instrument off. The instrument switches itself off automatically after 3 minutes of inactivity.
3.2.EFFACEMENT

CLR
The last action is cancelled or the display of the value is cleared.
3.3.REFERENCE LEVEL
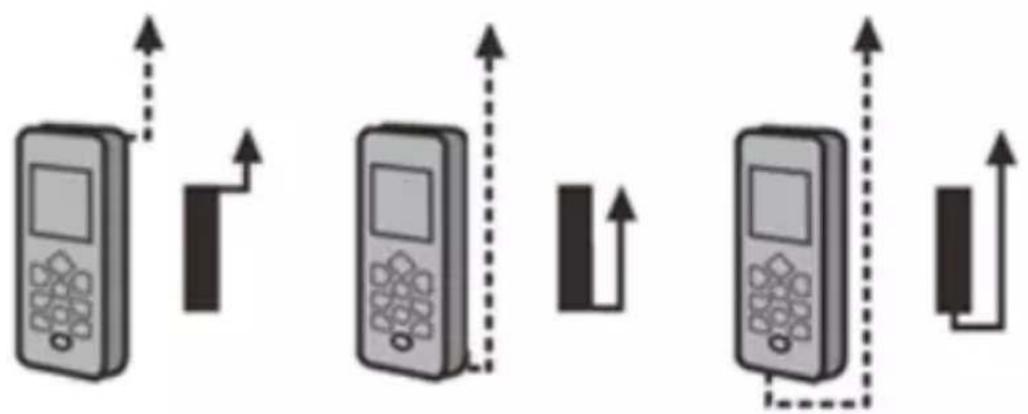
Press the key to toggle the reference point between the front, the back, or the ruler of the instrument. An audible beep indicates that the reference has been changed.
As default, the reference level is on the back of the instrument. When the instrument is switched on, the reference is automatically reset to the default value (back of the instrument).
flowchart
graph TD
    A["Mobile Device 1"] -->|dashed arrow| B["Mobile Device 2"]
    B -->|solid arrow| C["Mobile Device 3"]
    C -->|dashed arrow| D["Mobile Device 4"]
    D -->|solid arrow| A
3.4. LIGHTING OF THE DISPLAY UNIT
Press the key to switch the backlighting on or off.
3.5. CHANGING THE UNITS
A long press on the in, ft.+in).
key changes the unit of measurement (m, ft.
4. MEASUREMENT
Never aim the LASER sight at anyone's eyes.
4.1.SIMPLE DISTANCE MEASUREMENT
During a simple distance measurement, the symbol is displayed.
1: Press MEAS once to activate the LASER.
2: Press MEAS again to trigger the measurement.
The value measured is displayed immediately.
4.2.CONTINUOUS MEASUREMENT (MINIMUM / MAXIMUM)
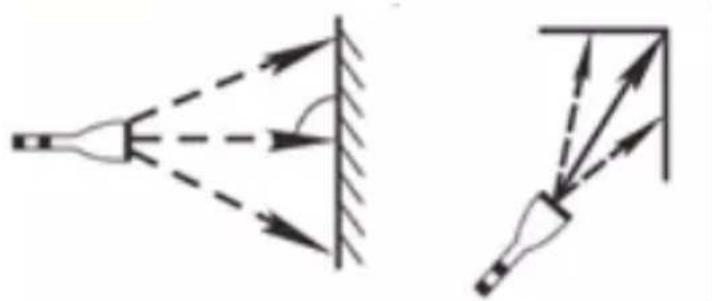
The continuous (tracking) measurement mode is used to go to a specified distance, for example as indicated by a blueprint. In this mode, the rangefinder can be moved with respect to the target; the measurement is displayed in the third row. The minimum and maximum values are automatically indicated in the first and second rows.

1: Press the MAX/MIN key to activate continuous measurement.
2: Pressing MEAS or stops the function.
natural_image
Diagram showing light rays reflecting off a surface with a conical object, no text or symbols present4.3.MEASUREMENT OF AREA
1: Press the key, the symbol is displayed.
2: Press twice to make the first measurement, for example the length.
3: Press MEAS again to make the second measurement, for example the width.
The calculated area is indicated in the last row. The individual measurements are recalled in rows 1 and 2, and the perimeter is displayed in row 3.
4.4.MEASUREMENT OF VOLUME
1: Press the key until the symbol is displayed
2: Press MEAS twice to make the first measurement, for example the length.
3: Press MEAS again to the second measurement, for example the length.
4: Press MEAS to make the third measurement, for example the height.
The measurement results, length, width, height, and volume, are displayed in that order.
4.5.INDIRECT MEASUREMENT - TWO-POINT PYTHAGOREAN
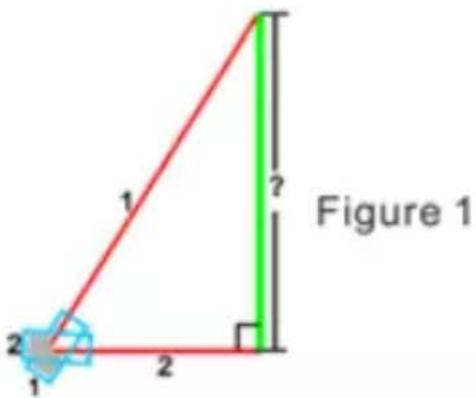
The indirect measurement is used to determine a distance using auxiliary measurements. For example, a height can be measured by measuring two other distances.
The target points must be on the same line. The orientation of the LASER during the measurement of the second distance must be perpendicular to the line.
text_image
Figure 1 1 2 2 1 21: With reference to figure 1, press the ■ key until the △ symbol is displayed.
2: Press MEAS twice to make measurement 1 while aiming at the high point.
3: Place the instrument horizontally and press MEAS again to make measurement 2. The result is displayed in the last row.
Pressing CLR clears the last length measurement and pressing MEAS repeats the measurement.
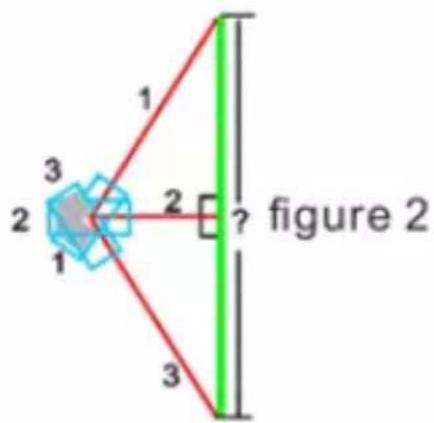
4.6.INDIRECT MEASUREMENT - THREE-POINT PYTHAGOREAN
text_image
1 2 3 E? figure 2 1 2 31: With reference to figure 2, press the ■ key until the △ symbol is displayed.
2: Press twice to make measurement 1 while aiming at the high point.
3: Place the instrument horizontally and press MEAS again to make measurement 2.
4: Press to make measurement 3 while aiming at the low point.
The result is displayed in the last row.
Pressing CLR clears the last length measurement and pressing MEAS repeats the measurement.
4.7.ADDITION / SUBTRACTION
1: Make a first measurement, then press the +/- key, or long-press it until the desired symbol is displayed.
2: Press MEAS to make the second measurement. This second value will automatically be added to or subtracted from the first. This process can be repeated as many times as you want.
4.8.MEASUREMENTS LOG
1: Press to access the measurements log. The last 20 items will be displayed in reverse order.
2: A short or long press on the +/- key displays these records.
Press ⏻ CLR to exit from this look-up of the log.
5. CHARACTERISTICS
5.1.SPECIFICATIONS
| Measurement range 0.2 | ~ 60 metres |
| Intrinsic error ± 2 mm + | 5 x 10⁻⁵ distance |
| Measurement of area and volume | Yes |
| Addition/Subtraction Yes | |
| Simple measurement Yes | |
| Continuous measurement | Yes |
| Display In 4 rows with backlighting | |
| Audible beep Yes | |
| Memory Log of 20 items | |
| Units m / in / ft / ft+in | |
| Batteries Type AAA 2 x | 1.5 V |
| Battery life Approximately | 5 000 measurements |
| Auto-off Automatic switching off of the LASER (30 seconds)Automatic switching off of the instrument (180 seconds) | |
5.2.ENVIRONMENTAL CONDITIONS
Range of operation: 0 to +40°C (32°F to 104°F) without condensation
Range of storage: -10^ to +60^ ( 14^ to 140^ )
5.3.PHYSICAL CHARACTERISTICS
Dimensions: 115 x 52 x 32 mm
Weight: 118 g
5.4.COMPLIANCE WITH INTERNATIONAL STANDARDS
LASER safety standards: IEC/EN 60825-1 or BS EN 60825-1
LASER: Class II
LASER wavelength: 630 nm \~ 670 nm - Power < 1 mW
Compliant with standards IEC/EN 61326-1 or BS EN 61326-1 and
IEC/EN 61010-1 and BS EN 61010-1.
Protection class: IP54
6. WARRANTY
Except as otherwise stated, our warranty is valid for 24 months starting from the date on which the equipment was sold. Extract from our General Conditions of Sale provided on request.
The warranty does not apply in the following cases:
- Inappropriate use of the equipment or use with incompatible equipment;
- Modifications made to the equipment without the explicit permission of the manufacturer's technical staff;
- Work done on the device by a person not approved by the manufacturer;
- Adaptation to a particular application not anticipated in the definition of the equipment or not indicated in the user's manual;
- Damage caused by shocks, falls, or floods.
7. MAINTENANCE
Except for the batteries, the instrument contains no parts that can be replaced by personnel who have not been specially trained and accredited. The manufacturer cannot be held liable for any accident that occurs following a repair done by anyone other than its customer service department or an approved repairer.
7.1. OPERATING PROBLEMS
Measurement errors may occur on semi-transparent materials, glass, Plexiglas, or similar materials. In such cases applying a sheet of paper will facilitate the measurement. Varnished surfaces can deflect the LASER beam and also lead to measurement errors. The measurement time may be increases in the case of non-reflecting surfaces.
Some errors are reported in the form of codes. The table below links the error codes to possible solutions.
| Code Cause Corrective measure | ||
| 204 Error of calculation Repeat the procedure | ||
| 208 Too much current Contact your dealer | ||
| 220 Batteries low Replace them | ||
| 252 Temperature too high | Place the instrument in a temperature location | |
| 253 Temperature too low | Place the instrument in a temperature location | |
| 255 | Signal received too weak; the measurement time is too long | Use a target plate to improve the reflection |
| 256 | Signal received too strong | The target point reflects too much; use a target that reflects less |
| 261 Measurement out range Target outside measurement range | ||
| 500 Hardware error | Switch the instrument on and several times. If the problem persists, contact your dealer | |
7.2.CLEANING THE MEASUREMENT LENS
Dust gently with a soft, moist cloth or a blower.
Do not use a solvent.
7.3.CLEANING THE HOUSING
Clean the housing using a cloth moistened with soapy water. Rinse with a damp cloth.
Do not use a solvent.
text_image
2 3 4 MEAS 1 6 5 8 Unit 7natural_image
Diagram showing light rays reflecting off a surface with a conical object, no text or symbols present4.3.FLÄCHENMESSUNG

text_image
1 3 2 2 E? figure 2 1 3text_image
2 3 4 MEAS 1 6 5 8 Unit 7natural_image
Diagram showing light rays reflecting off a surface with a conical object, no text or symbols present4.3.MISURA DI SUPERFICIE
text_image
1 2 3 2 E? figure 2 1 3text_image
2 3 4 MEAS 1 6 5 8 Unit 7natural_image
Diagram showing light rays reflecting off a surface with a conical object, no text or symbols present4.3.MEDIDA DE SUPERFICIE
text_image
1 3 2 E? figure 2 1 3Our international contacts
www.chauvin-arnoux.com/contacts

CHAUVIN
ARNOUX