Primus SO-341 - Speaker SONORO - Free user manual and instructions
Find the device manual for free Primus SO-341 SONORO in PDF.


User questions about Primus SO-341 SONORO
0 question about this device. Answer the ones you know or ask your own.
Ask a new question about this device
Download the instructions for your Speaker in PDF format for free! Find your manual Primus SO-341 - SONORO and take your electronic device back in hand. On this page are published all the documents necessary for the use of your device. Primus SO-341 by SONORO.
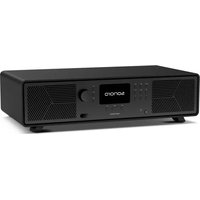
USER MANUAL Primus SO-341 SONORO
natural_image
Front view of a sonard audio recording device with control panel and speaker grille (no visible text or symbols on main body)Bedienungsanleitung
Operating manual
Mode d'emploi
natural_image
Front view of a Sanofi brand electronic device with sound wave and control buttons (no readable text beyond branding)Bedienungsanleitung
Inhaltsverzeichnis
1. Einleitung 6
natural_image
Hand inserting a small circular component into a mobile phone (no text or symbols visible)
natural_image
Technical line drawing of a bolt and nut assembly (no text or symbols)text_image
Diagram showing a hand inserting a cable into an electronic device with three labeled components and directional arrows indicating assembly or operation.18.9 Software Update
text_image
Select your Audio System Please select your audio system from the list below. Scanning...natural_image
Front view of a sonard audio recording device with control panel and speaker grille (no visible text or symbols on main body)Operating manual
Table of contents
1. Introduction 62
1.1 Contact data 62
1.2 Intended use....63
2. Getting to know your PRIMUS 63
2.1 Scope of delivery....63
2.2 Controls and ports 64
2.3 Technical data....69
2.4 Trademarks and trade names 71
3. Getting started 72
3.1 Unpacking PRIMUS....72
3.2 Inserting the battery in the remote control 72
3.3 Using the antennas 73
3.4 Performing initial setup....74
4. Basic operation....76
5. Using the menus....78
6. Display icons....79
7. FM Radio mode....80
7.1 Operation....80
7.2 Setup menu....81
8. DAB Radio mode 82
8.1 Operation....82
8.2 Setup menu....83
9. Internet Radio mode....84
9.1 Operation....84
9.2 Setup menu....85
9.3 Station List 85
9.4 Using the web portal 86
10. Streaming services....87
10.1 Operation....88
10.2 Setup menu....89
11. My Music mode 90
11.1 Operation....90
11.2 Setup menu....91
12. Bluetooth mode 93
12.1 Pairing....93
12.2 Operation....93
12.3 Setup menu....94
13. AUX In 1 mode ..... 95
13.1 Operation....95
13.2 Setup menu 95
14. AUX In 2 mode ...... 96
14.1 Operation....96
14.2 Setup menu 96
15. Optical mode....97
15.1 Operation....97
15.2 Setup menu 97
16. Alarm 98
16.1 Setting alarm 98
16.2 Turning the alarms on or off....99
16.3 Deactivating a sounding alarm....99
16.4 Snooze....99
17. Sleep timer....100
18. System Settings....101
18.1 Accessing the system settings 101
18.2 Streaming audio quality.... 101
18.3 Equalizer....101
18.4 Network....102
18.5 Time/date....102
18.6 Inactive standby 103
18.7 Language 103
18.8 Factory Reset 103
18.9 Software update.... 103
18.10 Setup Wizard 103
18.11 Info 103
18.12 Privacy police.... 104
18.13 Backlight.... 104
19. Using UNDOK™ app to control PRIMUS......105
20. Troubleshooting....107
21. Cleaning 109
22. Warranty....110
1. Introduction
Thank you for purchasing PRIMUS. This operating manual and the safety manual provide all the information required for trouble-free and safe operation of PRIMUS.
- Read the operating manual and the safety manual in their entirety before using PRIMUS.
- Keep the operating manual and safety manual for future reference.
- If you pass PRIMUS on to a third party, please provide them with the operating manual and safety manual as well.
- Failure to follow the operating manual and safety manual can result in serious injury or damage to PRIMUS.
• We assume no liability for damage resulting from failure to observe the instructions in this operating manual and safety manual.
The images in this operating manual are intended to illustrate the actions necessary to operate PRIMUS.
Enjoy your PRIMUS!
1.1 Contact data
| Address | sonoro audio GmbH, Hammer Landstraße 45, 41460 Neuss, Germany |
| Phone | +49 2131 8834-141 |
| Fax | +49 2131 7517-599 |
| support@sonoro.de | |
| Internet | www.sonoro.de |
1.2 Intended use
PRIMUS is intended for personal use only. It is not intended for commercial use. PRIMUS is solely intended for the following tasks:
- Playback of FM/DAB+/Internet radio and music streaming services.
- Audio playback from external devices connected via AUX In, USB port or Optical Input.
• Audio playback from Bluetooth-enabled devices (e.g. mobile phones).
• Music stream to Bluetooth headphone devices. - Charging of external devices that are connected via the USB port.
Any other use is considered improper use and is prohibited. We assume no liability for damages resulting from improper use.
2. Getting to know your PRIMUS
2.1 Scope of delivery
In addition to the PRIMUS itself, the following accessories are also included in the scope of delivery:
- Remote control
• One button cell (CR2032, 3 V) - Power cable
• FM/DAB telescopic antenna
• External WiFi antenna - Operating manual
- Safety manual
- Gloves
2.2 Controls and ports
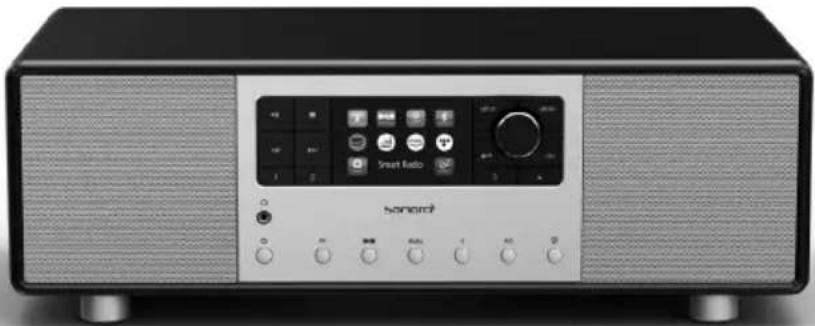
Front view
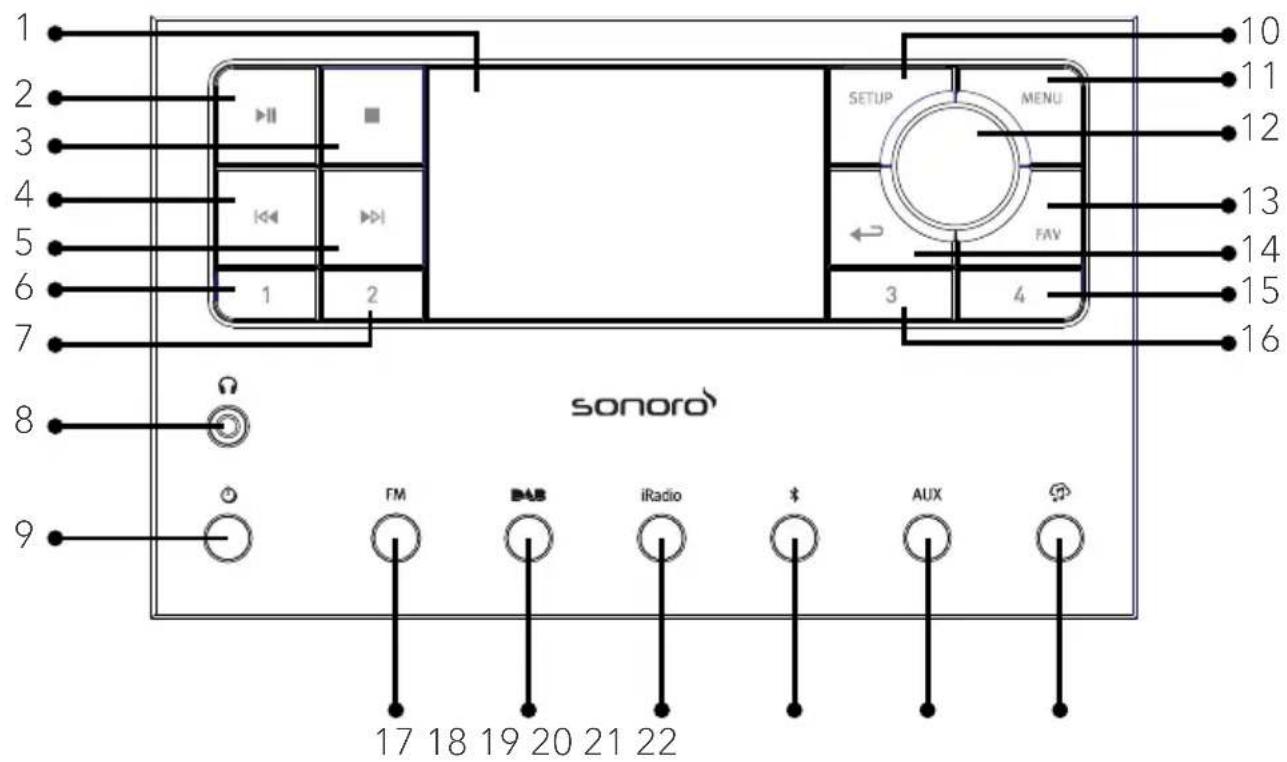
text_image
1 2 3 4 5 6 7 8 9 sonoro FM DAS iRadio AUX 10 11 12 13 14 15 16 17 18 19 20 21 22- Display
- Play/pause button (▶)
- Stop button ( ■ )
- Left button, skip previous ( ◀◀◀ )
- Right button, skip next (▶)
- Preset 1 button (1)
- Preset 2 button (2)
- Headphone jack (
- Standby button ( ⏻
- Setup button (SETUP)
-
Menu button (MENU)
-
Volume knob, navigation knob OK button (press the knob)
- Favourite button (FAV)
- Back button (←)
- Preset 4 button (4)
- Preset 3 button (3)
- FM Radio mode (FM)
- DAB Radio mode ( )
- Internet Radio mode (iRadio)
- Bluetooth mode ()
- Auxiliary input 1/2 mode (AUX)
- Music streaming services ( musical)
Rear view
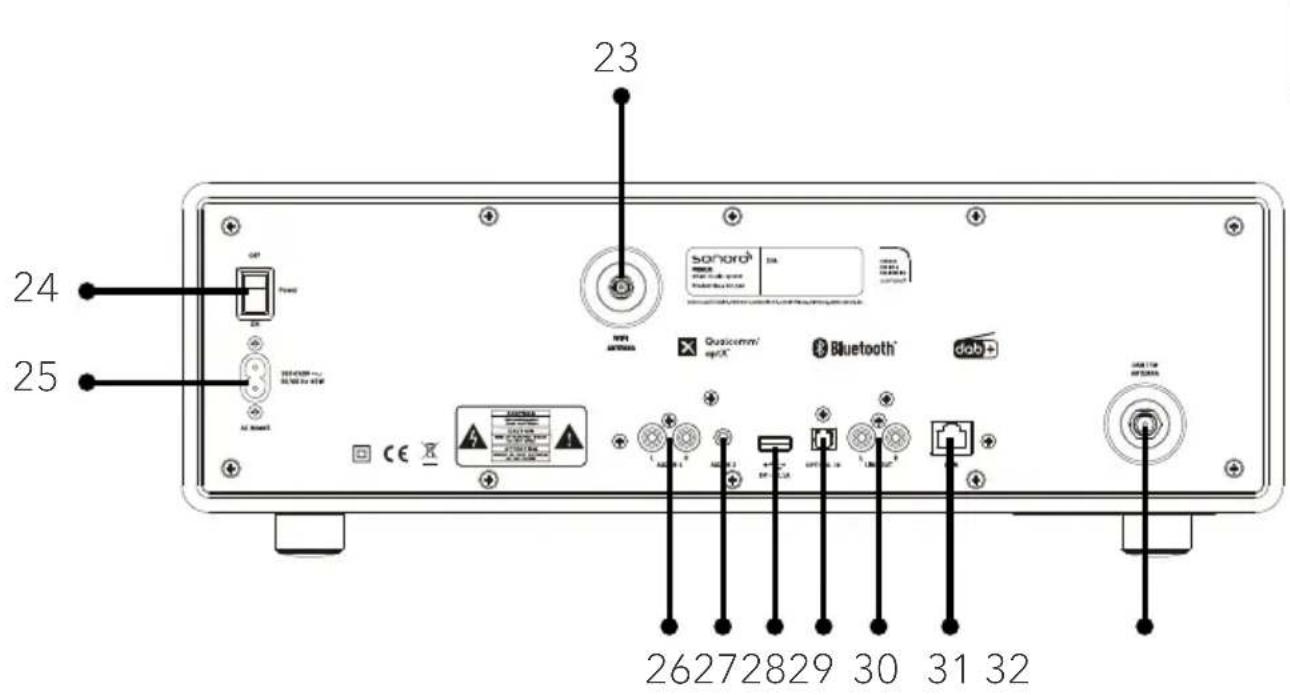
text_image
23 24 25 26272829 30 31 32GB
- External WiFi antenna jack
- Main ON/OFF switch
- AC socket
- Auxiliary input 1 (RCA)
- Auxiliary input 2 (3.5mm)
- USB port
- Optical port
- Line-output (RCA)
- LAN RJ45 Jack
- FM/DAB antenna jack
Bottom view
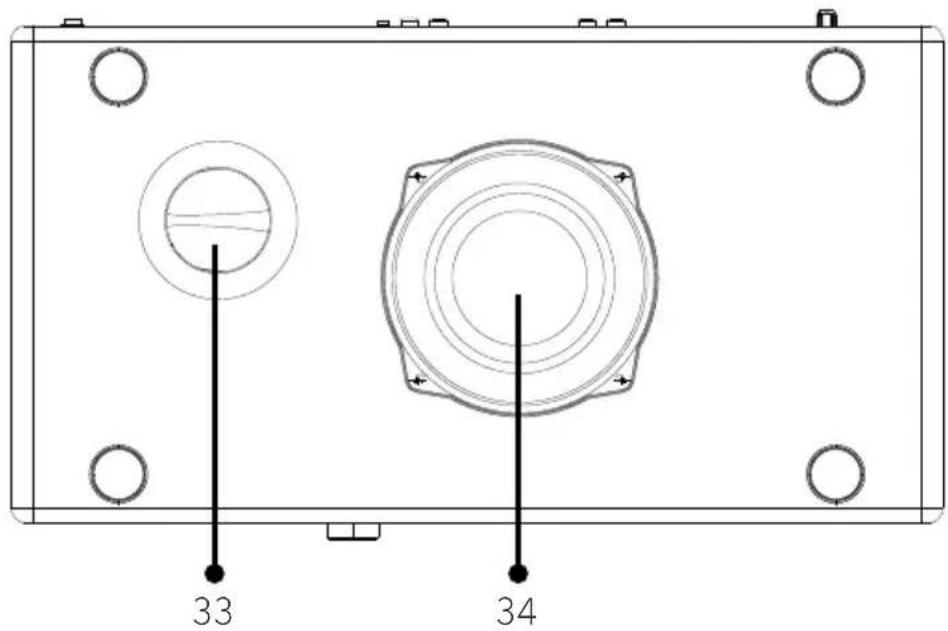
text_image
33 34- Bass reflex opening
- Subwoofer driver
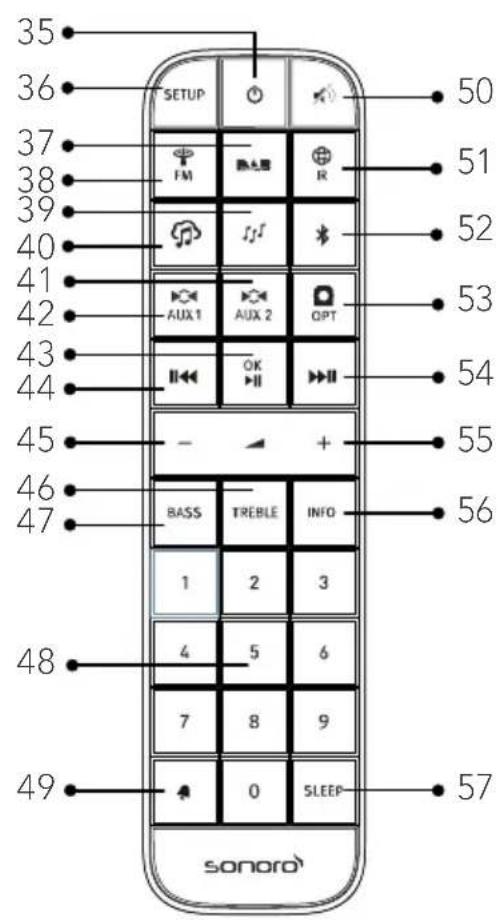
text_image
35 36 37 38 39 40 41 42 43 44 45 46 47 BASS TREBLE INFO 1 2 3 4 5 6 7 8 9 48 49 SONORO SETUP FM R AUX 1 AUX 2 OPT OK SLEEP 50 51 52 53 54 55 56 57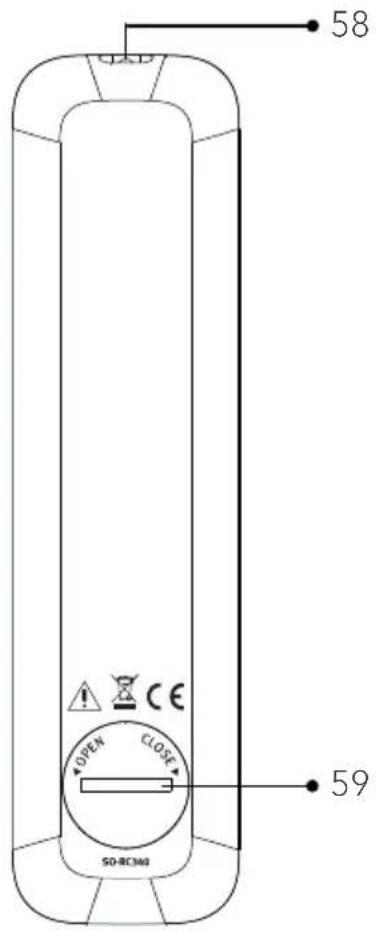
text_image
58 59 SO-BCM60GB
- Standby button ( ⏻ )
- Setup button (SETUP)
- DAB Radio mode (DAB)
- FM Radio mode (FM)
- My music mode (♩♩)
- Music streaming services ( musical)
- Auxiliary input 1 mode (AUX1)
- Auxiliary input 2 mode (AUX 2)
-
Play/Pause button (▶II), OK button
-
Left button, skip previous (||◀◀)
- Volume down button (-)^*
- Treble setting button (TREBLE)
- Bass setting button (BASS)
- Preset station buttons (0-9)
- Alarm button (💡)
- Mute button ( )
- Internet Radio mode (IR)
-
Bluetooth mode (*)
-
Optical input mode (OPT)
- Right button, skip next ( )
- Volume up button (+)*
- Information button (INFO)
- Sleeper timer button (SLEEP)
- Infra-red transmitter
- Battery compartment
*Navigation buttons (+,-)
2.3 Technical data
| Specification | Value |
| Dimensions (W×D×H) | approx. 450 x 258 x 153 mm |
| Weight | approx. 9.8 kg |
| Operating temperature | 0°C to +40°C |
| Display | 2.8" TFT colour display |
| Frequency range, FM | 87.50 MHz-108.00 MHz |
| DAB/DAB+ | Band III, 174.928 MHz-239.200 MHz |
| Internet radio | More than 50,000 stations worldwide |
| Station presets | 10 for each FM | DAB/DAB+ | Internet radio | Spotify8 for each TIDAL | Napster | Deezer | Qobuz | Amazon Music |
| USB charging | Output: DC 5V —— 2.1A |
| USB playback | Compatibility system: FAT 16, FAT 32 (not compatible with NTFS or other systems) |
| AUX-IN | Port 1 : RCA jack Sensitivity: 800 mVPort 2 : 3.5mm jack Sensitivity: 300 mV |
| Optical In, TOSLINK | Supports linear PCMSample rate: 32KHz/44.1KHz//48KHz/96KHzChannel: Stereo 16 bit, 24bit |
| Streaming | Bluetooth | Spotify | TIDAL | Napster | Deezer | Qobuz | Amazon Music | DLNA | UpnP | |
| My music support media formats | Codec Maximum supported bit rateAAC (LC, HE, HEv2) 320 kbits/secFLAC(1) 1.5 Mbits/secLPCM(2) 1.536 Mbits/secMP3 320 kbits/secWAV 1.536 Mbits/secWMA(3) 320 kbits/secAll codecs support 2 channels coded files only.All codecs support smaple rate up to 48 kHz (include 32 and 44.1 kHz)Files which have Digital Rights Management (DRM) protection applied will not be playable on PRIMUS.(1) 16 and 24 bit samples are supported in FLAC files.(2) The maximum support bit rate is for 48kHz sampling, 2 channels and 16-bits per sample.(3) WMA Lossless, WMA Voice, WMA 10 Professional, and files which have DRM protection are not supported. |
| Network supported | IEEE 802.11 a/b/g/n, 2.4 & 5GHz bands, Ethernet 2.412GHz-2.472GHz/5.18GHz - 5.32GHz/5.50GHz-5.70GHz |
| Transmitted power | 15dBm for 2.4GHz | 17dBm for 5GHz WiFi |
| Encrypted key | WEP, WPA, WPA2 (PSK), WPS |
| Bluetooth | Version 4.1, Profile: AVRCP v1.5, A2DP 1.32.402GHz-2.480GHz |
| Transmitted power | 4dBm for BT | 7dBm for BT-LE |
| Battery | CR2032 (remote control) |
| Standby Power | < 1.0W |
| Network Standby | < 2.0W |
2.4 Trademarks and trade names

Bluetooth®
The Bluetooth® word mark and logos are registered trademarks owned by the Bluetooth SIG, Inc. and any use of such marks by sonoro audio GmbH is under license. Other trademarks and trade names are those of their respective owners.
UPnP
UPnP ^TM is a trademark of the UPnP ^TM Forum.

Spotify®
The Spotify software is subject to third party licenses found here: http://www.spotify.com/connect/third-party-licenses

napster®
Napster and Napster logo are registered trademarks of Rhapsody International Inc registered in the United States and other countries.

TIDAL
TIDAL and TIDAL logo are registered trademark of Aspiro AB in the European Union and other countries.

deezer
Deezer and Deezer logo are international trademarks of Deezer S.A., registered in France and other countries.

qobuz
Qobuz and its logo are registered trademarks of Xandrie S.A.
amazon music
Amazon, Amazon Music Unlimited and all related logos are trademarks of Amazon.com, Inc. or its affiliates.
3. Getting started
3.1 Unpacking PRIMUS
- Take PRIMUS out of the packaging and check whether PRIMUS or the individual parts exhibit damages. If this is the case, do not use PRIMUS. Should you detect any damage, contact your dealer or sonoro audio GmbH customer support immediately.
- Check to make sure that the delivery is complete (see chapter "Scope of delivery").
- Place PRIMUS at a suitable location. If you want to put your PRIMUS on a natural wood surface, please make sure that it is suitable. On oiled and waxed surfaces may possibly cause stains.
- Remove the protective film from the display.
3.2 Inserting the battery in the remote control
- Open the battery compartment cover on the back of the remote control by turning it anticlockwise using a small coin.
- Insert the supplied batteries (CR2032, 3 V) with the label (+) side up.
- Replace and close the battery compartment cover by turning the cover clockwise using a small coin.
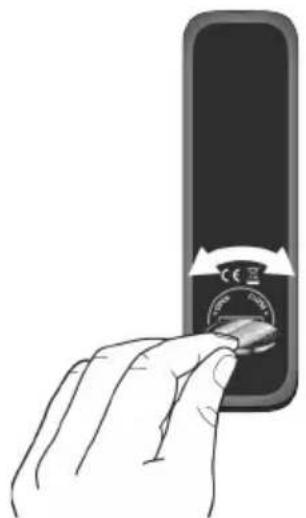
natural_image
Hand inserting a small circular component into a mobile phone (no text or symbols visible)
Do not block the infra-red sensor on the PRIMUS and the infra-red transmitter on the remote control during use.
3.3 Using the antennas
- Screw the rod antenna located on the back of PRIMUS to the FM/DAB antenna connector.
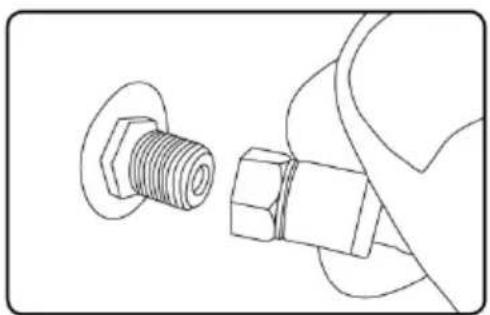
natural_image
Technical line drawing of a mechanical component with a threaded bolt and connector (no text or symbols)- If you are using the rod antenna, pull the rods of the antenna apart and align the antenna so that you have the best possible reception.

For even better reception, connect PRIMUS to a suitable house antenna.
-
Screw the desired Wi-Fi antenna located on the back of PRIMUS to the WiFi antenna connector. Lift Wi-Fi antenna upwards.
-
If you want to connect PRIMUS to your network using an Ethernet cable, connect an Ethernet cable from LAN port on the back of PRIMUS to your router.
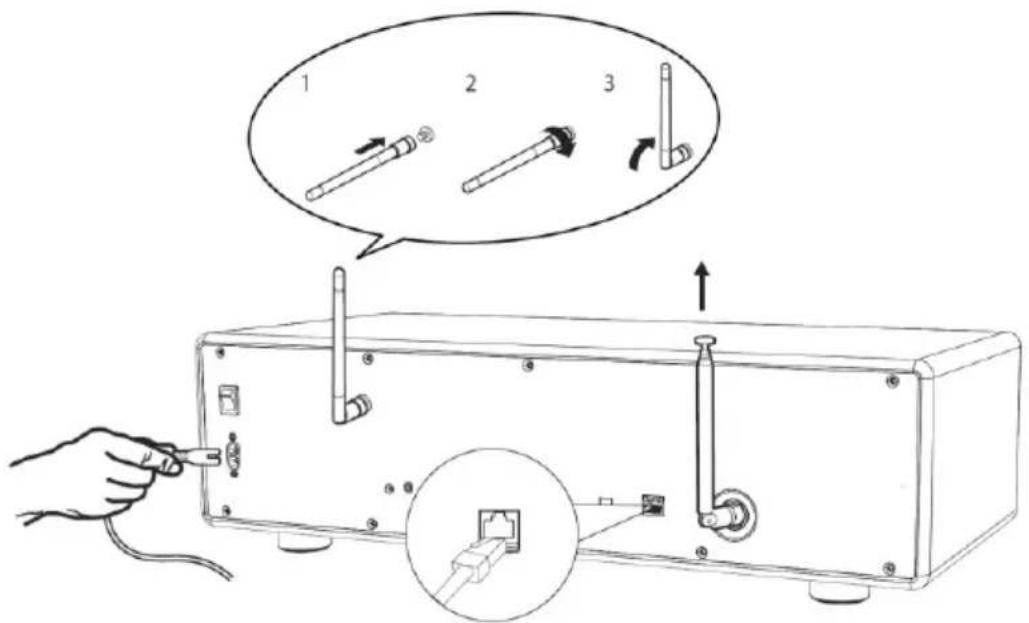
text_image
Diagram showing a hand inserting a cable into an electronic device with three labeled components and directional arrows indicating assembly or operation.- Plug-in the AC power cord.
3.4 Performing initial setup
When PRIMUS is powered on for the first time, the "Language" (to be used in the menu) selection appears on the display. Then, the "Setup wizard" appears on the display. Follow the instructions below to configure some basic settings.
-
When the "Setup Wizard" is displayed, press + or - on the remote control (or rotate the navigation knob) to select "YES" and then press OK to start the setup.
-
You are then prompted to select:
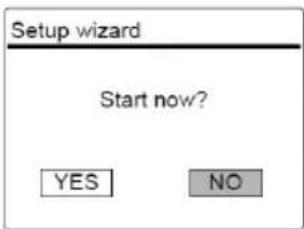
text_image
Setup wizard Start now? YES NO• Time format (12 or 24-hour),
- Source of auto update (Update from Radio, Internet or no update).
Depending on the selection you have made, follow the instructions on the display to further set up date and time, time zone, daylight saving or wireless network. Rotate the navigation knob on PRIMUS or press the navigation buttons on the remote control to make selections and then press OK to confirm (see chapter "Using the menus").
When update from Internet is selected, Wi-Fi connection must be first established. When entering the key of your wireless network, rotate the navigation knob on PRIMUS or press the navigation buttons on the remote control to select a character and then press OK to confirm. To delete the last entry, select [BKSP]. To cancel entering the key, select [CANCEL]. To confirm the entered key, select [OK].
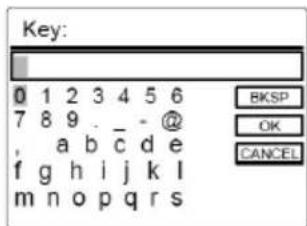
text_image
Key: 0 1 2 3 4 5 6 7 8 9 . - @ , a b c d e f g h i j k l m n o p q r s BKSP OK CANCEL- When "Setup wizard completed" appears, press OK to exit the setting.
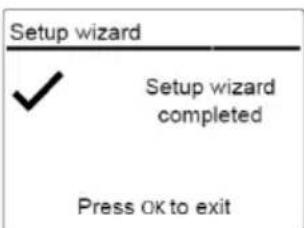
text_image
Setup wizard ✓ Setup wizard completed Press OK to exit- Alternative, use the Ethernet (LAN) connection to your router (with automatic configuration), select the [Wired] menu item in the available network.

To run the setup wizard again, go to [System Settings] and then select [Setup Wizard] (See chapter "System Settings").
GB
4. Basic operation
| To turn on, | Press ⏻PRIMUS starts operation from the last selected playback mode. |
| To turn off (standby mode), | Press ⏻The time and date (if set) are displayed.PRIMUS will automatically turn off without playback and operation after 15 minutes. |
| To select a playback mode, | Press MENU once, then ||◀◀ or ▶▶▶(or rotate the navigation knob) to select a playback mode and ther press OK to confirm.Mode sequence: FM Radio > DAB Radio > Internet Radio > Bluetooth > Aux In 1 > Aux In 2 > Optical > Spotify > TIDAL > Napster > Deezer > Qobuz > Amazon Music > My Music |
| To directly select a playback mode, | Press the direct operation mode key on the remote control to directly switching from one operation mode to the other. |
| To control the volume, | Press + or - on the remote control or rotate the volume knob on PRIMUS. |
| Pairing with a Bluetooth headphone, for the first time | In all operation modes except the Bluetooth mode, press and hold ✝key on remote control. Or, press SETUP once, then + or - (or rotate the navigation knob) to select [Bluetooth headphone], then select [Bluetooth pairing], then [Available devices], and then press OK to confirm. Wait for a while, your Bluetooth device name is shown in the display, and then select press OK to select it.The small Bluetooth headphone icon 🎨 blinking and indicating that PRIMUS is in pairing mode. The Bluetooth headphone icon 🎨 stops blinking when the pairing is completed. The paired Bluetooth headphone device name is temporarily shown in the display.Note: Make sure that your Bluetooth headphone is already in discovery mode and ready for pairing.For detail please refer to your Bluetooth device instruction manual. |
| Connecting with a paired Bluetooth headphone, | In all operation modes except the Bluetooth mode, press and hold ✗ key on remote control. Or, press SETUP once, then + or - (or rotate the navigation knob) to select [Bluetooth headphone], then select [Bluetooth pairing], then [Paired devices], and then press OK to confirm. Your paired Bluetooth device names are shown in the display. Select your device and press OK to confirm.The small Bluetooth headphone icon 🎨 blinking and indicates that PRIMUS is in pairing mode. The Bluetooth headphone icon 🎨 stops blinking when the pairing is completed. The paired Bluetooth headphone device name is temporarily shown in the display.Note: Make sure that your Bluetooth headphone is already in pairing mode, for detail please refers to your Bluetooth device instruction manual. |
| To disconnect a paired Bluetooth headphone, | Press SETUP once, then + or - (or rotate the navigation knob) to select [Bluetooth headphone], then select [Bluetooth disconnect] and then press OK to confirm. |
GB
5. Using the menus
There are three types of menus in PRIMUS.
- Setup menu (For specific settings in a playback mode, e.g. [FM Auto Search] in FM mode)
• System Settings (For general settings, e.g. time/date, language etc.) - Main menu (For accessing the playback modes and sleep time)
| To access the menus, Press | SETUP.Contents of the menus may differ in different playback modes. |
| To select an option in the menus, | Rotate the navigation knob on PRIMUS or press +or - on the remote control. |
| To confirm a selection in the menus, | Press OK.(On PRIMUS, press the navigation knob) |
| To go back one level in the menu, | Press←. |
6. Display icons
Refer to the table below for the meanings of the display icons when they show on the display.
| Wi-Fi connection is established (with signal strength). | |
| Wi-Fi connection is disconnected. | |
| LAN connection is established. | |
| LAN connection is unplugged. | |
| A Bluetooth device is connected. | |
| A Bluetooth headphone is connected. | |
| Alarm is activated. | |
| The radio station is in the preset list. | |
| FM RDS information is received. | |
| Radio signal is being received (with signal strength). | |
| Repeat all playback mode is active. | |
| Repeat one playback mode is active | |
| Repeat folder playback mode is active | |
| Shuffle playback mode is active. | |
| Repeat all and shuffle playback mode is active. | |
| Sleep timer is active. | |
| Stereo sound broadcast is available. | |
| Sound output is muted. | |
| A USB device is connected. | |
| Playback is paused. |
7. FM Radio mode
7.1 Operation
| To access the FM Radio mode, | Press FM key on PRIMUS or remote control FM key.Or, press MENU once, then ||◀◀ or ▶▶|| (or rotate the navigation knob) to select the FM Radio mode and then press OK to confirm. |
| To manually tune the frequency, | Press ||◀◀ or ▶▶||Or, press and hold the navigation knob to active the manual tune. |
| To automatically tune to the next available station, | Press and hold ||◀◀ or ▶▶||.Or, press the navigation knob to start the automatic tuning. |
| To store a radio station in the preset list, | A maximum of 10 radio stations can be stored.1. Press and hold the FAV key on PRIMUS until the preset list is shown.2. Press + or - (or rotate the navigation knob) to select a preset station number and then press OK to confirm. |
| To directly store a radio station in the preset list, | Tune to a station and then press and hold a preset station button (0-9) to directly store it in the preset list. |
| To recall a radio station in the preset list, | 1. Press FAV.2. Press + or - (or rotate the navigation knob) to select a radio station in the preset list and then press OK to confirm.Or, press preset station button (0-9) to access a stored preset station (1-10). |
| To browse the radio station information (if available), | Press INFO repeatedly. |
| To mute or restore the sound output, | Press ▶◀ or ▶▶button. |
7.2 Setup menu
Press SETUP in the FM mode to access the setup menu (see chapter "Using the menus"). The following options are available and the current settings (if applicable) are marked with an asterisk (*).
• [FM Auto Search]
To auto store all available radio stations in the preset list.
All existing preset stations will be erased.
• [FM Scan Setting]
To decide if only stations with strong signals are scanned when performing automatic tuning.
• [FM Reception Setting]
To listen radio in stereo or mono sound output.
• [Bluetooth headphone]
To connect or disconnect with a Bluetooth headphone, see chapter "Basic operation".
- [System Settings]
See chapter "System Settings".
- [Main menu]
To access other playback modes, alarm or sleep timer.
8. DAB Radio mode
8.1 Operation
| To access the DAB Radio mode, | Press the ▶▲▼ key on PRIMUS or remote control. Or press MENU once, then ▶▲▼ (or▼▼) to select the navigation knob) select the DAB Radio mode and then press OK to confirm. |
| To search for DAB radio stations, | The first time you select the DAB mode, or if the station list is empty, PRIMUS will automatically perform a full scan and store all available stations in the station list. |
| To tune to a station, | Press ▶▲▼ . ▶▼▼ |
| To store a radio station in the preset list, | A maximum of 10 radio stations can be stored.1. Press and hold the FAV key on PRIMUS until the preset list is shown.2. Press + or − (or rotate the navigation knob) to select a preset station number and then press OK to confirm. |
| To directly store a radio station in the preset list, | Tune to a station and then press and hold a preset station button(0-9) to directly store it in the preset list. |
| To recall a radio station in the preset list, | 1. Press FAV.2. Press + or − (or rotate the navigation knob) to select a radio station in the preset list and then press OK to confirm.Or, press a preset station button (0-9) to access a stored preset station (1-10). |
| To browse the radio station information* (if available), | Press INFO repeatedly. |
| To mute or restore the sound output, | Press ▶▼ or ▶▼ button. |
*DAB information (if available) includes: Station name, Dynamic Label Segment (DLS), Signal strength, Program type (PTY), Ensemble Name, Frequency, Signal error rate, Bit rate and audio status, Codec, and Time and date.
8.2 Setup menu
Press SETUP in the DAB mode to access the setup menu (see chapter "Using the menus"). The following options are available and the current settings (if applicable) are marked with an asterisk (*).
• [Station List]
To display all available stations.
- [Scan]
To scan and store all available stations.
- [Manual Tune]
To manually tune the frequency. The list of available digital radio ensembles is shown.
• [Prune invalid Stations]
To remove all invalid stations from the station list.
• [DRC]
Some DAB broadcasts offer dynamic range compression (DRC).
Compressing the dynamic range of a radio signal can increase the volume of quiet sounds and reduce the volume of loud sounds. You can select high, low or off level. High level is recommended for noisy environment.
• [Station Order]
To define how the stations are listed when browsing the station list. Options are:
• [Alphanumeric]: Arrange the stations in alphabetical order,
- [Ensemble]: List groups of stations that are broadcast together on the same ensemble, and
- [Valid]: List valid stations first, then off-air stations.
• [Bluetooth headphone]
To connect or disconnect with a Bluetooth headphone, see chapter "Basic operation".
- [System Settings]
See chapter "System Settings".
• [Main menu]
To access other playback modes, alarm or sleep timer.
9. Internet Radio mode
9.1 Operation
Wi-Fi or Ethernet Internet connection must be established first to use the Internet radio (see chapters "Performing initial setup" and "Network").
| To access the Internet Radio mode, | Press the iRadio key on PRIMUS or remote control ☑ key. Or, press MENU once, then ▶ (or rotate the navigation knob) to select the Internet Radio mode and then press OK to confirm.PRIMUS starts connecting to the previously connected network and then the last listened station. |
| To tune to a radio station or podcast, | See chapter "Station List". |
| To store a radio station in the preset list, | A maximum of 10 radio stations can be stored.1. Press and hold the FAV key on PRIMUS until the preset list is shown.2. Press + or - (or rotate the navigation knob) to select a preset station number and then press OK to confirm. |
| To directly store a radio station in the preset list, | Tune to a station and then press and hold a preset station button(0-9) to directly store it in the preset list. |
| To recall a radio station in the preset list, | 1. Press FAV key.2. Press + or - (or rotate the navigation knob) to select a radio station in the preset list and then press OK to confirm.Or, press preset station buttons (0-9) to access a stored preset station (1-10). |
| To browse the station information* (if available), | Press INFO repeatedly. |
| To mute or restore the sound output, | Press ▶ button. |
*Station information (if available) includes: Artist and track name, Station description, Station genre and location, Signal reliability, Codec and sampling rate, Playback buffer, and Date.
GB
9.2 Setup menu
Press MENU in the Internet Radio mode to access the setup menu (see chapter "Using the menus"). The following options are available and the current settings (if applicable) are marked with an asterisk (*).
- [Last listened]
To tune to your last listened radio stations.
• [Station List]
To tune to any available Internet radio stations (See chapter "Station list").
• [Bluetooth headphone]
To connect or disconnect with a Bluetooth headphone, see chapter "Basic operation". - [System Settings]
See chapter "System Settings". - [Main menu]
To access other playback modes, alarm or sleep timer.
9.3 Station List
The following menus and sub-menus are available in the [Station List]:
• [Local (name of your location)]
To browse and tune to any radio stations available in your area. The stations are grouped into several categories.
• [Stations]
- [Location]: To browse and tune to radio stations by location.
• [Genre]: To browse and tune to radio stations by genre. - [Search stations]: To search for any available radio stations by entering keywords.
- [Popular stations]: To browse and tune to the most popular Internet radio stations.
- [New stations]: To browse and tune to the latest Internet radio stations.
• [Podcasts]
- [Location]: To browse and tune to podcasts by location.
• [Genre]: To browse and tune to podcasts by genre.
- [Search podcasts]: To search for any available podcasts by entering keywords.
• [Help]
• To get help when the Internet radio does not work properly.
• To get the access code of PRIMUS for register.
9.4 Using the web portal
The Frontier Silicon Internet Radio portal website allows you to organise your "My favourites" and add new Internet radio stations on a computer. To do so, you need to first register at the web portal.
- In the Internet Radio mode, press SETUP and then go to [Station List] > [Help]. Write down the access code.
- Go to http://nuvola.link/sr on the web browser of your computer.
- Register a new account with the access code.
- Following the instructions in the web portal, use the "Manage Favourites" and "My added stations" features to add radio stations.
The added stations in "My favourites" can be accessed through [My favourites] in the Internet Radio mode of PRIMUS.
The added stations in "My added stations" can be accessed through [My added stations] in the Internet Radio mode of PRIMUS.
10. Streaming services
Your PRIMUS can play content from the following streaming services:
GB

Spotify®
TIDAL
napster

deezer
qobuz
amazon music
You will also find the symbols of these services in the display of your PRIMUS.
We recommend that you first install the UNDOK ^TM app on the device that you want to use to control your PRIMUS (this can be a smartphone or tablet, for example).

Please note: The use of streaming services requires contracts with the streaming providers; these may cause costs. In particular, free offers often contain advertising. Changes are in the responsibility of the streaming services. Please inform yourself on the homepages of the providers.

This device (eg. smartphone) must be in the same network as your PRIMUS! For hints how to deal with the UNDOK™ app please refer to chapter 19.

Occasionally, the services can also be operated directly with the providers app or the PRIMUS itself. Please check with the provider.
10.1 Operation
The procedures described below applies analogously to all available streaming services.
| Selection of a streaming service | Press the 🎨 key on PRIMUS or remote control and go to the selection of desired streaming service. The symbols of the services listed above will appear accordingly in the display of your PRIMUS.Or, press MENU once, then ||◀◀ or ▶▶▶ (or rotate the navigation knob) to select the desired streaming service and then press OK to confirm. |
| Log in a streaming account (TIDAL, Napster, Qobuz, Amazon Music), | To use a streaming service on your masterpiece, sign in to PRIMUS or the UNDOKTM app installed on your mobile device with your account. Follow the instructions on the screen. |
| How to use Spotify Connect, | Use your phone, tablet or computer as a remote control for Spotify.Go to spotify.com/connect to learn how.1. Connect your PRIMUS to your wifi network.2. Open up the Spotify app on your phone, laptop or tablet using the same wifi network.3. Play a song and select „Devices Available".4. Select your PRIMUS and start listening. |
| To pause or resume playback, | Press ▶▶▶. |
| To skip to the previous or next playback item, | Press ||←. >>|| |
| To store a playback item in the preset list, | A maximum of 8 playback items can be stored (10 for Spotify).1. Press SETUP until the save to preset is shown then press OK to confirm.2. Press + or−(or rotate the navigation knob) to select a preset item number and then pressOK to confirm. |
| To directly store a playback item in the preset list, | Select a playback item and then press and hold a preset station button to directly store it in the preset list. |
| To recall a playback item in the preset list, | 1. Press FAV key.2. Press + or−(or rotate the navigation knob) to select a playback item in the preset list and then press OK to confirm.Or, press preset station buttons to directly access a stored playback item. |
| To browse the information (if available) of the playback item, | Press INFO repeatedly. |
10.2 Setup menu
Press SETUP in the Music streaming services to access the setup menu (see chapter "Using the menus"). The following options are available and the current settings (if applicable) are marked with an asterisk (*).
• [Bluetooth headphone]
To connect or disconnect with a Bluetooth headphone, see chapter "Basic operation".
- [System Settings]
See chapter "System Settings".
• [Main menu]
To access other playback modes, alarm or sleep timer.
11. My Music mode

NOTICE!
Risk of damage!
Improper handling of the PRIMUS may cause damage.
Do not connect the PRIMUS directly to the USB port of a computer or other external storage media such as external hard disk.

My Music mode can play back audio files stored on a connected USB memory stick or from a media server (UPnP) sharing the same Wi-Fi network with the PRIMUS.
11.1 Operation
| To access the My Music mode, | Press the Key on the remote control. Or, press MENU once, then (or rotate the navigation knob) to select the My Music mode and then press OK to confirm. |
| To play back audio files stored on a USB memory stick, | Connect the USB memory stick to the USB port of PRIMUS. Then press SETUP and select [USB Playback] from the setup menu (see chapter "Setup menu" on next page). |
| To pause or resume playback, | Press ▶II |
| To skip to the previous or next audio file, | Press ||or ▶|| |
| To quickly search backward or forward within an audio file, | During playback, press and hold ||or ▶||. |
| To add an audio file to "My Playlist", | Press and hold ▶|| or the navigation knob when the file is highlighted in the selection menu. |
| To select a playback mode, | Press FAV repeatedly. = Repeat all = Repeat one = Shuffle = Repeat all and shuffle |
| To browse the information (if available) of the audio file, | Press INFO repeatedly. |
GB
11.2 Setup menu
Press SETUP in the My Music mode to access the setup menu (see chapter "Using the menus"). The following options are available and the current settings (if applicable) are marked with an asterisk (*).
• [Shared Media]
To search for audio files on the Wi-Fi or Ethernet network.
Once a media server has been found, a selection menu will show for selection of audio files for playback from PRIMUS.
- [USB Playback]
To search for audio files on the connected USB memory stick.
Once a USB memory stick has been found, a selection menu will show for selection of audio files for playback from PRIMUS.
• [My Playlist]
To browse and play back audio files stored in "My playlist".
• [Repeat]
To turn on or off the repeat playback mode of the current folder/ playlist.
- [Shuffle]
To turn on or off the shuffle playback mode of the current folder/ playlist.
• [Clear My Playlist]
To clear entries from "My Playlist".
- [Prune Servers]
If this setting is set to "YES", inactive media servers will be displayed. You can then select a media server and "wake it up" (WOL "wake on LAN" function) in order to play back audio files from PRIMUS.
- [Bluetooth headphone]
To connect or disconnect with a Bluetooth headphone, see chapter "Basic operation".
- [System Settings]
See chapter "System Settings".
- [Main menu]
To access other playback modes, alarm or sleep timer.
12. Bluetooth mode
PRIMUS can connect to Bluetooth-enabled players (e.g. mobile phone) within a range of approximately 10 meters (30 feet).
12.1 Pairing
- Press ✘ key on PRIMUS or remote control. Or, press SETUP once, then + or - (or rotate the navigation knob) to select the Bluetooth mode and then press OK to confirm.
The small Bluetooth icon 📋 is blinking, indicating that PRIMUS is ready for pairing. - On your Bluetooth-enabled player, turn on the Bluetooth function and search for available Bluetooth devices.
- Select "PRIMUS" in the list of available Bluetooth devices to start pairing.
The Bluetooth icon ☐ stops blinking when pairing is complete.
12.2 Operation
| To access the Bluetooth audio mode, | Press ⚙key on PRIMUS or remote control. Or, press MENU once, then ||◀◀ or ▶▶▶ (or rotate the navigation knob) to select the Bluetooth mode and then press OK to confirm. |
| To start playback, | Select an audio file from your Bluetooth-enabled player and start playback. |
| To pause or resume playback, | Press ▶▶▶ |
| To skip to the previous or next audio file, | Press ||◀◀ ▶▶▶▶ |
| To quickly search backward or forward within an audio file, | During playback, press and hold ||◀◀ or ▶▶▶▶. |
| To disconnect the Bluetooth connection, | Switch to another playback mode, orSelect[BT disconnect] from the setup menu (see below), orPress and hold in the remote control. |
| To browse the information (if available) of the audio file, | Press INFO repeatedly. |
12.3 Setup menu
Press SETUP in the Bluetooth audio mode to access the setup menu (see chapter "Using the menus"). The following options are available and the current settings (if applicable) are marked with an asterisk (*).
• [Bluetooth disconnect]
To disconnect the Bluetooth connection.
• [View Details]
- [Bluetooth Info]: To get the existing Bluetooth connection status.
- [Connected Device]: To get the existing connected Bluetooth device name.
- [System Setting]
See chapter "System Settings".
- [Main menu]
To access other playback modes, alarm or sleep timer.
13. AUX In 1 mode
13.1 Operation
Your external player (e.g. Blu-ray player) must be connected to the auxiliary input jack 1 of PRIMUS with an audio cable (with RCA connector, not supplied).
| To access the AUX In 1 mode, | Press AUX key on PRIMUS to toggle AUX In. 1 mode.Or press key on the remote control.Or, press MENU once, then [ ][ ][ ][ ][ ][ ][ ][ ][ ][ ][ ][ ][ ][ ][ ][ ][ ][ ][ ][ ][ ][ ][ ][ ][ ][ ][ ][ ][ ][ ][ ][ ][ ][ ][ ][ ][ ][ ][ ][ ][ ][ ][ ][ ][ ][ ][ ][ ][ ][ ][ ][ ][ ][ ][ ][ ][ ][ ][ ][ ][ ][ ][ ][ ][ ][ ][ ][ ][ ][ ][ ][ ][ ][ ][ ][ ][ ][ ][ ][ ][ ][ ][ ][ ][ ][ ][ ][ ][ ][ ][ ][ ][ ][ ][ ][ ][ ][ ][ ][ ][ ] |
| To start and control playback, | Perform all playback operations on the external player. |
| To mute or restore the sound output, | Press [ ][ ][ ][ ][ ][ ][ ][ ][ ][ ][ ][ ][ ][ ][ ][ ][ ][ ][ ][ ][ ][ ][ ][ ][ ][ ][ ][ ][ ][ ][ ][ ][ ][ ][ ][ ][ ][ ][ ][ ][ ][ ][ ][ ][ ][ ][ ][ ][ ][ ][ ][ ][ ][ ][ ][ ][ ][ ][ ][ ][ ][ ][ ][ ][ ][ ][ ][ ][ ][ ][ ][ ][ ][ ][ ][ ][ ][ ][ ][ ][ ][ ][ ][ ][ ][ ][ ][ ][ ][ ][ ][ ][ ][ ][ ][ ][ ][ ][ ]or ▶■ button. |
13.2 Setup menu
Press SETUP in the AUX In 1 mode to access the setup menu (see chapter "Using the menus"). The following options are available and the currentsettings (if applicable) are marked with an asterisk (*).
• [Bluetooth headphone]
To connect or disconnect with a Bluetooth headphone, see chapter "Basic operation".
• [System Settings]
See chapter "System Settings".
• [Main menu]
To access other playback modes, alarm or sleep timer.
14. AUX In 2 mode
14.1 Operation
Your external player (e.g. mp3 player) must be connected to the auxiliary input jack 2 of PRIMUS with an audio cable (with 3.5 mm connector, not supplied).
| To access the auxiliary input 2 mode, | Press AUX key on PRIMUS to toggle AUX In. 2 mode.Or press Alkey on the remote control.Or, press MENU once, then ||or ▶▶|(or rotate the navigation knob) to select the AUX In 2 mode and then press OK to confirm. |
| To start and control playback, | Perform all playback operations on the external player. |
| To mute or restore the sound output, | Press ▶ or ▶ button. |
14.2 Setup menu
Press SETUP in the AUX In 2 mode to access the setup menu (see chapter "Using the menus"). The following options are available and the currentsettings (if applicable) are marked with an asterisk(*).
• [Bluetooth headphone]
To connect or disconnect with a Bluetooth headphone, see chapter "Basic operation".
- [System Settings]
See chapter "System Settings".
- [Main menu]
To access other playback modes, alarm or sleep timer.
15. Optical mode
15.1 Operation
Your external player (e.g. audio amplifier) must be connected to the optical input jack of PRIMUS with an audio cable (with optical connector, not supplied).
| To access the Optical mode, | Press key on the remote control.Or, press MENU once, then ||◀◀ or ▶▶|| (or rotate the navigation knob) to select the Optical mode and then press OK to confirm. |
| To start and control playback, | Perform all playback operations on the external player. |
| To mute or restore the sound output, | Press◀◀ or ▶▶■ button. |
15.2 Setup menu
Press SETUP in the optical input mode to access the setup menu (see chapter "Using the menus"). The following options are available and the currentsettings(if applicable) are marked with an asterisk(*).
• [Bluetooth headphone]
To connect or disconnect with a Bluetooth headphone, see chapter "Basic operation".
• [System Settings]
See chapter "System Settings".
• [Main menu]
To access other playback modes, alarm or sleep timer.

The optical input is only supporting for the linear PCM, 2 channels 16 bit or 24bit music source.
16. Alarm
16.1 Setting alarm
You can set the alarm.
- Press and hold 🔔 to access the alarm setting mode.
Alternatively, press SETUP in any playback mode and then select [Main menu] and then [Alarm].
You may also access the alarm setting mode when PRIMUS is in the standby (off) mode. To do so, press and hold 🔔 button.
- Select the alarm you want to set and then press OK.
- The following options show how to set the alarm. Rotate the navigation knob or press the navigation buttons to perform the settings (see chapter "Using the menus").
- [Enable]
To turn on or off and set frequency of the alarm. The following options are available:
• [Off]: To deactivate the alarm.
• [Daily]: The alarm activates everyday.
• [Once]: The alarm activates once only.
• [Weekends]: The alarm activates on Saturdays and Sundays.
• [Weekdays]: The alarm activates from Monday to Friday.
• [Time]
To set the alarm time.
• [Mode]
To select the alarm sound source. The following options are available:
• [Buzzer]
- [Internet Radio]
• [DAB Radio]
• [FM Radio]
• [Preset]
To select the last listened station or a preset station as the alarm sound source. This only shows when Internet Radio, DAB or FM is selected in [Mode].
• [Volume]
To set the volume of the alarm sound.
- [Save]
To save the current settings.
Once [Save] is selected, the alarm settings will be stored. If an alarm is activated, the alarm icon(☐) will show.
GB
16.2 Turning the alarms on or off
- When PRIMUS is in operation mode or in the standby (off) mode, press repeatedly to switch on or off the alarm.
- When an alarm is turned on, the alarm icon(+) will show.
16.3 Deactivating a sounding alarm
- Press ⏻ or 🔍 to stop a sounding alarms.
16.4 Snooze
- To temporarily silence (default: 10 min) a sounding alarm, press the navigation knob or ✕ buttons.
- Press + or - (or rotate the navigation knob) to change the snooze period (5, 10, 15 or 30 min).
- During the snooze period, the alarm icon will blink and the remaining snooze time will show.
• To cancel the snooze function, press ⏻ or ♦.
17. Sleep timer
The sleep timer sets the duration of time before PRIMUS turns off automatically.
-
Press SETUP in any playback mode and then select [Main menu] and then [Sleep].
Or, direct press SLEEP button on the remote to turn the sleep timer on or off. -
Press + or - (or rotate the navigation knob) to select a sleep timer (15, 30, 45, 60, or 90 min).
-
Press OK to confirm the selection.
When the sleep timer is active, the sleep timer icon (☐) and the remaining time will be shown. To cancel the sleep timer, select [Sleep OFF].
18. System Settings
18.1 Accessing the system settings
- Press SETUP in any playback mode and then select [System Settings]
• Refer to the chapters below for details of each setting option. - The current settings (if applicable) are marked with an asterisk (*).
- See chapter "Using the menus" for browsing and making selections in the system settings.
18.2 Streaming audio quality
The three quality options presented in the System setting apply to music streaming services only.
• [Low quality] : Corresponds to the services' lowest quality.
• [Normal quality] : Corresponds to the services' mid-level quality.
• [High quality] : Corresponds to the services' highest quality.
18.3 Equalizer
Select one of the sound equalizer options to adjust the sound according to your taste.
• [3D Sound]
3D Sound on, it extends the stereo area, thus improving the depth of the music playback.
• [Loudness]
Loudness on, it adapts the treble and bass levels to suit the current volume, so that delicate sounds can still be heard clearly when you listen to your music quietly.
• [Bass]
Adjust the bass level to tailor the sound of the audio playback.
• [Treble]
Adjust the treble level to tailor the sound of the audio playback.
- Select one of the pre-defined sound equalizer options including: [Flat], [Pop], [Rock], [Jazz] and [Classic].
18.4 Network
• [Network wizard]
To establish network connection.
• [WPS WLAN Setup]
Select this option if your wireless router supports both WPS and PBC setup methods.
• [View Settings]
To view the current network information.
• [WLAN Region]
To select a WLAN region.
• [Manual Settings]
Under the [Wireless] option, select [DHCP enable] to allocate IP address automatically or [DHCP disable] to do it manually.
• [NetRemote PIN setup]
To set up a NetRemote PIN.
• [Network Profile]
To display a list of networks saved by PRIMUS.
• [Clear Network Setting]
To clear all network settings.
- [Keep Network Connected]
To keep the WiFi network connected or not. If [YES] is selected, this allows you to wake PRIMUS from standby using a remote app. If [NO] is selected, this will switch OFF the WiFi network connection in standby mode.
18.5 Time/date
- [Set Time/Date]
To set time and date.
• [Auto Update]
To select a source (Radio, Internet network or no update) for automatic time update. -
If you are updating time from a source (Radio - FM/DAB), the daylight saving setting has no effect.
If you are updating time from the Internet network, set your time zone. -
[Set Format] To set 12 or 24-hour time format.
- [Set Timezone] To set a time zone.
- [Daylight Savings] To enable or disable daylight saving time.
18.6 Inactive standby
- This option sets the duration of time before PRIMUS turns off automatically. Options include: Off, 2, 4, 5 and 6 hours.
18.7 Language
- This option sets the menu language. Options include: English, German, Danish, Spanish, French, Italian, Dutch, Norwegian, Polish, Portuguese, Finnish, Swedish and Turkish.
18.8 Factory Reset
- This option clears all user-defined settings and replaces them with the original default settings.
18.9 Software update
• [Auto check]
To set to periodically check for update.
- [Check now]
To check for update immediately.
If a new software is available, PRIMUS will ask if you want to proceed with an update.
Before software upgrade, make sure that PRIMUS is connected to a stable power connection. Disconnecting power during a software update may damage PRIMUS.
18.10 Setup Wizard
- To perform initial setup (see chapter "Performing initial setup").
18.11 Info
- This shows the current software version, spotify version, radio ID and friendly name.
18.12 Privacy police
- Please visit the following page on a PC or mobile device. www.frontiersmart.com/privacy
18.13 Backlight
To choose the brightness of the display: By the sensor in the front of PRIMUS the display brightness is automatically adjusted to the ambient light. You can adjust your settings for bright lightning conditions as well as for low lightning conditions f.i. in your bedroom. Please press and hold the display button on top of PRIMUS and adjust the brightness by turning and pressing of the navigation knob.
• [High Ambience]
Level 8 to 15
• [Dark Ambience]
Level 1 to 8
19. Using UNDOK™ app to control PRIMUS
PRIMUS is compatible with the Frontier Silicon's UNDOK™ app. The app offers comprehensive remote control functionality for FS based audio modules with an iOS or Android smart device.
To install and use the UNDOK™ app:
- Download the UNDOK™ app from "App Store" or "Google play" and install it on your iOS or Android smart device.

-
Connect your smart device to the same Wi-Fi network as PRIMUS.
-
Launch the UNDOK™ app on your smart device. The app will search for compatible audio systems. You may also tap on "Set up audio system" to start searching for audio systems.
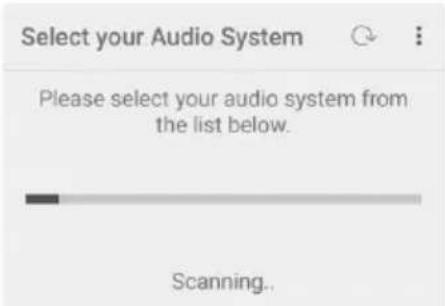
text_image
Select your Audio System Please select your audio system from the list below. Scanning...- Select "PRIMUS" from the list of available audio systems.
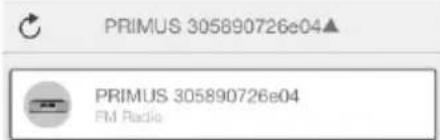
text_image
PRIMUS 305890726e04 PRIMUS 305890726e04 FM Radio5. Control PRIMUS through the UNDOK™ app.
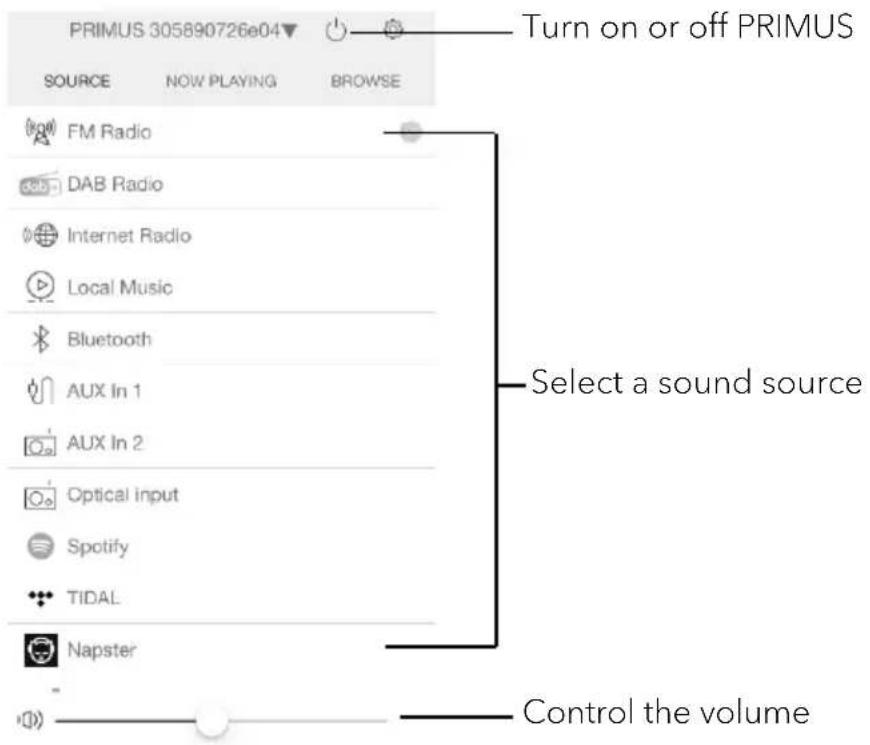
text_image
PRIMUS 305890726e04▼ SOURCE NOW PLAYING BROWSE FM Radio DAB Radio Internet Radio Local Music Bluetooth AUX In 1 AUX In 2 Optical input Spotify TIDAL Napster Turn on or off PRIMUS Select a sound source Control the volume20. Troubleshooting
Malfunctions can occur with any electrical equipment. This is not necessarily due to PRIMUS defect. As such, you should check the following table to see if you can eliminate the problem yourself.
| Malfunction | Possible cause | Solution |
| No power Power cable is not properly connected. | Connect the power cable properly. | |
| No response from PRIMUS | There is an error in PRIMUS. | Disconnect and reconnect the power plug. Then turn PRIMUS on again. |
| Remote control does not work, or only works sporadically | Distance to PRIMUS is too large. | Reduce the distance between the remote control and PRIMUS. |
| Battery is empty. | Replace the battery. | |
| No sound or poor sound | Sound is turned off. | Adjust the volume. |
| PRIMUS is not set to the correct playback mode. | Select another playback mode. | |
| Headset is plugged in. | Pull the headset out of the jack. | |
| FM/DAB or Internet reception is poor. | Extend/adjust the FM/DAB antenna or check the Wi-Fi connection. | |
| There is radio interference. | Keep PRIMUS away from other electronic devices. | |
| Optical Input no sound | Select PCM as output source in the external device. | |
| Insufficient Wi-Fi signal strength | The router is too far or blocked. | Place PRIMUS closer to the router or adjust the position of the Wi-Fi antenna. |
| Cannot connect to your Wi-Fi network | Router is not switched on or working properly. | Switch on your router or check the router conditions. |
| Setup method is incorrect. | Check if your router supports WPS and uses the correct setup method (PBC or PIN). | |
| Configure the Wi-Fi settings again. | ||
| Internet radio station does not work sometimes. | Some stations only support a limited number of listeners. | Try again later. |
| Station is not broadcasting. | Try again later. | |
| Some Internet radio stations disappear from the station list. | The station is removed from the list when it stops broadcasting. | Check again later. If the station broadcasts again, it will be brought back to the list. |
| USB device does not work. | USB playback is not support. | Check the files and file system on the USB device. |
| Hidden files on USB device. | Remove hidden files on the USB device. | |
| USB device is not charging. | Check the USB cable. | |
21. Cleaning

NOTICE!
Material damage due to improper cleaning!
Improper cleaning can result in damage to PRIMUS or cause certain functions to stop working.
- Never use abrasive or solvent-based cleaning agents, as these may damage the surface of PRIMUS.
• Never use hot or compressed air to dry PRIMUS. - The edges and corners of PRIMUS are vulnerable to pressure. Protect these areas to prevent them from being subjected to excessive pressure.
Cleaning off fingerprints and light soiling
- Clean PRIMUS only from the outside with a soft, dry cloth.
Cleaning off heavy soiling
- Clean PRIMUS only from the outside with a slightly damp cloth and then dry PRIMUS with a soft, dry cloth.
22. Warranty
When submitting warranty claims, the following applies without restricting your legal rights:
- Warranty claims can only be asserted within a period of max. 2 years (1 year in North America and Australia), calculated from the date of purchase.
- sonoro audio GmbH shall, at its own discretion, repair or replace PRIMUS free of charge any defects caused by material or manufacturing defects within the warranty period.
- In case of a complaint, please contact our customer service department. You can find contact details under "Contact data" or at www.sonoro.de.
- No new warranty period begins following repair or replacement of PRIMUS. The warranty period of 2 years (1 year in North America and Australia) from date of purchase remains applicable.
- Excluded from the warranty are batteries, damage caused by improper use, normal wear and tear, as well as defects which only minimally affect the value or usability of PRIMUS. The warranty also expires in case of any modifications not made by our authorised service centre.
PRIMUS
SO-340
SYSTÈME AUDIO STÉRÉO TOUT-EN-UN À 2 VOIES AVEC SUBWOOFER INTÉGRÉ DE 5.25", RADIO INTERNET, DAB+ & BLUETOOTH®
natural_image
Front view of a black and silver electronic device with a digital display and control buttons (no visible text or symbols on the device body)Mode d'emploi
Table des matières
1. Introduction ...... 115
natural_image
Hand inserting a small circular component into a rectangular device (no text or symbols visible)
natural_image
Technical line drawing of a bolt and nut assembly (no text or symbols)text_image
Diagram showing a hand inserting a plug into an electronic device with three labeled components and an inset close-up of the plug.- [Configuration PIN NetRemote]
Pour configurer un NIP NetRemote.
• [Profil réseau]
text_image
Select your Audio System Please select your audio system from the list below. Scanning...natural_image
Front view of a modern audio recording device with a digital display and control knobs (no visible text or symbols on the device body)natural_image
Hand holding a remote control knob with a circular dial indicator (no text or symbols visible)
natural_image
Technical line drawing of a bolt and nut assembly (no text or symbols)text_image
Diagram showing a hand inserting wires into an electronic device with three labeled components and directional arrows indicating assembly or operation.text_image
Select your Audio System Please select your audio system from the list below. Scanning...natural_image
Front view of a modern audio recording device with a digital display and control knobs (no visible text or symbols on the device body)natural_image
Hand holding a small device with a circular dial and 'CE' label, no visible text or symbols on the device itself.
natural_image
Technical line drawing of a mechanical assembly showing a bolt inserted into a nut (no text or symbols)text_image
Diagram showing a hand inserting a cable into an electronic device with three labeled components and directional arrows indicating assembly or operation.• [NetRemote PIN set-up]
text_image
Select your Audio System Please select your audio system from the list below. Scanning...natural_image
Front view of a black audio recording device with a digital display and control buttons (no visible text or symbols on the device body)http://www.spotify.com/connect/third-party-licenses

napster
natural_image
Hand holding a small electronic device with a rotary knob, no visible text or symbols
natural_image
Technical line drawing of a mechanical assembly showing a bolt inserted into a nut (no text or symbols)text_image
Diagram showing a hand inserting a plug into an electronic device with three labeled components and an inset close-up of the plug.text_image
Select your Audio System Please select your audio system from the list below. Scanning..At sonoro we are putting the utmost effort in to developing state-of-the-art products with impeccable quality standards. It is very important to us that you stay satisfied with your sonoro product for the lifetime of the unit. If for any reason you need assistance or have a warranty claim, please do not hesitate to get in touch with our Service Team.