RS1 - Subwoofer Ruark Audio - Free user manual and instructions
Find the device manual for free RS1 Ruark Audio in PDF.
| Product type | Active subwoofer |
| Brand | Ruark Audio |
| Model | RS1 |
| Dimensions (H x W x D) | 300 x 250 x 250 mm (feet included) |
| Weight | 6.7 kg |
| Amplifier | 100 W class D |
| Transducers | 170 mm downward-firing woofer, 170 mm passive radiator |
| Frequency response | 25 Hz - 200 Hz |
| Audio input | RCA mono (2.0 Vrms) |
| Controls | Phase (0°/180°), crossover frequency (50-180 Hz), volume level |
| Mains power | 100-240 V AC, 50/60 Hz, 1.0 A |
| Power consumption | Nominal 5 W, standby < 0.5 W |
| Auto standby function | Yes, after about 20 minutes without audio signal |
| Clipping protection | Soft clipping to prevent distortion |
| Thermal protection | Automatic shutdown in case of overheating, flashing LEDs |
| Cabinet material | Wood (variable natural finish) |
| Operating temperature | 5°C to 40°C |
| Maintenance | Clean with a lint-free or slightly damp cloth; do not use chemicals |
| Warranty | 2 years (extendable to 3 years upon registration) |
| Spare parts | Contact after-sales service or dealer |
| Repairability | Do not open the device; entrust any repairs to a professional |
| Included accessories | RCA interconnect cable, power cable |
| General information | Compliant with European WEEE directive; declaration of conformity available online |
Frequently Asked Questions - RS1 Ruark Audio
User questions about RS1 Ruark Audio
0 question about this device. Answer the ones you know or ask your own.
Ask a new question about this device
Download the instructions for your Subwoofer in PDF format for free! Find your manual RS1 - Ruark Audio and take your electronic device back in hand. On this page are published all the documents necessary for the use of your device. RS1 by Ruark Audio.
USER MANUAL RS1 Ruark Audio
natural_image
Simple line drawing of a rectangular container with two side supports and a label 'ruark' at the bottom (no other text or symbols)
natural_image
Simple line drawing of three overlapping paper sheets (no text or symbols)
natural_image
Two types of cordages with connectors, shown from different angles (no text or symbols)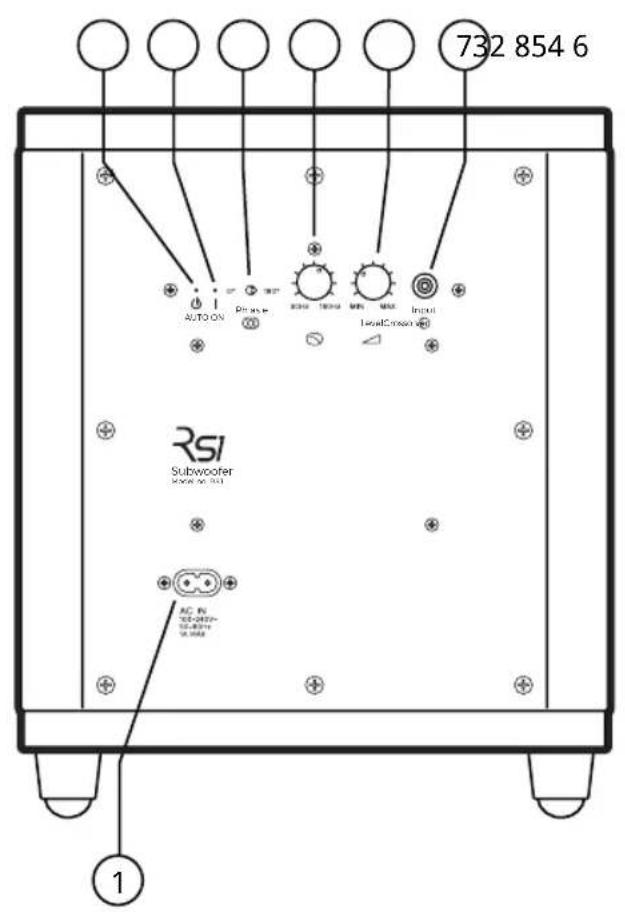
EN
- AC mains power inlet
- ⏻ Standby LED
- | On LED
- Phase switch (0-180°)
- Crossover frequency (50-180Hz)
- Volume level
- Audio input (RCA/Phono)
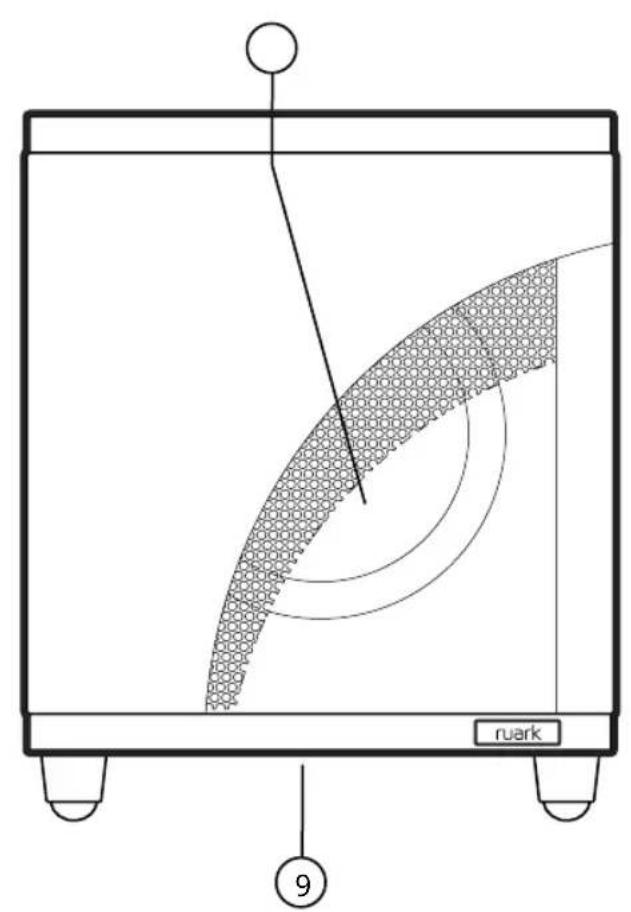
- 170mm bass radiator
- Downward firing 170mm driver
ES
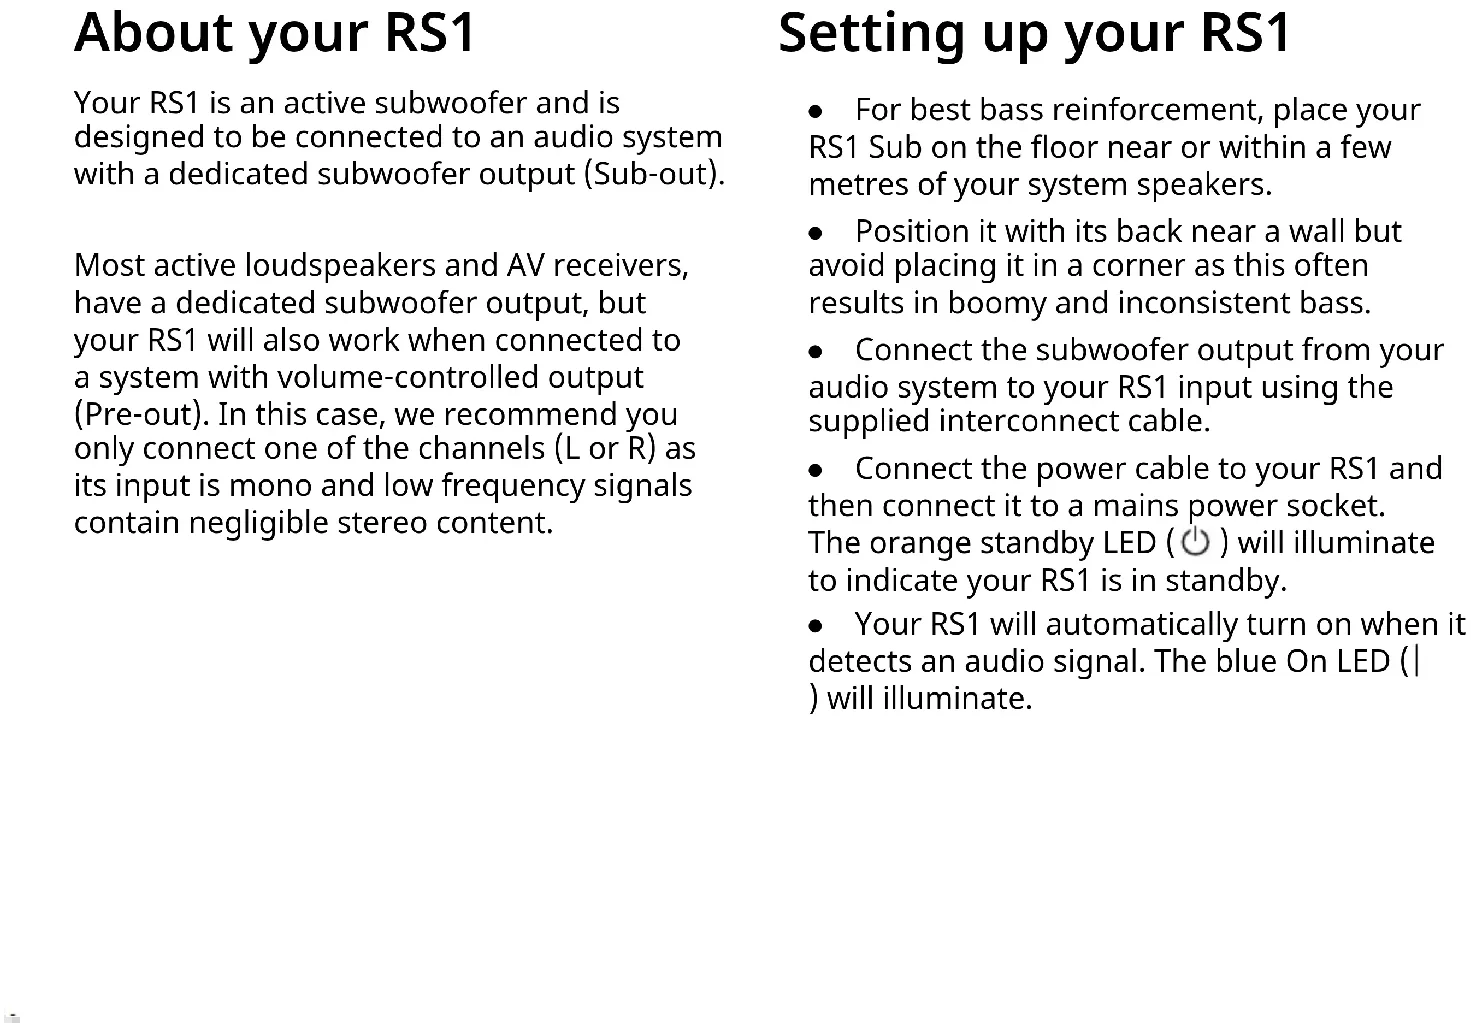
Your RS1 is an active subwoofer and is designed to be connected to an audio system with a dedicated subwoofer output (Sub-out).
Most active loudspeakers and AV receivers, have a dedicated subwoofer output, but your RS1 will also work when connected to a system with volume-controlled output (Pre-out). In this case, we recommend you only connect one of the channels (L or R) as its input is mono and low frequency signals contain negligible stereo content.
Setting up your RS1
- For best bass reinforcement, place your RS1 Sub on the floor near or within a few metres of your system speakers.
- Position it with its back near a wall but avoid placing it in a corner as this often results in boomy and inconsistent bass.
- Connect the subwoofer output from your audio system to your RS1 input using the supplied interconnect cable.
- Connect the power cable to your RS1 and then connect it to a mains power socket. The orange standby LED (⏻) will illuminate to indicate your RS1 is in standby.
- Your RS1 will automatically turn on when it detects an audio signal. The blue On LED (|) will illuminate.
Fine tuning your RS1
- The acoustics of every room is different, and time spent tuning your RS1 so it blends seamlessly with your system is important.
- When set correctly you should be unaware that the bass is coming from your RS1, and it should sound as though all the bass is being produced by your system's speakers.
- Start by setting the crossover and volume level controls to about halfway.
-
Listen to a variety of music that you know well and adjust your RS1 volume level so it matches that of your system.
-
Experiment with the crossover frequency volume level and phase switch until you're happy with the bass.
- When tuning your RS1, it's important you return to the same listening position to judge the effect.
- Final tuning will be down to your own taste and preference, but if you are aware that the subwoofer is the source of the bass then it's likely that the crossover frequency is either set too high or the subwoofer volume is too loud.
Auto standby
- Your RS1 Sub has an automatic standby function and is designed to be always connected to a mains AC outlet.
- When there is no audio signal, your RS1 Sub will remain in a low power standby state and only turn on when it detects an audio input.
- After about 20 mins of no audio, your RS1 Sub will go back to low power standby.
Overload protection
- Your RS1 Sub has a sophisticated soft-clipping feature to prevent distortion and thermal overload at high listening levels.
- In the unlikely event that it overheats, both status LEDs will flash, and it will cut the audio output until the internal temperature has stabilised. This normally takes a few minutes.
Specifications
Amplifier and driver
170mm downward firing driver
170mm front-facing bass radiator
100W class D power amplifier
Low distorion soft-clipping
Frequency response 25Hz - 200Hz
Audio input
Mono input (RCA) 2.0Vrms
Controls
Selectable phase (0-180°)
Adjustable crossover frequency (50-180Hz)
Volume level
Power
Auto power-on and standby
100-240V AC 50/60Hz 1.0A
Nominal 5W
Standby 0.5W
Dimensions
H300 x W250x D250mm (including feet)
6.7kg
Troubleshooting
For help with your product, please refer to the FAQ (Frequently Asked Questions) page in the support area of our website.
For more information visit
www.ruarkaudio.com/support

Specification and design subject to modification without notice.
Safety information
- Read this user guide and follow all instructions, it will help you set up and operate your product properly.
- Heed all warnings and keep this user guide for future reference.
- Do not attempt to use a damaged device as this could result in a dangerous electric shock.
- Do not open the unit or remove any panels to expose the electronics. No user serviceable parts inside.
- Refer all servicing to qualified service personnel. Servicing is required when the device has been damaged in any way, such as when any power cord, or power plug is damaged, liquid has been spilled or objects have fallen into the device, the device has been exposed to rain or moisture, does not operate normally, or has been dropped.
- This device is intended to be operated ONLY from the AC voltages listed on the back panel or included AC mains adapter. Operation from voltages other than those indicated may cause irreversible damage to the device and void the product warranty.
- Ensure that the mains plug or mains connector into the unit is readily accessible in case disconnection from the mains is required.
- The AC mains adapter, mains plug, or mains connector must be removed from the socket to completely disconnect the system from AC mains power.
- Do not place any naked flame sources, such as lighted candles, on or near the device. Do not install near any heat sources such as radiators, stoves, or other devices that produce heat.
- Avoid exposure to extreme heat or cold.
-
Only use attachments/accessories specified for this device. Make no modifications to the system or accessories. Unauthorised alterations may compromise safety, regulatory compliance, and system performance.
•To reduce the risk of fire or electrical shock, do not expose the device to rain or moisture. Do not expose this device to dripping or splashing, and do not place objects filled with liquids, such as vases, on or near the device. As with any electronic products, use care not to spill liquids into any part of the system. Liquids can cause a failure and/or a fire hazard. -
Disconnect this device from AC mains power during lightning storms or when unused for long periods of time to prevent damage to this device.
- To prevent risk of fire or electric shock, avoid overloading AC mains power outlets or extension cords.
- Long-term exposure to loud music may cause hearing damage. It is best to avoid extreme volume when using headphones, especially for extended periods.
- Do not install this device in a confined space. Always leave a space of at least 10cm around the device for ventilation and ensure that curtains or other objects never cover ventilation openings on the device.
Regulatory information

This device is labelled in accordance with European Directive 2012/19/EU concerning waste electrical and electronic equipment. This symbol indicates that the product or associated batteries should not be disposed of as general household waste. As with any electrical equipment, please dispose of it according to local regulations.

CE COMPLIANCE INFORMATION
This product conforms to all EU Directive requirements as applicable by law. Hereby, Ruark Audio, declares that this device complies with the essential requirements and other relevant provisions of the European Radio Equipment Directive 2014/53/EU. You can download the full CE Declaration of Conformity at www.ruarkaudio.com/doc/RS1doc.pdf

UK CONFORMITY ASSESSMENT INFORMATION
This product conforms to all UK Conformity Assessment regulations as applicable by law. You can download the full UKCA Declaration of Conformity at www.ruarkaudio.com/doc/RS1UKCA.pdf
Guarantee
Register your product to get an extended three-year guarantee.
As standard, this product is guaranteed to be free from defects for a period of two years from date of purchase, but this is extended to three years if you register your product at www.ruarkaudio.com.
This guarantee remains valid providing this product has been treated with due care and attention. Product failure through accidental damage, excessive wear and tear, negligence or unauthorised modification will void this guarantee.
If this product was purchased in the UK and it develops a fault, please contact the retailer from which it was purchased, or contact us directly via our website www.ruarkaudio.com/support.
For products purchased outside the UK the distributor in the country of purchase guarantees the product. For details, please contact the local Ruark distributor or outlet.
If returning this product, please ensure it is packed in its original packaging and a proof of purchase is included.
This guarantee in no way varies or removes the purchaser's statutory rights.
Errors and omissions excepted.
General care
- Clean with a soft, lint-free duster or slightly dampened cloth. Do not use wax sprays or other substances as these may damage the surface finish or impair performance.
- Do not expose your unit to direct sunlight, high humidity, dust, excessive vibration or extreme temperatures, all of which can affect the finish, performance and reliability of the unit.
- Recommended operating temp. range is 5°C to 40°C.
- Natural wood finishes will vary and lighten or darken with age, particularly when exposed to sunlight.
Copyright and trademarks
© Ruark Audio. All rights reserved. Ruark Audio, Ruark, the Ruark Audio and Ruark logos, and other Ruark Audio marks are owned by Ruark Audio and may be registered. All other trademarks are the property of their respective owners.
Om din RS1
Adjustable crossover frequency (50-180Hz)
Volume level
Strøm
Protection de surcharge
INFORMATIONS SUR LA CONFORMITÉ À LA CE
Mono inngang (RCA) 2,0 Vrms
Kontroller
Valgbar fase (0-180°)
Justerbar delefrekvens (50-180Hz)
Volumnivå
Strømtilførsel
natural_image
Silhouette of a tree with no text or symbolsruark
59-60 Tailors Court, Temple Farm Industrial Estate,
Southend on Sea, Essex, SS2 5TH, UK
www.ruarkaudio.com

GREAT
BRITISH
DESIGN
20230603.1