PIR-910 - Motion detector Chuango - Free user manual and instructions
Find the device manual for free PIR-910 Chuango in PDF.
| Product Type | Passive Infrared (PIR) Motion Detector |
| Brand | Chuango |
| Model | PIR-910 |
| Dimensions (L x W x H) | 108 x 52 x 36.8 mm |
| Bracket Dimensions | 52 x 30 x 26.5 mm |
| Power Supply | 3 V DC (2 x 1.5 V AA LR6 batteries) |
| Detection Range | 8 m (front) |
| Detection Angle | 110° |
| Pet Immunity | Up to 25 kg |
| Transmission Distance | < 80 m (open space) |
| Radio Frequency | 433 MHz (868 MHz for Europe) |
| Housing Material | ABS Plastic |
| Operating Temperature | 0 °C to 50 °C |
| Relative Humidity | < 80 % (non-condensing) |
| Standby Current | < 18 μA |
| Alarm Current | < 12 mA |
| Tamper Protection | Yes (tamper switch) |
| Status Indicator | Flashing LED (self-test, intrusion, power saving, low battery) |
| Recommended Installation Height | 2.2 m above floor |
| Number of Batteries | 2 x 1.5 V AA LR6 batteries |
Frequently Asked Questions - PIR-910 Chuango
User questions about PIR-910 Chuango
0 question about this device. Answer the ones you know or ask your own.
Ask a new question about this device
Download the instructions for your Motion detector in PDF format for free! Find your manual PIR-910 - Chuango and take your electronic device back in hand. On this page are published all the documents necessary for the use of your device. PIR-910 by Chuango.
USER MANUAL PIR-910 Chuango
natural_image
Simple diagram of two rectangular blocks with a small oval on the top block (no text or symbols)PIR-910
Pet-Immune PIR Motion Detector
Introduction
PIR-910 motion detector adopts unique design with dual infrared sensors and intelligent analysis algorithm which effectively identify interference signal from body movement signals. It can reduce false alarm rate caused by pets under 25kgs or other interfering objects. The detector is suitable for lobby, hallway detection with a detective range of 0-8 m at front. With low power feedback function, the users will get SMS alert or push message for low battery if the detector has been connected to a GSM or Wi-Fi alarm system.
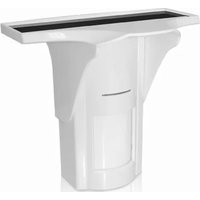
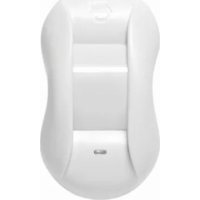
Product Overview
flowchart
graph TD
    A["Device 1"] --> B["Component 1"]
    C["Device 2"] --> D["Component 2"]
    E["Terminal Block"] --> F["Component 3"]
    G["External Component"] --> H["External Component"]
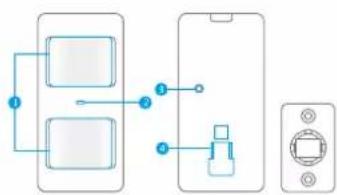
- Detection window
- Status indicator
- Test button
- Bracket slot
Status Indication
| Display Meaning | |
| Blinks continuously Self testing | |
| Blinks once Intrusion detected | |
| Blinks twice | Testing mode is finished, the detector enters power-saving mode |
| Blinks once every 3 seconds | Low battery, please replace the battery as soon as possible |
PCB Layout
text_image
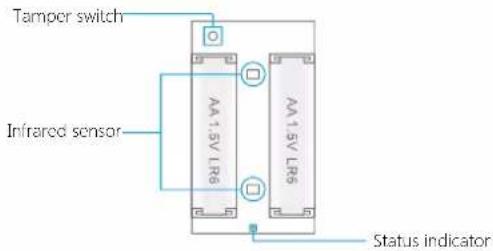
Tamper switch Infrared sensor AA 1.5V LR6 AA 1.5V LR5 Status indicatorInfrared sensor: It detects the infrared rays released by human body motion, please don't touch the surface and always keep it clean.
Tamper switch: Once the case is opened in working mode, the tamper switch is triggered and then generates an alarm signal.
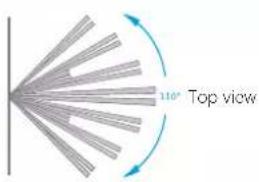
Detection Range
text_image
110° Top view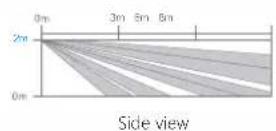
Pet-Immune Function Illustration
text_image
2.25m 1km 1km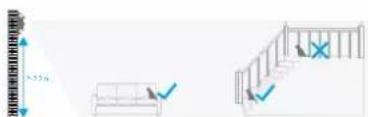
text_image
85% ✓IMPORTANT: If you keep a pet at home, make sure the detector is installed at the upright position to achieve pet-immune function.
Working Mode
Testing Mode
Press the test button, the detector enters testing mode and detects once every 10 seconds. After 3 minutes, the status indicator blinks twice, and the detector switches to power saving mode.
Power Saving Mode
If the PIR motion detector detects movements twice in 3 minutes, it automatically goes into a sleep state. If there is no movement detected in next 3 minutes, it will switch from sleep state to arm. During the 3 minutes, the detector won't be active and send any signals to the control panel. As long as there is a movement detected within 3 minutes, the duration of power saving mode will be extended.
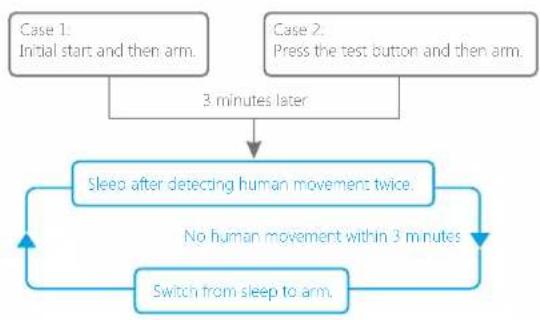
flowchart
graph TD
    A["Case 1: Initial start and then arm."] --> B["3 minutes later"]
    C["Case 2: Press the test button and then arm."] --> B
    B --> D["Sleep after detecting human movement twice."]
    D --> E["No human movement within 3 minutes"]
    E --> F["Switch from sleep to arm."]
    F --> D
Pairing to Control Panel
Control panel enters pairing state
Make the control panel in pairing state.
Press the test button
Press the test button on the back of the detector twice, the control panel beeps once to indicate a successful pairing.
Note: If the control panel beeps twice when the above operation is done, it means the detector has been paired already.
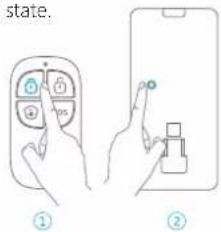
Test
It is to check whether the PIR motion detector can work properly or not.
① Arm the system
Make sure the alarm system is in armed state.
② Trigger an alarm
Press the test button until an alarm is triggered. The detector is proved to be connected successfully and ready for installation.
text_image
state. ① ②Installation
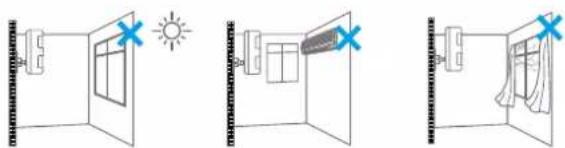
Important: Avoid installing the motion detector directly toward windows or near heat sources, such as heat extraction units, air-condition, micro-wave oven, refrigerator etc. Also try to avoid placing two motion detectors in the opposite of each other and don't place them in each other's detection range.
text_image
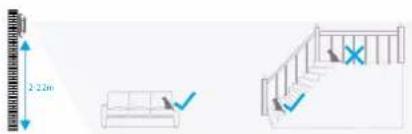
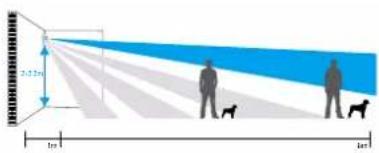
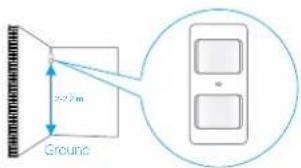
Diagram illustrating three different types of household lighting or ventilation, showing sun heating and drying methods.Step 1: The ideal mounting height of the motion detector is
2.2 meters from the floor. It is suggested to mount it at the corner of the wall or just stick it to the wall by using the supplied 3M sticker.
text_image
Ground 2.7 mStep 2: After mounting the detector, please walk from left to right in the room for a test; The status indicator will blink once when motion is detected.
natural_image
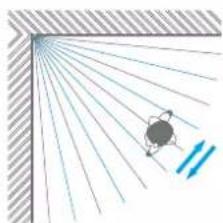
Diagram showing light rays reflecting off a corner with a central object and two parallel lines (no text or symbols)Note This PIR motion detector can also be mounted at special location by using the supplied bracket and screw kits.
Specifications
Power Supply: DC 3 V (AA 1.5V LR6 battery x 2 pcs)
Static Current: <18 μA
Alarm Current: <12 mA
Detection Scope: 8m/110°
Pet Immunity: <25 kgs
Transmitting Distance: <80 m (open area/ no interference)
Radio Frequency: 433.92MHz
Housing Material: ABS plastic
ERP (dBm). MAX: -7.44
Operating Condition:
Temperature: 0°C to 50°C
Relative Humidity: <80% (non-condensing)
Detector Dimensions (L x W x H): 108x52x36.8mm
Bracket Dimensions (L x W x H): 52x30x26.5mm
Einleitung
text_image
Diagram illustrating three different types of lighting or ventilation setups with sun and X symbols indicating light and no text.natural_image
Diagram showing light rays reflecting off a corner with a small object inside (no text or symbols)text_image
Diagram showing two-step smartphone control interface: one with hand and keypad, the other with finger and touch device.Installation
text_image
Diagram illustrating three different lighting or ventilation methods: sun, light, and rain.text_image
2.22 m 5x1natural_image
Diagram showing light rays reflecting off a corner with a small object inside (no text or symbols)text_image
Diagram showing two-step smartphone control interface with hand and touch buttons labeled ① and ②Installatie
text_image
Diagram showing three different lighting or ventilation methods with sun and cross symbols indicating light and noise respectively.natural_image
Diagram showing light rays reflecting off a corner with a small object near the edge (no text or symbols)text_image
2.2m 1m 8m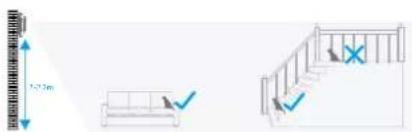
text_image
1-2.5m ✓ ✓text_image
Diagram showing two-step smartphone control interface: one with hand and keypad, the other with mouse and scroll.Instalación
text_image
Diagram showing three different lighting or ventilation setups with sun and cross symbols indicating light source, panel, and window positions.text_image
2-22 m Suelonatural_image
Diagram showing light rays reflecting off a corner with a small object near the edge (no text or symbols)text_image
2.2m 1m 5m