
GO2 - Alarm system Chuango - Free user manual and instructions
Find the device manual for free GO2 Chuango in PDF.


| Product Type | Wireless Alarm System |
| Brand | Chuango |
| Model | GO2 |
| Dimensions (Main Unit) | Approx. 120 x 80 x 25 mm |
| Weight (Main Unit) | Approx. 150 g |
| Power Supply | DC 5V via micro USB adapter (included) or 3x AAA batteries (backup) |
| Standby Current | < 50 mA |
| Alarm Current | < 300 mA |
| Wireless Range | Up to 100 meters (open area) |
| Number of Zones | 4 wireless zones, 1 wired zone |
| Supported Sensors | Door/window sensors, PIR motion detectors, smoke detectors, remote controls |
| Siren Loudness | Up to 110 dB |
| Communication | 433 MHz RF, optional GSM module (not included) |
| Mobile App Compatibility | Yes, via optional WiFi module (sold separately) |
| Operating Temperature | -10°C to 50°C |
| Storage Temperature | -20°C to 60°C |
| Humidity | Up to 90% non-condensing |
| Installation | Wall mount or tabletop |
| Keypad | Built-in, numeric backlit keypad |
| Audible Alerts | Entry/exit delay, alarm, trouble beeps |
| Visual Indicators | LED status lights (power, alarm, zone) |
| Maintenance | Replace batteries annually, clean with dry cloth |
| Security Features | Tamper protection, panic button, auto-arm/disarm |
| Spare Parts Available | Replacement sensors, remotes, power adapters |
| Certifications | CE, FCC, RoHS |
Frequently Asked Questions - GO2 Chuango
User questions about GO2 Chuango
0 question about this device. Answer the ones you know or ask your own.
Ask a new question about this device
Download the instructions for your Alarm system in PDF format for free! Find your manual GO2 - Chuango and take your electronic device back in hand. On this page are published all the documents necessary for the use of your device. GO2 by Chuango.
USER MANUAL GO2 Chuango
Thank you for choosing our product. This product is a totally D.I.Y. wireless home security solution. It features automatic connection to various accessories, putting your home under all-round protection. To experience this wonderful product, please follow the instructions in the user manual.
Disclaimer
Dear users,
We have reviewed this manual thoroughly in order that it will be an easy to use guide to this product. All statements, technical information, recommendations in this manual are believed reliable, but the accuracy and completeness thereof are not guaranteed or warranted.
The specifications and information regarding the products in this document are subject to change without notice.
Photocopy, copy, reproduction, translation to any language, modification, storage in a retrieval system or retransmission, in any form or by any means, electronic, mechanical or otherwise, is strictly prohibited without prior written permission.
In no event we are liable for any indirect, special, incidental, or consequential damages, including, without limitation, lost profits or loss or damage to data arising out of the use or inability to use this document, even if the product has been advised of the possibility of such damages.
Contents
In the Box 1-2
Included Accessories 2
How It Works 3
Accessories 4\~9
Remote Control 4
Door/Window Contact 5
PIR Motion Detector....8
Zone Mode of Sensor 8
Getting Started 9-17
Step 1. Insert SIM Card....9
Step 2. Download the Ago 9
Step 3. Add an Account 10
Step 4. Be Familiar with the Alarm System....10
Step 5. System Settings....11
Setting through SMS 13-14
Other SMS Notifications 14
Installation 15\~18
Sensor Placement 15
Installation Mode 18
Placing the Control Panel 16
Mounting the Door/Window Contact 17
Mounting the PIR Motion Detector....18
Pairing/Deleting Accessory 19-20
Pairing New Remote Control and Sensor 19
Pairing New Wireless Siren 20
Deleting Sensors 20
Deleting Wireless Siren 20
Arm & Disarm by Free Phone Call 21
Restore to Factory Settings 21
Specifications 22\~23
Control Panel 22
Remote Control 22
Door/Window Contact 23
PIR Motion Detector 23
In the Box
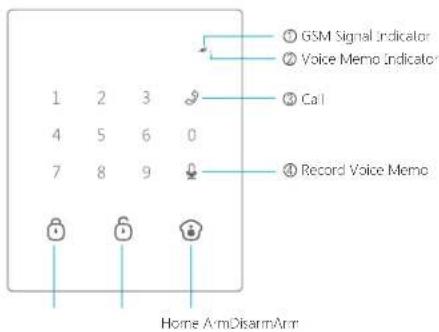
(1) Blinks once per second: Searching network.
Blinks once per 3 seconds: Connected with network.
(2) Blinking: There is a new voice memo.
③ Enter a phone number and press this call button to make a call.
(4) Press and hold it for 3 seconds to leave a 10-second voice memo. Press once to listen to a new voice memo or replay.

System Status
Arm: Press [6] to arm your system. Now all the sensors are on guarding. Disarm: Enter the password (default setting: 1234) and press [6] to disarm your system. Now your system stops handling alarm signal from sensors (except these sensors in 24-H zone). Home Arm: Press [6] to part arm your system. Now your system only stops handling alarm signal from home mode zone sensors, which enables users to move freely at home.
Included Accessories
This alarm system has the following accessories included in the box.

PIR Motion Detector x 1

Door/Window Contact x 1

Remote Control x 2

AC Adapter x 1

User Manual x 1
How It Works
The control panel will receive an alarm signal when a sensor is triggered, it will hoot and inform users by sending SMS and making calls.
![graph LR A["Mobile Device"] -->|60%| B[" keypad"] B --> C["Phone with envelope icon"] C --> D["Email"] D --> E["Telephone"]](/content/2026/06/1327156/images/414fdf33da8c32daf3322946bcb3e885293515a53e1cecf81aedbd36f1e16eb6.jpg)
When you receive a phone call from the control panel, you will hear your pre-recorded alarm voice message first, and then you can remotely control the system by pressing the numbers on your phone keyboard.
| Operation Function | |
| 0 Disarm | |
| 1 Arm | |
| 6 Turn off siren | |
| 9 Turn on siren | |
| * | Two-way talk |
| # I hang up |
You can record an alarm voice message by the following steps: Enter clearm password (default setting 1234), and then press | 🤒 | and | ↓ button to leave a 10-second alarm message.
Distinct on Voice memo: Message is recorded to your family members. A arm voice message: Message is played when you pick up an emergency call.
Accessories
Remote Control
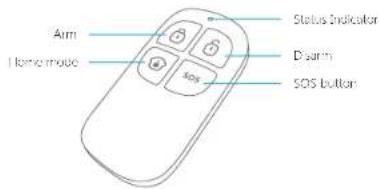
| Button | System Status |
| Press once to arm. The siren beeps once to confirm the system is armed. | |
| Press once to disarm. The siren beeps twice confirm the system is disarmed. | |
| Press once to home arm. After 3 seconds, the siren beeps once to confirm the system is in home mode.Note: The control panel only stops handling alarm signal from the home mode zone sensor, which enables users to move freely at home. | |
| SOS | The control panel will hoot on-site with indicator flashing, and users will receive SMS and calls. |
| Press the [ ] button. After the indicator on the remote control blinks once, press [ ] button within 3 seconds to mute y arm the system. | |
| Press the [ ] button. After the indicator on the remote control blinks once, press [ ] button within 3 seconds to mute y disarm the system. |
Door/Window Contact
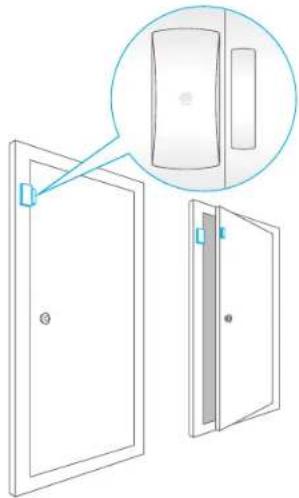
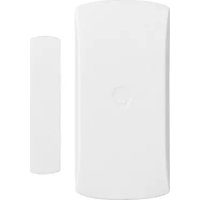
The contact contains a transmitter and a magnet. It can be mounted on doors, windows and any other objects that can be opened or closed. When the transmitter and magnet are separated over 2 cm, the contact will send a signal to the control panel to trigger an alarm.
Overview

Status Indicator
Binks once: Door/window is opened.
Binks once per 3 seconds: Low battery, please replace battery.
Note. When tamper switch is pressed, the system will alarm immediately
PIR Motion Detector
The detector adopts digital dual-core fuzzy logic control processing technology and intelligent analyze algorithm. When human body's infrared spectrum is detected, it will send alarm signal to the control panel.
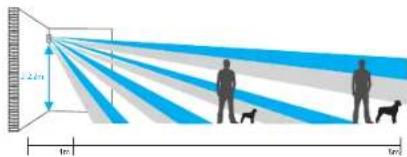
The detector features pet immunity for animals up to 25kgs.
Overview
![graph TD A["Block 1"] --> B["Block 2"] B --> C["Connector"] C --> D["Connector"]](/content/2026/06/1327156/images/abcd423e2e3b32e5cfc8516eb717cc48c9ae1493a3e0523db57df0e03ada7f45.jpg)
- Detection Lens
- Status Indicator
- Bracket Slot
Status Indication
Blinks continuously. Motion detector performs a self-test.
Blinks once: Motion is detected.
Blinks twice: Motion detector has exited testing mode, and goes to power saving mode.
Blinks once per 3 seconds: Low battery, please replace battery.
PCB Layout

Tamper Switch: When the tamper switch is pressed, system will alarm immediately.
Infrared Sensors: The infrared sensors detect movement, and please make sure they are always clean.
Working Mode
Testing Mode
After a 1 minute self-test, the detector enters a testing mode. It detects once in every 10 seconds and emits alarm signal when motion is detected. This will last for 3 minutes and then switches into power saving mode.
Note: You can press the test button to enter testing mode too.
Power Saving Mode
If the PIR motion detector detects movements twice in 3 minutes, it automatically goes into asleep state. If there is no movement detected in next 3 minutes, it will switch from asleep state to arm. During the 3 minutes, the detector won't be active and send any signs to the control panel. As long as there is a movement detected within 3 minutes, the duration of power saving mode will be extended.
![graph TD A["Case 1: Initial start and then arm"] --> B["3 minutes later"] C["Case 2: Press the test button and then arm"] --> B B --> D["Slice after detecting human movement twice"] D --> E["No human movement within 3 minutes"] E --> F["Switch from sleep to arm"]](/content/2026/06/1327156/images/6a0d6d67640388d9f7cf896a9daeb14cb2bb667c620036782cf7b19f4d4e5172.jpg)
Detection Range


Side view
Pet-Immune Function
This sensor adopts a special design to improve detection accuracy. Pets less than 25kgs will not trigger the alarm.

Zone Mode of Sensor
Sensors can be placed in different zones for different requirements. Four different zones can be selected:
Normal zone. In arm or home arm state, the detectors set to normal zone work normally. Once intrusion is detected, the detectors trigger an alarm.
Home zone. When system is in home arm state, the detectors set to home zone are disarmed. The detectors set to other zones are armed. That is, partial arm.
Single delay zone. Sensors set to this zone will alarm at the specified time (which can set by yourself) after being triggered.
24 H zone: The detector set to 24 H zone trigger an alarm immediately when detecting intrusion, no matter the system is armed or disarmed.
| Sensors in This Kit Zone Mode (Default Setting) | |
| Door/Window Contact Normal Zone | |
| FIR Motion Detector Home Mode Zone | |
You can set zone by changing the jumpers in detector. After the setting, detector can work in corresponding mode. It must be paired to the control panel again.
How to set:
Open the rear cover of the detector; change the array of jumpers on the zone setting to the corresponding position as below (Mind the direction of D0-D3):

Getting Started
Step 1. Insert SIM Card
Before inserting the SIM card, please perform the following steps:
- Make sure the alarm system is powered off.
- IMPORTANT: Remove the (default) code permanently from the SIM card.
- Turn off the voice mail function if it is enabled.
- Insert the SIM card into the SIM card slot; wait until the GSM indicator starts blinking once every 3 seconds; it means the network is connected.
SIM card requirement: 2G GSM SIM card with calling, SMS and caller display functions.
Step 2. Download the App
Download the App by searching keywords "GO2 Alarm" in the App Store or Google Play, and then create your own account.


Step 3. Add an Account

Step 4. Be Familiar with the Alarm System
Now you can tap | 📄 |, | 📄 |, | 📄 | to arm/disarm/home arm your system remotely. Tap [icon] and app will skip to messages interface automatically. After sending the SMS, you will receive a phone call from the control panel to leave a 10-second voice memo. Tap [icon] and app will skip to messages interface automatically. After sending the SMS, you will receive a phone call from the control panel to start a two-way talk.

Step 5. System Settings

Store Emergency Numbers & SMS Numbers
Emergency numbers are the phone numbers that will receive calls from the control panel when the alarm goes off.
SMS numbers are the phone numbers that will receive alarm SMS from the control panel when the alarm goes off.
IMPORTANT: After phone numbers are stored, only those numbers can modify the system settings. Commands from unauthorized phone numbers will be rejected.
Once an alarm is triggered, the control panel will dial the emergency numbers 3 rounds at most, if a phone is picked up with operation on phone button, the system will stop dialing.
Store Speed Dial Number
After the number is stored, you can dial this number immediately by pressing button once on the control panel.
Change Zone Name
10 remote controls and 50 sensors could be extended and the names of sensors are able to be edited.
This function aims at guiding users to identify the invasion location quickly by changing the sensor name. Their sequence in naming follows pairing order. For example, the first paired sensor is by default set to zone 1; the second paired sensor is by default assigned to zone 2, etc. In case of emergency, if you did not change the sensor name, this control panel will send SMS with zone number to user (e.g. Zone 1 Alarm).
Exit & Entry Delay Time
If you don't want to carry remote controls, you can set the exit or entry delay. Suppose entry delay was set at 30 seconds, the system will allow you 30 seconds to disarm the system before alarming. Suppose exit delay was set at 35 seconds, the system will allow you 35 seconds to leave before the system is armed. The "beep" is heard in every second to remind you to leave. The pace of reminding sound will speed up in last 15 seconds. Thus leaves you enough time to leave home without triggering the system.
Single Zone Delay Time
(To apply this function, you should change the zone mode of the sensor to single delay zone first. Please refer to "Zone Mode of Sensor" on page 9). After the time setup, the single delay zone sensor will delay to alarm when it is triggered
Comparison
For example: The exit & delay time is set at 30 seconds; single zone delay time is set at 40 seconds.
| Sensor Arm Alarm | ||
| Normal and home mode zone Delay 30s to arm Delay 30s to alarm | ||
| Single delay zone Delay 30s to arm Delay 40s to alarm | ||
| 24-H zone Always in arm state Alarm immediately | ||
Disarm Password
The default disarm password is 1234. It is suggested to change the passcode for safety.
Setting through SMS
If you use a non-smart phone, you can set your system by sending the related SMS command codes to the SIM card in the control panel.
| Item SMS Command Code | |
| SMS menu 3, 72, 77 | |
| System setting inquiry 00 | |
| Disarm 0 | |
| Arm 1 | |
| Home arm 2 | |
| Two-way talk 3 | |
| Call back to leave a 10-second voice memo 4 | |
| Store emergency telephone numbers 5 | |
| Store emergency SMS numbers 6 | |
| Store speed dial number 8 | |
| Change zone name 901-950 | |
| Set exit & entry delay time | 11 |
| Set alarm volume and ringing time | 12 |
| Change disarm passcode | 13 |
| Set single zone delay time | 14 |
For example:
- Send "5" to the SIM card number of the control panel.

- You will receive a menu SMS from the control panel.

- Copy and edit the menu message, and then send it back.
![graph LR A["App"] --> B["Message"] B --> C["Result"]](/content/2026/06/1327156/images/b840b68efe379220668bc18c5c3f1c13809a4a4033d9bdfff50b3c173ce25c8b.jpg)
- You will receive a SMS for confirmation from the control panel.
Other SMS Notifications
You will receive SMS for reminding you:
- When the control panel and sensors are in low battery, the 1st stored phone number will receive a SMS.
- When the AC power of control panel fails or restores, the 1st stored phone number will receive a SMS.
- When the tamper switch of sensors trigger an alarm, all the stored phone numbers will receive a SMS.
Installation
Sensor Placement
The alarm system is most effective with well-placed sensors. Determine which area you want to guard and what kind of detectors should be used. The following picture is the potential places shown for different types of detectors. You can refer it to choose an ideal place.

A. Alarm panel
B. Remote control
C. Wireless Siren
- Front door
- Living area
- Window: living area
- Window: living area
- Terrace door
- Window
- Bedroom
- Kitchen
Magnet contact
PIR motion detector
Magnet contact
Magnet contact
Magnet contact
Magnet contact
PIR motion detector
Gas detector
Installation Mode
There are possibilities to trigger an alarm when mounting the sensors. You can press the button for 3 times on the control panel to enter the 10-minute installation mode. During this period, system only beeps 3 times when the sensor is triggered. You can also press button on the control panel to exit this mode.
Placing the control panel
There are two installation methods for users. The one is placing the control panel on the desk, the other one is mounting it on wall by using the supplied screw kit. Please choose an ideal place and suitable method to mount your control panel.
![graph LR A["Box with internal structure"] --> B["Folded container with internal structure"] B --> C["Table with a potted plant on the table"]](/content/2026/06/1327156/images/1a2ea52cad2757adc9fa512c12c20d6ab1cbc816a8eab63a4ca104283165a934.jpg)

Mounting the Door/Window Contact
Make sure the contact works properly before installation.
Step 1: Choose a suitable installation location
It can be installed on doors, windows or any other objects that can be opened or closed.
If it is applied to metal doors, please place a spacer under the transmitter and magnet.
Step 2: Secure the contact with the supplied sticker
Make sure the gap marks on the side of transmitter and magnet are closed to each other and within the range of 1cm. As long as the space between transmitter and magnet is over 2cm; The status indicator on the transmitter will blink once.
Mounting the PIR Motion Detector
Important: Avoid installing the motion detector directly towards windows and near heat sources, such as heat extraction units, air-condition, micro-wave oven, refrigerator etc; Avoid placing two motion detectors in the opposite of each other; Don't place them in each other's detection range.

Step 1: The ideal mounting height of the motion detector is 7-7.2 meters from the floor. It is suggested to mount it at the corner of the wall by using the supplied 3M sticker.

Step 2: Press the test button twice and walk from left to right in the room. The status indicator will blink once when motion is detected.

Note: This PIR motion detector can also be mounted at special location by using the supplied bracket and screw kits.
Pairing/Deleting Accessory
The included accessories have been paired with the control panel by default, if you want to pair new accessories, please follow these instructions:
Pairing New Remote Control and Sensor
Enter the disarm password (default: 1234); then press the [icon] button on the control panel and trigger the sensors once.
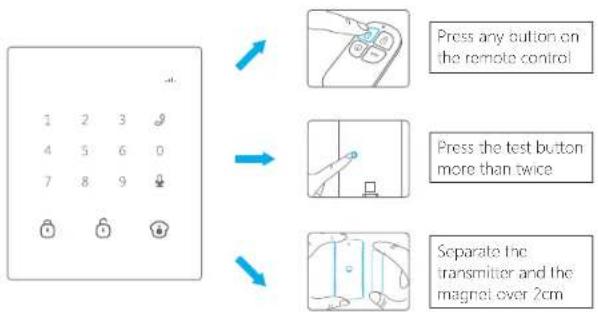
When a beep is heard from the control panel, the sensor is paired successfully. If two beeps are heard, the sensor has already been paired before.
Note: To pair other sensors, please refer to the related user manuals.
Pairing New Wireless Siren
Siren is sold separately.
- Make sure the siren enters pairing state (please refer to relevant user manual).
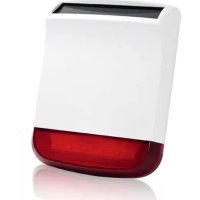
- Press [☐] or [☐] on the control panel to send out a pairing signal to the siren. When a beep is heard from the siren, the siren is paired successfully. If two beeps are heard, the siren has already been paired before.
If a wireless siren is paired, you can turn on or off the arm/disarm lone by sending '63701' or '63700' to the control panel (The default setting is off).
Deleting Sensors
Send SMS with content "21" to the control panel, then you will receive an SMS to confirm the successful deletion of sensors.
Send SMS with content "23" to the control panel, then you will receive an SMS to confirm the successful deletion of remote controls.
Deleting Wireless Siren
Press and hold the pair button of the wireless siren; the deletion is succeeded when two beeps are heard from the wireless siren.
Arm & Disarm by Free Phone Call
Arming the alarm system can be done by calling the SIM card No. in the control panel. Hanging up the call after you hear the dialing tone, and then you will be called by the control panel; do not answer the phone call and the system will be armed.
Disarming the alarm system can be done by calling the SIM card No. in the control panel. Do not hang up until the system disconnected by itself. The alarm system will not call you back and the system is disarmed.
Restore to Factory Settings
Send text "0000" to the control panel; the system will be restored to factory settings, but the paired sensors remain working.
Specifications
Control Panel
| Power Supply | DC 12V 500 mA |
| Battery | 3.7V 600 mAh Li-ion Battery |
| GSM Frequency | 850/900/1800/1900 MHz |
| Standby Current | <56 mA |
| Alarm Current | <270 mA |
| Internal Siren | 90 dB |
| Expandable Accessories | 10 Remote Controls, 50 Sensors |
| Radio Frequency | 315 MHz or 433.92 MHz ( ± 75KHz) |
| Housing Material | ABS Plastic |
| Operating Condition | Temperature 0°C +55°C Relative Humidity <80% (non-condensing) |
| Control Panel Dimensions | 125 x 150 x 30mm (L x W x H) |
| Bracket Dimensions | 87.5 x 81.5 x 12mm (L x W x H) |
RC-80 Wireless Remote Control
| Power Supply | DC 3V (CR2025 lithium battery x 1pc) |
| Transmit Current | <7 mA |
| Transmitting Distance | <80 m (open area/no interference) |
| Radio Frequency | 315 MHz or 433.92 MHz ( ± 75KHz) |
| Housing Material | ABS Plastic |
| Operating Condition | Temperature 0°C +55°C Relative Humidity <80% (non-condensing) |
| Dimensions | 58 x 31 x 9.5 mm (L x W x H) |
DWC-102 Wireless Door/Window Contact
| Power Supply | DC 1.5V (1 x AA 1,5V LR6) |
| Static Current | <35 uA |
| Alarm Current | <40 mA |
| Transmitting Distance | <80 m (open area/no interference) |
| Radio Frequency | 315 MHz or 433.92 MHz (+75KHz) |
| Housing Material | ABS Plastic |
| Operating Condition | Temperature 0°C~+55°CRelative Humidity <80% (non-condensing) |
| Transmitter Dimensions | 71 x 34 x 17.5 mm (L x W x H) |
| Magnet Dimensions | 51 x 12 x 13.5 mm (L x W x H) |
PIR-910 Wireless PIR Motion Detector
| Power Supply | DC 3V (2 x AA 1,5V LR6) |
| Static Current | <18 uA |
| Alarm Current | <12 mA |
| Detection Scope | 8m/110° |
| Pet Immunity | <25kg |
| Transmitting Distance | <80 m (open area/no interference) |
| Radio Frequency | 315 MHz or 433.92 MHz (±75KHz) |
| Housing Material | ABS Plastic |
| Operation Condition | Temperature 0°C--55°C |
| Relative Humidity <80% (non-condensing) | |
| Detector Dimensions | 108 x 52 x 36.8 mm (L x W x H) |
| Bracket Dimensions | 52 x 30 x 26.5 mm (L x W x H) |
CHUANGO®


- DISCLAIMER
- CONTENTS
- IN THE BOX
- SYSTEM STATUS
- INCLUDED ACCESSORIES
- HOW IT WORKS
- ACCESSORIES
- REMOTE CONTROL
- DOOR/WINDOW CONTACT
- STATUS INDICATOR
- PIR MOTION DETECTOR
- STATUS INDICATION
- WORKING MODE
- TESTING MODE
- POWER SAVING MODE
- PET-IMMUNE FUNCTION
- ZONE MODE OF SENSOR
- HOW TO SET
- GETTING STARTED
- STEP 1. INSERT SIM CARD
- STEP 2. DOWNLOAD THE APP
- STEP 3. ADD AN ACCOUNT
- STEP 4. BE FAMILIAR WITH THE ALARM SYSTEM
- STORE EMERGENCY NUMBERS & SMS NUMBERS
- STORE SPEED DIAL NUMBER
- CHANGE ZONE NAME
- EXIT & ENTRY DELAY TIME
- SINGLE ZONE DELAY TIME
- COMPARISON
- DISARM PASSWORD
- SETTING THROUGH SMS
- FOR EXAMPLE
- OTHER SMS NOTIFICATIONS
- INSTALLATION
- SENSOR PLACEMENT
- ALARM PANEL
- WIRELESS SIREN
- INSTALLATION MODE
- PLACING THE CONTROL PANEL
- MOUNTING THE DOOR/WINDOW CONTACT
- MOUNTING THE PIR MOTION DETECTOR
- PAIRING/DELETING ACCESSORY
- PAIRING NEW REMOTE CONTROL AND SENSOR
- PAIRING NEW WIRELESS SIREN
- DELETING SENSORS
- DELETING WIRELESS SIREN
- ARM & DISARM BY FREE PHONE CALL
- RESTORE TO FACTORY SETTINGS
- SPECIFICATIONS
Brand : Chuango
Model : GO2
Category : Alarm system