SPS260 - Alarm system Chuango - Free user manual and instructions
Find the device manual for free SPS260 Chuango in PDF.
| Product type | Outdoor wireless alarm system with siren and strobe |
| Brand | Chuango |
| Model | SPS260 |
| Main power supply | 1 rechargeable lithium battery 18650 3.7 V 1800 mAh |
| Backup power supply | 1 9V 6F22 battery (for backup charging) |
| Solar charging | Built-in solar panel, intensity ≥ 4 mA under 2000 lux |
| Maximum siren volume | 110 dB |
| Wireless reception range | < 80 m in open area |
| Wireless reception frequency | 433.92 MHz |
| Standby battery life | < 45 days (fully charged battery) |
| Static consumption | < 1 mA |
| Maximum consumption in alarm | < 500 mA |
| Dimensions (L x W x H) | 309 x 230 x 79.7 mm |
| Housing material | PC + ABS + UV-resistant |
| Operating temperature | -20 °C to +55 °C |
| Relative humidity | < 80 % (non-condensing) |
| Main features | Siren, strobe, tamper contact, test mode, wireless pairing, standalone use or with control panel |
| Installation | Wall mounting with fixing plate and wall plugs |
| Maintenance | Clean the solar panel with a soft cloth; check battery status every 45 days |
| Safety | Tamper contact; siren deactivated in service mode during installation |
Frequently Asked Questions - SPS260 Chuango
User questions about SPS260 Chuango
0 question about this device. Answer the ones you know or ask your own.
Ask a new question about this device
Download the instructions for your Alarm system in PDF format for free! Find your manual SPS260 - Chuango and take your electronic device back in hand. On this page are published all the documents necessary for the use of your device. SPS260 by Chuango.
USER MANUAL SPS260 Chuango
Change All Rights Reserved
0
VATSPS=760-UMA-MV=√7.1
Product Overview
The solar-powered siren is a totally wireless siren, which can be installed in driveways, gardens and all types of other external locations. The strobe siren is battery powered and kept recharging by the built-in solar panel. The signal transmission is all by wireless radio frequency which achieves significantly wirefree transmission and enhances the flexibility to install. The strobe outdoor siren can be used as a wireless siren by connecting to the control panel as well as a standalone alarm system to work with wireless accessories in same frequency by learning.
PCB Layout
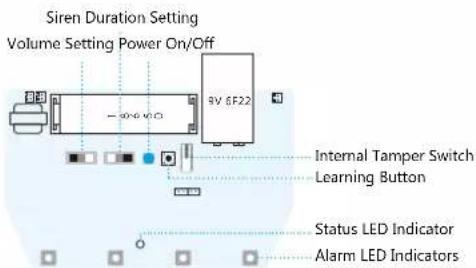
Note: The 9V battery is used to charge 18650 battery in case it is out of power/with low power after a long-time storage. Use the 9V battery to charge 18650 battery for 12 hours and then remove 9V battery before installation.
External Tamper Switch
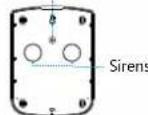
Note: The siren will sound immediately if the tamper switch is triggered.
The status LED light flashes every 5 seconds in Arm and Home Arm mode but doesn't flash at all in Disarm mode.
Jumper Setup
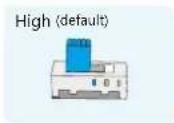
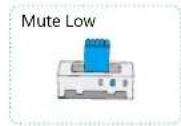
Volume Setting
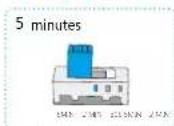
Siren Duration Setting
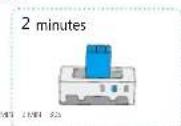
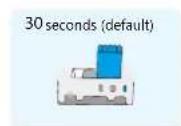
Note: To prevent possible hearing damage, it is suggested to avoid listening at high volume level for long period.
Usage
Getting Started
- Load the 9V battery.
- Set the volume and duration of the siren.
- Start to use by pressing the power button on.
Note: The battery is used to charge the 18650 battery in case it is out of power/with low power after a long time storage. Use the 9V battery to charge 18650 for 12 hours and then remove 9V battery before installation
When installed as part of a chuango Alarm System, the Siren must be paired to the Control Panel only.
The Siren will sound and the strobe lights will flash upon alarm activation. Disarming the System will stop the siren sounding. If not disarmed the Siren Status Indicator will flash once every 2 seconds for one hour (visual notification of an alarm event).
Pairing to a Control Panel
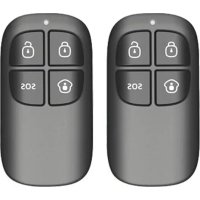
- Press the Learn Button on the Solar Siren (0.5 seconds), the siren goes into Learn Mode after one beep is heard.
- Press the Arm or SOS Button on the Control Panel (or press Arm on App if the panel does not have a button).
- The Siren is paired with Control Panel successfully after a second beep.
- If two beeps are heard, it is already linked.
To give up pairing the Control Panel, press the Learn Button (before step 2 is done) again to exit Learn Mode after one beep.
When installed as Siren only Alarm System (without control panel). All of the Alarm Accessories must be paired to the Siren.
The Siren will sound and the strobe light will flash upon activation of a connected Accessory. Disarming the System will stop the siren sounding. If not disarmed the Siren Status Indicator will flash once every 2 seconds for one hour (visual notification of an alarm event).
Pairing with Wireless Accessories
- Press the Learn Button (0.5 seconds), the system goes into Learn Mode after one beep is heard.
- Press the Test Button on the additional Accessory or trigger the Accessory once.
- The Wireless Accessory is learned successfully after a second beep.
- If two beeps are heard, the accessory is already linked. To give up pairing the Accessories,
press the Learn Button (before step 2 is done) again to exit Learn Mode after one beep.
Note: Press and hold the pair button of the wireless siren; the connection between the wireless siren and control panels (or accessories) is deleted when you hear a beep from the wireless siren.
Service Mode
Test Mule prevents the Siren's tamper switch from triggering an alarm during installation, maintenance or when changing the battery.
When the remote control is connected with the siren, press [Disarm] 3 times successively (please make sure two beeps are heard at each time before continuing the next press), the siren goes into service mode when a long beep is heard. During this period, the siren will not alarm but beep if the tamper switch or the connected sensors are triggered. This brings you convenience on installation.
Press [Arm] on remote control to exit service mode after a short break.
Note: Also you can press the lamp switch 7 times to enter installation mode.
Rite of making plans to power and rule the position of the two ruling leaders. It is a good idea to have a proper meeting with a sacred deal.
- all 穿着 衬衣
- I have three
- I am satisfied
- I like the dress in the street.
Eggs: Do not use.
Insecticide: Use the top of the container.
Can be carefully put the head of the container on top of the container.
Gives the container a place in places making the container dry.
Squeeze the container.
Holeup Power 186VA 7V 100mA h rechargeable lithium battery x1 9V G22 battery x1
Solar Panel Output Current 2000 LUX illumination ≥ 4 mA (in sunlight)
Maxima Alam Current < 500uA Wireless Receiving Distance ≤ 80m in cpon apal
Operation Condition Temperature -20^ - + 55^ Relative Humidity <80% (non-condensing)
Maaarum Sirn Vour 110 dP
Static Current < 1 mA
Staneby Time 45 days (fully charged)
Wireless Receiving Frequency 433.92 MHz
Housing Material PC-AB5+ ANTI-UV
Size(LxWxH)309x230x79.7mm