
008052 - Electric winch Hamron - Free user manual and instructions
Find the device manual for free 008052 Hamron in PDF.
| Product type | Electric winch |
| Brand | Hamron |
| Model | 008052 |
| Supply voltage | 12 V DC |
| Power | 4854 W |
| Max. pulling capacity | 4309 kg |
| Remote control | Yes |
| Cable speed | 2.1 m/min |
| Cable diameter | 8.0 mm |
| Cable length | 28.5 m |
| Battery cable length | 1.83 m |
| Protection rating | IP67 |
| Dimensions (L x W x H) | 529 x 160 x 196 mm |
| Weight | 35 kg |
| Gear ratio | 161:28 |
| Recommended mounting | Bolts M10 x 32, class 10.9, torque 60 Nm |
| Mounting plate material | Steel at least 6 mm thick |
| Monthly maintenance | Activate and inspect, rewind under minimum load 4500 N |
| Lubrication | High-temperature lithium grease (factory), light cable oil |
| Minimum number of turns on drum | 6 turns (steel cable), 10 turns (synthetic cable) |
| Prohibited use | Lifting loads, securing loads, lowering loads |
Frequently Asked Questions - 008052 Hamron
User questions about 008052 Hamron
0 question about this device. Answer the ones you know or ask your own.
Ask a new question about this device
Download the instructions for your Electric winch in PDF format for free! Find your manual 008052 - Hamron and take your electronic device back in hand. On this page are published all the documents necessary for the use of your device. 008052 by Hamron.
USER MANUAL 008052 Hamron
natural_image
Exterior view of a black and silver moving-coil winch with red belt and attached gear (no visible text or symbols)
SV ELVINSCH
BRUKSANVISNING
Important! Read the user instructions carefully before use. Save them for future reference. (Translation of the original instructions).
Care for the environment!
Recycle discarded product in accordance with local regulations.
Jula reserves the right to make changes. For latest version of operating instructions, see www.jula.com
Skara 2019-07-24
Tobias Hammer
BUSINESS AREA MANAGER (Signatory for Julia and authorised to compile the technical documentation. /Undertecknat för Julia samt behörg att sammanställa den tekniska dokumentationen. / Signert för Julia og kvalifisert til å sammenfatte den tekniske dokumentasjonen. Podpisano w imieniu Julia oraz osoby upoważnionej do sporządzenia dokumentacji technicznej. / Unterzeichnet im Namen von Julia und befugt, die technische Dokumentation zusammenzustellen. Allekirjoittanut Julian puolesta ja valtuutettu kokoamaan tekniset asiakirjat. / Signé au nom de Julia e habilité à établir la documentation technique. / Ondertekend namens Julia en gemachtigde voor de samenstelling van de technische documentatie
natural_image
Technical line drawing of an electrical enclosure with mounting brackets and wiring (no text or symbols)
natural_image
Technical line drawing of a mechanical device with no visible text or symbols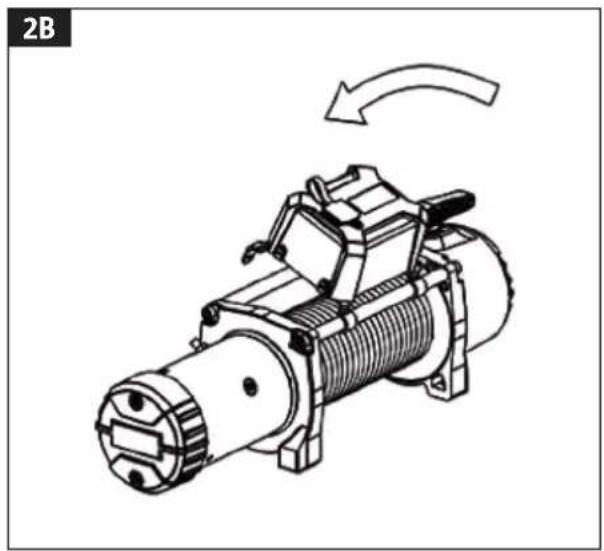
natural_image
Technical line drawing of a mechanical device with a curved arrow indicating motion (no text or symbols)
natural_image
Technical line drawing of a mechanical pump or motor assembly (no text or symbols visible)
natural_image
Technical line drawing of a mechanical pump or motor assembly (no text or symbols visible)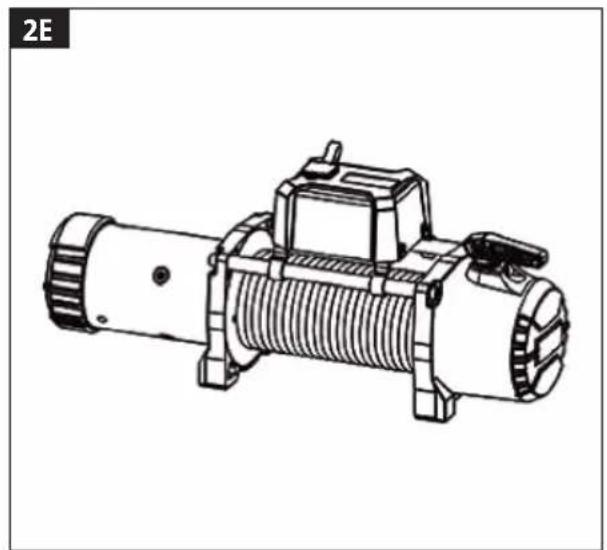
natural_image
Technical line drawing of a mechanical component with threaded body and mounting bracket (no text or symbols)
natural_image
Technical line drawing of a mechanical bracket assembly (no text or symbols)
natural_image
Technical line drawing of a mechanical device with mounting brackets and wiring, no text or symbols present
natural_image
Technical line drawing of a mechanical device with no visible text or symbols
natural_image
Technical line drawing of a mechanical device with mounting bracket and mounting base (no text or symbols)
natural_image
Technical line drawing of a mechanical pump or motor assembly (no text or symbols visible)
natural_image
Technical line drawing of a mechanical device with threaded shaft and mounting bracket (no text or symbols)9
10

11
12

natural_image
Technical line drawing of a mechanical device with two exploded views showing internal components (no text or symbols)13

natural_image
Technical line drawing of a mechanical device with two views: top shows a pin and lever, bottom shows a tool or component (no text or symbols)SÄKERHETSANVISNINGAR
PERSONLIGT SKYDD
- Do not wear loose-fitting clothing, jewellery or watches that can get caught in moving parts. Keep your hands and other parts of your body away from the drum and wire when winching.
- Wear heavy-duty safety gloves when handling wires. Do not handle wires with your bare hands – broken threads are sharp and can cause injuries.
- Wear non-slip shoes.
- Wear a hair net if you have long hair.
- Keep onlookers at a safe distance from the line/wire and the load when the winch is working. The recommended minimum safe distance is 1.5 times the length of the line/wire. If the wire comes loose or breaks the end will be thrown back towards the winch with great force, the whiplash effect, and can cause serious personal injury or death.
- Never step over the line/wire.
- Keep onlookers away from the work area. Always maintain a firm footing and good balance.
- Never carry the product by the power cord. Do not pull the power cord to pull out the plug.
- Keep the power cord away from heat, oil and sharp edges.
MOTOR
- If the motor gets so hot that it is too hot to touch, stop working and allow the motor to cool for a few minutes.
- If the load gets so heavy that the winch stops, disconnect the power to the motor immediately.
- Do not exceed the maximum loads specified in the tables. Shock loads must not exceed the specified values.
WINCH COUPLING
- The winch coupling must be disengaged when the winch is not in use and fully engaged when the winch is in use.
BATTERY
- Only use batteries in good condition.
Avoid contact with battery acid and other contaminants.
• Always wear safety glasses when handling batteries. - Keep the engine running while winching to keep the battery fully charged.
REPAIRS
Only use identical spare parts for repairs and service – non identical spare parts can result in the risk of serious accidents and personal injury.
WARNING!
The use of accessories or attachments other than those recommended can result in the risk of personal injury.
USE
- Do not use the winch if the wire is damaged.
- Carefully check the winch before use. All damaged parts must be repaired or replaced by an authorised service centre.
- Never attempt to use the winch with less than 10 turns of synthetic fibre wire or 6 turns of steel wire on the drum. The only function of the end attachment is to prevent the wire from winding off the drum – it is not a load bearing attachment point. Incorrect installation and/or unwinding to the last turn can put the end attachment under strain, which will result in the line/wire releasing from the end attachment.
EN
- Always completely unwind the line/wire from the drum and rewind it back on the drum with a minimum load of 4500 N.
- Some unevenness in the winding is not a problem when winching, but the line/wire must not collect at one end of the drum. If this happens, run the winch in reverse to relieve the strain and move the attachment point closer to the middle of the vehicle. Unwind and wind on the wire again, and check that it runs evenly on the drum.
- Keep the hand control safe inside the vehicle. Always check before use that it is not damaged.
- To start winching, disengage the winch drum and connect the hand control. Do not engage the winch drum while the motor is running.
- Never hook the hook round the line/wire – risk of material damage. Use a suitable loop or chain.
- Monitor the winch during use. Keep at a safe distance from the line/wire and load during the winching. Stop the winch after winding each metre of line/wire, and check that the line/wire is winding evenly. The winch can break down if the line/wire gets locked.
- Never fasten a tow line to the winch attachment, connect it to the chassis on the vehicle.
- A snatch block can be used to double the pulling power of the winch, at the expense of half the winching speed, and to enable the wire to remain centred on the rollers. With double pulling power for stationary winching the hook must be fastened to the vehicle chassis.
- When anchoring on a tree trunk or the like, use suitable rings or shackles for safe anchoring.
-
There should always be at least 6 turns of steel wire or 10 turns of synthetic fibre line on the drum. Otherwise, the line/wire can come loose from the drum when loaded and cause personal injury and/or material damage.
-
On delivery the steel wire has a red marking to show when there are 5 turns of wire left on the drum. Never load the wire if it is unwound further than this point where the red marking can be seen on the rollers.
- The winch has its maximum pulling power when the wire lies directly on the drum, i.e. when it is almost completely unwound. For this reason, unwind as much of the wire as possible for a heavy load. At least 10 turns of synthetic line and 6 turns of steel wire must, however, always be left on the drum – see the red marking. If this is not possible, use a snatch block and an arrangement with double lines/wires.
- Place a heavy blanket or jacket etc. over the line/wire near the hook end when winching heavy loads. The weight will reduce the risk of the wire end flying away, whiplash effect, if the line/wire breaks.
- Make sure that the line/wire winds up evenly, otherwise the line/wire can clench and get stuck. If this happens, run the winch forwards and backwards so that the line/wire unwinds and winds on again. Never attempt to loosen a clenched line/ wire when loaded. Relieve the line/wire and loosen by hand.
- Wedge the wheels of the vehicle on a slope.
- Never winch the vehicle when in gear, or in park if it has an automatic gearbox, this can damage the transmission.
- Never wind the wire round an object, or hook the hook round the wire.
-
Make sure that no one is near, or in line with the wire when it is loaded. If the wire comes loose or breaks the end will be thrown back towards the winch with great force, the whiplash effect, and can cause serious personal injury or death. Always stand at a safe distance to the side of the wire when it is loaded.
-
Do not leave the hand control connected when the winch is not in use.
- Do not use the winch as lifting gear.
- The winch must not be used to secure a load.
- Only run out enough wire needed to relieve the wire. Running out too much can damage the winch components.
- The winch must not be used to lower loads, for example when unloading from vehicle.
REWINDING THE LINE/WIRE
- Wear heavy-duty safety gloves when rewinding. To rewind the line/wire correctly on the drum it must be kept stretched with some tension. Hold the line/wire with one hand and hold the hand/remote control in the other hand. Start as far back and as close to the centre as possible. Walk slowly towards the winch while the line/wire is wound back, keeping the line/wire stretched.
- Do not allow the line/wire to slip through your hand and do not go too near the winch.
- Stop the winch instead, get a new grip some way out on the line/wire and repeat this process until all the line/wire except for 1 m is rewound.
- Disconnect the hand control, disengage the winch drum and rewind the remaining one metre of line/wire by turning the drum by hand.
- If the winch is installed in such a way that the drum is not accessible all the length of line/wire must be wound back with the winch motor, but be very careful and watch out for the risk of clenching your hands.
SYMBOLS
 | Read the operating instructions. |
 | Approved in accordance with the relevant directives. |
 | Recycle as electrical waste. |
TECHNICAL DATA
| Voltage 12 V DC | |
| Output 4854 W | |
| Gearing | 161:28 |
| Pulling power (max) 4309 kg | |
| Remote control Yes | |
| Wire speed 2,1 m/min | |
| Wire diameter 8,0 mm | |
| Wire length 28,5 m | |
| Battery cables 1.83 m | |
| Protection rating IP67 | |
| Dimensions 529 x 160 x 196 mm | |
| Weight 35 kg | |
INSTALLATION
INSTALLATION ON VEHICLE
- The winch must be installed with its four attachment points on a suitable horizontal or vertical steel frame.
- It is very important that the steel frame is completely level so that the winch motor, gearbox and drum are precisely in line with each other.
- Check that the installation is begun so that the attachment that is to be used can withstand the maximum pulling power of the winch.
EN
- The installation of the winch and/or front guard can affect the release of the air bags on the vehicle. If the vehicle has air bags, check for this reason whether the system is approved for installation of a winch.
- If you are making your own winch attachment, follow the instructions below. The mounting plate must be made of steel and at least 6 mm thick. Fasteners must be made of high-tensile steel with a yield limit of at least 640 MPa (screws of strength class 8.8 or higher). Inadequate attachment will invalidate the warranty.
- The screws for the 4 attachment points for the winch must be M10 x 32 with a strength rating of 10.9, tightened to at least 60 Nm, and provided with suitable screw lock to prevent them coming loose unintentionally.
- The line rollers must be installed so that they guide the line/wire correctly on the drum.
- Installed with the opening in the direction of pull. The traction is not put on the line rollers, it only controls the wire.
- The dimensions of the winch and winch attachments are provided in the technical data.
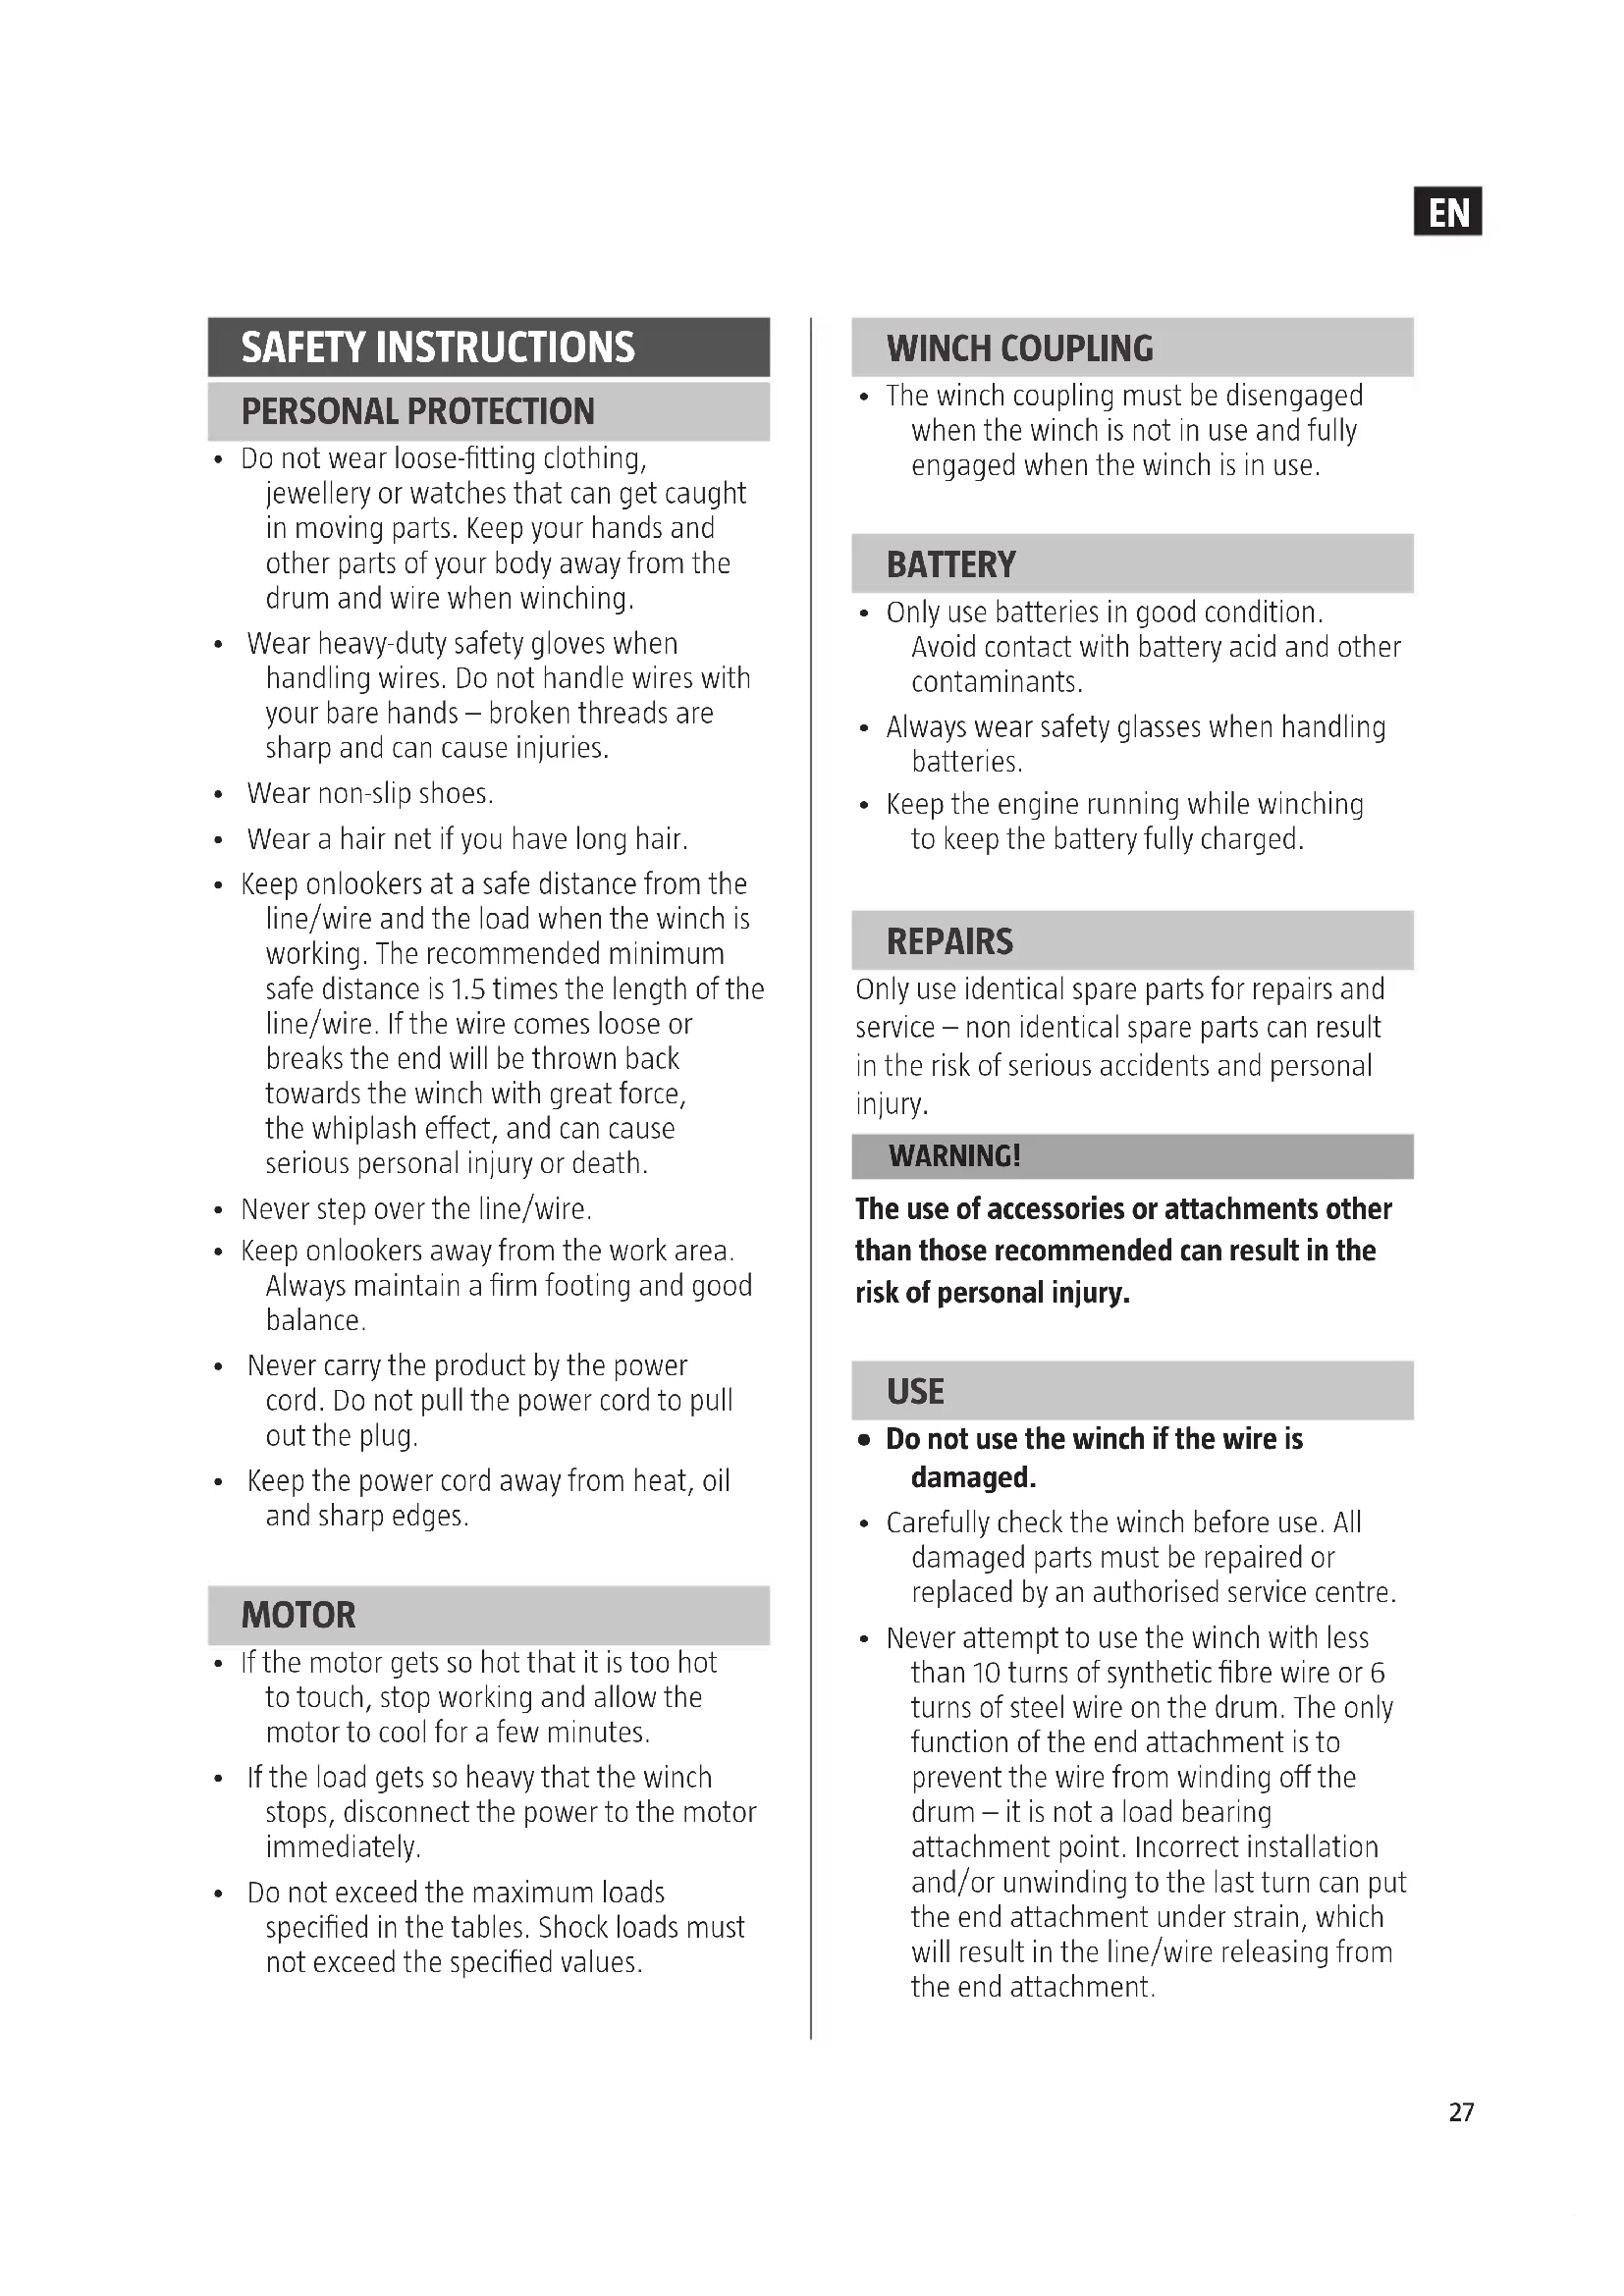
INSTALLATION OF RELAY BOX
Horizontal installation of drawbars over the drum
- Fit the long brackets (hook forward) with spacers on the relay box and tighten.
FIG. 1
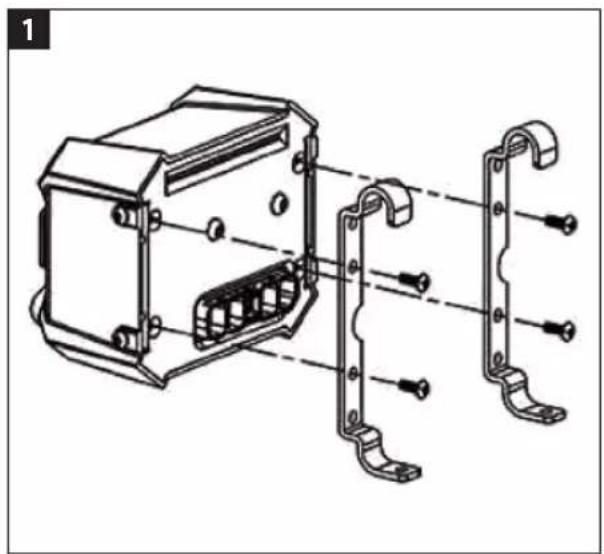
- Fit the relay box on the drawbars, with the bracket hooks forward, and tighten the screws on the back.
FIG. 2A-E
- The installation is now complete. Electrical
connection of the winch as per the wiring diagram
Vertical installation of drawbars over the drum
- Fit the angle brackets on the long brackets.
FIG. 3
- Fit the assembled brackets (hook forward) on the relay box and tighten.
FIG. 4
- Fit the relay box on the drawbars, with the bracket hooks forward, and tighten the screws on the back. The installation is now complete. Electrical connection of the winch as per the wiring diagram.
FIG. 5
Mounting on motor
- Undo the screws on the side of the relay box, fit the small bracket on the side of the box, and tighten.
FIG. 6
- Undo the drawbar screws on the motor and fit the relay box in place.
FIG. 7
- Tighten the drawbar screws. The installation is now complete. Electrical connection of the winch as per the wiring diagram.
FIG. 8
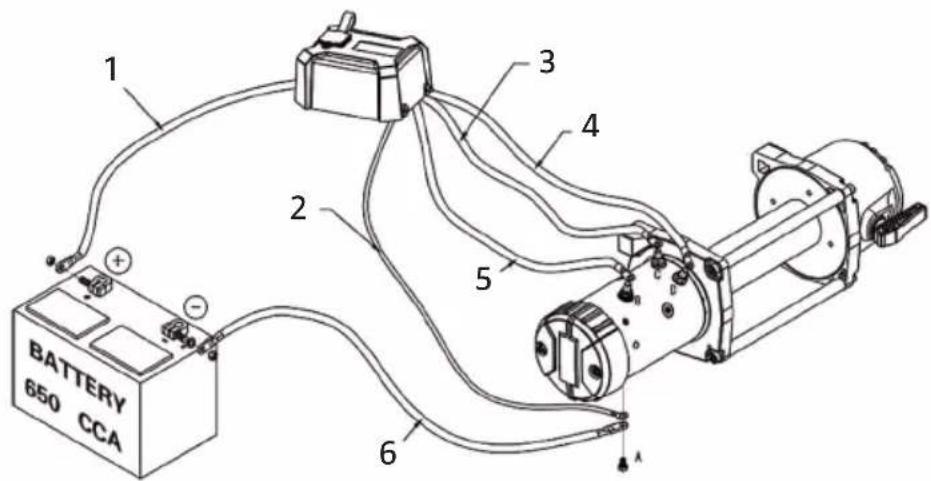
ELECTRICAL CONNECTION
The winching is powered by the electrical system in the vehicle. It is important, however, that the battery is fully charged and that the electrical connections are in good order. Keep the engine running while winching to keep the battery fully charged. Make sure that the wires are connected correctly as shown in the diagram.
- Long red wire (+ve)
- Thin black wire (A')
- Short yellow wire (C')
- Short black wire (D')
- Short red wire (B')
- Long black wire (-ve)
FIG. 9
- Connect the short red wire (B') to the red motor terminal (B).
- Connect the short yellow wire (C') to the yellow motor terminal (C).
- Connect the short black wire (D) to the black motor terminal (D).
- Connect the thin black wire (E) to the lower motor terminal (A).
- Connect one end of the long black 1.8 m wire (-ve) to the lower motor terminal (A') and the other end to the minus terminal on the battery (-).
- Connect the long red wire (+ve) to the plus terminal (+) on the battery.
WIRING DIAGRAM HAND CONTROL
- Black
- Brown
- Blue
- Green-yellow
- Green (IN)
- Brown
- Green-yellow
- Blue
- Red (OUT)
- Black
- Blue
- Green-yellow
- Red
- Fuse 1.25 A
- White
- Black
- Brown
-
Brown
-
Black
- Yellow
FIG. 10
NOTE:
- Only use batteries in good condition.
- Never run the battery leads where they could get damaged.
- Corroded electrical connections result in loss of performance and can cause short circuiting.
- Clean all the electrical connections, especially on the hand control.
- If the vehicle is used in a coastal climate or other saline environment use a silicone spray to prevent corrosion.
- Hook the key shaped holes on the back of the winch on the taps on the attachment plate.
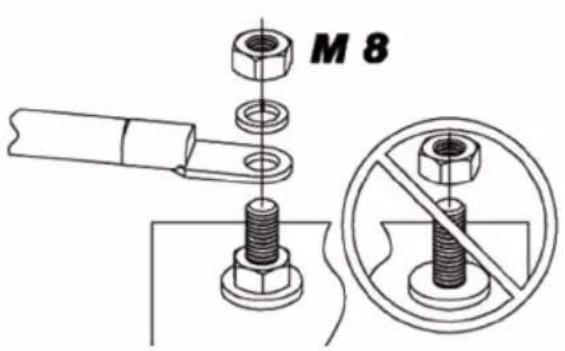
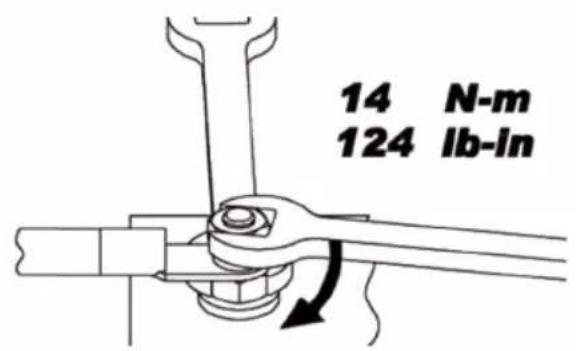
FITTING THE TERMINAL NUTS ON THE MOTOR
Use an extra spanner under the nut as a hold to relieve the terminal and prevent it breaking. Do not overtighten.
- M8
- Anvil
- 14Nm
FIG. 11
USE
IMPORTANT:
Read the safety instructions under the heading How to use, before using the winch.
Familiarise yourself with the controls on the product and how to use them. Plan the exercise. Learn not only to see, but also to hear how the winch works with different loads. Learn to recognise the sound of smooth and firm winching with light and heavy loads, including the sound of shock shifts caused
EN
by the winched load. In time the sound and way the winch works will become familiar — winching will become a routine job.
WINCHING
NOTE:
Wind the line back on the drum after use with the lowest load, 4500 N.
- Apply the parking brake on the vehicle and wedge the wheels.
- Pull out the wire to the required length and anchor it. The winch drum can be released, which permits fast unwinding of the wire. The clutch lever on the gearbox is used as follows.
— (A) Disengage the drum by moving the clutch lever to the OUT position. The drum can rotate freely when the wire is unwound.
— (B) Engage the drum drive by moving the clutch lever to the IN position. The winch is now ready for use.
-
Check that the wire and any auxiliary equipment is correctly arranged before starting to winch.
-
Connect the hand control. For safety reasons the winch should if possible be operated from the driver seat.
-
To start winching, start the engine, release the parking brake, select neutral, and let the engine idle.
-
Control the winch with the switch on the hand control (IN and OUT). Make sure that the wire is wound uniformly on the drum. The traction should be at least 4500 N.
FIG. 12
FIG. 13
MAINTENANCE
To keep the winch in good condition run it and inspect it once a month according to the
following instructions.
-
Run out about 5 m of line/steel wire with the winch motor. Disengage the winch drive and pull out at least another 15 m of line/steel wire. Make sure to always have at least 6 turns of steel wire or 10 turns of synthetic fibre line left on the drum.
-
Engage the winch drive and wind back the line/steel wire on the drum. Check the line/wire for damage while it is wound back on the drum. To reduce the risk of the line/wire getting pinched and damaged it should be tensioned with at least 4500 N during the rewinding.
LUBRICATION
All the moving parts on the product are permanently lubricated at the factory with high temperature lithium grease. No further lubrication is necessary in normal conditions. Oil the wire regularly with thin oil that has a good penetration capacity. Check the wire regularly for damage and broken threads. Replace the wire if it is damaged.
SICHERHEITSHINWEISE
PERSÖNLICHER SCHUTZ
- SV ELVINSCH
- Care for the environment!
- SÄKERHETSANVISNINGAR
- PERSONLIGT SKYDD
- MOTOR
- WINCH COUPLING
- BATTERY
- REPAIRS
- WARNING!
- USE
- EN
- REWINDING THE LINE/WIRE
- INSTALLATION
- INSTALLATION ON VEHICLE
- INSTALLATION OF RELAY BOX
- Horizontal installation of drawbars over the drum
- 1
- 2A-E
- Vertical installation of drawbars over the drum
- 3
- 4
- 5
- Mounting on motor
- 6
- 7
- 8
- ELECTRICAL CONNECTION
- 9
- WIRING DIAGRAM HAND CONTROL
- 10
- NOTE:
- FITTING THE TERMINAL NUTS ON THE MOTOR
- 11
- IMPORTANT:
- Read the safety instructions under the heading How to use, before using the winch.
- WINCHING
- Wind the line back on the drum after use with the lowest load, 4500 N.
- MAINTENANCE
- LUBRICATION
- SICHERHEITSHINWEISE
- PERSÖNLICHER SCHUTZ
Brand : Hamron
Model : 008052
Category : Electric winch