
025357 - Electric winch Meec Tools - Free user manual and instructions
Find the device manual for free 025357 Meec Tools in PDF.
| Product type | Electric winch |
| Brand | Meec Tools |
| Model | 025357 |
| Nominal voltage | 12 V |
| Power | 2.2 kW |
| Maximum load | 1587 kg |
| Winch speed | 1.3 m/min |
| Cable length | 12.8 m |
| Cable diameter | 5.2 mm |
| Dimensions (L x W x H) | 32.4 x 11.3 x 10.8 cm |
| Weight | 9.9 kg |
| Control cable length | 1.8 m |
| Clutch type | Locking knob (CLUTCH IN/OUT) |
| Control | Remote switch or wireless remote control |
| Number of cable layers | 6 |
| Nominal pulling force (layer 1) | 15.6 kN (1588 kgf) |
| Cable material | Steel |
| Protection | Safety glasses and gloves recommended |
| Maintenance | Check and tighten bolts and electrical connections regularly; replace cable if worn |
| Repairability | Approved spare parts by manufacturer; repair by authorized workshop |
| Intended use | Horizontal pulling (not for lifting or suspending) |
Frequently Asked Questions - 025357 Meec Tools
User questions about 025357 Meec Tools
0 question about this device. Answer the ones you know or ask your own.
Ask a new question about this device
Download the instructions for your Electric winch in PDF format for free! Find your manual 025357 - Meec Tools and take your electronic device back in hand. On this page are published all the documents necessary for the use of your device. 025357 by Meec Tools.
USER MANUAL 025357 Meec Tools
natural_image
Black-and-white photo of a MEEC Tool with attached components including a DC 12V power connector, cable, and mounting bracket (no visible text or symbols)POWER WINCH FOR PERMANENT INSTALLATION
SV ELVINSCH FÖR FAST MONTERING BRUKSANVISNING
Original instructions
DE ELEKTRISCHE SEILWINDE ZUR FESTEN MONTAGE
BEDIENUNGSANLEITUNG
Jula AB reserves the right to make changes to the product. Jula AB claims copyright on this documentation. It is not allowed to modify or alter this documentation in any way and the manual shall be printed and used as it is in relation to the product. For the latest version of operating instructions, refer to the Jula website.
natural_image
Two hand-drawn diagrams showing a tree with a branch and a rope, no text or symbols present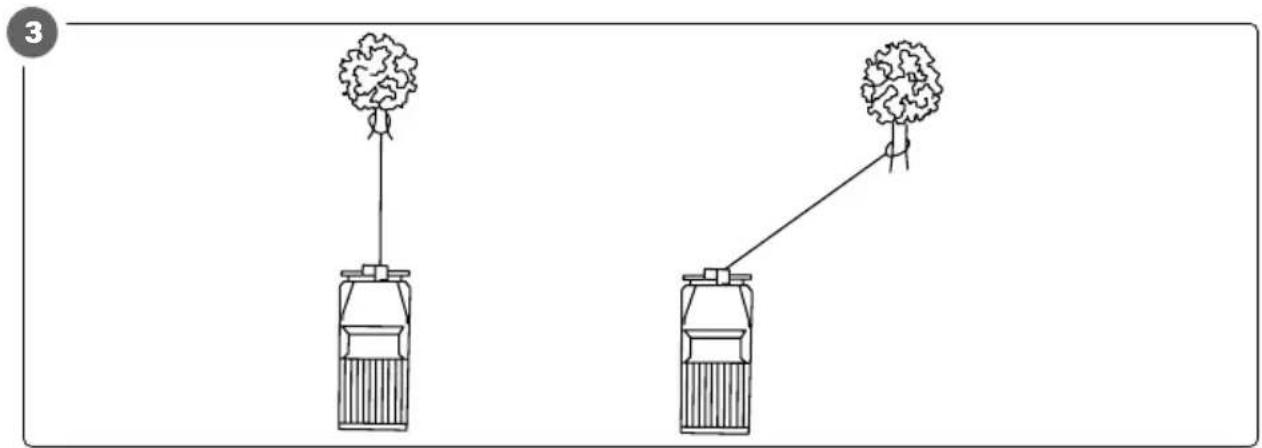
natural_image
Two identical illustrations of a tree with leaves, connected by a line to a container (no text or symbols)
natural_image
Line drawing of a car pulling a rope tied with a cloth, with a tree in the background (no text or symbols)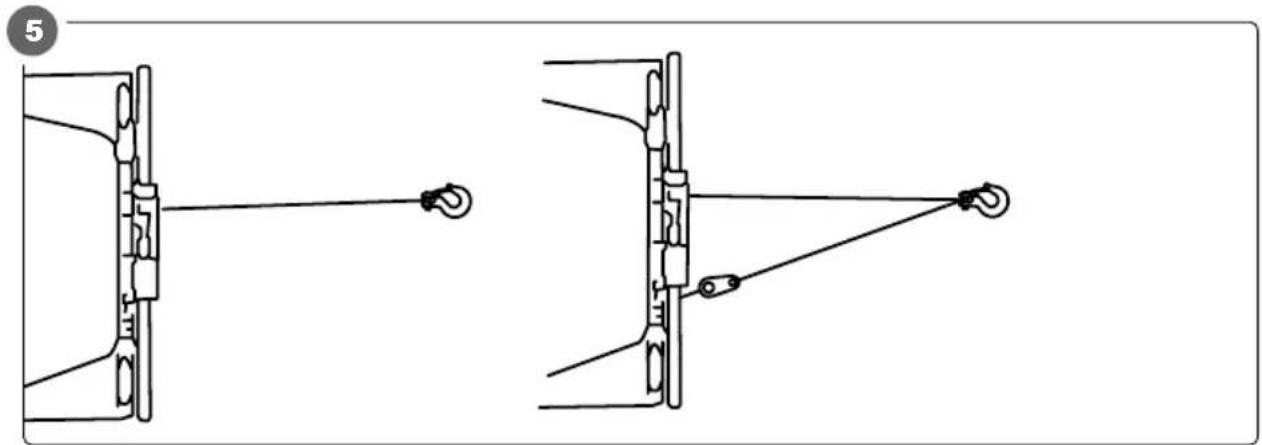
natural_image
Technical line drawing showing two mechanical assembly steps with hooks and connecting rods (no text or symbols)SÄKERHETSANVISNINGAR
WARNING!
TREKKING AV ANNET KJ∅RET∅Y
Read all warnings, safety instructions and other directives. Failure to follow all the instructions and safety instructions can result in a risk of electric shock, fire and/or serious personal injury. Save these instructions and safety instructions for future reference.
- Read these instructions carefully before use.
- Keep children and unauthorised persons away from the product and the winch wire.
- Never use the product for anything other than its intended purpose. The manufacturer cannot accept liability for any damages resulting from improper usage.
- Check that the vehicle chassis can support the maximum pulling power of the product.
- Wear safety glasses.
- Wear safety gloves when handling the winch wire. The winch motor, wire drum and winch wire can get hot when in use.
- Do not wear jewellery or a watch, etc. as they can get caught in parts of the product.
- Do not allow children under 16 to use the product.
- Do not allow the winch wire to run through your hands.
- Do not put your hands or fingers in the hook. Use the safety sling to control the winch wire.
- Do not touch the winch wire or hook when the wire is tensioned.
- Check that the anchor point can withstand the actual load.
- Do not switch between engaged and disengaged mode when the winch wire is tensioned.
- Only use the product when it is correctly fastened on the vehicle or other fixed structure.
-
Check that there are no objects in the work area that would prevent the product from being used safely.
-
If the product is used with a synthetic line, carefully read the instructions for the synthetic line before use.
- Never immerse the product or the remote control in water or any other liquid.
- Keep the remote control clean and dry.
- Place chocks in front of the wheels of the vehicle on which the product is mounted before using the product.
- Do not lift or move persons with the product.
- Keep your hands and the rest of your body away from the wire drum, winch wire, hook and hook eyelet when the product is in use.
• Make sure that all persons who may be affected by the use of the product are aware that the product is being used. - Pay attention to the vehicle when the product is used.
- Do not disconnect the winch wire when it is tensioned.
- Do not leave the winch wire tensioned after use.
- Do not lift or hang up objects with the product. Only pull objects horizontally.
- Do not pull objects at an angle.
- Do not use the product to hang up a load.
- Do not use the product to tow a vehicle or object. Shock loading can damage the product.
- Only use the product with a load within the specified range.
- Use snatch blocks and double wires when handling heavy loads (near the winch's maximum allowable pulling force).
- Do not wind up or off the winch wire stepwise when it is tensioned. Shock loading can damage the winch wire.
- When handling a heavy load place a blanket or the equivalent over the winch wire near the hook, to dampen the force if the winch wire breaks.
• Always use a hook with a catch. - Check that the hook catch is closed after connecting the hook.
EN
- Do not place the load on the tip of the hook or the catch. Position the load in the middle of the hook.
- Do not use the hook if it is damaged or if its opening has become bigger.
- Do not use the product if you are tired or distracted.
- Never use the product if you are under the influence of drugs, alcohol or medication.
- Do not use the product if you are stressed.
- Use your common sense when using the product.
- Do not use the product if there are less than five rounds of wire on the drum. The winch wire can come loose and cause personal injury and/or material damage.
- Do not move the vehicle the product is mounted on to move the load. Only use the product to pull a load.
- Wind up the winch wire slowly and make sure the wire is tensioned all the time.
- Check that all connections, the hook, and the nylon sling are properly and securely attached before the winch wire is wound up. Check all connections and the hook again when the winch wire is tensioned.
- Disconnect the power supply to the product before maintenance.
- Regularly inspect the winch wire, hook, and safety sling for damage and wear, as well as before each use.
- Do not use the product if the winch wire is worn or damaged.
- Replace the winch wire if it is worn or damaged.
- Only use approved spare parts recommended by the manufacturer.
- Do not use the product if it is damaged, or not working properly.
- Do not allow the remote control to be connected to the product when the product is not in use.
- Never step over the winch wire when it is tensioned.
- Do not attempt to repair the product. If the product is damaged or not working
normally it must be repaired by an authorised service centre. The manufacturer cannot accept liability for any damage caused by unauthorised repairs.
- Do not make any modifications to the product.
SYMBOLS
 | Read the instructions. |
 | Wear safety glasses. |
 | Wear safety gloves. |
 | Warning! Risk of crush injuries. |
 | Approved in accordance with the relevant directives. |
 | Recycle discarded product in accordance with local regulations. |
TECHNICAL DATA
| Rated voltage 12 V |
| Power 2.2 kW |
| Max load 1587 kg |
| Winch speed 1.3 m/min |
| Wire length 12.8 m |
| Wire diameter ∅ 5.2 mm |
| Size L32.4 x W11.3 x H10.8 cm |
| Weight 9.9 kg |
| Cord length 1.8 m |
WIRE PULLING POWER, WIRE LENGTH AND NUMBER OF LAYERS
| Bearing | Nominal permitted wire pulling power | Total wire length on drum |
| 1 15.6 | kN (1588 kgf) 1.7 m | |
| 2 12.3 | kN (1254 kgf) 3.7 m | |
| 3 10.2 | kN (1037 kgf) 6.0 m | |
| 4 8.7 | kN (884 kgf) 8.5 m | |
| 5 7.6 | kN (772 kgf) 11.3 m | |
| 6 6.7 | kN (683 kgf) 12.8 m |
ASSEMBLY
The winch's mounting hole pattern follows the standard for this type of winch. A large selection of mounting kits for different vehicles can therefore be used. The fastener to be used must be mounted on a flat surface, so that the winch's three main components (motor, gear reduction, and drum) are properly aligned. Correct alignment is necessary for uniform distribution of the winch forces.
- Mount the fairlead (A) on the bracket (B) using two M8 x 20 screws, flat washers, lock washers, and M8 nuts Note that the screws should be put in from the inside of the bracket. Otherwise, there will be insufficient clearance, making it impossible to install the winch in the bracket.
- Fit the winch (C) on the bracket. To do this, the winch drum must first be disengaged (place the clutch lever (D) in the CLUTCH OUT position) and the winch wire pulled out a few decimeters and threaded through the slot in the front of the bracket and through the fairlead.
- Screw the winch on the bracket using two M8 x 35 screws, flat washers, lock washers, and M8 nuts.
-
Connect the cables (E) to the battery and winch motor (F).
-
Fit the hook on the wire by removing the clevis pin, fitting the hook onto the wire's eyelet, and then reinserting the pin through the hook and the wire eyelet.
- Check the direction of rotation of the drum:
- Disengage the drum by placing the clutch lever in the CLUTCH OUT position.
- Pull out a length of wire from the drum and then engage the drum by placing the clutch lever in the CLUTCH IN position.
- Press the power switch to feed out the wire. If the winch drum rotates and feeds out more cable, the connections have been done correctly. However, if the winch drum pulls in the wire instead, the motor is connected with the wrong polarity – reverse the cables on the motor's terminal block. Check the direction of rotation again.
FIG. 1
WARNING!
- Batteries contain and can emit flammable and explosive gas.
- Wear safety glasses when connecting and do not handle batteries with wet hands, or when wearing jewellery on your hands – risk of severe burn injuries.
- Do not lean over the battery during connection.
USE
-
Disengage the drum by placing the clutch lever in the CLUTCH OUT position.
-
Grip the wire, pull out the required length, and connect the wire to the object to be winched.
IMPORTANT:
Check that there are at least five rounds of wire on the drum before the winch wire is loaded, and read the safety instructions before continuing the work.
- Engage the drum by placing the clutch lever in the CLUTCH IN position. The clutch
EN
does not always fully engage when the lever is switched – turn the winch drum by hand to check/ensure that the clutch has engaged/is engaging.
- Connect the remote control cable to the relay box.
- Start the vehicle's engine to keep the vehicle battery charged during the winching.
- Test run the winch for 1–2 seconds in each direction.
- Stand beside the winch wire path when operating with a wired remote control or wireless remote control. Allow the motor to stop before changing direction.
- Disconnect the wired remote control cable and replace the connection's cover after the winching is completed.
PULLING OF THE VEHICLE ON WHICH THE PRODUCT IS MOUNTED
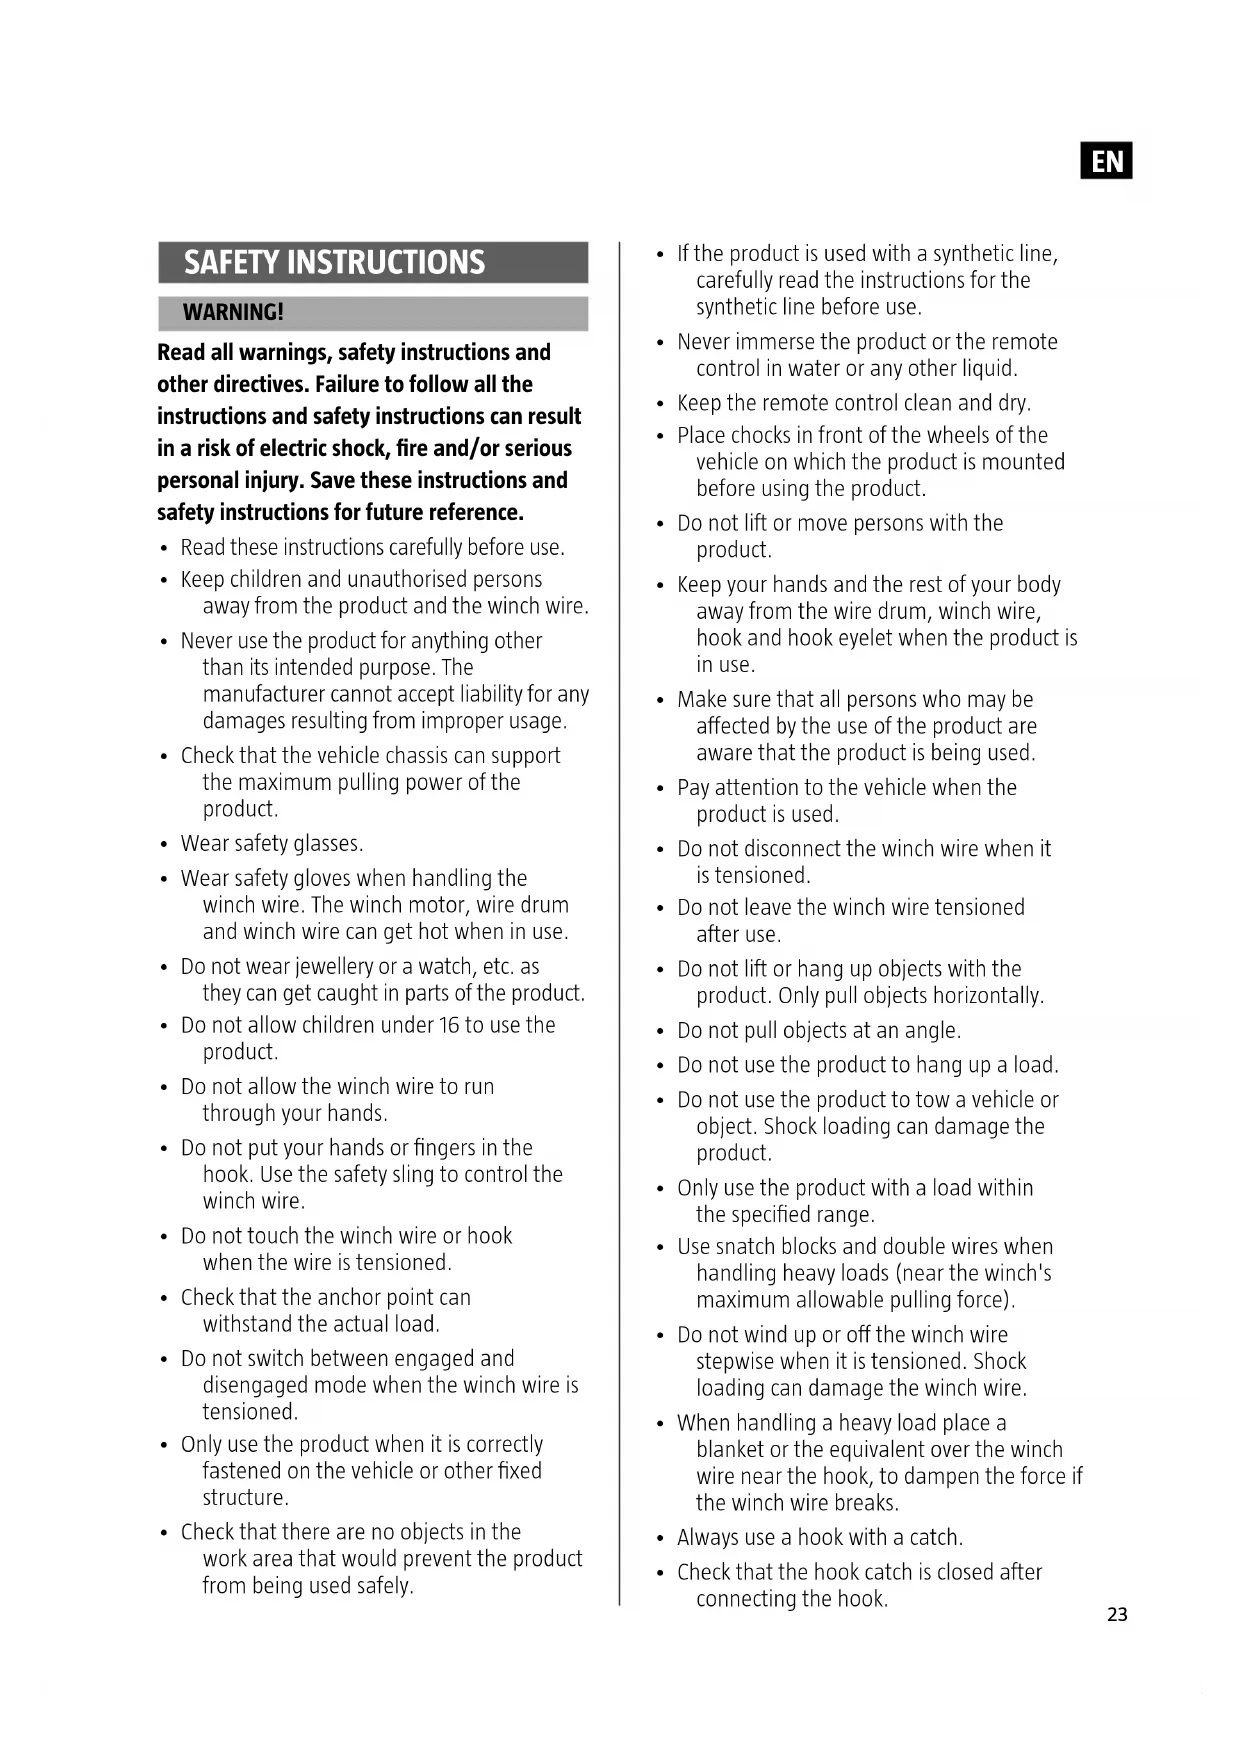
• Find a suitable anchorage point, for example a sturdy tree or a heavy, stable block of stone. Always use a hook strap to attach the wire to the anchorage point.
FIG. 2
- Winch only with the wire parallel to or only slightly angled relative to the vehicle's longitudinal direction – a large angle between the wire and the vehicle causes the wire to bunch on one side of the winch drum, resulting in damage to the wire and winch. Short winches, to straighten out the vehicle, can be done with an angled wire. Longer winches should always be done with the wire parallel to the vehicle's longitudinal direction, that is, at a right angle to the winch drum's axis.
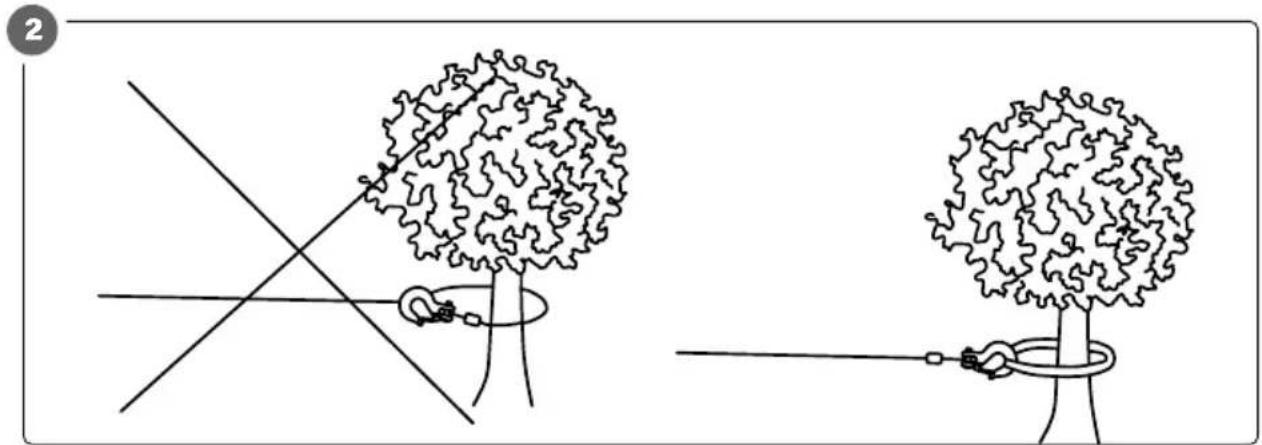
FIG. 3
- When winching a heavy load place a heavy blanket or jacket over the wire about 1.5–1.8 m from the hook. The weight will reduce the risk of the wire end flying away, whipping effect, if the wire breaks. Open the vehicle's hood to
provide extra protection from whip-lash accidents.
FIG. 4
- Double wires and snatch blocks should be used in all situations that require more than 70% of the winch's allowable nominal wire pulling force. This reduces the load on winch and wire by up to 50%, depending on the angle between the wire parts.
FIG. 5
PULLING OF OTHER VEHICLE
- Turn the clutch lever to engaged position.
- Release the hook from the holder and hook the nylon sling in the hook. Pull out the winch wire to a suitable length.
-
Hook the hook in the chassis of the vehicle to be pulled.
-
Start the engine on the vehicle the winch is mounted on.
-
Connect the remote control.
-
Wind up the winch wire until it is tensioned.
-
Check that all connections are correctly made and free from dirt and soil, etc.
-
Wind up the winch wire slowly until the pulled vehicle in on flat and stable ground.
-
Apply the parking brake in the vehicle that has been pulled.
-
Release the wire tension and remove the hook from the pulled vehicle.
-
Wind up the winch wire. Check that winch wire is would up correctly.
-
Disconnect the remote control.
MAINTENANCE
- Regularly check that all screw unions and electrical connections are correctly tightened. Tighten if necessary.
- Remove all impurities and corrosion.
REPLACING WIRE
The winch must not be used if the wire shows signs of wear or has broken threads. The wire must be replaced before using the winch again.
- Disengage the winch drum by placing the clutch lever in the CLUTCH OUT position.
- Pull out the complete wire. Check and memorise how the wire is mounted and fastened on the drum.
- Remove the old wire from the drum and fit and fasten a new wire in the same way as the old one. Put in the end of the new wire and tighten the M5 x 8 screw.
- The new wire should have the same winding direction as the old one – the wire should run out from the underside of the drum.
- Engage the winch drum drive by putting the clutch lever in the CLUTCH IN position.
- Wind in the new wire on the drum. Carefully check that the first five rounds of wire are wound on the drum uniformly and without kinks or irregularity. After the first five turns have been wound correctly, the remainder of the wire should be wound onto the drum with the wire under a load of at least 10% of the allowable nominal wire pulling force, to keep it well tensioned and wound correctly.
WARNING!
Only use approved spare parts recommended by the manufacturer.
TROUBLESHOOTING
| Problem Cause Step | ||
| The winch motor does not start. | Incorrectly connected power switch. | Connect the power switch correctly. |
| Loose battery connections. Tighten all cable connections. | ||
| Defective power switch. Replace the power switch. | ||
| Defective motor. | Keep the power switch pressed and measure the voltage at the terminal block to the motor. If there is voltage, replace the motor. | |
| Penetration of water in the motor. | Empty and allow to dry. Run the winch until it is completely dry. | |
| The motor runs, but the drum does not rotate. | Disengaged position. | Engage the winch drum drive by putting the clutch lever in the CLUTCH IN position. If the problem persists, have it checked and if necessary repaired by an authorised service centre. |
| The motor runs at low speed, or lacks power. | Supply voltage or current too low. | Run the vehicle engine during the winching. |
| Clean, tighten or replace the battery connections. | ||
| The motor overheats. | The winch has been run for too long. | Allow the winch motor to cool at intervals. |
| The motor only runs in one direction. | Loose or corroded battery or motor cable connections. | Clean and tighten. |
| Repair or replace the power switch. | ||