
18290003 - Deep fryer Gastronoma - Free user manual and instructions
Find the device manual for free 18290003 Gastronoma in PDF.
| Product Type | Dual Air Fryer |
| Power Supply | 230 V, 50 Hz |
| Main Functions | Smart Finish (simultaneous end), Match Cook (identical cooking), custom cooking (adjustable temperature and time) |
| Automatic Programs | Preheat, Fries, Meat, Drumsticks, Steak, Cake, Shrimp, Fish, Pizza, Vegetables, Reheat, Dehydrate |
| Temperature Range | 50 to 200 °C |
| Timer | 1 to 60 minutes |
| Capacity | 2 independent cooking zones |
| Smart Finish | Allows programming simultaneous cooking end for both zones |
| Match Cook | Sets both zones with the same parameters to cook the same food |
| Cleaning | Trays and drawers dishwasher safe; wipe interior and exterior with a damp cloth; do not use steel wool or harsh solvents |
| Safety | Automatic shut-off at end of cooking; overheat protection; hot surfaces; do not immerse; minimum 10 cm ventilation around appliance |
| Maintenance | Unplug and let cool before cleaning; do not repair yourself; contact Commaxx customer service |
| Spare Parts and Repairability | Contact Commaxx B.V. via www.commaxx.nl or service@commaxx-group.com |
| Warranty | Warranty valid under conditions; void in case of misuse or unauthorized modification |
| General Information | Made in China for Commaxx B.V.; recycling according to WEEE directive |
Frequently Asked Questions - 18290003 Gastronoma
User questions about 18290003 Gastronoma
0 question about this device. Answer the ones you know or ask your own.
Ask a new question about this device
Download the instructions for your Deep fryer in PDF format for free! Find your manual 18290003 - Gastronoma and take your electronic device back in hand. On this page are published all the documents necessary for the use of your device. 18290003 by Gastronoma.
USER MANUAL 18290003 Gastronoma
DK/NO Dobbelt airfryer 2
SE Dubbel varmluftsfritös ....11
NL Double airfryer 48
I: Dehydrate (dehydrering)
T: Pre-heat (forvarmning)
U: Match cook
DK/NO
TILBEREDNINGS- FUNKTIONER OG INDSTILLINGER
1. Tænd
To get the best out of your new double air fryer, please read these instructions carefully before using it for the first time. Take particular note of the safety precautions. We also recommend that you keep the instructions for future reference, so that you can refer to them at a later date.
GENERAL SAFETY INSTRUCTIONS
- This appliance may only be used by children aged from 8 years and above and persons with reduced physical, sensory or mental capabilities or lack of experience and knowledge if they are supervised or have been given instructions concerning use of the appliance in a safe way and understand the hazards involved. Children must not play with the appliance. Cleaning and user maintenance must not be performed by children without supervision.
- Never leave unattended when in use. Keep an eye on any children in the vicinity of the appliance when it is in use. The appliance is not a toy.
- Incorrect use of this appliance may cause personal injury or damage the appliance.
- Use for the intended purpose only. The manufacturer is not responsible for any injury or damage resulting from incorrect use or handling (see also Warranty Terms).
- For domestic use only. Not for outdoor or commercial use.
- Remove all packaging and transport materials from the inside and outside of the appliance.
UK
- Check that the appliance has no visible damage and that no parts are missing.
- Do not use with any cords other than that supplied.
- Check that it is not possible to pull or trip over the cord or any extension cord.
- The appliance must not be used together with a timer switch or a separate remote control system.
- Turn off the appliance and remove the plug from the socket when cleaning or when not in use.
-
Avoid pulling the cord when removing the plug from the socket. Instead, hold the plug.
-
Keep the cord and appliance away from heat sources, hot objects and naked flames.
- Ensure that the cord is fully extended.
- The cord must not be twisted or wound around the appliance.
- Check regularly that neither the cord nor plug is damaged and do not use the appliance if there is any damage, or if it has been dropped on the floor, dropped in water or damaged in any other way.
- If the appliance, cord or plug have been damaged, have the appliance inspected and if necessary repaired by an authorised repairer.
- Connect to 230 V, 50 Hz only. The warranty is not valid if the appliance is connected to incorrect voltage.
UK
- Never try to repair the appliance yourself. Please contact the store where you bought the appliance for repairs under warranty.
- Unauthorised repairs or modifications will invalidate the warranty.
- Caution! Some parts of this appliance can become very hot and cause burns if touched. Particular attention should be paid where children and vulnerable people are present.
SPECIAL SAFETY INSTRUCTIONS
- The appliance or cord must not be placed in water or any other liquid. If you drop the appliance in water by accident, or it gets wet in any other way, you must immediately remove the plug from the socket and get an authorised repairer to examine the appliance before you use it again.
- It is extremely important that you follow these instructions, as water in the appliance could give rise to fatal electric shocks.
- Do not use the appliance when your hands are wet, when the floor is wet or when the appliance itself is wet. Never touch the plug with wet or damp hands.
UK
- Do not let the cord hang over the edge of the counter top. Keep it away from hot objects and naked flames and make sure that it never comes into contact with the hot parts of the appliance during use.
- The appliance gets hot very quickly and takes a long time to cool down again. Only touch the appliance by the handle. Never place the appliance next to hot objects (e.g. cookers or ovens) or in the vicinity of flammable materials (e.g. curtains).
• Make sure there is sufficient ventilation around the appliance. There should be at least 10 cm of space on all sides of the appliance.
- Make sure not to cover the appliance's air intake or blower, as this may cause the appliance to overheat!
- Be aware that the appliance may emit very hot steam or grease splashes when in use and particularly when opened.
- Do not pour oil or other fat into the pan! The appliance does not deep-fry food but cooks it using hot air.
- The food must not be placed directly into the pan but must always be placed on the tray in the pan.
UK
PRIOR TO FIRST USE
- Remove all packing materials.
- Remove any stickers or labels from the appliance, other than the rating label.
- Thoroughly clean the frying tray, with hot water and some liquid washing soap using a non-abrasive sponge.
Note: You can also clean these parts in the dishwasher.
- Wipe the inside and outside of the appliance with a moist cloth.
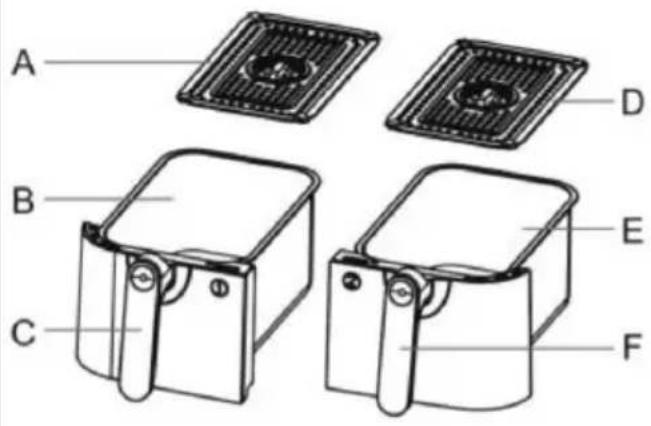
MAIN COMPONENTS
A/D: Rack
B/E: The tray
C/F: Basket handle
G: Air inlet
H: Control panel
I: Vent windows
J: Power cord storage place
K: Power cord
text_image
A B C D E F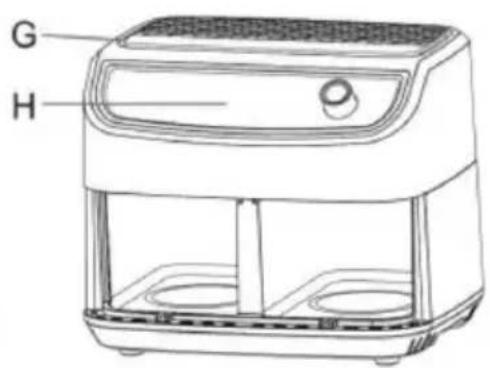
text_image
G H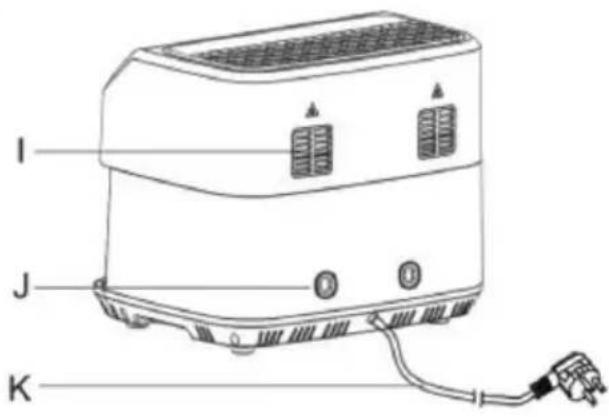
text_image
I J KUK

text_image
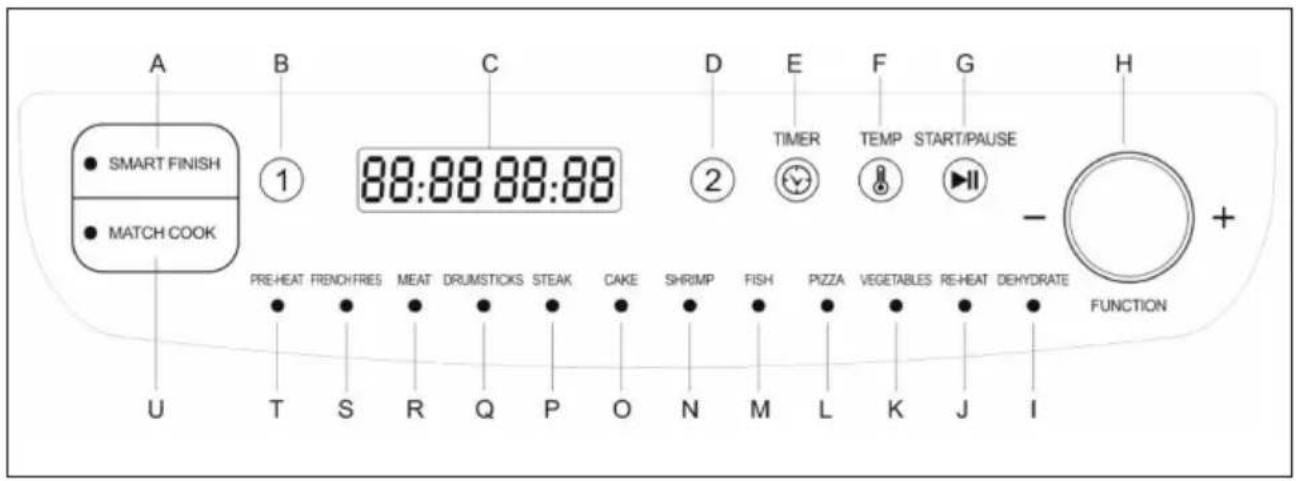
A SMART FINISH MATCH COOK B ① 88:88 88:88 D 2 E TIMER TEMP START/PAUSE F G - H + PRE-HEAT FRENCH FRIES MEAT DRUM STICKS STEAK CAKE SHRIMP FISH PIZZA VEGETABLES RE-HEAT DEHYDRATE FUNCTION T S R Q P O N M L K J ICONTROL PANEL
A: Smart finish
B: Zone 1
C: Display
D: Zone 2
E: Timer
F: Temperature
G: Start/pause
H: Dial & Function knob
I: Dehydrate
J: Re-heat
K: Vegetables
L: Pizza
M: Fish
N: Shrimp
O: Cake
P: Steak
Q: Drumsticks
R: Meat
S: Frenchfries
T: Pre-heat
U: Match cook
UK
COOKING MANNER AND SETTING
1. Power on
Insert the power plug of the appliance into the wall socket. Press on the power button (H) to turn on the appliance.
2. Set cooking temp. and cooking time for a personalized cooking
1) Press "1" or "2" to select the cooking zone The indication light of the cooking zone selected lights on.
2) Turn the function knob (H) to activate the function selection.
3) Press the Temp. button (F) to activate the temp. setting, turn the function knob (H) to set the cooking temp. The temperature could be set from 50 C to 200 C.
4) Press the Timer button (E) to activate the time setting, turn the function knob (H) to set the cooking time. The cooking time could be set from 1 minute to 60 minutes.
5) If you want 2 cooking zones cooking together, repeat the operation step from 1) - 4) to set the cooking temp. and cooking time for another cooking zone.
6) Press the Start/pause button (G) to start working. During cooking, the cooking process could be interrupted by pressing the Start/pause button to pause for the purpose like checking the cooking status of the food, or stirring the food in the tray,
7) The beeps sound when the cooking completes at one cooking zone and sound again when the cooking completes at all the cooking zones set to cook. The appliance turns off automatically after the cooking completes.
3. Set auto programmed cooking
1) Press "1" or "2" to select a single cooking zone to cook. The indication light of the cooking zone selected lights on.
2) Turn the function knob (H) to select the cooking program. The indicating light of the cooking program selected comes on. The cooking program from (I) to (T) could be selected.
3) If you want 2 cooking zones cooking together, repeat the operations step from 1) to 2) to select the auto cooking program for another cooking zone.
4) Press the Start/pause button (G) to start working.
5) The beeps sound when the cooking completes at one cooking zone and sound again when the cooking completes at all the cooking zones set to cook. The appliance turns off automatically after the cooking completes.
4. Set 2 cooking zones completing cooking at the same time.
Press “SMART FINISH” button (A), then repeat the operation step from 1) to 5) for setting a personalized cooking, or the operation step from 1) to 3) for setting an auto programmed cooking, you then set the 2 cooking zones completing cooking at the same time.
UK
5. Set 2 cooking zones cooking same
Press “MATCH COOK” button (U), then repeat the operation step from 2) to 4) for setting a personalized cooking, or the operation step 2) for setting an auto programmed cooking, You then set 2 cooking zones able cooking the same food.
USE
- Insert the power plug of the appliance into an earthed wall socket.
- Put the ingredients into the frying tray.
- Put the frying tray in the right position. Choose the cooking manner described above to start.
- During cooking process, the screen displays the setting temperature and the cooking time remaining.
-
Some ingredients require shaking the food when halfway throughout the cooking time to achieve an even effect on the whole food. To shake the ingredients, you can pull the frying tray out of the appliance by the handle and shake it. Then slide the frying tray back into the air fryer to continue the cook.
-
When the cooking time elapses, you can pull the pan out of the appliance and place it on a heat-resistant surface.
-
Check whether the ingredients are ready. If the ingredients are not ready yet, you can simply slide the frying tray back into the appliance and cook it extra minutes.
Note: Once cooking completes, the ventilation fan will keeps working for 1 minute more for cooling the appliance.
TROUBLE SHOOTING
In some cases, an error message may appear on the display. The table below shows how the errors shall be dealt with.
| Error code | Problem Action needed | |
| E 1 Temperature sensor disconnected from the connection in the electronic circuit. | Contact the store where the appliance was purchased or Commaxx customer service: service@comma-xxgroup.com | |
| E 2 Temperature sensor short circuit in the electronic circuit. | Contact the store where the appliance was purchased or Commaxx customer service: service@comma-xxgroup.com | |
| E 3 Under the protection state because of overheating. | Disconnect the product from the power supply and wait till the product cooling down. The product will come back normal. | |
CLEANING
- Unplug the appliance.
- Allow the appliance to cool to around 30-40 degrees before cleaning it.
- Wash the pans and trays in warm water with a little detergent added. These parts can also be cleaned in a dishwasher.
- Wipe the inside and outside of the appliance with a damp cloth or sponge.
- You must not use steel wool, scouring powder or any other form of strong solvent or abrasive cleaning agent.
UK
INFORMATION ON DISPOSAL AND RECYCLING OF THIS PRODUCT
Please note that this Commaxx product is marked with this symbol:

This means that this product must not be disposed of along with ordinary household waste, as electrical and electronic waste must be disposed of separately.
According to the WEEE directive, every member state must ensure correct collection, recovery, handling and recycling of electrical and electronic waste. Private households in the EU can take used equipment to special recycling stations free of charge.
In certain member states, used appliances can be returned to the retailer where they were bought on the condition you buy new products. Contact your retailer, distributor or the municipal authorities for further information on what to do with electrical and electronic waste.
WARRANTY TERMS
The warranty does not apply:
- if the above instructions have not been followed
- if the appliance has been interfered with
- if the appliance has been mishandled, subjected to rough treatment, or has suffered any other form of damage
- if the appliance is faulty due to faults in the electricity supply.
Due to the constant development of our products in terms of function and design, we reserve the right to make changes to the product without prior warning.
FREQUENTLY ASKED QUESTIONS
If you have any questions regarding the use of the appliance and cannot find the answer in this user guide, please try our website at www.commaxx.nl.
You can also see contact details on our website if you need to contact us for technical questions, repairs, accessories or spare parts.
MANUFACTURED IN CHINA FOR
Commaxx B.V.
Wiebachstraat 37,
NL-6466 NG Kerkrade
Netherlands
www.commaxx.nl
We cannot be held responsible for any printing errors.
DE
EINFÜHRUNG
text_image
G H I J KDE
text_image
A SMART FINISH MATCH COOK U B ① 88:88 88:88 D 2 E TIMER TEMP START/PAUSE F G - FUNCTION + PRE-HEAT FRENCH FRIES MEAT DRUM STICKS STEAK CAKE SHRIMP FISH PIZZA VEGETABLES RE-HEAT DEHYDRATEBEDIENFELD
A: Smart Finish
B: Zone 1
C: Display
D: Zone 2
E: Timer
F: Temperatur
G: Start/Pause
CONDITIONS DE LA GARANTIE
WYPRODUKOWANO W CHINACH DLA
Commaxx B.V.
Wiebachstraat 37,
NL-6466 NG Kerkrade
Netherlands
www.commaxx.nl
S: Frenchfries (Patatine fritte)
T: Pre-heat (Preriscaldamento)
U: Match cook (Cottura combinata)