
Blast - Blender NINJA - Free user manual and instructions
Find the device manual for free Blast NINJA in PDF.
| Product Type | Cordless Portable Blender |
| Brand | Ninja |
| Model | Blast |
| Power Source | Rechargeable lithium-ion battery, USB-C charging (5V, 3A) |
| Charging Time | Approximately 2 hours for a full charge |
| Blending Cycle | 30 seconds per cycle |
| Container Capacity | Up to the MAX FILL line (approx. 500 ml) |
| Container Material | BPA-free, dishwasher safe (top rack) |
| Motor Base | Water-resistant (rinseable), do not immerse |
| Blades | Very sharp motorized blade assembly, handle with care |
| Features | Portable blending, automatic 30s cycle, LED status indicators |
| Safety | Automatic shutoff in case of overheating, stall detection, safety lock |
| Care and Cleaning | Dishwasher safe parts (except motor base) or hand wash; wipe motor base with damp cloth |
| Warranty | 2 years (manufacturer limited warranty) |
| Included Accessories | Blending cup, spout lid, motor base, USB-C cable, blade protector |
| Spare Parts and Repairability | Available at ninjaaccessories.eu; repairs by Ninja customer service |
| Usage | Household use only, do not blend hot ingredients or dry ingredients alone |
Frequently Asked Questions - Blast NINJA
User questions about Blast NINJA
0 question about this device. Answer the ones you know or ask your own.
Ask a new question about this device
Download the instructions for your Blender in PDF format for free! Find your manual Blast - NINJA and take your electronic device back in hand. On this page are published all the documents necessary for the use of your device. Blast by NINJA.
USER MANUAL Blast NINJA
natural_image
Gray-scale icon of a play button with power and control buttons, no text or symbols presentPROGRAMMER:
START/STOP-KNAP
Tryk én gang på Start/Stop-knappen for at aktivere det 30 sekunder lange blandingsprogram.
STARTKNAP
text_image
Diagram illustrating a droplet in a container with liquid, showing an eye and droplet formation.
natural_image
Illustration of a two-step blender with a lid, showing the process from being opened to holding a tray (no text or symbols present)natural_image
Line drawing of two identical portable food containers with lid and control buttons, one being pushed by a hand (no text or symbols)INSTALLATION AF BEHOLDERLÅGET OG KNIVOVERTRÆK
BC151EU_Series_IB_MP1_230524_MV1
natural_image
Gray-scale icon of a play button with power and control buttons, no text or symbols presentPROGRAMME:
START/STOP-TASTE:
text_image
Diagram illustrating a droplet in a container with liquid, showing an eye and droplet formation.
natural_image
Illustration of a two-step food item being filled with granular material, showing a hand pressing the lid (no text or symbols)natural_image
Line drawing of two portable food containers with lid and control buttons, one being pushed by a hand (no text or symbols)BECHERDECKEL UND KLINGENABDECKUNG EINSETZEN
BC151EU_Series_IB_MP1_230524_MV1
IMPORTANT SAFETY INSTRUCTIONS
PLEASE READ ALL INSTRUCTIONS BEFORE USE • FOR HOUSEHOLD USE ONLY
| Read and review instructions for operation and use. | |
| Indicates the presence of a hazard that can cause personal injury, death, or substantial property damage if the warning included with this symbol is ignored. | |
| For household use only. | |
| Indicates location to attach USB-C cord for charging unit. | |
| When using electrical appliances, basic safety precautions should always be followed, including the following: | |
⚠ WARNING: To reduce the risk of injury, fire, electrical shock or property damage, basic safety precautions must always be followed, including the following numbered warnings and subsequent instructions. Do not use appliance for other than intended use.
1 Read all instructions prior to using the appliance and its accessories.
2 Carefully observe and follow all warnings and instructions. This unit contains electrical connections and moving parts that potentially present risk to the user.
3 ALWAYS exercise care when handling the Power Blade Assembly. The blades are sharp, handle carefully. ONLY grasp the Power Blade Assembly by the motor base. Failure to use care when handling the blade assembly will result in a risk of laceration.
4 Take your time and exercise care during unpacking and appliance setup. This appliance contains sharp, loose blades that can cause injury if mishandled.
5 Take inventory of all contents to ensure you have all parts needed to properly and safely operate your appliance.
6 DO NOT blend hot liquids or carbonated liquids, as doing so may cause pressure buildup, resulting in risk of burns or other injuries to the user.
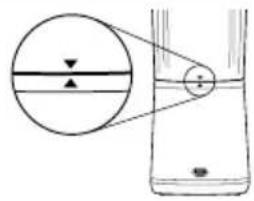
7 DO NOT fill the blending vessel past the MAX FILL line.
8 Blades are sharp. Handle carefully.
9 Before use, wash all parts that may contact food. Follow washing instructions covered in this instruction manual.
10 To protect against the risk of electric shock, DO NOT submerge the motor base in any form of liquid.
11 DO NOT store outdoors or allow the product to get submerged in liquid.
12 DO NOT allow children to operate this appliance or use as a toy. Close supervision is necessary when any appliance is used near children.
IMPORTANT SAFETY INSTRUCTIONS
PLEASE READ ALL INSTRUCTIONS BEFORE USE • FOR HOUSEHOLD USE ONLY
13 This appliance is NOT intended to be used by people with reduced physical, sensory, or mental capabilities, or lack of experience and knowledge, unless they have been given supervision or instruction concerning use of the appliance by a person responsible for their safety.
14 Before each use, inspect Power Blade assembly for damage. If a blade is bent or damage is suspected, contact SharkNinja to arrange for replacement.
15 DO NOT attempt to sharpen blades.
16 DO NOT allow any part of the unit to contact hot surfaces, including stoves and other heating appliances.
17 ALWAYS use the appliance on a dry and level surface.
18 Keep hands, hair, and clothing out of the vessel when loading and operating.
19 ONLY use attachments and accessories that are provided with the product or are recommended by SharkNinja. The use of attachments not recommended or sold by SharkNinja may cause fire, electric shock, or injury.
20 During operation and handling of the appliance, avoid contact with moving parts.
21 DO NOT operate the appliance with an empty container.
22 DO NOT microwave any containers or accessories provided with the appliance.
23DONOT perform grinding operations.
24 Before operation, ensure all utensils are removed from containers. Failure to remove utensils can cause the vessel to shatter and potentially result in personal injury and property damage.
25 DO NOT attempt to defeat the interlock mechanism. Ensure the vessel and sip lid are properly installed before operation.
26 DO NOT expose the containers and accessories to extreme temperature changes. They may experience damage.
27 NEVER leave the appliance unattended while in use.
28 If you find unmixed ingredients sticking to the sides of the cup, turn off the appliance using the Power Button, and use a scraper to dislodge ingredients.
29 DO NOT attempt to remove the vessel and lid from the motor base while the blade assembly is still spinning. Allow the appliance to come to a complete stop before removing lid and/or vessel.
30 DO NOT store ingredients for extended amounts of time before or after blending them. Some foods may contain active ingredients or release gases that will expand if left in a sealed container, resulting in excessive pressure buildup that can pose a risk of injury.
31 If the appliance overheats, a thermal switch will activate and temporarily disable the motor. To reset, turn OFF the Ninja Blast™ Portable Blender using the Power Button and allow it to cool for 15 minutes before using again.
32 DO NOT process dry ingredients without adding liquid to the blending vessel. Unit is not intended for dry blending.
33 Operate ONLY with the sip lid on.
34 DO NOT refrigerate or freeze blender.
35 Switch off the appliance and disconnect from supply before changing accessories or approaching parts that move in use.
36 Do not misuse the appliance to avoid potential injury.
BATTERY USE
1 The battery is the power source for the Ninja Blast Portable Blender. Carefully read and follow all charging instructions.
2 DO NOT incinerate this appliance even if it is severely damaged. The lithium-ion batteries can explode in a fire. Always properly recycle products powered by lithium-ion batteries.
3 Since there is no power cord, prevent accidental blade activation by ensuring the blender is turned OFF when not in use or when drinking from the spout lid.
4 Keep the battery away from all metal objects such as paper clips, coins, keys, nails, or screws. Shorting the battery terminals together increases the risk of fire or burns.
5 Under abusive conditions, liquid may be ejected from the battery. Avoid contact with this liquid, as it may cause irritation or burns. If contact occurs, flush with water. If liquid contacts eyes, seek medical help.
6 This appliance contains batteries that are only replaceable by skilled persons.
7 This appliance contains batteries that are non-replaceable.
SAVE THESE INSTRUCTIONS
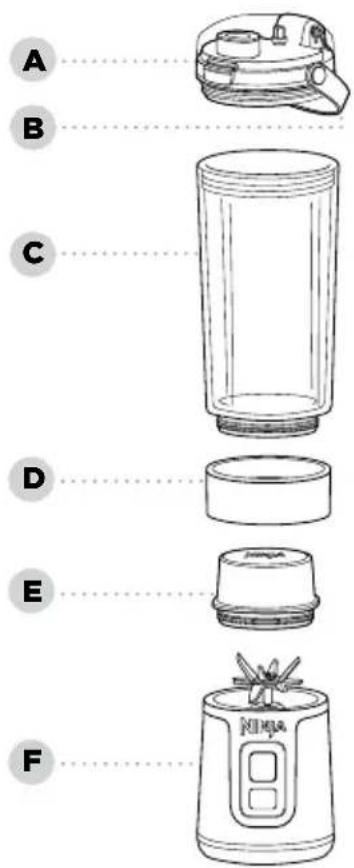
A Sip Lid
B Carry Handle
c Blending Vessel*
D Vessel Cap*
E Blade Cover*
F Motor base with Power Blades Assembly
G USB-C Charging Cord
H Charging Port
* Blending vessel sizes and quantity, and accessories vary by model.
CHARGING:
Charge the unit for at least 2 hours for a full battery. LEDs will illuminate GREEN when fully charged.
Charging port is located at the back of the motor base. Use provided USB-C charging cord with a 5V 3A Power Supply.
text_image
A B C D E F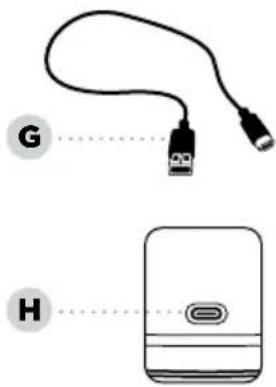
text_image
G HMotor Base Back
BEFORE FIRST USE
IMPORTANT: Review all warnings at the beginning of this Owner's Guide before proceeding.
NOTES:
- Handle the Power Blade Assembly by grasping around the motor base.
- All attachments are BPA free. All attachments EXCEPT the motor base are top-rack dishwasher safe. DO NOT use a heavy cycle. Ensure lid and vessel are removed from motor base before placing in the dishwasher. Exercise care when handling Power Blade Assembly.
1 Remove all packaging materials from the unit. Exercise care when unpacking blade assembly, as the blades are sharp.
2 Wash vessel, lid, and blade assembly in warm, soapy water using a dishwashing utensil with a handle to avoid direct contact with the blades. DO NOT submerge the motor base in water when cleaning. Exercise care when handling blade assembly, as the blades are sharp.
3 Thoroughly rinse and air-dry all parts.

natural_image
Gray-scale icon of a play button with power and control buttons, no text or symbols presentPROGRAMS:
START/STOP BUTTON
Press Start/Stop button once to activate the 30-second blend cycle.
POWER BUTTON
Press Power button to turn unit ON and OFF.
ERROR STATES LED Shows Solutions
| Vessel and Base are Not Aligned | Flashing WHITE | Ensure vessel and motor base are aligned using the arrows on the back of motor base and vessel. |
| Blades are Blocked | Flashing ORANGE | Move lodged ingredients from blade & re-start blend program. |
| Requires Charge Solid | RED Charge unit. | |
| Abnormal charger | Flashing RED and BLUE | Defective charger, unplug & find correct 5V 3A charger. |
| Unit Cool Down Time Out | Clockwise Moving ORANGE LEDs | Let unit sit at room temp for 15 minutes before using again. |
| While Charging | Flashing WHITE and RED Call Customer Service. | |
| While Blending | Flashing RED in the bottom left and top right | Call Customer Service. |
IMPORTANT: Review all warnings at the beginning of this Owner's Guide before proceeding.
1 Ensure the motor base is fully charged and the vessel is properly installed by aligning vessel arrow with motor base arrow located on the back of the motor base.
text_image
Diagram illustrating a droplet in a container with liquid, showing an eye and droplet formation.
text_image
Diagram showing two types of blender with arrows indicating transformation, one pointing to a handle and the other holding a tray.2TurnunitON by pressing the lights illuminate.
Button until Start/Stop button
3 Add ingredients, starting with liquids then solid ingredients. If using ice, always add last. DO NOT fill ingredients past the MAX FILL line. Secure lid onto the vessel, twisting clockwise to tighten.
4 Blend for a 30-second blend cycle by pressing the Start/Stop button.
5 Open the sip lid to sip, or remove the lid to pour out blender outputs into another container. DO NOT remove vessel from motor base when filled. Empty vessel prior to removing from motor base.
6 After blending, power OFF the unit by pressing the ⏻ button. Motor base should be turned OFF when drinking from the sip lid and when blender is no longer in use.
7 Refer to the Care & Maintenance section for cleaning and storage instructions.

natural_image
Line drawing of two beverage containers with a lid, one with a handle and the other with a control panel (no text or symbols)INSTALLING VESSEL CAP AND BLADE COVER
After blending is complete, ensure the lid is on tight and turn the blender upside down. Twist anti clockwise to remove the motor base from the vessel. Install the flat lid on the bottom of the vessel and turn clockwise.
Install the blade cover on the motor base to cover the exposed blades by twisting anti clockwise.
CLEANING
Blades can still operate when the lid is removed. Always turn the unit OFF when cleaning without the lid on or when the Power Blade Assembly is exposed.
Hand-Washing
Wash vessel, lid, and Power Blade Assembly with warm, soapy water. Use a dishwashing utensil or cloth to clean the Power Blade Assembly on the motor base. Exercise care when handling the Power Blade Assembly on the motor base as the blades are sharp. Wipe the motor base with a clean, damp cloth.
DO NOT submerge the motor base in water. Thoroughly rinse and air-dry all appropriate parts.
Motor Base
The USB-C port and the Motor Base are water resistant, which means the motor base can get rinsed in the sink; HOWEVER DO NOT put the motor base in the dishwasher or submerge it in water. Ensure the USB-C charger is not inserted before cleaning.
DEEPER CLEAN
Dishwasher
Vessel, sip lid, vessel cap, and blade cover are top-rack dishwasher safe. DO NOT use a heavy cycle. Ensure the vessel and sip lid are removed from the motor base before being placed in the dishwasher.
STORING
Store the unit upright and with the lid, vessel, and motor base fully assembled.
DO NOT store blended or unblended ingredients in the vessel with the Power Blade Assembly for prolonged periods of time.
DO NOT stack items on top of the vessel. Store any remaining attachments alongside the unit or in a cabinet where they will not be damaged or create a hazard.
If your unit needs servicing, call Customer Service at 0800 862 0453. So we may better assist you, please register your product online at registryourninja.eu and have the product on hand when you call.
ORDERING REPLACEMENT PARTS
To order additional parts and attachments, visit ninjaaccessories.eu
⚠ WARNING: To reduce the risk of shock and unintended operation, unplug unit before troubleshooting.
Ensure the unit is not charging when troubleshooting. Ensure the unit is fully charged and vessel is properly aligned.
Control panel doesn't turn off.
- Press and hold the ⏻ Button to turn the cordless blender ON and OFF.
Doesn't mix well; ingredients get stuck.
- If ingredients are routinely getting stuck, adding some liquid will usually help. You can also shake the blender while blending or turn the blender upside down, start a blend cycle and turn it right side up to move ingredients while blending.
- When filling the vessel, start with liquid or yogurt, then fresh fruit or veggies, followed by leafy greens or herbs. Add your seeds, powders, or nut butters and end with ice or frozen ingredients.
Sip lid is hard to assemble on the vessel.
- Set the assembled motor base and vessel on a level surface. Carefully place the spout lid on the top of the vessel and align the threads so the spout lid sits flat. Turn clockwise until you have a tight seal.
Vessel is hard to assemble on the motor base.
- Set the motor base on a level surface. Carefully place the vessel on the top of the motor base and align the threads so the vessel sits flat. Turn clockwise until you have a tight seal. The LEDs on the UI should flash blue when the vessel is properly aligned.
PRODUCT REGISTRATION
Please visit registryourninja.eu to register your new Ninja® product within twenty eight (28) days of purchase. You will be asked to provide the store name, date of purchase, and model number along with your name and address.
The registration will enable us to contact you in the unlikely event of a product safety notification. By registering, you acknowledge you have read and understood the instructions for use and warnings set forth in the accompanying instructions.
When you buy a product in Europe as a consumer, you get the benefit of legal rights relating to the quality of the product (your “statutory rights”). You can enforce these statutory rights against your retailer. However, at Ninja we are so confident about the quality of our products (the “Products”) that we give you a manufacturer’s guarantee of two years. This guarantee only applies to the Product if it is bought in new and unused condition. These terms and conditions relate to our guarantees only – your statutory rights as a buyer are unaffected. Please note that the 2 year guarantee is available in all EU countries.
The conditions below describe the prerequisites and scope of our guarantees which are issued by SharkNinja Germany GmbH, c/o Regus Management GmbH, Excellent Business Center 10. + 11/Stock, Westhafenplatz 1, 60327 Frankfurt am Main (Germany) ("us", "our" or "we"). They do not affect your statutory rights or the obligations of your retailer and your contract with them. The same applies if you have purchased the product directly from Ninja.
Ninja® Guarantees
A household kitchen appliance constitutes a sizeable investment. Your new machine needs to work properly for as long as possible. The guarantee it comes with is an important consideration - and reflects how much confidence the manufacturer has in its product and manufacturing quality. You'll find online support at www.ninjakitchen.eu.
How do I register my guarantee?
You can register your guarantee online within 28 days of purchase. To save time, you'll need the following information about your machine:
•Modelno.
- Serial Number (only if available)
• Date of purchase of the Product (receipt or delivery note)
To register online, please visit www.ninjakitchen.eu
IMPORTANT
• The guarantee covers your Product for 2 years starting on the date of purchase.
- Please keep the receipt at all times. Should you need to use your guarantee we will need the receipt to verify the information supplied to us is correct. The inability to produce a valid receipt will invalidate your guarantee.
What are the benefits of registering my guarantee?
When you register your guarantee, you can choose to receive our newsletter containing tips, advice and competitions. Hear the latest news about new Ninja technology and launches. If you register your guarantee online, you'll get instant confirmation that we've received your details. For details of our privacy policy please visit www.ninjakitchen.eu
How long are our Products guaranteed for?
Our confidence in our design and quality control means that your Product is guaranteed for two years.
What is covered by the guarantee?
Repair or replacement (at Ninja's discretion) of your Product, including all parts and labour in case of any defect in design, materials and workmanship (including transport and shipping costs). Our guarantee is in addition to your legal rights as a consumer.
What is not covered by the guarantee?
• Normal wear and tear.
- Accidental damage, faults caused by negligent use or care, misuse, neglect, careless operation or handling of the kitchen appliance which is not in accordance with the Ninja® Instruction Manual supplied with your machine.
• Use of the kitchen appliance for anything other than normal domestic household purposes.
• Use of parts not assembled or installed in accordance with the operating instructions.
- Use of parts and accessories which are not Ninja® Genuine Components.
- Faulty installation (except where installed by Ninja®).
- Repairs or alterations carried out by parties other than Ninja or its agents, unless you can show that the repairs or alterations carried out by others are not related to the defect for which you exercise the guarantee.
What happens when my guarantee runs out?
Ninja does not design products to last for a limited time. We do appreciate that there may be a desire for our customers to want to repair their kitchen appliance after the guarantee has elapsed. In this case please contact our free phone customer service help line and ask about our guarantee program, on 0800 000 9063.
Where can I buy genuine Ninja spares and accessories?
Ninja spares and accessories are developed by the same engineers who developed your Ninja kitchen appliance. You'll find a full range of Ninja spares, replacement parts and accessories for all Ninja machines at www.ninjakitchen.eu
Please remember that using non-Ninja spares may invalidate your manufacturer's guarantee. However, your statutory rights are unaffected.
text_image
A B C D E F G Hnatural_image
Gray-scale icon of a play button with power and control buttons, no text or symbols presentPROGRAMAS:
BOTÓN START/STOP (INICIAR/DETENER)
text_image
Diagram illustrating a droplet being poured into a container with liquid, showing an eye and droplet position.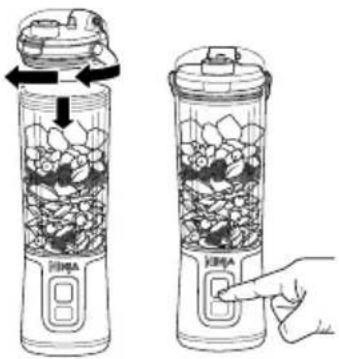
natural_image
Illustration of a blender with a lid and side panel, showing two steps: one being filled with food, the other holding a hand.natural_image
Line drawing of two beverage containers with lid and control buttons, one being turned open while the other is closed (no text or symbols)BC151EU_Series_IB_MP1_230524_MV1
text_image
A B C D E F G Hnatural_image
Gray-scale icon of a play button with power and control buttons, no text or symbols presentPROGRAMMES :
TOUCHE START/STOP
text_image
Diagram illustrating a droplet in a container with liquid, showing an eye and droplet formation.
text_image
Diagram showing two types of blender with a hand pointing to one, illustrating the process of adding granular material.natural_image
Line drawing of two beverage containers with a lid, one open and one closed, both with a hand adjusting the button (no text or symbols)INSTALLATION DU COUVERCLE DU RÉCIPIENT ET DU CACHE DES LAMES
text_image
A B C D E F G Hnatural_image
Gray-scale icon of a play button with power and control buttons, no text or symbols presentPROGRAMMI:
PULSANTE START/STOP
text_image
Diagram illustrating a droplet in a container with liquid, showing an eye and droplet formation.
natural_image
Illustration of a two-stage blender with a lid and side panel, showing internal contents and a hand interacting with it (no text or symbols)natural_image
Line drawing of two portable food containers with lid and control buttons, one being turned open while the other holds a button (no text or symbols)MONTAGGIO DEL COPERCHIO DEL RECIPIENTE E DELLA PROTEZIONE PER LA LAMA
BC151EU_Series_IB_MP1_230524_MV1
text_image
A B C D E F G Hnatural_image
Gray-scale icon of a play button with power and control buttons, no text or symbols presentPROGRAMMA'S:
START/STOP-KNOP
text_image
Diagram illustrating light refraction through a droplet on a container, with an inset showing the same object's reflection.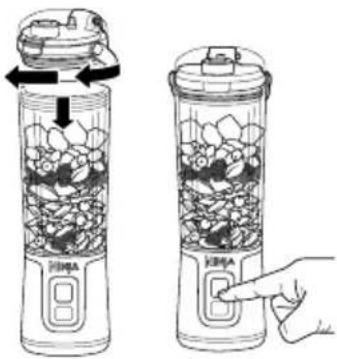
natural_image
Illustration of a two-step blender with a lid, showing the process from dropping funnel to interacting with a hand (no text or symbols)natural_image
Line drawing of two beverage containers with a lid, one being turned open and the other holding a button (no text or symbols)KULHON KANNEN JA TERÄN KANNEN KIINNITTÄMINEN
BC151EU_Series_IB_MP1_230524_MV1
natural_image
Gray-scale icon of a play button with power and control buttons, no text or symbols presentPROGRAMMER:
START/STOP-KNAPP
text_image
Diagram illustrating a droplet in a container with liquid, showing an eye and droplet formation.
natural_image
Illustration of a two-step blender with a lid and side panel, showing internal contents and a hand interacting with the lid (no text or symbols)natural_image
Line drawing of two portable water heaters with a hand adjusting the interior panel (no text or symbols)INSTALLERING AV BEHOLDER OG LOKK TIL BEHOLDER
text_image
A B C D E F G Hnatural_image
Gray-scale icon of a media player control panel with play button and power button (no text or symbols)PROGRAMAS:
BOTÃO INICIAR/PARAR
text_image
Diagram illustrating a droplet in a container with liquid, showing an eye and droplet formation.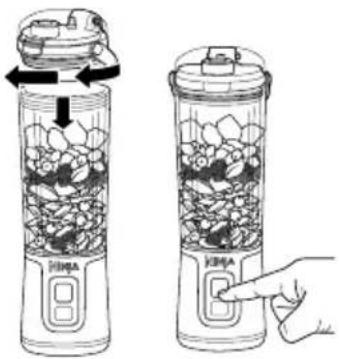
natural_image
Illustration of a two-step food item being filled with ice cubes, showing the lid and side view (no text or symbols)natural_image
Line drawing of two hand-drawn models of a blender with lid and control buttons, no text or symbols presentBC151EU_Series_IB_MP1_230524_MV1
text_image
A B C D E F G Hnatural_image
Gray-scale icon of a play button with power and control buttons, no text or symbols presentOHJELMAT:
START/STOP-PAINIKE
Paina Start/Stop-painiketta kerran aktivoidaksesi 30 sekunnin sekoitusjakson.
VIRTAPAINIKE
text_image
Diagram illustrating a droplet in a container with liquid, showing an object submerged in liquid and labeled with arrows indicating flow direction.
natural_image
Illustration of a blender with food being opened, showing the lid and side view (no text or symbols)natural_image
Line drawing of two identical portable water filters with a lid, one open and one closed, both with a hand adjusting the button (no text or symbols)KULHON KANNEN JA TERÄN KANNEN KIINNITTÄMINEN
BC151EU_Series_IB_MP1_230524_MV1
natural_image
Gray-scale icon of a play button with power and control buttons, no text or symbols presentPROGRAM:
START-/STOPP-KNAPPEN
text_image
Diagram illustrating a droplet in a container with liquid, showing an eye and droplet formation.
natural_image
Illustration of a two-step blender with a lid, showing the front and side views of the contents (no text or symbols)natural_image
Line drawing of two identical portable food containers with lid and handle, one being turned open while the other holds a small object (no text or symbols)MONTERA BEHÅLLARENS LOCK OCH BLADSKYDDET
BC151EU_Series_IB_MP1_230524_MV1
© 2023 SharkNinja Operating LLC. PRINTED IN CHINA
ENGLISH
Illustrations may differ from actual product. We are constantly striving to improve our products, therefore the specifications contained herein are subject to change without notice.
NINJA is a registered trademark in the United Kingdom of SharkNinja Operating LLC. NINJA BLAST is a pending trademark application in the United Kingdom of SharkNinja Operating LLC. BLASTBLADE is an unregistered trademark in the United Kingdom of SharkNinja LLC.
© 2023 SharkNinja Operating LLC. PRINTED IN CHINA
ESPAÑOL
© 2023 SharkNinja Operating LLC. PRINTED IN CHINA
FRANÇAIS
© 2023 SharkNinja Operating LLC. PRINTED IN CHINA
ITALIANO
© 2023 SharkNinja Operating LLC. PRINTED IN CHINA
NEDERLANDS
© 2023 SharkNinja Operating LLC. PRINTED IN CHINA
NORSK
© 2023 SharkNinja Operating LLC. PRINTED IN CHINA
PORTUGUESE
© 2023 SharkNinja Operating LLC. PRINTED IN CHINA
SUOMI
© 2023 SharkNinja Operating LLC. PRINTED IN CHINA