
TX-65MX600E - Television PANASONIC - Free user manual and instructions
Find the device manual for free TX-65MX600E PANASONIC in PDF.
| Product type | Television |
| Brand | Panasonic |
| Model | TX-65MX600E |
| Dimensions (with stand) | 275 x 1453 x 896 mm |
| Dimensions (without stand) | 82 x 1453 x 836 mm |
| Weight | 22 kg |
| Power supply | 220-240 V AC, 50 Hz |
| Power consumption (max) | 200 W |
| Network standby consumption | < 2 W |
| Screen size (diagonal) | 65 inches (165 cm) |
| Display resolution | Ultra HD (3840 x 2160 pixels) |
| Supported video formats | MPEG2, MPEG4-AVC (H.264), HEVC (H.265) |
| Connectivity | HDMI (x3), USB (x2), Ethernet LAN, Wi-Fi 802.11 a/b/g/n, SPDIF optical output, 3.5 mm headphone jack, CI+ input |
| Key features | Ultra HD 4K, HDR (HLG, Dolby Vision), DVB-T2/C/S2, HbbTV, built-in Alexa, Google Assistant, game mode, CEC/eARC, USB media player |
| Audio power output | 2 x 12 W (RMS, 10% THD) |
| Care and cleaning | Clean with a soft cloth slightly dampened with clean water or diluted neutral detergent (1:100). Then wipe with a dry cloth. Do not use solvents, alcohol, or abrasive cloth. |
| Safety | Use a stable wall mount or cabinet. Do not place on an unstable surface. Do not block ventilation openings. Keep batteries out of reach of children. Unplug during storms. |
| Included parts and accessories | Remote control, 2 AA batteries, power cord, detachable stand, stand mounting screws (M4 x 12) |
| General information | 65-inch LED TV, compatible with VESA 400x200 mm wall mount, M6 screws (depth 7-10 mm). |
Frequently Asked Questions - TX-65MX600E PANASONIC
User questions about TX-65MX600E PANASONIC
0 question about this device. Answer the ones you know or ask your own.
Ask a new question about this device
Download the instructions for your Television in PDF format for free! Find your manual TX-65MX600E - PANASONIC and take your electronic device back in hand. On this page are published all the documents necessary for the use of your device. TX-65MX600E by PANASONIC.
USER MANUAL TX-65MX600E PANASONIC
MapknpoBKn Bbpxy npOdykTa 3
IopdpbXka. 4
Panael, a dincnner. kkaΦ, nnecestan 4
Uencen 4
Crno6BaHe/EmoHTnpaHHe HnneDecTana 5
Pn n3no3BaHe Ha cKo6n 3a OkaYBaHe Ha CTeHa..5
HOpMaun 3a OKJIHaTa cpea.6
Функци.. 6
Ultra HD (UHD). 6
BnCok DnHaMnueH OxbaT (HDR) / Hybrid Log-Gamma (HLG): 6
Dolby Vision. 7
BkIoueHn akcecoapn. 7
PexnHa rToBHOCT KapTHa.7
UnpaBneHne Ha TeJeBn3opa & pa6ota 8
I3noJI3BaHe Ha IJIaBHO MeHIO Ha TeJIeBn3opa....9
IocTabaHHe Ha 6aTePmB DnCTaHcNoHHOTO ynpabVeHne. 10
Cbpb3BaHe KbM eJEnKtpnueeckaTmpeXa 10
AHTeHEn BxOД 11
YBeDOMJIeHne 3a JInueH3. 11
I3XbpbJHe Ha cTapUte ypeu n 6aTepuNTe.....12
ДeКларачиязасьтВETCTBNE(DoC) 12
Cneuufkaun 13
3a6eEckka: 14
DuctaHIOHO ynpabneHne 15
Bpb3kn 16
BknIOUbaHe/V3KnIOUbaHe 17
Pbpa HcTajaua 17
MeiHOBb3npOn3BexJaHe npes USB 19
MeiHOBb3pOu3BexKaHe 19
CEC 20
Pekim "Irga" 21
EneKtpoHNO pBkoBOdCTBO. 21
POnuHnHa MeHTo, "HaCtpoNk" 22
06u yka3aHn 3a ekcnloatauaHa TeIeBn3opa31
I3noI3BaHe Ha cncsbKa c KaHaHn 31
KoHpynpaHe Ha poNTeJcknte HacTpoNk. 31
EneKtpoHc npaBOuHnKa nporpaMnte 32
TeTetekct ycnytn 32
CoΦTyep 3a akTyaIinau 33
OTcTpaHbAHe Ha HEn3npaBHOCTN & cbBETN..... 33
HDMI CunHaHa CbBMeCTnMoCT 34
Iopdbpxan faiIOB fOpMaT BpeKIM USB. 35
Bvdeo fainobn fopmatu 35
PexHM Ha roTOBHOCT B Mpeka. 39
Bezkuyen dincpnei 39
OTcTpaHraBaHe Ha Hen3npaBHOCTn, CBbp3aHN CbC CBbp3BaHeTo 40
I3noJI3BaHe HaMpexKoBaTa ycLyra 3a cNoJeJaHe Ha ayDnO BInDeo paInObe. 40
PpuiJooKeHHa 41
InHTepHET 6pay3bp 41
HBBTV cncema 42
Alexa e rotoBa. 43
Google AcncteHT 44
HOpmaa3a DVB cyHKnOHaJHoCTTa. 45
HhOpMaun3a6e3onacnOCT

BHUMAHNE
ONACHOCT OT TOKOB YAP HE OTBAPY

BHIMAHNE:3A DA HAMAJITE ONACHOCTTA OT TOKOB

YJAPHECBALIHTE KANIKA(NJINbP6A) BBTPEHMAYACTN,KOUTOTNPEBNTEJIATDA CEPBUN3IPA.IPEIOCTABETEPMOHTUPAHETO HA KBALNFUUPAHNACEPBUN3EHIEPCOHAI.
Pn loo BpeMe (6yn, rpbMOTeBnC) n DJIg NepnoDn 6e3 PON3BaHe (3AMHabaHe B NOYbKa), INKIOUcTe TeneBn3Opa OT 3axpaHbAHeTo.
UencenbHa Ka6eNa ce n3noJ3Ba 3a n3KnOuBaHe Ha TeJeBn3Opa ot eNeKTpnuYeckaTa MpeKa n 3aTOBa ToI Tpa6Ba Da e BnHaRn rOden 3a yNoTpe6a. Ako TeJeBn3OpbT He e n3KnIOueH OT eNEKTpnuEckata MpeKa, Toi BCE OSe Ie KOHCymipa eNEKTPOeHepnB BB BCNUKN CNTyaUN, DOpN TeJeBn3OpbT Da e B pexm HA rOTOBHOCT NIN Da e n3KnIOueH.
3a6eEka: Cnebaume uHcmpykuuume Ha ekpaHa, 3a da 3adeucbame cbomeemhme yHKuuu.
BAxHO - MoI npOyeTe BHNMaTeJIHo Te3n INcTpkykCn npeDn Da INcTaJnpaTe IINn N3NoJ3BaTe ypeDa

BHHMAHNE: Toba e npedha3HaueHo 3a
ynoTpe6a OT nua (BKNIOHTeHNO deua), KONTO ca cnocO6HN/IMat ONNTa Da N3N0N3BaT TaKnBA yCTpOuCTBa 6e3 Ha3Op, OCBEN AKO He ca 6nn Ha6IIODaBAHN nn HcTpyKTnpAHN OTHO CHO yNoTpe6ata Ha yCTpoiCTBOTo OT nue, OTROBOPHO 3a TAnHATA 6e3OnaCHOCT.
- I3noJ3BaIte To3n TeJIeBUN3Op Ha BUCOuHa HauMaIko ot 5000 MeTp aHa nAdmOpCKOTO paBHNue, Ha cyxN MecTa n paioHc yMepen NII N TpONUeCKN KJIIMaT.
- TeleBn3OpbTe npedHa3HaueH 3a DomaSHA n noD6Ha yNtpe6a Ha 3akpnto, Ho MoKe da ce H3NON3Ba N ha O6eCTBeHm MecTa.
3a Do6pa BeHTnlaucn, OCTaBeTe noHe 5 cm CBO6OJHO npocTpaHCTBO OKoIeTeneBn3opa. - BeHTnlaunra He 6nBa Da ce npeKbcBa qpe3 nocTabrHe Ha npEdMeTu KaTo BECTHnU, NOKPNBKn, Jeka Me6eI, nepDeTa, KINIMN INpOChne Bbpxy INJN 6noknpaHe Ha BeHTnlaunOHnTe OTBOpN.
- Μεπεζβτ Ḁ 3αхpaHbaùnq Ka6e Πρ6Ba da e IecnoocTbneH. He nocTabraIte TepeBn3opa, Me6eI NII dpyro BbpxU 3αxpaHbaùnq Ka6eI ΠobpeDen 3αxpaHbaùk Ka6eI/μenceI Moxe da npedeN3BnKa noXap II N Da BN yDapN TOKOB yDap. XbaaIte 3αxpaHbaùnq Ka6eI 3a μeNceIa, He n3KJIuYBaIte TepeBn3opa KATO dBpNaTe 3αxpaHbaùnq Ka6eI. Hnkora He doKocBaIte 3axpaHbaùnq Ka6eI/μenceIa C MOKpn pbCe, TbN KATO TOBA MOKe Ia npeDiN3BnKa KbCO cBeDInHeHne IIN TOKOB yDap. Hnkora He npabete Bb3eI Ha 3αxpaHbaùnq Ka6eI N He BpB3BaIte C Hero dpyrN
Ka6eH. Ako ca NOBpeDeH, CMeHeTe rH He3a6abHo, KoETo Tp6Ba Da ce N3BbPshn OT KBaIuΦnUpaH nepcoHaJ.
He n3nparaTe TeJeBn3Opa Ha KaIKn I npbckn OT TeuHocTn H He NoCTaBraTe PpeDMeTn, PbLNc C TeuHOCTn, KATO HApPImep Ba3N, YaSiN, N T.H. Bbpxy nn NaD TeJeBn3Opa (HaPpImep Ha paΦTOBe HaI TeJeBn3Opa).
- He n3jarate TeleBn3opa Ha npraKa cIbHueBa CBETInHa nn He NoCTaBraTe OTKpNTn PImbucn, KaTO HApPIMep 3anaJIeHN CBeU, BbpXy rOpHata Yact Ha nn 6nn3o Do TeleBn3opa.
He noctabrayte n3tohncn Ha tonnnha, kaTo Hanpimep eJektpnueckn neukn, paanatopn np. 6n3o do TepeBn3opa.
He nocTabraTe TeJeBn3Opa Ha noJa nn Bbpxy HAKIOHEH NOBbpxHOCTN.
3a Da H36erHete OnachocTta OT 3adyuBaHe, DpbkTe HaIIOHOBnTe Top6nKn Ha MeCTa, Tpydnooctbnn 3a 6e6eta, Deua I Domaunn KINBOTNI.
BHHMaTeJIHO npIKpeNeTe cToKata KbM TeJebu3Opa. Ako cToiKaTc ce DoCTaBc 6oNTObe, 3aterHeTe 6oTobTe 3dpaBO, 3a da npedna3nte TeJebu3Opa OT naHaHe. He npesatraIte 6oTobTe n MOHTpaTe npabUNHO rymenTe noDnOxKn.
- He n3xBbpyIe 6aTeepnIe B orbH nIIN 3aeDHO C onacn H 3apaJIMM MaTepeJauJN.
BHIMAHNE
- BaTePnIte He Tp8Ba Da ce n3NaRaT Ha npEkoMePha ToJIHa, KaTo CJIbHueBa CBeTIHa, OYbN IpyrN noo6Hn.
- IpeKomepHOTO 3ByKOBO HaJIraHe OT CnyuJaIKNTe MoKe Da npUHH 3aRy6a Ha Cnyxa.
IPEIN BCNUKO - HNKORA He no3BOJBAuTe Ha HnKoro, ocObeHO Ha deca, da HATNCKaT nn ydpT ekpaHa, da NOCTaBt PpeMeTN B Dynknte, cNOTOBete NN OTBOpNTe Ha KytTnTa.
| Вииманио н н н н н н н н н н н н н н н н н н н н н н н н н н н н н н н н н н н н н н н н н н н н н н н н н н н н н н н н н н н н н н н н н н н н н н н н н н н н н н н н н н н н н н н н н н н н н н н н н н н н\/ у д р . \ . . . . . . . . . . . . . . . . . . . . . . . . . . . . . . . . . . . . . . . . . . . . . . . . . . . . . . . . . . . . . . . . . . . . . . . . . . . . . . . . . . . . . . . . . . . . . . . . . . . . . . . . . . . . . . . . . . . . . . . . . . . . . . . . . . . . . ; . . . . . . . . . . . . . . . . . . . . . . . . . . . . . . . . . . . . . . . . . . . . . . . . . . . . . . . . . . . . . . . . . . . \. \. \. \. \. \. \. \. \. \. \. \. \. \. \. \. \. \. \. \. \. \. \. \. \. . \. \. \. \. \. \. \. \. \. \. \. \. \. \. \. \. \. \. \. \. \. \. \. \? \. \. \. \. \. \. \. \. \. \. \. \. \. \. \. \. \. \. \. \. \. \. \. \. \? . \. \. \. \. \. \. \. \. \. \. \. \. \. \. \. \. \. \. \. \. \. \. \. \. \. \. \. \. \. \. \. \. \. \. \. \. \. \. \. \. \. \. \. \. \. \. \. \. \. \. \. \. \. \. \. \. \. \. \. \. \. \. \. \. \. \. \. \. \. \. \. \. \. . \. \. \. \. \. \. \. \. \. \. \. \. \. \. \. \. \. \. \. \. \. \. \. \. . \. \. \. \. \. \. \. \. \. \. \. \. \. \. \. \. \. \. \. \. \. \. \. \/. \/ \/ \/ \/ \/ \/ \/ \/ \/ \/ \/ \/ \/ \/ \/ \/ \/ \/ \/ \/ \/ \/ \/ \/ \/ \/ |
MapknupobkN Bbpxy npodykTa
CneHnTe CmB0JIe Ce n3NoJ3BaT Bbpxy npOdyKta KaTo MapKe 3a OrpaHnueHn I npEJa3Hn MepKn N yKa3aHnra 3a 6e3OnacHocT. BcAko o6rCheHne Tp86Ba Da ce B3eMe npEdBnD cAmo TaM, KbDeTO Bbpxy npOdyKta NMa CbOTBeTHaTa MapKnipOBka. B3eMeTe Ta3n INΦOpMaunr npEdBnD OT Cbo6paJxHn 3a CNrypHOCT.

O6opyDbAhe ot KnaC II: To3n ypeIe npoeKtnpaH no TaKbB NaunH, ye da He n3nCKBa npedna3Ha Bpb3Ka KbM 3a 6e3oNaChOCT KbM eJekTpueeCKOTO 3a3emBaHe.

OnaceH TePmHaHa XnBO: MapKupaHnT(Te) n3BoD(n) e/ca onaceH(n) φa3a(n) npH HopMaHn ycNoBn Ha ekCnIooataqna.

BHHMaHHe, BHXTe HNCTpyKcUNTE 3a yNoTpe6a: MapKnpaHata(NTe) 30Ha(1) cbDbpxKa(T) 6aTePnC cOpMaTa Ha KOnYe/ KNeTKa, KONTO NOTpe6nteJrT MoKe da 3aMeHr.

Ja3epen npoodykT KnaC 1: To3n npo4yKT cbDbpxka Ja3epen n3TouHKnKnaC 1, KOInTo e 6e30naceH npn HopMaJIHH ycNoBnHa ynoTe6a.
BHHMAHNE
- He rbIaIte 6atepnaTa, cbIeCTbByBa onaCHOCT OT XIMnuecko n3rapaHe
To3n npOdyKT, nIIN BkJIIOUeHInTe B o6ema Ha doCTaBkata My akcecoapu, Moat Da cBdbpxKat 6aTepeN rTn Ta6Netka/6yToH. Ako 6aTepeNraTa 6bDe IOBJHaT, TOBa MOxE Da IpeDn3BnKa TeKKn BbTpEshn N3rapAHHa B pAMKeTe Ha 2 Yaca N MoXe Da DOBeDe Do CMBpT. - Pana3eTe HOBnTe n yIOTpe6BaHnTe 6aTePn nn daJeue ot Deua.
Ako otdeleheneto 3a 6atepnaTa He ce 3atbapdobpe, cnpete Da n3no3BaTe npOdykTa n ro dpbxTe daenee OT deua.
Ako MncJInte, ye cTe nOrbJHaJIu 6aTepuNTe nn CTe rN NOCTabUNI , KbDeTo N da 6nIO B TAnOTo CN, NotbpcTe He3a6abHO MednUHcKa NOMou.
TeIeBn3OpbT MoKe Da NaHe N Da npuHn CepNo3Hn HapaHbAHn IIN cMbpt. MHoro HapaHbAHn, OcO6eHO npi DecaTa, Morat Da 6bDat n36erHaTn C B3ImaHe Ha IpocTN ppeNa3HN MEPKn, KaTo HAnp.;
BINHAN n3noJ3BaIte ukafoBe nn cToKn nn MeToOn 3a MOHTax, npenopbuaHN OT pOn3BOUInTeNa TeNEBu3Opa.
BUNHn n3noN3BaIte Me6eJIn, KOITo cNoKoHOMorat da noDnbPkaT TeJeBu3opa.
BUNHAN CE yBepTe, Ye TeNebu3OpbT He HaDbucBa pb6a Ha HoceseaTa Me6eJ.
BUNHAGn 6oyuabaTe deaTa 3a onacHOCTNe OT KaTepeHeTo No Me6eN, 3a Da DOCTnHaT Do TeJIeBn3Opa IIN KOHTpOInTe My.
BINHAN Cbbp3BaIte MappTyHn n dpyrN Ka6eJI NkBM BaIIra TeJIeBN3Op, Taka Ye Da He MoRat da Ce cnbbAT, n3DbPbBAT nn XBaUaT.
- HNKOΓA He nocTaBryTe TeNeBu3Opa Ha HeCTa6nHa OCHOBA.
- HNKOFA He noctabraIte TeJIeBn30pa Bbpxy BnCOKN Me6eN (Hanp. ⅢkaΦObE nII N 6n6nIOTeKn), 6e3 Da CTE 3axBaHaJI N HeNoDBrXHO camITe Me6eN i CTOnKaT a Ha TEJIeBn30pa.
- HNKOFA He nocTabraIte TeleBn3opa Bbpxy nnat nn
- dpyrMaTePnaI, NoCTaBeHm MExdy TeJeBn3opa N
- Me6eINe, KOIO CnyKAT 3a HerOba Onopa.
- HNKOFA He nocTabraIte npedMeTu, KOnto 6nxa MOrn Da n3KyuwaT deuata da ce KATEpT, KaTo IrpauKn i DnCTaHcNoHHO ynpabNeHne, Bbpxy RopHaTa Yact Ha TeJeBn3Opa Hnn Me6eJNTe, Bbpxy KOnto e NoCTaBeH TeJeBn3OpT.
- 06opydBaHTo e nOxOJaIcMo 3a MoHTaK Ha BncoUHa ≤ 2 m.
Ako cbuectbvaunr TeeneBn3Op 6bde 3ana3en npemecTe, TpaBa da ce npnilarat cbuTe cbo6paxeHn KaTo nO-rope.
Upei, KOITcBb3aH CbC 3aHTHO T3aEMBaHe Ha cIpaHaTt HCTaIauNg Upe3 Ka6JIHa Bpb3Ka IINI pE3 dpyr Upei, IMaU 3aUNTHO 3aEMBaHe, KAeIO N KbM TeJEBn3NOHHa pa3npdeJEA CNTema, IN3IOJ3BaUa KaOKcnAJeH Ka6eI, MOKe B HraKoI CNyAn Da Cb3dAte onachocT OT NOXap. CBbP3BaHTo KbM CNCTema 3a TeJEBn3n CNEIOBAteJIHO Tp8Ba Da ce OCNpyu Upe3 ycTpoIcTBQ, KOeTO OCNpyraBeNeKTpUeCKa N3OJaN IO nOppeJeH YecTeH Dnana3OH (raIbAHnueH n3Onatop)
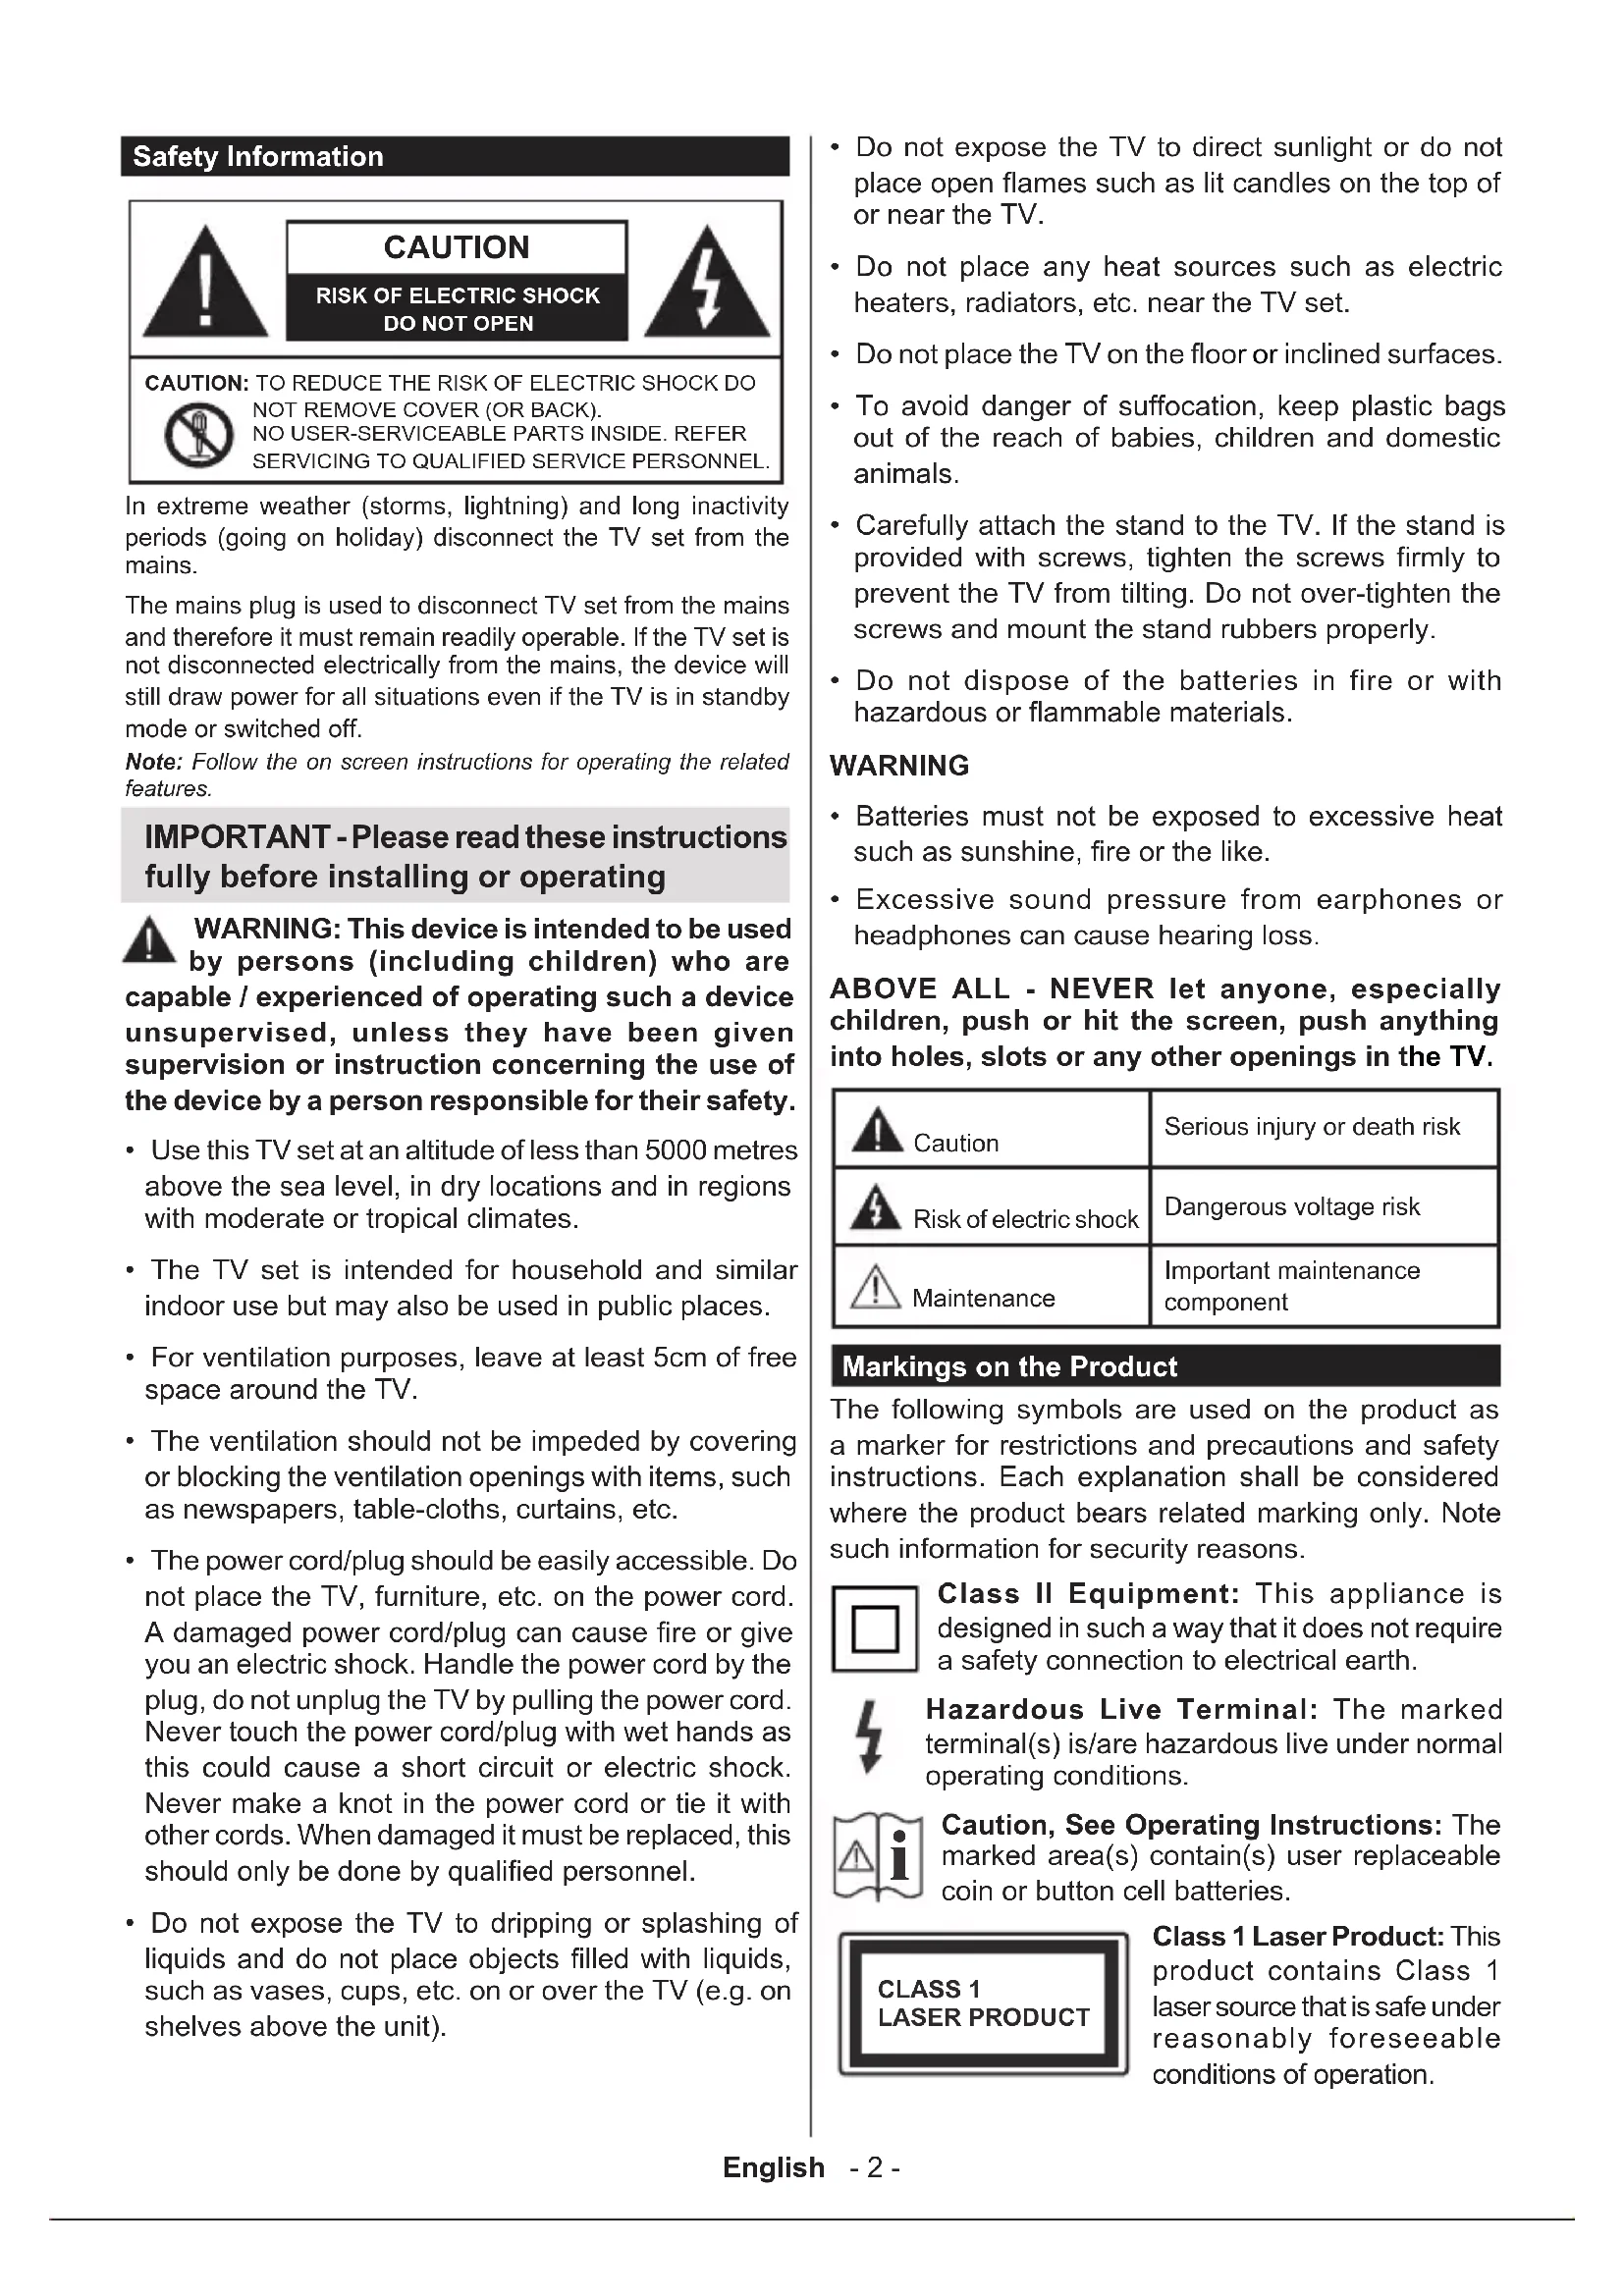
ИНСТРУКЦИ 3A MOHTИРАЕ HA CTEHA
-Прочerte Инстукциnte,прдд моHTираTe TeJIeBn3Opa Ha CTeHaTa.
KOMJIeKbT 3a MOHTax Ha CTeHa He e 3aIbJINrTeJeH. MoKeTe Da ro 3aKynTe OT MeCTHnA DInbp, TbN KaTo He e BkIOUeH B O6ema Ha DOCTaBka Ha TeJIeBn3opa.
He moHTnpaTe TeJIeBn3Opa Ha TaBaHa NJIH HAKJIOHEHa CTeHa.
- ɪnəʊlɪbærɪte cneɪnaɪhɪte 6ɒlɪtəbe 3a Moɪtʌk Ha CTeHATA, KAKTO n ἀργιnte akcecoapu.
3aTeHHeTe 3dpaBO 6oJTOBete 3a MOHTax Ha CTeHaTa, 3a Da npedna3nte TeIeBu3opa oT naJaHe. He npesatraTe 6oJTOBete.
- I3noJI3BaHETO HaIpyrBn BucAun Ha CteHaTa CkO6n HIN CAMOCToTeJHOTo MOHTnpaHe Ha CTeHHata KOH3OJa KpNt pNCK OT HapaHBAhe N NobpeDa HA npOdyKta. 3a Da nOdbpXate epeKTNBHOCTTa N 6e3OnacHOCTTa Ha ypeDa, nomoneTe Baun
TbproBeu nIIN JIuceH3npaHa 0npMa da 0nKcnpa BnCraUnte Ha cTeHata cko6n. BcnuKn uetn, npuHHEno OT MOHTax 6e3 KbannuHnucpaHo JnXe aHynnaprapaHua.
BHHMaTeJIHo npOeTe HNCTpyKcHnTe Ha DonbJHnTeJHnTe akcecoapn n ce yBepTe, Cte B3eJI N BCNUKm MepKn, 3a da npedOTbpaTnTe NaandaHTo Ha TeIeBn3opa.
- IIO Bpeme Ha MOHTaJa DpbXTe TeJIeBn3Opa 3IpaBO, TbJ KaTO yDpRHeTo My IIN IpnIraHTo Ha IpyrCINN Bbpxy HrO MoKe Da r O nobpeDi.
BHHMaBaTe KOraToΦnKcnpaTe CkObnte 3a MoHTax Ha cTeHa. Ppei Da MOHTnPate CkObnte Ha cTeHaTBAHarN Ce yBepraBaiTe, Ye BCTeHaTa Hma eJeKtpueeKn KaBeN nn Tpb6n.
- 3a Да ИЗБERHETe паде ИПИ НараяВаHe, CBANETeJIeBUN3Opa OTeHaTа, AkO HЯMaДЯ ГИЗПОЛ3BaTe.
Hnrgpnte H nIOCTpaCNIte B TOBa pBKOBOcTBO 3a ekCnloataa ca cAmO 3a cnpaBka N MORa T da ce pa3nuaBAt OT DeiCTBNTeHNbN Ha npOdykTa. Dn3aHbT N CNEuΦnKaaCNIte Ha npOdykTa MORaT Da 6bDat npomehHi 6e3 npEiN3BecTne.
PnDpBxxka
PbBO n3KJIHcyTe 3axpaHBaunKa6eI OKTaKA.
Pahen, a dncnpe. wkaf, nnecectan
PeDOBHa rpnka:
BnmaTeHNO n36bpwe Te NOBbpxHocCTTa Ha naHena Ha dncnner, kkaopa nn pneJeceTana c NOMOuTa Ha MeKa Kbpna, 3a da OTcTpaHnte Mpbcotra N OTneaTbcnte OT npbctn.
Pnynopntn netha:
- Пьрв почесе прахта OT NOБьрховстта.
- Notonete Meka Kbpna B ucta Boda nnpa3pehen Heytpanen npenapat (1 act npenapat KbM 100 qactn Boda).
3.ИЗцeTe Te KbpNaTApOKpaB.(BnHmBaIte B TeJIeBn3Opa Da He INonaIHe TeUHOCT,TK KaTO TOBa MoKe Da IOBeDe Do HrOBOTo NOBpeXdaHe.) - BhimateJHNO HabnaXHete n OCTpaHete ynpuTata Mpbcotn.
- Hakpar n36bpuTe Blarata.
BHIMAHNE
He n3noJ3BaIte TBbpda Kbpna Hn TbpKaITe NOBbpxHOCTTa TBbpDe CnHNO, B npOTnbEh CnyaI NOBbpxHOCTTa MOKe Da Ce HaIpaCa.
- IorpnkTe ce da He n3JaIate NOBbpxHOCTnTe Ha npenapat npOTNB HaceKOMN, pa3TBOpNTeIN, pa3peDITeIN nn DpyrN neTJINB BeuecTBA. ToBa MOKe Da yBpeDN KauecTBOTo Ha NOBbPxHOCTTa NN da npuHHn OBeJIbaHe Ha 6oTa.
-ПовьрхнocтпаHa ekpaання панe сспuaиноТретираи И може Лесно DA 6ьд e NOВpedeha.Вимаиte Да He DoKOCBaTe Nn N3ДpackaTe TeNEBn3Opa C HOKTN INN DpyrN OCTPN PpeMTeN.
He no3B0JBAIte Ha Kopnyca n IneJeCTaJa, 3a BIn3a B KOHTaKT C rMa INI pNactMacoBN BeIeCTBa 3a Dbliro BpeMe. Toba MoKe Da yBpeNi KaYeCTBOTO Ha nobbpxHOCTTa.
Wencen
PepOBHO n36bpcBaIe TcncceJa cbc cyxa Kbpna.
BnaraTa n npaxTa Morat da npuHrT noXap nn TOKOB yap.
Crno6BaHe/deMOHTnpaHe Ha nIeDecTaJa
NoIroTOBka
I3BaTe Te nneDectana (nte) n TeNeBn30pa OT onaKOBkata NocTabeTe TeneBn30pa Bbpxy pa6oTHa Maca C ekpanHa HaOny Bbpxy NcTa n MeKa Kbpna (OdeJNo, n T.H.)
- ɪЗнолзBAиTe ПлOCKа И TBьрДa Ма са NO-гOLЯмоТ TeJIeВИЗОпа.
- He ДрьжтЕ Телевизopa 3a ekpaHa.
BHHMaBaIe Ta He HaIpaKate Nnn Cuynnte TeneBu3opa.
BHIMAHHE: Mon, 6b30pkaume ce om nocmahe Ha u3o6pa3ehu eunmoe KbM Kopnyca Ha meeneu3opa, Ko2amo He u3non3ame cmoukama Ha meeneu3opa, Hanp. Okaybahe Ha cmeha. NocmaHemo Ha eunmoe 6e3 nodcmaeka moke da npuunu noepeda Ha meeneu3opa.
Crno6BaHe Ha nnepeTana
- Noctabkata Ha TeJIeBUN3opa Ce CbCTOn OT DBe Yactn. INcTaNpaIte Te3n Yactn 3aeDNo.
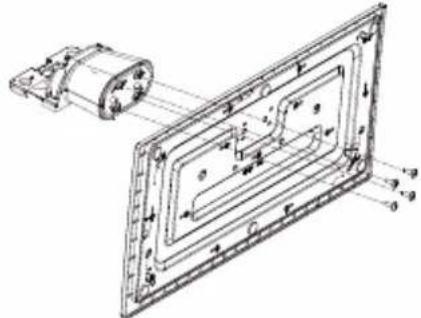
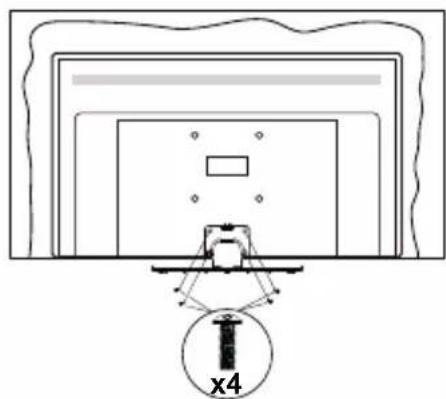
- NocTabete cToiKaTa(NTe) Ha rbp6a Ha TeJIeBn30pa.
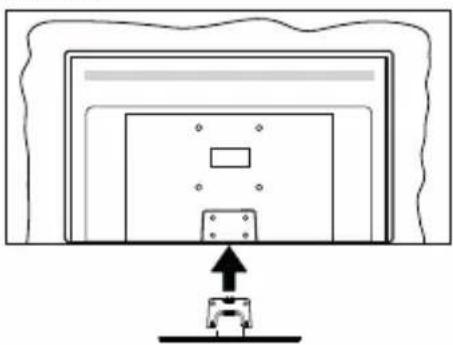
- NocTabete BnHTOBete (M4 x 12) BKIOUeHN B DOCTaBkata, IN 3aTeHHeTe BHIMaTeJHO, DOKATO MOHTnPate npabUNHO CToKata.
ДемоHTиране Ha ПиЕдстana OT TeJIeBn3opa
YBepete ce, ye cTe demoHTnpaII nneJeCTana no CJIeHnHaun, IN3noJ3BaIKN cKobata 3a OKaUbaHe Ha CTehata IIN NaKeTnpaIte OTHOBO TeLEBu3opa.
- NocTabete TeJIeBn3opa Bbpy pa6oTHata Maca c ekpaHa HaOJy Bbpy uCTa n MeKa Kbpna. Octabete cToiKaTa(HTe) da N3TbpyaT N3BbH pb6obete Ha NOBbpxHOCTTa.
Pa3BnTe BnHTOBeTe,ΦnKcnpaun CToiKaTa(nte). - CHEMETe cToiKaTAt(NTe).
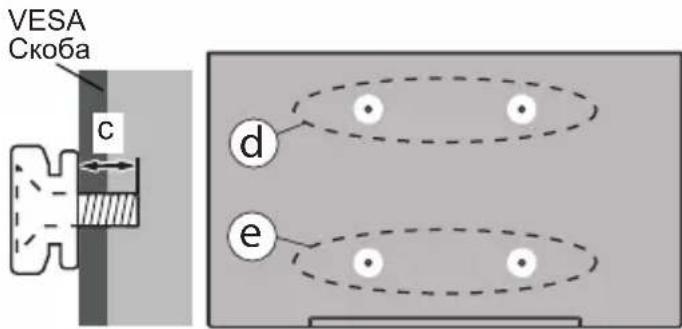
Ipn n3noJ3BaHe Ha cko6n 3a OKaYBaHe Ha CTeHa
Mon, cBbpxte ce c Baunn npeDctabnten Ha Panasonic, 3a da 3akynnte npenopbnuTeHHte cko6n 3a okayane Ha cTeHa.
DyNk3a MoTax CbC CKo6n 3a OKaYBaHe Ha CTeHa;
Pb6Ha TeBn3opa
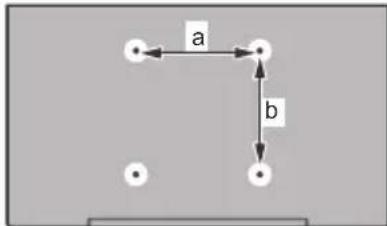
| 43”50 | "55"65" | |||
| a (mm) | 100 | 200 200 | 400 | |
| b (mm) | 100 200 | 200 200 |
I3rneOToCTpaHn
CmHa Ha KaHaJIte N IpomHa Ha CnJaTa Ha 3Byka
MoxTe Da npOMeHnTe KaHaJa N da HaCTpOnTe CnJaTa Ha 3ByKa KaTO n3NoJ3BaTe 6yToHnTe Programme +/- n Volume +/- Na DnCTaHcUHOHOT ynpaBneHne.
HylnpaHe n n3KJIIOUBAHe ype3 6yTOH 3a roTOBHOCT
HaTnCHete n 3aDpBxTe 6yToHa 3a roTOBHOCT, 3a da BnNTe DOnbHInTeJHn DeIcTBnA 3a To3n 6yToH. Ue 6bDat HaJIuHuN OUcN 3a HynipaHe (peCTapTnpaHe), pexHM Ha roTOBHOCT (HOpMaJeH peXMM Ha roTOBHOCT) n N3KnIOuBaHe Ha 3axpaHbaHeTO (PpHydnteJeH peXMM Ha roTOBHOCT). MapKpuAte eNo n HaTnCHete OK, 3a Da n3BbPunTe n36paHOTo DeIcTBne. Ako Bb3HNKHe npoblem, KOHTo He No3BOJRA Ba Ha TeLEBUN3Opa Da npemHne npabINHO B pEXMM Ha roTOBHOCT, MOKeTe Da n3NOJ3BaTe ONcJraTa 3a N3KNIOUcBAHe, 3a Da npHydnte TeLEBUN3Opa Da npemHne B pEXMM Ha roTOBHOCT.
Ako Baunr TeBn3Op cnpe da OTRObAp Ha KOMaHn
m MeHTo 3a DeiCTBna He MoKe Da ce NOKaKe,
TeBn3OpbT Ue 6bDe PnHydEn Da ce pectapTnpa,
Korato 6byOnbT 6bDe HATNCHaT 3a OKONo 5 cekyHn.
ToBa Ue npekpatn npouceca.
N3nON3BaHe Ha rnaBHOTo MeH0 Ha TeJeBu3Opa
Ako 6ytohT Home (Hauano) e Hatachat, rnaBHOTo MeHIO Ha TeIeBn3Opa ige Ce NOBn B Ha ekpaHa. MoKeTe Da HaburnpaTe npes elemehnte Ha MeHIO, KATO n3noJI3BaTe 6ytoHnte 3a HacoUbaHe Ha yCTPOcTBOTo 3a dNCTAHNoHHO ynpabInHe. 3a Da n3bepete enemet nn Da BVNTe ONUNTe Ha NOdMeHIOHO HA MapKupaHOTo MeHIO, HATNCHE6yTOHa OK. Korato MapKupate ONUra OT MeHIO, HAKON OT elemehnte Ha NOdMeHIOHO TOBA MeHIO MORaT da CE NOBRT B TropHaTa NN DOJHATA CTPaHa Ha JeHTaTa C MeHIOTA 3a 6bp3 DoCTbn. 3a Da n3noN3BaTe No3uYrTa 3a 6bp3 DoCTbn, MapKupaTe r, HATNCHE6 OK n HactpoiTe cnped npednoHTAHnTa Bn c 6ytoHnte HanraBO/HadrcHo. CneD kato npNKIOHTe, HATNCHE6 OK NnHa3a/BpBuaHe, 3a Da n3Je3eTe. Korato ce NOdueptae npINOxKeHNTo Netflix (ako e hAnuHo), npenopbknte ige ce NOKa3Bat IO cbuHa NaHH KATO elemehnte B NOdMeHTO. Ako Beue cTe BJe3nB aKayHTa cn B Netflix, ige ce BvXkdT nepcoHaIIIN3npaHn npenopbkn.
Moxete cBto Da Bnnte HOpmaun 3a MeCTOnOToXeHHeTO,BpeMeTO,YacaN DaTataHa ekpaHa Ha TnABHOTo TeJIeBn3NoH0 MeHIO.3eJeHNTe MaIKN IKOH NOKa3BaT KeYUTo CbCToRHe Ha BpeMeTo, MpeXata NcHxpoHn3InpAHeTO 3a npINOKeHn.AKO Te3N IKOH Ce NOBRT B 3eJEno, TOBa O3NaUba, Ye INHOpMaunraTa 3a BpeMeTo e AKTyAnu3InpAHa, MpeXata e CBbp3aHa N CnHxpoHn3InpAHeTo e 3aBbpSeHo ycNeuHO.B IpOTnBeH CnyaI INKOHTe ige Ce NOBRT B 6yNo.
B 3aBnCmOcT OT n36opa Ha dIbpxkaba, HappaBEN IO BpeMe Ha IbPbAta IHCTaIauzna, INHΦOpMaIraTa 3a EKcIIoatauHOHHN JxVBOT Ha TeJIeBn3Opa B YacOBe MoKe Da 6bIe NOKa3aHa Upe3 HA TnCKaHe Ha 6yToHa Home i Cnei TOBa CNHn 6yToH. 3arpIXeHN 3a KaueCTBOTo Ha HaUNTe PPOdYKTn, TeJIeBn3OpITe ce NoIparat Ha CTporn PPOBepKn, PpeNi Da 6bDat NychaTi Ha Na3apa, NopAdn KoEt e Bb3MOXHo Ta3N CTOnHOCT Da He e paBHa Ha O IO BpeMe Ha IbPbN MaHTaX.
HaTnchete 6yToHa N3xoD, 3a Da 3aTBOpnte n 13ne3eTe.
1. Hauano
Korato rnaBHOTo MeHoe OTBOpeHo,JeHTata Ha MeHIO Hauano,ue ce Mapknpa.CbIbpxKaHNeTO Ha MeHIO To Hauano MoKe Da 6bIe nepcoHaUN3npaHO.3a da HappaNTe TOBa,OTNDTe B MeHIO To HA TeJIeBN3Opa, MapkpaiTe onuTApTa PedaKTnPaHe Ha Hauano n HATnCHete OK.MehIo Hauano ige npEbkJIOvN B pexmHa pdaKTnPaHe MOKeTe Da n3TpneTe IIN npOMEHte NO3nCnTA Ha KOITOn N da e ENeMHT B MeHIO To Hauano. MapkpaiTe onuHa HATnCHete OK.N36epTe IKoHATA 3a n3TPnBaHe INn IpemecTbaHe n HATnCHete OK.3a Da IpemecTnTE eENeMHT OT MeHIO, N3NON3BaTe
6byOnHte 3a Nocoka HadaCHO, HalaBO, Harope n HaOny, 3a Da N36epTe N03nUraT, B KOrTO NCKate da ce npemectn enemehtbT, n HatncheT OK.
MokTe cIIO da doabnte onuIN OT dpyr MeHToa KbM HauJIHOTo MeHIO. IpocTo MapKnpaIte OUnra HaTNCHeTe 6yToHa 3a NocKa Harope nIn HAnOly Ha DnCTaHcNHOHOTo. Ako BnDInTe OUnrTa DoabAne KbM HauJIO, MokTe Da rdoabnte B HauJIHOTo MeHIO.
2. TbpcHe
Moxete da Tbpcnte KaHJI, nbTeBOOnTeJ, TeNEBn3NOHN MeHOTa, npINOxKeHn, ye6, YouTube n BnDEOKNIOBE, kaTO n3NoJ3BaTe Ta3n OOnu. Hatnche OK n BbBeDeTe KIOUOBA dyma Upe3 BnPTyAnHaTa KnaBnAtya. CneT TOBa MapKnpaIte OK n HATNCHeT OK, 3a Da 3anOHTe TbpcHeTo. Ha ekpaHa Ie ce nokaxat "Pe3yIITaTI". N36epete XeJaHnpe3yIITaC nOMoTuHa ha 6yToHIne cbc CTpeKNi HATNCHeT OK, 3a Da ce OTBOpN.
3. TV
3.1.PbKOBOIDCTBO
C nOmoUtTa Ha Ta3n OOnu MoXeTe Da nonyUnTe DoCTbN DO MeHIOTo 3a eNeKTPoHHN CnpaBOUHk Ha npOrpaMITE. 3a DOnbJNHITeJIHa INΦopMaun BxKTe pa3dE NEnKTPoHEn nporpaMeH cnPaBOUHk (ENC).
3.2.KaHann
C nOMOuTa Ha Ta3n OOnuN IMaTe DoCTbN Do MeHIO KaHaJI. 3a DOnbJIHHTeJIHa HOpMaUra BIXKTe pa3dE N3non3BaHe Ha CnncBka C KaHaJI.
3.3.TaMepn
Moxete da 3aadaTe TaMepn 3a 6bdeu Cb6ntna, KaTo n3no3BaTe onuHte B TOBa MeHIO. Moxete cBto Taka da npereJeate Cb3daeHHTe NO-paHO TaMepn B TOBa MeHIO.
3a Da Do6abTe HOB TaMep, n3bepe Ta3deI Do6abAne Ha TaMep c NOMOuTa Ha 6yToHa HAJABo/HaJrAChO HATnCHete 6yToHa OK. HAcTpoNe XeJAHnte OT Bac ONUInTe HA NOmEHOTOn CJIeD TOBa HAtNCHeTc OK. Ue ce Cb3daJe HOB TaMep.
3a da peDaKTnPaTe npEnuHo cb3dAneH TaMep, MapKnpaTe ro, n36epTe pa3deI PeDaKTnpaHe Ha n36pan TaMep H aTnCHeTe OK. IpomHeTe onuNTe Ha noDMeHTo Cnopei npedNoHTaHnTa Bn H aTnCHeTe OK, 3a da 3anamEtBe BaunTe HacTpoKn.
3a da OTMeHnTe Beue 3aJaDeH TaMep, MapKnpaIte ro, n36peTe pa3dena N3TpNBaHe Ha n36paH TaMep HnHaTnCHeTe OK. Ie ce noBn ekpan ce noBBAcbObSeHne 3a notBbpxJdeHne. MapKnpaIte DA nHaTnCHeTe OK, 3a Da npoDbJnxTe. TaMepbT Ie ce OTMeHn.
He e Bb3MOxHO da 3aadaTe TaMepn 3a DBe Hnn NOBuec b6uTna, KOnTO ue ce n3IbYBaT no eHaKBN KaHaN B eINH N CbUe INHTepBaN OT BpeMe. B To3N
cnya n 6bTe HOpMnpaHn TaMeBt 6bDe OTmeHeH.
3.4.PedaKtnpaHe HaHaayanHaTa cTpaHua
Moxete da nepcoHaJIIN3npaTe cBdbpKaHneTo Ha HauaJIHOTo MeHIO, KaTO n3NoJ3BaTe Ta3N ONuJ. MapKupaIte n HatncHeTe OK. MeHIoTo Haayano ige npEeBKnOuN B pexm Ha peJaKTnpaHe. 3a noDpo6HocTn BVXTe pa3deJa HauaJo.
3.5.Osue npuiokeHn
3a da ynpabnbaTe npnoxehnTa, nHctanpaHn Ha Baunr TeNeBn3Op, Moxe Ta n3noN3BaTe Ta3n ONu. MapkpauTe n HATNChe TE OK. Moxe Da do6abnte IHCTaHpaHO npnoxehne B hauaHOTo MeHIO, da ro cTaptnpate nn npemaxhete. MapkpauTe npnoxehne n HATNChe TE OK, 3a da BNNTe BCNUKn HAUNHN ONUIN.
3.6. Na3ap
Moxete da do6abrte HOBn npINOxehn O T mara3Ha 3a npINOxehn n3no3Baikn Ta3n onu. MapkpauTe H Hatnche TE OK. Ie ce nokaxat hauNHTe npINOxehn. Moxte cbo Taka da noJyHtE doCTbI Do na3apa ot MeHTo OSe npINOxehn.
3.7.HynipaHe Ha npinloKeHHa
MoKTe Da Bb3CTaHOBtte HAcTPOIKnTe Cn B MeHIOTo Haayano Do HAcTPOIKnTe No NpOpa36bnpaHe, KaTO n3PON3BaTe Ta3n OOnu (HaNHyOCTTa 3aBnCn OT MoEJa Ha TeNeBn3opa N HerOBtne FyHKun). MapKupaTe n Hatnche TE OK. Ue ce noRbN ekpan ce NOBRA cbo6ueHne 3a NOTBbpxJeHne. MapKupaTe DA n HATNCHEoK, 3a Da npOdbJXnTe. ObbpHete BHIMaHne, Ye HMa Da MOKTe Da n3BbPUnTe Ta3n ONepaun OTHOBo B pAMKInTe Ha CneDbAunTe HAKOJIKO MNHyTu.
3.8. DocTbNHOCTTa
Mokete da noJyHnte DocTbI Do MeHIO To 3a HAcTpoKnHa DoCTbNHOCTTa DnpeKTHO C NOMOI Ta Ha Ta3n ONU.
3.9.ПичнНЯстpoйк
Moxete da noJyute DocbIg MeHTo 3a HacTpoKn Ha nobepntenHOCTTa dIpeKTHO C NOMOuTa Ha ta3n onu. Ta3n onu MoKe Da He e HaJIuHa B 3aBNCIMoCT OT MoeJa Ha BaWn TeJeBu3Op n U36paHaTa DpbXaBa No Bpeme Ha PbPBOHaayHOTOnHCTaJInpaHe.
4. HactpojuKu
MoXeTe Da ynpabJbAte HAcTpoKnTe Ha Baunr TeJIeBn3Op, KaTo n3NoJ3BaTe OOnnTe B TOBa MeHIO. 3a DonbNHnTeJHa NHΦopMaunr BnXTe pa3dEn CbIbpxaHne Ha MeHOTo 3a HAcTpoKn.
5.И3TOUHnIu
Moxete da ynpabBate npednoHTaHnra Ta H BxODHnte n3TOUHNu, KaTo n3NoJ3BaTe ONuNTe B TOBa MeHIO. 3a Da CMeHnte TeKyuIINr N3TOUHNK, MapknpaTe HAKO rT ONcInTe HATNCHEt OK.
5.1. HacTpoKn HaN3ToUHnka
Moxete da noJyHnte doCTbN DO MEHIO Tc HAcTPOKn Ha n3ToUHnKa DnpeKTHO C NOMoUta Ha Ta3n OOnu. PedaKTnpaTe NMeHaT, AKTNBpaIte Nn DeakTNBpaIte n36paHnte OOnu 3a n3ToUHnKa. CbueCTByBat n Onu N PeoBeH, YcUnEn Nn DeakTNBpan 3a HDMI n3ToUHnCtne. OOnuNTe PeoBeH yCUnEn BInrAHT Ha HAcTPOkKaTa Ha Ubeta Ha n36paHna HDMI n3ToUHnK.
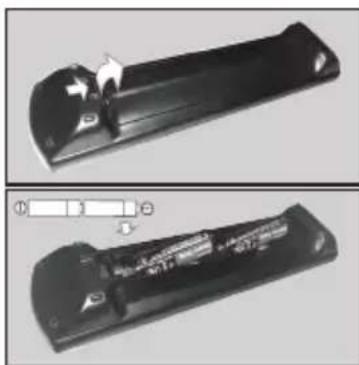
IocTaBHe Ha 6aTePm B DnCTaHcNoHHOTO ynpaBneHne
CbaTe 3aHnKaK, 3a Da HMaTe DoCTbN Do OTdJeHHeTo 3a 6aTePnte. NocTabeTe DBe 6aTePn C pa3Mep AA. YBepTe ce, ye 3HaunTe (+) n (-) cBnadT (cnaTe npabnHnnoJnPaTET). He n3non3BaIte eoHOBpeMeHHo CTapn n HOBn 6aTePn. 3aMeHnTe camo cbc cbuHn nn EKBVBanEHTeh TIn. NocTabeTe o6paTHo KanaKa.
Ha ekpaHa ige ce nOBn cbo6eHne, KOrato 6aTeepnte ca n3ToeHN n Tp8Ba da 6bDaT CMeHeHN. HMaIte npedBnD, ye Korato 6aTeepnte ca n3ToeHN, pa6oTaTa Ha dInctaHcNOHHOTO ynpabVeHne MoKe da ce HapuN.
BaTepeHnTe He Tp6Ba Da ce n3JaraT Ha npekomepha ToJIHHa, KATO CbHcEBA CBETNIHa, OYB H Ipyrnoo6Hn.
Cbbp3BaHe KbM eNeKTpNueckKaTa MpeXa
BAKHO: TeNeBn3OpbTe npoeKtnpaH da pa6oTn npHn HnpeXeHne 220-240V AC c yeCToTa 50 Hz. CneI KaTO n3BaDInTe TeNeBn3Opa OT oNaKOBkata, OCTaBeTe Ro Da DoCTnIHe CTaHa TEMpePaTypa, npEi Da ro BKJIIOUHTe KbM eJNEKTPnueCKaTa MpeKa.
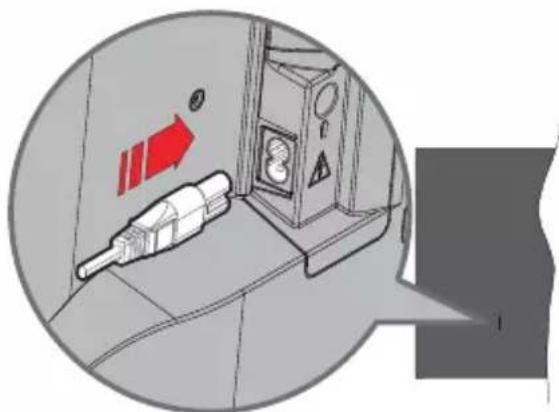
BknIOUeTe eINHnKpaI (uencela c dBa OTbOpa) Ha npedocTabeHn pa3rno6yem 3axpaHbau Ka6en BvB BXoJa 3a 3axpaHbau Ka6en Ha 3aHaTa CtpaHa Ha TeNeBn3Opa, KaKTo e Noka3aHo no-rope. CneTobA BKnIOUeTe Dpynna KpaI Ha 3axpaHbau Ka6en KOHTaKTa.
3a6eIexka: IoouuraHa 6xoda Ha 3axpaHauua Ka6en MoKe da ce pa3nueaba e 3aeucumocm om Modena.
AHTeHeH BXoD
CbpxeTe 1eKepa 3a aHTeHa nn Ka6eJHa TeJeBn3n KbM rHe3dOTo 3a BXoD 3a aHTeHa (ANT) nn 1eKepa 3a caTeIHTeH BXoD KbM rHe3dOTo 3a caTeIHTeH BXoD (LNB), pa3noIOxEHO OT 3aHaTaNJaBa CtpaHa Ha TeJeBn3opa.
3aHa JIyBa CtpaHa Ha TeJeBn3Opa
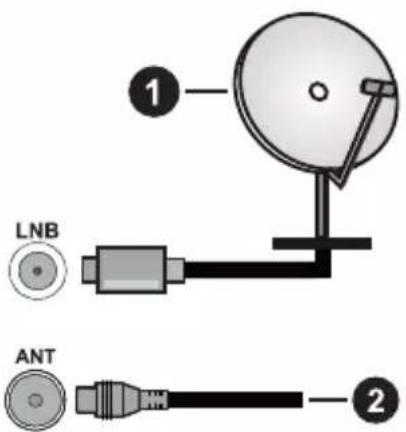
- CateJnt
2.AHTeHa nn Ka6en

Ako Xenaete da CbpxkTe yctpoNCTBO KbM TeJeBn3opa, ybepeTe ce, Ye N To N TeJeBn3Opa ca N3KnIOyeHN, npEn Da OcbIeCTBnTE KaKBaTO n Da BnIO BpB3Ka. Cnei npKIOHbHe Ha CbP3BaHTo Da BKNIOHTe yctpoNCTBaTa n Da nN3NOJ3BaTe.
YBeDMJIeHne3aJIInceH3
TepMNHTeHDMI, HDMIMyTTmEneH INTEPpeC C BnCOka pa3dEnIteJIHa cNoCo6HoCT, TbproBcKn BnD HaHDMI nOrata HaHDMI ca TbproBckn MapKn nI npereNCTpnpaHn TbproBckn MapKn HaHDMI Licensing Administrator, Inc.

Dolby, Dolby Vision, Dolby Atmos, n CnMBOJbT c DboHa D ca TbproBckn Mapkn Ha Dolby Laboratories. Licensing Corporation. Ppon3BeDen no JnueH3 Ha Dolby Laboratories. NOBepntenHn Hny6nkyBaHn npon3BeHn. Copyright © 2012-2022 Dolby Laboratories. BcnuKn npaba 3ana3eHn.
Dolby Vision·Atmos
YouTube n Ioroto Ha the YouTube ca 3ana3eHa Mapka Ha Google Inc.
To3n npodykt cbdbpka texholorna, 6eKT Ha onpeDeJIeHN npaba Ha nHTeJIeKTyaHHaTa co6CTBeHOCT Ha Microsoft. N3noJ3BaHeto nn pa3npocTpaHEHneTo Ha Ta3N TexHOJOrNA n3BbH To3n npOdyKT e 3a6paHeHa 6e3 cBoTBetTHra(Te) nIueH3(n) ot Microsoft.
Co6CTBHeHnIte Ha cBdpbXaHne n3noJ3BaT Microsoft PlayReadyTM TexHONOrna 3a DocTbN Do CbDpbXaHne, 3a Da 3aunTAT INTEKeKTyAInHaTa CN Co6CTBeHoCT, BKIOHTeJIHO CbDbPxAHne 3a ABTOPCKOTn IpaBO. Toba yCTPOIcTBo n3noJ3Ba PlayReady texHONOrna 3a DocTbN Do PlayReady-3aUHTeHO CbDbPxAHne n/nn WMDRM-3aUHTeHO CbDbPxAHne. AKO YCTPOIcTBOTO He ycnee Da npINOxN npABUNHO orpaHueHnra Ta Bbpxy n3noJ3BaHeTo Ha CbDbPxAHne, Co6CTBHeHnIte Ha CbDbPxAHneTo Morat Da n3nCKat OT Microsoft Da npemaxHe Bb3MOXHOCTTA Ha YCTPOIcTBOTO Da n3noJ3Ba PlayReady-3aUHTeHO CbDbPxAHne. OTMnHATA He Tp8Ba Da 3acra He3aUHTeHO CbDbPxAHne nII N cbDbPxAHne, 3aUHTeHO OT DpyrN TexHONOrn 3a DOCTbN Do CbDbPxAHne. Co6CTBHeHnIte Ha CbDbPxAHne MORAT Da n3nCKBaT OT Bac Da aKTyaJIn3npate PlayReady 3a DOCTbN Do TAXHOTo CbDbPxAHne. AKO OTKaXeTe Da HAnpaBnTe AKTyANJ3aCnIyTA, HMA Da nOlyuHTe DOCTbN Do CbDbPxAHne, KOEt O3NCKBa aKTyaJIn3auJyTA.
Iloroto "CI Plus" e TbproBcKa Mapka Ha CI Plus LLP. To3n npOdyKT e 3aunTeH OT onpeJeHn npaba Ha nHTeNeKtyaHa co6CTBeHoCt Ha Microsoft Corporation. H3non3BaHeTo nn pa3npocTpaHeHneTo Ha TaKnBa TexHOJOrn N3BbH To3n npOdyKT e 3a6paHeNo 6e3 liueH3 OT Microsoft nn Otopu3napaH ot Microsoft Dbuepho DpyKeCTBO.

Panasonic Testing Centre
Panasonic Marketing Europe GmbH
Winsberging 15, 22525 Hamburg, Germany
Иntepnetctpansa:http://www.panasonic.com
CneunphiKaun
| Телевионно Изльчвае | RAL BG/I/DK/ SECAM BG/DK | |||
| Пробима Каналу V | HF (BAND I/III) - UHF (BAND U) - HYPERBAND | |||
| Цфраво приема | Наллно Interg�рараца цфрава нааземна/каблна/cателега ТELEBИЗЯ TV (DVB-T-C-S) (DVB-T2, DVB-S2 събмостima) | |||
| Бpoi празварNTелно насстwoЕни Каналу | 11 000 | |||
| Иndидахога Каналa | Еранно мени | |||
| RF Вхod 3a Аntehа | 75 Ohm (небалансирано) | |||
| РавOTно напlexене | 220-240V AC, 50Hz. | |||
| Чади A2 Stereo+Nickam Stereo | ||||
| Служankи 3,5 MM Мн | Пи стешегожak | |||
| Консу��ая нөргий в рекIM на ГOTOВHOCT в Мрека (W) | <2 | |||
| TX-43MX600E TX-50 | MX600E TX-55MX600 | E TX-65MX600E | ||
| ИЗХODДΙΥА АУДЮ MOUIHOCCT (WRMS.) (10% THD) | 2 x 10 W 2 x 10 W 2 | 10 W 2 x 12 W | ||
| КOHСУМИРАHA MOUCHOCT (W) | 150 W 135 W 140 W | 200 W | ||
| Терло (кr) 7,5 Kg 9,5 | Kg 13 Kg 22 Kg | |||
| Разmersи на Телевизора ШхДхВ (със сточьага) (MM) | 235 x 965 x 619 235 x 1 | 120 x 706 235 x 1233 x | 770 275 x 1453 x 896 | |
| Разmersи на Телевизора ШхДхВ (бe3 сточьага) (MM) | 87 x 965 x 561 87 x 1 | 120 x 648 87 x 1233 x | 712 82 x 1453 x 836 | |
| Ди检п徴 16/9 43" 16 | 9 50" 16/9 55" 16/9 65" | |||
| Разотн Тemператуся Влажноct | 0°C до 40°C, 85% м akс. Влажноct | |||
3a noBue HnΦopMaun 3a npOyKta, MoJ, nocTeTe EPREL: https://eprel.ec.europa.eu.
PerictpaunOHnT Homep Ha EPREL e doctbneH ha https://eprel.panasonic.eu/product.
Cneunkaun Ha 6e3knHn LAN TpaHmTep
| Чебтахдун спектейн | Мак. изховни мошноct |
| 2400 - 2483,5 MHz (CH1 - CH13) < 100 | mW |
| 5150 - 5250 MHz (CH36 - CH48) < 200 | mW |
| 5250 - 5350 MHz (CH52 - CH64) < 200 | mW |
| 5470 - 5725 MHz (CH100 - CH140) < 200 | mW |
BpKabHn OpraHnueHn
ToBa yCtpoiCTBO e npEHa3HaueHo 3a DomaHnA n oOpnc yNtpe6a BbB BCnKu CTpaHn OT EC (n dpyrN DbpKABN, KOnTO CJIeDBar CbOTBeTHaT a NInpeKTnBa Ha EC). YecToTHa TneHTa 5,15 - 5,35 GHz e orpaHnHeHa do onepaun Ha 3akpnto camo B ctpaHnte ot EC.
WEP 64/128, WPA, WPA2, TKIP, AES, WAPI
3a6eJexka:
DVB/IM3bYBaHeHaDaHHI IPTVФyHKnnte
To3n TeIeBn3Op e npoeKtpanHa otroBapn Ha cTaNdApTne (KbM Mapr 2021r) Ha uΦpOBeTne H3eMHn ycnyr n DVB-T/T2 (MPEG2, MPEG4-AVC(H.264) n HEVC(H.265)), uΦpOBeTne ka6eHn ycnyr n DVB-C (MPEG2, MPEG4-AVC(H.264) n HEVC(H.265)) n uΦpOBeTne cateHTn ycnyr n DVB-S (MPEG2, MPEG4-AVC(H.264) n HEVC(H.265)).
KoHcyItpaIte ce c Baunn dIbnp OTHOCHOHaIInuHnTe DVB-T / T2 nnn DVB-S ycnyr BbbBaunpaon.
KoHcyItpaIte ce c Baun Ka6enonepaTOp OTHOCHO HAnuHnTe DVB-C ycnyr 3a To3n TeNEBn3Op.
To3n TeIeBn3Op MoKe Da He yHKcNoHnpa npaBnJHo Cbc CnHaJI, KOITo He n3NbJHBA cTaNapTnte 3a DVB-T / T2 nn DVB-S.
He BCnUKN FyHKcNn Ca HaNuHN, B 3aBNCmOCT OT DbpxKaBaTa, paOnHa, N3IbYBaTeTn, DOCTaBUnKa Ha ycnyr, cnBnHcnte n MpeXOBOTo 6KpbJxHeHne.
He BCnukn Cl moynn cyHKnnoHpaT npabnHo cTo3n TeBn3Op. KOncyTnpaIte ce C Baunn DOCTABuNK Ha ycnyr OTHOCHO HAnuHnTe CI moynn.
To3n TeIeBn3Op MoKe Da He yHKuNoHnp npabnHo c Cl moyn, KOHTo He e oO6peH ot DOCTaBvNka Ha ycnyr.
- Moxe da Иma ДОпьНИТЕЛHи ТАКС, В 3aВИСИМоCT OТdoctabuKaHa yCnyr.
CbBmecTnMoCTTa c 6bDeu ycnyr He e rapaHTnpaHa.
- INHTepHET npnIOJKeHnRA ta ce nppeIOCTaBt OT CbOTBeTHnTe NM DOCTaBnUHa ycnyu N MoRat Da 6bDat IpomeHeH, npeKbChatn NnnpEkpateHn NO BcAko BpeMe.
Panasonic He noema HnkaKba OTROBOPHOCT N He daBa rapaHm 3a HaIuHOCCTTa IIN HepeKbCHAOTCTT a Ha ycnyrTe.
Panasonic He rapaHTnpa pa6ota n npo3BODnteHnOCT Ha nepuΦepHu yctpoiCTBa, npo3BedeHn OT dpyr npo3BODHTeH; n Hne OTXBpJMaMe BcKaKbA OTROBOPHOCT nnIeTn, npo3TuHaUOTeknloataua /nn npo3BODNTeHnOCT OT n3NoJ3BaHeTo Ha nepuΦepHu yctpoiCTBa Ha TaKbB npo3BODHTeH.
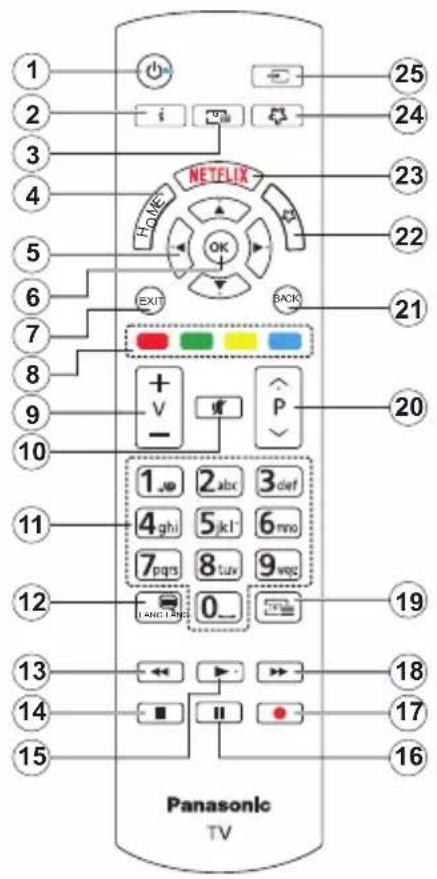
(*) ByToH B roToBHOCT
HaTnuche n 3aDpBxTe 6yToHa 3a roTOBHOCT, 3a da BnIte DOnbHnTeHN DeiCTBna 3a To3n 6yToH. MapKnpaIte eHa ot Ounnte HynnpaHe (PecTaptnpaHe), Pexm Ha rotOBHOCT (HopmaJeH peXIM Ha rotOBHOCT) u N3KnIOuBaHe Ha 3axpaHbAHeTO (PnPHyDnTEJen H pEXM Ha rotOBHOCT) n HAtncHE OK, 3a da N3BbpUnTe N36paHOTo DeiCTBne. Ako BaunrT TeNEBn3Op cIpe Da OTROBApHa KOMaHn i MeHOTo 3a DeiCTBnH He MoKe Da ce NOKaKe, TeneBn3OpBT Ie 6bnde npHydE Ha ce pectaptnpa, Korato 6yToHbT 6bnde HATnCHat 3a OKONo NET CEkyHn.
HaTnchete 3a KpaTko N OCBO6oTe 6yToHa, 3a da npEbkIIOuHTe TeNEBn3Opa B pExKIM Ha rTOBHOCT nII Da r BOKIOUHTe, KOrato e B pEXKIM HA rTOBHOCT.
(^**) MoT 6yToH 1 & MoT 6yToH 2
Te3n 6ytoHn MoT aHa MAt fynKuNn No Noppa3bnpaHe B 3aBncmocT OT MoDena. Bbnpekn ToBa MoKeTe Da 3aadaTe CneuaHnHa fynKUHa Te3n 6yToHn, KaTO HATNCHE TBypX TY X B POnBJIxKeHne Ha TpN CekyHn, KOrato CTe Ha JKeNaHn n3TOUHk UIn npINOKeHne. MoKeTe cBtQ TaKa dHa HAcTpOnte MoT 6yToH 1 Da cTAptna npINOKeHne. Ha ekpana Ue ce nOraBV cb6oHHe 3a NotBbPjXDeHne. Cera n36paHnT MOrT BYTOH ce acounnpa c n36paHnata fynKUHa.
ImaTe npedBnD, Ye no BpeMe Ha IpbBa HnHctanaun MOrT ByTOH 1&2 ue ce BbpHe KbM yHKunTe cn no nopa3bnpahe.
- PexnHa roTOBHOCT(*): PexnHa rTOBHOCT / BKnIOUbaHe (HaTnCHTe 3a KpaTko), HynipaHe / N3KnIOUbaHe (HaTnCHTe n 3aApbXte)
- Hhopmaun: Noka3Ba HhOpmaun 3a CbDbpxKaHHeTo Ha ekpaHa, Noka3Ba CKpTa HhOpmaun (pa3KpNaBe - B TEKT peXm)
- CnpaBoUHnK: Ioka3Ba eJneKTpoHHnC npaBOuHnK 3a nporpaMnte
- Home (Hauano): Noka3Ba MeHIO Ha TeJeBn3Opa
- BytoHn 3a HacOyBaHe: Nomara Da HabnInpate n3 MeHIOta, CbIbPkaHNeTo n T.H. n NOKa3Ba NOCTpaHnUnte B TeNeTeKCT pExNM, KOrato HAtnCKate IaCHO nn JIABO
- OK NotBbpxkdaBa n36opa Ha notpe6nten, 3aIbpxka ctpaHncaTa (B pexm TeTeKCT), NOKa3Ba MeHIO KaHaIN (DTV peXIM)
- 3xOa: 3aTbapn n 3n3aOT NOKa3HNTe MeHToA ININ Bpbua KbM ppeuHnE ekpaH
- LBeTHN 6yToHn: CneIBaIte HNCTpyKUInTe Ha ekpaHa OTHOCHO yHKUInTe HA LBeTHNtE 6yToHn
- Cnna Ha 3Byka +/-
- ɪnʌkɪnəʊbahe Ha 3Byka: Hɑnʌbɪnəʊnɪsɪkɪnəʊba 3BykaHa TeneBɪnəropa
- Κιφροῦς 6byToHπ: ΠρεΒκληουγαΚαΗλΝΤΕ, BνΒεχДα Συσρα ΑνΙΝ ΜγκΑΒ TΕΚΤΟΒΑΤΑ KΥΤΑ Ḍ Ḍ Ḍ Ḍ Ḍ Ḍ Ḍ Ḍ Ḍ Ḍ Ḍ Ḍ Ḍ Ḍ Ḍ Ḥετιδινινίας Ḥετιδινινίας Ḥετιδινινίας Ḥετιδινινίας Ḥετιδινινίας Ḥετιδινινίας Ḥετιδινινίας Ḥετιδινινίας Ṣπετιδινίας Ḥετιδινινίας Ṣπετιδινίας Ḥετιδινινίας Ṣπετιδινίας Ṣπετιδινίας Ṣπετιδινίας Ṣπετιδινίας Ṣπετιδινίας Ṣπετιδινίας Ṣπετιδινίας Ṣπετιδινίας Ṣητιδινίας Ṣητιδινίας Ṣητιδινίας Ṣητιδινίας Ṣητιδινίας Ṣητιδινίας Ṣητιδινίας Ṣητιδινίας ṢητιδɪVΩ
- E3nk: PpeBkIIOyMa MeKdy 3ByKObPpeKIMN (AHaIorOB TeNEBn3n), NOKa3Ba n CMeHr e3NKa Ha ayDnOTo/Cy6TntpTe n BKnIOHBA nn N3KIOUyBa cy6TntpTe (uNppoBa TneBn3n, aKe e HAnuHa)
- PpeHabBaHe: PpeBbPta Ha3aJ KaIpTe Ha MeDnTa, HApN. HaФИM
- CToTn: Cnnpa Bb3Pon3BexKaHeTo Ha MeiuraTa
- Bb3 npon3Bexkdahe: CtaptnpaBb3npoN3BexkdaHeTo Ha n36paHaTa Meiura
- Nay3a: Cnnpa BpeMeHHo Bb3npOn3BekdaHeTo Ha MeIraTa
- HamaФункця
18.Бbp3o HanpeI:ПревьртHaHppeI KaDpnte Ha MeDnTa, HApN.HaФИM - TeKCT: Ioka3Ba TeIeTeKCTa (KbJeTo e HaJIuHe), HAITNCHETe OTHBO, 3a Da BINOKeTte TEnTeKCTa B N3O6paXeHneTO Ha Bb3POn3BExJaHaTa B MOMHTa nporpama (MUKCupaHe)
- Pporpama +/-: Pporpama Harope-HaDony, CtpaHua Harope-HaDony (B peKIM TeNeTeKCT), BKJIIOvBa TeJeBn3Opa, KOrato ToI e B peKIM Ha IOTOBHOCT
- Ha3aI / Bpb7aHHe: Bpb7a KbM npEiunHnnaekpaH, npEiunHOTo MeHIO, OTBapr INHeKCHataCTpaHnua (B peXIM TeJIeTeKCT) Bbp30 npeBbPtaMeJdy npEiunHnra INeKU7nKaHaJIINnnN3TOUHNu
- MoT 6yToH 2 (^**)
- Netflix: Cтартура Netflix прилwxeнeto
- MoT 6yToH 1 (^**)
- 3TOHnK: Ioka3Ba HAnuHHe Tn3JIbYBaHnI n3TOUHnHa CbDpKaHne
Bp3Kn
- HaTnchHeTe UeHTbpa Ha JxKoIcTnka Ha TeJeBn3Opa HABbTpE.
3a npeBkIIOUBaHe Ha TeJIeBn3Opa B peKIM Ha IOTOBHOCT
HaTnCHete 6yToHa 3a roTOBHOCT Ha nCTaHcNOHOTO ynpabNeHne, TeNEBn3OpbT ige npemHe B peKm Ha rTOBOHCT.
3a npebKJIIOUbaHe Ha TeJIeBn3Opa B TBbPd peXIM HA rOTOBHOCT
HaTnCHHeTe ZENTbpa Ha JxKOJCTNka Ha TeJeBn3Opa I ro 3aDpBXKTe 3a NOBeue OT 3ceKyHn, TeJeBn3OpbT 1e IpemHe B pexHM Ha TBbpD peXm HA rTOBOHOCT.
3a da n3KnIOuHTe TeJeBu3Opa
3a da n3KnIOHTe HAnbJIHO TeJIeBn3Opa, n3BaJeTe 3axpaHbAunKa6eJ OT MPexKOBn KOHTaKT.
3a6eKka: Kozamo meNeBuaOpb m eEKnIOueH e peXum Ha zomoeHocm, uHDukamOpb m 3a peXum Ha zomoeHocm MoKe da MuZa, Koemo NOKa3Ba, ye fynkuuume 3a PeXum mbpche Ha pexum Ha zomoeHocm, edupho U3me2nHe unu maUme pa AkmuHc. Ceemoduoobm ue MuZa no epeme Ha bKnIOyBaHemo/u3KnIOyBaHemo Ha peXuma „FomoeHocm".
PbpbMaMHCTanaua
Korato BkIIOHTe TeneBn3Opa 3a nbpBn nT, ue ce NOABm MeHIOTo "N36Op Ha e3NK".MOna N36epTe XeJAHnE3NK nHaTNCHe TE OK.B CneDbaunTE CTbIKN OT pBKOBOCTBOTO 3a HnCTaIInpaHe 3aJaTe IpeDIOHTaHnraTa cn C NOMoUta Ha 6yTOHnTe 3a NocOKa n 6yToHa OK.
Cnei n36opa Ha e3NK ige 6bDeTe nonHTaHn daNNCKate Da npomeHnte HactpoKNTe 3a DOCTbNHOCT. MapkpauTe DA u HAtncHeTe OK, 3a da NOTBbpDntepomHaTata.BxTe pa3dela CbDbpxaHne Ha CNCTEMHOTo MeHIO 3a NOdpObHa INΦOpMaun OTHOCHOHAUNHNTe ONUIN.
3aAaTe npednoHTAHnra Ha BaWata cTpaHa Ha cnEdBaunr ekpan. B 3aBucnMoCT ot n3bopa Ha IbpXkAba MoKe Da ce HAnoxn Da BBeDeTe NotBbPdnte PNH-KoI. N3bpaHnT PNH KoI He MoKe Da 6bJe 0000. Tp6Ba Da ro BbBeDeTe, aKO ToBa Ce HAnoxn Ha eINH No-KbcEH etan 3a KOrTO n da e pa6Ota Ha MeHOTo.
MoxTe Da aKTHBnPaTe onu Pekm "Mara3H" cIeDbaUata CTbNka. Ta3n onu ige konfupupa HAcTPOkNTe Ha TeJIeBN3Opa BN 3a CpeDa Ha Mara3Ha n B 3aBNCIMoCT OT n3NOJ3BaHnRA MoJe TneBn3Op, NOIbPjKaHnTE My fYHKUN MOrAT Da CE NOKa3BaT Ha ekpHa KaTO INFOPMaUHOHe 6aHep NNMOKe da CE Bb3npOn3BeDe pEdBapHTeHNo IHCTaHnPAHnT Bndeo paJ. Ta3n onu e npedHa3NaYeHa cMo 3a n3NOJ3BaHe B pexm Mara3n. 3a DomaHa yNotpe6a e npenopbTuTEH No Da CE n3NOJ3Ba pexm "y Doma". OnuTa 3a pexm Ha cbxpaHHeNe 6bDe HAnuHa B MeHTo HOcTPOkN> CnCTema> Ose i npednoHTAHnra Ta BN 3a Ta3n HAcTPOkKa MOrat Da 6bDat npomeHnNo -KbCHO. Hanpabete Baunr N36Op n HAtncHEt OK, 3a Da npOJbnKeTe.
B 3aBnCmOCT OT MoJeHa BaIINeBn3Op, B TO3N MOMENT MOKe Da Ce IIOBn EKpaH 3a N36Op Ha pexkM Ha KapTIna. 3a Da MOKe BaIINrT eTneBn3Op Da N3pa3XoDbA No-MaIKo eHeprNn Da 6bDe NoEkoJorHEn, N36peTe Natural n HATNChe TE OK, 3a Da npOdbJxKITE.AKO N36peTe DnHAMuHEn n HAtNChe TE OK, ige Ce NOKae DnAnorOB np03opeu 3a NotBbPjXdHHe. N36peTe "Da" n HATNChe TE OK, 3a Da npOdbJxKITE.Moxete Da npOMeHIne N36opa Cn NO-KbCHO c NOMOHTa Ha ONUraTa Mode B MeHHTO HAcTPOKn> N36paxKeHne.
B 3aBnCmOcT OT MoJeHa Ha Baunr TeIeBn3Op
H Ha ekpaHa 3a n3bOp Ha DbPkaBa MoKe Da Ce
NoBn EkpanbT HAcToPkn 3a NobepntenHOCT.
N3noJ3BaKn OnuInTe Ha To3n ekpaH, MoKete
Da 3aadane TcBOUte npaba 3a NobepntenHOCT.
MapkpauTe FyHKuIN HaTncHete OK, 3a da
akTNBupate Nnn DeakTNBupate. Ipouetete
cbOTBeTHnte obraChEnra, NOKa3AHn Ha ekpHa 3a
BCa Ka NDuepTaHa FyHKuIN, PpeIN Da HAnpabNTe
KaKBnTO N da BnIO npomeHN. MoKete Da HATNCHE
6yToHa 3a Nocoka HAdrACHO, 3a Da Mapkpate TekCTA,
N da N3noJ3BaTe 6yToHnte 3a Nocoka +/- INn Harope/
HaOny, 3a Da NpeDbXHTe Harope n HADony, 3a Da
npoetete UeINr TEKT. PO BCaKO BpeMe Ue MoKete
da npomeHnte NpeDNOHTAHnRA Ta CN OT MeHOTO
HAcToPkn> CnCTema> NobepntenHOCT>HaCTpoKN
3a NobepntenHOCT. Ako OOnzra "INTepHET Bp3Ka"
e DeakTNBupana, ekpaHbT "HAcToPkn Ha MpeXata/
INTEPHeta" 5e 6bDe pneCKOueH IN Hma Da CE NOBn.
Ako Imate Bbnpocn, ONJaKBAHHN INN KOMeHTapn
OTHOCHO Ta3N DEknapaCn 3a NobepntenHOCT INN
HeHOTO IN3bJIHeHne, MOJ, CBbpXeTe Ce C Hac Ha
HMeiSmartvsecurity@voshub.com.
MapkpauTe CneDbauN HaTnchTe 6byToHa OK haNCTaHcNoHHoTo ynpabNeHne, 3a da npOdbJxKeIe Iue ce nokaxe ekpaHbT MpeXa / INTEpHET HAcTPOKn. MoJa, BnKTe pa3deJa 3a CBbp3aHOCT, aKO Imate HyXda OT IHOpMaunr 3a KOHOpHypnpaHe Ha KUnHa NII 6e3KUnHa Bpb3Ka (HaInuHocTTa 3aBnCnOT MOneJa) IN DpyrH HAnuHN OOnuN . Ako NCKaTe TeJeBn3OpbT BN Da KOHCympu No-Majko eHepnra
BpeKIM Ha rotOBHOCT,MOKeTe Da DeaKaTbNpuPat e Onueta PeKIM Ha rotOBHocCT B MpeXa, KaTo ro 3aJaTe KaTO N3Kn.. CneI npNKJIOUcBaHe c HacTpoKnTe MapKpaTte Hanpei HaTncHeTe 6yToHa OK,3a Da npOdbJnxTe.
Ha cneBaun eKpaH MoKeTe Da 3aDaTe BnIOBete
H3bUbaHe, KOnto Da Ce TbpCrt, Da 3aAdTe
WuPobAHOTbpcHe Ha KaHJIu N YacOBaTa
3OHa (B 3aBncmocT OT n36opa Ha DbpXaba).
DOnbHInTeJHo MoKeTe Da Hactponte PpeINoHTan
TIN HA n3bYBaHnra. Ue 6bJe daJeH npOpNTet
Ha n36paHnra TIN n3bYBaHnra NO BpeMe Ha npOceca
Ha TbpCeHe i KaHAnTe Ue 6bDat n36poEHn Hau-
OTrope Ha CnncbKa C KaHJIu. CJeI KATO npNKJIOChte
MapKnpaTe Hanpei HnatcHete OK, 3a Da
npOdbJxnte.
OTHOCHO n3bopa Ha Tnna npedeBaHe
3a da BkIIOUHTe ONZy 3a TbpcHe 3a TIN n3JIbYBaHe, MapKnpaIte y n HATncHete OK, JnB nn Decen 6yToH 3a Nocoka. Ue 6bJe OTMeTHaTO KBAdpaTuTeo 3a OTMeTKa DO n36paHaT a ONzra. 3a Da n3KIOUHTe ONzraTa 3a TbpcHe, MaxHete OTMeTKaTa, KaTO HATncHete OK, JnB nn Decen 6yToH 3a HAcOVAHe CNeI npemecTBaHe Ha fOKyCa BbpxJ XeJaHaT a ONzra 3a TIN n3JIbYBaHe.
UΦpOBO eHnpho: Ako onuTAta 3a TbpcHe Ha UΦpOBA aHTeHa N3lbYBaHn e BKnIOueHa, TeIeBn3OpbT 1e Tbpcn 3a UΦpOBn eΦnpHn N3lbYBaHn CNeI KaTO 6bDaT 3aBbPseHn dpynte NbpBOHaunHn HAcTpOkn.
CnΦpOBO Ka6eHNo: Ako onuTAt 3a TbpcHe Ha D. Ka6eHn n3JIbYBaHn e BkIIOUeHa, TeJIeBn3OpbT Ⅲe TbpcN 3a CnΦpOBn Ka6eHn n3JIbYBaHn CneJ KATO 6bDat 3aBbPseHn dpyrnte NpBPBOHauaHn HacTpOKn. Moxe Da ce nokae dnaIor B 3aBncmocT ot n3bopaHa nbpxkaba, npEi Da 3aNoOHcTbpcHeTo, KATO nonNTa daNN NcKATE Da n3BbPwNTe TbpcHe B Ka6eHn MpeXa. Ako n3BepeTe Da nHaTnCHTe OK MoXeTe Da n3BepeTe MpeXa nn Da 3aAdaTe CTOnHOCTn KATO YecToTA, NdeHTNuKATOp Ha MpeXaTa n CtbnKa 3a TbpcHe Ha cJeDaBauNЯ ekpan. Ako n3BepeTe He n HaTnCHete OK nII nDnAIOROBnT pO3Opeu 3a TbpcHe B MpeXaTa He ce NOKa3Ba, MoXeTe Da 3aJaTeHaayAnHa YecToTA, CnnpaHe Ha YecToTataN CtbnKa 3a TbpcHe Ha cJeDaBauNЯ ekpan. CneI kato npNKIOUHTe MapKupaTe HanpeN HaTnCHte 6byToHa OK, 3a da npOdbJnxITE.
BeneKa: npodbnnkumennocmmha mtpceHe ue ce npomeHu 3aeucumocm om u3paHama CTbnKa Ha TbpceHe.
CateNT: Ako onueta 3a TbpceHe Ha cateHTHn
H3IbYBaHn e BkIIOyeHa, TeleBn3OpbT ige TbpcN 3a
UncpOBn CateHTHn H3IbYBaHn, cNeI KaTO 6bDat
3aBbPseHn Dpyrnte NbpBOHaayalHn HAcTpOKn.
Ppei Da ce H3BbpHn CateHTHTo TbpceHe, HAKON
HaCTpoKn Tp6Ba Da 6bDat HanpaBeHn.
B 3aBnCmOCT OT MoJeIu N36paHaTa DbPkaBa CneIbAaata CTbNka MoKe Da 6bDe N36OpbT Ha Tnna IHCTaIaua3a CATeJIIT. MoKete Da N36epete Da CTapTpate INHCTaIauaIHa OIepaTop IIN CTaHApTHa IHCTaIauaIB TO3N MOMENT. AKO NcKaTe Da N3BbPwNTe IHCTaIauaHa OIepaTop, 3aJaIte TIN NHCTaIIpHaKeTOpeTOp U CNEd TOBa 3aJaIte CaTeJNTHNa ONepaTop CnpopeI PpeDIOHTAHNA Ta Ha Baunr OIepaTop. HAcON OT CneIbBaUInTE CTbNkMORAT Da ce pa3nnuabat IIN Da 6bDat npOnyCHaTI B 3aBNCmOCT OT N36paHnro OIepaTop B Ta3N CTbNk. AKO HAcTPOnte TIN Ha IHCTaIauaIg Da 6bDe CTaHApTHa, MoKete Da npOdbLXKeTe c ObIKHOBeHaTa IHCTaIauaIHa CNbTHNuTE I Da rJeDAte CnBTHNKOBn KaHaJI. Hatnche ToHa OK, 3a da npOdbLnKInTe.
CneTOBa MoKe Da Ce NOKaKe ekpaHbT 3a n36Op Ha TnAnTeHa. MoKeTe Da n36epe Te TnAnTeHa KaTo DNpeKTeH, eINHueH CateNtEn Ka6eI nn PpeBKnUoyBaTei DiSEqC, Kato n3non3BaTe 6yToHn 3a Nocoka HAnBaO nn HndcHc. CneD n3bpanHe Ha TnPa aHTeHa HATncHeT Ok, 3a Da BnDnte ONuNTe, c KOInTo MoKeTe Da npoDbLknte. PpOdbJxKeTe, MoKe Da ca HaNChn CNscbK C TpaHCnoHdepn I KOhFpynpaH He LNB. MoKeTe Da npomehnte NaCTpoNkTe Ha TpaNCNoHepa n LNB, Kato n3noJ3BaTe cbOTBeTHNe ONuHa MeHIOTo.
-ДиpeKTeH:Ако IMaTe само eДИN ппeMHнК И само eДHa cATEЛNTHa YUHn,ИЗБepeTe To3n BИd aHTeHa. HatиСсeTe OK,за длбЛЖиTe.ИЗБepeTe HaJIuHnTe cATEЛNTn Ha CJIeДВaДЯ ekpan И HatиСсeTe OK 3a Да сKaHnPaTe 3a уCnyrN.
- EdnHueh catenTeh Ka6e: Ako mATE HAKOJIKO npneMHnka n CnCTema c eHNuHcATeNTeH Ka6e, n36epTe To3n Tn antHeHaTncHe OK, 3a da npoDbJnxTe. KOnfpynpaIte NaCtpoiKeTa KaTO cJeDbate IHCTpyKunTe Ha cNeDbaunr ekpaH. HatncHe OK, 3a da cKaHnpaTe 3a ycnyr.
DiSEqC npeBknOuBaTe: Ako npntExkBaTe HAKoKo catenHn uHHn N DiSEqC npeBknOuBaTe, n36epTe TO3n TnTn aHTeHa. Cnei ToBa hAcToPe DiSEqCBepnTa n HaTncHeTe OK, 3a da npOdbJnxTe. MoKeTe Da HAcToPe Do YetnpnCatEnIta (ako ca HAnuHn) 3a Bepcn y1.0 n WeecThaDecet catEnIta 3a Bepcn v1.1 Ha cIeDbauNn ekpan. HAtncHeTe 6yToHa OK, 3a da cKaHnPate NbpBnA catEnIT B cnncbKa.
3a6eJekka: B 3aeucumocm om modena Ha bawu meeneusop, DISeqC eepcua v1.1 moke da he ce noobpka u cneobameHno cmbIkama 3a u3bop ha eepcua DiSEqC moke da He e HauuHa.
Anorob: Ako onueta 3a TbpceHe Ha Anorobn I3IbYBaHn e BkIIOyeHa, TeJIeBn3OpbT ue TbpCn 3a aHaNoRbN n3IbYBaHn cneKato 6bDaT 3aBbpSeHn Dpyrnte NpBBOHaauHn HAcTpOyKn.
Cne KaTo 3aBbPwaT NbpBOHaayHnTe HacTroKn, TeNeBn3OpbT 3aNoUHe Da TbpCn HaNnHnTe n3NbYBaHnO Tn6paHnTe TnNOBe N3NbYBaHn.
ДokаТо TьрсЕнTo npOДьПЖАВ, TeKушITE pe3yIITaTn OT cKaHиpaHETO ue ce NOKa3BaT B DoNHaTa YacT Ha ekpaHa. MoKTe Da HATNCHEte 6yToHa Haayano, Ha3aДиИи N3xOД, 3aДа OTMeHNTe TьрсЕнTo. Beue HamepeHNTe KaHaII N ue ce CBxpaHЯВaT B CnICbKa C KaHaII.
Cne3anametraBaHeTo Ha BCnKn HauNCH CTaHcN Ⅲe Ce nOBm MeHIO KaHJ. MoKeTe da peaKTnpaTe CncbKa C KaHAn Cnopei BaUnTe PpeIPOHTaHn C NOMOuTa Ha OUnrTa PeaKTnpaHe IIN HaTNCHeTe 6yToHa Home (Haayano), 3a Da n3Je3eTe n rJeDaTe TeJIeBn3nJ.
Дokato TbpcHeTo npOdbJIkaBa, MoKe Da ce NOBn DnaIIOROB npO3opeuC Bbnpoc DaII NcKaTe Da copTnape KaHJIte cNopeLDCN (^*) .N36peTe Da nHaTNCHeTc OK, 3a Da NOTBbpDInTe.
(*) LCN e cucmemama 3a lozuecku Homepa Ha KaHau, Koamopopeaun3upa hauunhume u3nbyeaun8 cbomeemcmeue cpa3no3haeaema nopedua om Homepa Ha KaHana (ako e hauunha).
3a6eJekka: He uKIIouyeaume meeneu3opa no epeme Ha nIbpeama uncmanaua. 3a6eJekeme, ye hKou onuu MoKe da He ca HauHn, e 3aeucumocm om u360pa H dbpkaea.
ClekatoNbpbataHnctanaunnpknluynMoKe da ce nokaxe ekpan 3a npinloxehna Ha HD + onepaTop B 3abncmocT ot n3bopa, KOTo cTe HnnpabnnnoBpeMe Ha nHCTaIauonOHnnpoec.3a da noJyUHTe DOCTbn Do ycnyrnte Ha onepaTopa, TOBa npinloxehne Tp6ba Da 6bde aKtubnpaHo.Ako aKTKBupate npinloxehneTO,elementHe NaOTpe6bteLcknIHnTepceNc KaTo 6aHep C INHOpMaunza KaHala n eJIeKTPoHHo pKOBODCTBO 3a nporpaMaTa, KOITO oBnKHOBeHO Ce npedocTabrOt TEJIeBu3Opa,Se 6bDat 3aMeHenn Ot npinloxehneTO 3a onepaTop.AKO He n3BbPbBaTe catenTHa nn HD + nHCTanaun NCKATE da aKtubnpaTe npinloxehneTO NO-KbCHO, MapkpaiTe npinloxehneTO HD + B MeHIO To HaJIo nHaTNCheTc OK. 5e 6bDeTe hAcouEn KbM ekpan, KbDETo MoKeTe Da n3BbPbUnte aKtubnpaHeTo.
MeiHOBb3npoN3BexJaHe npe3 USB BXoD
Moxeme da cebpxeme 2,5" u 3,5" unHouBu (HDD c ebHnHO 3axpaheane) ebHuHu xpD ducKoBe unu USB qnau namem KbM Bawur meeBuzOp, u3non3auku Hezoeume USB exodoBe.
BAxHO! HanpaBeTe pe3epBNO konne Ha BaunTe 3aamTBAuyn yctpoNCTBa, npei Da rnc CBpKte KbM TeJeBn3Opa. Ipon3BOAnTEJrT He Hocn OTROBOPHcT 3a KaKBnTo N da 6nlo nobpeiHa faInObe nn 3ary6a Na daHN. HkON BnObe USB ycTPONCTBa (KaTO MP3 npeIbpn) nn USB xapd DnCKOB/MemOpn CTnK MoKe Da He ca CbBMecTUMC TO3n TeJeBn3Op. TeJeBn3OpbT NODlbPka eINHCTBEHO nckOB fopmat FAT32.
I3yaKaaiTe MaNko npedn Da BkNIOUHTe N I3KNOUHTe, TbB KaTO pIeHbpa MoKe OSe Da Yete paNIOBe. B IpOTNBcCnyaM oKe Da npedn3BnKate NOBpeDa B USB pIeHbpa n camoto USB ycTpoiCTBO. He n3KJIuOyBaIte BaWeTo ycTpoiCTBO, DOKaTO Bb3npoN3BExdAte paNl.
KbM USB BxOObTe Ha TeJeBn3opa MoKeTe Da Cbbp3BaTe USB xb6oBe. B TaKbB cnyaH ca npenopbUnTeHNH USB xb6oBe C BbHsHo 3axpaHbaHe. PpenopbUnTeHno e DnpeKTHo Da n3NoJ3BaTe USB BxoJa(OBeTe) Ha TeJeBn3opa, aKO NCKaTe Da CbbpKeTe USB xapd dNcK.
3a6eIekKa: Kozamo npaeIeKdame meduHu paIIOBE, e MeHIO MoBpay3bp Ha MeIN MoKe Da BnDHTe MaKCUMUM 1000 meduu Ha nanka.
MeiHOBb3pOu3BExdaHe
MoKeTe Da Bb3npOn3BExJaTe PaIIOBe C My3Nka,ФИIMN n CHIMKn, 3aIIncAHn Ha USB nck, KaTO rO CBbpXeTe KbM BaUNr TeJeBn3Op. CBbpXeTe USB nCKa KbM HAKoI OT USB BXOJOBeTe, pa3noJoxeHn OTCTpaHn Ha TeJIeBn3Opa.
Cne CBp3BaHe Ha USB ycTpoIcTO 3a cbxpaHHe NkM MeHOTo Ha TeJIeBn3N0HHTe N3TOUHNu Ie Ce NOKaKe Ha ekpaHa. N36epTe CbOTBeTHaTa ONnra 3a USB BxOJ OT TOBA MeHIO n HATNCHETe OK. Ha ekpaHa Ie ce NOKaKe MeHOTo MeDnEh 6pay3bp. Cne ToBa N36epTe PaIN n HATNCHETe OK, 3a Da rO NOKaKeTe INn Bb3npOn3BeDeTe. MoXeTe da NONYHTe DOCTbN Do CBp3aHOTo USB yCTPOINCTBO NO BCRAKO BpeMe IO-KbCHO OT MeHIO N3TOUHNu. MoXeTe CbIo Da HATNCHETe 6yToHa N3TOUHNK Ha DnCTaHnOHHO YnpabJeHne i Cne ToBa Da N36epTe USB ycTPOINCTBOTO 3a cbxpaHHeNe O T CNICbKa C N3TOUHNu.
Moxete da 3adaTe npednoHTaHnraHa MeHHn6pay3bp, kato n3noJ3BaTe MeHTo HactpoKn. Do MeHIO HactpoKn Moxe da ce cTnIHe ppe3 HOpMaunOHnata JeHTa, KOrTO ce Noka3Ba BdoHATA Yact Ha ekpaH, KOrATO NO Bpeme Ha Bb3npoN3BExkDaHe Ha BnDeo nnaydno paJI nn Ce Noka3Ba paJn C n3o6paKeHne.Hatnche
6ytoHa HhOpMaun, aKO HHOpMaunOHnHaTa IeHTa e n3Ye3Hana, MapKpaIte CmB0Ja Ha 3b6HTo KOJIeNo, pa3noJoxEHO OT JAcHata CTpaHa Ha HhOpMaunOHnHa Ta IeHTa N HaTnCHete OK. HAcTpOKnTe Ha KapTHaT, HAcTpOKnTe Ha 3Byka, HAcTpOKnTe Ha 6pay3bpa 3a MeIN N MeHOTata OOnmIO MoKe Da ca HAnuHN B 3abNCUMoCT OT TnPa Ha MedInHna Fain N MOdeNa Ha BaWn TneEBN3Op N HerOBnTE FyHKnn. CbDbPjXaHnETo Ha Te3n MeHOTa MOKe CbIo Da ce pa3nUcaba B 3abNCUMoCT OT TnPa Ha OTBOpEHn B MOMeTa MeINeH Fain. Camo MeHIO HAcTpOKn Ha 3ByKa Ue e HAnuHo NO BpeMe Ha Bb3npOn3BeXdAhe Ha ayDnO FainNoBete.
ABTomaTnueH peKIM c HnCKa JnteHTHOCT
Moxete cbuo da aKTHBnpuTe onueta ALLM (ABTOMATUeH pexm C HnCKa JATEHTHOCT) B MeHIO To HAcTpoN>YcTPOINCTBa. Ako Ta3n 0yHKnra e AKTNBUPHa, TeJIeBN3OpbT ABTOMATUHNO PpeBKnOuBa peXIMHa KaPTUNHATA B Nrpa, Korato ce noJyHu CNrHal OT pexm ALLM OT Tekyunia HDMI n3TouHnk. TeJIeBN3OpbT Ce Bpbua KbM npednHaTa HAcTPOJa Ha pexmHa Ka KaptnHaTa, Korato ce 3ary6n ALLM CNrHaIbT. Taka ye Hma Da e Heo6xOdmo da npomeHte HAcTPOINTE pbHo.
Ako onueta ALLM e akTnBupaHa, pexmbl Ha KaptnHaTa He MoKe da 6bde npomeHe,doKaTo ce nOnyuaba ALLM cnHan ot Tekyunia HDMi n3ToUnk.
3a da φyHKUOHnpa φyHKUYTA ALLM cBbP3aHaT aHactpoiKa Ha HDMI n3ToUHnKa Tp86Ba da 6bde 3aJaDeHa Na PoDo6peHo. MoXeTe da npomEnTe Ta3n HAcToPiKa OT MeHIO To N3ToUHnCu> HAcToPiKn Ha n3ToUHnKa nPi OT MeHIO To HAcToPiKn> CnCTema> N3ToUHnCi.
EneKtpoHNO pkoBOdCTBO
MokTe Da oTKpHeTe HnCTpyKcHn 3a 0yHKcHnTe Ha Baunr TeJIeBn3Op B eJNEKTPOHHTO pkoBOdCTBO. 3a da nOnyuTne DoCTbN Do eJNEKTPOHHTO pkoBOdCTBO, BJe3TE B MeHIO HAcTPOKn, n36peTe PkoBOdCTBa n HATnCHete OK. 3a 6bp3 DocTbn HAtnCHete 6yToHa Hauano n CneI TOBa 6yToHa INΦopMaunr.
C nOMOHTa Ha 6yToHnTe 3a nocoka n36peTe JKeJHaHata TeMa n HATnCHeTe OK, 3a Da npoTeTe INHCTpyKUInTe. 3a da 3aTBOpHTe ekpaHa Ha eNeKTPoHHn HApBuHNK, HATnCHeTe 6yToHa N3xOd nn Haayano.
3a6eIekka:B 3abucumocm om modena meenebu3opb m Bu moke da He noodpbka ma3u qyHKua. CbdpkaHuem Ha enekmponHom o pbko8oDcmeo moke da ce pa3nuaba e 3a6ucumocm om modena.
Позцин Ha MeHTo,HaCTpoiKn"
3aKlIOUvBaHe Ha MeHIO: Ta3n HAcTpoiKa pa3peuBaBnI 3a6paHЯBa DoCTbNa Do BCnUKN MeHOTa NIN HCTaNaOHH MeHOTA Ha TeLEBn3opa.
YnbTbaHe: Ta3n HactpoKa NO3BOJRA NJI
DeakTNBIPA DOCTbNa DO HAKON OT npINOKeHnTa
MHEG. DeakTNBIPAHnTe npINOKeHnMaorat Da ce
aKTHBnPa Tpe3 BbBeKdAne Ha INH KoJa.
3aKIOUbaHe 3a HENbJHOJeTHN: AKO ce BKNIOuNTa3n ONU, TeJIeBn3OpbT B3mAm INHΦOpMaunraTa 3a HENbJHOJeTHN OT npOrpamata n aKO Ta3n npOrpama He e pa3peSeHa, He NOKa3Ba KapTuHa n 3Byk.
Bekka: Ako onuyma "Dbpxaa" no epeme Ha NpboHaanHomo uHcmanupane e HacmpoHa Ha PhaHua, Umanu unAecmpure, cmoHocmma Ha Podumenckua KOHpmonue 6bde hacmpoHa no npda3bupahe Ha 18.
3akJIOUvaHe 3a Deca: Ako Ta3n OOnuE hAcTpoeHa B NO3nCnB KJI., TeJeBn3OpbT MoKe Da ce ynpabNba cAmO OT DnCTaHcNoHHTo ynpabNeHne. B To3n Cnyaay ynpabJaBaunTe 6yToHn Ha TeJeBn3OpbT HMa Da yHKUHOHpaT.
3aKIOUbaHe Ha HHTepHeT: Ako Ta3n OOnuH e HAcTpOeHa Ha BKn., yCTpoiCTBaTa, n3NoJ3BaUn HHTepHeT, ige 6bDaT DeakTbHpaH. HAcTpOiTe Ha N3Kn., 3a da pa3peWnte OTHOBo npInOKeHneTo.
HactpoBbAhe Ha INH: DeOpHnpa HOB INH KOJ.
CICAM INH kOJ no noDpa36upahe: Ta3n onuia ue ce noa nocBena, aKO CI moyIbT 6bJe nbxHaT B Cl cnoTa ha TeleBn3opa. MoKeTe da npomeHnte INH kOJa no noDpa36upahe Ha CI CAM c nomoUta Ha Ta3n onuia.
BeneKa: INH KOBm no nodpa3bupaHe e Hacmpoeh Ha 0000 unu 1234. Ako cme hacmpouu INH KOD (u3uckea ce 3abucumocm om u36paHama dbpkaea) no epeMe Ha PbpOHauHnO uHCTaHnPae, u3non3eAime ebedeHua om bac INH KOD. B cnuyai, ue INH KOBm 6bde ebedeH He npabunno nen mbu nocledobameJHo, ebexdoHema Ha INH ue 6bde 6nokupao u eue Hma da e b3MOxHO da ce HanpaBu HOBO ebexdahe e npodbnXeHue ha 30 Muhymu. Moxe me obae da de6nokupame ebexdoHemo HA INH unu da hynpame 6por Ha nobmopHume onumu Ha hyna, kamo u3KnIOUme u ekIIOUme meNeBU3opa.
HraKou onuu MoKe da He ca Ha pa3noJoxHe 6 3aBucumocm om Modena u/Unu u3bopa Ha dbpkaea npu PbpBOHaayanHTo IHCTaInpahe.
EneKtpoHeH cnpaBOuHnK Ha nporpaMnte
Upe3 cyHKnraTa 3a eNeKtpoHNO nporpaMHO hAcOuBaHe Ha TeJIeBn3opa MoKeTe Da npeIeJaTe rpaФnka Ha CbINTyHa NHCTaIIpAHite NOHAcToIeM KaHAn B CnCbKa CN C KaHAn. 3aBnCn OT TOBa, DaJI N Ta3N cyHKcNr Ce NODbPxa NN He.
3a Da Bne3eTe B pkoBOcTBOTO 3a nporpaMn, HATNCHEte 6yToHa PkoBOcTBo Ha BaWeTo DCtAnuOHNo ynpabJeHne.OCBeH ToBa MoKeTe Da N3NOJ3BATE ONUraTa PkoBOcTBo B MeHIO TeNeBu3Op.
Ima 2 da pa3nHn Bnda rpaqunHn oopMneHna, XpoHOnOruHa rpaKa n Cera/CneDbau. 3a da npBkIOUbATE MExdy Te3n OOpMneHn, MapKpaiTe pa3deJa C HMeTO Ha aNTepHaTHNBHO OOpMneHne B rohpata Yact Ha ekpaHa n HaTNChe TE OK.
I3noJ3BaIte 6yToHITe 3a nocoka, 3a da npemHeTe npes pkoBoDCTBOTO 3a nporpaMn. I3noJ3BaIte 6yToHa Ha3aI/BpBzane, 3a da I3noJ3BaTe OuncInTe Ha pa3deNa B rophata yact Ha ekpaHa.
Iporpama no BpeMe
B Ta3n onu 3a oopomneHne BcNkCb6ntna OT n36poehnte kaHJI N ce Ce noka3BaT NO BpeMeBa nnHra. MoKeTe Da n3noJ3BaTe 6yToHnTe 3a NoCoka, 3a da npemHeTe npe3 cnncbKa Cbc Cb6ntnTa. MapKupaIte cb6ntne Hnatnche T OK, 3a da ce nokaxe MeHIO TO c onu 3a Cb6ntna.
HaTnCHeTe 6yToHa Ha3aI/BpBuaHe, 3a Da n3no3BaTe HAIuHnTe OunB pa3deJa. MapKnpaTe pa3deJaΦnTbp HATnCHeTe OK, 3a Da BnDInTe OOnHTe 3aΦnTprpaHe. 3a Da npomeHte OopmLeHneTo MapKnpaTe Cera/cneDbauN HAtncHeTe OK. MoKeTe Da n3no3BaTe OOnHTe PpeMWeH DeH N CneDbauchen, 3a Da ce nokaxat cb6ntnaTa 3a npednHnYnn CneDbaun DeH.
MapknpaTe pa3eJa Ekctpn HaTnchete OK, 3a da nOnyuHTe DoCTbN Do ONUNTe No-dony.
MapknapaH KaHp: Noka3Ba MeHHTO MapknapaH KaHp. N36epTe KaHpa HaTnCHeTe 6yToHa OK.
Cb6ntyraBpbKOBOcTBOTOHa nporpamata, cBOTBeTcBaun Ha n36paHn JxHp, ige 6bdat Mapkpapn.
PbKOBOCTBO 3a TbpceHe: Poka3Ba onuNTe 3a TbpceHe. Kato n3no3Bate Te3n onuH, MoKeTe Da npereNaTe 6a3ata daHHc nporpaMHte yka3aHnB CbOTBeTcBHe c N36paHnTe KpHTepnN. CbBnadaunTe pe3yJrTaTu 6bDat n36poEHn.
Cera: Ioka3Ba TekyuTo Cb6nTne Ha MapKnpaHna KaHaI.
Maza6npahe: MapkpaTe nHaTncHete OK, 3a Da BVNDTe Cb6uTnaTBA WIPOK BpeMeBn HHTepBaJ.
Tekyua/CneBbau nporpama
B Ta3n Oonu 3a oOpomne Hne ue ce noka3BaT cAmo TekyuNTe N CneDbauNTe cb6ntna OT n3bpoHnte
kaHann. MoXeTe Da n3non3BaTe 6yToHnTe 3a Nocoka, 3a Da npemHHete npe3 cnncbKa cbc cbntnTa.
HaTnCHeTe 6yToHa Ha3aI/BpBuaHe, 3a Da n3nON3BaTe HAnuHInTe onuB pa3deJa. MapkpaiTe pa3deJa HnTbp N HAtnCHeTe OK, 3a Da BnDInTe ONuNtE 3a QnTnpaHe. 3a Da npomeHInTe oOfOpMneHneTo MapkpaiTe BpeMeBn cncbK n HaTnCHeTe OK.
OnuHa c6bTuTnTa
N3noJ3BaIte 6yToHInTe 3a NocOKnTe, 3a Da MapKnpaTe Cb6HTne HATNCHeTe 6yToHa OK, 3a Da NOKaKeTe MeHIO OnuIN 3a Cb6HTneTo. Ha pa3noJoxKeHne ca CJIeHNTE OOnU.
H36op Ha KaHaI: H3noJ3BaIKn Ta3n 4yHKcIa Bne MoKeTe Da npEbkNIOUHTe Ha H36paH OT Bac KaHaI, 3a Da ro rIeIate. PbKOBOdCTBOTO 3a nporpaMnte Ue 6bDe 3aTBopeHo.
DOnbJHnTeJIHa HhOpMaun: Noka3BaHe Ha noIpo6Ha HhOpMaun 3a n36paHOTo cb6HTne. I3noJ3BaIte 6yToHnTe 3a nocoka Harope n HADony, 3a da npebbptnte Tekcta.
HactpoBaHe Ha TaMep 3a Cb6ntne / N3TpNaHe Ha TaMep 3a Cb6ntne: N36epTe OnuTa HActpoKa Ha TaMepa 3a Cb6ntne n HATnCHete OK. MoKTe Da 3aJaTe TaMepn 3a 6bDeuN Cb6ntna. Cb6ntNeTo 6e 6bJe Do6aBeHo KbM CNNCbKa C TaMepn. 3a Da OTMeHnTe Beue HACTpoEH TaMep, MapKnpaTe TOBa Cb6ntne n HATnCHete 6yToHa OK. CNeD ToBa N36epTe N3TpNaHe Ha TaMep ot OOnuTa Cb6ntne. TaMepbT ige ce OTMeHN.
3 AM TbpcHe n peXnHa aKtyaJn3aun
BaunrTeNeBn3Op 3a HObN aKtuaH3auu B 3:00 yaca, aKO onuTAt ABTomTuHcKaHnpaHe e B No3nPa Pa3peSeHo n aKO TeNEBn3OpbTe cBbp3AH KbM Ha3eMeH ePhipeH CnHaJI NIN KbM HHTepHET. Ako 6bJe HamepeH HOB coΦTyep n Toi 6bJe CBAJEn ycneHNO, ToI 9e 6bJe IHCTaHnpaH npCJIeDbaOTo BEKJIIOvBaHe Ha TeNEBn3Opa.
3a6eKka: He u3KnIOuBaUme 3axpaHeauaJra Ka6en, dokamo cemoduoobm Muza no epeme Ha npoueca Ha pecmapupahe. Ako meJeBuaOpb m He ycnee da ce 6knOyu cne akmyanu3upahe, u3KnIOyeme 3axpaHeaHemo, u3aKaUme dee Muhymu u omHOo EKnIOyeme 3axpaHeaHemo.
Bcuku akmyanu3auu ce KOHmpolupam avmomamuhyo. Ako ce u36bpu puho mpcene u He ce Hamepu codmyep, moea e mekyama cepura.
OCTpaHReBaHe Ha HEn3npaBHOCTN & CbBETN
TeneBn3OpbT HMa da Ce BKnIOUH
YBepete ce, ye 3axpaHbau nka6e e BkIouen npabnHO B KOHTa. Hatnche 6yToHa ha rTOBOHOC Ha DCtAHcIOHHO ynpabneHne.
Jlowa KaptnHa
- YBepete ce, Ye npaBnHcTe HacTpOnJN TeJIeBn3Opa.
HnCKOTO HnBO Ha CnHaJa MoKe Da npuHHn CmUeHnB KApTHaT. MoJ npOBepTe aHTeHHnte Bp3Kn.
- PpOBepTe dAni CTe BBBn npaBnHaTa YecToTa Ha KaHJa, aKO CTe n3BbPbBaI npbUHa HAcTPOKa.
HЯma n3o6paXeHne
TeNeBn3OpbT He nOlyuBa CnHaJI.N. YBepeTe, ye cTe n36paJI npaBnHnIaR BxOd Ha n3ToUHnKa.
-Даи aHTeHaTa e npaBnHNo CBbp3aHa?
-Даи e noBpeH Ka6eJbT Ha aHTehata?
-Даиca n3noJ3BaHn noJxOJaU nIeKepeN 3a CBbp3BaHe Ha aHTehata?
Ako cIbpxkaHneTo e noJyHeO ype3 HDMI BXoI, ONtaiTe Da npomeHnte HacTpoiKaTa 3a BXoJeH n3ToUHK Ha HDMI Ha NDo6peH nn PeDObEH OT OUnyTA HAcTPOkN Ha n3ToUHKa B MeHIOTo N3ToUHKn nn OnuYra N3ToUHKn B MeHIOTo HAcTPOkN> CnCTema.
- Ako imate cblmheHna, cBbpxKeTe ce c Baunra TbproBeu.
Hama 3Byk
- PpOBepTe DaJIH 3ByKbT Ha TeJIeBn3Opa He e n3KnIOueH. HATNCHe 6yToHa Mute uN yBeIuYeTe cINaTa Ha 3ByKa, 3a da npOBepNTe.
3BykT ce YuBa cAmO OT eINHnB BNCOKOROBOpnteI. PpOBepTe HAcTpOnKtPe Ha 6aHaHca OT MeHIO "3Byk". - PpOBepete daJIOnOpuTa N3XoJHa 3Byka e 3aJaDeHa npabNJHO OT MeHOTO 3ByK.
Ako cbdbpxaHneTo e noJyueHo ype3 HDMI BXoJ, onntaTe da npomeHte HactpoiKaTa 3a BxOJeH n3TOUHnK Ha HDMI Ha NDo6peH nn PeoBHeOT ONuTAta HactpoiKn Ha n3TOUHnKa B MeHIOTo n3TOUHnCi nn ONUrTa N3TOUHnCi B MeHIOTo HactpoiKn> CnCTema.
HaTnucHe T WPS Ha Baunia wifi pyTeP
Ako MoEmbT/pyTeBt Bn nMa WPS, moKeTe DnpeKTHO da ce CBpXeTe KbM Hero 6e3 da BBBeKdaTe napOJa nn PbBO da doabAte MpeXa. MapKnpaIte onuYta "HaTncHe T WPS Ha Bauny wifi pyTe" n HATNCHeTc OK. OTnDeTe Ha Bauny moEm/pyTe n HAtnCHeTc 6yToHa WPS Ha Hero, 3a da ocBueCTBnte CBbp3BaHe. Ye BnInTe NOTBbpxJeHne Ha Bpb3KaTa Ha TeLeBn3Opa, cNe KaTO yCTpoiCTBaTa ca CDbOeHn. N36epTe OK, 3a da npOblJxNte. He ce n3nckBa DonbHNHTeJIHa KOHnrypauia.
Tect 3a ckopoctTa Ha uHTepHET Bpb3kaTa
MapknpaTe Tect 3a CKopoCT Ha nHTepHET n HATnCHete 6yToHa OK, 3a Da npOBepNTe ckopoCTTa Ha BaWata nHTepHET Bpb3Ka.
Pa3upeHn Hactpoyn
MapkpauTe Pa3wupenH HactpoKn n HaTnchte 6yToHa OK, 3a Da OTBOpNTe MeHOTo 3a pa3wupenH HAcTPOKn. N3NoJ3BaIte HACOVAuN uNΦpOBn 6yToH, 3a HAcTPOKnata. IpOceDypata e cbuaata, KaKTo e o6rCheHa 3a Ka6eHnA Cbbp3aHOCT. MapkpauTe 3ana3BaHe n HaTnCHete 6yToHa OK, 3a Da 3anaMeTne HAcTpoKnTE, KOrato ca 3aBbPWeHN.
Pexm Ha rTOBHOCT B Mpeka
Moxete da akTbupate nIe deakTbnpate yHKuaTa 3a MpeKOB pexnHa rotobHOCT, KaTO 3aadTe cBOTBeTHO Ta3n Oun. BnxTe pa3deJa Pexm Ha rotobHOCTB MpeKa 3a DonbHnTeHnHa HOpMaun.
Dpyra HOpmaun
CtaTycbT Ha Bpb3kata 6bde noka3aH KaTO Cbbp3an HHe cBbP3An n Tekyuia IP aDpec, ako Bpb3kata e OcbIeCTBeHa. MAC aDpecT Ha Baunr TeneBn3Op cbIo ige Ce nokae Ha ekpaHa.
Cbbp3BaHe KbMaBaaeTo Mo6nHNo ycTpoiCTBO 4pe3 WLAN
AkoMO6HNOTo BN yCTPOINCTBO nMa WLAN, MoXeTe Da CbpxKeTe TeneBn3Opa npe3 pyTeP, 3a Da NOLyHTe DOCTbN Do CbDbpxKaHNeto BV CTPOINCTBO. 3aTOBa BaWEto MO6NJHO yCTPOINCTBO Tp6Ba Da pa3NoIara c NoJxOJaUcΦTyep 3a CnoJeTHe.
CbpxeTe TeJebn3opa cn KbM MapwpyTu3aTopa cn, cIeDbaKu CTbKnITE, NocOueHn B rOpHnTe pa3denn. Cnei TOBa, CbpxeTe BaWeto MO6nHNO yCTpoNCTBO KbM pyTepa n Cnei TOBa aKTINBupaHTe coΦTyepa 3a cnoJeIHe Ha Mo6nHTo To Bu yCTpoNCTBO. Cnei TOBa n36epTe faInOBete, KOnto 6nxTe nckaJI Na cnoJeNTEc Baunr TeJebn3Op.
AkoBpb3katae yctaHOBeHa npabNlHo,ue IMate DoCTbI Do CnoDeHEnTe paInoBe, HcTaInpaHI Ha BaWeTo Mo6nHNo yCtpoiCTBO, Upe3 cyHKunra AVS (CnoJeJIHe Ha ayDIO BnDeO) Ha BaIINr TeJIeBN3Op.
MapKnpaIte OIeAVS B MeHIO N3ToUHnI HATNCHETe OK, HAJIuHInTe yCTpoiCTBa Ha MeINHnIcBpBbp B MpeXaTa Ie ce IoRbT. N36epTe BaWetO MObNHO YCTPOIcTBO IN HAITNCHETe 6yTOHa OK, 3a Da IIPODbJIIXTE.
Ako e HauHNO, ot DoCTaBvika Ha npInIOxKeHneTo 3a BaneTo MObINHO yCTpoIcTBo MoKeTe Da n3TeRnITE npInIOxKeHne 3a BnPTyALHO dNCTaHcNoHNO ynpabLnHe.
Benexka: Te3u cyHKuu MoKe da He ce noobpKam om BCu4ku MO6unHu ycmpoucmea.
06pa6oTKa Ha nHΦopMaζηrTa 3a KπηENTa
Ipn n3noJ3BaHe Ha cyHKnraTa 3a Cbbp3BaHe KbM INHTepHET Ha To3n TeNeBn3Op, cnei CbrrnacyBaHe C yCNoBnraHa Ycnyrata / DeKnapaun 3a NOBepntenHocT Ha Panasonic (Hapuahn no-dony "O6uynycNoBn" n T.H.), HOpopMaunraTa 3a KIneHTa OTHOCHO n3noJ3BaHeTo Ha TOBa UcTpojCTBO MOKe da 6bJe Cb6paHa n n3noJ3BaHa CbrrnaCHO ycNoBnTa n T.H.
3a noDpo6Hocn OTHOCHO yCNOBnraHa ycnyraTa /deKnapaunra 3a NOBepNTeJHoCT BNXTe [HOME] HAcTPOkN > Cnctema > NOBepNTeHocT> HAcTPOkN 3a NOBepNTeHocT.
JInuHaTaNHOpMaun Ha KIneHTa MoKe da 6bde 3aIncaHa Ha To3n TeJeBn3Op OT n3JIbYBa7a opraHn3aun IIN DoCTaBvHK Ha npINOKeHn. Ppei Da peMOHTnpaTe, IpexXBpNITE INn IN3XBpNITe TO3n TeJeBn3Op, INTPnTE cIyNaTa INHOpMaun, 3aIncaHa Ha To3n TeJeBn3Op, CbIpaCHO cIeDHaTApnoeDypa.
[HOME] INhctanaqna>NbpbBOHaayanHa INhCTanaqna
HOpMaunTa 3a KIneHTa MoKe Da 6bJe Cb6paHa OT DoCTabUka Ype3 npInOxKeHne, PpeDoctabeHo OT TpeTn Iuca Ha To3n TeJebN3Op nIu ye6caiT. MoJIra, NOrBbPdTe CpOKOBTe n ycNoBnra T.H. 3a npEdBaPntHa 3aBAka.
Panasonic He Hocn OTROBOPHOCT 3a Cb6npaHTo nn n3no3BaHeTo Ha INHOpMaucn 3a KIneHTnte Upe3 npINOxKeHne, npEOctabeHo OT TpeTa CtpaHa Ha To3n TeJIeBN3Op nn Ye6caIr.
Korato BbBexJaTe Homepa Ha KpeiTHaTa CN KapTa, IMeTo N T.H., ObpHeTe CneuJHIO BHIMaHne Ha NaExdHOCTTa Ha DoCTaBuNka.
PernctpupaHata HOpmaun MoKe da ce pernctpupa Ha cbpBbpa N T.H. Ha DoCTaBnuKa. Ppei Da peMOHTnpate, npexBbPnTe nn n3XBbPnTe To3n TeJIeBN3Op, He 3a6paBnTe da n3Tpne HOpmaun Ta CnopeJ yCNOBnTa N dp. Ha DoCTaBnuKa.
Pexm Ha TOTOBHOCT B Mpexa
PexmbT Ha rotobhoCT B mpeka e ctaHdapT, KOITO NO3BOJRA BaIaDEHO yCTPOINCTBO Da 6bJe BKNIOUeHO INN Cb6yDeHO OT MPeKOBO CbOSeHne. CbOSeHneTO ce N3npaHa Ha yCTPOINCTBOTO OT npOrpama, N3NbJIHeHa OT DnCTaHcNOHHO yCTPOINCTBO, CBp3aHO KbM CbUaTa IOKaJHa Mpeka, KaKTo cMapT TeJefoHa.
3a da akTbBpTa Ta3nФyHKU,3aJaTe onuYta PexMM ha roTOBHOCT B MpeXa B MeHIO To MpeXa KaTo BKn. Heo6xoDIMO e DBeTe yCTPOINCTBa,OT KOnTO 1e 6bDe n3npaTeHO MpeXOBOTO Cbo6ueHne KbM TeLeBn3Opa, n TeLeBn3OpT Da 6bDaT Cbbp3AHN KbMa EHa N CbSha MPexa. FyHKUra T B peXMM ha roTOBHOCT B MpeXa Ce NOdIbPka cAmo 3a yCTPOINCTBa c Android OS n MoKe Da ce I3NoJ3Ba cAmo Ype3 npINOxEHHa YouTube n Netflix.
3a da n3noJ3BaTe Ta3nФyHKU, TeJIeBn3OpbT n DnCTaHcNoHHOT yCTpOInCTBO Tp6Ba Da ca Cbbp3aHn NOHe BeHbX, DOkATO TeJIeBn3OpbTe 6IN BKNIOueH. Ako TeJIeBn3OpbTe n3KIOUeH, Bpb3KaTa Tp6Ba Da ce Bb3CTaHOBn pRn CJIeDbaOTo BKIOUVAhe. B npOTuBeH cIyuaNfYHKUraTa HMA Da e aKTUBHa. TOBa He BaXn, AKO TeJIeBn3OpbTe BpeXIM Ha IOTOBHOCT.
Ako nckate TeIeBn3OpbT Bn da KOHCymnpa Nomanko eHepnBpeKIM Ha rTOBHOCT,MOKeTe DaDeakTNBpuATE Ta3N FyHKun, KaTo 3aJaTe OOnrTaPeKIM Ha rTOBHOCT B MpeKa KaTo N3Kn.
Be3xuyeH ducnne
БeЗкчнгдиспл徳 e cTaHДapT 3a CtpиMuHr Ha Bndeo n aydno cbdbpxKaHneTo. Ta3n no3BoJraBa N3NoJ3BaHepTo Ha TeJIeBu3Opa n KaTO 6e3KuHEn DIncПл徳.
YnOtnpe6a c MObUHn yCtpoNCTBa
CbuecTByBaT pa3nHn CTaHdapTu, KOITo NO3BOJRAB CnoJeIHe Ha ekpaHn, BKNIOHTeNHO Ha rpaΦuHNO, BVdeO n ayDnO cbDbpxAHaNe MExy BaWeTo MObUNHO yCTPOIcTBOn TEJIeBn3opa.
Пьрв Вкючete 6e3хичня USB npneMHNKВ TeNeBu3opa,ako TeNeBn3OpbT He pa3noIarac BbTpewHa WLANФункци.
HaTnchete 6yToHa Source Ha nCTaHcNoHHoTo n npEbkIIOUeTe KbM Wireless Display source.
IorBaCeekpaH,KOITOnNOKa3Ba,YeTeJIeBn3OpbTe roTOB 3a Bpb3ka.
OTbopTe npnIOxHHeTo 3a cnOeJIHe Ha MO6NJHOTo Bn ycTpoIcTBo. Te3n npnIOxHHe HocrTa p3NHyHO HanMeHOBaHne 3a BcRA Ka MapKa, 3a noDp06Ha
HOpMaunBnKTe pkoBDCTBOTo 3a eKcnnoataua Ha BaWeTo moNIOHOyCTPOINCTBO.
TbpcTe yctpoiCTBa.CneI KaTo n36epTe Baunr TeLeBn3Op I ro CbPjKeTe, ekpaHbT Ha BaWeto yctpoiCTBO ige ce NOKaKe Ha TeLeBn3Opa.
BeneKa: Ta3u fynkuu MoKe da ce u3non36a cmo, ako MobunHomo ycmpoucMBO cbuo nodbpxka. Ako umame npo6nemu c 8pb3kama, npoepeme danu epcuyma ha onepauonHama cuscema, koryo u3non36ame, no0dbpxka m3u fynkuu. MoKe da uma npo6nemu cbc b6mecumocmma Ha cepcuume Ha onepauonHama cuscema, koumo ca nychamu cneD npou3bOcmeo ha mo3u meNeBu3Op. Ipouecume Ha ckanupahe u c6bp3BaHe ce pa3nu4abam 3abucumocm om npoapamama, koryo u3non3eame.
OTcTpaHЯBaHe Ha Heu3npaBHOCTn, Cbbp3aHn Cbc Cbbp3BaHeTo
Be3KnUHaTa MpeKa He e HaInuHa
- YBepete ce, ye 3aunTHnTE cTeHn Ha BaWata mpeXa no3BOJRABaT 6e3xUHa BpB3ka KbM TeJeBu3Opa.
- OntaTe OTHObTbpcHe Ha 6e3KuHmMpexn, n3NoJ3BaKn ekpaHa Ha MeHIOTo Mpexka.
Ako 6e3xuHaTa MpeKa He cyHKUOHa pa npaBnHOb, onntaTe da n3noJ3BaTe ka6enHaTa MpeKa B doma BN. BuXTe pa3dena XnUHO CBp3BaHe 3a nobuee HOpMaunr OTHOCHO npoeca.
Ako TeIeBn3OpbT He cyHKcNoHnpa c Ka6JIHaTa Bpb3Ka, npOBepTe MoDema (pyTepa). Ako MapwpyTu3aToPbT He e npo6Jem, npOBepTe INHTepHe T Bp3kata Ha Baunr moEm.
Cbbp3BaHeTo e 6aBHO
BnKTe KnHrata C nHcTpkyuHa Baunia 6e3xuueH MoDEM, 3a Da nOnyUHe INΦopMaunia 3a BbTpeuHaTa 3oHa Ha o6CnyXBaHe, CKOpocTtHa HbPb3KaTa, KaueCTBOTO Ha cnHana I npYn HacTpoKn. Tp6Ba Da imate BnCOKOCOPoCTHa Bp3Ka 3a BaUnia MoDEM.
Hapyuene no BpeMe Ha Bb3npoN3BekdaHe nn 6abn peakun
Mоже до onntaTe cneHOTO,В тakbB cnyuан:
CbxpaHbAte Ha-MAJIO TPN MeTpa pa3CTOHNeOT MKNPOBbNHOBN PeKNU, MO6NJH NTepeOHn,Bluetooth yctpoiCTBa nIN dpyrWLAN cBBMeCTmNyyctpoiCTBa. ONntaIte da npomeHnte AKTNBHn KaHaJI Ha WLAN pyTep.
He e haInuHa nHTepHET Bp3ka / CnoJeIaHe Ha aydno BVdeo faiNoBe He yHKuOHnpa
Ako MAC aDpeca (yHnKaJIeH nIeHTnФIKAToP, HOMep) Ha Baunr KOMNIObTp IIN MoE mEOCTOHa perncTpaunr, To e Bb3MOxHO, Ye Baunr TeJeBUN3Op He moKe Da ce CbpxKe c INTEpHET. B TaKbClyuai, MAC aDpec Ce 3aBePraBt BCEKn NbT, Korato Ce CbpxKeTe KbM INTEpHET. TOba e npedna3Ha MApka cpeuy HeOTOpn3npan DocTbn. Tb KATO Baunr TcneBUN3Op Ima CBOA CO6CTBEN MAC aDpec, Baunr INTEpHET DOCTaBUnk He MoKe Da npOBepn MAC
aDpeca Ha Baunr TeBn3Op. Iopadn Ta3n npuHna, Baunr TeBn3Op He MoKe Da ce CbPke C nHTepHeT. CbPkeTe Ce c Baunr DoCTabvnK Ha nHTepHeT ycnyr N da noncKa nHOpMaunr 3a ToBa KaK Da ce CbPke C dpyro yctpoiCtBO, KATO HAnpImep Baunr TeBn3Op, nHTepHeT.
Bb3MOxHo e cBsqO, Ye Bp3KaTa He MoKe da 6bJe Ha pa3NoJoxHe nopadn npo6IeMa 3aunTHa CTeHa. Ako cmTate, ye TOBa npuHra Ba npo6IeMa BN, CBpbKTe CE C Ba7nA DOCTaBvNK Ha INHTepHET ycLyrN. aHybpyoJIbT MOKe Da e npuHnHaTa 3a npo6IeMa Cbc CBbp3aHOCTTa N OTkpNBaHETo Ha dpyri ycTPOiCTBa, DOKATO n3non3BaTe TeNeBn3opa B pexm CnoJeIHe Ha ayDIOu N BInDeo faiNoBe nn KOrato pa3rJExJaTe faiNoBeTe qpe3 Ta3n FyHKqur.
HenpaBnEn domeH
YBepTe ce, Ye Buee Cte BHe3nB CnCTemaTa Ha BaWnK KOMNtbp C OTOp3npaH ONotpe6nteNcKO nme / npoJa, a cbto Ta ce yBepTe, Ye BaWnT JOMeH e AKTNBeH, Ppei Da cnoJeNTe faiNoBe Ype3 BaWata nporpama 3a MeDneH CbPbBp Ha BaWnKOMNtbp. Ako DomeHbTe HeBaJIndeH, TOBa MoKe Da IpeDi3BnKa npo6nEMn, DOKaTO pa3rJexDaTe faiNoBE B pexIM Ha cNoDeJIHe Ha ayDIO BVdeO.
H3noI3BaHe Ha MpeXoBata ycnyra 3a cnOdeJIne Ha ayDnO BnDeo paINoBe
Функцята 3a aydno Bndeo cnopeJHHe n3noJ3Ba CTaHdapT, KOITo o6neKUaba npoueca Ha rIeJaHe Ha uΦpOBAtA eJIeKTPoHnKa n IIN ppABn NO-yO6Hn 3a N3NoJ3BaHe B DOMaUHa MpeXa.
To3n cTahdapt Bn no3Bolra Da npereJexdaTe N Bb3npoN3BeXdaTe CHIMKIn, My3nKa N BnDeO3aINcN, CbxpaHraBaHn Ha MeiHnCbpBbp, CBbp3aH KbM BaWata DomaunHa Mpeka.
1.ИнсталupaHeHa codTyepaHa cbpBbpa
ФункцяТа Aудно/Bид�о споделян He можда ce n3noJ3Ba, ako cБрВьрHata nporpama He e nHCTaIInpaHa Ha BaWnKOMNtbp uNn aKO Heo6xOIMMncofTyep Ha MeDnHnRcBpBbP He e nHCTaIInpaHa Na npdpyXaBaUTo yCtpoIcTBO. POrTBete KOMNtbpa cn C noDxoJaA cBpBbPHa nporpama.
2. Cbbp3BaHe KbM Ka6eHa Hn 6e3XnHa Mpeka
BuxTe pa3deneIte 3a Ka6eIHa/6e3KuHa Bpb3ka 3a noDpo6Ha HOpMaunra 3a KOHnpyaunaTa.
3. AkTnBupaHe Ha cNoTeJHaTo Ha aydno n BnDeo paInoBe
Bne3Te B MeHIO To HAcTpoiKn>YcTpoiCTBa n aKTHBnpaIte onuTa CnoJeJHe Ha aydno n BVdeo.
4. Bb3npo3Bexdahe Ha cnopeHn paIIOBe npe3 MeiHn6pay3bp
MapknpaTe onuTAt AVS B MeHIO N3ToHnU, N3NoI3BaIte 6yToHnTe 3a NocOka HHaTnCHeTe OK. 5e 6bDat N36poEHN HaNCHnTe MeiHn CbPbBpHn yCTpOInCTBa B MpeXkata. N36epTe eDINH HHaTnCHeTe OK, 3a Da npOdbJnxIte. 5e ce NoRBN MeiHnTat 6pay3bp.
BnK pa3dena 3a MeHou Medueh 6pay3bp 3a DOnbHnTeHa HOpMaunr OTHOCHO Bb3npoN3BExKaHe Ha qaiJa.
Ako ce noBn npo6nem C mpeXaTa, n3KnHouTe TeNeBu3Opa OT KOHTaTaN rO BKNIOUte o6pato.
PC / HDD / Medienen pnenbp nnn npyn yctpoinCTBa, KOINTO ca cbbmecTnMn, Tp6Ba da ce n3noJ3BAT C Ka6eHnHa Bpb3Ka 3a No-BnCOKo KaueCTBO Ha Bb3npOn3BexJaHe.
I3noJ3BaIe LAN Bpb3ka 3a no-6bp3o cnoJeIHe Ha paJIOBE MExdy dpYrN yCTpoIcTbA KaTO KOMnIOTpn.
Benekka: Moke da uma komnompu, Koumo He Mozam da u3non3am yHKuMa CnodenHe Ha ayduo budeo qaunoe e pezymam Ha hacmpouku Ha admuHucmpamopa u hacmpoukume 3a cuayphoc (Ha npumep 6u3hec Komnompu).
PpnoKxHn
MoKeTe Da nOlyuHrTe DoCTbN Do npJIoKHeHnra, HcTaNpaHn Ha Baunr TeNeBn3Op OT MeHIO Hauano.. HaTNCHeTe 6yToHa HauaNo Ha DCtAnuHnHOTo, Ie ce NOKae MeHTo Hauano. MapKnpaTe npJIOxKeHne H HatNCHeTe OK, 3a Da cTapTnpaTe.
3a Da ynpablaBaTe npINOxKeHnTa, nHCTaInpaHn Ha Baun TeJeBn3Op, MoXeTe Da n3NoJ3BaTe OUnra Ta OSe npINOxKeHn B MeHIOTo Ha TeJeBn3Opa. MoXeTe Da DoabuTe nHCTaInpaHO npINOxKeHne B HauaHnTO MeHIO, Da rO CTapTnpaTe nIN npemaxHeTe. MapKpauTe npINOxKeHne n HATncHeTe OK, 3a da BNInTE BCNUKN HAIuHn ONUIN.
Moxete da do6abrte HOBn npINOxehn O T Ma3nHa 3a npINOxehn. 3a doctb n DO Mara3nHa MapknpaTe onueta Market B MeHOTo Ha TeJeBn3Opa N HATNCHEt OK. Ue ce nokaxat hAnuHnTe npINOxehn. Moxe Cbto Taka da noyuHTe DoCTb n DO na3apa OT MeHOTO Oue npINOxehn.
Mokete Da Bb3ctaHOBITE HactpoiKITE CN BaHauJIHOTo MEHIO, BKJIOUHTeJIHO CBbp3AHNTe C npINOxKeHHeTo, NO noDpa36upaHe, KATO n3NOJ3BaTe OOnuTAta Reset Apps B MeHtO Ha TeJeBn3Opa (HaJIuNHOCTTa 3aBncn OT MoDeJa Ha TeJeBn3Opa N HerOBITE yHKcun).MapkpaiTe Ta3n OnuN HaTNCHEt OK. Ie ce No8Bn ekpan Ce No8BBA cb06ueHne 3a NotBbpXkDeHne. MapkpaiTe DA
nHaTnCHeTe OK, 3a Da npOdbJnxIte. O6bpHeTe BHHMaHHe, Ye HMa Da MoXeTe Da N3BbPUnTe Ta3N ONepaunr OTHOBo B pAMKInTe Ha CJIeDbaUInTe HAKONKO MNHyTu.
3a6eJexKu:
EbeHmyaHomo npunaahe 3aeucu npoBneMu Mozam da 6bdam npuunehu om docmabuka Ha cbdbpxahue, ycnyu. Hmephem yclyaume ha mpemu cmpahu Mozam da ce npomeharm, da ce npekpmam unu opaHuyam no ecaKO epeMe.
INHTepHeT 6pay3bp
3a da n3noJ3BaTe nHTepHET 6pay3bpa, npBBO Bne3Te B MeHIO Hauano CneT TOBa cTApTnpaIte npJIOKeHHeTo Ha nHTepHET 6pay3bpa, KOeTO mA opAHKeBO Ioro Cbc CmB0N Ha 3emrTa.
Ha nbpbohaunnaekpan Ha 6pay3bpa,CHIMKNTe Ha npedBapntenHO 3aadaHnTE (ako nma TaKNBa) INHKOBe KbM HauuHnry ye6caT, ige ce NOKaKaT KaTO onuIN Bp3o Ha6npaHe, 3aeDHO C ONuNtE PeaktnpaHe Ha 6bp30To Ha6npaHe I Do6abRHe KbM 6bp3o Ha6npaHe.
3a da ynpablaBaTe ye6 6pay3bpa, n3non3BaTe 6byoHnte cbc cTpeKn OT dNCTaHcNoHHOTO ynpabIeHne nn CBbp3aHaTa Mmka. 3a da BnDte IeHTata C onuHa 6pay3bpa, npemecTe Te Kycpcopa B rohpata qact Ha cTpaHuaTa. OnuHnte Nctopna, Pankn OTMekn IeHTata Ha 6pay3bpa, KOrTO cbDbpka 6ytoHnte previous/next, 6yTohBT refresh, aDpechata JeHTa/JeHTata 3a TbpceHe, 6byoHnte Speed Dial n Vewd ca HAnuHN.
3a da do6abnte kehaata ctpanuca KbM cnncbka Bbp3o h6npahe 3a 6bp3 Doctbn, npemecte Te Kypcopa B rohpata yact Ha ctpanuata. Ie ce nOBn leHTata Ha 6pay3bpa. MapknpaTe 6ytoHa Bbp3o n36npahe H aTNCHETe OK.Cnei TOBa n36peTe onueta Do6abnHe KbM 6bp3o h6npahe n HATNCHETe 6yTOHa OK.IonblHete npa3Hnte MeCTa 3a IMe n Adepoc, MapknpaTe OK n HATNCHETe 6yTOHa OK, 3a da do6abnte. DOKato CTE Ha ctpanuata N NCKate Da do6abnte KbM CNscbKa Bbp3o h6npahe, MapknpaTe 6yTOHa Vewd n HATNCHETe OK.Cnei TOBa MappknpaTe onueta Do6abnHe KbM 6bp3o H6npahe n HATNCHETe 6yTOHa OK. PoneTa tMe n Adpec ue Ce nonbIHNrT ABTomatNHO CnopeD caITa, KOITO noceuabate. MapknpaTe OK n HATNCHETe 6yTOHa OK, 3a da do6abnte.
OcBeH ToBa MoKeTe Da n3n0n3BaTe OIuInTe OT MeHIO Vewd, 3a Da ynpabnBate 6pay3bpa. MapKnpaTte 6yToHa Vewd n HATncHeTe OK, 3a Da BnCnTe CneunΦnkata Ha HAnuHaTa CTpaHnca n OoUnte ONuN.
CbueCTByBat pa3nHn HauHHn Da TbpCnTe n noceaaBate ye6 caHTOBe c nomoTa Ha ye6 6pay3bpa.
BbBeTe aDpeca Ha ye6 caTAt (URL) BJeHTaTa 3a TbpceHe/aDpeChata JeHtAmapKnpaTe 6yToHa Submit OT BnPTyAnHaTa KnaBnAtypa N HATNCHeTe 6yToHa OK, 3a Da NoCetNTe CtpaHnCaTa.
BbBeTe KNoOBA(n) Dyma(n) BJeHtata 3a TbpceHe/aDpeChATA JeHTa n MapKnpaTe 6yToHa Submit OT BnPTyaJHATA KnabNAtypa N HATNCHeTe 6yToHa OK, 3a Da NocETnTe CtpaHnUata.
MapkupaTe MmHaTIOpaTa 3a 6bp3o HabnpaHe n HaTnCHeTe 6yToHa OK, 3a Da NocETnTe CbOTBeTHnrye6caIr.
TeJeBn3OpbT Bn e CbBMecTm c USB Mnka. Cbpxte Baata Mnka nIa anTep 3a Mnka KbM USB BxOa Ha Baunr TeJeBn3Op 3a no-do6pa n 6bp3a HABnraua.
HЯкоубстраици BKIOUvBaTФлаш cIbpxKaHne. Te He ce noДьржAT ot 6pay3ba.
Baunr TeBn3Op He noDbpxa npocn Ha n3TerIHe OT nHTepHET ppe3 ye6 6pay3pa.
Bb3MOxHo e He BCnUKN HHTepHET CtpaHnUd a ce noDlbpxkat. CnopeI cTpaHnUata MoKe da ce nOraBn npo6bnem cbc cbdbpxkAHneTo. Ppi HrkOn 0bCTOaTeJIcTBa BnDEOCbDbpxKaHNeto MOKe da He 6bDe Bb3PON3BeDeHO.
HBBTV cncTeMa
HbbTV (Hybrid Broadcast Broadband TV) e HOB INdyctpnajen cTaHdapt, KoITo 6e3npo6mHo KOM6HnHa pTeLeBn3NoHn ycIyI, npedocTabaHn Upe3 npedaBaHe C ycIyR, npedocTabaHn Upe3 WnpOKoJIeHTOBA Bpb3Ka I DaBa Bb3MOxHOCT 3a DOCTbN Do nHTepHET ycLyr 3a Notpe6nteJIte, n3NoJ3BaUcCBp3AHn TeLeBn3Opn N DeKOdePn. YcIyrIte, npedocTabaHn Upe3 HbbTV BkIOuCbat TpaIuCIOHHte KaHaJI 3a TeLeBn3NoHn npedaBaHn, HOBINapCKyIg, BInDeO No nopByka, eNEKTPOHe nPoIpAmEn cPpABOUnHK, INTEpAKTINBaHapeKlama, nepcoHaJIIN3aun, ynpaxHЯBaHe Ha npabOTO Ha rIac, irpn, coCuJIHN MpeKn N dpyrMMyTTIMeDeHn npINOKeHn.
HbbTV npnloxehnra ta ha nuchn 3a kaan, KbTeTo ce cnHaun3npat OT TeleBn3noHHn Oepatop. OepatopbT mapknpa eNo npnloxehne kato "ABTomatueh cTapt" I TO CTaptnpa ABTomatuHO. Npnpnucn npnloxehneTO ce cTaptnpa abTomatuHO ot IKoHata Ha MaKn yepBeH 6yToH 3a yBeDomBaHe Ha notpe6nteJ, ye To3n KaHn Ima HbbTV npnloxehne. Hatnche YepBeHn 6yToH, 3a da OTbOpnte ctpanuata C npnloxehneTO. CneI KATO CE NOBn cTpanuata, Bne moXete Da ce BbpHete KbM nbpBOHaJHOTo NoIOxehne Ha IKoHata C yepBeHn 6yToH KATO HATNCHE TNOBTO HO cepBeHn 6yToH. Bne moXete Da npEKBJIIOUBAte MExdy pexnMa Ha IKoHata Ha YepBeHn 6yToH n peXnMa IOTpe6nteNckn INTEPpeic qe3 HATnCKaHe Ha YepBeHn 6yToH. Tp6Ba da ce otBeJenx, ye cnoc6HoCTTa 3a
npeBknOuBaHe Ha cepBeHna 6yToH e ocNrypeHa OT npInoXeHneTo HЯKOn npInoXeHna MORaT Da ce IbpxkAT no pa3nueH Naun (dpyr nCbETn 6yToHn KaTO 3eNEHO, XbIto, CnHbO, MORaT da 6bDaT DeΦHHpaHn 3a HЯKOn dpyrФyHKcnn, Happ. KpaTbK PtB).
Ako npBkIIOHTe Ha dpyr KaHaJ,doKaTo e aKTHBHO HbbTV npInloXeHne (n nn B peXm Ha NKOHaTa Ha cepBeHHa 6yToH nnn B peXm POnpe6nteJcKn INTEPoeic),MOKe Da ce cnUyn CneDHOto.
- PpIIOJKeHHeTo MoKe Da npOdbJnx Da pa6oTn.
- PpIIOXeHHeTo MoKe Da 6bJe npeKbChaTo.
- Ппложенeto може да ьдe пркьсато и OTЧервеня сутон да ce рисною ппложене с abTomatун стapt.
HbbTV no3BOLJBA npnloXeHnra Ta da ce Bb3CTaHOBraT OT uPOKoIeHTOBaTa Bpb3ka nnn OT n3lbYBaHeTo. OepaTopbT moKe da n36epe DaBata nn Camo eHNHaun. Ako PnATopMaTa Hma pa6oteua uPOKoIeHTOba Bpb3ka, TRe MoKe camo da CTapTnpuLOXeHn, PpeDaBaHn Ype3 n3lbYBaHe.
PpInIOXeHnra Tc ABToMaTUnHe CTapT, 3aDeiCCTBaHn C
ueRBeHHa 6yToH, 0bIKHOBeHo npeOCTabrt npepPatKu
KbM dpYr npInIOxehn. IOTpe6nteIaT MoKe da
npEbkNIOUHy Ha dpyro npInIOxehne ype3 npepPaTKte.
PpInIOXeHnra TpRA6Ba Da npEdoCTabrt HaunHa
6bDat cinnpaHn, 0bIKHOBeHo ype3 HaTnCKaHe Ha
6yToHa N3xoA.
HbbTV npnIOxehnraTa ce ynpabIbIbAT OT 6yToHnTe Ha dinCTaHcNoHHoTo ynpabJIeHne. KoraTo e cTapTupHo HbbTV npnIOxehne, ynpabJIeHneTo Ha hKoN 6yToHn CTabaOT npnIOxehneTo. HanpImep n36OpbT Ha cnΦpOB KaHaJMOKe Da e HeBb3MOxEH B TeJTeKCT npnIOxehne, KbDeTo cNΦpNTe INdIKnpat TeJTeKCT CtpaHnCi.
HbbTV n3nckBa AV ctpnIMnH Bb3MOxHOCTn 3a nlaTopopMaTa. Ima MHoro npINOxEHN, IpednaVOD (Bndeo no nopByka) HOBnHapCKn TeNeBn3NOHn ycnyr. NOpTeJrMoKe Da n3noJI3Ba 6yToHnte Ha nCTaHcNOnHOTO ynpabJeHne 3a Bb3PON3BeXdaHe, cnnpaHe, Hanpei Ha3aI, 3a Da ynpabJraBA AV ycnyrata.
Ako Tp6Ba Da npomeHnte HactpoKnte 3a aydno Oncahne Ha Baunr TeJeBn3Op, Tp6Ba Da ro HanpaBNTe npedn Da 3anOue He Bb3npoN3BeJdaHeTo Ha HbbTV. Hma Da nMaTe DocTbn Do CbP3AHn HactpoKn No BpeMe Ha Bb3npoN3BeJdaHe. OTndTe B MeHIO To HactpoKn> CnCTema> DocTbNHOCT> Aydno Oncahne N KopuHpaIte CnpoeD BaWnte Hykdi.
3a6enexka: Moxeme da akmubape unu deakmubapame ma3u yHKua om meHIO ,Dpyu"e MeHIO HAcmpouku>Cucmema.B 3abucumocm om modena ha meeneuzopa u u36paHama om Bac onuza 3a nbpeohauHa Hcmaunupahe, mazu cyHKua moKe da e hane e MeHOMo Hacmpouku> Cucmema> LnuHu Hacmpouku emecmo e MeHOMo Hacmpouku> Cucmema> DonbHumeHn.
Alexa e rotoBa
Alexa e rnaocobata ycnyra Ha Amazon, 6a3npaHa Ha oblaunte, Ha pa3noJoxeHne Ha MHO anapatn c rnaocBO ynpabHeHne. Ype3 BrpaDeHaTa cyHKuia Alexa n pa60Tu c Alexa moKeTe Da n3noJ3BaTe TeNeBn3Opa cn KaTo yCTpOiCTBO 3a Alexa n da ynpabnBaTe cyHKUnTe Ha BaUnr Ta neBn3Op c Alexa..
Alexa BrpaedhaФункун
Moxete da n3no3BaTe TeneBn3opa cn KaTo AI exa yctpoiCTBO. 3a da HanpaBte TOBA, ue Bne Heo6xOIMMa MnkpoOhHa kyTna (^*) .CneD Cbbp3BaHe Ha MnkpoOhHata KyTna KbM TeJeBn3opa npouecbT Ha HacTroPka Tp8Ba Da npNKIOuH. HAcTroPkaTa MOXe da ce N3BbpNn NO HauHHTE, ONNCAHN NO-DOy.
(*) Mukpofohama kymu moke da 6bde 3akyneha omdenho, ako he ce docmae c meenu3opa. 3a noeeue uhopmaue ce c6bpkeme C Bauu maemeh ducmpubymop unu mbp0eum, om kozomo cme 3akunu meenu3opa.
CbpxKeTe Baata KaTna 3a MmKpOoH KbM Baunr TeJIeBn3Op
- 13no13BaIte BrpaIeHaTa onuHa Alexa B MeHIO HAcTpoKn> Cntema> IJacOB acNCTeHT
- HanpaBete nbpBaT a HcTaJaCnHa BaSha TeJeBn3Op. CbBETHnKbT 3a HacTpOka ige ce nokaxe cIeD npNKIOUbaHe Ha IHCTaJauOnHHn npouec
CbBETNkBT 3a INCTaJInpaHe 7e Bn BOJn no BpeMe Ha npoueca Ha HacTpoJka. 3a NOpO6Ha HHOpMaun BnKTe pBkoBOcTBOTo 3a NtpeBnten Ha MKNPOOHHATA KytJ.
Haapan Ha Alexa
CJIeI KaTo HAcTpoNkata npNKJIOUCh,ФyHKcIra 3a NaHauJeH ekpan Ha Alexa ue 6bJe nHTerpnpaHa. Ta3nФyHKcIra e OKoJIeH ekpan, KOItO ce nOraBBA, KOrato He ce OTKPne AKTNBHOCT Ha NOTpe6nteJIr. Ha NaHannHЯ ekpan Ha Alexa ue Ce NOKa3BaT fOHOBO n3O6paXeHHe, INΦopMaunr 3a Yac n DaTa I npEINOKeHn 3a rnaCOBn KOMaHdN.
Moxete da n3no3BaTe onuTata 3a HauaneH ekpaH ha Alexa B MeHTo HAcTpoKn> Cntema> Tlacob acnteHT> BrpaedeHa Alexa, 3a da konfnpupate HAcTPOknte Ha Ta3n fynKzna. Moxete da 3aadete eINH OT nepNOITE Ha HeAKTNBHOCT, 3a da ro AKTNBUPate, INI Da n3KnIOUHTe, 3a Da DeAKTNBUPate.
HaayaHnTekpah HaAlexa ce Noka3Ba cmo KOrato pa60Tu ye6bpay3bp nn Dpyro npuOKeHne 3a BnDeo n0 3aBka, cnKlnoueHne Ha NetfliX. POBBA ce, KOrato He e OTkpnta AKTNBHOCT Ha Notpe6nteJr NO BpeMe Ha npEdBapnteHNo 3aJaDeHnepnoD Ha 6e3dEiCTBHe, OCBen Ako He e B XOD Bb3POn3BExKaJHa MeDInr. JIeDaHTo Ha QnIM HAnpImep He ce CHTa 3a 6e3dEiCTBHe Ha Notpe6nteJr.
Moxete da HaTnchete 6yToHInTe 3a DnCTaHcNoHOnHo ynpabIeHne, 3a Da n3Ye3He. KaTo n3KnIOueHne MOxete da n3PON3BaTe 6yToHInTe 3a CNJa Ha 3ByKa +/-, 3a Da KOHTpOJIpaTe HNBOTo Ha cINaTa Ha 3ByKa, DOpN KOrato pa6OTn HauaHnIe ekpaH Ha Alexa.
Pa6oTu c Alexa
Mokete da KOHTpOIpaTe cyHKcInTe Ha BaIaIa TeJIeBn3Op c Alexa. 3a Da HAnpaBInTe TOBa, npocetbHa HAcTpoIka Tpy6Ba Da 6bJe 3aBbPWeH. HAcTpoIkaTa MoKe Da ce N3BbPUn No HauHInTe, OINCAHN NO-DOJy.
-ИзползВаиTe onцяТа Pa6OTn c Alexa B MeHIO HAcTpoKn> CnCTema > ΓlacOB acnCTeHT
- HanpaBete nbpBaTa uHCTaIauIgnaHa BaIuIaTeIeBn3Op. CbBeTHNKbT 3a HAcTpOJa ige ce nokaxe cJeI npKJIIOUbaHe Ha uHCTaJIauIauINHInr npouec
PpOuec Ha HacTpoKa
CbBETHnKbT 3a HnCTanipaHe ige Bn Bodn no Bpeme Ha npoueca Ha nactpoiKa.
Ako n3BbPwnte nbpBaTa NHCTaJaunnaHa Baunn TaJIeBN3Op, cIeJ 3aBbPWBaHe Ha IHCTaJaUNHnHaPouec Ie Ce NOKae CbBETNKBt 3a HAcTpoiKa HaAlexa.Ha npBnra ekpan MapknpaTe OOnyTA HayeTe NOBeYe nHaTNChe TE OK. Ha cIeDaunn ekpan Ie 6bDeTe INΦopMnpaHn 3aФyHKnpya. MapknpaTe CTapt n HaTNChe TE OK, 3a da npOdbJXHTe.
Ako nponycheTe cbbetnka 3a HactpoKa Cnei Nbpbata nHcTanaun, MoKeTe Da n3non3BaTe onueta Works With Alexa B MeHOTo HactpoKni>Cntema > IlacOB acncteHT 3a Da n3BbPUnTe HactpoKaTa NO-KbCHO pBuHO. Ha nbpBna ekpan ue 6bJeTe nHΦopMnpaHn 3a ΦyHKnra.Ta. MapkpauTe Ctapn HnatncheTe OK, 3a Da npOdbJnxTe.
- Ⅲe ce c63daJe KOd 3a yOocTOBepBaHe n Ⅲe Ce nokaxe Ha ekpHa. N3noJ3BaIte CBOA KOMnIOTpBp
HIN dpyro yCTPOiCTBO C DOCTbN DO INTEpHEt, 3a
Ja OTnDETe Do INTEpHET aDpeCa (URL), nOKa3aH
Ha ekpHa. Ⅲe 6bDeTe HAcOyen KbM CTpaHnca,
KbDETo MOKeTe PbPBO Da BJIe3eTe B akayHt Ca B
Amazon, aKO Beue He cTe BNe3n. CneI TOBa Ⅲe
6bDeTe HAcOyen KbM CTpaHnca, KbDETo MOKeTe Da
BbBeDETe KOda 3a yOocTOBepBaHe, KOITTO BIXkDaTe
Ha TeJIeBn3Opa, n Da CBbpKeTe TEJIeBn3Opa Cn KbM
Baunr akayHT B Amazon.
Ako npocebHa cBbp3BaHe e 6nI ycneWeH,ue 6bndeT NOMOJIeH Da ONpeJeNTe IMe 3a BaJna TeLEBn3Op, Hapeeh ,Friendly Name" (FN).. "PpnaTeNcKO IMe" e IMe, Koeto Bn HAnOMH 3a TeLEBn3Op BA, KATO "TeLEBn3Op B DHeBHa CTa", "KyxHc TLeBn3Op", "TeLEBn3Op B TpanEzapnTa" nT.H. N3bupaTe neChODocTbHNo IMe. Ie KaKeTe TOBa IMe, 3a Da KaKeTe Ha Alexa KOn TELEBn3Op da
KoHTpOJInpa. KOrato cTe roTobN, MapKnpaIte OK n HATnCHeTe OK.
-Примети 3a ИЗплзВаHeTo Ha ФункцяТа ige 6ьдат nokazанHa cIeДвцяEkpaH. HatncheTe OK,3a Da 3aBbPшte HactpoKata.
Ako cTe n3BbpwnHnHaCtpoKaTa CneI npBaT a HcTanaqna, Ie Ce BbpHeTe Ha NpBnE ekpan Ha CbBeTHnka 3a HAcTPOKa, KOrato HATnCHete OK. B To3n CnyauHnATnCHte N3XoD nn MapKnpaT e HAcTpoBaHe No-KbCHO n HATnCHete OK, 3a da n3JIe3eTe OT HAcTPOKaTa.
Cne KaTo npouecbT Ha OTKpNBaHe npNKIOUHy, Ie MoKeTe Da KOHTPOINPaTe TeJIeBn3Opa Cn IJacOBO.
3a6eJekka: Yeepe me ce, ye ycmpoucmeama ca cebp3aH uKbM uHmephem.
Ppimepn KOMaHdN
ETo HApKoI rJaCoBn KOMaHdN, KOUTo MoKeTe Da n3NoJ3BaTe:
| Команда Функция | |
| Alexa, turn on 'FN' Вклочва | Телевизора |
| Alexa, turn off 'FN' Излочва | Телевизора |
| Alexa, play 'FN' | Старта медино вбз-пpon3векдане |
| Alexa, pause 'FN' | Спima мединоTO вбз-пpon3векдане |
| Alexa, resume 'FN' | Вьзстановая мединоTO вьзпpon3векдане |
| Alexa, stop 'FN' | Спima мединоTO вьз-пpon3векдане |
| Alexa, fast forward on 'FN' | Вьлочва медино в pe-jжим на брzo превърта-he нап徳 |
| Alexa, rewind on 'FN' | Вьзпpon3векдане на медята назд |
| Alexa, set the volume of 'FN' to 50 | Зада в силatable на звуka на сьответото НИВО |
| Alexa, turn the volume up on 'FN' | Увениава силatable на звуka c 10 edини |
| Alexa, turn the volume down on 'FN' | Hamалая силatable на звуka c 10 edини |
| Alexa, mute 'FN' Излочва | Звуka |
| Alexa, unmute 'FN' Пухка звуka | |
| Alexa, change the input to "input_name" on 'FN' | Телевизорыт певклочва на вхODня ИЗTOЧИК с пооченOTO иme (напри-mер HDMI 1) |
| Alexa, change channel to "channel_number" on 'FN' | Телевизорыт певклочва на канала с указан�ю homeр (напр. Канал 200) |
JIeCHOIOCTbHNO IMe. Korato cTe roTOBn, MapKnpaIte OK n HaTncHeTe OK
- Μe ce cb3daJe KOD 3a yDocToBepBaHe n Ze ce nokaxe Ha ekpaHa. BbBeDeTe KODa, KOTo BnXdaTe Ha TeNeBn3Opa B npInoJxHneTo Google Home
Cne KaTo HAcTpoiKaTa npKIOUCh, BHe Ue MoXeTe Da KOHTpOIIpaTe yHKUInTe Ha BaIINr TeJIeBn3Op C Google AcnteHT.
3a6eIekka:Yeepeme ce,ye ycmpoucmeama ca c8bp3auH kBM uHmephem.Moxeme da c6bpxeme camo eduh meeneu3op kBM bawua akayhm.
PnmepnKomahn
ПрocToKaжTe „Ok Google“, 3a Да КОHTpoJnpaTe TeNeBn3Opa cn caMo c rnaCa cn.

Covered by patents at patentlist.accessAdvance.com
Panasonic Testing Centre
Panasonic Marketing Europe GmbH
Winsbergring 15, 22525 Hamburg, Germany
WEP 64/128, WPA, WPA2, TKIP, AES, WAPI
Poznámka
DVB / datové vysiláni / IPTV
Panasonic Testing Centre
Panasonic Marketing Europe GmbH
Winsberging 15, 22525 Hamburg, Germany
Website: http://www.panasonic.com
WEP 64/128, WPA, WPA2, TKIP, AES, WAPI.
Hinweis
Skaerm, Kabinet, Sokkel 4
Netstik. 4
Skaerm, Kabinet, Sokkel
Almendelig pleje:
Panasonic Testing Centre
Panasonic Marketing Europe GmbH
Winsbergring 15, 22525 Hamburg, Germany
Website: http://www.panasonic.com
| Specifikationer | ||||
| TV-udsendelse | PAL BG/I/DK/SECAM BG/DK | |||
| Modtagende kanaler | VHF (BAND I/III) - UHF (BAND U) - HYPERBAND | |||
| Digital modtagelse | Fuldt integreret digital antenna-kabel-satellit TV (DVB-T-C-S)(i overensstemmelse med DVB-T2, DVB-S2) | |||
| Antal forudindstillede kanaler | 11 000 | |||
| Kanalindikator Skærmenu | ||||
| RF antenneindgang | 75 Ohm (ubalanceteret) | |||
| Driftspænding 220-240V vekselstrøm, 50Hz | ||||
| Audio A2 Stereo+Nicam Stereo | ||||
| Hovedtelefon 3.5 mm mini stereo jack | ||||
| Netværksbaseret standbytilstands-elforbrug (W) | <2 | |||
| TX-43MX600E TX-50 | MX600E TX-55MX60 | E TX-65MX600E | ||
| Audio udgangseffekt (WRMS.) (10% THD) | 2 x 10 W 2 x 10 W 2 x 10 W 2 x 12 W | |||
| Strømforbrug (W) 150 W 135 W 140 W 200 W | ||||
| Vægt (kg) 7,5 Kg 9,5 Kg 13 Kg 22 Kg | ||||
| TV-dimensioner BxHxD (med stativ) (mm) | 235 x 965 x 619 235 x 1 | 120 x 706 235 x 1233 x | 770 275 x 1453 x 896 | |
| TV-dimensioner BxHxD (eden stativ) (mm) | 87 x 965 x 561 87 x 1 | 120 x 648 87 x 1233 x | 712 82 x 1453 x | 836 |
| Skærm | 16/9 43" | 16/9 50" | 16/9 55" | 16/9 65" |
| Brugster temperatur og driftsluftfugtighed | 0°C op til 40°C, maks. 85% luftfugtighed | |||
For mere produit information besøge EPREL: https://eprel.ec.europa.eu.
EPREL-Registraringsnummer findes på https://eprel.panasonic.eu/product.
Trädlose LAN-Specificationer
| Frekvensområder | Maksimal udgangseffekt |
| 2400 - 2483,5 MHz (CH1 - CH13) < 100 mW | |
| 5150 - 5250 MHz (CH36 - CH48) < 200 mW | |
| 5250 - 5350 MHz (CH52 - CH64) < 200 mW | |
| 5470 - 5725 MHz (CH100 - CH140) < 200 mW | |
Landebegraensninger
WEP 64/128, WPA, WPA2, TKIP, AES, WAPI
Angaende
For at slukke for TV'et.
1. Server software installation
Covered by patents at patentlist.accessAdvance.com
Panasonic Testing Centre
Panasonic Marketing Europe GmbH
Winsbergring 15, 22525 Hamburg, Germany
Sitio Web: http://www.panasonic.com
Especificaion
WEP 64/128, WPA, WPA2, TKIP, AES, WAPI
Aviso
Covered by parents at parentlist.accessadvance.com
Panasonic Testing Centre
Panasonic Marketing Europe GmbH
Winsberging 15, 22525 Hamburg, Germany
WEP 64/128, WPA, WPA2, TKIP, AES, WAPI
Huomautus
Premiere Installation 17
Lecture de media via entrée USB. 19
Panasonic Testing Centre
Panasonic Marketing Europe GmbH
Winsberging 15, 22525 Hamburg, Germany
Site Internet: http://www.panasonic.com
Specifications
WEP 64/128, WPA, WPA2, TKIP, AES, WAPI
Remarque
Markings on the Product 2
Maintenance. 4
Display panel, Cabinet, Pedestal. 4
Mains plug 4
Assembling / Removing the pedestal 4
When using the wall-hanging bracket. 5
Environmental Information. 5
Features 5
Ultra HD (UHD). 6
High Dynamic Range (HDR) / Hybrid Log-Gamma (HLG) 6
Dolby Vision. 6
Accessories Included 6
Standby Mode Picture 6
Standby Notifications. 7
TV Control & Operation 7
Using Main TV Menu 8
Inserting the Batteries into the Remote 9
Power Connection 9
Antenna Connection 9
Licence Notification 10
Disposal of Old Equipment and Batteries. 10
Declaration of Conformity (DoC) 10
Specification 11
Notice 12
Remote Control 13
Connections 14
Switching On/Off. 15
First Time Installation. 15
MediaPlayback via USB Input 16
Media Browser. 17
CEC 17
Game Mode 18
E-Manual 18
Settings Menu Content 19
General TV Operation 26
Using the Channel List 26
Configuring Parental Settings. 26
ElectronicProgramme Guide 26
Teletext Services 27
Software Upgrade 27
Troubleshooting & Tips 27
HDMI Signal Compatibility. 28
Supported File Formats for USB Mode 29
Video File Formats 29
Picture File Formats 29
Audio File Formats 29
Subtitle File Formats 29
Supported DVI Resolutions 30
Connectivity 31
Wired Connectivity. 31
Wireless Connectivity 31
Handling of the customer information. 33
Networked Standby Mode 33
Wireless Display 33
Connectivity Troubleshooting 33
Using Audio Video Sharing Network Service.34
34
Internet Browser 34
HBBTV System. 35
Alexa Ready 36
Google Assistant 37
DVB functionality information 38
Safety Information

CAUTION
RISK OF ELECTRIC SHOCK DO NOT OPEN

CAUTION: TO REDUCE THE RISK OF ELECTRIC SHOCK DO NOT REMOVE COVER (OR BACK).
NO USER-SERVICEABLE PARTS INSIDE. REFER SERVICING TO QUALIFIED SERVICE PERSONNEL
In extreme weather (storms, lightning) and long inactivity periods (going on holiday) disconnect the TV set from the mains.
The mains plug is used to disconnect TV set from the mains and therefore it must remain readily operable. If the TV set is not disconnected electrically from the mains, the device will still draw power for all situations even if the TV is in standby mode or switched off.
Note: Follow the on screen instructions for operating the related features.
IMPORTANT - Please read these instructions fully before installing or operating
WARNING: This device is intended to be used by persons (including children) who are capable / experienced of operating such a device unsupervised, unless they have been given supervision or instruction concerning the use of the device by a person responsible for their safety.
- Use this TV set at an altitude of less than 5000 metres above the sea level, in dry locations and in regions with moderate or tropical climates.
- The TV set is intended for household and similar indoor use but may also be used in public places.
- For ventilation purposes, leave at least 5cm of free space around the TV.
- The ventilation should not be impeded by covering or blocking the ventilation openings with items, such as newspapers, table-cloths, curtains, etc.
- The power cord/plug should be easily accessible. Do not place the TV, furniture, etc. on the power cord. A damaged power cord/plug can cause fire or give you an electric shock. Handle the power cord by the plug, do not unplug the TV by pulling the power cord. Never touch the power cord/plug with wet hands as this could cause a short circuit or electric shock. Never make a knot in the power cord or tie it with other cords. When damaged it must be replaced, this should only be done by qualified personnel.
-
Do not expose the TV to dripping or splashing of liquids and do not place objects filled with liquids, such as vases, cups, etc. on or over the TV (e.g. on shelves above the unit).
-
Do not expose the TV to direct sunlight or do not place open flames such as lit candles on the top of or near the TV.
- Do not place any heat sources such as electric heaters, radiators, etc. near the TV set.
- Do not place the TV on the floor or inclined surfaces.
- To avoid danger of suffocation, keep plastic bags out of the reach of babies, children and domestic animals.
- Carefully attach the stand to the TV. If the stand is provided with screws, tighten the screws firmly to prevent the TV from tilting. Do not over-tighten the screws and mount the stand rubbers properly.
- Do not dispose of the batteries in fire or with hazardous or flammable materials.
WARNING
- Batteries must not be exposed to excessive heat such as sunshine, fire or the like.
- Excessive sound pressure from earphones or headphones can cause hearing loss.
ABOVE ALL - NEVER let anyone, especially children, push or hit the screen, push anything into holes, slots or any other openings in the TV.
| Caution | Serious injury or death risk |
| Risk of electric shock | Dangerous voltage risk |
| Maintenance | Important maintenance component |
Markings on the Product
The following symbols are used on the product as a marker for restrictions and precautions and safety instructions. Each explanation shall be considered where the product bears related marking only. Note such information for security reasons.

Class II Equipment: This appliance is designed in such a way that it does not require a safety connection to electrical earth.

Hazardous Live Terminal: The marked terminal(s) is/are hazardous live under normal operating conditions.

Caution, See Operating Instructions: The marked area(s) contain(s) user replaceable coin or button cell batteries.

Class 1 Laser Product: This product contains Class 1 laser source that is safe under reasonably foreseeable conditions of operation.
WARNING
- Do not ingest the battery, Chemical Burn Hazard.
- This product or the accessories supplied with the product may contain a coin/button cell battery. If the coin/button cell battery is swallowed, it can cause severe internal burns in just 2 hours and can lead to death.
- Keep new and used batteries away from children.
- If the battery compartment does not close securely, stop using the product and keep it away from children.
If you think batteries might have been swallowed or placed inside any part of the body, seek immediate medical attention.
A television may fall, causing serious personal injury or death. Many injuries, particularly to children, can be avoided by taking simple precautions such as:
- ALWAYS use cabinets or stands or mounting methods recommended by the manufacturer of the television set.
- ALWAYS use furniture that can safely support the television set.
- ALWAYS ensure the television set is not overhanging the edge of the supporting furniture.
- ALWAYS educate children about the dangers of climbing on furniture to reach the television set or its controls.
- ALWAYS route cords and cables connected to your television so they cannot be tripped over, pulled or grabbed.
NEVER place a television set in an unstable location. - NEVER place the television set on tall furniture (for example, cupboards or bookcases) without anchoring both the furniture and the television set to a suitable support.
- NEVER place the television set on cloth or other materials that may be located between the television set and supporting furniture.
- NEVER place items that might tempt children to climb, such as toys and remote controls, on the top of the television or furniture on which the television is placed.
- The equipment is only suitable for mounting at heights ≤ 2m .
If the existing television set is going to be retained and relocated, the same considerations as above should be applied.
Apparatus connected to the protective earthing of the building installation through the MAINS connection or through other apparatus with a connection to protective earthing - and to a television distribution system using coaxial cable, may in some circumstances create a fire hazard. Connection to a television distribution system has therefore to be provided through a device providing electrical isolation below a certain frequency range (galvanic isolator).
WALL MOUNTING WARNINGS
- Read the instructions before mounting your TV on the wall.
- The wall mount kit is optional. You can obtain from your local dealer, if not supplied with your TV.
- Do not install the TV on a ceiling or on an inclined wall.
- Use the specified wall mounting screws and other accessories.
-
Tighten the wall mounting screws firmly to prevent the TV from falling. Do not over-tighten the screws.
-
Using other wall-hanging brackets, or installing a wall-hanging bracket by yourself have the risk of personal injury and product damage. In order to maintain the unit's performance and safety, be absolutely sure to ask your dealer or a licensed contractor to secure the wall-hanging brackets. Any damage caused by installing without a qualified installer will void your warranty.
- Carefully read the instructions accompanying optional accessories, and be absolutely sure to take steps to prevent the TV from falling off.
- Handle the TV carefully during installation since subjecting it to impact or other forces may cause product damage.
Take care when fixing wall brackets to the wall. Always ensure that there are no electrical cables or pipes in the wall before hanging bracket. - To prevent fall and injury, remove the TV from its fixed wall position when it is no longer in use.
Figures and illustrations in these operating instructions are provided for reference only and may differ from the actual product appearance. Product design and specifications may be changed without notice.
Maintenance
First, remove the mains plug from the mains socket.
Display panel, Cabinet, Pedestal
Regular care:
Gently wipe the surface of the display panel, cabinet, or pedestal by using a soft cloth to remove dirt or fingerprints.
For stubborn dirt:
- First clean the dust from the surface.
- Dampen a soft cloth with clean water or diluted neutral detergent (1 part detergent to 100 parts water).
- Wring out the cloth firmly. (Please note, do not let liquid enter the TV inside as it may lead to product failure.)
- Carefully wipe moisten and wipe away the stubborn dirt.
- Finally, wipe away all the moisture.
Caution
Do not use a hard cloth or rub the surface too hard, otherwise this may cause scratches on the surface.
- Take care not to subject the surfaces to insect repellent, solvent, thinner or other volatile substances. This may degrade surface quality or cause peeling of the paint.
- The surface of the display panel is specially treated and may be easily damaged. Take care not to tap or scratch the surface with your fingernail or other hard objects.
- Do not allow the cabinet and pedestal to make contact with a rubber or PVC substance for a long time. This may degrade surface quality.
Mains plug
Wipe the mains plug with a dry cloth at regular intervals.
Moisture and dust may cause fire or electrical shock.
Assembling / Removing the pedestal
Preparations
Take out the pedestal(s) and the TV from the packing case and put the TV onto a work table with the screen panel down on the clean and soft cloth (blanket, etc.)
- Use a flat and firm table bigger than the TV.
- Do not hold the screen panel part.
- Make sure not to scratch or break the TV.
CAUTION: Please refrain from inserting pictured screws to the TV body when not using the TV stand e.g. wall hanging. Inserting screws without pedestal may cause a damage of the TV.
Assembling the pedestal
- The stand of the TV consists of two pieces. Install these pieces together.
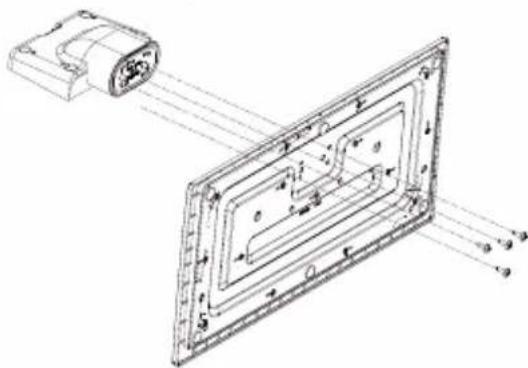
- Place the stand(s) on the stand mounting pattern(s) on the rear side of the TV.
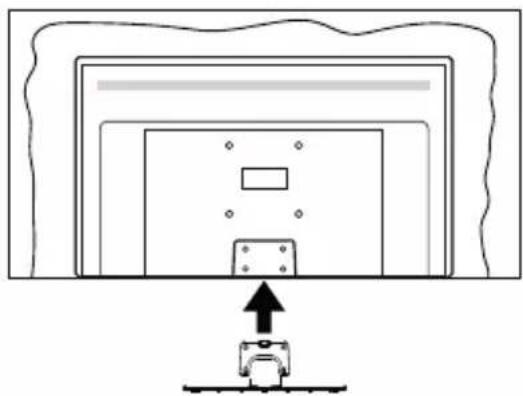
- Insert the screws (M4 x 12) provided and tighten them gently until the stand is properly fitted.
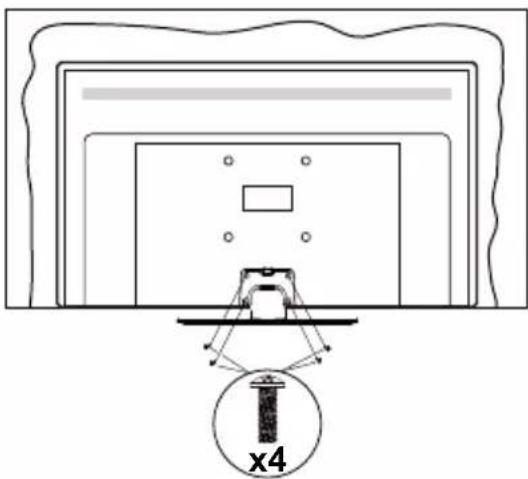
Removing the pedestal from the TV
Be sure to remove the pedestal in the following way when using the wall-hanging bracket or repacking the TV.
- Put the TV onto a work table with the screen panel down on the clean and soft cloth. Leave the stand(s) protruding over the edge of the surface.
- Unscrew the screws that fixing the stand(s).
- Remove the stand(s).
When using the wall-hanging bracket
Please contact your local Panasonic dealer to purchase the recommended wall-hanging bracket. Holes for wall-hanging bracket installation;
Rear of the TV
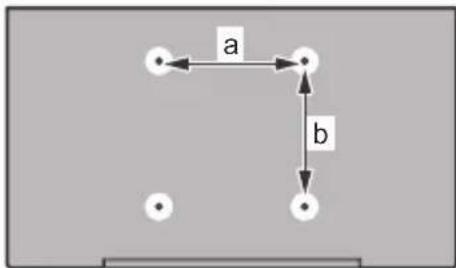
| 43” 50” 55” 65” | ||||
| a (mm) | 100 | 200 | 200 | 400 |
| b (mm) | 100 | 200 | 200 | |
View from the side
VESA
Bracket
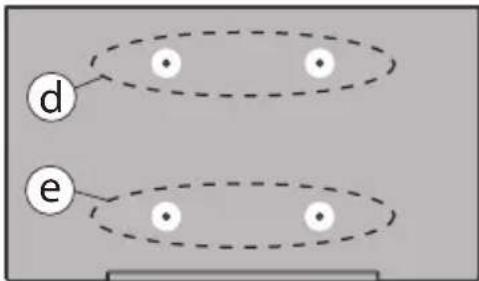
| (d) (e) | |||
| 43” 50” 55” | 43” 50” 55” | ||
| Diameter M4 M6 M4 M6 | |||
| Depth of screw (c) | min. | 7 mm | 5 mm |
| max. | 10 mm | 6 mm | |
| (d) (e) | |||
| 65” | |||
| Depth of screw (c) | min. | 7 mm | |
| max. | 10 mm | ||
| Diameter | M6 | ||
Note: The screws for fixing the TV onto the wall-hanging bracket are not supplied with the TV.
Environmental Information
This television is designed to be environmentally friendly. To reduce energy consumption, you can follow these steps:
If you set the Energy Saving to Minimum, Medium, Maximum or Auto the TV will adjust the energy consumption accordingly. Set as Off to turn this setting off. If you like to set the backlight to a fixed value set as Custom, highlight the Backlight (will be located under the Energy Saving setting) and then adjust manually using Left or Right directional buttons on the remote.
Note: Available Energy Saving options may differ depending on the selected Mode in the Settings>Picture menu.
The Energy Saving settings can be found in the Settings>Picture menu. Note that some picture settings will be unavailable to be changed.
You can also turn the screen off using the Screen Off option, if you want to hear the sound only and don't need to watch. If pressed Right button or Left button consecutively Screen Off option will be selected and "Screen will be off in 15 seconds." message will be displayed on the screen. Select Proceed and press OK to turn the screen off immediately. If you don't press any button, the screen will be off in 15 seconds. Press any button on the remote or on the TV to turn the screen on again.
Note: Screen Off option is not available if the Mode is set to Game.
When the TV is not in use, please switch off or disconnect the TV from the mains plug. This will also reduce or stop the energy consumption.
Features
Remote controlled colour TV
Fully integrated digital terrestrial/cable/satellite TV (DVB-T-T2/C/S-S2)
- HDMI inputs to connect other devices with HDMI sockets
- USB input
- OSD menu system
- Stereo sound system
- Teletext
- Headphone connection
Automatic programming system
- Manual tuning
Automatic power down after up to eight hours.
- Sleep timer
Child lock
Automatic sound mute when no transmission.
- NTSC playback
AVL (Automatic Volume Limiting)
- PLL (Frequency Search)
Game Mode (Optional) - Picture off function
- Ethernet (LAN) for Internet connectivity and service
802.11 a/b/g/n built in WLAN Support
Audio Video Sharing
HbbTV
Ultra HD (UHD)
TV supports Ultra HD (Ultra High Definition - also known as 4K) which provides resolution of 3840 × 2160 (4K:2K). It equals 4 times the resolution of Full HD TV by doubling the pixel count of the Full HD TV both horizontally and vertically. Ultra HD content is supported via native and market applications, HDMI, USB input(s) and over DVB-T2 and DVB-S2 broadcasts.
High Dynamic Range (HDR) / Hybrid Log-Gamma (HLG)
Using this feature the TV can reproduce greater dynamic range of luminosity by capturing and then combining several different exposures. HDR/HLG promises better picture quality thanks to brighter, more realistic highlights, more realistic colour and other improvements. It delivers the look that filmmakers intended to achieve, showing the hidden areas of dark shadows and sunlight with full clarity, colour and detail. HDR/HLG content is supported via native and market applications, HDMI, USB inputs and over DVB-S broadcasts. Set the related HDMI source input as Enhanced from the Sources option in the Settings>System menu or from the Sources>Source Settings menu in order to watch HDR/HLG content, if the HDR/HLG content is received through an HDMI input. The source device should also be at least HDMI 2.0a compatible in this case.
Dolby Vision
Dolby VisionTM delivers a dramatic visual experience, astonishing brightness, exceptional contrast, and vivid colour, that brings entertainment to life. It achieves this stunning image quality by combining HDR and wide colour gamut imaging technologies. By increasing the brightness of the original signal and using a higher dynamic colour and contrast range, Dolby Vision presents amazing true-to-life images with stunning detail that other post-processing technologies in the TV aren't able to produce. Dolby Vision is supported via native and market applications, HDMI and USB inputs. Set the related HDMI source input as Enhanced from the Sources option in the Settings>System menu or from the Sources>Source Settings menu in order to watch Dolby Vision content, if the Dolby Vision content is received through an HDMI input. The source device should also be at least HDMI 2.0a compatible in this case. In the Settings>Picture>Mode menu two pre
defined picture modes will be available if Dolby Vision content is detected: Dolby Vision Bright and Dolby Vision Dark. Both allow the user to experience the content in the way the creator originally intended with different ambient lighting conditions.
Accessories Included
Remote Control
- Batteries: 2 × AA
- Operating Instructions
Power Cord
- Detachable stand
- Stand mounting screws (M4 x 12)
Standby Mode Picture
You can use your TV as a digital picture frame using the Standby Mode Picture feature. In order to do this follow the steps below.
- Set the Standby Mode Picture option in the Settings>System>More menu as On. This option is set as Off by default. You can also define interval for standby mode picture slideshow using the Standby Mode Picture Interval option in this menu.
- Create a separate folder named as standby_picture in the USB storage device's root directory and copy the files you want to use into that folder and then connect the USB storage device to your TV.
- Press the Standby button on the remote briefly to switch your TV into standby mode picture state.
Note that once the Standby Mode Picture option is set as On, the function of the Standby button on the remote will change. After this you will need to press and hold the button to switch the TV into standby mode while the TV is in normal operating mode.
If there are more than 1 picture file available in the folder all picture files will be displayed as a slide show in succession. If the necessary folder is not created or there isn't any picture file in the folder, a warning message will be displayed on the screen for a few seconds and then disappear.
In standby mode picture state the backlight level of the screen will be decreased by 50% and Smart Center features will not be usable, if Smart Center is available for your TV model.
To switch your TV from standby mode picture state back to normal operating mode press the Standby button on the remote briefly.
Beside the remote control you can also use the control unit on the TV to switch into standby mode picture state and back to normal operating mode. In order to do that follow the same instructions as described in the TV Control & Operation section for switching the TV into the standby mode. Note that you will not be able to
switch the TV into standby mode using the control unit on the TV while the TV is in standby mode picture state.
Note: The availability of this feature depends on the TV model and its features.
Refer to the Supported File Formats for USB Mode section for the supported media file formats.
Standby Notifications
If the TV does not receive any input signal (e.g. from an aerial or HDMI source) for 3 minutes, it will go into standby. When you next switch-on, the following message will be displayed: "TV switched to stand-by mode automatically because there was no signal for a long time." You can disable this functionality by setting the Timer of No Signal option in the Settings>Devices menu accordingly.
The Auto Power Down option (in the Settings>System >More menu) could have been set to a value between 1 and 8 hours by default. If this setting is not set as Off and the TV has been left on and not been operated during the set time, it will switch into standby mode after the set time has expired. When you next switch-on the TV, the following message will be displayed: "TV switched to stand-by mode automatically because no operation was made for a long time." Before the TV switches into standby mode a dialogue window will be displayed. If you do not press any button the TV will switch into the standby mode after a waiting period of about 5 minutes. You can highlight Yes and press OK to switch the TV into standby mode immediately. If you highlight No and press OK, the TV will remain on. You can also choose to cancel the Auto Power Down function from this dialogue. Highlight Disable and press OK, the TV will remain on and the function will be set as Off. You can enable this function again by changing the setting of the Auto Power Down option from the Settings>System>More menu.
TV Control & Operation

This TV has a joystick as shown in the above drawing. It allows you to control the Volume / Programme / Source and Turn Off - On functions of the TV.
Note: The position of the joystick may differ depending on the model.
To change volume: Increase or decrease the volume by pushing the joystick right or left.
To change channel: Scroll through the stored channels by pushing the joystick forwards or pulling it towards yourself.
To change source: Press the centre of the joystick in, the sources list will appear on the screen. Scroll through the available sources by pushing the joystick forwards or pulling it towards yourself.
To turn the TV off (Hard Standby): Press the centre of the joystick in and hold it down for more than 3 seconds, the TV will turn into hard standby mode.
In hard standby mode the remote control will not function and the standby LED on the TV will not lit. The functions such as networked standby mode (if available) and timers will be disabled. You can turn on the TV from the hard standby only via joystick.
To turn on the TV: Press the centre of the joystick in, the TV will turn on.
Note: Main menu OSD cannot be displayed via joystick.
Operation with the Remote Control
Press the Home button on your remote control to display main menu. Use the directional buttons and OK button to navigate and set. Press Back/Return, Exit or Home button to quit a menu screen.
Input Selection
Once you have connected external systems to your TV, you can switch to different input sources. Press the Source button on your remote control consecutively to select the different sources.
Changing Channels and Volume
You can change the channel and adjust the volume by using the Programme + / - and Volume + / - buttons on the remote.
Reset and Power Off via Standby Button
Press and hold the Standby button to see additional actions for this button. Reset (Restart), Standby (Normal Standby), and Power off (Forced Standby) options will be available. Highlight one and press OK to perform the selected action. If a problem occurs that prevents the TV from switching into standby mode properly, you can use the Power off option to force the TV to switch into standby mode.
If your TV stops responding to commands and the actions menu can not be displayed, the TV will be forced to restart when the button is kept pressed for about 5 seconds. This will terminate the process.
Using Main TV Menu
When the Home button is pressed, the main TV menu will appear on the screen. You can navigate through the menu items using the directional buttons on the remote. To select an item or see the sub-menu options of the highlighted menu press OK button. When you highlight a menu option some of the submenu items of this menu may appear on the upper or lower side of the menu bar for quick access. To use a quick access item highlight it, press OK and set as desired using the Left/Right directional buttons. When finished press OK or Back/Return button to exit. When the Netflix application (if available) is highlighted, recommendations will be displayed in the same way as the sub-menu items. If you have already signed in to your Netflix account personalised recommendations will be seen.
You can also see information on location, weather, time and date on the main TV menu screen. The green small icons indicate the current status for time, network and sync for apps. If these icons appear in green, it means that the time information is updated, network is connected and sync is successfully completed. Otherwise the icons will appear in white.
Depending on the country selection made during first time installation, TV's life time information in hours can be displayed by pressing the Home button and then the Blue button. Concerned about the quality of our products, televisions are subject to rigorous checks before being put on the market, therefore it is possible that this value is not at 0 during the first installation.
Press Exit button to close the main menu.
1. Home
When main menu is opened Home menu bar will be highlighted. The content of the Home menu can be customised. In order to do this go to the TV menu, highlight the Edit Home option and press OK. The Home menu will switch to edit mode. In edit mode you can delete or change the position of any item in the Home menu. Highlight an option and press OK. Select the delete or move icon and press OK. In order to move a menu item use the Right, Left, Up and Down directional buttons to select the position that you want the item to move to and press OK.
You can also add options from other menus to Home menu. Just highlight an option and press the Up or Down directional button on the remote. If you see Add to Home option you can add it to the Home menu.
2. Search
You can search for Channels, Guide, TV menus, Applications, Web, YouTube and Videos using this option. Press OK and enter a key word using the virtual keyboard. Then highlight OK and press OK to start the search. Results will be displayed on the screen.
Highlight the desired result using the directional buttons and press OK to open.
3. TV
3.1. Guide
You can access the electronic programme guide menu using this option. Refer to Electronic Programme Guide section for more information.
3.2. Channels
You can access the Channels menu using this option. Refer to Using the Channel List section for more information.
3.3. Timers
You can set timers for future events using the options of this menu. You can also review the previously created timers under this menu.
To add a new timer select the Add Timer tab using the Left/Right buttons and press OK. Set the sub-menu options as desired and when finished press OK. A new timer will be created.
To edit a previously created timer, highlight that timer, select the Edit Selected Timer tab and press OK. Change the sub-menu options as desired and press OK to save your settings.
To cancel an already set timer, highlight that timer, select Delete Selected Timer tab and press OK. A confirmation message will be displayed. Highlight Yes and press OK to proceed. The timer will be cancelled. It is not possible to set timers for two or more events that will be broadcasted at the same time interval. In this case you will be informed and the timer will be cancelled.
3.4. Edit Home
You can customise the content of the Home menu using this option. Highlight and press OK. The Home menu will switch to edit mode. Refer to the Home section for details.
3.5. More Apps
In order to manage the apps installed on your TV, you can use this option. Highlight and press OK. You can add an installed app to Home menu, launch or remove it. Highlight an app and press OK to see the available options.
3.6. Market
You can add new apps from the application market using this option. Highlight and press OK. Available apps will be displayed. You can also access the application market from within the More Apps menu.
3.7. Reset Apps
You can reset your customisations on the Home menu to defaults using this option (availability depends on TV model and its features). Highlight and press OK. A confirmation message will be displayed. Highlight
Yes and press OK to proceed. Note that you will not be able to perform this operation again within the next few minutes.
3.8. Accessibility
You can access the accessibility settings menu directly using this option.
3.9. Privacy Settings
You can access the privacy settings menu directly using this option. This option may not be available depending on the model of your TV and the selected country during the first time installation process.
4. Settings
You can manage the settings of your TV using the options of this menu. Refer to Settings Menu Content section for more information.
5. Sources
You can manage your input source preferences using the options of this menu. To change the current source highlight one of the options and press OK.
5.1. Source Settings
You can access the source settings menu directly using this option. Edit the names, enable or disable selected source options. There are also Regular and Enhanced options available for HDMI sources. Regular and Enhanced options are affecting the colour settings of the selected HDMI source.
Inserting the Batteries into the Remote
Remove the back cover to reveal the battery compartment. Insert two size AA batteries. Make sure the (+) and (-) signs match (observe correct polarity). Do not mix old and new batteries. Replace only with same or equivalent type. Place the cover back on.
A message will be displayed on the screen when the batteries are low and must be replaced. Note that when the batteries are low, the performance of the remote control may be impaired.
Batteries should not be exposed to excessive heat such as sunshine, fire or the like.


Power Connection
IMPORTANT: The TV set is designed to operate on a 220-240V AC, 50Hz supply. After unpacking, allow the TV set to reach the ambient room temperature before you connect the set to the mains.
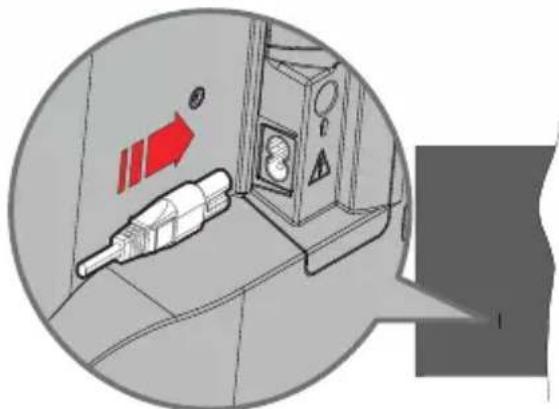
Plug one end (the two-hole plug) of the supplied detachable power cord into the power cord inlet on the rear side of the TV as shown above. Then plug the other end of the power cord into the mains socket outlet.
Note: The position of the power cord inlet may differ depending on the model.
Antenna Connection
Connect the aerial or cable TV plug to the aerial input (ANT) socket or satellite plug to the satellite input (LNB) socket located on the rear-left side of the TV.
Rear-left side of the TV
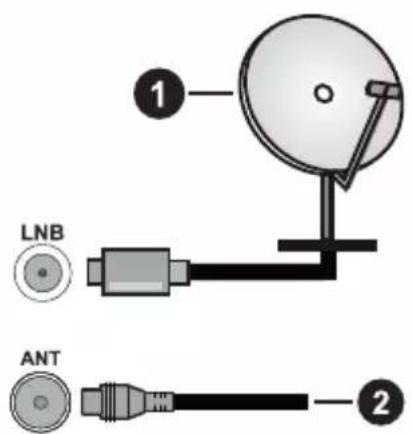
-
Satellite
-
Aerial or cable

If you want to connect a device to the TV, make sure that both the TV and the device are turned off before making any connection. After the connection is done, you can turn on the units and use them.
Licence Notification
The terms HDMI, HDMI High-Definition Multimedia Interface, HDMI trade dress and the HDMI Logos are trademarks or registered trademarks of HDMI Licensing Administrator, Inc.

Dolby, Dolby Vision, Dolby Atmos, and the double-D symbol are registered trademarks of Dolby Laboratories Licensing Corporation. Manufactured under licence from Dolby Laboratories. Confidential unpublished works. Copyright © 2012-2022 Dolby Laboratories. All rights reserved.
Dolby Vision·Atmos
YouTube and the YouTube logo are trademarks of Google Inc.
This product contains technology subject to certain intellectual property rights of Microsoft. Use or distribution of this technology outside of this product is prohibited without the appropriate licence(s) from Microsoft.
Content owners use Microsoft PlayReady™ content access technology to protect their intellectual property, including copyrighted content. This device uses PlayReady technology to access PlayReady-protected content and/or WMDRM-protected content. If the device fails to properly enforce restrictions on content usage, content owners may require Microsoft to revoke the device's ability to consume PlayReady-protected content. Revocation should not affect unprotected content or content protected by other content access technologies. Content owners may require you to upgrade PlayReady to access their content. If you decline an upgrade, you will not be able to access content that requires the upgrade.
The "CI Plus" Logo is a trademark of CI Plus LLP.
This product is protected by certain intellectual property rights of Microsoft Corporation. Use or distribution of such technology outside of this product is prohibited without a licence from Microsoft or an authorised Microsoft subsidiary.

Advance
Covered by patents at patent list.accessadvancemc
Disposal of Old Equipment and Batteries

Only for European Union and countries with recycling systems
These symbols on the products, packaging, and/or accompanying documents mean that used electrical and electronic products and batteries must not be mixed with general household waste.
For proper treatment, recovery and recycling of old products and batteries, please take them to applicable collection points in accordance with your national legislation.
By disposing of them correctly, you will help to save valuable resources and prevent any potential negative effects on human health and the environment.
For more information about collection and recycling, please contact your local municipality.
Penalties may be applicable for incorrect disposal of this waste, in accordance with national legislation.
Note for the battery symbol (bottom symbol):
This symbol might be used in combination with a chemical symbol. In this case it complies with the requirement set by the Directive for the chemical involved.
Declaration of Conformity (DoC)
Hereby, Panasonic Marketing Europe GmbH, declares that this TV is in compliance with the essential requirements and other relevant provisions of the Directive 2014/53/EU.
If you want to get a copy of the original DoC of this TV, please visit the following website:
http://www.ptc.panasonic.eu/compliance-documents
Authorized Representative:
Panasonic Testing Centre
Panasonic Marketing Europe GmbH
Winsberging 15, 22525 Hamburg, Germany
Web Site: http://www.panasonic.com
Specification
| TV Broadcasting | PAL BG/I/DK SECAM BG/DK | |||
| Receiving Channels | VHF (BAND I/III) - UHF (BAND U) - HYPERBAND | |||
| Digital Reception | Fully integrated digital terrestrial-cable-satellite TV (DVB-T-C-S) (DVB-T2, DVB-S2 compliant) | |||
| Number of Preset Channels | 11 000 | |||
| Channel Indicator On | Screen Display | |||
| RF Aerial Input 75 Ohm (unbalanced) | ||||
| Operating Voltage 220-240V AC, 50Hz. | ||||
| Audio A2 Stereo+Nicam Stereo | ||||
| Headphone 3.5 mm mini stereo jack | ||||
| Networked Standby Mode Power Consumption (W) | < 2 | |||
| TX-43MX600E TX-50 | MX600E TX-55MX600E TX-65MX600E | |||
| Audio Output Power (WRMS.) (10% THD) | 2 x 10 W 2 x 10 W 2 x 10 W 2 x 12 W | |||
| Power Consumption (W) | 150 W 135 W 140 W | 200 W | ||
| Weight (kg) 7,5 Kg 9,5 Kg 13 Kg 22 Kg | ||||
| TV Dimensions DxLxH (with stand) (mm) | 235 x 965 x 619 235 x 1 | 120 x 706 235 x 1233 x | 770 275 x 1453 x 896 | |
| TV Dimensions DxLxH (without stand) (mm) | 87 x 965 x 561 87 x 1 | 120 x 648 87 x 1233 x | 712 82 x 1453 x 836 | |
| Display | 16/9 43" | 16/9 50" | 16/9 55" | 16/9 65" |
| Operation temperature and operation humidity | 0°C up to 40°C, 85% humidity max | |||
For more product information, please visit EPREL: https://eprel.ec.europa.eu. EPREL registration number is available on https://eprel.panasonic.eu/product.
Wireless LAN Transmitter Specifications
| Frequency Ranges | Max Output Power |
| 2400 - 2483,5 MHz (CH1 - CH13) < 100 mW | |
| 5150 - 5250 MHz (CH36 - CH48) < 200 mW | |
| 5250 - 5350 MHz (CH52 - CH64) < 200 mW | |
| 5470 - 5725 MHz (CH100 - CH140) < 200 mW | |
Country Restrictions
This device is intended for home and office use in all EU countries (and other countries following the relevant EU directive). The 5.15 - 5.35 GHz band is restricted to indoor operations only in the EU countries.
| Country Restriction | |
| Bulgaria | General authorisation required for outdoor use and public service |
| Italy | If used outside of its own premises, general authorisation is required. Public use is subject to general authorisation by the respective service provider |
| Greece | In-door use only for 5470 MHz to 5725 MHz band |
| Luxembourg | General authorisation required for network and service supply (not for spectrum) |
| Norway | Radio transmission is prohibited for the geographical area within a radius of 20 km from the centre of Ny-Ålesund |
| Russian Federation | In-door use only |
| Israel | 5 GHz band only for 5180 MHz-5320 MHz range |
The requirements for any country may change at any time. It's recommended that user checks with local authorities for the current status of their national regulations for 5 GHz wireless LAN's.
Standard
IEEE 802.11.a/b/g/n
Host Interface
USB 2.0
Security
WEP 64/128, WPA, WPA2, TKIP, AES, WAPI
Notice
DVB / Data broadcasting / IPTV functions
- This TV is designed to meet the standards (as of March, 2021) of DVB-T / T2 (MPEG2, MPEG4-AVC(H.264) and HEVC(H.265)) digital terrestrial services, DVB-C (MPEG2, MPEG4-AVC(H.264) and HEVC(H.265)) digital cable services and DVB-S (MPEG2, MPEG4-AVC(H.264) and HEVC(H.265)) digital satellite services.
Consult your local dealer for availability of DVB-T / T2 or DVB-S services in your area.
Consult your cable service provider for availability of DVB-C services with this TV.
- This TV may not work correctly with the signal which does not meet the standards of DVB-T / T2, DVB-C or DVB-S.
- Not all the features are available depending on the country, area, broadcaster, service provider, satellite and network environment.
- Not all CI modules work properly with this TV. Consult your service provider about the available CI module.
- This TV may not work correctly with CI module that is not approved by the service provider.
Additional fees may be charged depending on the service provider. - The compatibility with future services is not guaranteed.
- Internet apps are provided by their respective service providers, and may be changed, interrupted, or discontinued at any time.
Panasonic assumes no responsibility and makes no warranty for the availability or the continuity of the services.
- Panasonic does not guarantee operation and performance of peripheral devices made by other manufacturers; and we disclaim any liability or damage arising from operation and/or performance from usage of such other maker's peripheral devices.
Remote Control

(*) Standby Button
Press and hold the Standby button to see additional actions for this button. Highlight one of the Reset (Restart), Standby (Normal Standby), and Power off (Forced Standby) options and press OK to perform the selected action. If your TV stops responding to commands and the actions menu can not be displayed, the TV will be forced to restart when the button is kept pressed for about five seconds.
Press briefly and release the button to switch the TV into standby mode or to switch it on when it's in standby mode.
(^**) My Button 1 & My Button 2
These buttons may have default functions depending on the model. However you can set a special function to these buttons by pressing on them for more than three seconds when on a desired source or channel. You can also set My Button 1 to launch an application. A confirmation message will be displayed on the screen. Now the selected My Button is associated with the selected function.
Note that if you perform First Time Installation, My Button 1&2 will return to their default function.
- Standby (^*) : Standby / On (press briefly) Reset / Power Off (press and hold)
- Info: Displays information about on-screen content, shows hidden information (reveal - in TXT mode)
- Guide: Displays the electronic programme guide
- Home: Displays TV menu
- Directional buttons: Helps navigate menus, content, etc. and displays the subpages in TXT mode when pressed Right or Left
- OK: Confirms user selections, holds the page (in TXT mode), views Channels menu (DTV mode)
- Exit: Closes and exits from displayed menus or returns to previous screen
- Coloured Buttons: Follow the on-screen instructions for coloured button functions
- Volume +/-
- Mute: Completely turns off the volume of the TV
- Numeric buttons: Switches the channel, enters a number or a letter in the text box on the screen, switches the TV on when in standby mode
- Language: Switches among sound modes (analogue TV), displays and changes audio/subtitle language and turns subtitles on or off (digital TV, where available)
- Rewind: Moves frames backwards in media such as movies
- Stop: Stops the media being played
- Play: Starts to play selected media
- Pause: Pauses the media being played
- No function
- Fast Forward: Moves frames forward in media such as movies
- Text: Displays teletext (where available), press again to superimpose the teletext over a normal broadcast picture (mix)
- Programme +/-:Programme up-down, Page updown (in TXT mode), switches the TV on when in standby mode
- Back/Return: Returns to previous screen, previous menu, opens index page (in TXT mode). Quickly cycles between previous and current channels or sources
- My Button 2 ( )
- Netflix: Launches the Netflix application
- My Button 1 ( )
- Source: Shows available broadcast and content sources
Connections
| Connector Type | Type Cables Device | |
| HDMI Connection | ||
| SPDIF | SPDIF (Optical Out) Connection | |
| HEADPHONE | Headphone Connection | |
| USB Connection | ||
| CI Connection | ||
| LAN | Ethernet Connection | LAN / Ethernet Cable |
When using the wall mounting kit (available from a third party in the market, if not supplied), we recommend that you plug in all cables before mounting the TV on the wall. Insert or remove the CI module only when the TV is SWITCHED OFF. You should refer to the module instruction manual for details of the settings. The/ Each USB input of your TV supports devices up to 500mA . Connecting devices that have current value above 500mA may damage your TV. When connecting equipment using a HDMI cable to your TV, to guarantee sufficient immunity against parasitic frequency radiation and trouble-free transmission of high definition signals, such as 4K content, you have to use a high speed shielded (high grade) HDMI cable with ferrites.

If you want to connect a device to the TV, make sure that both the TV and the device are turned off before making any connection. After the connection is done, you can turn on the units and use them.
Switching On/Off
To Switch the TV On
Connect the power cord to a power source such as a wall socket (220-240V AC, 50 Hz).
To switch on the TV from standby
- Press the Standby button, Programme +/- or a numeric button on the remote control.
- Press the centre of the joystick on the TV in or push it up/down.
To switch on the TV from hard standby
- Press the centre of the joystick on the TV in.
To switch the TV into standby
Press the Standby button on the remote control, the TV will switch into standby mode.
To switch the TV into hard standby
Press the centre of the joystick on the TV in and hold it down for more than 3 seconds, the TV will switch into hard standby mode.
To switch off the TV
To power down the TV completely, unplug the power cord from the mains socket.
Note: When the TV is switched into standby mode, the standby LED can blink to indicate that features such as Standby Mode Search, Over Air Download or Timer is active. The LED can also blink when you switch on the TV from standby mode.
First Time Installation
When turned on for the first time, the language selection screen is displayed. Select the desired language and press OK. In the following steps of the installation guide, set your preferences using the directional buttons and OK button.
After the language selection, you will be asked whether you want to change accessibility settings. Highlight Yes and press OK to change. Refer to System Menu Content section for detailed information on available options.
Set your country preference on the next screen. Depending on the country selection you may be asked to set and confirm a PIN at this point. The selected PIN cannot be 0000. You have to enter it if you are asked to enter a PIN for any menu operation later.
You can activate Store Mode option in the next step. This option will configure your TV's settings for store environment and depending on the TV model being used, the supported features of it may be displayed on the screen as an info banner or the pre-installed video file may be played back. This option is intended only for store use. It is recommended to select Home Mode for home use. Store mode option will be available in Settings>System>More menu and your preference for this setting can be changed later. Make your selection and press OK to continue.
Depending on the model of your TV, the picture mode selection screen may appear at this point. In order for your TV to consume less energy and be more environmentally friendly select Natural and press OK to continue. If you select Dynamic and press OK, a confirmation dialogue will be displayed. Select Yes and press OK to proceed. You can change your selection later using the Mode option in the Settings>Picture menu.
Depending on the model of your TV and the country selection Privacy Settings screen may appear at this point. Using the options on this screen you can set your privacy privileges. Highlight a feature and press OK to enable or disable. Read the related explanations displayed on the screen for each highlighted feature before making any changes. You can press the Right directional button to highlight the text and use the Programme +/- or Up/Down directional buttons to scroll up and down to read the entire text. You will be able to change your preferences at any time later from the Settings>System>Privacy>Privacy Settings menu. If the Internet Connection option is disabled Network/Internet Settings screen will be skipped and not displayed. If you have any questions, complaints or comments regarding this privacy policy or its enforcement, please contact by email at smarttvsecurity@vosshub.com.
Highlight Next and press OK button on the remote control to continue and the Network/Internet Settings screen will be displayed. Please refer to Connectivity section if you need information on configuring a wired or a wireless connection (availability depends on the model) and other available options. If you want your TV to consume less power in standby mode, you can disable the Networked Standby Mode option by setting it as Off. After the settings are completed highlight Next and press OK button to continue.
On next screen you can set broadcast types to be searched, set your encrypted channel searching and time zone (depending on the country selection) preferences. Additionally you can set a broadcast type as your favourite one. Priority will be given to the selected broadcast type during the search process and the channels of it will be listed on the top of the channel list. When finished, highlight Next and press OK to continue.
About Selecting Broadcast Type
To turn a search option on for a broadcast type highlight it and press OK, Left or Right directional button. The checkbox next to the selected option will be checked. To turn the search option off clear the checkbox by pressing OK, Left or Right directional button after moving the focus on the desired broadcast type option.
Digital Aerial: If D. Aerial broadcast search option is turned on, the TV will search for digital terrestrial broadcasts after other initial settings are completed.
Digital Cable: If D. Cable broadcast search option is turned on, the TV will search for digital cable broadcasts after other initial settings are completed. A dialogue may be displayed depending on the country selection before starting to search asking whether you want to perform cable network search. If you select Yes and press OK you can select Network or set values such as Frequency, Network ID and Search Step on the next screen. If you select No and press OK or the network search dialogue is not displayed you can set Start Frequency, Stop Frequency and Search Step on the next screen. When finished, highlight Next and press OK button to continue.
Note: Searching duration will change depending on the selected Search Step.
Satellite: If Satellite broadcast search option is turned on, the TV will search for digital satellite broadcasts after other initial settings are completed. Before satellite search is performed some settings should be made.
Depending on the model and the selected country the next step may be the selection of the installation type for satellite. You can select to start an operator installation or a standard installation at this point. If you want to perform an operator installation set the Install Type as Operator and then set the Satellite Operator according to your operator preference. Some of the following steps may differ or be skipped depending on the selected operator in this step. If you set the Install Type as Standard, you can continue with regular satellite installation and watch satellite channels. Press OK to proceed.
Antenna type selection screen may be displayed next. You can select Antenna type as Direct, Single Satellite Cable or DiSEqC switch by using Left or Right directional buttons. After selecting your antenna type press OK to see the options to proceed. Continue, Transponder list and Configure LNB options may be available. You can change the transponder and LNB settings using the related menu options.
- Direct: If you have a single receiver and a direct satellite dish, select this antenna type. Press OK to continue. Select an available satellite on the next screen and press OK to scan for services.
- Single Satellite Cable: If you have multiple receivers and a single satellite cable system, select this antenna type. Press OK to continue. Configure settings by following instructions on the next screen. Press OK to scan for services.
- DiSEqC switch: If you have multiple satellite dishes and a DiSEqC switch, select this antenna type. Then set the DiSEqC version and press OK to continue. You can set up to four satellites (if available) for version v1.0 and sixteen satellites for version v1.1 on the next screen. Press OK button to scan the first satellite in the list.
Note: Depending on the model of your TV, DiSEqC version v1.1 may not be supported and therefore the DiSEqC version selection step may not be available.
Analogue: If Analogue broadcast search option is turned on, the TV will search for analogue broadcasts after other initial settings are completed.
After the initial settings are completed the TV will start to search for available broadcasts of the selected broadcast types.
While the search continues current scan results will be displayed at the bottom of the screen. You can press the Home, Back or Exit button to cancel the search. The channels that have already been found will be stored in the channel list.
After all the available stations are stored, Channels menu will be displayed. You can edit the channel list according to your preferences using the Edit tab options or press the Home button to quit and watch TV.
While the search continues a dialogue may appear, asking whether you want to sort channels according to the LCN^(*) . Select Yes and press OK to confirm.
(*) LCN is the Logical Channel Number system that organises available broadcasts in accordance with a recognisable channel number sequence (if available).
Note: Do not turn off the TV while initialising first time installation. Note that, some options may not be available depending on the country selection.
After the first time installation is completed, HD + operator application screen may be displayed depending on selections you made during the installation process. In order to access operator services this application needs to be activated. If you activate the application, the elements of the user interface such as channel info banner and electronic programme guide, which are normally provided by the TV, will be replaced by the operator application. If you do not perform satellite or HD + installation and want to activate the application at a later time, highlight the HD + application on the Home menu and press OK. You will be directed to a screen where you can carry out the activation.
Media Playback via USB Input
You can connect 2.5" and 3.5" inch (HDD with external power supply) external hard disk drives or USB memory stick to your TV by using the USB input(s) of the TV.
IMPORTANT! Back up the files on your storage devices before connecting them to the TV. Manufacturer will not be responsible for any file damage or data loss. Certain types of USB devices (e.g. MP3 Players) or USB hard disk drives/memory sticks may not be compatible with this TV. The TV supports FAT32 and NTFS disk formatting.
Wait a little while before each plugging and unplugging as the player may still be reading files. Failure to do so may cause physical damage to the USB player and the USB device itself. Do not pull out your drive while playing a file.
You can use USB hubs with your TV's USB input(s). External power supplied USB hubs are recommended in such a case.
It is recommended to use the TV's USB input(s) directly, if you are going to connect a USB hard disk.
Note: When viewing media files the Media Browser menu can only display a maximum of 1000 media files per folder.
Media Browser
You can play back music and movie files and display photo files stored on a USB storage device by connecting it to your TV. Connect a USB storage device to one of the USB inputs located on the side of the TV.
After connecting a USB storage device to your TV Sources menu will be displayed on the screen. Select the related USB input option from this menu and press OK. Media Browser menu will be displayed on the screen. Then select the file of your choice and press OK to display or play it back. You can access the content of the connected USB device any time later from the Sources menu. You can also press the Source button on the remote and then select your USB storage device from the list of sources.
You can set your media browser preferences by using the Settings menu. Settings menu can be accessed via the information bar which is displayed on the bottom of the screen while playing back a video or an audio file or displaying a picture file. Press the Info button if the information bar has disappeared, highlight the gear wheel symbol positioned on the right side of the information bar and press OK. Picture Settings, Sound Settings, Media Browser Settings and Options menus may be available depending on the media file type and the model of your TV and its features. The content of these menus may also differ according to the type of the currently open media file. Only Sound Settings menu will be available while playing back audio files.
| Loop/Shuffle Mode Operation | |
| Start playback and activate | All files in the list will be continuously played in original order |
| Start playback and activate | The same file will be played continuously (repeat) |
| Start playback and activate | All files in the list will be played once in random order |
| Start playback and activate | All files in the list will be continuously played in the same random order |
To use the functions on the information bar highlight the symbol of the function and press OK. To change the status of a function highlight the symbol of the function and press OK as much as needed. If the symbol is marked with a red cross, that means it is deactivated.
Custom Boot Up Logo
You can personalise your TV and see your favourite image or photo on the screen each time your TV boots up. To do this, copy your favourite image files onto a USB disk and open them in the Media Browser. Select USB input from the Sources menu and press OK. You can also press the Source button on the remote and then select your USB storage device from the list of sources. When you have chosen the desired image, highlight it and press OK to view it in full screen. Press the Info button, highlight the gear wheel symbol on the information bar and press OK. Select Options and press OK to enter. Set Boot Logo option will be available. Highlight it and press OK again to choose the image as custom boot logo. A confirmation message will be displayed. Select Yes and press OK again. If the image is suitable(*) you will see it on the screen during the TV's next boot up.
Note: You can use the Restore Default Boot Logo option in the Settings>System>More menu to restore the default boot logo. If you perform First Time Installation the boot logo will also be restored to its default.
(*) Images must have an aspect ratio between 4:3 to 16:9 and they must be in .jpeg or .jpg file formats. The image cannot be set as boot logo, if its resolution doesn't appear on the info banner.
CEC
This function allows the user to control the CEC-enabled devices, that are connected through HDMI ports by using the remote control of the TV.
The CEC option in the Settings>Devices menu should be set as Enabled at first. Press the Source button and select the HDMI input of the connected CEC device from the Sources List menu. When a new CEC source device is connected, it will be listed in Sources menu with its own name instead of the connected HDMI port's name (such as DVD Player, Recorder 1, etc.).
The TV remote is automatically able to perform the main functions after the connected HDMI source has been selected. To terminate this operation and control the TV via the remote again, press and hold the "0-Zero" button on the remote control for 3 seconds.
You can disable the CEC functionality by setting the related option under the Settings>Devices menu accordingly.
The TV supports ARC (Audio Return Channel). This feature is an audio link meant to replace other cables between the TV and an audio system (A/V receiver or speaker system).
When ARC is active, the TV will mute its other audio outputs, except the headphone jack, automatically and volume control buttons are directed to the connected audio device. To activate ARC set the Sound Output option in the Settings>Sound menu as HDMI ARC.
Note: ARC is supported only via the HDMI2 input.
Enhanced Audio Return Channel (eARC)
Similar to ARC, the eARC feature enables the transfer of the digital audio stream from your TV to a connected audio device via the HDMI cable. eARC is an improved version of ARC. It has a much higher bandwidth than its predecessor. Bandwidth represents the range of frequencies or amount of data that is being transferred at a time. Higher bandwidth translates into a higher amount of data that can be transferred. Higher bandwidth also means that digital audio signal doesn't have to be compressed and is much more detailed, rich, and vibrant.
When eARC is enabled from the sound menu, TV first tries to establish eARC link. If eARC is supported by the connected device, the output turns into eARC mode and the "eARC" indicator can be observed on the connected device's OSD. If an eARC link cannot be established (for example, the connected device is not supporting eARC but supporting ARC only) or if eARC is disabled from the sound menu, then TV initiates ARC.
For eARC to function properly;
- The connected audio device should also support eARC.
- Some HDMI cables do not have enough bandwidth to carry high-bit-rate audio channels, use an HDMI cable with eARC support (HDMI High Speed Cables with Ethernet and the new Ultra High Speed HDMI Cable - check hmi.org for latest info).
- Set the Sound Output option in the Settings>Sound menu to HDMI ARC. The eARC option in the Sound menu will be enabled. Check to see if it is set to On. If not, set it to On.
Note: eARC is supported only via the HDMI2 input.
System Audio Control
Allows an Audio Amplifier/Receiver to be used with the TV. The volume can be controlled using the remote control of the TV. To activate this feature set the Sound Output option in the Settings>Sound menu as HDMI ARC. When HDMI ARC option is selected, CEC option will be set as Enabled automatically, if it is not already set. The TV speakers will be muted and the sound of the watched source will be provided from the connected sound system.
Note: The audio device should support System Audio Control feature.
Game Mode
You can set your TV to achieve lowest latency for games. Go to Settings>Picture menu and set the Mode option to Game. Game option will be available when the TV's input source is set to HDMI. When set the picture will be optimised for low latency.
Auto Low Latency Mode
You can also enable the ALLM (Auto Low Latency Mode) option in the Settings>Devices menu. If this function is enabled the TV automatically switches the picture mode to Game when ALLM mode signal is received from the current HDMI source. TV switches back to previous picture mode setting when the ALLM signal is lost. So you won't need to change the settings manually.
If the ALLM option is enabled, picture mode can not be changed as long as ALLM signal is received from the current HDMI source.
In order for the ALLM feature to be functional the related HDMI source setting should be set to Enhanced. You can change this setting from the Sources>Source Settings menu or from the Settings>System>Sources menu.
E-Manual
You can find instructions for your TV's features in the E-Manual.
To access the E-Manual, enter Settings menu, select Manuals and press OK. For quick access press Home button and then Info button.
By using the directional buttons select a desired topic and press OK to read instructions. To close the E-Manual screen press the Exit or Home button.
Note: Depending on model, your TV may not support this function. The content of the E-Manual may vary according to the model.
Settings Menu Content
| Devices Menu Content | ||
| Virtual Remote | Enable or disable the virtual remote feature. | |
| Audio Video Sharing | This feature allows you to share files stored on your smartphone or tablet pc. If you have a compatible smartphone or tablet pc and the appropriate software is installed, you can share/play photos, music and videos on your TV. See instructions of your sharing software for more information. | |
| ALLM | ALLM (Auto Low Latency Mode) function allows the TV to activate or deactivate low latency settings depending on playback content. If this option is enabled the picture mode will be set to Game automatically when ALLM mode signal is received from the current HDMI source. Refer to Game Mode section for more information. | |
| Timer of No Signal | If your TV does not receive any input signal (e.g. from an aerial or HDMI source) for 3 minutes, it will go into standby mode. You can enable or disable this functionality by setting this option accordingly. | |
| CEC | With this setting you can enable and disable CEC functionality completely. Press Left or Right button to enable or disable the feature. | |
| CEC Auto Power On | This function allows the connected HDMI-CEC compatible device to turn on the TV and switch to its input source automatically. Press Left or Right button to enable or disable the feature. | |
| Picture Menu Content | ||
| Mode | You can change the picture mode to suit your preference or requirements. Picture mode can be set to one of these options: Cinema, Game, Sports, Dynamic and Natural. Note: Available options may differ depending on the input source. Dolby Vision Modes: If Dolby Vision content is detected Dolby Vision Dark and Dolby Vision Bright picture mode options will be available instead of Cinema and Natural modes. | |
| Contrast | Adjusts the light and dark values on the screen. | |
| Brightness | Adjusts the brightness values on the screen. | |
| Sharpness | Sets the sharpness value for the objects displayed on the screen. | |
| Colour | Sets the colour value, adjusting the colours. | |
| Energy Saving | For setting the Energy Saving to Custom, Minimum, Medium, Maximum, Auto, Screen Off or Off. Note: Available options may differ depending on the selected Mode. | |
| Backlight | This setting controls the backlight level. This option (will be located under the Energy Saving setting) will be available if the Energy Saving is set to Custom. Highlight and use Left/Right directional buttons to set. | |
| Picture Zoom | Sets the desired image size format. | |
| Picture Shift | This option (will be located under the Picture Zoom setting) may be available depending on the Picture Zoom setting. Highlight and press OK, then use directional buttons to shift the picture upwards or downwards. | |
| Advanced Settings | ||
| Dynamic Contrast | You can change the dynamic contrast ratio to desired value. | |
| Colour Temp | Sets the desired colour temperature value. Cool, Normal, Warm and Custom options are available. | |
| White Point | If the Colour Temp option is set as Custom, this setting will be available (will be located under the Colour Temp setting). Increase the 'warmth' or 'coolness' of the picture by pressing Left or Right buttons. | |
| Vivid Blue | White colour enhancement function that makes white colour more cooler in order to make more bright picture. Set as On to enable. | |
| Vivid Dimming | Low, Medium, High and Off options are available. While Vivid Dimming is active, it will enhance contrast locally for each defined zone. | |
| Noise Reduction | Low, Medium, High and Off options are available. If the signal is weak and the picture is noisy, use the Noise Reduction setting to reduce the amount of noise. | |
| Film Mode | Films are recorded at a different number of frames per second to normal television programmes. Turn this feature to Auto when you are watching films to see the fast motion scenes clearly. | |
| MEMC | Press left/right buttons to set MEMC to Low, Medium, High or Off. While MEMC is active, it will optimise the TV's video settings for motional images to acquire a better quality and readability. | |
| MEMC Demo | When MEMC option is set to Low, Medium or High, this option will be available. Press OK button to activate the demo mode. While demo mode is active, the screen will be divided into two sections, one displaying the MEMC activity, the other displaying the normal settings for TV screen. Press OK button again to cancel. | |
| Skin Tone | Skin tone can be changed between -5 and 5. | |
| Colour Shift | Adjust the desired colour tone. | |
| Colour Tuner | Opens colour tuner settings. Set the Colour Tuner as Enabled to adjust the Hue, Colour and Brightness values manually. | |
| Gamut Mapping | You can use this option to set the range of colours displayed on your TV screen. When set as On, colours are set according to the source signal. When set as Off, the TV's maximum colour capacity is used by default (recommended option).Note: This option may not be available depending on the TV model and its features. | |
| Gamma | You can use this option to set your gamma preference. Press Left/Right directional buttons to set to Normal, Bright or Dark.Note: This option may not be available depending on the TV model and its features and you may not be able to change this setting depending on the current content. | |
| HDMI Full Range | While watching from a HDMI source, this feature will be visible. You can use this feature to enhance blackness in the picture. | |
| Reset | Reset the picture settings to factory default settings (except Game mode). | |
| Sound Menu Content | ||
| Dolby Atmos | Your TV supports Dolby Atmos technology. By means of this technology the sound moves around you in three-dimensional space, so you feel like you're inside the action. You will have best experience if input audio bitstream is Atmos. Auto, On and Off options will be available. If set as Auto, the TV will switch between On and Off modes automatically depending on the input audio bitstream information, if the input audio bitstream is Atmos this feature will work as if it is set as On. Set as Off to disable. | |
| Mode | Smart, Movie, Music, News and Off options will be available. Set as Off to disable. Note: Some items in Sound menu will be greyed out and unavailable if set to an option other than Off. | |
| Surround Sound | Enables or disables the surround sound mode. | |
| Sound Output | Sets the sound output preference. TV, S/PDIF, HDMI ARC, Headphone Only and Lineout options will be available. There will be no sound output except through the selected option and the headphone jack. Note that, if this option is set as Headphone Only, TV speakers will be muted when headphone set is plugged in. When you connect an external amplifier to your TV using the headphone jack, you can select this option as Lineout. If you have connected headphones to the TV, set this option as Headphone Only. Please ensure before using headphones that this menu item is set to Headphone Only. If it is set to Lineout, the output from the headphone socket will be set to maximum which could damage your hearing. If HDMI ARC option is selected, CEC feature will be enabled. Note: Depending on the selected option some items in Sound menu will appear as greyed out and will be unavailable. | |
| AVL (Automatic Volume Limiting) | Sets the sound to obtain fixed output level between programmes. If the Mode menu item is set to an option other than Off the AVL setting options will change. Auto, Night, Normal and Off options will be available. In Auto mode the TV will switch to Normal or Night mode automatically according to the current time information. If no time information is available this option will always function as Normal. When the TV switches to Night mode for the first time after setting this option as Auto, an information bar will pop up on the screen. Please note that compared to Normal mode Night mode provides more aggressive dynamic compression control which is suitable for silent environments. | |
| eARC | When the Sound Output option is set to HDMI ARC, the eARC menu option will be available. Otherwise, it will be greyed out. This option will be set to On by default. Set to Off to disable. Refer to CEC section for more information. | |
| Advanced Settings | ||
| Equalizer | Selects the equalizer mode. Custom settings can be made only when in User mode. | |
| Dynamic Bass | Enables or disables the Dynamic Bass. | |
| Sound Mode | You can select a sound mode (if the viewed channel supports). | |
| Digital Out | Sets digital out audio type. PCM, Auto, and Passthrough options will be available. PCM: This option provides two-channel uncompressed digital audio output. You can use this option if you experience compatibility problems such as not hearing sound. Auto: This option provides multi-channel digital audio output (up to 5.1 channel). Passthrough: This option provides original audio output as such in HDMI ARC. It is recommended to use this option if you have an A/V receiver with eARC support. If your A/V receiver does not support source audio format you may experience compatibility problems such as not hearing sound. | |
| Headphone | Sets headphones volume. This option will not be available if the Sound Output option is set as Lineout. Please ensure before using headphones that the headphones volume is set to a low level, to prevent damage to your hearing. | |
| Balance | Sets sound balance. This feature will be activated if Sound Output option is set as TV or Headphone Only. Balance item adjusts the balance level of the TV speakers and headphones together. | |
| Reset | Reset some of the sound settings to factory defaults. | |
| Network Menu Content | |
| Network Type | Disable the network connection or change the connection type. |
| Scan Wireless Networks | Start a search for wireless networks. This option will be available if the Network Type is set as Wireless Device. |
| Disconnect | To disconnect from a wireless network and delete your saved wireless network profile (if previously saved), highlight this option and press OK. This option will not be available if you did not connect to a wireless network. Refer to Connectivity section for more information. |
| Press WPS on your wifi router | If your modem/rodter device has WPS, you can directly connect to it using this option. Highlight this option and press OK. Go to your modem/rodter device and press the WPS button on it to make the connection. This option will be available if the Network Type is set as Wireless Device. |
| Internet Speed Test | Start a speed test to check your connection bandwidth. The result will be displayed on the screen when finished. |
| Advanced Settings | Change the IP and DNS configurations of your TV. |
| Networked Standby Mode | Enable or disable this feature by setting it as On or Off. |
| Note: For detailed information on the options of this menu refer to the Connectivity section. | |
| Installation Menu Content | |
| Automatic channel scan (Retune) | Displays automatic tuning options. D. Aerial: Searches and stores aerial DVB stations. D. Cable: Searches and stores cable DVB stations. Analogue: Searches and stores analogue stations. Satellite: Searches and stores satellite stations. |
| Manual channel scan | This feature can be used for direct broadcast entry. |
| Network channel scan | Searches for the linked channels in the broadcast system. D. Aerial: Searches for aerial network channels. D. Cable: Searches for cable network channels. Satellite: Searches for satellite network channels. |
| Analogue fine tune | You can use this setting for fine tuning analogue channels. This feature is not available if no analogue channels are stored and if currently watched channel is not an analogue channel. |
| Satellite Settings | Displays satellite settings. Satellite list: Displays available satellites. You can Add, Delete satellites or Edit satellite settings on the list. Antenna installation: You can change satellite antenna settings and/or start a satellite scan. |
| Installation Settings (optional) | Displays installation settings menu. Standby Mode Search (*): Your TV will search for new or missing channels while in standby. Any new found broadcasts will be shown. Dynamic Channel Update(*): If this option is set as Enabled, the changes on the broadcasts such as frequency, channel name, subtitle language etc., will be applied automatically while watching. (*) Availability depends on model. |
| Clear Service List | Use this setting to clear channels stored. This setting is visible only when the Country option is set to Denmark, Sweden, Norway or Finland. |
| Select Active Network | This setting allows you to select only the broadcasts within the selected network to be listed in the channel list. This feature is available only for the country option of Norway. |
| Signal Information | You can use this menu item to monitor signal related information such as signal level/ quality, network name, etc. for available frequencies. |
| First time installation | Deletes all stored channels and settings, resets TV to factory settings. |
| System Menu Content | ||
| Accessibility | Displays accessibility options of the TV. Some options will not be available if no channels are installed. | |
| High Contrast | Increase the contrast of the menu options and texts to make them easier to read. White Text, Yellow Text and Off options will be available. | |
| Hard of Hearing | Enables any special feature sent from the broadcaster. | |
| Audio Description | A narration track will be played for the blind or visually impaired audience. Press OK to see all available Audio Description menu options. This feature is available only if the broadcaster supports it.Note: Audio description sound feature is not available in recording or time shifting mode (availability depends on the model of your TV and its features). | |
| Dialogue Enhancement | This feature provides sound postprocessing options for speech-gated dialogue enhancement. Off, Low, Medium and High options will be available. Set according your preference.Note: This feature has an effect only if input audio format is AC-4 and this effect only applies to TV loudspeaker output. | |
| Spoken Subtitles | Default preference of spoken subtitles is selected with this setting option. To make spoken subtitles priority higher than normal ones, this option should be set to On. This option may not be available depending on the model of your TV. | |
| Magnification | Enables the use of button combinations to magnify the screen. On and Off options will be available. Set as On to enable.Magnification support will be enabled or disabled with long-press of the numeric button 5. First top-left quadrant of the screen will be zoomed. After the magnification support is enabled, long-press of the numeric buttons 2, 4, 6, 8 will move the zoomed area to up, left, right and down. | |
| Minimap | Minimap is enabled and deactivated by default. It will be activated when Magnification feature is enabled. With this option, you can prevent magnification feature from displaying the minimap. | |
| Click Sound | This option enables the key click sound on TV menu. Set to On to enable. | |
| Highlight programmes with | ||
| [S] Subtitle | If this option is enabled and if any electronic programme guide event has "Subtitle" access service, these events will be highlighted with another colour. | |
| [SL] Sign Language | If this option is enabled and if any electronic programme guide event has "Sign Language" access service, these events will be highlighted with another colour. | |
| [AD] Audio Description | If this option is enabled and if any electronic programme guide event has "Audio Description" access service, these events will be highlighted with another colour. | |
| Language | You may set a different language depending on the broadcaster and the country. | |
| Conditional Access | Controls conditional access modules when available. | |
| Privacy | ||
| Privacy Settings | Manage your privacy privileges for smart TV related applications. Press OK to enter the menu and set according to your preferences. | |
| Show All Cookies | Displays all saved cookies. | |
| Delete All Cookies | Deletes all saved cookies. | |
| Do Not Track | You can set your preference regarding the tracking behaviour for HbbTV services using this option. | |
| Parental | Enter correct PIN to change parental settings. You can easily adjust Menu Lock, Maturity Lock, Child Lock or Guidance in this menu. You can also set a new PIN or change the Default CICAM PIN using the related options. Note: Some menu options may not be available depending on the country selection in the First Time Installation. Default PIN could have been set to 0000 or 1234. If you have defined the PIN (is requested depending on the country selection) during the First Time Installation use the PIN that you have defined. | |
| Date/Time | Sets date and time. | |
| Sources | Edit the names, enable or disable selected source options. There are also Regular and Enhanced options available for HDMI sources. These options are affecting the colour settings of the selected HDMI source. To be able to watch 4K or HDR/HLG images from an HDMI source related source setting should be set as Enhanced if the connected device is compatible with HDMI 2.0 and subsequent versions. Set as Regular if the connected device is HDMI 1.4 compatible. Set accordingly or disable the related HDMI source by setting as Disabled. | |
| Netflix | If this feature is supported by your TV, you can view your ESN(*) number and deactivate Netflix. (*) ESN number is an unique ID number for Netflix, created especially to identify your TV. Note: For 4K video streaming, a minimum 25Mb/s internet connection speed is required – For an example of the requirements for streaming 4K content you may find more information on the Netflix website (https://help.nsfli.com/en/node/13444). When you start to stream video content via the internet the quality of your connection will be analysed and the full HD or 4K quality may take a short time to be realised, or in the event of a slow connection not be possible. You should check your internet capabilities with your internet provider if you are at all unsure. | |
| Samba ACR | Samba Interactive TV powers recommendations and other apps by gathering data regarding consumption of specific on-screen content to enhance your viewing experience. Using this option you can access Samba Interactive TV settings menu, review Samba TV's Terms of Service, Privacy Policy and manage your advertising preferences, etc. Internet connection will be required in order to access HTML based settings. You can enable or disable Interactive TV at any time from the Settings>System>Privacy>Privacy Settings menu by checking or unchecking the check box next to the related item. This option may not be available depending on the selected country during the First Time Installation process, the model of your TV and its features. | |
| Voice Assistant | ||
| Alexa Built-in | Starts the setup process for this feature manually. If the setup is primarily completed Alexa Language, Alexa On Standby Mode, Alexa Alarm Volume and Sign Out options will be available. Refer to Alexa Ready section for more information. | |
| Alexa Language | Sets the language preference for Alexa. | |
| Alexa On Standby Mode | Enables or disables Alexa On Standby Mode feature. If enabled Alexa will be available while the TV is in standby mode. Note: This feature may affect your TV's power consumption. | |
| Alexa Home Screen | Set as Off to disable this feature or choose one of the inactivity periods to enable. 15 min, 30 min, 1 hour and 2 hour options will be available. | |
| Alexa Alarm Volume | Sets the volume level for Alexa alarms. | |
| Sign Out | You can use this option to sign out. If you sign out Alexa Built-in feature will be disabled. | |
| Works With Alexa | Starts the setup process for this feature manually. If the setup is primarily completed Change Friendly Name and Sign Out options will be available. Refer to Alexa Ready section for more information. | |
| Change Friendly Name | You can define a new name for your TV using this option. | |
| Sign Out | You can use this option to sign out. If you sign out Works With Alexa feature will be disabled. | |
| Google Assistant | Starts the setup process to enable your TV to work with Google Assistant devices. Highlight Start and press OK. If the setup is priorly completed Sign Out option will be available. If you sign out Google Assistant feature will be disabled. Refer to Google Assistant section for more information. | |
| More | Displays other setting options of the TV. | |
| Menu Timeout | Changes timeout duration for menu screens. | |
| Standby Mode LED | If set as Off the standby mode LED will not light up when the TV is in standby mode. | |
| HBBTV | You can enable or disable this feature by setting it as On or Off. Refer to HbbTV System section for further information. | |
| Device Identification | When this option is enabled it causes a 'Device ID' to be generated internally for each Web origin visited. When disabled all the current 'Device ID's' are cleared for each Web origin that was visited. You can enable or disable this feature by setting it as On or Off. This feature is available if channels are installed and the country option is set as Norway during the first time installation. | |
| Software upgrade | Ensures that your TV has the latest software. Press OK to see the menu options. | |
| Application Version | Displays current software version. | |
| Subtitle Mode | This option is used to select which subtitle mode will be on the screen (DVB subtitle / Teletext subtitle) if both are available. Default value is DVB subtitle. This feature is available if channels are installed and the country option is set as Norway during the first time installation. | |
| Auto Power Down | Sets the desired time for the TV to automatically go into standby mode when not being operated. This option can be set from 1 to 8 hours in steps of 1 hour. You can also disable this option by setting as Off. | |
| Biss Key | Biss is a satellite signal scrambling system that is used for some broadcasts. If you need to enter Biss key on a broadcast, you can use this setting. Highlight Biss Key and press OK to enter keys on the desired broadcast. This option will appear if satellite channels are installed. Availability depends on the model of your TV and its features. | |
| Store Mode | Select this mode for store display purposes. Whilst Store Mode is enabled, some items in the TV menu may not be available. For some models Enabled with video option may also be available. If this option is set, the TV will switch to store mode and the pre-installed video file will be played back. | |
| Power Up Mode | This setting configures the power up mode preference. Last State and Standby Mode options are available. | |
| OSS | Displays Open Source Software licence information. | |
| Restore Default Boot Logo | Restores the default boot logo. A confirmation message will be displayed. Select Yes and press OK. This option may not be available depending on the model of your TV and its features. | |
| Change Friendly Name | Using this option you can change the device name that is used to identify your TV when connecting a device to the TV wirelessly. The default device name will be restored if the device name is left blank or first time installation is performed. | |
| Application Priority | You can set your preference regarding the priority between the broadcast applications and CICAM AppMMI applications using this option. In case a CICAM is inserted into the TV and a contention occurs between the applications the priority will be given to the selected type of application. | |
| Dolby Notification | Sets the notification appearance preference for Dolby content. When set as On, Dolby logo will be displayed on the screen when Dolby content is detected. | |
| Model Information | Displays information such as model name, serial number, MAC address, etc. | |
Note: Some options may not be available depending on the model of your TV, its features and the selected country in the First Time Installation.
General TV Operation
Using the Channel List
The TV sorts all stored stations in the channel list. You can edit this channel list, set favourites or set active stations to be listed by using the Channels menu options. Press the OK button to open the channel list. You can filter the listed channels or make advanced changes in the current list using the Filter and Edit tab options. Highlight the tab you want and press OK to see available options.
In order to add the channel you are currently watching to the Home menu, highlight the Add to Home option in the Edit tab in the Channels menu and press OK.
Managing the Favourite Lists
You can create four different lists of your favourite channels. Enter the TV>Channels menu or press the OK button in order to open the Channels menu. Highlight the Edit tab and press OK to see the editing options and select the Tag/Untag channel option. Select the desired channel on the list by pressing the OK button while the channel is highlighted. You can make multiple choices. You can also use the Tag/ Untag all option to select all channels on the list. Then press Back/Return button to return to the Edit menu options. Select Add/Remove Favourites option and press the OK button again. Favourite channel list options will be displayed. Set the desired list option to On. The selected channel/s will be added to the list. In order to remove a channel or channels from a favourite list follow the same steps and set the desired list option to Off.
You can use the filtering function in the Channels menu to filter the channels in the channel list permanently according to your preferences. For instance, using the options of the Filter tab, you can set one of your four favourite lists to be displayed every time the channel list is opened. The selected filtering options will be shown on the top of the Channels menu screen.
Configuring Parental Settings
The Parental menu options can be used to prohibit users from viewing of certain programmes, channels and usage of menus. These settings are located in the Settings> System>Parental menu.
To display parental lock menu options, a PIN should be entered. After coding the correct PIN, parental setting options will be displayed.
Menu Lock: This setting enables or disables access to all menus or installation menus of the TV.
Guidance: This setting enables or disables access to some of the MHEG applications. Disabled applications can be released by entering the right PIN.
Maturity Lock: If this option is set, the TV gets the maturity information from the broadcast and if this
maturity level is disabled, prohibits access to the broadcast.
Note: If the country option in the First Time Installation is set as France, Italy or Austria, Maturity Lock's value will be set to 18 as default.
Child Lock: If this option is set to On, the TV can only be controlled by the remote control. In this case the control buttons on the TV will not work.
Internet Lock: If this option is set to ON, the internet using applications will be disabled. Set to OFF to release these applications again.
Set PIN: Defines a new PIN number.
Default CICAM PIN: This option will appear as greyed out if no CI module is inserted into the CI slot of the TV. You can change the default PIN of the CI CAM using this option.
Note: Default PIN could have been set to 0000 or 1234. If you have defined the PIN (is requested depending on the country selection) during the First Time Installation use the PIN that you have defined. In case the PIN is entered incorrectly five times in succession, PIN entry will be blocked and it will no longer be possible to make a new entry for 30 minutes. However, you can unblock the PIN entry or reset the retry count to zero by turning the TV off and on.
Some options may not be available depending on the model and/or on the country selection in the First Time Installation.
Electronic Programme Guide
By means of electronic programme guide function of your TV, you can browse the event schedule of the currently installed channels on your channel list. It depends on the related broadcast whether this feature is supported or not.
To access the programme guide, press the Guide button on your remote. You can also use the Guide option under TV menu.
There are 2 different types of schedule layouts available, Timeline Schedule and Now/Next. To switch between these layouts highlight the tab with the name of the alternative layout on the upper side of the screen and press OK.
Use the directional buttons to navigate through the programme guide. Use the Back/Return button to use the tab options on the upper side of the screen.
Timeline Schedule
In this layout option, all events of the listed channels will be displayed by timeline. You can use the directional buttons to scroll through the list of the events. Highlight an event and press OK to display event options menu.
Press Back/Return button to use available tab options. Highlight Filter tab and press OK to see the filtering options. To change the layout highlight Now/Next and press OK. You can use the Previous Day and Next Day options to display the events of the previous and next day.
Highlight Extras tab and press OK to access below options.
Highlight Genre: Displays Highlight Genre menu.
Select a genre and press OK. The events in the programme guide matching the selected genre will be highlighted.
Guide Search: Displays searching options. Using these options, you can search the programme guide database in accordance with the selected criteria. Matching results will be listed.
Now: Displays current event of the highlighted channel.
Zoom: Highlight and press OK to see events in a wider time interval.
Now/Next Schedule
In this layout option, only the current and next events of the listed channels will be displayed. You can use the directional buttons to scroll through the list of the events.
Press Back/Return button to use available tab options. Highlight Filter tab and press OK to see the filtering options. To change the layout highlight Timeline Schedule and press OK.
Event Options
Use the directional buttons to highlight an event and press OK button to display Options menu. The following options are available.
Select Channel: Using this option, you can switch to the selected channel in order to watch it. The programme guide will be closed.
More Info: Display detailed information on the selected event. Use up and down directional buttons to scroll through the text.
Set Timer on Event / Delete Timer on Event: Select Set Timer on Event option and press OK. You can set timers for future events. The event will be added to Timers list. To cancel an already set timer, highlight that event and press the OK button. Then select Delete Timer on Event option. The timer will be cancelled.
Notes: You cannot switch to any other channel while there is an active timer on the current channel.
It is not possible to set timer for two or more individual events at the same time interval.
Teletext Services
Press the Text button to enter. Press again to activate mix mode, which allows you to see the teletext page and the TV broadcast at the same time. Press once more to exit. If available, sections in the teletext pages will become colour-coded and can be selected by pressing the coloured buttons. Follow the instructions displayed on the screen.
Digital Teletext
Press the Text button to view digital teletext information. Operate it with the coloured buttons, directional buttons and OK button. The operation method may differ
depending on the content of the digital teletext. Follow the instructions displayed on the digital teletext screen. When the Text button is pressed again, the TV returns to television broadcast.
Software Upgrade
Your TV is capable of finding and updating the software automatically via the broadcast signal or via Internet.
Software upgrade search via user interface
On the main menu select Settings, then navigate to Software Upgrade and press the OK button. Then select Scan for upgrade and press OK button to check for a new software upgrade. You can select the satellite, which is used for updating process by setting Edit upgrade for Satellite option. The Software Upgrade option is also available in the Settings>System>More menu.
If a new upgrade is found, it starts to download the upgrade. After the download is completed, a warning will be displayed, press OK button to complete software upgrade process and restart TV.
3 AM search and upgrade mode
Your TV will search for new upgrades at 3:00 o'clock if Automatic scanning option is set to Enabled and if the TV is connected to an aerial signal or to the Internet. If a new software is found and downloaded successfully, it will be installed at the next power on.
Note: Do not unplug the power cord while led is blinking during the reboot process. If the TV fails to come on after the upgrade, unplug, wait for two minutes then plug it back in.
All updates are automatically controlled. If a manual search is carried out and no software is found then this is the current version.
Troubleshooting & Tips
TV will not turn on
Make sure the power cord is plugged in securely to a wall outlet. Press the Standby button on the remote.
Poor picture
- Check if you have correctly tuned the TV.
- Low signal level can cause picture distortion. Please check antenna connections.
- Check if you have entered the correct channel frequency if you have performed manual tuning.
No picture
- TV is not receiving any signal. Make sure the correct source has been selected.
- Is the antenna connected properly?
- Is the antenna cable damaged?
- Are suitable plugs used to connect the antenna?
- If the content is received through an HDMI input, try changing the related HDMI source input setting to Enhanced or Regular from the Source Settings
option in the Sources menu or the Sources option in the Settings>System menu.
If you are in doubt, consult your dealer.
No sound
- Check if the TV sound is muted. Press the Mute button or increase the volume to check.
Sound is coming from only one speaker. Check the balance settings from the Sound menu. - Check if the Sound Output option is set correctly from the Sound menu.
- If the content is received through an HDMI input, try changing the related HDMI source input setting to Enhanced or Regular from the Source Settings option in the Sources menu or the Sources option in the Settings>System menu.
Remote control - no operation
- The batteries may be exhausted. Replace the batteries.
- The batteries maybe inserted incorrectly. Refer to the section "Inserting the Batteries into the Remote".
No signal on an input source
- It is possible that no device is connected.
- Check the AV cables and connections from your device.
- Check the device is switched on.
HDMI Signal Compatibility
| Source Supported Signals Available | |||
| HDMI | 480i 60Hz O | ||
| 480p 60Hz O | |||
| 576i, 576p 50Hz O | |||
| 720p 50Hz,60Hz O | |||
| 1080i 50Hz,60Hz O | |||
| 1080p | 24Hz,25Hz,30Hz,50Hz,60Hz | O | |
| 3840x2160p | 24Hz,25Hz,30Hz,50Hz,60Hz | O | |
| 4096x2160p | 24Hz,25Hz,30Hz,50Hz,60Hz | O | |
(X: Not Available, O: Available)
In some cases a signal on the TV may not be displayed properly. The problem may be an inconsistency with standards from the source equipment (DVD, Set-top box, etc.). If you do experience such a problem please contact your dealer and also the manufacturer of the source equipment.
Supported File Formats for USB Mode
Video File Formats
| File Extension | Format | |
| Video Codec Audio | ||
| .mpg/.mpeg/.dat/ .vob MPEG | G1/2, H.264, VC1 MPEG Layer 1/2/3, AC3 | |
| /ts/.trp/.m2ts MPEG1/2, H.264, VC1, HEVC/H.265 MPEG Layer 1/2/3, AC3, E-AC3 | ||
| .avi MPEG1/2, MPEG4, H.264, MJPEG MPEG Layer 1/2/3, AC3, AAC, WMA | ||
| .mp4/.m4a/.m4v/.mov/.qt/.3gp/.3g2/.3gpp | MPEG1/2, H.263, MPEG4, H.264,HEVC/H.265, AV1 | MPEG Layer 1/2/3, AAC LC, AC3 |
| .mkv | MPEG 1/2, MPEG4, H.264,HEVC/H.265, AV1 | MPEG Layer 1/2/3, AAC, AC3 |
| .flv Sorenson Spark, MPEG4, H.264 MPEG Layer 3, ADPCM, AAC LC | ||
| .asf/.wmv MPEG4, WMV3,VC1 WMA, AMR-NB | ||
| .webm VP9, VP8, AV1 OPU,S, Vorbis | ||
Picture File Formats
| File Extension Format | |
| .jpg/.jpeg JPEG, PJ | PEG |
| .bmp | BMP |
| .png | PNG |
Audio File Formats
| File Extension | Format | |
| Video Codec | Audio | |
| .mp3 | mp3 | |
| .aac | AAC | |
| .wma | WMA | |
| .wav | MPEG Layer 1/2/3, AAC, PCM | |
| .m4a | M4A | AAC |
Subtitle File Formats
| External Subtitles | |
| Extension | Specification |
| .ssa | SubStation Alpha |
| .ass | Advanced SubStation Alpha |
| .srt | Subripper |
| .sub | Micro DVD / SubViewer |
| .txt | Micro DVD / TMPlayer / MPL2 |
| .smi | Sami |
Internal Subtitles
| Extension Specification | |
| .mkv | VOBSub |
| .mkv | ASS / SSA / TEXT |
| .dat, .mpg, .mpeg, .vob D | D Subtitle |
| .mp4 | DVD Subtitle, TEXT |
Supported DVI Resolutions
When connecting devices to your TV's connectors by using DVI converter cable (DVI to HDMI cable - not supplied), you can refer to the following resolution information.
| 56Hz 60Hz 66Hz 70Hz 72Hz 75Hz | |||||
| 640x480 | X | X | |||
| 800x600 | XXXX | ||||
| 1024x768 | XXXX | ||||
| 1280x768 | X | X | |||
| 1280x960 | X | ||||
| 1360x768 | X | ||||
| 1366x768 | X | ||||
| 1280x1024 | XXXX | ||||
| 1400x1050 | X | ||||
| 1600x900 | X | ||||
| 1920x1080 | X | ||||
Connectivity
Wired Connectivity
To Connect to a Wired Network
- You must have a modem/rodter connected to an active broadband connection.
- Connect your TV to your modem/rodter via an Ethernet cable. There is a LAN port at the rear-left side of your TV.
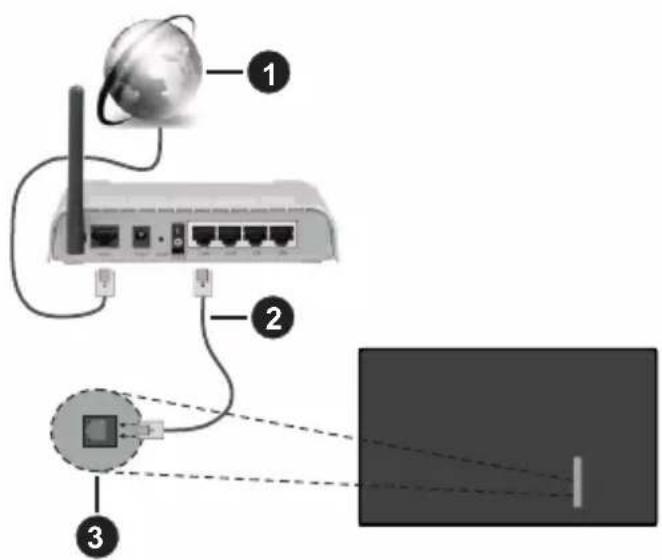
1 Broadband ISP connection
LAN (Ethernet) cable
3 LAN input on the rear-left side of the TV
- You might be able to connect your TV to your LAN depending on your network's configuration. In such a case, use an Ethernet cable to connect your TV directly to the network wall outlet.
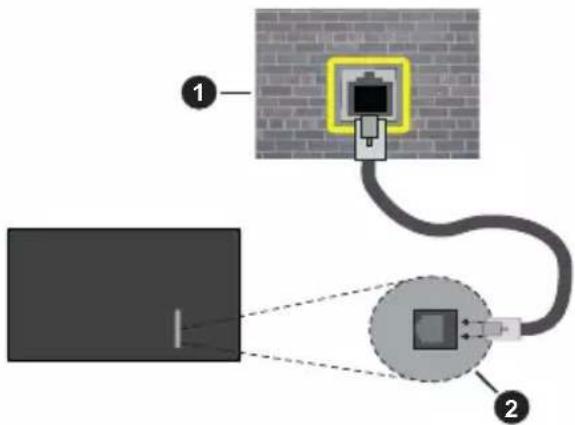
1 Network wall socket
LAN input on the rear-left side of the TV
Configuring Wired Device Settings
To configure wired connection settings go to the Settings>Network menu.
Network Type
Set Network Type as Wired Device if you are connecting via an Ethernet cable.
Internet Speed Test
Highlight Internet Speed Test and press the OK button. TV will check the internet connection bandwidth and display the result when complete.
Advanced Settings
Highlight Advanced Settings and press the OK button. On the next screen you can change the IP and DNS settings of the TV. Highlight the desired one and press Left or Right button to change the setting from Automatic to Manual. Now you can enter the IP and / or DNS values manually. Select the related item in the drop down menu and enter the new values using the numeric buttons of the remote. Highlight Save and press the OK button to save settings when complete.
Other Information
The status of the connection will be displayed as Connected or Not Connected and the current IP address, if a connection is established. The MAC address of your TV will also be displayed on the screen.
Wireless Connectivity
To Connect to a Wireless Network
- You must have a wireless modem/rodter connected to an active broadband connection.
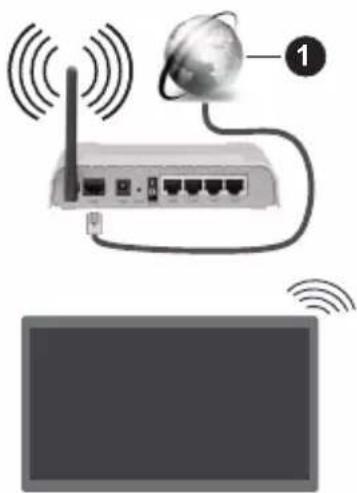
1 Broadband ISP connection
A Wireless-N router (IEEE 802.11a/b/g/n) with simultaneous 2.4 and 5 GHz bands is designed to increase bandwidth. These are optimised for smoother and faster HD video streaming, file transfers and wireless gaming.
The frequency and channel differ depending on the area.
The transmission speed differs depending on the distance and number of obstructions between the transmission products, the configuration of these products, the radio wave conditions, the line traffic
and the products that you use. The transmission may also be cut off or may get disconnected depending on the radio wave conditions, DECT phones or any other WLAN 11b appliances. The standard values of the transmission speed are the theoretical maximum values for the wireless standards. They are not the actual speeds of data transmission.
The location where the transmission is most effective differs depending on the usage environment.
The TV supports 802.11 a, b, g & n type modems. It is highly recommended that you should use the IEEE 802.11n communication protocol in order to avoid any possible problems while watching videos.
You must change your modem's SSID when there are any other modems around with the same SSID. You can encounter connection problems otherwise. Use a wired connection if you experience problems with a wireless connection.
Configuring Wireless Device Settings
To configure wireless connection settings go to the Settings>Network menu.
Network Type
Set Network Type as Wireless Device to start connection process.
Scan Wireless Networks
Highlight Scan Wireless Networks option and press OK to start a search for available wireless networks. All found networks will be listed. Highlight your desired network from the list and press OK to connect. A network with hidden SSID can not be detected by other devices. If you want to connect to a network with hidden SSID, scroll down the list of detected wireless networks, highlight the Add New Network option and press OK. Enter the name of the network and select the security type using the related options to connect.
Note: If the modem supports N mode, you should set N mode settings.
If the selected network is password-protected, enter the correct key by using the virtual keyboard. You can use this keyboard via the directional buttons and the OK button on the remote control.
Wait until the IP address is shown on the screen. This means that the connection is now established.
Disconnect
If you have connected to a wireless network Disconnect option will appear in the Network menu and your wireless network profile will also be saved, thus your TV will connect to the same network automatically whenever you switch to wireless connection. To disconnect from a wireless network and delete the saved wireless network profile, highlight Disconnect and press OK.
Press WPS on your wifi router
If your router has WPS, you can directly connect to the modem/rodter without entering a password or adding the network first. Highlight Press WPS on your wifi router option and press OK. Go to your modem/rodter device and press the WPS button on it to make the connection. You will see a connection confirmation on your TV once the devices have paired. Select OK to proceed. No further configuration is required.
Internet Speed Test
Highlight Internet Speed Test and press the OK button to check your internet connection speed.
Advanced Settings
Highlight Advanced Settings and press the OK button to open the advanced setting menu. Use directional and numeric buttons to set. The procedure is the same as explained for wired connectivity. Highlight Save and press the OK button to save settings when complete.
Networked Standby Mode
You can enable or disable the Networked Standby Mode feature by setting this option accordingly. Refer to Networked Standby Mode section for further information.
Other Information
The status of the connection will be displayed as Connected or Not Connected and the current IP address, if a connection is established. The MAC address of your TV will also be displayed on the screen.
Connecting to your mobile device via WLAN
- If your mobile device has WLAN feature, you can connect it to your TV via a router, in order to access the content in your device. For this, your mobile device must have an appropriate sharing software.
Connect your TV to your router by following the steps mentioned in the sections above.
Afterwards, connect your mobile device to the router and then activate the sharing software on your mobile device. Then, select files that you want to share with your TV.
If the connection is established correctly, you will be able to access the shared files installed on your mobile device via the Audio Video Sharing feature of your TV.
Highlight the Audio Video Sharing option in the Sources menu and press OK, available media server devices in the network will be displayed. Select your mobile device and press the OK button to continue.
- If available, you can download a virtual remote controller application from the server of your mobile device application provider.
Note: This feature may not be supported on all mobile devices.
Handling of the customer information
When using Internet connecting function of this TV, after agreeing to Panasonic's terms of service / privacy policy (hereinafter referred to as terms and conditions etc.), Customer Information on the use of this unit may be collected and used according to terms and conditions etc.
For details of terms of service / privacy policy, refer to [HOME] Settings>System>Privacy>Privacy Settings
Customer's personal information may be recorded on this TV by broadcasting organisation or application provider. Before repairing, transferring or discarding this TV, erase all the information recorded on this TV according to the following procedure.
[HOME] Installation>First time installation
Customer information may be collected by provider via application provided by third parties on this TV or website. Please confirm the terms and conditions etc. of provide in advance.
- Panasonic will not be held responsible for collecting or using customer Information via application provided by third party on this TV or website.
- When entering your credit card number, name, etc., pay special attention to the trustworthiness of the provider.
- Registered information may be registered in the server etc. of provider. Before repairing, transferring or discarding this TV, be sure to erase the information according to the terms and conditions etc. of provider.
Networked Standby Mode
Networked Standby Mode is a standard that allows a device to be turned on or woken up by a network message. The message is sent to the device by a program executed on a remote device connected to the same local area network, such as a smartphone.
To enable this feature set the Networked Standby Mode option in the Network menu as On. It is necessary that both the device, from which the network message will be sent to the TV, and the TV are connected to the same network. Networked Standby Mode feature is only supported for Android OS devices and can only be used via YouTube and Netflix applications.
In order to use this feature the TV and the remote device should be connected at least once while the TV is on. If the TV is powered off, the connection should be re-established, the next time it is switched on. Otherwise this feature will be unavailable. This does not apply, when the TV is switched into the standby mode.
If you want your TV to consume less power in standby mode, you can disable this feature by setting the Networked Standby Mode option as Off.
Wireless Display
Wireless Display is a standard for streaming video and sound content. This feature provides the ability to use your TV as wireless display device.
Using with mobile devices
There are different standards which enable sharing of screens including graphical, video and audio content between your mobile device and TV.
Plug the wireless USB dongle to TV first, if the TV doesn't have internal WLAN feature.
Press the Source button on the remote and switch to Wireless Display source.
A screen appears stating that the TV is ready for connection.
Open the sharing application on your mobile device. These applications are named differently for each brand, refer to the instruction manual of your mobile device for detailed information.
Scan for devices. After you select your TV and connect, the screen of your device will be displayed on your TV.
Note: This feature can be used only if the mobile device supports this feature. If you experience problems with the connection check if the operating system version you use supports this feature. There may be incompatibility problems with the operating system versions which are released after the production of this TV. Scanning and connecting processes differ according to the program you use.
Connectivity Troubleshooting
Wireless Network Not Available
- Ensure that any firewalls of your network allow the TV wireless connection.
- Try searching for wireless networks again, using the Network menu screen.
If the wireless network does not function properly, try using the wired network in your home. Refer to the Wired Connectivity section for more information on the process.
If the TV does not function using the wired connection, check the modem (router). If the router does not have a problem, check the internet connection of your modem.
Connection is Slow
See the instruction book of your wireless modem to get information on the internal service area, connection speed, signal quality and other settings. You need to have a high speed connection for your modem.
Disruption during playback or slow reactions
You could try the following in such a case:
Keep at least three metres distance from microwave ovens, mobile telephones, bluetooth devices or any
other WLAN compatible devices. Try changing the active channel on the WLAN router.
Internet Connection Not Available / Audio Video Sharing Not Working
If the MAC address (a unique identifier number) of your PC or modem has been permanently registered, it is possible that your TV might not connect to the internet. In such a case, the MAC address is authenticated each time when you connect to the internet. This is a precaution against unauthorized access. Since your TV has its own MAC address, your internet service provider cannot validate the MAC address of your TV. For this reason, your TV cannot connect to the internet. Contact your internet service provider and request information on how to connect a different device, such as your TV, to the internet.
It is also possible that the connection may not be available due to a firewall problem. If you think this causes your problem, contact your internet service provider. A firewall might be the reason of a connectivity and discovery problem while using the TV in Audio Video Sharing mode or while browsing via Audio Video Sharing feature.
Invalid Domain
Ensure that you have already logged on to your PC with an authorised username/password and also ensure that your domain is active, prior to sharing any files in your media server program on your PC. If the domain is invalid, this might cause problems while browsing files in Audio Video Sharing mode.
Using Audio Video Sharing Network Service
Audio Video Sharing feature uses a standard that eases the viewing process of digital electronics and makes them more convenient to use on a home network.
This standard allows you to view and play photos, music and videos stored on the media server connected to your home network.
1. Server Software Installation
The Audio Video Sharing feature cannot be used if the server program is not installed onto your PC or if the required media server software is not installed onto the companion device. Prepare your PC with a proper server program.
2. Connect to a Wired or Wireless Network
See the Wired/Wireless Connectivity sections for detailed configuration information.
3. Enable Audio Video Sharing
Enter the Settings>Devices menu and enable the Audio Video Sharing option.
4. Play Shared Files via Media Browser
Highlight the Audio Video Sharing option in the Sources menu by using the directional buttons and press OK. Available media server devices in the
network will be listed. Select one and press OK to continue. The media browser will then be displayed. Refer to the Media Browser menu section for further information on file playback.
If a problem occurs with the network, switch your television off at the wall socket and back on again.
PC/HDD/Media Player or any other devices that are compatible should be used with a wired connection for higher playback quality.
Use a LAN connection for quicker file sharing between other devices like computers.
Note: There may be some PC's which may not be able to utilise the Audio Video Sharing feature due to administrator and security settings (such as business PC's).
Apps
You can access the applications installed on your TV from the Home menu. Press the Home button on the remote, Home menu will be displayed. Highlight an app and press OK to launch.
In order to manage the apps installed on your TV, you can use the More Apps option in the TV menu. You can add an installed app to Home menu, launch or remove it. Highlight an app and press OK to see the available options.
You can add new apps from the application market. To access the market highlight the Market option in the TV menu and press OK. Available apps will be displayed. You can also access the application market from within the More Apps menu.
You can reset your customisations on the Home menu, including app-related ones, to defaults using the Reset Apps option in the TV menu (availability depends on TV model and its features). Highlight this option and press OK. A confirmation message will be displayed. Highlight Yes and press OK to proceed. Note that you will not be able to perform this operation again within the next few minutes.
Notes:
Possible application dependent problems may be caused by the content service provider.
Third party internet services may change, be discontinued or restricted at any time.
Internet Browser
To use the internet browser, enter the Home menu first.
Then launch the internet browser application which has an orange coloured logo with earth symbol on it. In the initial screen of the browser, the thumbnails of the predefined (if any) links to web sites available will be displayed as Speed Dial options along with the Edit Speed Dial and the Add to Speed Dial options.
To navigate the web browser, use the directional buttons on the remote or a connected mouse. To see the browser options bar, move the cursor to the top of the page. History, Tabs and Bookmarks options and
the browser bar which contains previous/next buttons, the refresh button, the address/search bar, the Speed Dial and the Vewd buttons are available.
To add a desired website to the Speed Dial list for quick access, move the cursor to the top of the page. The browser bar will appear. Highlight the Speed Dial button and press the OK button. Then select Add to Speed Dial option and press the OK button. Fill in the blanks for Name and Address, highlight OK and press the OK button to add. Whilst you are on the site you wish to add to the Speed Dial list, highlight the Vewd button and press the OK button. Then highlight Add to Speed Dial option in the submenu and press the OK button again. Name and Address will be filled automatically according to the site you are visiting. Highlight OK and press the OK button to add.
You can also use the Vewd menu options to manage the browser. Highlight the Vewd button and press the OK button to see available page specific and general options.
There are various ways to search or visit websites using the web browser.
Enter the address of a website(URL) into the search/ address bar and highlight the Submit button on the virtual keyboard and press the OK button to visit the site.
Enter keyword/s into the search/address bar and highlight the Submit button on the virtual keyboard and press the OK button to start a search for the related websites.
Highlight a Speed Dial thumbnail and press the OK button to visit the related website.
Your TV is compatible with USB mice. Plug your mouse or wireless mouse adaptor into the USB input of your TV for easier and quicker navigation.
Some web pages include flash content. These are not supported by the browser.
Your TV does not support any download processes from the internet via the browser.
All sites on the internet might not be supported. According to the site; content problems may occur. In some circumstances video content might not be able to be played.
HBBTV System
HbbTV (Hybrid Broadcast Broadband TV) is a new industry standard that seamlessly combines TV services delivered via broadcast with services delivered via broadband and also enables access to Internet only services for consumers using connected TVs and settop boxes. Services delivered through HbbTV include traditional broadcast TV channels, catch-up services, video-on-demand, electronic programme guide, interactive advertising, personalisation, voting, games, social networking and other multimedia applications. HbbTV applications are available on channels where they are signalled by the broadcaster. The broadcaster
marks one application as "autostart" and this one is started by the platform automatically. The autostart applications are generally launched with a small red button icon to notify the user that there is an HbbTV application on that channel. Press the red button to open the application page. After the page is displayed you can go back to the initial red button icon state by pressing the red button again. You can toggle between the red button icon mode and full UI mode of the application via pressing red button. It should be noted that the red button switching capability is provided by the application and some applications may behave differently (other colour buttons such as green, yellow, blue, may be defined for some other functions, e.g. shortcuts).
If you switch to another channel while an HbbTV application is active (either in red button icon mode or full UI mode), the following scenarios can occur.
- The application can continue running.
The application can be terminated. - The application can be terminated and another autopost red button application can be launched.
HbbTV allows the applications to be retrieved both from broadband or broadcast. The broadcaster may enable both ways or one of them. If the platform does not have an operational broadband connection, the platform can still launch applications transmitted on broadcast.
The autopost red button applications generally provide links to other applications. The user then can switch to other applications by using the links provided. The applications should provide a way to terminate themselves, usually Exit button is used for this.
HbbTV applications use keys on the remote control to interact with the user. When an HbbTV application is launched, the control of some keys are owned by the application. For example, numeric channel selection may not work on a teletext application where the numbers indicate teletext pages.
HbbTV requires AV streaming capability for the platform. There are numerous applications providing VOD (video on demand) and catch-up TV services. The user can use play, pause, stop, forward, and rewind keys on the remote control to interact with the AV content.
If you need to change the audio description settings of your TV you should do it before a HbbTV playback starts. You will not be able to access related settings during a playback. Go to the Settings>System>Accessibility>Audio Description menu and adjust according to your need.
Note: You can enable or disable this feature from the More menu in Settings>System menu. Depending on the model of your TV and the selected country option in the First Time Installation this feature might be available in the Settings>System>Privacy>Privacy Settings menu instead of the Settings>System>More menu.
Alexa Ready
Alexa is Amazon's cloud-based voice service available on many voice controlled assistant devices. By means of the Alexa Built-in and Works With Alexa features you can use your TV as an Alexa device and control the functions of your TV with Alexa.
Alexa Built-in
You can use your TV as an Alexa device. In order to do this, a Microphone Box(*) will be required. After connecting your Microphone Box to your TV the setup process should be completed. The setup can be carried out in the ways described below.
(*) The Microphone Box can be purchased separately if not supplied with the TV. For more information contact your local dealer or retail outlet where you bought your TV.
- Connect your Microphone Box to your TV
- Use the Alexa Built-in option in the Settings>System>Voice Assistant menu
- Carry out first time installation on your TV. The setup wizard will be displayed after the installation process is completed
The wizard will guide you through the setup process. Refer to the user manual of the Microphone Box for detailed information.
Alexa Home Screen
Once the setup is complete, Alexa Home Screen feature will be integrated. This feature is an ambient screen which appears when no user activity is detected. A background image, time and date information and voice command suggestions will be displayed on the Alexa Home Screen.
You can use the Alexa Home Screen option in the Settings>System>VoiceAssistant>AlexaBuilt-in menu to configure the settings of this feature. You can set to one of the inactivity periods to enable or set to Off to disable.
Alexa Home Screen is displayed only when web browser or any other video on demand application except Netflix is running. It appears when no user activity is detected during the predefined inactivity period unless a media playback is in progress. Watching a movie, for example, is not considered as user inactivity.
You can press remote control buttons to make it disappear. As an exception you can use the Volume +/- buttons to control volume level even when Alexa Home Screen is running.
Works With Alexa
You can control the functions of your TV with Alexa. In order to do this, the setup process should be completed. The setup can be carried out in the ways described below.
-
Use the Works With Alexa option in the Settings>System>Voice Assistant menu
-
Carry out first time installation on your TV. The setup wizard will be displayed after the installation process is completed
Setup process
The wizard will guide you through the setup process.
- If you carry out first time installation on your TV, the Alexa setup wizard will be displayed after the installation process is completed. On the first screen highlight Learn More option and press OK. On the next screen you will be informed about the feature. Highlight Start and press OK to proceed.
If you skip the setup wizard after the first time installation you can use the Works With Alexa option in the Settings>System>Voice Assistant menu to carry out the setup later manually. On the first screen you will be informed about the feature. Highlight Start and press OK to proceed.
-
An authentication code will be created and displayed on the screen. Use your computer or any other device with internet access to go to the internet address (URL) shown on the screen. You will be directed to a page where you can sign in to your Amazon account first, if you are not already signed in. Then you will be directed to a page where you can enter the authentication code you see on the TV and link your TV to your Amazon account.
-
If the linking process was successful you will be asked to determine a name for your TV, called 'Friendly Name'(FN). A 'Friendly Name' is a name that reminds you of your TV, such as 'Living Room TV', 'Kitchen TV', 'Dining Room TV', etc. Choose an easy-to-say name. You will say this name to tell Alexa which TV to control. When you are done, highlight OK and press OK.
Examples about the use of the feature will be displayed on the next screen. Press OK to finish the setup.
If you carried out the setup after the first time installation you will return to the first screen of the setup wizard when you press OK. In that case press Exit or highlight Setup Later and press OK in order to exit the setup.
Once the setup is complete, you will be able to control the functions of your TV with Alexa.
Note: Make sure that the devices are connected to the internet.
Example Commands
Here are some voice commands that you can use:
| Command Function | |
| Alexa, turn on 'FN' Powers on the TV | |
| Alexa, turn off 'FN' Powers off the TV | |
| Alexa, play 'FN' Starts media playback | |
| Alexa, pause 'FN' Pauses media playback | |
| Command Function | |
| Alexa, resume 'FN' Resumes | media playback |
| Alexa, stop 'FN' Stops media | playback |
| Alexa, fast forward on 'FN' | Advances media in fast forward mode |
| Alexa, rewind on 'FN' Rewinds media | |
| Alexa, set the volume of 'FN' to 50 | Sets the volume to the specified level |
| Alexa, turn the volume up on 'FN' | Increases volume by 10 units |
| Alexa, turn the volume down on 'FN' | Decreases volume by 10 units |
| Alexa, mute 'FN' Mutes sound | |
| Alexa, unmute 'FN' Unmutes | sound |
| Alexa, change the input to "input_name" on 'FN' | The TV switches to the input source with the spec-ified name (e.g. HDMI 1) |
| Alexa, change channel to "channel_number" on 'FN' | The TV switches to the channel with the specified number (e.g. channel 200) |
| Alexa, change channel to "channel_name" on 'FN' | The TV switches to the channel with the specified name |
| Alexa, channel up on 'FN' | The TV switches to the next higher channel, if any available |
| Alexa, channel down on 'FN' | The TV switches to the next lower channel, if any available |
| Alexa, next channel on 'FN' | The TV switches to the next channel on the channel list |
FN is the abbreviation for 'Friendly Name'.
Google Assistant
Your TV works with Ok Google for voice control of your connected devices and appliances.
Works With Ok Google
By means of this feature you can control the functions of your TV with Google Assistant devices. In order to do this, the setup process should be completed.
Before the setup
Complete the following procedures before you start the setup on your TV.
- Install the Google Home application on your mobile phone and login to your account
- Add the assistant device to your account
- Select the Vsmart TV action from the list of actions within the application
- A screen will be displayed where you will enter the authentication code which will be created during the setup process on your TV in order to link your TV to your account. Continue with the setup on your TV to get the authentication code
Setup process
The setup can be carried out by using the Google Assistant option in the Settings>System>Voice Assistant menu. The wizard will guide you through the setup process.
- On the first screen highlight Start and press OK to proceed
- You will be asked to determine a name for your TV on the next screen, called 'Friendly Name'(FN). A 'Friendly Name' is a name that reminds you of your TV, such as 'Living Room TV', 'Kitchen TV', 'Dining Room TV', etc. Choose an easy-to-say name. When you are done, highlight OK and press OK
- An authentication code will be created and displayed on the screen. Enter the code you see on the TV on the Google Home application
Once the setup is complete, you will be able to control the functions of your TV with Google Assistant.
Note: Make sure that the devices are connected to the internet. You can link only one TV to your account.
Example Commands
Just say "Ok Google" to control your TV using just your voice.
| Command Function | |
| turn on 'FN' Powers on the TV | |
| turn off 'FN' Powers off the TV | |
| pause on 'FN' Pauses media playback | |
| resume on 'FN' Resumes media playback | |
| stop on 'FN' Stops media playback | |
| volume up on 'FN' Increases | volume |
| volume down on 'FN' Decreases volume | |
| set mute volume on 'FN' Mutes sound | |
| switch input to "input_name" on 'FN' | The TV switches to the input source with the spec-ified name (e.g. HDMI 1) |
| switch to "input_name" on 'FN' | |
| change channel to "chan-nel_number" on 'FN' | The TV switches to the channel with the specified number (e.g. channel 200) |
| change channel to "chan-nel_name" on 'FN' | The TV switches to the channel with the specified name |
| channel up on 'FN' | The TV switches to the next higher channel, if any available |
| channel down on 'FN' | The TV switches to the next lower channel, if any available |
FN is the abbreviation for 'Friendly Name'.
Google is a trademark of Google LLC.
DVB functionality information
This DVB receiver is only suitable for use in the country which it was designed to be used in.
Although this DVB receiver conforms to the latest DVB specifications at the time of manufacture, we cannot guarantee compatibility with future DVB transmissions due to changes that may be implemented in broadcast signals and technologies.
Some digital television functions may not be available in all countries.
We continually strive to improve our products; therefore, specifications may change without prior notice.
For advice on where to purchase accessories, please contact the store where you purchased your equipment.
περεχόμενα
PAnpoopopec aOpaaleia. 2
Pnnpopoeic yia to πepiαλov 6
Xapaktnpiotiká 6
Ultra HD (UHD). 6
Yynn duvaikn Tepiox (HDR) / Ybetaikn loayapituknyaumkaunuHLG) 6
Dolby Vision. 7
Aeouap Tpu TepiIaIaBavovtai 7
Eikova etoupyia Avouvns 7
Eiooioeic oxetikαe Tnvaovn 7
XeipiooC kai aeitoupyia Tns tnaepaon8
XpnoTou Kupoiu evou Tnaepaon. 9
ToTnTnT Twv mTapw vTo nExeiipntpio..10
Σuδεσηρεματος 11
Σύνδεοη Κεραίας 11
Vwottoinon oxetikae TIC aedeic 11
Teiikn diaeon xpnoiotoinpvov oukeuwkai nataipiw 12
- Eoiaye TIC TAPEXOeVc BiEc (M4 x 12) kai OphiTE TIG PPOEKTiKa WOTe V A ExI I PPOApooTei Owota n Baoon.
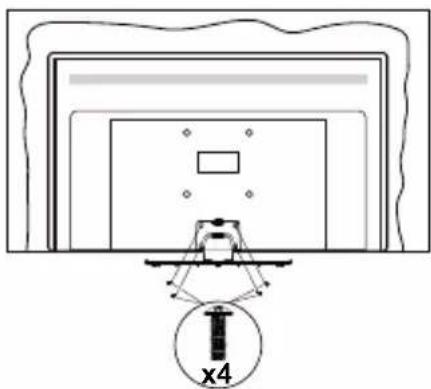
Apaipexon tnc baoons aTTO nV tnlaeopaon
Aiaopaiote oTI aqaipoeete TN baon me Tov Tpotto Tou Tepiypapetai napakatw otav xpooiotoiite To otpiyauvaptnoans eToixo n otav oukeuaeTe TaI tvnTneopaon.
ToTIOEtnote TnV tNtEopaon Tavw oEv a TpaTeCi Epyaiaac Tnv 0ovn Ppoc Ta KATW NAVw eEv KaApo kai mAlako Tavi. Afnote n Baoi (Tic Baoei) va TPOEEX(-Ouv) aTto akpo Tc ETTIqaveiaC.
- Eβiodωte TIG βiδες οτερεωσns TNS βαONS (TOW βαεωv).
AqapéoTe Tbaon (Ticbaeic).
Otau xpooiotnoie t n baoan avaptnonc oToixo
Panasonic Testing Centre
Panasonic Marketing Europe GmbH
Winsberging 15, 22525 Hamburg, Germany
Iotototoc:http://www.panasonic.com

WEP 64/128, WPA, WPA2, TKIP, AES, WAPI
Emiohavon
Panasonic Testing Centre
Panasonic Marketing Europe GmbH
Winsberging 15, 22525 Hamburg, Germany
Web Site: http://www.panasonic.com

WEP 64/128, WPA, WPA2, TKIP, AES, WAPI
Megegyzés
Con这对于 the operation of this application, we have decided to use it for the purposes of the project.
Panasonic Testing Centre
Panasonic Marketing Europe GmbH
Winsbergring 15, 22525 Hamburg, Germany
Sito web: http://www.panasonic.com
Specifiche
WEP 64/128, WPA, WPA2, TKIP, AES, WAPI
Avviso
DVB/Transmission data/Funzioni IPTV
TV-bediening & Operation 8
TV-bediening & Operation
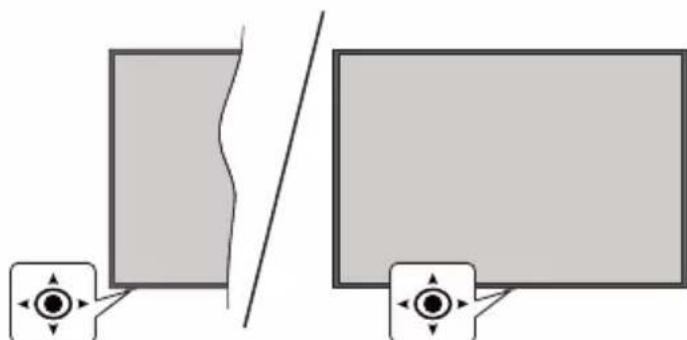
Covered by patents at patent listaccessadvance.com
Panasonic Testing Centre
Panasonic Marketing Europe GmbH
Winsberging 15, 22525 Hamburg, Germany
Web Site: http://www.panasonic.com
Specifications
| TV-UITZENDING | PAL BG/I/DK/ SECAM BG/DK | |||
| Kanalen ontvangen | VHF (BAND I/III) - UHF (BAND U) - HYPERBAND | |||
| Digitale ontvangst | Volledig geintegreerde digitale aardse/kabel-satelliet TV (DVB-T-C-S) (in overeenstemming met (DVB-T2, DVB-S2) | |||
| Aantal instelbare kanalen | 11 000 | |||
| Kanaalindicator Weergave op het scherm | ||||
| RF Antenne-Input 75 | Ohm (niet gebalanceerd) | |||
| Werkingsspanning 2 | 20-240V AC, 50Hz. | |||
| Geluid A2 Stereo+Nicam Stereo | ||||
| KoptelefooN 3,5 mm | mini stereo jack | |||
| Netwerk stand- bymodus energieverbruik (W) | < 2 | |||
| TX-43MX600E TX-50 | MX600E TX-55MX600 | TX-65MX600E | ||
| Geluidsuitgang stroom (WRMS.) (10% THD) | 2 x 10 W 2 x 10 W 2 | 10 W 2 x 12 W | ||
| Stroomverbruik (W) | 150 W 135 W 140 W | 200 W | ||
| Gewicht (kg) 7,5 Kg 9,5 Kg 13 Kg 22 Kg | ||||
| TV afmetingen BxLxH (met voet) (mm) | 235 x 965 x 619 235 x 1 | 120 x 706 235 x 1233 x | 770 275 x 1453 x 896 | |
| TV afmetingen BxLxH (met voet) (mm) | 87 x 965 x 561 87 x 1 | 120 x 648 87 x 1233 x | 712 82 x 1453 x 836 | |
| Beeldscherm | 16/9 43" | 16/9 50" | 16/9 55" | 16/9 65" |
| Operationele temperatuur en opérationele vochtigkeit | 0°C tot 40°C, 85% max. vochtigkeit | |||
WEP 64/128, WPA, WPA2, TKIP, AES, WAPI
Bericht
Enhanced Audio Return Channel (eARC)
3.7. Tilbake still apper
Covered by patents at patentist.accessadvance.com
Panasonic Testing Centre
Panasonic Marketing Europe GmbH
Winsbergring 15, 22525 Hamburg, Tyskland
Nettsted: http://www.panasonic.com
| Spesifikasjon | ||||
| Fjernsynssending | PAL BG/I/DK/SECAM BG/DK | |||
| Mottak av Kanaler VHF (BAND I/III) - UHF (BAND U) - HYPERBAND | ||||
| Digitalt Mottak | Fullt integrett digital bakkesendt-kabel-satellitt TV (DVB-T-C-S)(kompatibel med DVB-T2, DVB-S2) | |||
| AntallForhåndsstilteKanaler | 11 000 | |||
| Kanalindikator Skjermvisning | ||||
| RF-antenneinngang 75 Ohm (ubalansert) | ||||
| Operasjonsspenning | 220-240V AC, 50Hz. | |||
| Lyd A2 Stereo+Nicam Stereo | ||||
| Hodetelefon 3,5 mm stereo-minijackplugg | ||||
| NettverksbasertventemodusStromforbruk (W) | < 2 | |||
| TX-43MX600E TX-50 | MX600E TX-55MX60 | 0E TX-65MX600E | ||
| Audio Utgangseffekt(WRMS.) (10% THD) | 2 x 10 W 2 x 10 W 2 | x 10 W 2 x 12 W | ||
| Stromforbruk (W) 150 | W 135 W 140 W 200 | W | ||
| Vekt (kg) 7,5 Kg 9,5 Kg | 13 Kg 22 Kg | |||
| TV-dimensjonerDlxH (med stativ)(mm) | 235 x 965 x 619 235 x | 120 x 706 235 x 1233 x | 770 275 x 1453 x 896 | |
| TV-dimensjonerVxHxD (uten stativ)(mm) | 87 x 965 x 561 87 x | 120 x 648 87 x | 1233 x 712 82 x | 1453 x 836 |
| Skjerm | 16/9 43" | 16/9 50" | 16/9 55" | 16/9 65" |
| Driftstemperatur ogdriftsluftfuktigkeit | 0 °C optil 40 °C, 85 % fuktighet maks. | |||
For mer produitinformationjon, vennligst besok EPREL: https://eprel.ec.europa.eu.
EPREL-Registraringsnummer er tilgengelig på https://eprel.panasonic.eu/product.
WEP 64/128, WPA, WPA2, TKIP, AES, WAPI
Merknad
For a sette TV-en i hard standby
Enhanced Audio Return Channel (eARC)
Auto Low Latency Mode
Du kan ogsa aktivere alternativet ALLM (Auto Low Latency Mode) iimenyen Innstillinger>Enheter. Hvisijke funksjonen er aktivert, bytter TV automatisk bildemodus til Spill nar ALLM-modussignal mottas fra gjeldende HDMI-kilde. TV gár tilbake til forrige bildemodusinnstilling nár ALLM-siqalet gár tapt. Sá du trenger ikke à endre innstillingene manuelt.
Hvis alternatively ALLM er aktivert, kan/DDke bildemodus endres sa lenge ALLM-signalet mottas fra den gjeldende HDMI-kilden.
Panasonic Testing Centre
Panasonic Marketing Europe GmbH
Winsberging 15, 22525 Hamburg, Germany
Strona internetowa: http://www.panasonic.com
WEP 64/128, WPA, WPA2, TKIP, AES, WAPI
Uwaga
Auto Low Latency Mode (ALLM)
Panasonic Testing Centre
Panasonic Marketing Europe GmbH
Winsberging 15, 22525 Hamburg, Germany
Sítio web: http://www.panasonic.com
Especialização
WEP 64/128, WPA, WPA2, TKIP, AES, WAPI
Observação
Enhanced Audio Return Channel (eARC)
Conectivitate wireless. 36
Manipularea informatiilor despere consumatori... 38
Mod Standby in retea 38
Afisaj wireless 38
Depanare Conectivitate 39
NU EXISTÁ PIESE PENTRU REPARARE
INAUNTRU. LUCRARILE DE SERVICE TREBUIE REALIZEDE PERSONAL DE SERVICE CALIFICAT.
In cazul unor conditi meteorologice extreme (furtuni, fulgere) si perioadelor lungi de inactivitate (atunci cand plecati in concediu), deconnectati televizorul de la reteaua electrica.
Imagine in Modul Standby
Puteti folosi televizorul dumneavoastracama digitalafolosindcharacteristica Imagine in Modul Standby.
Pentru a face asa, urmati pasi ide mai jos.
Panasonic Testing Centre
Panasonic Marketing Europe GmbH
Winsbergring 15, 22525 Hamburg, Germany
Pagina web: http://www.panasonic.com
Specificati
| Transmitere la televizor | PAL BG/I/DK/ SECAM BG/DK | |||
| Canale receptiveare VHF (BAND I/III) - UHF (BAND U) - HYPERBAND | ||||
| Receptie digitală | Televizor prin satelit - cablu terestru digital complet integrat (DVB-T-C-S) (conformitate cu DVB-T2, DVB-S2 ) | |||
| Număr de canale presetate | 11 000 | |||
| Indicator canal Afișajpe ecran | ||||
| Intrare antenna RF 75Ohm (dezechilibrat) | ||||
| Tensiune de functiònare | 220-240V AC, 50Hz. | |||
| Audio A2 Stereo+Nicam Stereo | ||||
| Căști Mini mufă stereode 3,5 mm | ||||
| Consum de energia in Modul Repaus în rețea (W) | < 2 | |||
| TX-43MX600E TX-50 | MX600E TX-55MX600E TX-65MX600E | |||
| Putere ileșire audio (WRMS.) (10% THD) | 2 x 10 W 2 x 10 W 2 x 10 W 2 x 12 W | |||
| Consum energia electrică (W) | 150 W 135 W 140 W | 200 W | ||
| Greunate (kg) 7,5 Kg | 9,5 Kg 13 Kg 22 Kg | |||
| Dimensiuni televizor Axlşî (cu stand) (mm) | 235 x 965 x 619 235 x 1 | 120 x 706 235 x 1233 x | 770 275 x 1453 x 896 | |
| Dimensiuni televizor Axlşî (fără stand) (mm) | 87 x 965 x 561 87 x 1 | 120 x 648 87 x 1233 x | 712 82 x 1453 x 836 | |
| Ecran | 16/9 43" | 16/9 50" | 16/9 55" | 16/9 65" |
| Temperatura și gradul de umiditate de functiònare | 0 °C- 40 °C, 85% umiditate maximă | |||
Pentru mai multe inatati despre produse, va rugam sa vizitat EPREL: https://eprel.ec.europa.eu.
Specifications transmitator LAN wireless
| Intervale frecență | Putere ileșire maximă |
| 2400 - 2483,5 MHz (CH1 - CH13) < 100 mW | |
| 5150 - 5250 MHz (CH36 - CH48) < 200 mW | |
| 5250 - 5350 MHz (CH52 - CH64) < 200 mW | |
| 5470 - 5725 MHz (CH100 - CH140) < 200 mW | |
WEP 64/128, WPA, WPA2, TKIP, AES, WAPI.
Observatie
DVB/Transmitereadatelor/IPTV
- Acest TV este conceput saynthesispeasca standardele (din Martie, 2021) DVB-T / T2 (MPEG2, MPEG4-AVC(H.264) si serviciile digitale terestre HEVC(H.265)), DVB-C (MPEG2, MPEG4-AVC(H.264) si serviciile digitale prin cablu HEVC(H.265)) si DVB-S (MPEG2, MPEG4-AVC(H.264) si serviciile digitale prin satelit HEVC(H.265)).
Ghid electronic de programme (GEP)
Conectivitate wireless
Conectare la o retea wireless
Mod Standby in retea
Puteti activa sau deactiva caractetrica Networked Standby Mode (Mod Standby in retea) prin setarea corespunzatoare a acesti optiuni. Pentru informati detaliate, consultati sectiunea Networked Standby Mode (Mod Standby in retea).
Alte informati
[HOME] Installation>First time installation ([HOME] Instalare>Prima instalare)
Mod Standby in retea
Networked Standby Mode (Mod Standby in retea)
este un standard care permite unui disposizitiv sa fie
pornit Sau trezit de un mesaj de retea. Mesajul este
trimis catre disposizitiv prinr-un program executat pe
un dispositiv separat conectat la aceeasi retea locala, precum un smartphone.
Covered by patients at patentlist.accessAdvance.com
Panasonic Testing Centre
Panasonic Marketing Europe GmbH
Winsberging 15, 22525 Hamburg, Germany
Websida: http://www.panasonic.com
| Specifikationer | ||||
| TV-Sändninger | PAL BG/I/DK SECAM BG/DK | |||
| Mottagande Kanaler | VHF (BAND I/III) - UHF (BAND U) - HYPERBAND | |||
| Digital Mottagning | Fullt integrerad digital terrestrial-kabel-satellit-TV (DVB-T-C-S) (DVB-T2, DVB-S2-kompatibel) | |||
| Antal Förinställda Kanaler | 11 000 | |||
| Kanalindikator Visining | på skärmen | |||
| RF-antennaingång 75 | Ohm (obalanserat) | |||
| Driftsvolt 220-240V AC, 50Hz. | ||||
| Audio A2 Stereo+Nicam Stereo | ||||
| Hörlunar 3,5 mm mini stereo-utttag | ||||
| Nätverkets strömforbrukning i standby-läge (W) | < 2 | |||
| TX-43MX600E TX-50 | MX600E TX-55MX600E TX-65MX600E | |||
| Ljudutgängsström (WRMS.) (10 % THD) | 2 x 10 W 2 x 10 W 2 x 10 W 2 x 12 W | |||
| Strömforbrukning (W) | 150 W 135 W 140 W | 200 W | ||
| Vikt (kg) 7,5 Kg 9,5 Kg | 13 Kg 22 Kg | |||
| TV-dimensioner BxHxD (med stativ) (mm) | 235 x 965 x 619 235 x 1 | 120 x 706 235 x 1233 x | 770 275 x 1453 x 896 | |
| TV-dimensioner BxHxD (utan stativ) (mm) | 87 x 965 x 561 87 x 1 | 120 x 648 87 x 1233 x | 712 82 x 1453 x | 836 |
| Skärn | 16/9 43" | 16/9 50" | 16/9 55" | 16/9 65" |
| Driftstemperatur och driftsfuktigkeit | 0 °C upp till 40 °C, 85 % fuktighet max | |||
WEP 64/128, WPA, WPA2, TKIP, AES, WAPI
Obs:
Covered by patiens at patienlistaccessadvancemc
Panasonic Testing Centre
Panasonic Marketing Europe GmbH
Winsberging 15, 22525 Hamburg, Germany
WEP 64/128, WPA, WPA2, TKIP, AES, WAPI
Upozornenie:
DVB / DátOVé vysielenie / IPTV
- Tento televizor je navrhnuty tak, aby spinal normy (k Marcu 2021) digitálnych pozemnych sluzieb DVB-T / T2 (MPEG2, MPEG4-AVC (H.264) a HEVC (H.265)), DVB-C (MPEG2, digitánlne káblóve sluzby MPEG4-AVC (H.264) a HEVC (H.265)) a digitánlne satelitné sluzby DVB-S (MPEG2, MPEG4-AVC (H.264) a HEVC (H.265)).
Works With Alexa (Fungovanie's Alexa)
pomocou Alexa možete ovladat' funkcie televízora. Za tymto učelom dokončite proces nastavenia. Nasta venie je možné vykonat' sposobmi opisanými nizšie.
- Použite funkciu Works With Alexa v ponuke Nastavenia> System> Hlasovy asistent
- Vykonajte prvu instalaciu vo vašom televizore. Podokönčeni procesu instalacie sa zobrazi Sprievodca nastavenim
Proces nastavenia
Sprievodca vás prevedie procesom nastavenia.
- HhOpMaun3a6e3onacnOCT
- BHUMAHNE
- ONACHOCT OT TOKOB YAP HE OTBAPY
- BAxHO - MoI npOyeTe BHNMaTeJIHo Te3n INcTpkykCn npeDn Da INcTaJnpaTe IINn N3NoJ3BaTe ypeDa
- BHIMAHNE
- MapknupobkN Bbpxy npodykTa
- BHHMAHNE
- ИНСТРУКЦИ 3A MOHTИРАЕ HA CTEHA
- PnDpBxxka
- Pahen, a dncnpe. wkaf, nnecectan
- PeDOBHa rpnka:
- Pnynopntn netha:
- Wencen
- Crno6BaHe/deMOHTnpaHe Ha nIeDecTaJa
- NoIroTOBka
- Crno6BaHe Ha nnepeTana
- ДемоHTиране Ha ПиЕдстana OT TeJIeBn3opa
- Ipn n3noJ3BaHe Ha cko6n 3a OKaYBaHe Ha CTeHa
- Pb6Ha TeBn3opa
- I3rneOToCTpaHn
- CmHa Ha KaHaJIte N IpomHa Ha CnJaTa Ha 3Byka
- HylnpaHe n n3KJIIOUBAHe ype3 6yTOH 3a roTOBHOCT
- N3nON3BaHe Ha rnaBHOTo MeH0 Ha TeJeBu3Opa
- Hauano
- TbpcHe
- TV
- 3.1.PbKOBOIDCTBO
- 3.2.KaHann
- 3.3.TaMepn
- 3.4.PedaKtnpaHe HaHaayanHaTa cTpaHua
- 3.5.Osue npuiokeHn
- Na3ap
- 3.7.HynipaHe Ha npinloKeHHa
- DocTbNHOCTTa
- 3.9.ПичнНЯстpoйк
- HactpojuKu
- 5.И3TOUHnIu
- HacTpoKn HaN3ToUHnka
- IocTaBHe Ha 6aTePm B DnCTaHcNoHHOTO ynpaBneHne
- Cbbp3BaHe KbM eNeKTpNueckKaTa MpeXa
- AHTeHeH BXoD
- 3aHa JIyBa CtpaHa Ha TeJeBn3Opa
- YBeDMJIeHne3aJIInceH3
- BpKabHn OpraHnueHn
- 3a6eJexka:
- DVB/IM3bYBaHeHaDaHHI IPTVФyHKnnte
- (*) ByToH B roToBHOCT
- (**) MoT 6yToH 1 & MoT 6yToH 2
- Bp3Kn
- 3a npeBkIIOUBaHe Ha TeJIeBn3Opa B peKIM Ha IOTOBHOCT
- 3a npebKJIIOUbaHe Ha TeJIeBn3Opa B TBbPd peXIM HA rOTOBHOCT
- 3a da n3KnIOuHTe TeJeBu3Opa
- PbpbMaMHCTanaua
- OTHOCHO n3bopa Ha Tnna npedeBaHe
- MeiHOBb3npoN3BexJaHe npe3 USB BXoD
- MeiHOBb3pOu3BExdaHe
- ABTomaTnueH peKIM c HnCKa JnteHTHOCT
- EneKtpoHNO pkoBOdCTBO
- Позцин Ha MeHTo,HaCTpoiKn"
- EneKtpoHeH cnpaBOuHnK Ha nporpaMnte
- Iporpama no BpeMe
- Tekyua/CneBbau nporpama
- OnuHa c6bTuTnTa
- AM TbpcHe n peXnHa aKtyaJn3aun
- OCTpaHReBaHe Ha HEn3npaBHOCTN & CbBETN
- TeneBn3OpbT HMa da Ce BKnIOUH
- Jlowa KaptnHa
- HЯma n3o6paXeHne
- Hama 3Byk
- HaTnucHe T WPS Ha Baunia wifi pyTeP
- Tect 3a ckopoctTa Ha uHTepHET Bpb3kaTa
- Pa3upeHn Hactpoyn
- Pexm Ha rTOBHOCT B Mpeka
- Dpyra HOpmaun
- Cbbp3BaHe KbMaBaaeTo Mo6nHNo ycTpoiCTBO 4pe3 WLAN
- 06pa6oTKa Ha nHΦopMaζηrTa 3a KπηENTa
- [HOME] INhctanaqna>NbpbBOHaayanHa INhCTanaqna
- Pexm Ha TOTOBHOCT B Mpexa
- Be3xuyeH ducnne
- YnOtnpe6a c MObUHn yCtpoNCTBa
- OTcTpaHЯBaHe Ha Heu3npaBHOCTn, Cbbp3aHn Cbc Cbbp3BaHeTo
- Be3KnUHaTa MpeKa He e HaInuHa
- Cbbp3BaHeTo e 6aBHO
- Hapyuene no BpeMe Ha Bb3npoN3BekdaHe nn 6abn peakun
- He e haInuHa nHTepHET Bp3ka / CnoJeIaHe Ha aydno BVdeo faiNoBe He yHKuOHnpa
- HenpaBnEn domeH
- H3noI3BaHe Ha MpeXoBata ycnyra 3a cnOdeJIne Ha ayDnO BnDeo paINoBe
- 1.ИнсталupaHeHa codTyepaHa cbpBbpa
- Cbbp3BaHe KbM Ka6eHa Hn 6e3XnHa Mpeka
- AkTnBupaHe Ha cNoTeJHaTo Ha aydno n BnDeo paInoBe
- Bb3npo3Bexdahe Ha cnopeHn paIIOBe npe3 MeiHn6pay3bp
- PpnoKxHn
- 3a6eJexKu:
- INHTepHeT 6pay3bp
- HBBTV cncTeMa
- Alexa e rotoBa
- Alexa BrpaedhaФункун
- Haapan Ha Alexa
- Pa6oTu c Alexa
- PpOuec Ha HacTpoKa
- Ppimepn KOMaHdN
- PnmepnKomahn
- Poznámka
- DVB / datové vysiláni / IPTV
- Hinweis
- Skaerm, Kabinet, Sokkel
- Almendelig pleje:
- Landebegraensninger
- Angaende
- For at slukke for TV'et.
- Server software installation
- Aviso
- Huomautus
- Remarque
- Safety Information
- CAUTION
- RISK OF ELECTRIC SHOCK DO NOT OPEN
- IMPORTANT - Please read these instructions fully before installing or operating
- WARNING
- Markings on the Product
- WALL MOUNTING WARNINGS
- Maintenance
- Display panel, Cabinet, Pedestal
- Regular care:
- For stubborn dirt:
- Mains plug
- Assembling / Removing the pedestal
- Preparations
- Assembling the pedestal
- Removing the pedestal from the TV
- When using the wall-hanging bracket
- Rear of the TV
- View from the side
- Environmental Information
- Features
- Ultra HD (UHD)
- High Dynamic Range (HDR) / Hybrid Log-Gamma (HLG)
- Dolby Vision
- Accessories Included
- Standby Mode Picture
- Standby Notifications
- TV Control & Operation
- Operation with the Remote Control
- Input Selection
- Changing Channels and Volume
- Reset and Power Off via Standby Button
- Using Main TV Menu
- Home
- Search
- Guide
- Channels
- Timers
- Edit Home
- More Apps
- Market
- Reset Apps
- Accessibility
- Privacy Settings
- Settings
- Sources
- Source Settings
- Inserting the Batteries into the Remote
- Power Connection
- Antenna Connection
- Licence Notification
- Dolby Vision·Atmos
- Disposal of Old Equipment and Batteries
- Only for European Union and countries with recycling systems
- Note for the battery symbol (bottom symbol):
- Declaration of Conformity (DoC)
- Country Restrictions
- Standard
- Host Interface
- Security
- Notice
- DVB / Data broadcasting / IPTV functions
- Remote Control
- (*) Standby Button
- (**) My Button 1 & My Button 2
- Switching On/Off
- To Switch the TV On
- To switch on the TV from standby
- To switch on the TV from hard standby
- To switch the TV into standby
- To switch the TV into hard standby
- To switch off the TV
- First Time Installation
- About Selecting Broadcast Type
- Media Playback via USB Input
- Media Browser
- Custom Boot Up Logo
- CEC
- Enhanced Audio Return Channel (eARC)
- System Audio Control
- Game Mode
- Auto Low Latency Mode
- E-Manual
- Settings Menu Content
- General TV Operation
- Using the Channel List
- Managing the Favourite Lists
- Configuring Parental Settings
- Electronic Programme Guide
- Timeline Schedule
- Now/Next Schedule
- Event Options
- Teletext Services
- Digital Teletext
- Software Upgrade
- Software upgrade search via user interface
- AM search and upgrade mode
- Troubleshooting & Tips
- TV will not turn on
- Poor picture
- No picture
- No sound
- Remote control - no operation
- No signal on an input source
- (X: Not Available, O: Available)
- Supported File Formats for USB Mode
- Supported DVI Resolutions
- Connectivity
- Wired Connectivity
- To Connect to a Wired Network
- Configuring Wired Device Settings
- Network Type
- Internet Speed Test
- Advanced Settings
- Other Information
- Wireless Connectivity
- To Connect to a Wireless Network
- Configuring Wireless Device Settings
- Scan Wireless Networks
- Disconnect
- Press WPS on your wifi router
- Networked Standby Mode
- Connecting to your mobile device via WLAN
- Handling of the customer information
- [HOME] Installation>First time installation
- Wireless Display
- Using with mobile devices
- Connectivity Troubleshooting
- Wireless Network Not Available
- Connection is Slow
- Disruption during playback or slow reactions
- Internet Connection Not Available / Audio Video Sharing Not Working
- Invalid Domain
- Using Audio Video Sharing Network Service
- Connect to a Wired or Wireless Network
- Enable Audio Video Sharing
- Play Shared Files via Media Browser
- Apps
- Notes:
- Internet Browser
- HBBTV System
- Alexa Ready
- Alexa Built-in
- Alexa Home Screen
- Works With Alexa
- Setup process
- Example Commands
- Google Assistant
- Works With Ok Google
- Before the setup
- DVB functionality information
- περεχόμενα
- Apaipexon tnc baoons aTTO nV tnlaeopaon
- Otau xpooiotnoie t n baoan avaptnonc oToixo
- Emiohavon
- Megegyzés
- Avviso
- DVB/Transmission data/Funzioni IPTV
- TV-bediening & Operation
- Bericht
- Tilbake still apper
- Merknad
- For a sette TV-en i hard standby
- Uwaga
- Auto Low Latency Mode (ALLM)
- Observação
- Imagine in Modul Standby
- Observatie
- DVB/Transmitereadatelor/IPTV
- Ghid electronic de programme (GEP)
- Conectivitate wireless
- Conectare la o retea wireless
- Mod Standby in retea
- Alte informati
- [HOME] Installation>First time installation ([HOME] Instalare>Prima instalare)
- Obs:
- Upozornenie:
- DVB / DátOVé vysielenie / IPTV
- Works With Alexa (Fungovanie's Alexa)
- Proces nastavenia
Brand : PANASONIC
Model : TX-65MX600E
Category : Television