Solo Hands-free - Breast pump MEDELA - Free user manual and instructions
Find the device manual for free Solo Hands-free MEDELA in PDF.
| Product type | Hands-free electric breast pump |
| Brand | Medela |
| Model | Solo Hands-free |
| Expression technology | 2-Phase Expression® (stimulation and expression) |
| Usage | Domestic, personal (single user) |
| Motor unit dimensions | 120 × 90 × 54 mm |
| Motor unit weight | 250 g |
| Power supply | AC adapter (model MS-V2000U050-010B0-*) and integrated lithium-ion battery 3.6 V / 2500 mAh |
| Adapter input voltage | 100-240 V~, 50/60 Hz, 0.5 A max |
| Adapter output voltage | 5 V == 2 A, 10 W |
| Suction range | -45 to -245 mmHg (-60 to -327 hPa) |
| Cycles per minute | 45 to 111 cpm |
| Protection level | IP22 |
| Wireless technology | Bluetooth® 4.2 BLE (band 2.402-2.480 MHz, max power +4 dBm) |
| Materials in contact with milk | Breast shield: polypropylene; shell: polypropylene, thermoplastic elastomer; membrane: silicone; tube: PVC |
| Closed system | Yes, prevents milk from entering the tubing |
| Session recording | Last 30 sessions in the pump, unlimited via Medela Family™ app |
| Compatible app | Medela Family™ (iOS and Android) |
| Care and cleaning | Manual or dishwasher cleaning; disinfection by boiling or microwave (Quick Clean™ bags). Do not clean the tubing. |
| Safety | Automatic shut-off after 30 minutes; pause after 2 minutes; non-replaceable battery |
| Replacement parts | Breast shields 21, 24, 27 mm; membranes; tubing |
| Warranty | International, see www.medela.com/ewarranty |
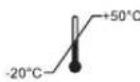
| Operating temperature | 5°C to 35°C |
| Operating humidity | 15% to 93% RH |
| Atmospheric pressure | 70 kPa to 106 kPa |
Frequently Asked Questions - Solo Hands-free MEDELA
User questions about Solo Hands-free MEDELA
0 question about this device. Answer the ones you know or ask your own.
Ask a new question about this device
Download the instructions for your Breast pump in PDF format for free! Find your manual Solo Hands-free - MEDELA and take your electronic device back in hand. On this page are published all the documents necessary for the use of your device. Solo Hands-free by MEDELA.
USER MANUAL Solo Hands-free MEDELA
Netherlands Belgium Luxembury
| Medalo bilbao Srl. a sodo unico Vyo Turmini, 13/15 |
| 400121 Calderaria da Renao (BO) Italy |
| Rice +39 051 72 76 88 |
| Phione +39 051 72 76 88 |
| info@medalo.lif |
| Iro@medalo.lif |
| Iwuw.medalo.lif |
www.medela.ch
contact.ch@medalo.com
F0x+41 41 562 14 42
Phone +41 848 633 352
Switzerland
6340 Boor
Lethistrasse 46
Medalo Schweiz AG
Switzerland
www.medeio.fr
info@mediela.fr
FAX+33169161032
Phone: +33 1 69 16 10
91154 Economies Cedex, France
- nuo de la Butte Carolina
Medalo Finance
France
www.medelo.at
info@medalo.oq
F0x+43720310313-999
Phone +43 720 310313 - 0
Postach 1148 85378 Eching, Germany
85386 Erching, Germany
George-Kollmanberger-Sir.2
6340 Door, Switzerland
Lottichstrasse 46
Medalo AG


THE SCIENCE OF CARE.
medela
medela
THE SCIENCE OF CARE

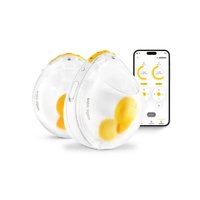
Solo™ Hands-free
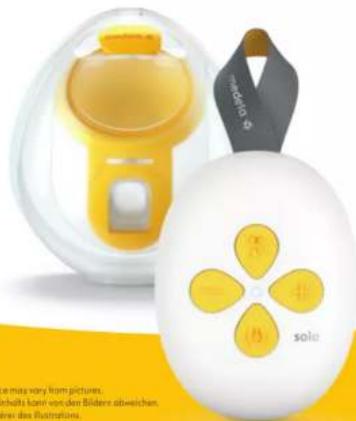
natural_image
Product photo of a yellow and white baby pacifier device with a four-petal flower design, no visible text or symbols.Current appearance may vary from pictures.
Electric breast pump
Instructions for use

natural_image
Simple line drawing of a boiled egg with a spoon and two small pieces, no text or symbols present.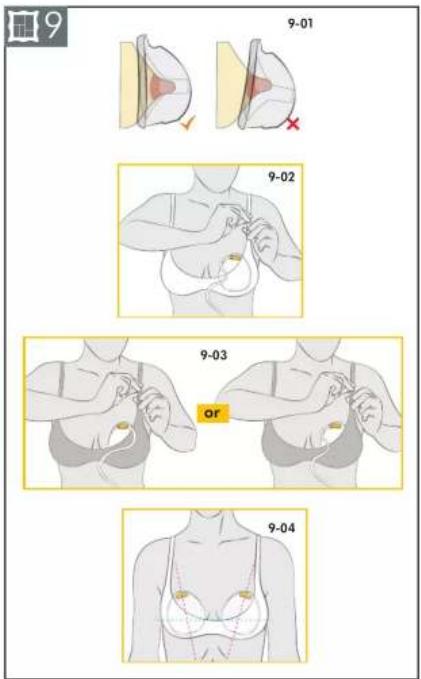

1. Important safety information

Please read all instructions before using this product. Keep these instructions for future reference.
Warnings identify all instructions that are important for safety. Failure to observe these instructions can lead to personal injury or damage to the product. The following symbols and signal words show the significance of the warnings:

WARNING
Can lead to serious injury or death.
NOTICE
Can lead to material damage (not related to personal injury).

CAUTION
Information
to minor injury.

Useful or important information that is not related to safety.
When using electrical products, especially when children are present, basic safety precautions must always be followed.

WARNING
To avoid fire, electric shock, or serious burns:
- The breast pump should never be left unattended when plugged into a power source.
- Never operate an electrical device if it has a damaged cord or plug, if it is not working properly, if it has been dropped or damaged, or dropped into water. If damage is found, immediately discontinue use of power adapter and call Medela Customer Service.
- Do not use an electrical product that has been exposed to water or other liquids including:
- Do not use while bathing or showering.
- Never place or drop into water or other liquids.
- Do not run water over the breast pump.
- If an electrical product has been exposed to water or other liquids, do not touch and if possible unplug the device from electrical outlet, turn off and contact the manufacturer.
- Do not expose the breast pump or battery to excessive temperatures.
- Only use power adapter and cable that comes with the breast pump. An inadequate power source or cable may result in a fire hazard, electric shock or malfunction equipment due to overvoltage.
To avoid health risks and reduce the risk of severe injury:
- This is a single-user product. Use by more than one person may present a health risk and voids the warranty.
- Do not use the breast pump while operating a moving vehicle.
- Pumping may induce labour. Do not pump until after giving birth. If you become pregnant while breastfeeding or breast pumping, consult with a licensed healthcare professional before continuing.
- If infected with Hepatitis B, Hepatitis C, or Human Immunodeficiency Virus (HIV), pumping breast milk will not reduce or remove the risk of transmitting the virus to your baby through your breast milk.
- Wash all parts that come into contact with your breast and breast milk after every use.
- The tubing poses a risk of strangulation when being played with and small parts may be swallowed by toddlers.
- Close supervision is necessary when the breast pump or accessories are used in the vicinity of children.
- This appliance is not intended for use by persons (including children up to 14 years) with reduced physical, sensory or mental capabilities, or lack of experience and knowledge, unless they have been given supervision or instruction concerning use of the appliance by a person responsible for their safety.
• Children must not play with the appliance. - Cleaning and maintenance must not be performed by children without supervision.
CAUTION
To avoid fire or burns:
- Make sure the voltage of the power adapter is compatible with the power source. See chapter 18 for technical specifications.
- Always unplug electrical products immediately after use except for when charging.
- Do not place or store the product where it can fall into water.
- The breast pump and accessories are not heat-resistant. Keep away from heated surfaces or open flames.
- Do not use near flammable materials.
To avoid health risks and reduce the risk of injury:
- Before each use visually inspect the individual components for cracks, chips, tears, discoloration or deterioration. In the event that damage to the device is observed, please discontinue use until the parts have been replaced.
- This product cannot be serviced or repaired. Do not repair yourself. Do not modify the device.
- Never use a damaged device. Replace defective or worn parts.
- Use the breast pump only for its intended use as described in these instructions for use.
- Do not use the breast pump while sleeping or overly drowsy.
-
If tubing becomes mouldy, discontinue use and replace tubing.
-
Do not microwave or boil breast milk. Microwaving can cause severe burns to baby's mouth from hot spots that develop in the milk during microwaving (microwaving or boiling can also change the composition of breast milk).
- Clean and sanitise all parts that come into contact with your breast and breast milk prior to first use.
- Only use Medela recommended parts with your breast pump.
- If pumping is uncomfortable or causing pain, turn the unit off, break the seal between the breast and the breast shield with your finger and remove the breast shield from your breast.
- While some discomfort may be felt when first using a breast pump, using a breast pump should not cause pain. If you are unsure about correct breast shield sizing please visit www.medela.com or see a lactation consultant/breastfeeding specialist who can help you get a proper fit.
- Contact your healthcare professional or breastfeeding specialist if you can express only minimal or no milk or if expression is painful. See chapter 7.1 for more information.
- If pumping at high altitudes, including in an airplane, consider pumping more often or longer if you feel there is milk remaining in your breasts after your pumping session.
NOTICE
Take appropriate care in handling bottles and components:
- Plastic bottles and parts become brittle when frozen and may break when dropped.
- Bottles and parts may become damaged if mishandled (e.g., dropped, over-tightened, or knocked over).
- Do not use the breast milk from bottles or components that show signs of damage.
Contents
-
Important safety information 3
-
Intended purpose 6
-
Product description 6
-
Getting started 7 4.1 Cleaning before first use 7 4.2 Charging the battery 7
-
Disassembling your collection cup 7
-
Cleaning 7 6.1 Cleaning overview 8 6.2 Washing 6.3 Sanitising 10 6.4 Cleaning the motor unit 10
-
Assembling your breast pump 11 7.1 Selecting the correct breast shield size 11 7.2 Assembling the collection cup 11 7.3 Preparing for pumping 11 7.4 Placing collection cup within your bra 12
-
Operating your breast pump 12 8.1 Mimicking the baby's rhythm (2-Phase Expression® technology) 12 8.2 Buttons and status light 12 8.3 Bluetooth® connectivity 13
-
Expressing your breast milk 14
-
Handling of breast milk 15 10.1 Removing the collection cup from your bra 15 10.2 Pouring milk from collection cup 15 10.3 General storage guidelines 15 10.4 Freezing 15 10.5 Thawing 15
-
Maintenance and care 16
11.1 Power adapter care 16
11.2 Battery maintenance 16
11.3 Long-term storage 16 -
Troubleshooting 17
- Ordering information 18
- Warranty 18
- Disposal 18
- Meaning of symbols 19
- International regulations 20 17.1 Electromagnetic compatibility (EMC) 20
- Technical specifications 21
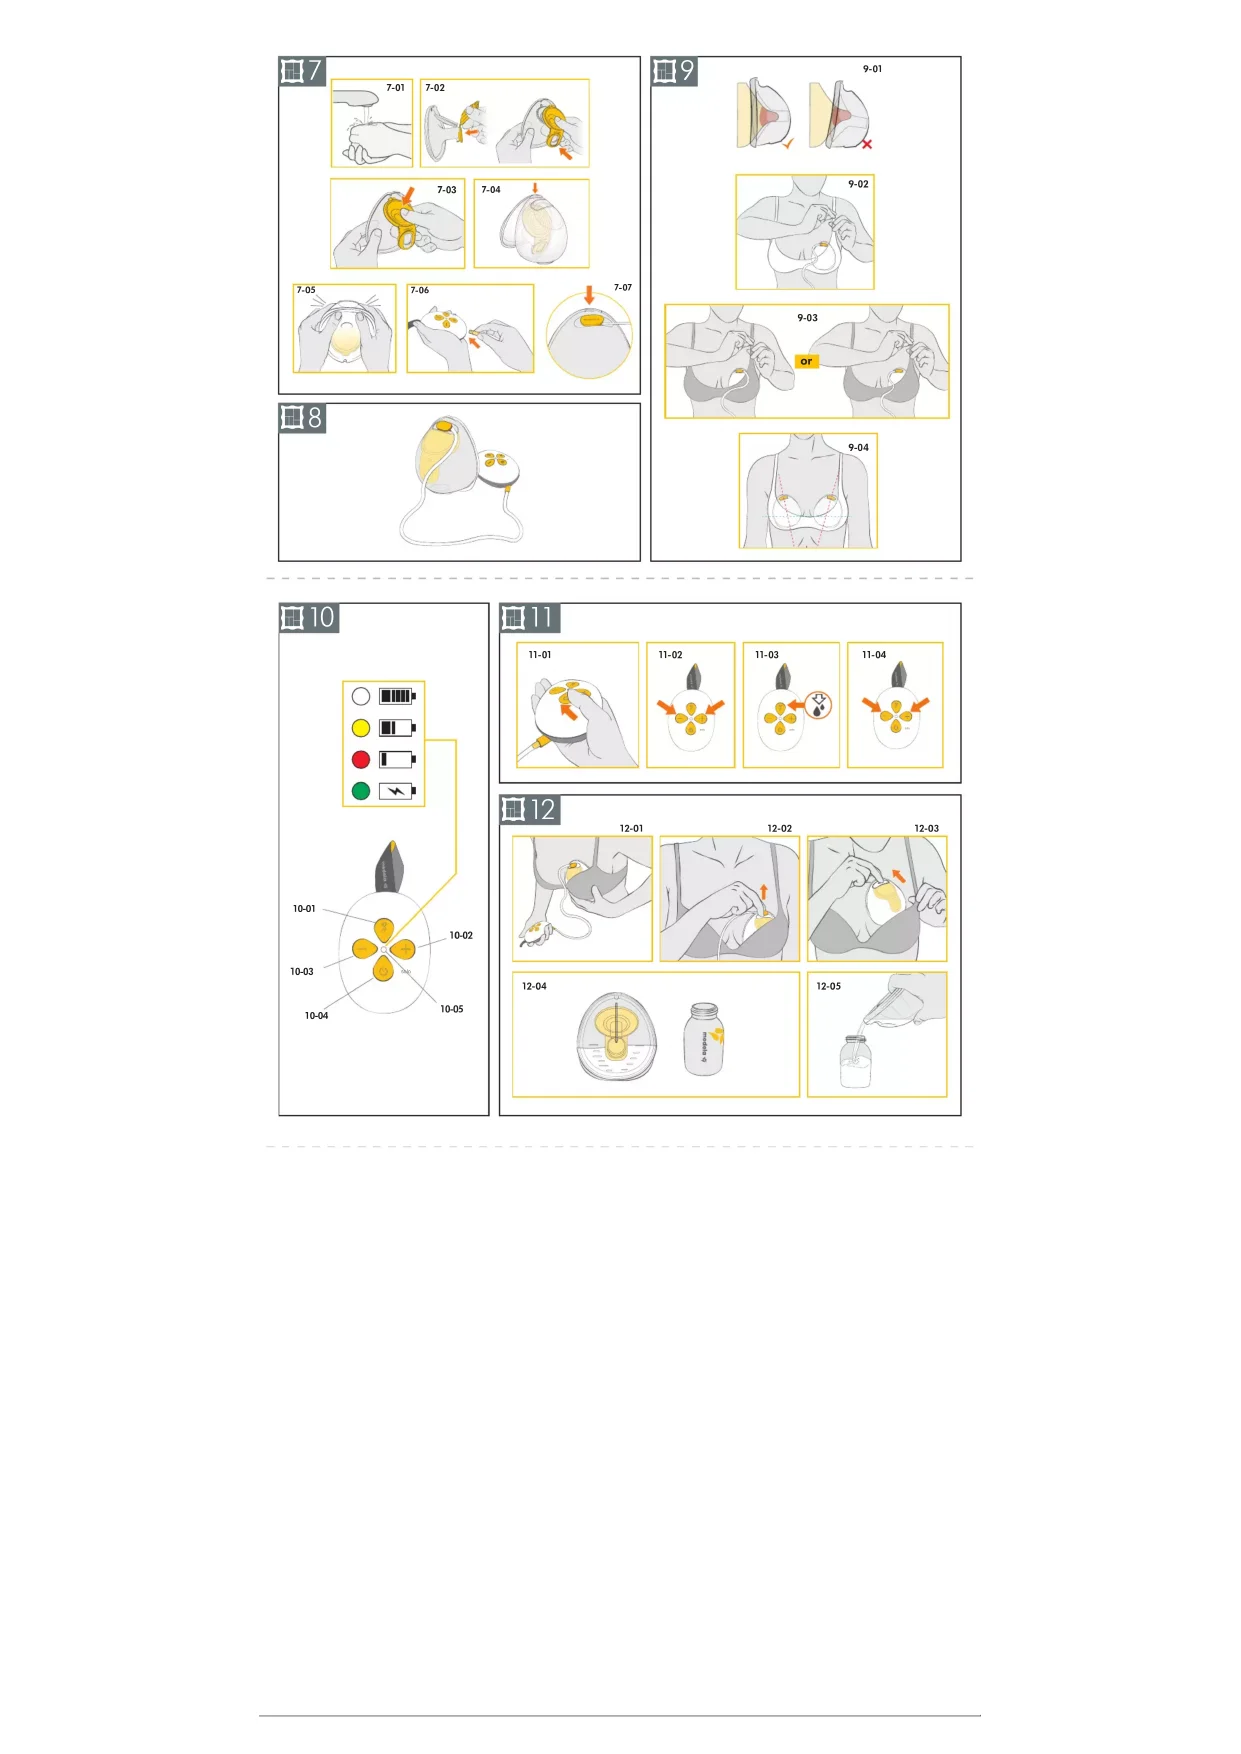
EN Illustrated items or instruction steps are marked with the figure and detail number (e.g. 2-01).
2. Intended purpose
The Solo™ Hands-free breast pump is a powered breast pump to be used by lactating women to express and collect milk from their breasts. The Solo™ Hands-free breast pump is intended for a single user. The breast pump is intended to be used in a home environment.
3. Product description
The Solo ^™ Hands-free breast pump is a personal-use electric breast pump that includes 2-Phase Expression ^® technology and is designed for single pumping only. Mode of operation: Continuous. The operating life of the Solo ^™ Hands-free breast pump is 275 hours. Only the parts of the collection cup come into contact with the breast or milk. The motor unit generates an intermittent vacuum. For milk expression, the tubing conveys the resulting air flow via a membrane, which separates the milk from the pulsing air, to the breast.
Refer to figure ☐1 on the foldout pages.
1-01 Hands-free Collection Cup
1-01-1 Breast shield 24mm
1-01-2 Nipple Tunnel
1-01-3 Yellow membrane
1-01-4 Alignment Tab
1-01-5 Valve
1-01-6 Outer shell
1-01-7 Pouring spout
1-02 Tubing
1-02-1 Round end piece of tubing (connects to collection cup)
1-02-2 End piece with polygonal shape (connects to motor unit)
1-03 Motor unit
1-04 Power adapter with cable
1-01-8 Tubing connection port
For ordering information about accessories see chapter 13.
All pictures shown in these instructions are for illustration purpose only. The actual product may vary due to local differences or product enhancement. Medela reserves the right to substitute any component or accessory with a replacement of equivalent performance.
4. Getting started
4.1 Cleaning before first use
It is important to do the following before using your breast pump for the first time:
- Disassemble and clean all parts (except for the tubing) according to the instructions – see chapter 5 and 6.
- Please ensure to boil all parts of the collection cup before first use. Do not clean or boil the tubing.
- When assembling, please ensure the cup is fully sealed until you hear a snap - see chapter 7.2.
! WARNING
Only use power adapter and cable that comes with the breast pump. An inadequate power source or cable may result in a fire hazard, electric shock or malfunction equipment due to overvoltage. Do not expose the breast pump or battery to excessive temperature.
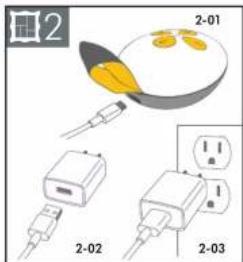
4.2 Charging the battery
Charge the battery for two hours. Refer to figure ☐2 on the foldout pages.
- 2-01 Connect the power cable to the motor unit.
- ☐2-02 Connect the power cable to the power adapter.
- ☐2-03 Plug the power adapter into a wall outlet.
→ During charging, the status light is pulsing in green color.
→ When charging is complete, it lights up steadily in green color. For details on the status light see chapter 8.2.
i Information
- The warranty is only valid when using the Medela power adapter to charge your pump (Model MS-V2000U050-010B0- ^* ).
- You can use the breast pump while charging the battery. However, it will charge in a slower mode when the pump is running.
*country code
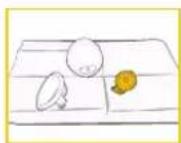
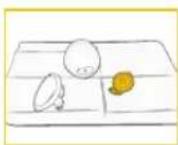
5. Disassembling your collection cup
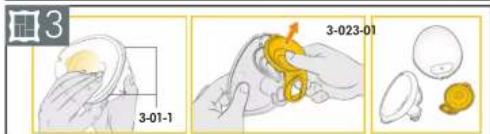
Refer to figure ☐3 on the foldout pages.
- 3-01 Open the collection cup using the tabs (3-01-1) at the bottom.
- ☐3-02 Remove the yellow membrane from the breast shield.
6. Cleaning
It is important you do the following before using your collection cup parts for the first time: Disassemble all parts and clean by following the cleaning instructions.
Supplies needed:
- Dish soap
- Clean soft brush
- Clean wash basin or dishwasher
- Drinking-quality water
- Clean pot for boiling water
Parts to wash or sanitise:
- Breast shield
- Outer shell
- Yellow membrane
CAUTION
Separate and wash all parts that are in contact with breast milk immediately after use. This will help to remove breast milk residue and prevent growth of bacteria.
- Wash hands thoroughly with soap and water.
- Only use drinking-quality tap water or bottled water for cleaning.
- Do not place collection cup parts parts directly in the sink to rinse or wash. Use a clean wash basin used only for infant items.
- Do not use a dish towel to rub or pat items dry.
- Do not use disinfectants for cleaning.
6.1 Cleaning overview
Washing and sanitising are two different activities. They must be done separately to protect you and your baby, and to maintain the performance of your breast pump.
Wash – To clean the surfaces of the parts by physically removing milk residues and other possible contaminants.
Sanitise – To efficiently lower the number of germs that may be present on the surfaces of the washed parts.
| When to clean | Breast shield Outer shell 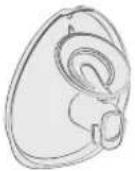 | Yellow membrane 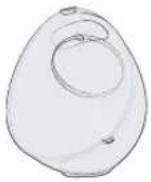 | 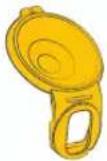 |
| Before first use | Disassemble the parts according to chapter 5Wash the parts according to chapter 6.2Sanitise the parts according to chapter 6.3 | ||
| After each use | Disassemble the parts according to chapter 5Wash the parts according to chapter 6.2 | ||
| Once per day after use | Disassemble the parts according to chapter 5Wash the parts according to chapter 6.2Sanitise the parts according to chapter 6.3 | ||
| When to clean | Solo tubing Mot 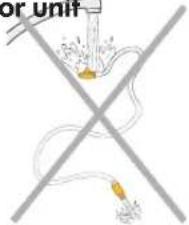 | 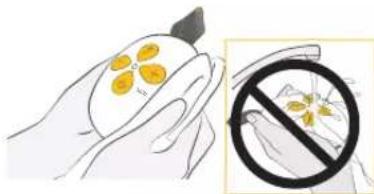 | |
| As needed | Do not clean or rinse the tubing under any circumstance. | Wipe with clean, damp towel.Refer to chapter 6.4. | |
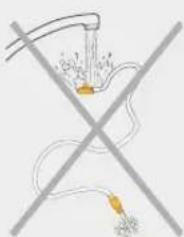
NOTICE
The Solo™ Hands-free breast pump has a closed system so milk cannot get into the tube when the pump is used as instructed. Do not clean or rinse the tubing under any circumstance.
- Inspect the tubing before use. If you find condensation, breast milk or mould in the tubing, discontinue use and replace tubing. Refer to chapter 13 for ordering information.
- Do not run the breast pump with wet tubing; doing so will cause damage to your breast pump.
natural_image
Crossed line diagram with a plug and plug plug, no text or symbols present• Take care not to damage parts of the collection cup during cleaning.
- Store the dry collection cup in a clean bag/container until next use.
- Do not store wet or damp parts as mould may develop.
- If you notice a white residue on your collection cup part after boiling, your water may have a high mineral content. Remove residue by wiping parts with a clean towel and allow to air dry.
- Distilled water is recommended when boiling parts to prevent substantial mineral build-up over time, which may compromise your parts.
6.2 Washing
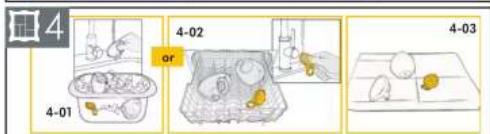
Refer to figure ☐4 on the foldout pages.
Rinse and wash by hand (before first use and after each use)
natural_image
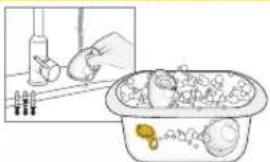
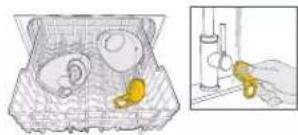
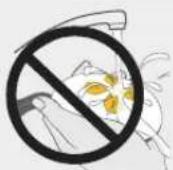
Illustration of a kitchen sink with a hand holding a tool and a bowl containing food items (no text or symbols)Do not place the parts directly in the kitchen sink for rinsing and washing. Use a dedicated wash basin for infant items.
- Rinse the disassembled parts, except for the tubing, with cold, clear drinking quality water (approx. 20 °C / 68 °F).
- Clean these parts with plenty of warm, soapy water (approx. 30 °C / 86 °F). Use a commercially available dish soap and clean soft brush.
- Rinse the parts with cold, clear drinking quality water for 10 to 15 seconds (approx. 20 °C / 68 °F).
- Drying: Allow to air dry on a clean, unused dish towel or paper towel.
or
Wash in dishwasher (maximum once per day)
natural_image
Illustration of a kitchen sink with food items and a close-up of a hand holding a syringe (no text or symbols)- Dishwashing: Place the disassembled parts, except for the tubing, on the top rack or in the cutlery section. Use a commercially available dishwashing detergent.
- Rinse the yellow membrane under running water after dishwashing
- Drying: Allow to air dry on a clean, unused dish towel or paper towel.
i Information
By using the dishwasher, parts may become discolored. This will not impact the functioning of the parts. Never wash the tubing. See chapter 6.1 for more details.
6.3 Sanitising
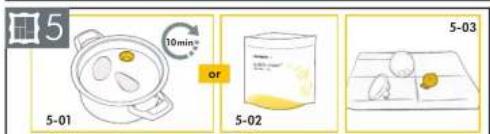
Refer to figure ☐5 on the foldout pages.
Sanitise on stovetop
(before first use and once per day after use)
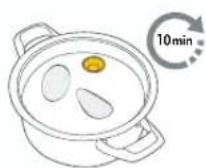
- Cover the disassembled, washed parts, except for the tubing, with plenty of water and boil at least for 10 minutes. Ensure that the parts are not in direct contact with the bottom of the pot.
- Drying: Allow to air dry on a clean, unused dish towel or paper towel. Do not store parts in an airtight container/bag if moist. It is important that all residual moisture dries.
6.4 Cleaning the motor unit
Supplies needed:
- Drinking-quality water
- Dish soap
- Clean dish towel or paper towel
Parts needed:
- Motor unit

CAUTION
To prevent electric shock and damage to the material:
- Unplug the breast pump before cleaning the motor unit.
- Do not immerse the motor unit in water; do not run water over the motor unit.
Sanitise in microwave (once per day after use)

- Use Quick Clean ^™ bags in the microwave in accordance with the instructions on the bags. (*Refer to local website/shops for availability in your country.)
- Drying: Allow to air dry on a clean, unused dish towel or paper towel. Do not store parts in an airtight container/bag if moist. It is important that all residual moisture dries.
NOTICE
- Do not spray or pour liquid directly onto the pump.
- Switch the breast pump off.
- Unplug the breast pump from the power source.
- Wipe the motor unit with a clean towel moistened with soapy water.
- Wipe the motor unit dry with a clean, dry towel.
7. Assembling your breast pump
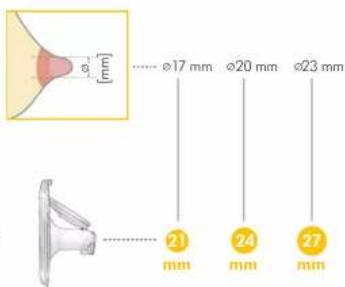
7.1 Selecting the correct breast shield size
Make sure to use the correct breast shield size. It is an essential component of effective pumping, helping to optimise milk flow.
Refer to figure ☐6 on the foldout pages.
-
Select the breast shield size by measuring the diameter of your nipple (☐6-01).
-
Select the breast shield size that is slightly larger than your nipple (☐6-02). A 24mm size shield is included in the pack.
For more information on breast shield sizing and other available sizes, visit www.medela.com or see chapter 13 for ordering information.
72 Assembling the collection cup
Only use clean and dry parts for assembly. Refer to chapter 6 for cleaning.
Parts needed:
- Tubing
- Yellow membrane
- Breast shield
- Outer shell
- Motor unit

CAUTION
To prevent contamination of your milk:
- Wash hands thoroughly with soap and water before touching the motor unit, parts of the collection cup and breasts.
- Dry your hands with a fresh towel or a single-use paper towel.
- Avoid touching the inside of the collection cup components.
To make sure that your breast pump works properly and safely:
- Check collection cup's components for wear or damage before use. Replace if necessary.
- Always inspect all parts prior to use for cleanliness. If dirty, clean according to chapter 6.
- Only use genuine Medela parts. See chapter 13 for details.
NOTICE
To prevent damage to the breast pump all components must be completely dry before use.
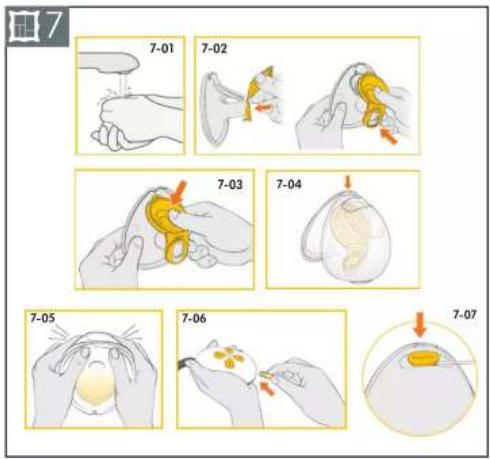
Refer to figure ☐7 on the foldout pages.
- ☐7-01 Wash hands thoroughly with soap and water before touching the motor unit, parts of the collection cup and breast. Dry your hands with a clean towel.
- ☐7-02 First assemble the valve of the yellow membrane on the front of the breast shield.
- 7-03 Align the disc of the yellow membrane on the designated circular slot using the alignment tab at the top to ensure that it is at the right place. Press around the edges to make sure it is fully assembled.
- ☐7-04 Insert the pouring spout into the opening on the shield.
- ☐7-05 Push the outer shell and breast shield together tightly, ensuring it is fully sealed all the way around until you hear a snapping sound.
- ☐7-06 Connect the tubing end with a polygonal shape to the motor unit as far as it will go.
- 17-07 Connect the round tubing end into the tubing connection port on the collection cup.
7.3 Preparing for pumping
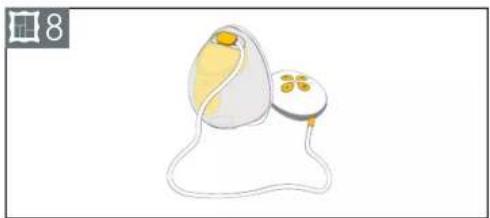
Refer to figure ☐8 on the foldout pages.
- Assemble the collection cup as described in chapter 7.2. ☐8-01 Correctly assembled system.
- Place the collection cup in your bra according to chapter 7.4. Start pumping as described in chapter 9.
74 Placing collection cup within your bra
Refer to figure ☐9 on the foldout pages.
- ☐9-01 Ensure that the nipple is centered in the tunnel of the breast shield.
- ☐9-02 The Hands-free collection cup can be worn under your regular nursing bra. Your bra will hold the collection cup in place. If you find it uncomfortable or painful during use, try switching to a looser, more stretchy nursing bra.
- ☐9-03 The tubing can be connected facing inwards (towards the breasts) or outwards (towards the arms) based on personal
preference. Ensure that the tubing is not pinched or bent during use. → Kinking could impact the vacuum performance.
- ☐9-04 The Hands-free collection cup can be used in a vertical or slightly tilted position for better visibility of the nipple and milk ejection. The scale on the collection cup gives you an approximate indication of the volume during pumping.
8. Operating your breast pump
8.1 Mimicking the baby's rhythm (2-Phase Expression ^® technology)

Babies use a "two-speed" sucking action. At first, they suck quickly, and then they switch to a slower, deeper sucking rhythm once milk starts to flow. The quicker sucking action stimulates the milk ejection reflex and triggers the milk flow; the slower sucking draws the milk out for the feeding phase.

The breast pump begins with a fast sucking action called the stimulation phase. When you see milk flow or feel milk ejection, you can then press the "Let-down" button to switch to the expression phase, which is slower than the previous one. If you do not press the Let-down button, the expression phase will automatically start after the pump has been running for one minute in the stimulation phase.

The pump mimics the baby's natural sucking rhythm by using a "two-speed" pumping action, the so called "2-Phase Expression ^ technology".
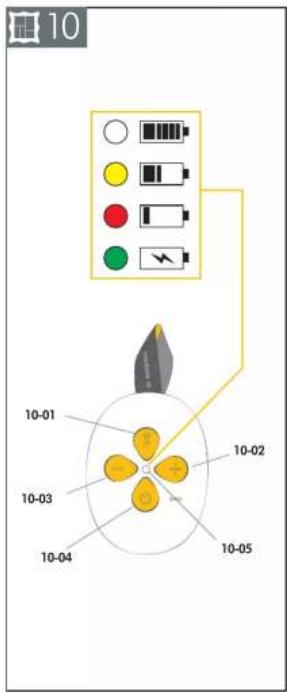
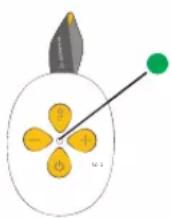
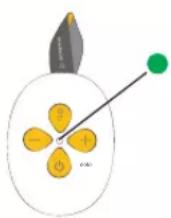
8.2 Buttons and status light
Refer to figure ☐10 on the foldout pages.
10-01 Let-down button (switches between stimulation and expression phase)
10-02 Increase vacuum button
10-03 Decrease vacuum button
10-04 On/Pause/Off button
10-05 Status light

Status light: Mode of pump Status light: Battery level
Light is off Pump is off
Light is flashing
Pump is on, stimulation phase
Lights up steadily
Pump is on, expression phase
Light is pulsing Pump is on, paused
Good
Low, approximately 10 minutes left
Very low, charge the battery immediately
Light is pulsing: Charging Lights up steadily: Battery fully charged
8.3 Bluetooth ^® connectivity
Bluetooth ^® is a wireless technology for exchanging data over short distances. This is used to connect your Solo ^™ Hands-free breast pump to the Medela Family ^™ smartphone app. By connecting your breast pump to the Medela Family ^™ app you can automatically transfer your pumping data (session length, phases & levels) and manually input the amount of milk expressed. To benefit from the features of the app you need to create an account in the Medela Family ^™ app.
Installing the Medela Family™ app
- Download and install the Medela Family app to your mobile device. The app is available free of charge for Apple iOS and Android operating systems.
- When starting the Medela Family ^™ app for the first time you are asked to give the app permission to connect to Bluetooth ^® devices. Please give the app permission to allow the app to connect to your Medela pump.
-->Android ^™ phones only: You will also be asked to give the app permission to use your location. We don't track the position of your phone, but this is a requirement of the Android ^™ operating system to connect to Bluetooth ^® devices.
-->If you denied the permissions and now you can't connect to the pump:
-
Open the Settings app of your smartphone, then (depending on your smartphone brand, you might need to select a submenu called "Apps") and scroll down and find Medela Family™.
-
There, make sure Bluetooth ^® permission is authorised. On Android ^™ : also authorise location permission.
-
Open the Medela Family™ app on your mobile device and register by means of the app.
Connecting (pairing) your Solo™ Hands-free breast pump
- Make sure that Bluetooth ^® is enabled on your mobile device.
- In Medela Family ^™ , click on "More", navigate to "Pump settings" and follow the set-up and pairing instructions on the screen, which include the following steps:
- Press and hold the Let-down button for two seconds to start the pairing procedure.
→ The status light is pulsing in blue colour to show that the breast
pump is ready for pairing with your Bluetooth ^® device.
- Successful pairing will be indicated with the blue light being on steadily for two seconds.
- After initial setup, the status light will turn off.
- When reconnecting to Medela Family ^™ , the status light changes to blue colour for two seconds.
Saving your pumping session into the app
After you finished a session press the On/Pause/Off button of the breast pump for 2 seconds to transmit the data to the Medela Family™ app and to switch off the breast pump.
Removing your Solo™ Hands-free breast pump from your smartphone
- Inside the Medela Family™ app go to "More" and then to "Pump settings".
- Tap on the pump you want to remove and then tap on "Remove this pump" button.
i Information
- The Solo™ Hands-free breast pump has the ability to store your last 30 pump sessions in its memory. If the pump is not connected prior to session 31 your history will be overwritten with new session data.
- When connected to the pump, your Medela Family™ account will log an infinite number of historical sessions.
- Solo™ Hands-free uses Bluetooth® technology. Please follow airline rules for the use of portable electronic devices when flying.
- Removing the Solo™ Hands-free breast pump from your mobile device will not delete pumping information stored in the Medela Family™ app.
- If you reconnect your breast pump and mobile device the last 30 records stored within your pump will be transferred.
To learn more, please visit www.medela.com/app.
Trademark recognition: The Bluetooth® word mark and logos are registered trademarks owned by Bluetooth SIG, Inc., and any use of such marks by Medela AG is under license. Apple is a trademark of Apple Inc., registered in the U.S. and other countries. Android is a trademark of Google LLC.
9. Expressing your breast milk
CAUTION
- Do not try to express with vacuum that is too high and uncomfortable (painful). The pain, along with potential breast and nipple trauma, may decrease milk output.
- Contact your healthcare professional or breastfeeding specialist if you can express only minimal or no milk or if expression is painful.
NOTICE
Make sure that the tubing is not kinked or pinched while pumping.
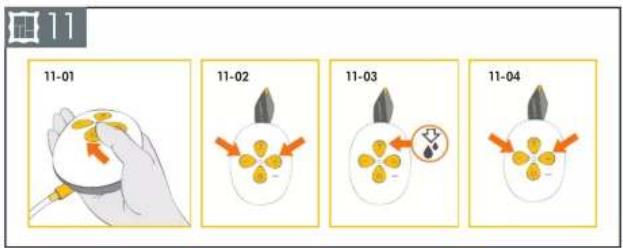
Refer to figure ☐11 on the foldout pages.
- Make sure that the collection cup is connected and positioned properly.
- ☐11-01 Press the On/Pause/Off button 🔍 to start pumping. → The stimulation phase begins and the status light is flashing.
- □11-02 Adjust the vacuum with the Increase vacuum + and Decrease vacuum - buttons to find a comfortable level.
-
□11-03 As soon as your milk begins to flow, press the Let-down button. → The expression phase begins and the status light is on steadily. → If the Let-down button is not pressed within one minute, the breast pump will automatically go to expression phase.
-
□11-04 Adjust the vacuum with the Increase vacuum + and Decrease vacuum 🔍 buttons to find your maximum comfort vacuum (see information below).
Once you are pumping in the expression phase, increase the vacuum level until pumping feels slightly uncomfortable (not painful), then decrease the vacuum by 1 level with the Decrease vacuum button.
-
When your pumping session is over, press the On/Pause/Off button to stop the pumping operation.
→ The breast pump stops automatically after 30 minutes if there is no user interaction with the pump. -
To switch the breast pump off press and hold the On/Pause/Off button 🤒 for two seconds.
i Information
• Maximum comfort vacuum is the highest vacuum setting where pumping still feels comfortable. This is different for every mother.
- Stimulation should be at a comfortable vacuum level, striving for a maximum level is not necessary.
- Reassess your maximum comfort vacuum throughout your pumping experience. It may change throughout each stage of lactation.
Pausing
In both stimulation and expression phases the breast pump can be paused. This allows you to readjust yourself or your collection cup, or attend to your surroundings.
For pausing, press the On/Pause/Off button ☑ while the breast pump is running.
→ The pumping operation stops and the status light is pulsing.
To resume pumping, press the On/Pause/Off button 🤒 again.
Turning off
To switch the breast pump off press and hold the On/Pause/Off button for two seconds.

i Information
- If pumping is not resumed within two minutes, the breast pump switches off automatically.
• To resume pumping, you will need to start a new session. - If you need to pause for more than two minutes, we recommend restarting with stimulation phase.
- Do not forget to record milk output in the Medela Family app.
10. Handling of breast milk
10.1 Removing the collection cup from your bra
Refer to figure ☐12 on the foldout pages.
- ☐ 12-01 While the pump is still running, slightly lean forward and ensure all milk from the nipple tunnel enters the collection container. Turn off the pump.
- ☐12-02 Detach the tubing from the collection cup.
- ☐12-03 Carefully remove the collection cup from your bra.
10.2 Pouring milk from collection cup
- ☐ 12-04 Place the collection cup in an upright position on a surface where it will not be easily knocked over. You can use the volume scale markings on the shield to read the collected milk volume. The scale on the outer shell gives you an approximate indication of the volume during pumping.
- ☐12-05 With the rounded outer shell facing down, pour breast milk through the pouring spout into a bottle or container for storage. Do not use the collection cup to store milk. Do not store assembled cup in the refrigerator.
- Fully disassemble and clean after each use and sanitise once per day as described in chapter 6.
10.3 General storage guidelines
Refer to www.medela.com for a recommendation on storing and thawing of breast milk.
| Storage guidelines for freshly expressed breast milk (for healthy term babies) | |||
| Room temperature16 to 25 °C(60 to 77 °F) | Refrigerator4°C (39°F)or colder | Freezer-18°C (0°F)or colder | Breast milkthawedin the refrigerator |
| Up to 4 hours is best*Up to 6 hours formilk expressedunder very cleanconditions | Up to 3 days isbest*Up to 5 days formilk expressedunder very cleanconditions | Up to 6 months isbest*Up to 9 monthsfor milk expressedunder very cleanconditions | At roontemperature:Up to 2 hoursRefrigerator:Up to 24 hoursDo not refreeze! |
*Guidelines for expressing milk under very clean conditions: Before expressing breast milk, mothers should wash their hands with soap and water or an alcohol-based hand sanitiser. The pump parts and pumping area must be clean. Breasts and nipples do not need to be washed before pumping.
- These guidelines for storage and thawing of breast milk are a recommendation. Contact your lactation consultant or breastfeeding specialist for further information.
- Store breast milk in the coldest spot of the refrigerator (at the back of the glass shelf above the vegetable compartment).
- For information on storing your breast milk, visit www.medela.com.
10.4 Freezing
NOTICE
- Repeated freeze/thaw cycles destroy the structure of the milk. Therefore, never refreeze breast milk.
- Freeze expressed breast milk in food-grade bottles or milk storage bags. Do not fill the bottles or bags more than 3/4 full to allow space for possible expansion.
- Label the bottles or bags with the date and volume of expression.
- Plastic bottles and parts become brittle when frozen and may break when dropped.
- Do not use the breast milk from bottles or components that show signs of damage.
10.5 Thawing
CAUTION
Do not thaw or warm breast milk in a microwave or a pan of boiling water. This helps preserve important components and prevents burns.
- To preserve breast milk components, thaw the milk overnight in the refrigerator.
- Alternatively, hold the bottle or bag under warm water (max. 37^ / 98.6^ ) and use immediately, as soon as it has been thawed.
NOTICE
Gently swirl the bottle or bag to mix any fat that has separated. Avoid shaking or stirring the milk.
11. Maintenance and care
11.1 Power adapter care

WARNING
If the power adapter outer casings become loose or are separating, stop use and contact Medela immediately. Separation of the casing can result in electric shock.

NOTICE
To keep your power adapter and cable in good working condition, pay attention to the following: Do not unplug the cable or the power adapter by pulling on the cord, but hold it by the connector housing and adapter body.
Traveling internationally

Information
When traveling internationally, we recommend purchasing a travel adapter (not included) to match the corresponding wall outlet. Please consult with the country you are visiting to find out what type of adapter will work best. The power adapter of the breast pump is two-pronged and does not require a grounded outlet. This breast pump has a lithium-ion battery.

Information
Carrying such batteries on airplanes may be restricted by the country you are visiting. Please consult with the country you are visiting to find out if there are any restrictions that pertain to traveling with lithium-ion batteries.
11.2 Battery maintenance
Your breast pump contains a built-in (not replaceable) lithium-ion rechargeable battery.
NOTICE
- In case of a completely discharged battery the breast pump cannot be used instantly after connecting it to the power adapter. Allow the battery to be charged for at least 15 minutes before attempting to switch the pump on.
- For optimum pump and battery performance use the power adapter that comes with the breast pump (Model MS-V2000U050-010B0- ^* ).
- Make sure that the voltage of the power adapter is compatible with the power source.
- Be aware of the risk of USB-C-socket of the pump or battery being shortcircuited by metal objects or fluids. *country code

Information
To preserve the battery life cycle:
- Keep your breast pump in a cool place.
- Recharge the battery before it completely drains. This is better for the life cycle of the battery
- Fully charge the battery before storing your breast pump. Refer to chapter 8.2 for information on the battery charging state.
- If your breast pump has been stored in a hot location, it may not run on battery power right away. To resume normal battery function, allow the breast pump to cool down for one hour. During this time, you can power your breast pump with the power adapter plugged into a wall outlet.
11.3 Long-term storage
Your breast pump contains a rechargeable battery. To preserve your breast pump, when not in use for an extended amount of time, it will automatically transition into storage mode. To remove from storage mode, plug your breast pump into an external power source and charge the battery for two hours. Do not store the collection cup in assembled state over an extended period of time.
Before storing your breast pump for an extended amount of time remember to:

Clean the collection cup (refer to chapter 6)

Clean the motor unit (refer to chapter 6.4)


Make sure that the battery is charged (refer to the following information)
It is best to fully charge the battery before storing your breast pump for an extended period of time. Refer to chapter 8.2 for information on the battery charging state.
12 Troubleshooting
In case of an unexpected behaviour of your breast pump check with the troubleshooting table if you find the issue in the column "Problem" and follow the instructions in the column "Solution".
| Problem Solution | Problem Solution | ||
| The breast pump is not working after you pressed the On/Pause/Off button | Charge for 15 minutes before restarting the pump.Charging is indicated by the status light pulsing in green.If the pump is still not working contact Medela Customer Service. | There is low or no suction | Make sure that all pump set components are clean and dry and that connections are secure.While pumping, make sure the breast shield forms a complete seal around the breast.If suction does not improve after having followed these steps, contact Medela Customer Service. |
| The breast pump generates only constant vacuum instead of sucking cycles | Contact Medela Customer Service. | ||
| The breast pump is not responding as expected | Press and hold the On/Pause/Off button for two seconds to turn the breast pump off, then restart the breast pump.If there is no change, contact Medela Customer Service. | ||
| The status light is flashing rapidly in red when you try to pump or charge the breast pump | Charging/pumping is not possible when the battery temperature is too high. Allow the motor unit to cool down, then resume charging/pumping.If the status light is still flashing rapidly in red, a device fault occurred. Contact Medela Customer Service. | ||
| The motor unit's exterior got wet | Unplug the motor unit from the power source and turn it off.Dry off the exterior of the motor unit. |
| Problem Solution | |
| The motor unit has been submerged in water | Unplug the motor unit from the power source and turn it off.Contact Medela Customer Service. |
| Data cannot be sent | The Bluetooth® function “bluetooth picture” on the mobile device is turned off. Turn the Bluetooth® function on and try to send the data again.Pairing between the two devices has not been completed. Perform pairing instructions again. Refer to chapter 8.3.The mobile device is too far away from the breast pump.Move the device and breast pump closer together.The application on the mobile device is not ready.Check the application. |
If you have not resolved the problem with your breast pump or you have further questions, please contact Medela Customer Service. For contact data visit www.medela.com/contact-us. Under "Contact" choose your country.
13. Ordering information
Accessories
| Article number Product | |
| Depending on your region, check local website/shops for availability. | 21mm Breast shields compatible with Medela Hands-free Collection Cup*24mm Breast shields compatible with Medela Hands-free Collection Cup*27mm Breast shields compatible with Medela Hands-free Collection Cup* |
| Membrane compatible with Medela Hands-free Collection Cup | |
| Please contact Medela Customer Service | Tubing compatible with SoloTM Hands-free |
* If the result of expression is unsatisfactory or expression is painful, contact your lactation consultant or breast feeding specialist. A different size of breast shield may help make expression more comfortable and effective. In case of difficulties in finding your desired accessory, please contact Medela Customer Service. For contact data visit www.medela.com/contact-us. Under "Contact" choose your country. For replacement of lost or defective parts please contact Medela Customer Service. Other Medela products are available at www.medela.com.
14. Warranty
Find information on the international warranty on www.medela.com/ewarranty.
15. Disposal
Disposal of your breast pump
At the end of its operating life, separate the parts of your breast pump and dispose of according to the following instructions.
This appliance contains batteries that are non-replaceable.
When the battery is at end of life, the appliance shall be properly disposed of.
The integrated battery must not be removed for disposal.
If the battery should leak, the breast pump must be disposed of.
Breast shield, outer shell, tubing and membrane
The parts are made of plastics that are not harmful to the environment when disposed of as household waste. Recycle or dispose of according to local regulations.
Motor unit and power adapter


Do not dispose of electric or electronic equipment together with unsorted municipal waste, but collect it separately.
In the European Union the manufacturer or its vendor must take back waste equipment. Other countries may have similar collection and recycling systems. Dispose of the waste equipment according to local regulations.
Inquire at the point of sale or contact your local authority for appropriate collection points for waste equipment.
The separate collection and recycling of your waste equipment at the time of disposal will help conserve natural resources and ensure that it is recycled in a manner that protects human health and the environment.

CAUTION
Hazardous materials present in electric/electronic equipment may harm human health and the environment if the waste equipment is not disposed of properly.
16. Meaning of symbols
The following tables explain the meaning of the symbols found on the product parts and its packaging.
Note: Symbols may vary depending on the market the unit is sold.
 | General safety alert symbol, points to information related to safety. |  | Defines a temperature range (e.g. for operation, transport or storage). |  | Defines a relative humidity range (e.g. for operation, transport or storage). |
 | Defines an atmospheric pressure range (e.g. for operation, transport or storage). |  | Identifies the manufacturer. Indicates the degree of manufacturing. |  | Indicates compliance with international requirements for protection from electric shock (Type BF applied parts). |
 | Indicates the serial number of the device. |  | Indicates the degree of protection against ingress of foreign objects and moisture. |  | |
 | Do not dispose of electric/electronic devices together with unsorted municipal waste (dispose of the device in accordance with local regulations). |  | Read and follow the instructions for use. |  | The CE mark indicates conformity with the applicable European directives. |
 | Indicates direct current. |  | Indicates the location of the On/Pause/Off button. |  | Indicates alternating current. |
 | Indicates the polarity of the USB power output. |  | Indicates that the device is a Class II electrical appliance (double insulated). |  | Indicates that the device is for indoor use only. |
 | Indicates that a specific separate power adapter is required for connecting the device to the supply mains and specifies its model/type MS-V2000U050-010B0-* |  | Indicates that the appliance is intended to be usable up to the maximum altitude of 5000 m. |  | Indicates that the power supply unit shall not be used if pins of the plug part are damaged. |
 | Indicates the efficiency level for external power supplies. |  | Indicates that the device is UK conformity assessed. |  | Indicates the part number of the product. |
| ### | Contains fragile goods. Handle with care. | ### | Keep away from sunlight. | ### | Keep away from rain. Keep in dry conditions. |
| ### | Indicates that an item can technically be recycled. | ### | The packaging contains products intended to come in contact with food according regulation (EC) No 1935/2004. | ### | Indicates that the electronic device incorporating transformer(s) and electronic circuitry(ies), converts electrical power into single or multiple power outputs. |
 | Indicates the material from which an item is made. |  | Indicates the model number of the device. | ### | Indicates that this device contains Bluetooth® wireless technology. |
 | Indicates that the device is a short-circuit proof safety isolating transformer. | ### | The EAC (Eurasian Conformity) mark indicates that the product complies with the basic safety requirements according to the technical regulations of the Eurasian Customs Union. | [KBYA] | The UA TR conformity mark indicates compliance with the Ukrainian technical regulations. |
| ### | The conformity mark indicates that the product meets the electric safety and EMC requirements of Morocco. | ### | Recycling scheme according to the Spanish packaging law. | ### | Indicates that an item can technically be recycled according to the French AGEC law. |
17. International regulations
17.1 Electromagnetic compatibility (EMC)
The Solo ^™ Hands-free breast pump complies with all requirements of the relevant standards and regulations with regard to electromagnetic emission and immunity to interference.

WARNING
The Solo ^™ Hands-free breast pump should not be used adjacent to or stacked with other equipment. If adjacent or stacked use is necessary, the Solo ^™ Hands-free breast pump should be observed to verify normal operation in the configuration in which it will be used. Wireless communications equipment such as wireless home network devices, mobile phones, cordless telephones and their base stations, walkie-talkies can affect the electric breast pump and should be kept at a distance of at least 30 cm away from the device.
18. Technical specifications
Summary of important technical specifications
Vacuum performance (at 500 m above sea level [954.62 hPa ambient pressure]) -45 to -245 mmHg (-60 to -327 hPa) 45 to 111 cpm
Power adapter (Model: MS-V2000U050-010B0-*)
*country code
Input 100 to 240 V\~ 50/60 Hz max. 0.5 A
| Output 5 V | --- 2 A 10 W |
| Average efficiency 78.7 % | |
| No-load power consumption | less than 0.075W |
Motor unit
Battery capacity and type: 3.6 V, 2500 mAh (nominal) Li-ion. Size: 120 x 90 x 54 mm. Weight: 250 g. Ingress protection level: IP22.
Transmission standard: Bluetooth ^® version 4.2 BLE
Frequency range: 2402-2480 MHz
Max. power output: +4 dBm (class 2)
Materials touching skin or coming in contact with milk
- Breast shield : Polypropylene
• Outer shell : Polypropylene, Thermoplastic Elastomer - Membrane : Silicone
- Tubing: Polyvinyl Chloride
Not intentionally made of BPA.

Operating temperature range
(5 °C to 35 °C)
(41 °F to 95 °F)

Operating humidity range
(15% to 93% relative humidity)
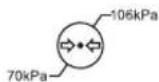
Operating atmospheric pressure range:
70kPa...106kPa
Transport/storage
temperature range
(-20°C to 50°C)
(-4°F to 122°F)
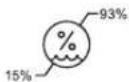
Transport/storage
humidity range
(15% to 93% relative humidity)
HINWEIS
natural_image
Illustration of a kitchen sink with utensils and a bowl containing food items (no text or symbols)REMARQUES
natural_image
Simple line drawing of a funnel with an orange handle and a yellow cable, crossed by two crossed lines (no text or symbols)natural_image
Illustration of a hand using a tool to clean food in a sink bowl (no text or symbols visible)natural_image
Illustration of a kitchen sink with food items and a hand holding a tool (no text or symbols)10-04 Tasto On/Pausa/Off
10-05 Spia di stato
AVVISO
AVISO
natural_image
Crossed safety symbol showing a cigarette emitting smoke from a plug, with no text or labels present.natural_image
Illustration of a hand using a tool to clean food items in a bowl (no text or symbols visible)10-02 Knop Vacuum verhogen
10-03 Knop Vacuüm verlagen
10-04 Knop Aan/Pauze/Uit
10-05 Statuslampje
Statuslampje: Kolfmodus Statuslampje: Accuniveau
9. Expressing your breast milk
⚠ WAARSCHUWING
LET OP
16. Meaning of symbols
The following tables explain the meaning of the symbols found on the product parts and its packaging.