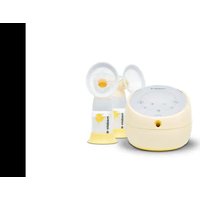
Sonata - Breast pump MEDELA - Free user manual and instructions
Find the device manual for free Sonata MEDELA in PDF.


| Product type | Personal electric breast pump, double or single pumping |
| Brand and model | Medela Sonata |
| Expression technology | 2-Phase Expression® (stimulation and expression) with two rhythms (Signature and Lifestyle) |
| Dimensions (L × W × H) | 160 × 160 × 120 mm |
| Weight | 1.1 kg |
| Power supply | Power adapter 100-240 V~ 50/60 Hz, output 12 V 1.5 A; rechargeable Li-ion battery 7.26 V 2750 mAh |
| Battery life | Approximately 3 daily 15-minute sessions for 1 year (personal use) |
| Suction range | -50 to -250 mmHg (54 to 120 cycles per minute) |
| Connectivity | Bluetooth® 4.0 (Class 3) for synchronization with the Medela Family™ app |
| Key features | Adjustable expression rhythm, timer (on/off and countdown), pause, maximum comfort vacuum indicator, let-down, silent mode |
| Maintenance and cleaning | Manual cleaning (warm soapy water) or dishwasher (top rack); disinfection by boiling (10 min) or microwave (Quick Clean™ bag) |
| Safety | For single user only; do not use in bath/shower; do not immerse; stop if pain occurs; do not use while driving |
| Spare parts and repairability | Spare parts available: breast shields (multiple sizes), connectors, valves, membranes, tubing, bottles, lids; no internal maintenance possible |
| Warranty | 1 year motor / 90 days parts and accessories (subject to terms) |
| Included accessories | 2 PersonalFit Flex™ 21 mm breast shields, 2 PersonalFit™ 24 mm breast shields, 4 bottles 150 ml, 2 connector sets with valves and membranes, 1 tubing, 1 cooler bag, 1 cooling element, 1 power adapter |
Frequently Asked Questions - Sonata MEDELA
User questions about Sonata MEDELA
0 question about this device. Answer the ones you know or ask your own.
Ask a new question about this device
Download the instructions for your Breast pump in PDF format for free! Find your manual Sonata - MEDELA and take your electronic device back in hand. On this page are published all the documents necessary for the use of your device. Sonata by MEDELA.
USER MANUAL Sonata MEDELA
natural_image
Product photo of a modern baby pacifier with neonatal device and digital display (no visible text or symbols)When using electrical products, especially when children are present, basic safety precautions should always be followed.
READ ALL INSTRUCTIONS BEFORE USING THIS PRODUCT.
The defined signal words identify all instructions that are important to safety. Failure to observe these instructions can lead to injury or damage to the breast pump or yourself. When used in conjunction with the following words, the defined signal words stand for:

WARNING Can lead to serious injury or death.

CAUTION Can lead to minor injury.

NOTE Can lead to material damage.

TIP Useful or important information that is not related to safety.

WARNING: To avoid fire, electrocution, or serious burns:
- This is a single-user product. Use by more than one person may present a health risk and voids the warranty.
• Always unplug electrical product immediately after use except for when charging. - Do not place or store product where it can fall or be pulled into a tub or sink.
- The breast pump and accessories are not heat-resistant: keep away from heated surfaces or open flames.
- Do not use near flammable materials.
- The breast pump should never be left unattended when plugged into a power source.
- Never operate an electrical device if it has a damaged cord or plug, is not working properly, or if it has been dropped or damaged. If damage is found, immediately discontinue use and call Medela Customer Service at 1-800-435-8316.
-
Do not use an electrical outlet device that has been exposed to water or other liquids including:
-
Do not use while bathing or showering.
- Never place or drop into water or other liquids.
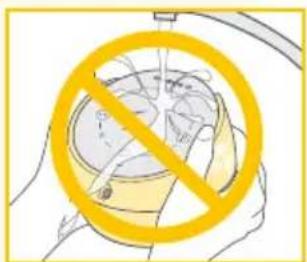
- Do not run water over breast pump.
- If a device has been exposed to water or other liquids, do not touch, unplug the device from electrical outlet, turn off and contact manufacturer.

WARNING: To avoid health risk and reduce the risk of injury:
- This device cannot be serviced or repaired. Do not repair yourself. Do not modify the device.
- Never use a damaged device. Replace damaged or worn parts.
- Use only the power adaptor that comes with the breast pump.
- Use the breast pump only for its intended use as described in this manual.
- Do not use the breast pump while sleeping or overly drowsy.
- Do not use Sonata breast pump while operating a moving vehicle.
- Inspect all appropriate pump components before each use.
- If tubing becomes moldy, discontinue use and replace tubing.
- Pumping can induce labor. Do not pump until after giving birth. If you become pregnant while breastfeeding or breast pumping, consult with a licensed healthcare professional before continuing.
- If infected with Hepatitis B, Hepatitis C, or Human Immunodeficiency Virus (HIV), pumping breast milk will not reduce or remove the risk of transmitting the virus to your baby through your breast milk.
- Do not microwave or boil breast milk. Microwaving can cause severe burns to baby's mouth from hot spots that develop in the milk during microwaving. (Microwaving can also change the composition of breast milk.)
- Clean and sanitize all parts that come into contact with your breast and breast milk prior to first use.
- Wash all parts that come into contact with your breast and breast milk after every use.
- Only use Medela recommended parts with your Sonata® Breast Pump.
- Close supervision is necessary when the breast pump or accessories are used in the vicinity of children.

CAUTION: Can lead to minor injury:
- Portable and mobile radio frequency communications equipment can affect the breast pump.
- Make sure the voltage of the power adaptor is compatible with the power source. See Section 23 for technical specifications.
- Wash hands thoroughly with soap and water before touching breast pump, kit and breasts, and avoid touching the inside of bottles or lids.
- Separate and wash all parts that are exposed to breast milk immediately after use. This will help remove breast milk residue and prevent growth of bacteria.
- Always inspect breast shields, connectors, valves, membranes, bottles, lids, and tubing prior to use for cleanliness. Contact Medela Customer Service if cleaning does not resolve the issue.
- Only use drinking-quality tap or bottled water for cleaning your breast pump and parts.
- Do not store wet or damp parts as mold may develop.
- Do not run pump with wet tubing. Doing so may damage the breast pump.
- If you are experiencing discomfort at the base of the nipple due to rubbing of your breast tissue against the breast shield tunnel, use of a lubricant such as Tender Care™ Lanolin may be beneficial. For assistance with correct breast shield sizing and comfort please visit www.MedelaBreastshields.com or see a lactation consultant/breastfeeding specialist.
- If pumping is uncomfortable or causing pain, turn the unit off, break the seal between the breast and the breast shield with your finger and remove the breast shield from your breast.
- Contact your health care professional or breastfeeding specialist if you can express only minimal or no milk or if expression is painful. See Section 7 & 8 for more information.
- While some discomfort may be felt when first using a breast pump, using a breast pump should not cause pain. For assistance with correct breast shield sizing and comfort please visit www.MedelaBreastshields.com or see a lactation consultant/breastfeeding specialist.
- Do not try to express with vacuum that is too high and uncomfortable (painful). The pain, along with potential breast and nipple trauma, may decrease milk output.
- Make sure tubing is not kinked or pinched while pumping.
- Do not hold the pump kit by the bottle. This can lead to blockage of the milk ducts and engorgement. See Section 11 for more information.
- The breast pump uses Bluetooth® technology. Please follow your air carrier rules for the use of Portable Electronic Devices when flying with your breast pump.
- Using a breast pump on an aircraft is not recommended. The cabin pressure may affect the breast pumps performance.

Note
- Plastic bottles and parts become brittle when frozen and may break when dropped.
- Bottles and parts may become damaged if mishandled (e.g., dropped, over-tightened, or knocked over).
• Take appropriate care in handling bottles and components. - Do not use the breast milk if bottles or components become damaged.
Indications for use
The Sonata ^® breast pump is a powered breast pump to be used by lactating women to express and collect milk from their breast. The Sonata Breast Pump is a single user device.
Contraindications for use
There are no known contraindications for use with this product.

Tip
If you have medical reasons or other needs for exclusively pumping, it is recommended that you use a hospital-grade (multi-user) breast pump such as the Medela Symphony® Breast Pump. To learn more, visit www.medelabreastfeedingus.com | www.medela.ca.
Product Description
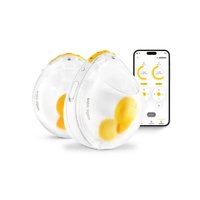
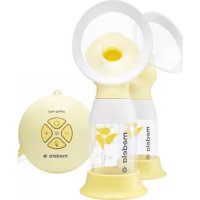
This breast pump is a personal-use electric breast pump that includes 2-Phase Expression® technology and is capable of single and double pumping.
The operating life of this breast pump is defined to be approximately three 15-minute sessions per day, for one year. The operating life for the breast pump kit is 6 months.
PLEASE SAVE THESE INSTRUCTIONS. THIS IS A SINGLE-USER PRODUCT.
- Important Safeguards....2-5
- Product Description 8-9
- Getting Started ....10
- Cleaning Overview....11
- Cleaning Instructions 12-13
- Breast Pump & Tubing Care 14-15
6A Cleaning the Breast Pump....14
6B Tubing Care ....15
- Breastfeeding Information ....16
- Breast Shield Sizing....17
- Assembling Your Breast Pump....18-19
- Powering Your Breast Pump 20-22
10A Charging Your Breast Pump....20
10B Battery Care & Status Codes....20-21
10C Power Adaptor Care....22
10D Traveling Outside of Your Country....22
- Operating Your Breast Pump....23-26
11A Glossary of Terms, Controls & Icons ....23
11B Single Pumping 24
11C Double Pumping 24
11D Pumping Steps....25-26
-
Finding Your Maximum Comfort Vacuum™ 27
-
Features 28-33
Breast Pump Connectivity....28-29
Selecting a Rhythm....30
Setting the Session Timer ....31
Pausing Your Breast Pump 32
Silencing Your Breast Pump Chimes ....33
-
Storing Breast Milk....34
-
Preparing & Feeding Breast Milk....35
-
Troubleshooting....36-41
Air Leak Alert 36
Battery Drained....37
Battery Broken....38
Bluetooth ^® Broken....39
General Alert....40
Additional Troubleshooting....41
-
Long-term Storage 42
-
Disposal....43
-
Supplemental Information....44
-
Warranty....45
-
Meaning of Symbols....46
-
EMC/Technical Description....47-53
-
Technical Specifications....54
2. Product Description
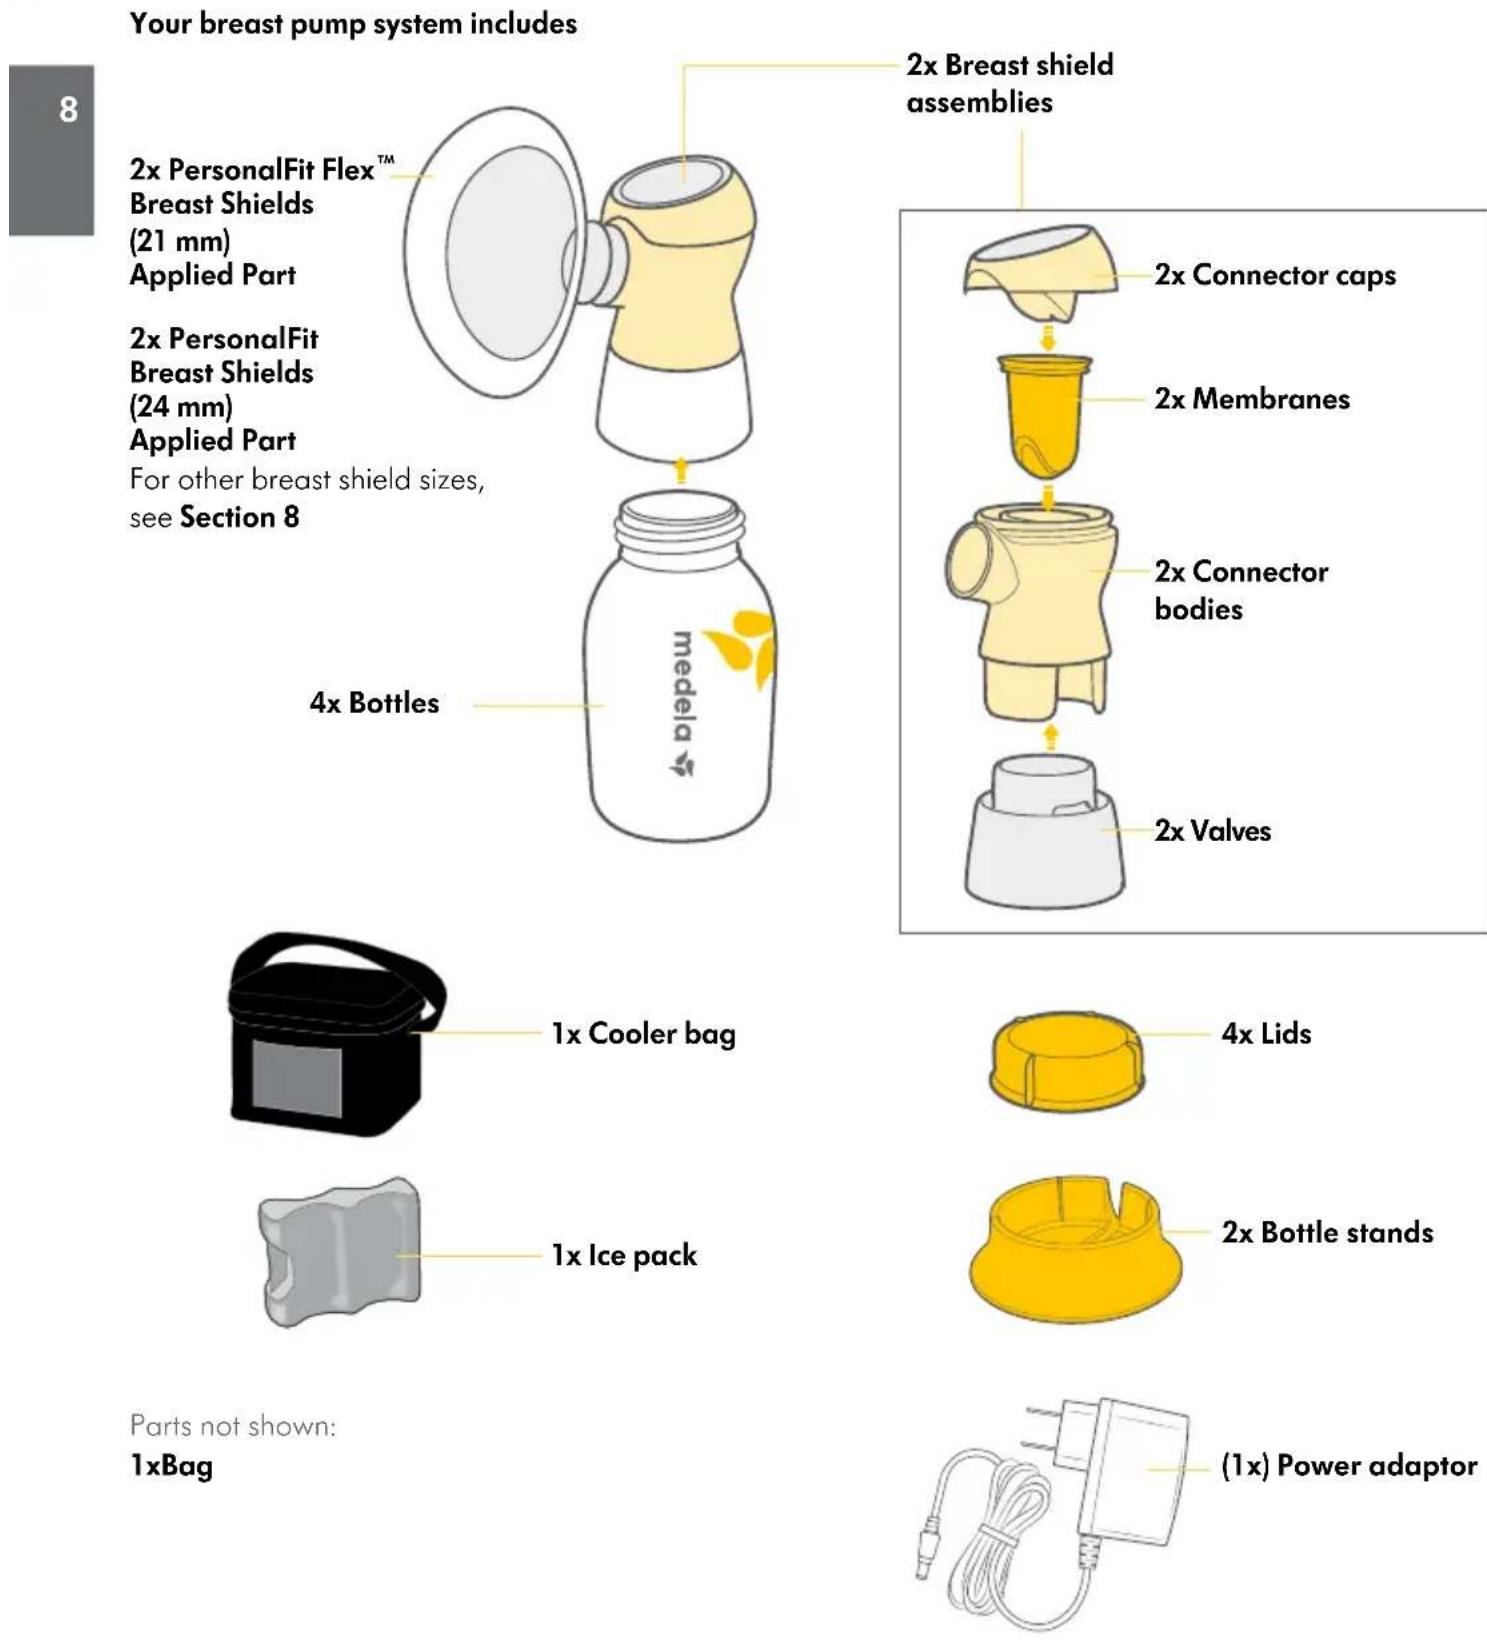

Quality & performance you can trust
Medela reserves the right to substitute any component or accessory with a replacement of equivalent performance.
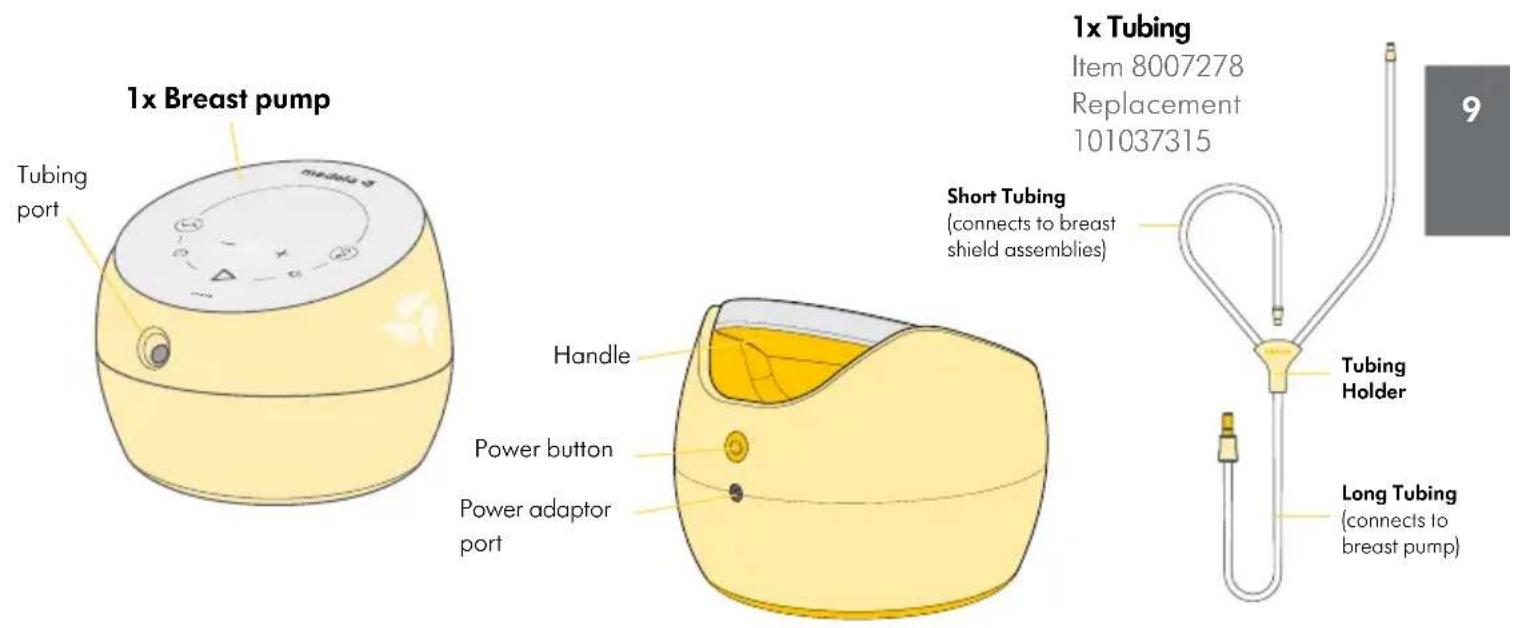
Controls
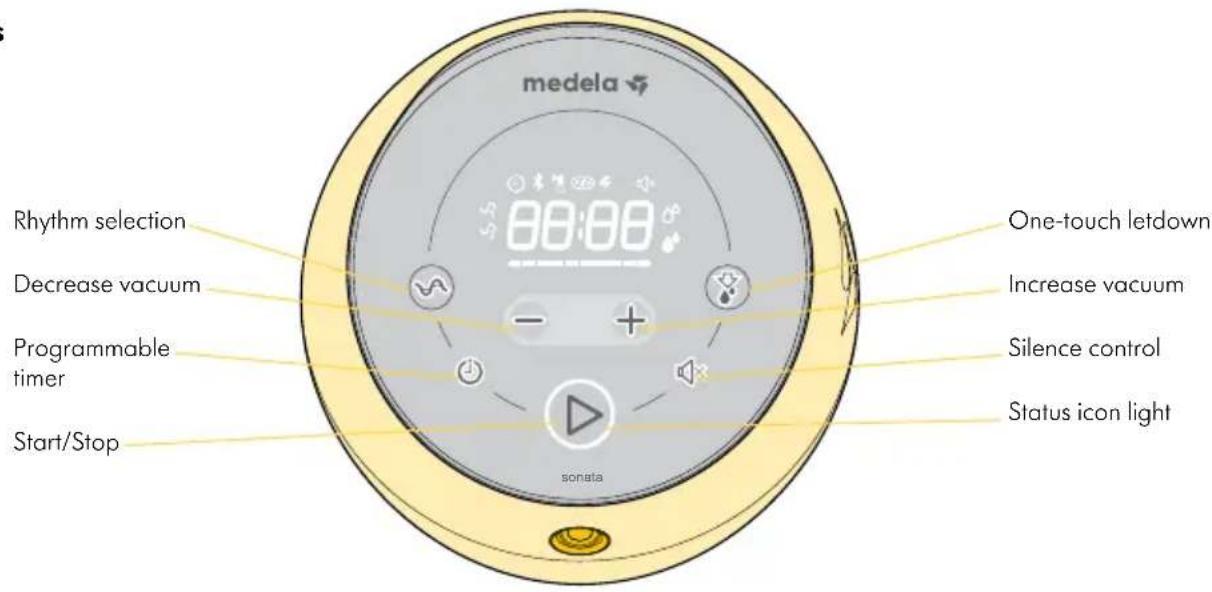
Display Icons
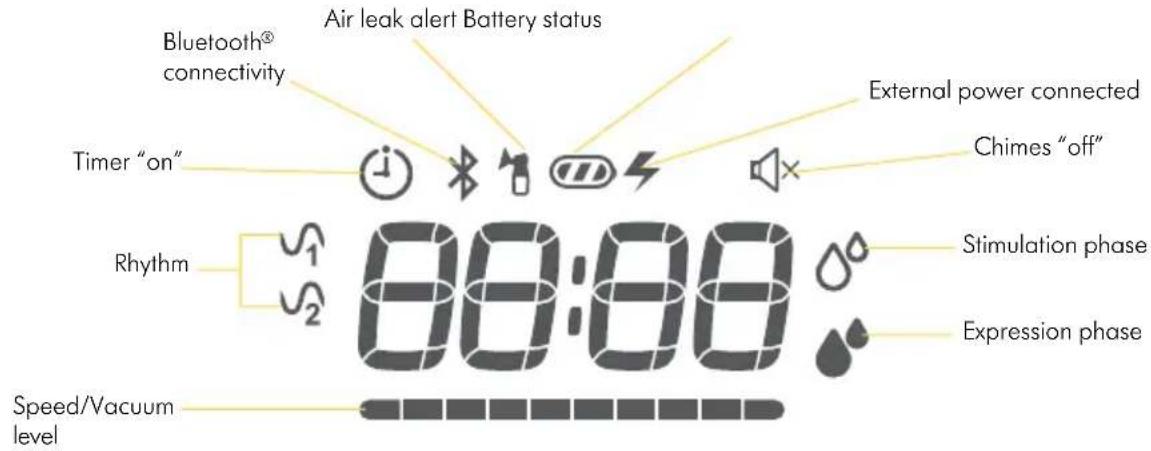

Note
It is important for you to do the following before using your breast pump for the first time:
- Plug the Sonata into an external power source. Charge the battery for 12 hours. (See Section 10, Powering Your Pump).
- Separate all parts that are exposed to the breast or breast milk prior to cleaning.
- Clean - see Section 5.
Parts to clean
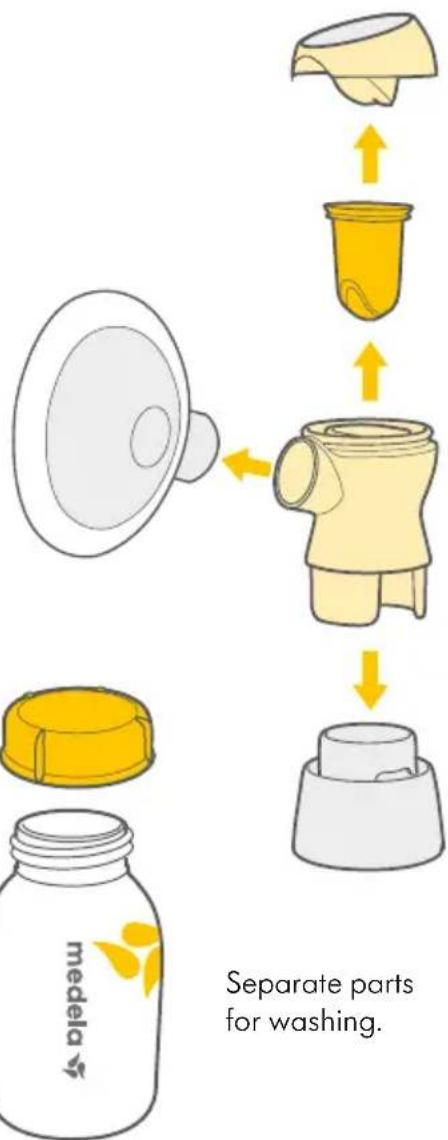
Separate all parts that are exposed to the breast and breast milk prior to cleaning.
natural_image
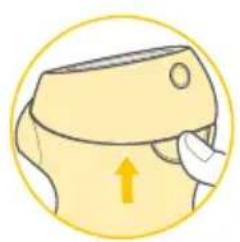
Illustration of a hand pressing down on a yellow object with an upward arrow (no text or symbols)Use your thumb to separate the connector cap and body.
natural_image
Simple line drawing of a human ear with a yellow arrow indicating direction (no text or symbols)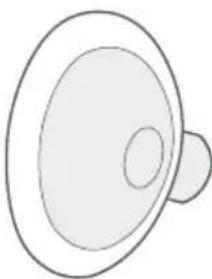
natural_image
Simple line drawing of a speaker with no text or symbols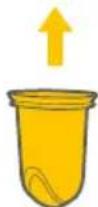

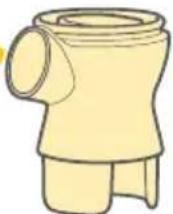

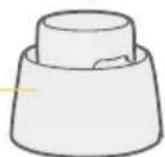


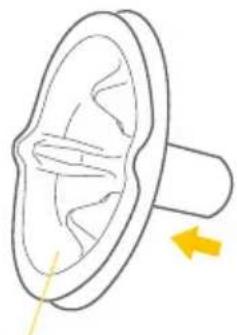
Remove and dispose of the protective cover from the breast shield before first use.
Pull down on valve to remove from connector body. Do not rotate.
4. Cleaning Overview
Washing and sanitizing are two different activities. They must be done separately to protect you, your baby and the performance of your breast pump.
Wash – To clean the surfaces of the parts by physically removing contamination.
Sanitize – To kill living organisms, such as bacteria or viruses, that may be present on the surfaces of the parts.
| When to Wash | Breast Shields 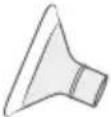 | Breast Pump Kit 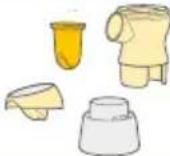 | Bottles & Lids 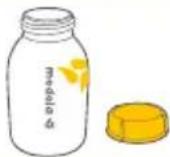 |
| Before 1st use | √ wash√ sanitize | √ wash√ sanitize | √ wash√ sanitize |
| After each use | √ wash √ wash √ wash | ||
| Once per day | √ sanitize √ sanitize √ sanitize |
| When to Wash Tubing | 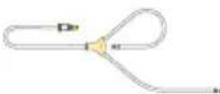 | Breast Pump | 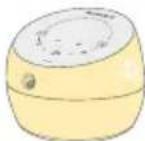 | Carry Bag |
| As needed | √ See tubing care - Section 6 | √ wipe with clean, damp cloth | √ wipe with clean, damp cloth | |
Detailed cleaning instructions on pages 12-15:
- Wash – Section 5
- Sanitize – Section 5
- Breast Pump and Tubing Care – Section 6
5. Cleaning Instructions
12
Supplies needed:
- Mild dish soap or Medela Quick Clean™ Breastmilk Removal Soap
- Clean dish towel or soft brush
- Clean wash basin
- Drinking-quality water
- Tongs
- Clean pot for boiling water
Parts to wash or sanitize:
- Breast shields
- Breast milk bottles
- Lids
- Connector bodies
- Valves
- Membranes
- Connector caps

Caution
- Separate and wash all parts that are exposed to breast milk immediately after use. This will help to remove breast milk residue and prevent growth of bacteria.
- Only use drinking-quality tap or bottled water for cleaning.
- When cleaning the valves do not use small objects such as brushes. Be careful not to puncture.

Note
• Take care not to damage parts of the breast pump kit during cleaning.
- Store the dry breast pump kit in a clean bag/container until next use.
- Wash hands thoroughly.
- If you notice a white residue on your breast pump parts after boiling, your water may have a high mineral content. Remove residue by wiping parts with a clean cloth and allow to air dry.
• Distilled water is recommended when boiling parts to prevent substantial mineral build-up over time, which may compromise your parts.
1. Disassemble
flowchart
graph TD
    A["Raw Material"] --> B["Separate Part"]
    B --> C["Product with Top Cover"]
    C --> D["Final Product with Top Cover"]
    D --> E["Separate Parts for Washing"]
Separate parts for washing.

Tip
- If using the dishwasher, parts may become discolored. This will not impact part function.
- Tubing should only be washed if dirty or milk is present.
See Section 6 for more details.
2. Wash
Before first use and after each use
natural_image
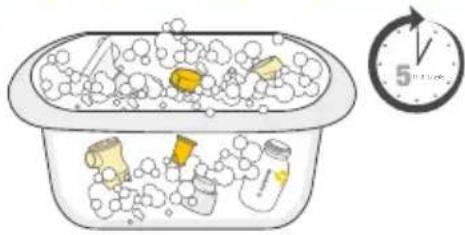
Illustration of a bathtub filled with bubbles and small items, next to a clock showing 5 (no text or symbols on the objects)Step 1 – Rinse all separated parts that come into contact with the breast and breast milk in cool water to remove breast milk residue. Once rinsed, parts that have touched the breast or breast milk should be placed in a clean wash basin, dedicated to only cleaning these items. Do not place parts directly in the sink.
Step 2 – Soak in warm soapy water for 5 minutes. Wash with a clean, unused dish cloth and rinse with clean water.
Step 3 – Place parts on a clean surface and/or towel. Allow parts to air dry. Store dry parts in a cool place when not in use. Do not store wet or damp parts.
OR
Dishwasher
natural_image
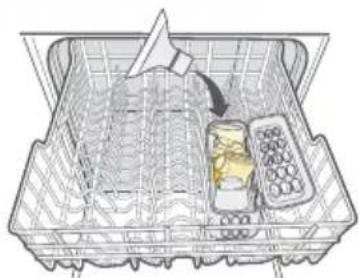
Diagram of a grocery drawer with a tray holding a food item and a refrigerator beside it (no text or symbols)Step 1 – Wash all separated parts by using the top rack of your dishwasher.
Step 2 – Place parts on a clean surface and/or towel. Allow parts to air dry. Store dry parts in a cool place when not in use. Do not store wet or damp parts.
3. Sanitize
Before first use and once per day
StovetopSink/clean wash basin

natural_image
Illustration of a cooking pot with ingredients being heated, accompanied by a clock showing 10 o'clock (no text or symbols on the pot itself)Step 1 – Wash hands thoroughly.
Step 2 – Fill pot with enough water to cover all parts. Bring to a boil.
Step 3 – Place parts in boiling water for 10 minutes.
Step 4 – Allow parts to air dry. Store dry parts in a cool place when not in use. Do not store wet or damp parts.
OR
Microwave
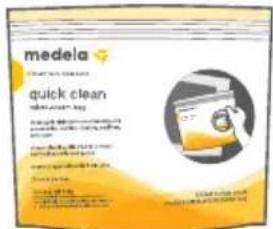
Step 1 – Use Medela's Quick Clean™ Micro-Steam™ bags. Sold separately (Follow instructions as provided on bag)
Step 2 – Place parts on a clean surface and/or towel. Allow parts to air dry. Store dry parts in a cool place when not in use. Do not store wet or damp parts.
6. Breast Pump & Tubing Care
14
Supplies needed:
- Mild dish soap or Medela Quick Clean™ Breast Milk Removal Soap
- Clean dish towel
- Clean sink or bowl
- Drinking-quality water
Parts needed:
- Tubing
- Breast pump

Tip
- Tubing should only be washed if dirty or milk is present. Follow instructions in Section 6B.
- There is no need to clean tubing if condensation inside the tube is from previous washings or atmospheric conditions. Follow drying instructions in Section 6B.
6A. Cleaning the Breast Pump
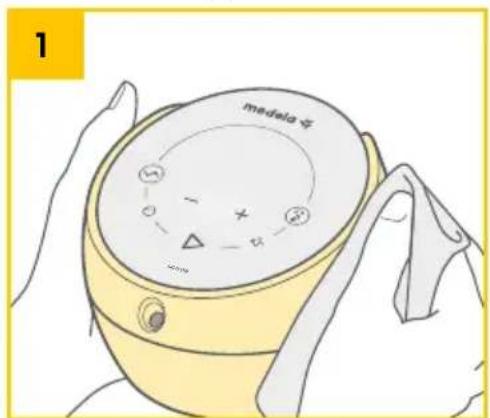
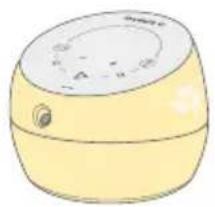
Wipe pump unit with a clean, damp cloth.

Warning
- Do not immerse the breast pump in water; do not run water over the breast pump.
- When cleaning the breast pump display, only use a damp, soft cloth with mild dish soap. Other cleaners or abrasive cloths may de-performance.
6B. Tubing Care
- Tubing does not need to be washed before first use.
- Inspect tubing after each pumping session.

Caution
- Do not store wet or damp parts as mold may develop.
- If tubing becomes moldy, discontinue use and replace tubing. To find replacement parts visit www.ShopMedela.com (USA) or www.medelastore.ca (Canada)
- Do not use breast pump with wet tubing; doing so will cause damage to your breast pump.
To properly clean your tubing

natural_image
Illustration of a hand inserting a medical device into a yellow liquid container (no text or symbols)Turn off ⏻breast pump and unplug from power source.
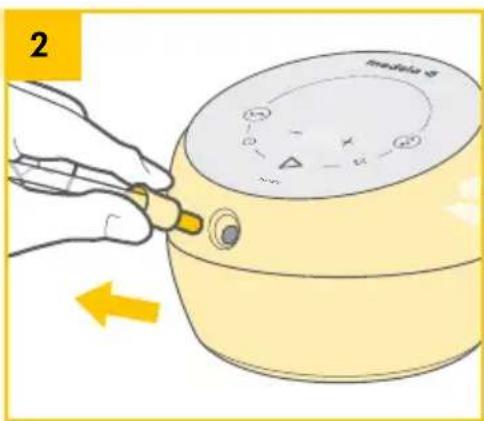
To remove tubing from the breast pump, grab the tube adaptor and pull directly from the tubing port. Do not wiggle or pull tubing at an angle.
Washing tubing
natural_image
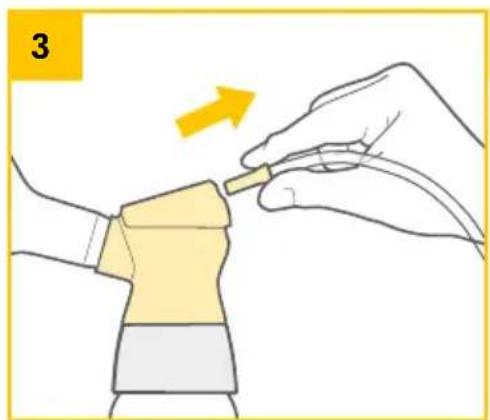
Illustration of a hand using a tool to adjust or install a component, with an arrow indicating direction (no text or symbols present)Remove tubing from breast shield.
natural_image
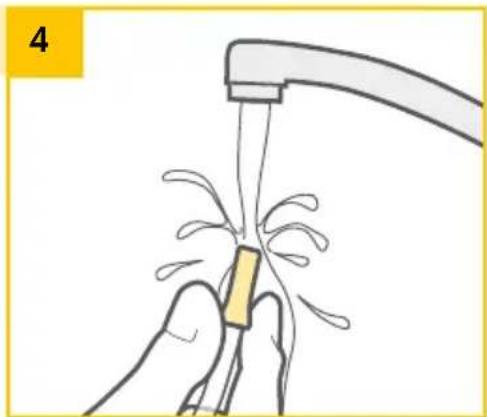
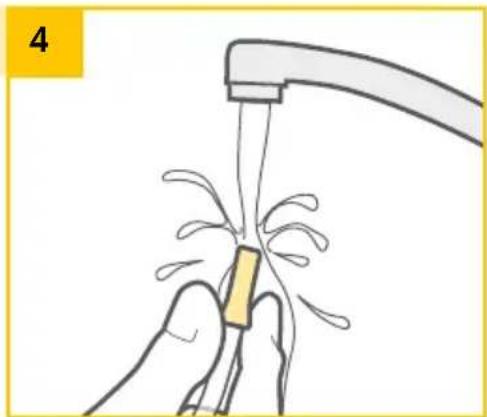
Illustration of a hand holding a tool with a water droplet, using a faucet (no text or symbols)- Rinse tubing in cool water.
- Wash tubing in warm, soapy water.
- Rinse tubing with clear water.
- Shake out water droplets.
- Hang to air dry.
1
Common pumping questions & answers
How often should you breast pump?
A breast pump is a replacement for when you are separated from your baby. It is important to pump when the baby would normally be breastfeeding. For example, a working mother may pump 2-3 times during an 8-hour work day.
How long should your pumping session last?
Pumping times can vary from mother to mother. Pumping sessions usually last from 15 to 30 minutes.
How should your breasts feel before and after pumping?
Before pumping, your breasts will have a firm, heavy feeling. After pumping, your breasts should feel soft with no firm areas. Firm areas could indicate that the breast is not completely drained.
1. Medela's PersonalFit™ and PersonalFit Flex™ sizing
Pumping should not hurt. For maximum comfort and pumping efficiency, Medela offers PersonalFit Flex™ in four breast shield sizes*:
21 mm
24mm
27 mm
30 mm
* Medela's original PersonalFit breast shields are also available in 36 mm.
Visit MedelaBreastshields.com to view the full guide to help you determine your optimal size based on your nipple diameter.
2. Test your breast shield size
- Start with the 21 mm that came with your pump, or the size determined by measuring.
- Center nipple and gently hold breast shield against your breast.
- Adjust for Maximum Comfort Vacuum ^™ , to achieve optimum suction level.
- Refer to images while pumping in expression.
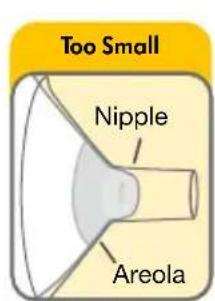
- Nipple rubs along side of tunnel
- Try a larger size
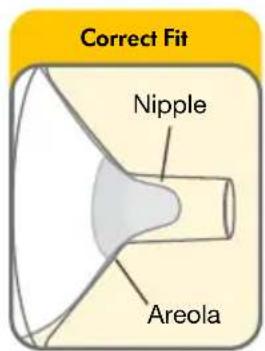
• Nipple is centered and moves freely
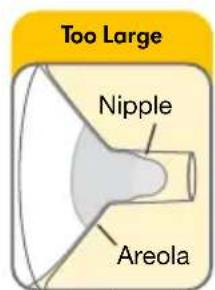
- Nipple and excessive areola are pulled into the tunnel
- Try a smaller size
3. Should you try a new size?
- Does your nipple rub sides of tunnel, to the point of causing discomfort?
- Do you see excessive areola being pulled into tunnel?
- Do you see any redness?
• Is your nipple or areola turning white? - Do you feel unexpressed milk after pumping?
If you answered "YES" to any of these questions, consider trying a new size by following the measuring instructions above.
If you are still unsure if you selected the correct size, see a lactation consultant, breastfeeding specialist, or visit MedelaBreastshields.com for assistance in choosing the right size breast shield.

Caution
- While some discomfort may be felt when first using a breast pump, using a breast pump should not cause pain. If you are unsure about breast shield sizing, please contact a health care professional or breastfeeding specialist who can help you get a proper fit.
- If you are experiencing discomfort at the base of the nipple due to rubbing of your breast tissue against the breast shield tunnel, use of a lubricant such as Tender Care Lanolin may be beneficial.
9. Assembling Your Breast Pump
18
Parts Needed:
- Tubing
- Breast pump
- Breast shields
- Breast milk bottles
• Lids - Connector bodies
- Valves
- Membranes
- Connector caps

Tip
- Only use Authentic Medela Spare Parts. See Section 2 for details.
- Check breast pump kit components for wear or damage before use. Replace if necessary.
• Always inspect all parts prior to use for cleanliness. If dirty, see Section 4.
• To prevent damage to the breast pump all components must be completely dry before use.
natural_image
Illustration of a hand holding a small object with water droplets, no text or symbols present
Tip
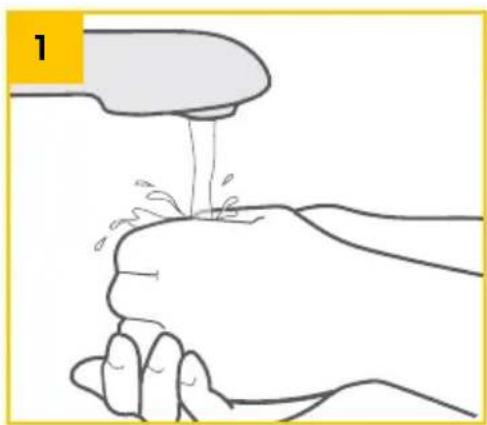
Wash hands thoroughly with soap and water before touching breast pump, breast pump kit and breasts. Avoid touching the inside of containers and lids.
natural_image
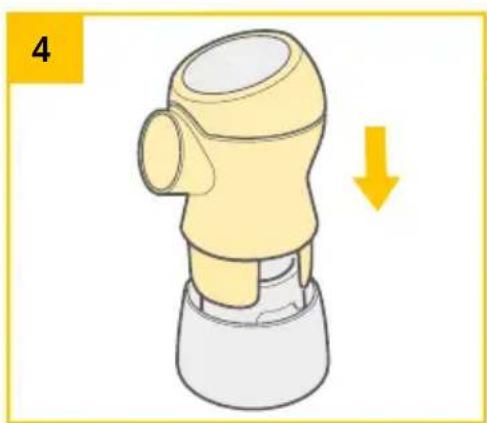
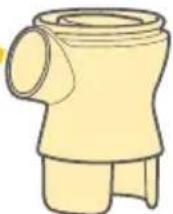
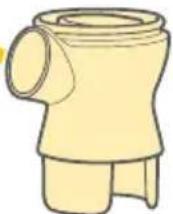
Illustration of a yellow mechanical component with a downward arrow indicating motion (no text or symbols)Using the two legs as guides, insert the connector body onto the valve.
natural_image
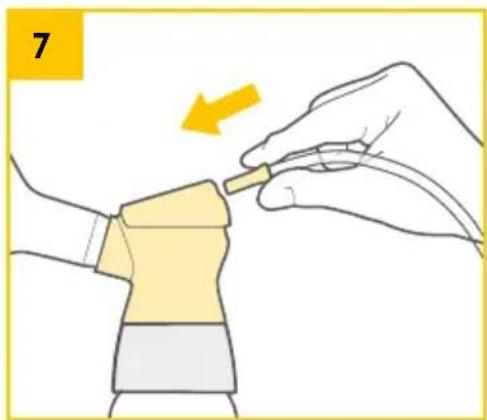
Illustration of a hand holding a small object with an arrow indicating motion (no text or symbols)Insert short tubing into the connector cap until snug.
natural_image
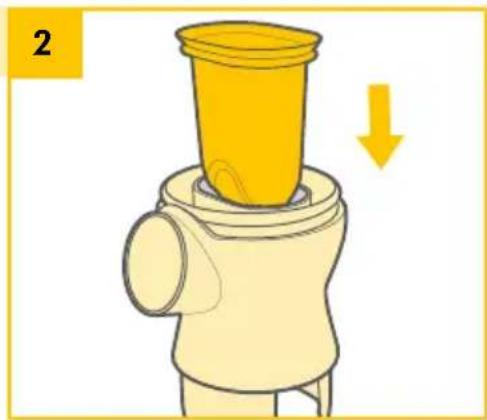
Illustration of a yellow mechanical component with a downward arrow indicating motion (no text or symbols)- Carefully insert the (dark yellow) membrane into the top of the connector body.
- The membrane must be secure for correct assembly.
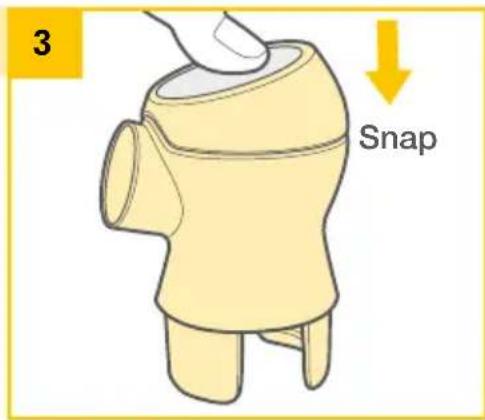
Press the connector cap onto the connector body. It will snap closed.
natural_image
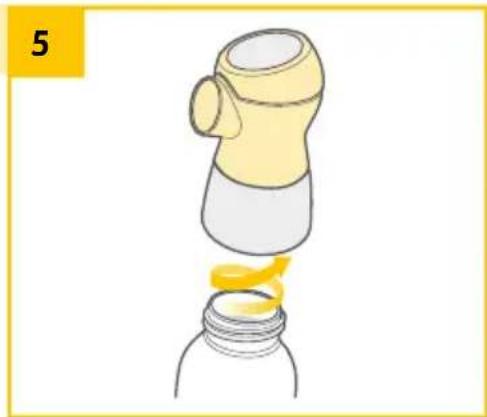
Illustration of a bottle being poured into a container with a yellow liquid (no text or symbols)Fasten the bottle onto the complete breast shield assembly.
natural_image
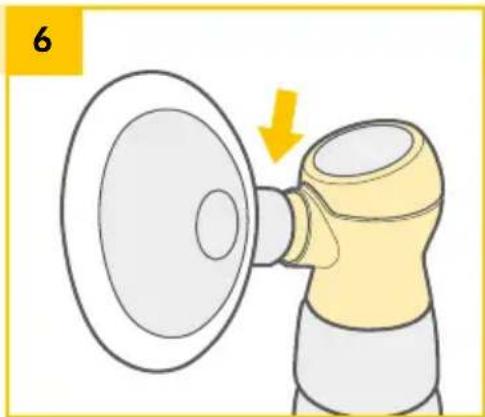
Illustration of a yellow megaphone emitting a white circular lens, with a yellow arrow indicating direction (no text or symbols)Push breast shield onto the connector body.
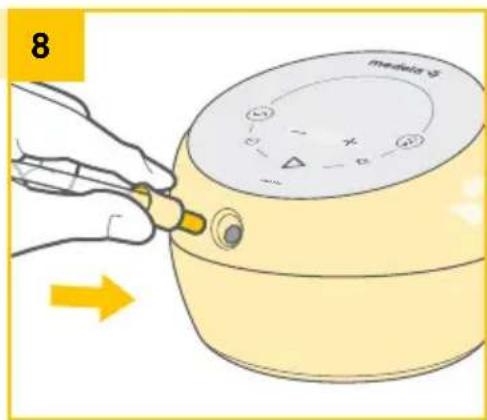
Insert the long tubing end into the breast pump as far as it will go.
natural_image
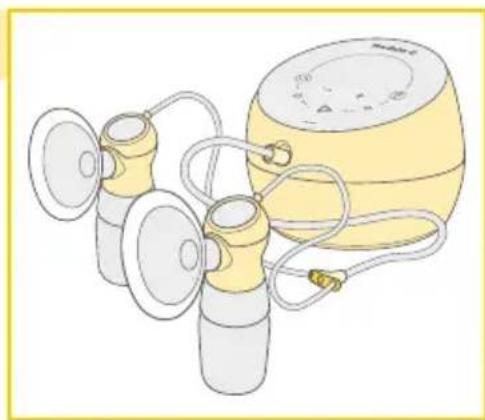
Illustration of a yellow and white baby pacifier with attached tubing (no text or symbols)Accurately assembled system.
10A. Charging the Breast Pump
There are two ways to power your breast pump for your pumping session;
Power AdaptorRechargeable Battery
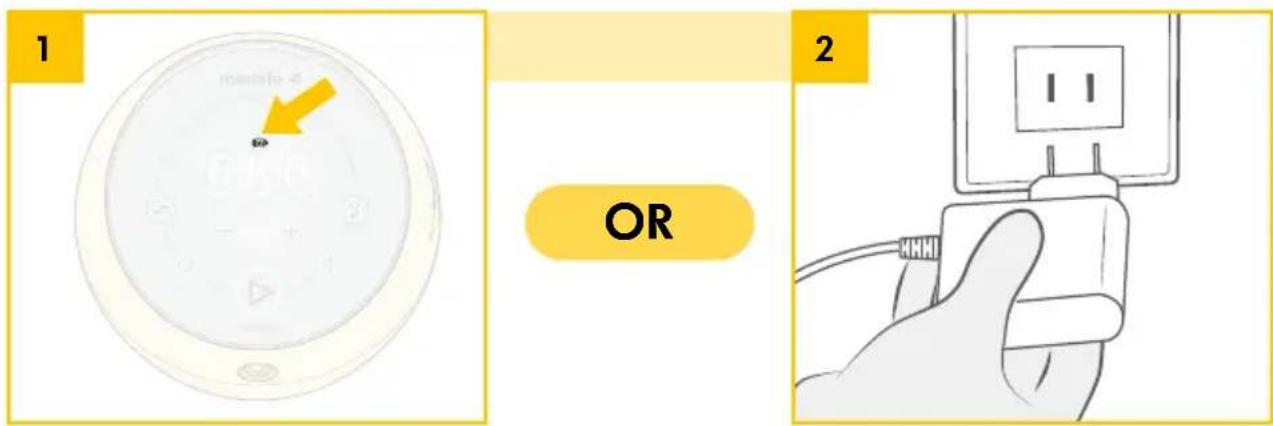
- Before first use, charge the breast pump battery for 12 hours with the power adaptor. The battery icon will appear fully charged on the display when charging is complete.
•ProceedtoSection 11, Operating Your Breast Pump, to begin your pumping session.
- Plug power cord into the power adaptor port on the back of the breast pump. Plug power cord into power source.
•Proceed to Section 11, Operating Your Breast Pump to begin your pumping session.
10B. Battery Care & Status Codes
Your breast pump contains a Lithium ION rechargeable battery.

Tip
- Before using on battery power for the first time, fully charge your breast pump for 12 hours.
- You can use your breast pump while charging the battery. The battery will charge as soon as the breast pump is connected to a power source. It will not charge while the pump is running.
- Keep your pump in a cool place.
- Keep your battery charged.
- Fully charge the battery before storing your pump for an extended period of time.
- Recharge the battery before it completely drains. This is better for the lifecycle of the battery.
- If your breast pump has been stored in a hot location, it may not run on battery power right away. To resume normal battery function, allow the breast pump to cool for one hour. During this time, you can use your breast pump when plugged into external wall power.
Battery Charge Status Codes
| [xwtg] | External power source connected |
 | Battery charge status |
 (flashing) (flashing) | Low battery, needs charging |
 bAtt bAtt | Battery drained.See Troubleshooting (Section16). |
 (flashing) (flashing) | Battery broken.See Troubleshooting (Section16) and Call Medela Customer Service. |
10. Powering Your Breast Pump (cont.)
2
10C. Power Adaptor Care
How to care for your adaptor:
natural_image
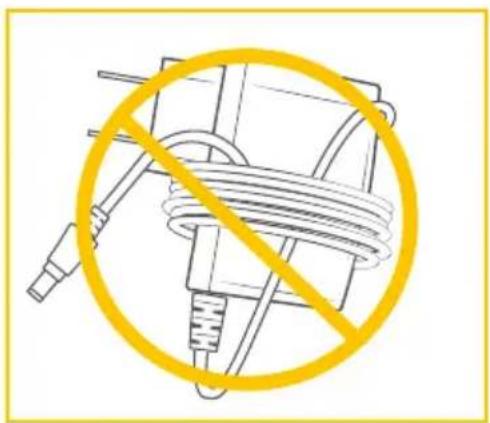
Diagram of a mechanical device with a yellow prohibition symbol crossed out by a black line (no text or labels)Do not wrap cord of power adaptor around the plug body.
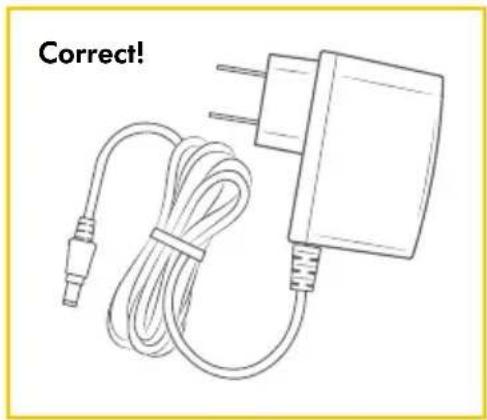
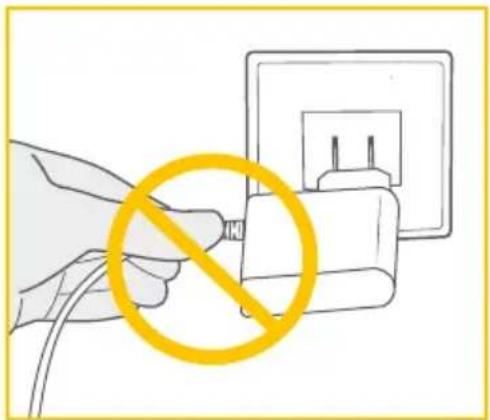
Do not unplug power adaptor by pulling on the cord.
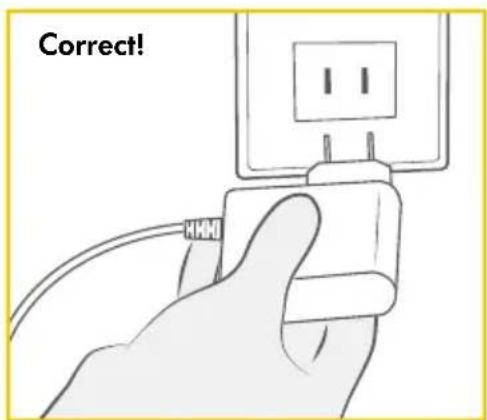
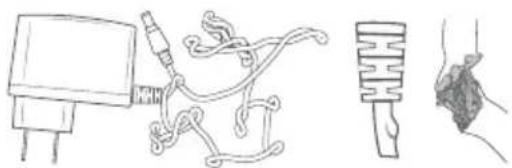
Never operate an electrical device if it has a damaged cord or plug, if it is not working properly, if it has been dropped or damaged, or dropped into water. If damage is found, immediately discontinue use of power adaptor and call Medela Customer Service at 1-800-435-8316.
natural_image
Line drawings of medical or laboratory equipment including a device, tubing, and a textured object (no text or symbols)
Warning
- Use only the power adaptor that comes with the breast pump.
- Make sure the voltage of the power adaptor is compatible with the power source.
10D. Traveling Outside of Your Country
When travelling internationally, we recommend purchasing a Universal Power Plug Adaptor (not included). Please consult with the country you are visiting to find out what type of adaptor will work best. This breast pump's A/C adaptor is two-pronged and does not require a grounded outlet. This breast pump has a Lithium ION Battery which may be restricted from the country you are visiting. Please consult with the country you are visiting to find out if there are any restrictions that pertain to travelling with Lithium ION.
For information about traveling with your breast pump and expressed breast milk, visit www.TSA.gov.
11A. Glossary of Terms, Controls & Icons
| 2-Phase Expression® | 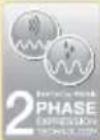 | Through research, Medela found that babies nurse in 2 Phases – Stimulation and Expression. This research is the basis for the technology in all Medela breast pumps. |
| Stimulation Phase | Fast sucking/pumping rhythm to stimulate milk flow. | |
| Expression Phase | Slower sucking/pumping rhythm for gentle and efficient milk removal after milk has started flowing. | |
| Maximum Comfort Vacuum^TM | Highest vacuum setting where pumping still feels comfortable. Different for every mother. | |
| Pumping Rhythms | This breast pump includes two clinically-tested pumping rhythms. It offers you options to choose the most comfortable and effective for you. | |
| Responsive Pump Technology | Responsive Pump Technology automatically adjusts to the body and environment and makes sessions more consistent and productive. | |
| Letdown | When milk begins to flow from the breast. | |
Controls
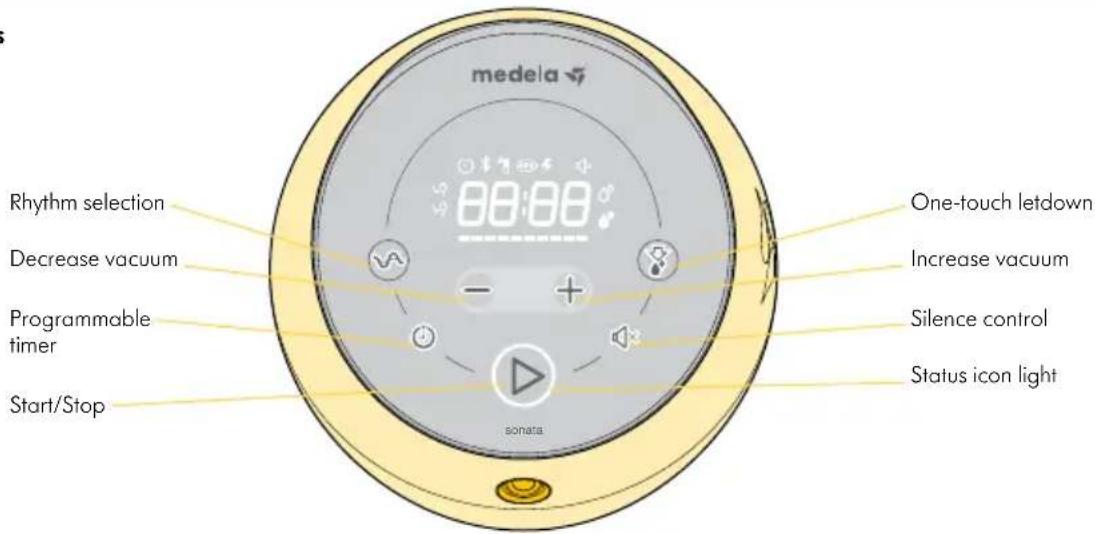
Display Icons
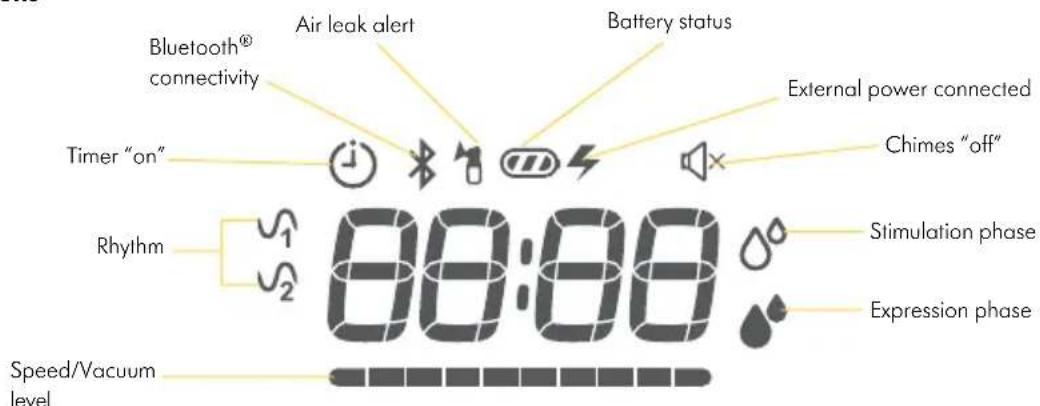
11. Operating Your Breast Pump (cont.)
11B. Single Pumping
24
natural_image
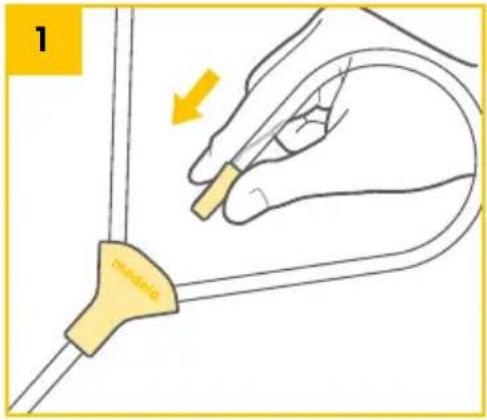
Illustration of a hand holding a medical catheter with an arrow indicating force or movement (no text or symbols present)Insert the unused tubing end into the tubing holder.
natural_image
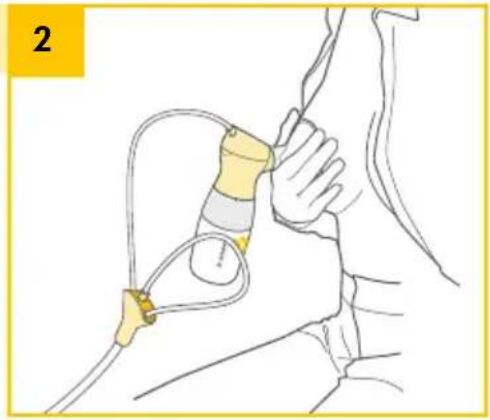
Medical illustration showing a hand holding a catheter connected to a patient's arm (no text or symbols present)Hold the breast shield and connector onto your breast with your thumb and index finger. Support your breast with the palm of your hand.
11C. Double Pumping
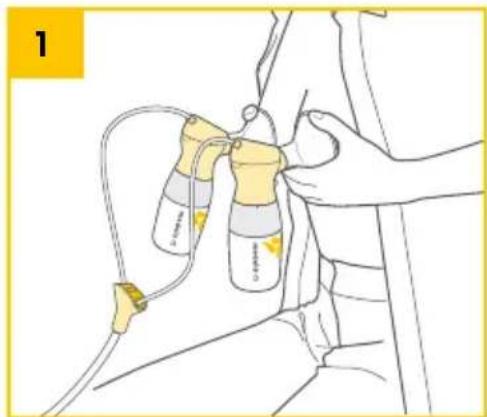
Place the breast shields on your breasts so that your nipples are properly centered in the tunnels.
Refer to Section 8 for breast shield sizing information.
T
Tip
- Wash hands thoroughly with soap and water before touching breast pump, kit and breasts. Avoid touching the inside of containers or lids.
- Always inspect all parts prior to use for cleanliness.
11D. Pumping Steps
natural_image
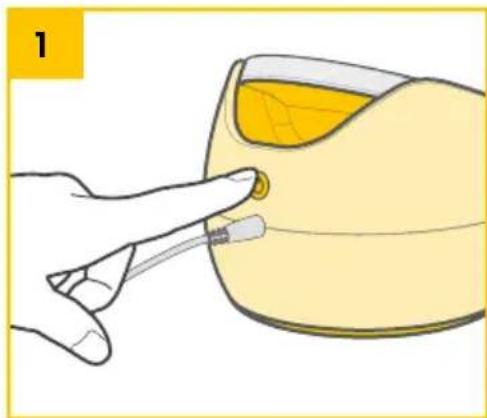
Illustration of a hand inserting a needle into a yellow bowl with a small mouth (no text or symbols)Turn on the breast pump by pressing the power button ⏻ on the back.
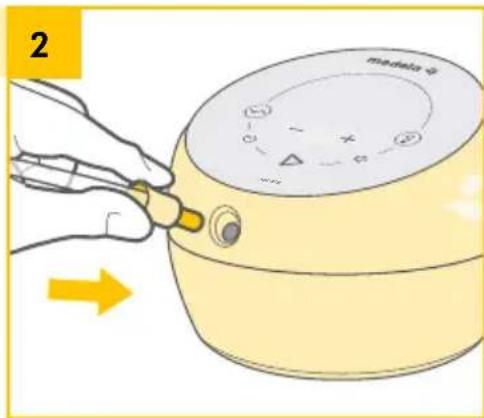
Plug your assembled double-breast pump kit into the tubing port on the front of the breast pump.
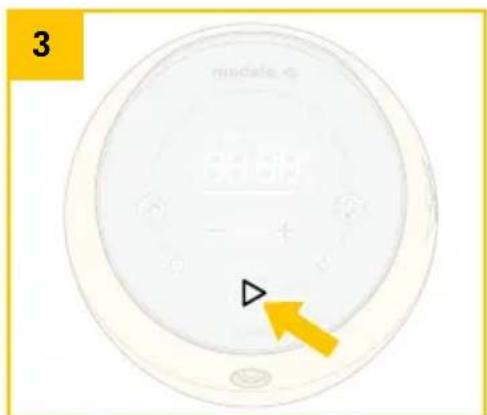
Start breast pump vacuum by pressing the start/stop button.

Caution
• Make sure tubing is not kinked or pinched while pumping.
- Do not hold the breast pump kit by the bottle. This can lead to blockage of the milk ducts and engorgement.
- Do not try to express with vacuum that is too high and uncomfortable (painful). The pain, along with potential breast and nipple trauma, may decrease milk output. The comfortable level is based on each individual.
- Contact your healthcare professional or breastfeeding specialist if you can express only minimal or no milk or if expression is painful.
11. Operating Your Breast Pump (cont.)
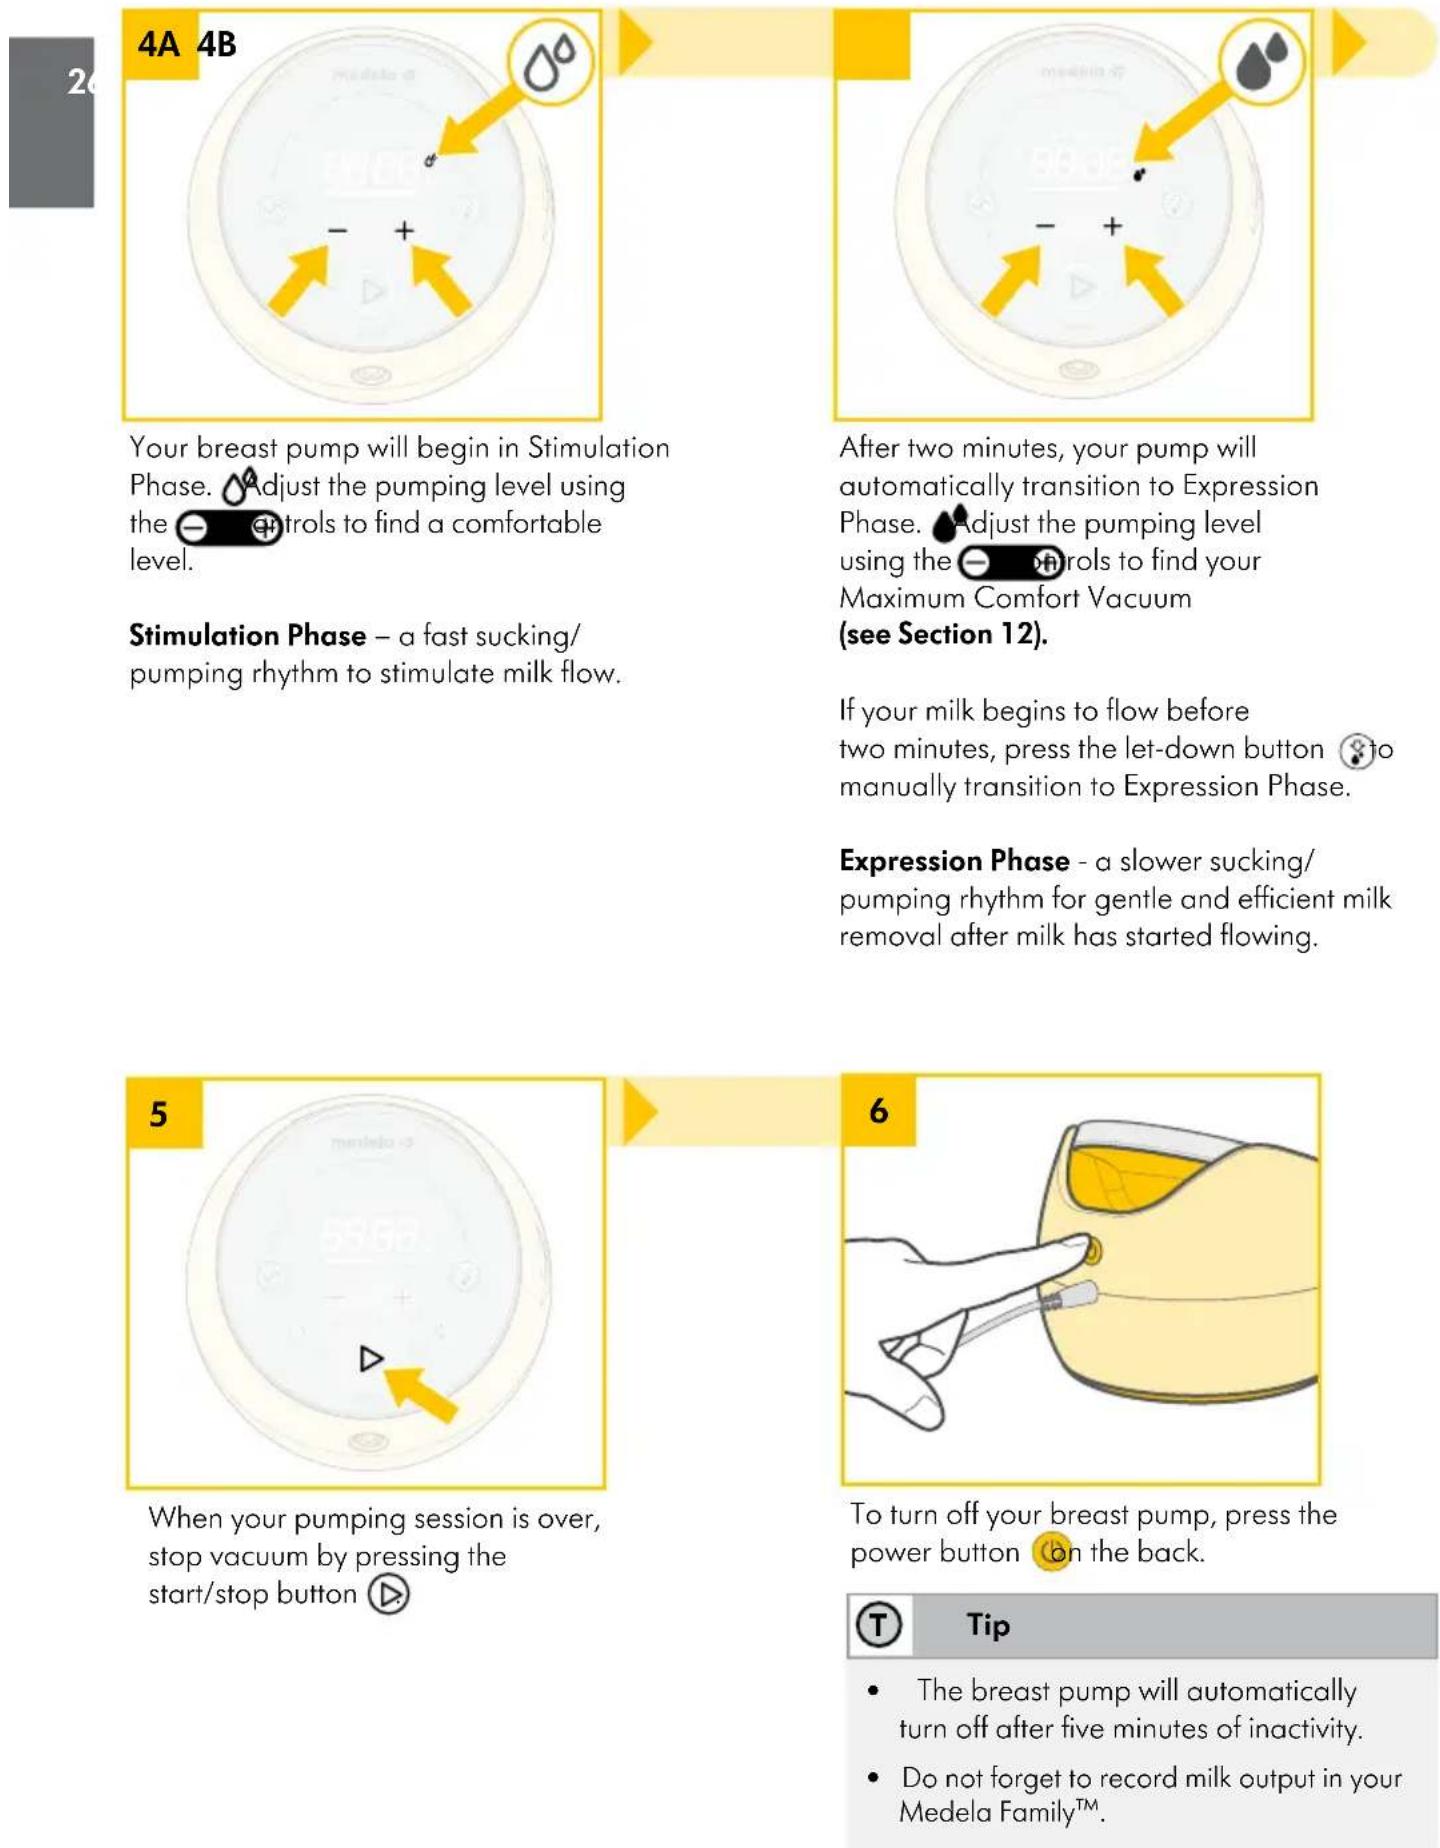
Your breast pump will begin in Stimulation Phase. ▲Adjust the pumping level using the - controls to find a comfortable level.
Stimulation Phase – a fast sucking/pumping rhythm to stimulate milk flow.
After two minutes, your pump will automatically transition to Expression Phase. Adjust the pumping level using the - controls to find your Maximum Comfort Vacuum (see Section 12).
If your milk begins to flow before two minutes, press the let-down button ⚙ to manually transition to Expression Phase.
Expression Phase - a slower sucking/pumping rhythm for gentle and efficient milk removal after milk has started flowing.
When your pumping session is over, stop vacuum by pressing the start/stop button ▶
To turn off your breast pump, press the power button on the back.
T Tip
• The breast pump will automatically turn off after five minutes of inactivity.
- Do not forget to record milk output in your Medela Family™.
12. Finding Your Maximum Comfort Vacuum™
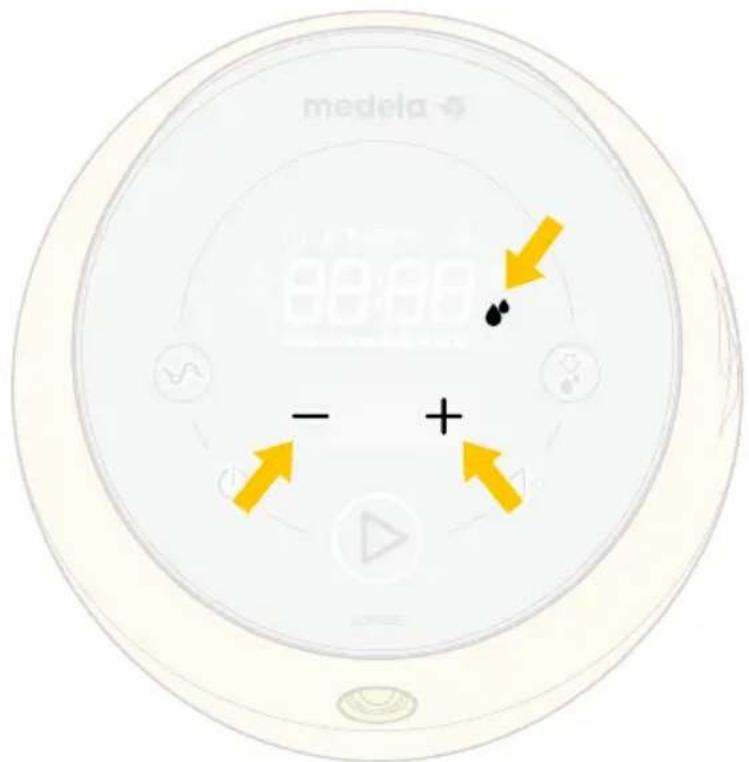
Once you are pumping in the Expression Phase, increase the speed/vacuum until pumping feels slightly uncomfortable (not painful), then decrease slightly.

Tip
- Maximum Comfort Vacuum is the highest vacuum setting where pumping still feels comfortable. This is different for every mother.
• Stimulation should be at a comfortable vacuum level. - Reassess your Maximum Comfort Vacuum throughout your pumping experience. It can change throughout each stage of lactation.
Breast Pump Connectivity

By tracking your sessions in our Medela Family™ app, you can stay on-target with daily highlights and custom content. Having visibility to your pumping history gives you the opportunity to plan efficiently each day and track changes in your body like an increase or decrease in milk output.
By connecting your breast pump to your mobile device you can automatically transfer your pumping data (session length, phases & levels) and manually input the amount of milk expressed into your Medela Family™ pumping log.
How do I connect (pair) my Sonata Breast Pump with my mobile device?
Step 1. Download and install Medela Family™ for iOS and Android.

to your mobile device. Available for free
Step 2. Open Medela Family™ on your mobile device. Follow set-up and pairing instructions.
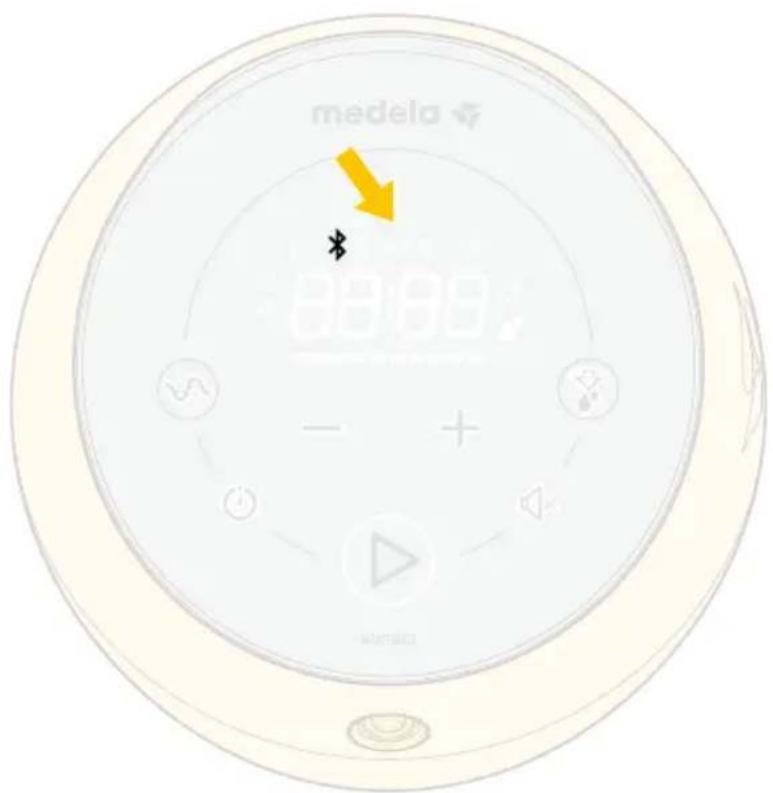
Step 3. When correctly paired, the
*will appear on your breast pump display.
Saving your pumping session in Medela Family™ app
After you finished a session, long press the start the data to the Medela Family™ app.
▶ button on the breast pump to transmit

Tip
- After initial set-up, the Bluetooth ^ icon will automatically appear on your breast pump, when powered on, if your paired device is near and Medela Family ^TM is open.
- You can pair multiple mobile devices with Sonata.
- Only one mobile device at a time can interact with Sonata.
- Sonata has the ability to store your last 30 pump sessions in its memory. If the pump is not connected prior to session 31 your history will be overwritten with new session data. When connected, Medela Family™ will log an infinite number of historical sessions.
How do I remove my Sonata breast pump from my mobile device?
Step 1. Navigate through Medela Family ^™ to remove your Sonata Breast Pump.

Tip
- Removing Sonata from your mobile device will not delete information stored in Medela Family™.
- If you re-connect your breast pump and mobile device the last 30 records stored within your pump will transfer.
To learn more about Medela Family™, including download instructions, please visit: www.medela.app.
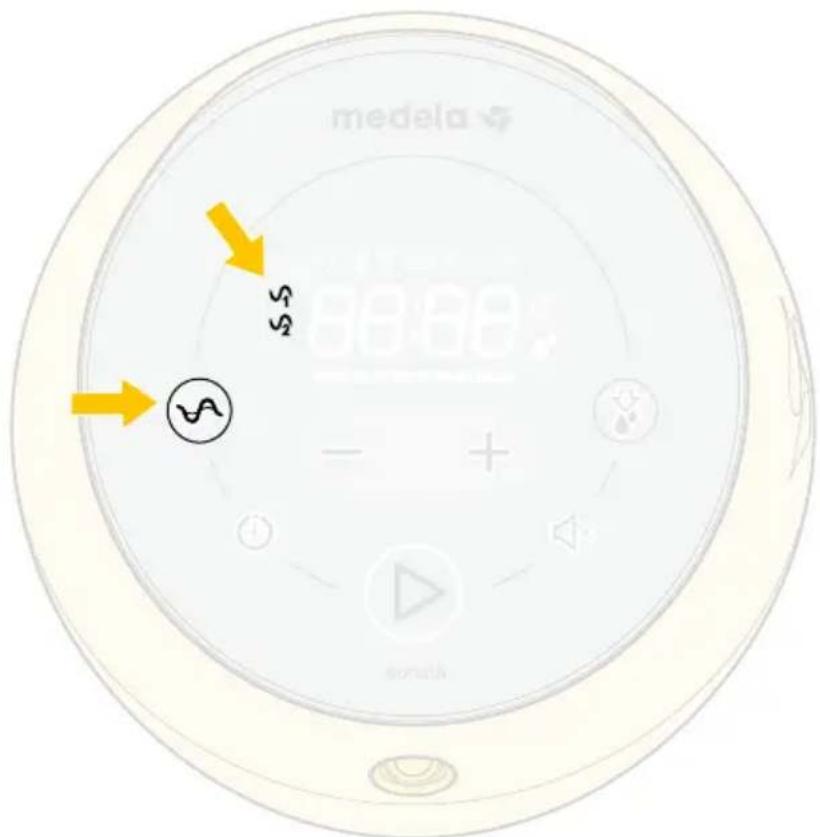
Selecting a Rhythm
Two clinically tested pumping rhythms are included:
1.Signature- This rhythm is based on Medela's successful Symphony ^® Breast Pump used in hospitals.
- Lifestyle - An alternate rhythm for when you want to change your pumping routine. It includes additional benefits of longer battery, and quieter pump operation when you need it.

Note
Your breast pump will default to Signature rhythm. To change to the alternate Lifestyle rhythm, push the pattern button.
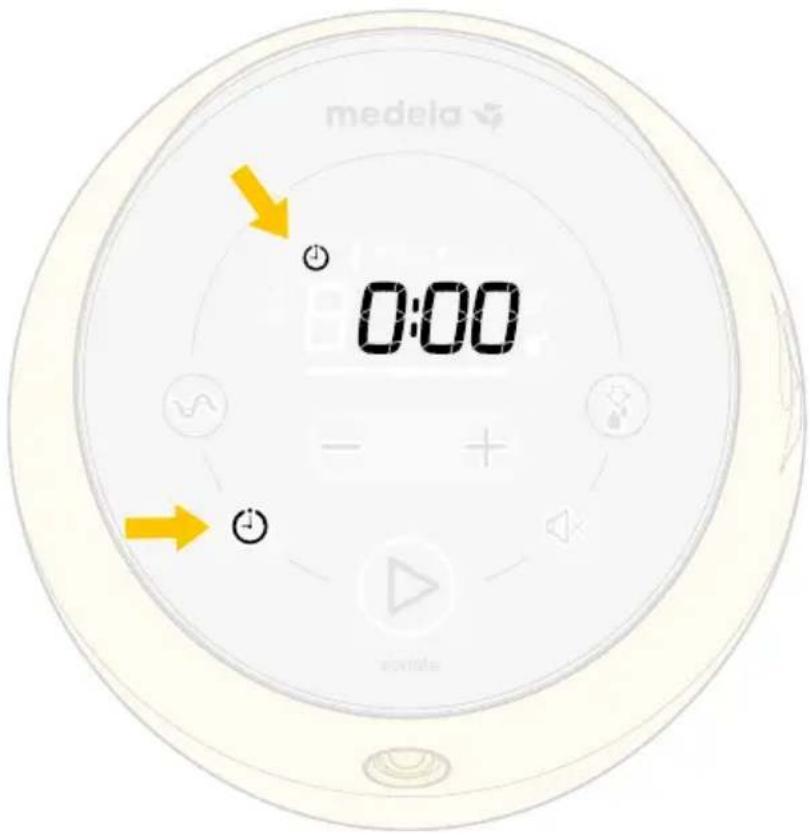
Setting the Session Timer
The default timer on your breast pump will start at zero and count up. Follow the steps below if you want to count down from a set time.
To set your count-down timer:
-
Before you begin pumping, press the timer ⏻ button. The timer icon will appear on the display and the ⏻ icons will be illuminated.
-
Use the ⏻ 100 tons to adjust time in 1 minute increments (up to 30 minutes).
-
Press start ▶to begin your pumping session.
-
Once you've reached your goal time, the vacuum will pause and the display will show your total pumping duration.

Note
- Your breast pump will make a sound and the display will flash to let you know that your session has 1 minute remaining.
- Your breast pump will make a sound and flash to alert you that your session has ended.

Tip
If you want to continue the same session, press start/stop ① hence and vacuum will continue in same level, phase and rhythm. The timer will count up from your previously entered pumping time.
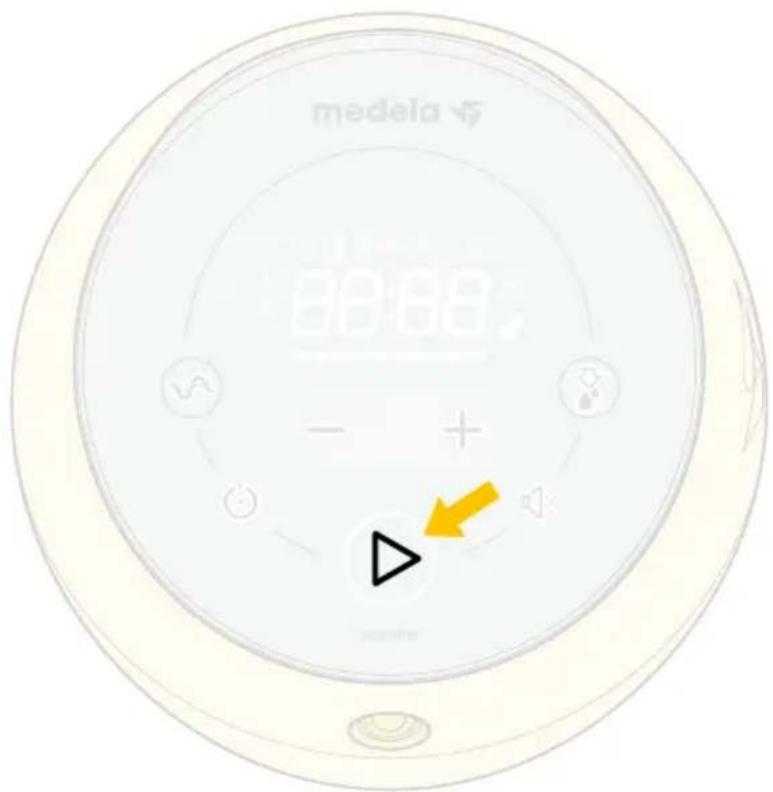
Pausing Your Breast Pump
Your breast pump has the ability to briefly pause during your pumping session. This allows you to readjust yourself or your breast pump pieces, or attend to your surroundings.
To pause your breast pump:
-
Press the start/stop ▶ button. Vacuum will stop and time on the display will flash. Start/stop icon on display will flash.
-
When ready to resume your session, press start/stop button.

Note
- If pumping is not resumed within two minutes, the breast pump will end your session. To resume pumping, you will need to start a new session.
- If you need to pause for more than two minutes, we recommend restarting in Stimulation Phase.
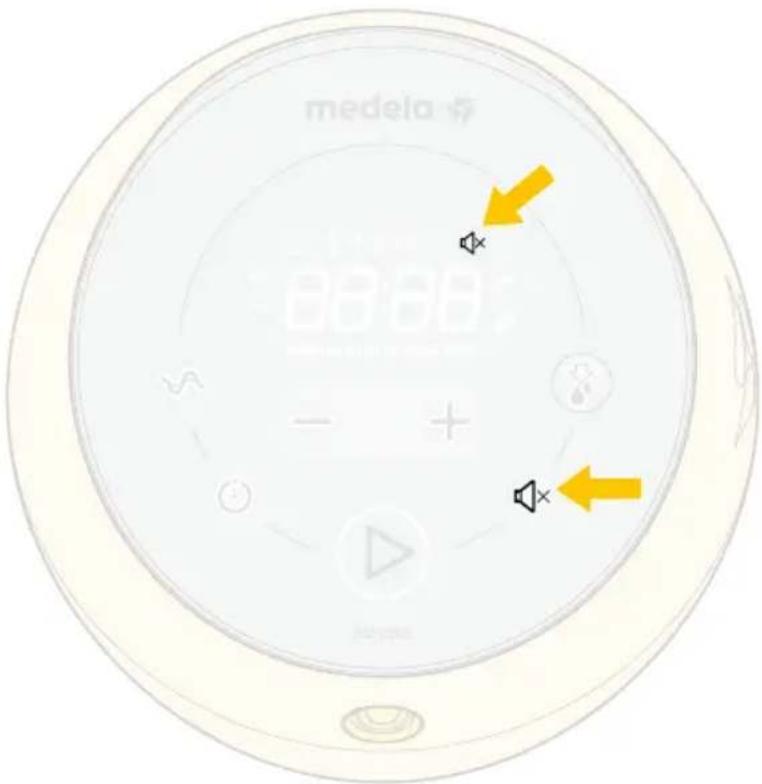
Silencing Your Breast Pump Chimes
Your breast pump is equipped to provide sound notifications, such as button presses, during your pumping sessions.
To silence your breast pump chimes:
-
Push the Silence control button.
-
Your breast pump will remember your setting for future sessions. To reactivate the sound feature, push the button again.

Note
When the breast pump chimes are turned off, the sound 📄con will appear on the display screen.
Storing Breast Milk in a Medela Cooler Bag
- Your Medela cooler bag requires one Medela contoured ice pack. Up to four 5 oz/150 mL bottles of breast milk will stay cool for up to 10 hours in a room temperature environment inside your pump bag. Up to four 5 oz/150 mL bottles of breast milk will stay cool for up to 8 hours in a room temperature environment, inside the cooler, stored outside of the pump bag.
- As soon as you are finished pumping, place the breast milk bottle or breast milk storage bag in the cooler bag with the ice pack.
- Transfer breast milk bottles or breast milk storage bags to the refrigerator or freezer once you are home.
| Storage Guidelines for Freshly Expressed Breast Milk(For Healthy Term Babies) | |||
| Room Temperature60°F to 77°F(16°C to 25°C) | Refrigerator39°F (4°C)or colder | Freezer0°F (-18°C)or colder | Breast Milk Thawed in the Refrigerator |
| Up to 4 hours is best*Up to 6 hours for milk expressed under very clean conditions | Up to 3 days is best*Up to 5 days for milk expressed under very clean conditions | Up to 6 months is best*Up to 9 months for milk expressed under very clean conditions | At room temperature: Up to 2 hoursRefrigerator: Up to 24 hoursDO NOT REFREEZE |
References: www.BreastmilkGuidelines.com
Preparing Breast Milk

Caution
- Do not thaw frozen breast milk in a microwave or in a pan of boiling water.
- Do not microwave breast milk. Microwaving can cause severe burns to baby's mouth from hot spots that develop in the milk during microwaving. (Microwaving can also change the composition of breast milk.)
- Thaw breast milk overnight in the refrigerator. Thawed breast milk is safe in the refrigerator for 24 hours. Do not refreeze thawed breast milk.
- Quickly thaw breast milk by holding the bottle or bag under warm running water.
- Place the sealed bottle or bag in a bowl of warm water for 20-minutes to bring it to body temperature.
- If you are adding expressed breast milk to a container of already frozen breast milk, make sure to add a lesser amount than the already frozen amount.
Feeding Breast Milk
It is recommended that breastfeeding is well established prior to bottle feeding your baby.
- Always inspect the bottle, nipple and other components immediately before and after each use. If nipple appears cracked or torn, discontinue use immediately.
- To prevent possible choking hazard, test strength of nipple by pulling on bulb portion of the nipple.
- Do not attempt to enlarge the nipple hole.
- Infants must not be bottle fed without adult supervision.
- Nipple should not be used as a pacifier.
For additional breast milk collection & storage information, please visit www.BreastmilkGuidelines.com.
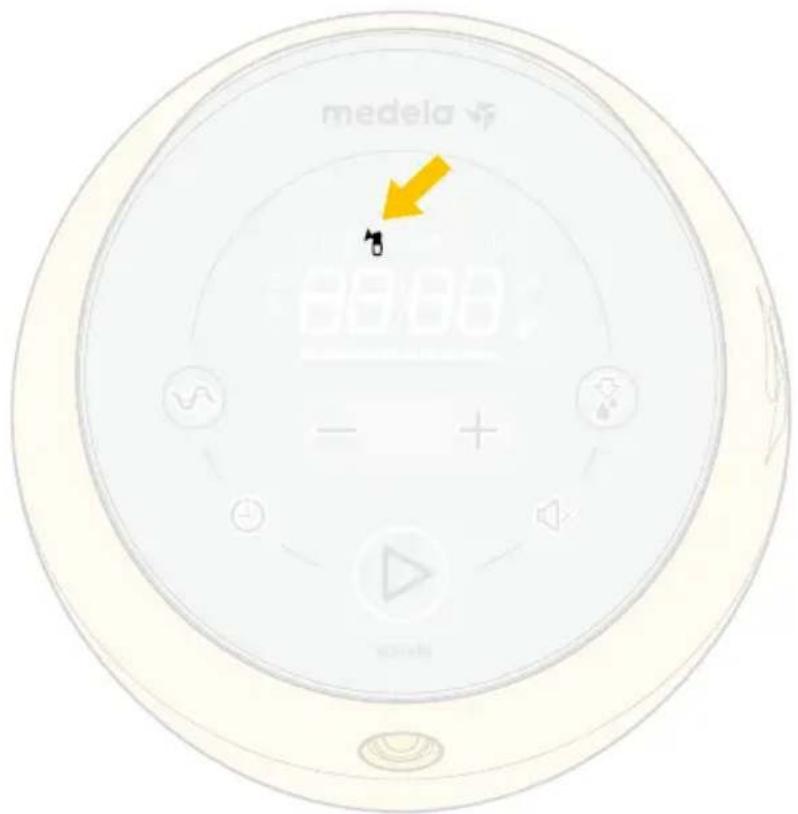
Air Leak Alert
There is an air leak in your system and vacuum is not operating at optimal performance. During this time, the breast pump will continue to run, but an alert icon will appear on the display and a chime will sound every 30 seconds until the correction has been made.
- Verify that the kit connections are properly assembled.
• Make sure the breast shields are secure to your breasts. - Check that the tubing connection between the breast pump and kit is secure.
- If you still have issues after following these steps, please call Medela Customer Service at 1-800-435-8316 for further assistance.

Note
There is no need to turn off your breast pump. The alert "ion will disappear once your breast pump detects that the error has been fixed. In order to do this, the breast pump must be running.
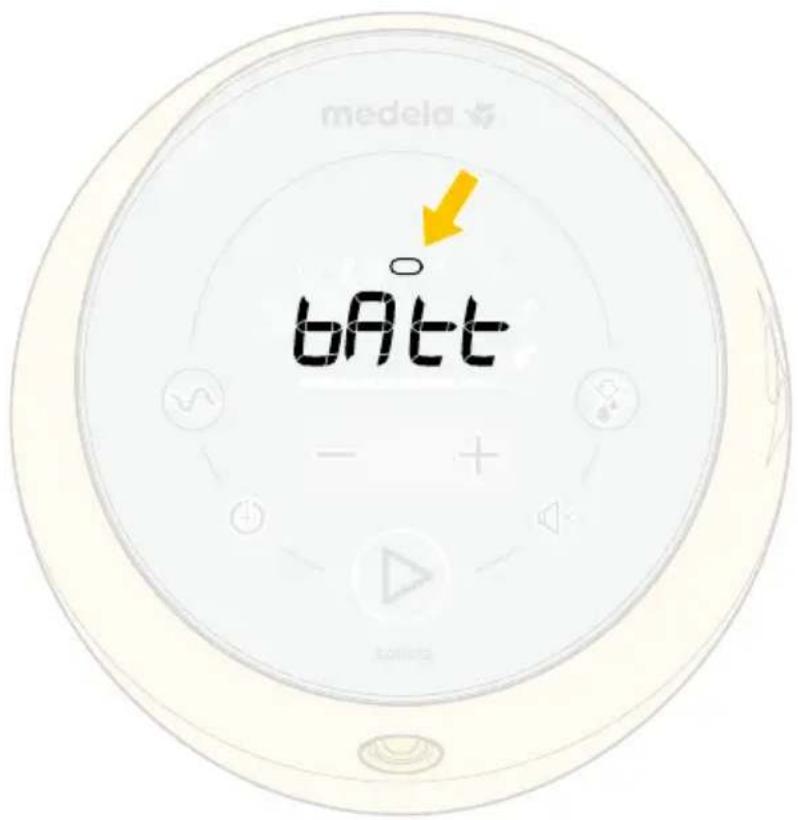
Battery Drained
If bAtt appears on the screen with an empty battery cell, the battery is too drained to start a vacuum.
To recover:
- Plug your breast pump into an external power source.
- Fully charge the battery for 12 hours.
16. Troubleshooting (cont.)
38
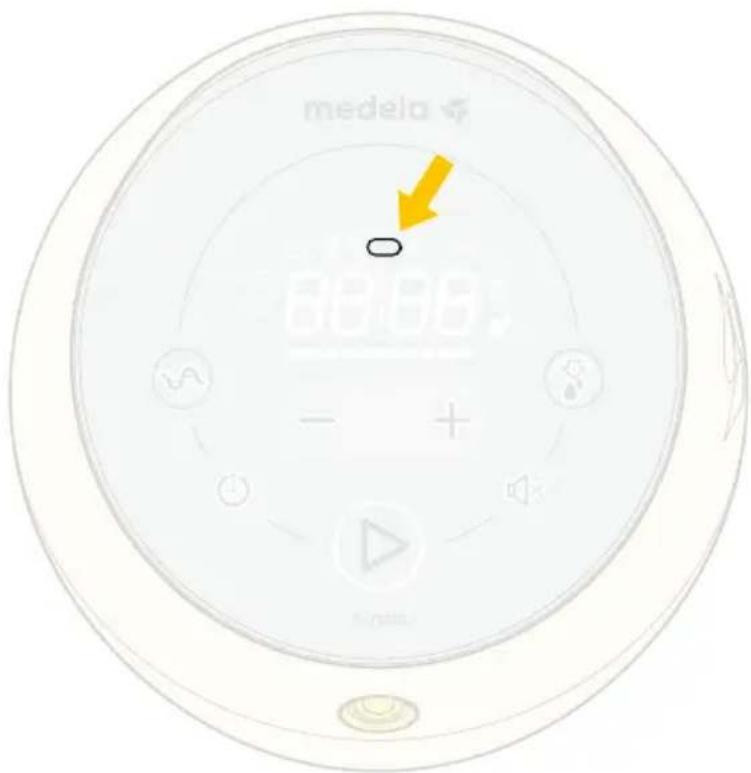
Battery Broken
If the battery icon is empty and flashing, your battery is broken. The battery cannot be serviced or replaced. Please call Customer Service at 1-800-435-8316 for replacement options.
To continue pumping:
Plug your breast pump into an external power source to use.

Note
If your battery is broken, your breast pump will no longer be able to charge or run on battery power.
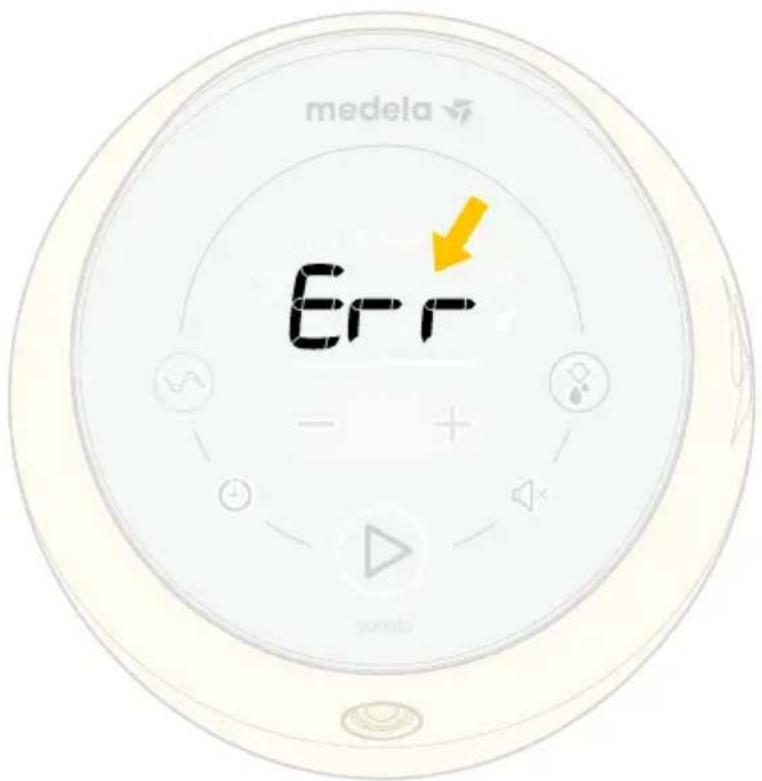
Bluetooth® Broken
If Err flashes on your breast pump for three seconds it means the Bluetooth ^ connection is broken and the breast pump or mobile device are unable to complete data transmission. This will not impact the ability to pump with Sonata, only the ability to transfer data to the Medela Family ^TM app. Please call Customer Service at 1-800-435-8316 for assistance.
16. Troubleshooting (cont.)
40
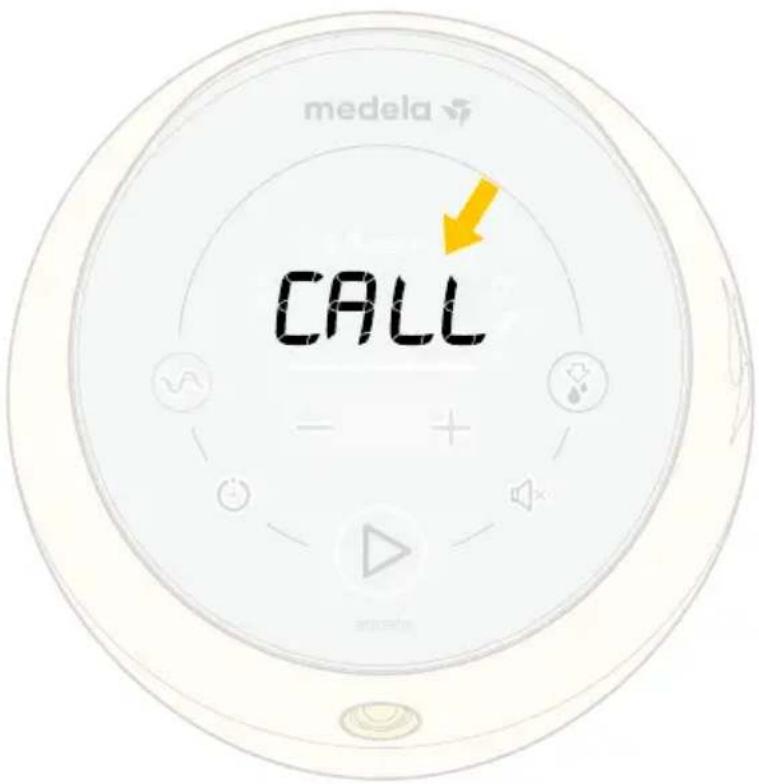
General Alert
Pump is not operable in this condition. Please contact Medela Customer Service at 1-800-435-8316 for assistance.
Additional Troubleshooting
| If your breast pump is not responding as expected | To reset your device, plug Sonata into external power and press and hold the power button (on the back) for up to 10 seconds or until the pump display flashes. If there is no change contact Medela Customer Service at 1-800-435-8316. |
| If breast pump does not power on | Check that the breast pump is plugged into a working electric outlet.If there is no power, display does not light up, and there is no error alert appearing on screen, contact Medela Customer Service at 1-800-435-8316. |
| If breast pump does not run after pushing the start/stop button | Make sure you've powered on the breast pump.Make sure breast pump is plugged in and/ or charged.For more information, refer to General Alert (Section 16). |
| If breast pump exterior gets wet | Unplug from power source and power off and discontinue use.Dry off the exterior of the breast pump. |
| If breast pump is submerged in water | Unplug from power source, power off and discontinue use.Contact Medela Customer Service at 1-800-435-8316. |
| If there is low or no suction | Check that all of the breast pump and kit connections are secure.Disassemble the double-pumping kit and check that all pieces are clean and not damaged.Assemble the pump set as directed in Assembling your Breast Pump (Section 9).While pumping, make sure the breast shields form a complete seal around the breast.When single pumping, check that the unused end is correctly stored in the tubing holder.If suction does not improve after following these steps, contact Medela Customer Service at 1-800-435-8316. |
| If there is a breast milk overflow | Turn off the breast pump and unplug the power cord from the electrical outlet.Use a damp (not wet) cloth to wipe the breast pump.If there is milk in the tubing: Remove tubing from the pump unit as well as breast shield assembly. Clean as directed in Section 6.When all components are dry, reassemble. |
| No "let-down" or breast milk expression | Ensure your breast pump kit is assembled correctly and suction is available.Relax and take a 10-15 minute break if let-down is not achieved after two consecutive pumping sessions.Consult with a health care or lactation professional if expression does not occur. |
| Data cannot be sent | The Bluetooth® function on the mobile device is turned off. Turn on the Bluetooth® function and try sending data again.Pairing between the two devices has not been completed. Perform pairing instructions again. Refer to "How do I pair my Sonata Breast Pump with my mobile device?" in Section 13.The mobile device is too far away from the breast pump. Move the device and breast pump closer together.The application on the mobile device is not ready. Check the application.If the Err symbol appears after checking the application, contact Customer Service at 1-800-435-8316. |
If you have not resolved the problem with your breast pump or you have further questions, please contact Medela Customer Service at 1-800-435-8316 or fill out the Contact Us form at www.medelabreastfeedingus.com | www.medela.ca.
17. Long-term Storage
Your breast pump contains a rechargeable battery. To preserve your breast pump, when not in use for an extended amount of time, it will automatically transition into storage mode.
To remove from storage mode, plug your breast pump into an external power source and fully charge the battery for up to 12 hours.
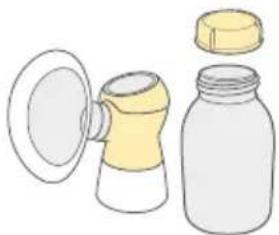
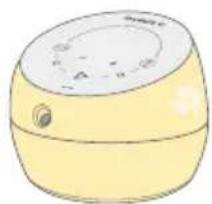
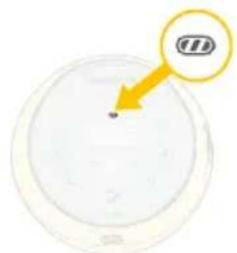
√ Before storing your breast pump for an extended amount of time remember to:
natural_image
Illustration of a baby bottle with a lid, another bottle with a yellow cap, and a white cap with a yellow cap (no text or symbols)
Clean breast pump kit (Section 5)
natural_image
Illustration of a yellow spherical object with a circular top and small protrusions (no text or symbols)
Clean breast pump (Section 6)
natural_image
Circular object with a small dot and a yellow arrow pointing to it, no visible text or symbols.
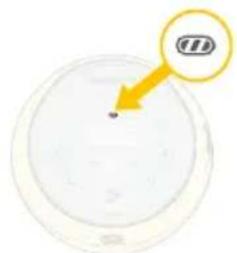
Make sure breast
pump battery is
fully-charged
Disposal
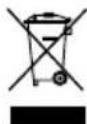
The symbol on the product or its packaging indicates that this product must not be disposed of with your other household waste. Instead, it is your responsibility to dispose of your waste equipment by handing it over to a designated collection point for the recycling of waste electrical and electronic equipment. The separate collection and recycling of your waste equipment at the time of disposal will help conserve natural resources and ensure that it is recycled in a manner that protects human health and the environment. for more information about where you can drop off your waste for recycling, please contact your local authority, or where you purchased your product.
Recycle your breast pump

Through the Medela Recycles program, Medela LLC. provides customers the option to recycle their breast pump after they have finished their breast milk feeding journey. For information on how to recycle your pump, visit www.MedelaRecycles.com.
This program is currently only available to U.S. residents. We only accept the return of electric breast pumps. All other breast pump kit components (connectors, breast shields, tubing, bottles, valves, membranes, and cooling elements) can be disposed of in your waste management recycling container at your home. Cooler bags and other soft-good items are not recyclable.
19. Supplemental Information
Supplemental Information
Following are some common breastfeeding-related conditions. If you experience any of these symptoms, contact a healthcare professional or lactation professional.
| Symptom Potential Causes | ||
| Engorgement | Breasts are hard and uncomfortable, possibly with reddened areas. | Milk not draining properly from breast. Milk can drain back into the tissue causing areas to swell and become tender. |
| Blocked/Plugged Ducts | Area of breast will look reddened and may be tender to touch. | Milk not being drained from a specific duct. The area becomes “clogged” up and milk is then prevented from flowing. |
| Mastitis | Often follows engorgement but can just occur suddenly. The initial symptoms are similar to flu – fatigue, headache and muscle aches, fever and localized breast tenderness. It can be in one or both breasts and needs immediate treatment. | A bacterial infection in the breast tissue which is often accompanied by cracked nipples. |
| A Healthcare Professional or Lactation Professional can give you guidance in breastfeeding your baby and using a breast pump. Their guidance is valuable in terms of the lifetime of health benefits for both you and your baby. A listing of lactation professionals are available at www.medelalocator.com or calling 1-800-TELL-YOU (1-800-835-5968). | ||
This product is warranted by Medela to the original retail purchaser to be free from defects in material and workmanship for the period of one year for pump mechanism (90 days for parts and detachable components) from the date of purchase. Warranty can only be claimed in the country of purchase and will be void if the product was not authorized to be sold by Medela in that country. In the event of a defect, Medela will repair or, at Medela's option, replace this product, without charge for such replacement, parts or labor. Purchaser shall bear all expense for returning this product to Medela. This warranty does not apply to any product used commercially or which has been subjected to misuse, abuse or alteration.
ANY AND ALL IMPLIED WARRANTIES, INCLUDING THE WARRANTY OF MERCHANTABILITY, ARE LIMITED TO A DURATION OF 1 YEAR FROM DATE OF PURCHASE. SOME AREAS DO NOT ALLOW LIMITATIONS ON THE DURATION OF AN IMPLIED WARRANTY OR EXCLUSIONS OF AN IMPLIED WARRANTY, SO THE ABOVE LIMITATIONS MAY NOT APPLY TO YOU. THIS WARRANTY GIVES YOU SPECIFIC LEGAL RIGHTS AND YOU MAY ALSO HAVE OTHER RIGHTS WHICH VARY FROM STATE TO STATE OR IN YOUR COUNTRY.
For questions regarding this warranty or instructions on making a warranty claim, please call Medela Customer Service (toll free) at 1-800-435-8316. All returns must be sent with a Return Authorization Number from Medela, with your dated bill of sale or other proof of purchase and a brief statement of the problem to the following address:
Medela LLC – Returns, Door 4501
1101 Corporate Dr.
McHenry, IL 60050
ATTENTION: RETURNS
Medela Canada
4160 Sladeview Crescent Unit #8
Mississauga, ON L5L 0A1
ATTENTION: RETURNS
info@medela.ca
Contact Customer Service for a return authorization number. Returns are not accepted without an authorization number.
We recommend recording your serial number here when you first open your pump for easy reference when contacting Medela Customer Service.
Your serial number can be found on the sticker on the bottom of the breast pump.
SERIAL NUMBER:
Glossary of Symbols

On/off
08:00
Session duration

Refer to Operating Instructions for important safety information, failure to follow instructions could place operator at risk. (when shown on the product this symbol is blue)

This symbol indicates the manufacturer.

This symbol indicates do not dispose the device together with unsorted municipal waste (in accordance with local regulations).

This symbol indicates compliance with international requirements for protection from electric shock. (Type BF applied parts.)
IP21
This symbol indicates the protection against entrance of solid foreign objects and against harmful effects due to the entrance of water.

This symbol indicates the date of manufacture (four digits for the year and two digits for the month).

This symbol indicates Class II.

This symbol indicates that the power adaptor is for indoor use only.

Classified by UL according to the standards ANSI/AAMI ES60601-1 (2005) + AMD 1 (2012), CAN/CSA-C22.2 No. 60601-1 (2014), IEC 60601-1-6:2010 + AMD1(2013), IEC 62366:2007 + AMD1(2014) and IEC 60601-1-11:2015

This symbol indicates alternating current.

This symbol indicates direct current.

Symbol showing that the manufacturer has taken all necessary measures to ensure that the product complies with the applicable safety legislation for distribution within the European Community. This symbol only applies to the power adaptor.
Bluetooth
This device contains Bluetooth® wireless technology. "The Bluetooth® word mark and logos are registered trademarks owned by Bluetooth SIG, Inc., and any use of such marks by Medela LLC. is under license. Other trademarks and trade names are those of their respective owners".

Warning sign (when shown on product this symbol is yellow)

UL Recognized Component.

Keep Dry.

Certification mark on electronic products manufactured or sold in the United States which certifies that the electromagnetic interference from the device is under limits approved by the Federal Communications Commission.
22. EMC/Technical Description
The breast pump needs special precautions regarding EMC and needs to be installed and put into service according to the EMC information provided in the instructions for use. Portable and mobile RF communications can affect the breast pump.

Note
This equipment has been tested and found to comply with the limits for a Class B digital device, pursuant to part 15 of the FCC Rules. These limits are designed to provide reasonable protection against harmful interference in a residential installation. This equipment generates, uses and can radiate radio frequency energy and, if not installed and used in accordance with the instructions, may cause harmful interference to radio communications. However, there is no guarantee that interference will not occur in a particular installation. If this equipment does cause harmful interference to radio or television reception, which can be determined by turning the equipment off and on, the user is encouraged to try to correct the interference by one or more of the following measures:
- Reorient or relocate the receiving antenna.
- Increase the separation between the equipment and receiver.
- Connect the equipment into an outlet on a circuit different from that to which the receiver is connected.
- Consult the dealer or an experienced radio/TV technician for help.
Guidance and manufacturer's declaration – electromagnetic emissions
This breast pump is intended for use in the electromagnetic environment specified below. The customer or the user of the breast pump should assure that it is used in such an environment.
| Emission tests Compliance | Electromagnetic environment – guidance | |
| RF EmissionsCISPR 11 | Group 1 | The breast pump uses RF energy only for its internal function. Therefore, its RF emissions are very low and are not likely to cause any interference in nearby electronic equipment. |
| RF emissions | Class B | The breast pump is suitable for use in all establishments, including domestic establishments and those directly connected to the public low-voltage power supply network that supplies buildings used for domestic purposes. |
| Harmonic emissionsIEC 61000-3-2 | Class A | |
| Voltage fluctuations/flicker emissionsIEC 61000-3-3 | Pst < 1.0 | |

Warning
Warning – This breast pump should not be used adjacent to or stacked with other equipment. If adjacent or stacked use is necessary, this breast pump should be observed to verify normal operation in the configuration in which it will be used.
Guidance and manufacturer's declaration – electromagnetic immunity
This breast pump is intended for use in the electromagnetic environment specified below. The customer or the user of the breast pump should assure that it is used in such an environment. The Sonata Breast Pump has no essential performance but was tested for immunity to electromagnetic disturbances and passed using the following criteria:
- No visible change in the operation of the breast pump.
- The breast pump changes settings but returns automatically to previous settings.
- The breast pump changes settings but can return to previous settings by intervention of the user.
- The breast pump changes settings but can return to previous settings by executing the INITIATION SEQUENCE.
INITIATION SEQUENCE: (The following sequence can be used to reset the device in the event of an EM Disturbance)
- Unplug the power cord from the back of the breast pump.
- Unplug the power adaptor from the wall outlet.
- Attach a breast pump kit to the pump port (if none is attached).
- Press and hold the power button for at least 30 seconds. (Note: The breast pump may cycle on/off several times. After 30 seconds the breast pump should remain off.)
- Plug the power adaptor back into the wall outlet.
- Plug the power cord into the back of the breast pump.
- Press the on/off switch to power on the breast pump.
- Press the 'PLAY' button to begin pumping.
| Immunity test | IEC 60601test level | Compliance level | Electromagnetic environment– guidance |
| Electrostatic discharge ( ESD )IEC 61000-4-2 | +/- 2kV, +/- 4kV,+/- 6 kV, +/- 8kVcontact discharge+/- 2kV, +/- 4kV,+/- 6 kV, +/- 8kV,+/- 15 kV air discharge | +/- 2kV, +/- 4kV,+/- 6 kV, +/- 8kVcontact discharge+/- 2kV, +/- 4kV,+/- 6 kV, +/- 8kV,+/- 15 kV air discharge | Floors should be wood, concrete or ceramic tile.If floors are covered with synthetic material, the relative humidity should be at least 30%. |
| Electrical fast transient/burstIEC 61000-4-4 | ± 2 kV100 kHz repetition frequency | ± 2 kV100 kHz repetition frequency | Mains power quality should be that of a typical commercial or hospital environment. |
| SurgeIEC 61000-4-5 | ± 0,5 kV, ± 1 kVLine-to-line | ± 0,5 kV, ± 1 kVLine-to-line | Mains power quality should be that of a typical commercial or hospital environment. |
| Voltage dips, short interruptions and voltage variations on power supply input linesIEC 61000-4-11 | 0 % UT ; 0,5 cycleAt 0°, 45°, 90°, 135°, 180°, 225°, 270°, and 315° | 0 % UT ; 0,5 cycleAt 0°, 45°, 90°, 135°, 180°, 225°, 270°, and 315° | Mains power quality should be that of a typical commercial or hospital environment. If the user of the breast pump requires continued operation during power mains interruptions, it is recommended that the breast pump be powered from an uninterruptible power supply or a battery. |
| Power frequency (50/60 Hz) magnetic fieldIEC 61000-4-8 | 30 A/m, 50 or 60 Hz 30 A/m, 50/60 Hz | It may be necessary to position the breast pump further from sources of power frequency magnetic fields or to install magnetic shielding. The power frequency magnetic field should be measured in the intended installation location to assure that it is sufficiently low. | |
| NOTE U_T is the a.c. mains voltage prior to application of the test level. | |||
Guidance and manufacturer's declaration – electromagnetic immunity
This breast pump is intended for use in the electromagnetic environment specified below. The customer or the user of the breast pump should assure that it is used in such an environment.
| Immunity test | IEC 60601test level | Compliancelevel | Electromagneticenvironment – guidance |
| Conducted RFIEC 61000-4-6 | 0,15 MHz – 80 MHz6 V in ISM andamateur radio bandsbetween 0,15 MHzand 80 MHz80% AM at 1 kHz | 6V3 V | Portable and mobile RF communications equipment should be used no closer to any part of the breast pump, including cables, than the recommended separation distance calculated from the equation applicable to the frequency of the transmitter.Recommend separation distanced = 1,2√Pd = 1,2√P 80 MHz - 800 MHzd = 2,3√P 800 MHz - 2.7 GHzWhere P is the maximum output power rating of the transmitter in watts (W) according to the transmitter manufacturer and d is the recommended separation distance in metres (m).Field strengths from fixed RF transmitters, as determined by an electromagnetic site survey, ^a should be less than the compliance level in each frequency range. ^b Interference may occur in the vicinity of equipment marked with the following symbol. |
| Radiated RFIEC 61000-4-3 | 10 V/m (minimum)80 MHz – 2,7 GHz80 % AM at 1 kHz | 10 V/m(minimum) |
Note 1 At 80 MHz and 800 MHz, the higher frequency range applies.
Note 2 These guidelines may not apply in all situations. Electromagnetic propagation is affected by absorption and reflection from structures, objects and people.
^a Field strengths from fixed transmitters, such as base stations for radio (cellular/cordless) telephones and land mobile radios, amateur radio, AM and FM radio broadcast and TV broadcast cannot be predicted theoretically with accuracy. To assess the electromagnetic environment due to fixed RF transmitters, an electromagnetic site survey should be considered. If the measured field strength in the location in which the breast pump is used exceeds the applicable RF compliance level above, the breast pump should be observed to verify normal operation. If abnormal performance is observed, additional measures may be necessary, such as re-orienting or relocating the breast pump.
^b Over the frequency range 150 kHz to 80 MHz, field strengths should be less than 10 V/m.
Recommended separation distances between portable and mobile RF communications equipment and the breast pump
This electric breast pump is intended for use in an electromagnetic environment in which radiated RF disturbances are controlled. The customer or the user of the electric breast pump can help prevent electromagnetic interference by maintaining a minimum distance between portable and mobile RF communications equipment (transmitters) and the electric breast pump as recommended below, according to the maximum output power of the communications equipment.
| Rated maximum output power of transmitter W | Separation distance according to frequency of transmitter m | ||
| 150 kHz to 80 MHz d = 1.2 | 80 MHz to 800 MHz d = 1.2 | 800 MHz to 2,7 GHz d = 2.3 | |
| 0,01 0,06 0,04 0,07 | |||
| 0,1 0,18 0,11 0,22 | |||
| 1 0,58 0,35 0,22 | |||
| 10 1,84 1,11 2,21 | |||
| 100 | 5,83 | 3,50 | 7,00 |
For transmitters rated at a maximum output power not listed above, the recommended separation distance d in metres (m) can be estimated using the equation applicable to the frequency of the transmitter, where P is the maximum output power rating of the transmitter in watts (W) according to the transmitter manufacturer.
Note 1 At 80 MHz and 800 MHz, the separation distance for the higher frequency range applies.
Note 2 These guidelines may not apply in all situations. Electromagnetic propagation is affected by absorption and reflection from structures, objects, and people.
WARNING: Portable RF communications equipment (including peripherals such as antenna cables and external antennas) should be used no closer than 30 cm (12 inches) to any part of the breast pump including cables specified by the manufacturer. Otherwise, degradation of the performance of this equipment could result.
23. Technical Specifications
Technical Specifications
Vacuum Range
-50...-250 mmHg
54 ... 120 cpm
Power In/Power Out
| In Out | |
| 100-240V~ 50/60 Hz | 12V1.5A --- |
Battery Capacity and Type
7.26 V, 2750 mAh
Li-Ion
Size
160×160×120
Weight
1.1 kg
Bluetooth ^® RF Output Power 0dBm (class 3)
Frequency band 2379–2496 MHz Frequency
hopping spread spectrum per Bluetooth®4.0
Core Specification.

Operation Temperature
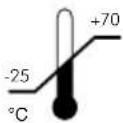
Transport/Storage Temperature
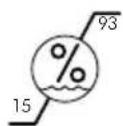
Operation Humidity
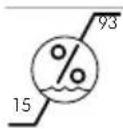
Transport/Storage Humidity
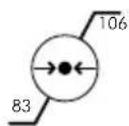
Ambient Pressure
kPa
natural_image
Illustration of a yellow object with a hand holding a knob, enclosed in a circular frame (no text or symbols)natural_image
Simple line drawing of a human ear with a yellow arrow indicating direction (no text or symbols)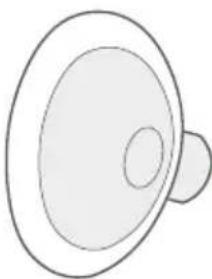
natural_image
Simple line drawing of a speaker with no text or symbols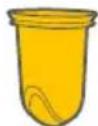




natural_image
Illustration of a bathtub filled with bubbles and bottles, accompanied by a clock showing 5 o'clock (no text or symbols on the main subject)natural_image
Illustration of a supermarket basket with a gift box, calculator, and a star-shaped arrow indicating flow (no text or symbols)natural_image
Illustration of a cooking pot with ingredients being heated by a stove, accompanied by a clock showing 10 o'clock (no text or symbols on the main image)natural_image
Illustration of a hand inserting a medical device into a yellow anatomical structure (no text or symbols)natural_image
Illustration of a hand using a tool to adjust or install a component, with no visible text or symbols.natural_image
Illustration of a hand holding a tool with a water droplet inside, no text or symbols presentnatural_image
Illustration of a hand holding a small object with water droplets, no text or symbols present
Consejo
natural_image
Illustration of a yellow mechanical component with a downward arrow indicating motion (no text or symbols)natural_image
Illustration of a hand holding a small object with an arrow indicating motion (no text or symbols)natural_image
Illustration of a yellow plastic device with a downward arrow indicating compression or disassembly (no text or symbols)natural_image
Illustration of a bottle being folded with a yellow object, no text or symbols presentnatural_image
Illustration of a yellow megaphone emitting sound waves from a white circular component, with a yellow arrow indicating sound direction (no text or symbols)natural_image
Illustration of a yellow medical device with two pump units and tubing (no text or symbols)natural_image
Diagram of a mechanical device with a yellow prohibition symbol (no text or labels)natural_image
Line drawings of medical or laboratory equipment components including a device, tubing, and a tool (no text or symbols)
Advertencia
natural_image
Medical illustration showing a hand holding a medical device with tubing and a yellow component, no text or symbols present.natural_image
Illustration of a person holding two medical devices with tubing, no text or symbols presentnatural_image
Illustration of a hand inserting a needle into a yellow container with a small mouth (no text or symbols)natural_image
Illustration of a hand inserting a medical device into a yellow anatomical structure (no text or symbols)natural_image
Illustration of a baby bottle with a lid, another bottle with a yellow cap, and a white cap partially open (no text or symbols)
natural_image
Illustration of a yellow cylindrical device with a circular top and small protrusions (no text or symbols)
natural_image
Circular object with a small dot and a yellow arrow pointing to it, no visible text or symbols.
natural_image
Illustration of a yellow object with a hand holding it, no text or symbols presentnatural_image
Simple line drawing of a human ear with a yellow arrow indicating direction (no text or symbols)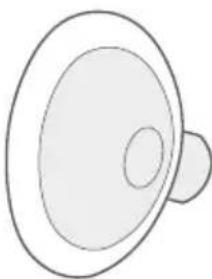
natural_image
Simple line drawing of a speaker with no text or symbols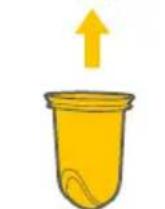


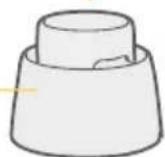


natural_image
Illustration of a bathtub filled with bubbles and small items, accompanied by a clock showing 5 (no text or symbols on the main subject)natural_image
Diagram of a supermarket drawer with a refrigerator and mobile phone, showing a shopping cart inside (no text or symbols)natural_image
Illustration of a cooking pot with ingredients being heated, accompanied by a clock showing 10 o'clock (no text or symbols on the pot itself)6B. Entretien de la tubulure
natural_image
Illustration of a hand inserting a medical device into a yellow liquid container (no text or symbols)natural_image
Illustration of a hand using a tool to adjust or install a component, with an arrow indicating direction (no text or symbols present)Retirez la tubulure de la téterelle.
natural_image
Illustration of a hand holding a tool with a yellow object, pouring liquid from a water tap (no text or symbols)natural_image
Illustration of a hand holding a small object with water droplets, no text or symbols present
Astuce
natural_image
Illustration of a yellow mechanical component with a downward arrow indicating motion (no text or symbols)natural_image
Illustration of a hand holding a tool over a mechanical component, with an arrow indicating motion (no text or symbols)natural_image
Illustration of a yellow plastic component being inserted into a cylindrical housing, with a yellow arrow indicating downward motion (no text or symbols)natural_image
Illustration of a bottle being folded with a yellow object, no text or symbols presentnatural_image
Illustration of a yellow megaphone emitting a light bulb, with a yellow arrow indicating direction (no text or symbols)natural_image
Illustration of a yellow breast pump device with attached tubing and two white earbuds (no text or symbols)natural_image
Diagram of a mechanical or electrical component with a yellow prohibition symbol (no text or labels)natural_image
Line drawings of electrical components including a plug, coiled wires, a microphone, and a hand holding a small object (no text or symbols)
Avertissement
natural_image
Medical illustration showing a hand holding a catheter connected to a patient's arm (no text or symbols present)natural_image
Illustration of a hand inserting a needle into a yellow container with a small mouth (no text or symbols)natural_image
Illustration of a hand inserting a medical device into a yellow anatomical structure (no text or symbols)natural_image
Illustration of a baby bottle with a yellow cap and a white cap, alongside a yellow cap with a lid (no text or symbols)Nettoyer l'ensemble-accessoires de tire-lait (Section 5)
natural_image
Illustration of a yellow cylindrical device with a circular top and small knob (no text or symbols)Nettoyer le tire-lait (Section 6)
natural_image
Circular object with a small dot and a yellow arrow pointing to it, no visible text or symbols.8-4160 SLADEVIEW CRESCENT,
MISSISSAUGA, ONTARIO, L5L 0A1
ATTENTION : RETOURS
Medela Canada
4160 Sladeview Crescent Unit # 8
Mississauga, ON L5L 0A1
ATTENTION : RETOURS
info@medela.ca
22. CEM/description technique (suite)
Manufactured and Assembled by Medela LLC
1101 Corporate Drive
McHenry, IL 60050, USA
(800) 435-8316 / (815) 363-1166
customer.service@medela.com
www.medelabreastfeedingus.com
Distributedby
Medela Canada, Inc.
4160 Sladeview Crescent, #8
Mississauga, ON, L5L 0A1
(800) 435-8316 / (905) 608-7272
info@medela.ca
www.medela.ca
Content appearance may vary from pictures.
Medela wordmark and logo, Sonata, Symphony, 2-Phase Expression, Medela Family and Easy Expression are registered in the U.S. Patent and Trademark Office. Mother's Milk, Everyday Amazing, Responsive Pump Technology, Quick Clean, Micro-Steam, Maximum Comfort Vacuum, PersonalFit and PersonalFit Flex are trademarks of Medela. The Bluetooth® word mark and logos are registered trademarks owned by Bluetooth SIG, Inc. and any use of such marks by Medela is under license.
iOS is a trademark of Cisco in the U.S. and other countries. Medela is not affiliated with Cisco. Android is a trademark of Google Inc. Medela is not affiliated with Google.

- READ ALL INSTRUCTIONS BEFORE USING THIS PRODUCT.
- WARNING: To avoid fire, electrocution, or serious burns:
- WARNING: To avoid health risk and reduce the risk of injury:
- CAUTION: Can lead to minor injury:
- Note
- Indications for use
- Contraindications for use
- Tip
- Product Description
- PLEASE SAVE THESE INSTRUCTIONS. THIS IS A SINGLE-USER PRODUCT.
- Product Description
- Parts to clean
- Cleaning Overview
- Cleaning Instructions
- Supplies needed:
- Parts to wash or sanitize:
- Caution
- Disassemble
- Wash
- OR
- Dishwasher
- Sanitize
- StovetopSink/clean wash basin
- Microwave
- Breast Pump & Tubing Care
- Parts needed:
- 6A. Cleaning the Breast Pump
- Warning
- 6B. Tubing Care
- Common pumping questions & answers
- How often should you breast pump?
- How long should your pumping session last?
- How should your breasts feel before and after pumping?
- Medela's PersonalFit™ and PersonalFit Flex™ sizing
- Test your breast shield size
- Should you try a new size?
- Assembling Your Breast Pump
- 10A. Charging the Breast Pump
- Power AdaptorRechargeable Battery
- 10B. Battery Care & Status Codes
- Powering Your Breast Pump (cont.)
- 10C. Power Adaptor Care
- 10D. Traveling Outside of Your Country
- Operating Your Breast Pump (cont.)
- 11B. Single Pumping
- 11C. Double Pumping
- 11D. Pumping Steps
- T Tip
- Finding Your Maximum Comfort Vacuum™
- Breast Pump Connectivity
- How do I connect (pair) my Sonata Breast Pump with my mobile device?
- Saving your pumping session in Medela Family™ app
- How do I remove my Sonata breast pump from my mobile device?
- Selecting a Rhythm
- Setting the Session Timer
- To set your count-down timer:
- Pausing Your Breast Pump
- To pause your breast pump:
- Silencing Your Breast Pump Chimes
- To silence your breast pump chimes:
- Storing Breast Milk in a Medela Cooler Bag
- Preparing Breast Milk
- Feeding Breast Milk
- Air Leak Alert
- Battery Drained
- To recover:
- Troubleshooting (cont.)
- Battery Broken
- To continue pumping:
- Bluetooth® Broken
- General Alert
- Long-term Storage
- √ Before storing your breast pump for an extended amount of time remember to:
- Disposal
- Recycle your breast pump
- Supplemental Information
- Supplemental Information
- Glossary of Symbols
- 08:00
- IP21
- Bluetooth
- EMC/Technical Description
- Guidance and manufacturer's declaration – electromagnetic emissions
- Guidance and manufacturer's declaration – electromagnetic immunity
- INITIATION SEQUENCE: (The following sequence can be used to reset the device in the event of an EM Disturbance)
- Recommended separation distances between portable and mobile RF communications equipment and the breast pump
- Technical Specifications
- Technical Specifications
- Consejo
- Advertencia
- 6B. Entretien de la tubulure
- Astuce
- Avertissement
- CEM/description technique (suite)
- Content appearance may vary from pictures.
Brand : MEDELA
Model : Sonata
Category : Breast pump