ProMax Pressure Cistern 6000/6 - Water pump OASE - Free user manual and instructions
Find the device manual for free ProMax Pressure Cistern 6000/6 OASE in PDF.

User questions about ProMax Pressure Cistern 6000/6 OASE
0 question about this device. Answer the ones you know or ask your own.
Ask a new question about this device
Download the instructions for your Water pump in PDF format for free! Find your manual ProMax Pressure Cistern 6000/6 - OASE and take your electronic device back in hand. On this page are published all the documents necessary for the use of your device. ProMax Pressure Cistern 6000/6 by OASE.
USER MANUAL ProMax Pressure Cistern 6000/6 OASE
natural_image
Black-and-white photo collage showing two scenes: one person tending to shrubs in a garden, the other handling a fire extinguisher outdoors.ProMax Pressure Cistern 6000/6
EN Operating instructions
FR Notice d'emploi
natural_image
Exterior view of a portable water dispenser with black and silver casing (no text or symbols visible)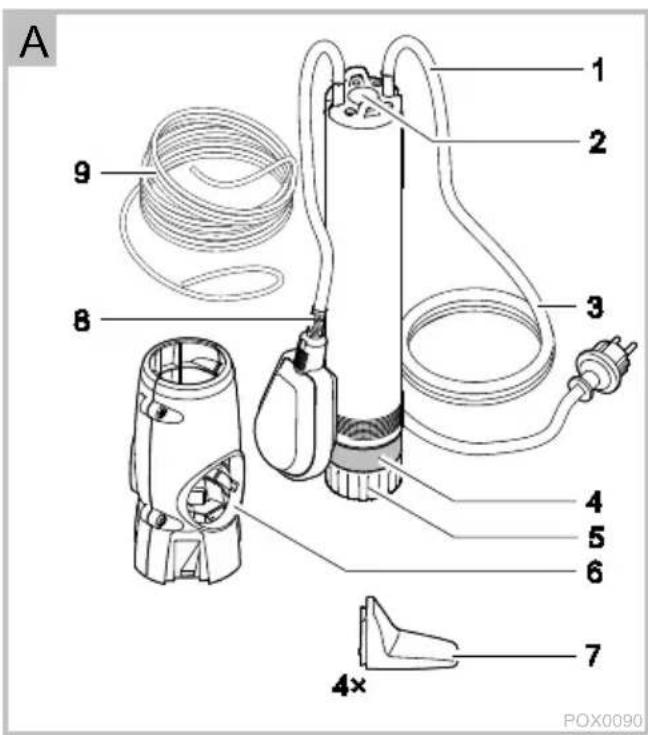
POX0093
E
POX0094
Translation of the original Operating Instructions

WARNING
- This unit can be used by children aged 8 and above and by persons with reduced physical, sensory or mental capabilities or lack of experience and knowledge if they are supervised or have been instructed on how to use the unit in a safe way and they understand the hazards involved.
- Do not allow children to play with the unit.
- Only allow children to carry out cleaning and user maintenance under supervision.
- Ensure that the unit is fused for a rated fault current of max. 30 mA by means of a fault current protection device.
- Only connect the unit if the electrical data of the unit and the power supply correspond. The unit data is to be found on the unit type plate, on the packaging or in this manual.
- Possible death or severe injury from electrocution! Before reaching into the water, always disconnect all units in
the water that have a voltage of >12 V AC or >30 V DC from the power supply.
- Only operate the unit if no persons are in the water.
- If a power connection cable is damaged, have it immediately replaced by OASE, an authorised customer service or a qualified electrician to prevent electric shock.
SAFETY INFORMATION
Electrical connection
- Extension cables and power distributors (e.g. outlet strips) must be suitable for outdoor use (splash-proof).
- Protect the plug connection from moisture.
- Only connect the unit to a correctly fitted socket.
Safe operation
- Never operate the unit if the housing is defective!
- Never operate the unit if an electrical cable is defective!
- Never carry or pull the unit by the electrical cable.
- Route cables such that they are protected from damage and do not present a tripping hazard.
- Never carry out technical changes to the unit.
- Only carry out work on the unit that is described in this manual. If problems cannot be overcome, please contact an authorised customer service point or, if in doubt, the manufacturer.
- Only use original spare parts and accessories for the unit.
INFORMATION ABOUT THIS OPERATING MANUAL
Welcome to OASE Living Water. You made a good choice with the purchase of this product ProMax Pressure Cistern 6000/6.
Prior to commissioning the unit, please read the instructions of use carefully and fully familiarise yourself with the unit. Ensure that all work on and with this unit is only carried out in accordance with these instructions.
Adhere to the safety information for the correct and safe use of the unit.
Keep these instructions in a safe place! Please also hand over the instructions when passing the unit on to a new owner.
Symbols used in these instructions Warnings
The warning information is categorised by signal words, which indicate the extent of the hazard.

WARNING
- Indicates a possibly hazardous situation.
- Non-observance may lead to death or serious injuries.

NOTE
Information for the purpose of clarification or for preventing possible damage to assets or to the environment.
Additional information
☐ A Reference to a figure, e.g. Fig. A.
→ Reference to another section.
PRODUCT DESCRIPTION
Overview
| ☐ A | ProMax Pressure Cistern 6000/6 |
| 1 | Fastening lugs for the rope |
| 2 | Connection, pressure side G1 |
| 3 | Power connection cable |
| 4 | Screen, suction side |
| 5 | Pump base |
| 6 | Foot |
| 7 | Mounting feet |
| 8 | Float switch |
| 9 | Fixing rope, 20 m |
Accessories
- OASE ProMax Garden Automatic Switch (44538) controls the pump during water withdrawal. The pump is switched on and off automatically.
- OASE ProMax Floating Intake (57772) changes the position of the pump intake. This prevents sand or dirt particles from being drawn into the pump.
Intended use
ProMax Pressure Cistern 6000/6, referred to as "unit", may only be used as specified in the following:
- For pumping clear water or rain water.
- For irrigating and watering.
- For pumping the water out of water butts/rain barrels or cisterns.
- Operate in accordance with instructions. (→ Technical data)
Possible incorrect use
The following restrictions apply to the unit:
- Not suitable for salt water.
- Not suitable for drinking water.
- Do not use for long-term operation (e.g. continuous recirculation of the water in a pond).
- Do not use for commercial or industrial purposes.
- Do not use in conjunction with chemicals, foodstuff, easily flammable or explosive substances.
- Do not connect to the drinking water supply.
INSTALLATION AND CONNECTION
The pump is only suitable for vertical installation. The float switch will not be able to switch unimpaired if the pump is installed horizontally.
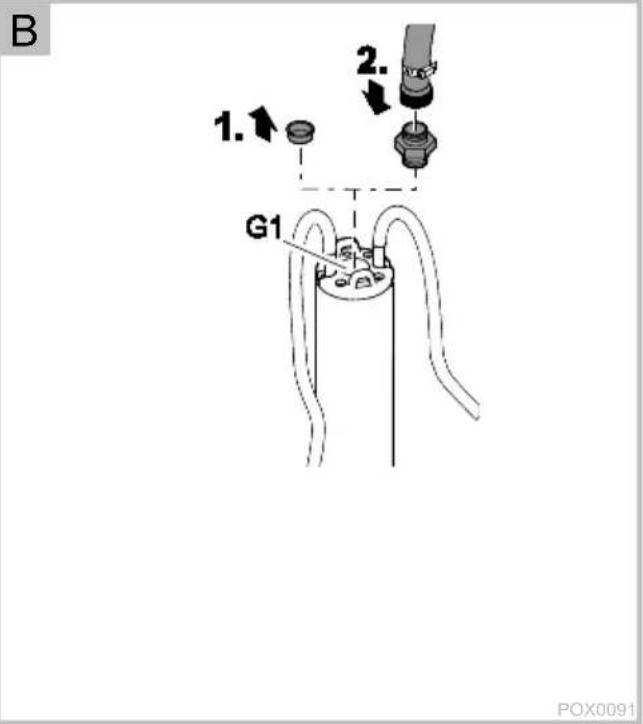
Connecting the pressure hose
An optimum flow rate is achieved with a hose inside diameter of 25 mm (1").
How to proceed:
□ B
- Remove the protection cap.
- Connect the pressure hose and adapter to the connection on the pressure side.
- Recommendation: Use a quick-release coupling.
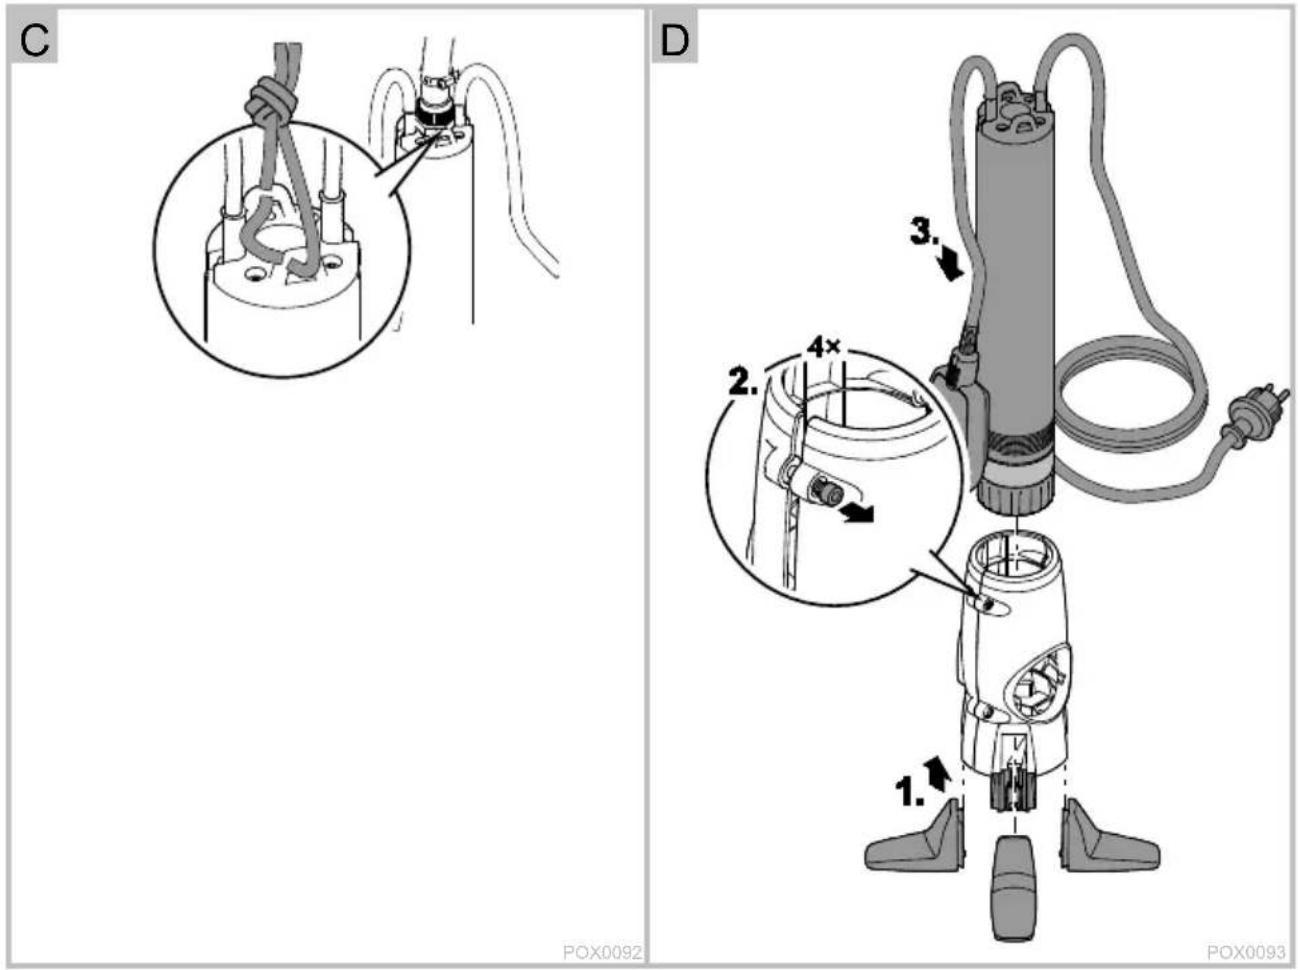
Installing the pump in a bored well or shaft
□ C
- Attach the fixing rope with a double knot to the lugs and lower the pump into the bored well or shaft.
- Use the fixing rope to fix the pump at a height of at least 1.5 m above the bottom of the well or shaft.
- This prevents it from drawing in dirt particles.
- Ensure that the screen on the suction side is at least 150 mm below the surface of the water.
- Do not carry the pump by its power connection cable.
- From a well or shaft depth of 5 m, fix the power connection cable to the fixing rope at a distance of 5 m from the pump (strain relief).
Vertical installation of the pump with the stand
The pump can be vertically installed with the stand in a tank or well.
- Ensure that the screen on the suction side is at least 150 mm below the surface of the water.
- If the water contains sand and/or is soiled, install the pump in a raised position or use ProMax Floating Intake (57772).
How to proceed:
□D
- Push the mounting feet onto the stand.
- Undo the Allen screws until the opening of the stand is wide enough to fit onto the pump.
- Push the pump into the stand.
- Tighten the Allen screws until the pump is fixed in the stand.
OPERATION
When the water level rises, it lifts the float switch until the switch-on point is reached and the pump switches on.
When the water level drops, the float switch lowers until the switch-off point is reached and the pump switches off.
- The integrated non-return valve prevents water from flowing back into the pump from the pressure hose when it is switched off. The non-return valve also prevents damage to the pump resulting from water hammer.
Automatic mode
The use of OASE ProMax Garden Automatic Switch allows automatic operation. When the connected appliance (water withdrawal) is opened, the pump switches on; when it is closed, the pump is switched off.
- The float switch of the pump serves as dry run protection. If there is not sufficient water, the float switch automatically switches off the pump.
Starting up the pump

WARNING
Dangerous electrical voltage!
Death or severe injury from electrocution.
- Only connect the pump to the power supply when there are no persons in or reaching into the water.
-
Before stepping into or reaching into the water, switch off all units located in the water.
-
Insert the power plug into the socket.
– The pump is ready for operation. - The pump will start up as soon as the level of the water reaches the switch-on height.

NOTE
If the water contains a large quantity of suspended sand (e.g. in the case of a new well), allow the pump to run at full flow rate for approx. 1 hour without interruption in order to pump out the water containing the sand. Otherwise the non-return valve could become blocked by sand being deposited in the pressure line.
Taking the pump out of operation
- Disconnect the power plug.
REMEDY OF FAULTS

WARNING
Dangerous electrical voltage!
Death or severe injury from electrocution.
Prior to starting work:
- Switch off the unit, disconnect the power plug and secure the unit from being switched on again.
- Before stepping into or reaching into the water, switch off all units located in the water.
On completion of the work: - Restore all the prerequisites for start-up.
| Malfunction | Cause | Remedy |
| Pump does not start. | Power supply interrupted | Check the fuse and electrical plug connections. |
| Pump switches off after a short running period. | Overload protection has switched the pump off due to overheating. | Clean the intakeAllow the pump to cool down. |
| The well has run dry. | Wait until there is sufficient water in the well. | |
| The pump is running but is not delivering, or the delivered quantity is insufficient | Pressure hose blocked | Route the pressure hose without kinks.Check the outlet and clean if necessary |
| Intake blocked | Clean the intake | |
| Air in the pressure hose | Expel the air from the pressure hose. | |
| If applicable:Non-return valve incorrectly fitted in the pressure hose or clogged | Correctly fit the non-return valve.Clean the non-return valve. | |
| The non-return valve is blocked with sand. | Clean the non-return valve. (→ Cleaning the non-return valve)If the pump still does not start up, contact OASE. | |
| Impeller defective or worn | Contact OASE.The impeller may only be replaced by the OASE Service. | |
| The impeller is clogged with sand. | Clean the non-return valve. (→ Cleaning the non-return valve)Flush the pump with sand-free water until allthe sand has been completely flushed out. If the pump still does not start up, contact OASE.- The impeller may only be replaced by the OASE Service. |
MAINTENANCE AND CLEANING

WARNING
Dangerous electrical voltage! Death or severe injury from electrocu- tion.
- Before reaching into the water, switch off the mains voltage of all units in the water.
- Isolate the unit (disconnect from the power supply) before carrying out any work on it.

NOTE
Recommendation on regular cleaning:
- Clean the unit as required but at least twice per year.
- Do not use aggressive cleaning agents or chemical solutions as they could attack the housing or impair the function of the unit.
- Recommended cleaning agent for removing stubborn limescale deposits:
- Pump cleaning agent PumpClean from OASE.
– Vinegar- and chlorine-free household cleaning agent. - After cleaning, thoroughly rinse all parts in clean water.
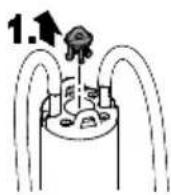
Cleaning the non-return valve
Sand can block the non-return valve of the pump so that it cannot close properly. The non-return valve has to be cleaned.
Prerequisite:
- The pressure hose and adapter have been dismantled.
How to proceed:
□E
- Carefully pull out the non-return valve with pliers.
- Thoroughly clean the non-return valve with clean water.
- Reassemble in the reverse order.
- Prior to installing, allow the pump to convey clear water for a few minutes (e.g. in a basin) to completely remove any sand residue. ( Installation and connection)
WEAR PARTS
The following components are wear parts and may only be replaced by the OASE Service.
- Impeller unit
STORAGE/OVERWINTERING
The unit is not frost proof. If the unit is installed in a frost-protected place, it does not need to be removed in case of minus temperatures. If the unit is not installed in a frost-protected place, it must be removed and stored if minus temperatures are expected.
How to correctly store the unit:
- Drain the unit as far as possible, clean thoroughly and check for damage.
- Empty all hoses, pipes and connections as far as possible.
- Thoroughly clean the unit, check it for damage and replace any damaged parts.
- Store the unit in a dry and frost-free place.
- Protect open plug connections from moisture and dirt.
DISPOSAL

NOTE
Do not dispose of this unit with domestic waste.
- Render the unit unusable beforehand by cutting the cables and dispose of the unit via the return system provided for this purpose.
SPARE PARTS
The use of original parts from OASE ensures continued safe and reliable operation of the unit.
Please visit our website for spare parts drawings and spare parts.

www.oase-livingwater.com/spareparts-di
TECHNICAL DATA
| ProMax Pressure Cistern 6000/6 | |||
| Rated voltage | V AC | 220-240 | |
| Rated frequency | Hz | 50 | |
| Rated power | W | 950 | |
| Protection type | - | IPX8 | |
| Connection, pressure socket | - | G1 | |
| Flow rate | Max. | l/h | 6000 |
| Head height | Max. | m | 45 |
| Immersion depth | Max. | m | 20 |
| Permissible quantity of sand in the water to be pumped | Max. | g/m^3 | 150 |
| Power connection cable | Length | m | 30 |
| Dimensions | Diameter | mm | 98 |
| Height | mm | 630 | |
| Weight | kg | 12 | |
AFVOER VAN HET AFGEDANKTE APPARAAT

OPMERKING
www.oase-livingwater.com/onderdelen-di
TECHNISCHE GEGEVENS
OPSTILLING OG TILSLUTNING
INSTALLATION OCH ANSLUTNING
www.oase-livingwater.com/nahradnidily-di
TECHNICKÉ ÚDAJE