Intense Pure Air Home PU6180 - Air purifier ROWENTA - Free user manual and instructions
Find the device manual for free Intense Pure Air Home PU6180 ROWENTA in PDF.

User questions about Intense Pure Air Home PU6180 ROWENTA
0 question about this device. Answer the ones you know or ask your own.
Ask a new question about this device
Download the instructions for your Air purifier in PDF format for free! Find your manual Intense Pure Air Home PU6180 - ROWENTA and take your electronic device back in hand. On this page are published all the documents necessary for the use of your device. Intense Pure Air Home PU6180 by ROWENTA.
USER MANUAL Intense Pure Air Home PU6180 ROWENTA
natural_image
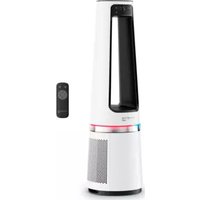
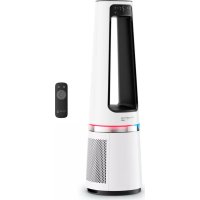
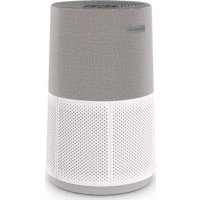
Exterior view of a white air purifier with digital display and control buttons (no visible text or symbols on the device body)INTENSE PURE AIR HOME
PU618X / PT618X
text_image
E F G H I J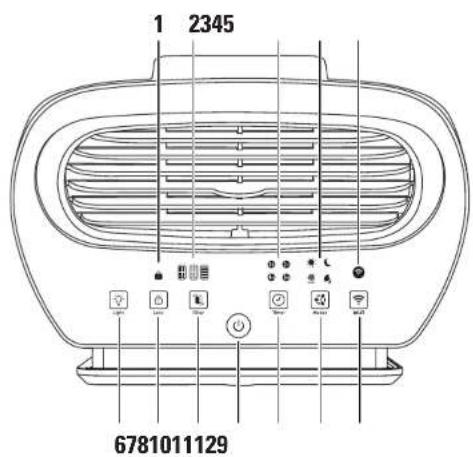
text_image
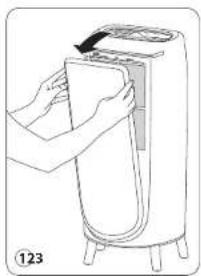
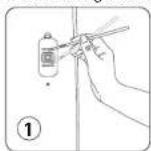
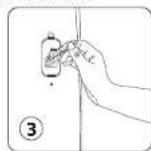
1 2345 6781011129DISASSEMBLING/REASSEMBLING FILTERS
natural_image
Line drawing of a hand holding a small electronic device next to a portable air conditioner unit (no text or symbols)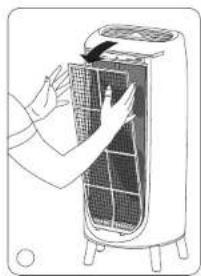
natural_image
Illustration of hands installing or adjusting a grid panel inside a portable air conditioner unit (no text or symbols visible)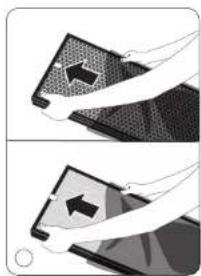
natural_image
Two-step diagram showing a device being processed, with no visible text or symbols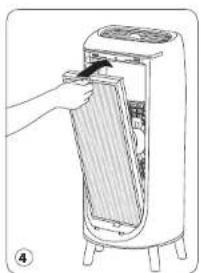
natural_image
Illustration of a hand inserting a fan into a portable air conditioner unit (no text or symbols visible)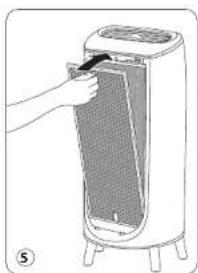
natural_image
Illustration of a hand inserting a component into a portable air conditioner unit (no text or symbols visible)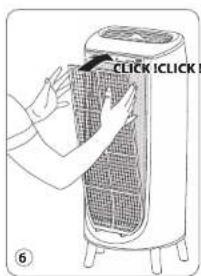
text_image
CLICK I CLICK! ⑥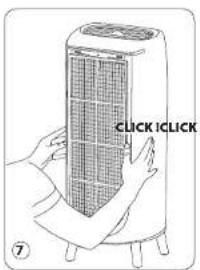
text_image
CLICK I CLICK ⑦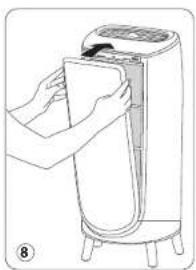
natural_image
Line drawing of a hand holding a cloth next to a vertical cylindrical device (no text or symbols)Montage/Démontage des Filtres - Einsetzen/Wechseln der Filter - Desmontar/Voltar a montar os filtros - Rimozione/installazione dei filtri - Instalación/Desmontaje de los filtros - Demontering/Montering van de filters - Demontaž Montaž filtrów - Rastavljanje/Ponovno sastavljanje filtera - Rasklapanje/Ponovno sklapanje filtera - Разборка И Сборка Филиров - Алюауарцолоунып / Енговуюарцолоунып Тuv Фітраш - Filtrite Lahtivötmine/Uuesti Kokkupanemine - Rastavljanje/Ponovno Postavljanje Filtera - Szürök KI-/Beszereleše - Filtru Išardymas/Pakartotinis Surinkimas - Filtru Iznjemšana/Ielikšana - Odstranjevanje/Ponovno Nameščanje Filtrov - Rastavljanje/Ponovno Sastavljanje Filtera - Rasklapanje/Ponovno Sklapanje Filtera
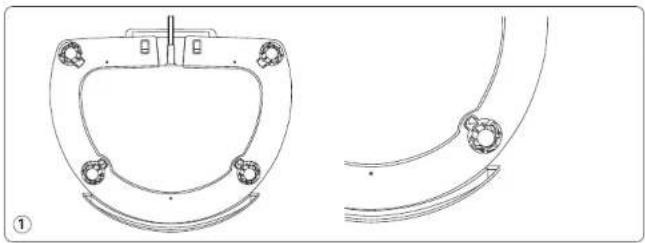
ASSEMBLING / DISASSEMBLING FEET
natural_image
Technical line drawing of a mechanical component with mounting holes and curved surfaces (no text or symbols)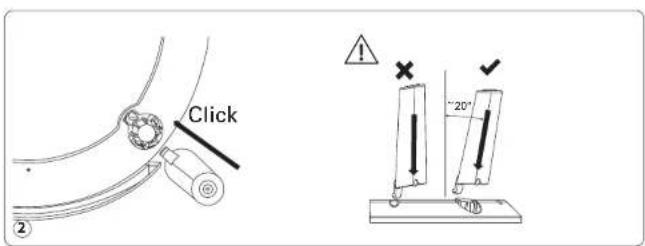
text_image
Click 12 2 10 "20"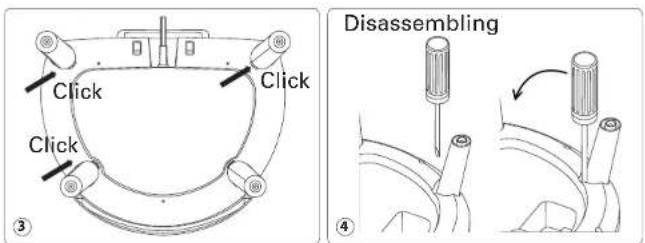
text_image
Click Click ③ Disassembling ④Montage/démontage des pieds – Füße montieren/demontieren – Montagem/desmontagem dos pés – Piedini di montagligo/smontagligo – Montaje/Desmontaje de pies – Voeten monteren/demonteren – Montaž/demontaž nõzek – Сборка/разборка ножек – Крачета за монтаж/демонтаж – Asamblea/demontarea picloarelor – Montáž/demontaž nohou – Montáz/demontaž nõh – Sastavljanje/demontaž stopala – Састављanje/pastављanje stonala – Apououvarpaloğunyn/епапоouvarpaloğunyn тов пъщаткив – Jalgade lahtivõtmine/uuesti kokkupanemine – Rastavljanje/ponovno postavljanje nožica – Talp ki-/beszerelése – Kojelës išardymas/pakartotinis surinkimas – Käju izjaukšana/salikšana – Odstanjevanje/ponovno nameščanje nožic – Rastavljanje/ponovno sastavljanje postolja – Rasklapanje/ponovno sklapanje stope
DESCRIPTION
https://www.compatibility.groupeseb.com/CompatibilityList-Pureair-Rowenta.pdf https://www.compatibility.groupeseb.com/CompatibilityList-Pureair-Tefal.pdf
ENTRETIEN
A Air quality indicator
B Adjustable air outlet grid
C Control panel
D Front door
E Handle
E. Air inlets
G. Particle sensor
G Particle set H Gas sensor
1. Power cord outlet
J Feet
Control panel Lights
1 Lock control Panel
- Filter change indicator
3 Timer/ delayed start
4 Mode display Auto Day /
Auto Night / Boost / silent
modes
5 Wi-Fi connection indicator
Control buttons
6 Light
7 Control Panel Lock
8 Filter Reset
9 Start/Stop
10 Timer / Delayed start setting
11 Automatic modes / filtration
speed selection
12 Wi-Fi Pairing Button
(hold 3 sec)
Read the instructions for use and safety carefully before use and keep them for future reference.
Original instructions
SAFETY TIPS
It is essential that you read these instructions carefully and observe the following recommendations:
- For your safety, this appliance complies with the applicable standards and regulations (Machinery, electromagnetic compatibility, environmental directives, etc.).
- This appliance should not be used by persons (including children) with reduced physical, sensory or mental capacities or lack of experience and knowledge, unless they are supervised or have been given instructions beforehand concerning use of the appliance by a person responsible for their safety.
- Children should be supervised to ensure they do not play with the appliance.
- The appliance can be used by children aged 8 and over and persons with a lack of experience or knowledge or reduced physical, sensory or mental capacities, provided they are supervised, have been trained on the safe use of the appliance and are aware of the risks involved. Children must not play with the appliance.
- If the power cord is damaged, it must be replaced by the manufacturer, its after-sales service or a similarly qualified person so as to avoid any danger.
- Children should not clean or perform maintenance on the appliance without being supervised.
-
For maintenance operations, please refer to the "Maintenance" section.
-
Keep the appliance and its power cord out of the reach of children aged under 8.
- This appliance can be used for domestic and commercial use.
- The A-weighted emission sound pressure level is less than 70 dB(A).
- At any time, during assembly / cleaning, you must be able to see that the plug is unplugged.
- This appliance is designed for domestic use only. It should not be used for industrial purposes.
- The warranty will be invalidated if damage occurs due to incorrect use.
- Do not operate this appliance in a very dusty and/or humid place or in a location with fire hazards.
- Before use, always make sure that the appliance, plug and power cord are in good condition. - Never insert objects into the appliance (e.g., needles, etc.)
- Never insert objects into the appliance (e.g. needles, etc.).
- Do not pull on the power card or the appliance, even to use
- Do not pull on the power cord of the appliance, even to unplug it from the wall power outlet. - Unroll the full length of the cord before use.
- On/off the full length of the lord before use.
VERY IMPORTANT
- Do not cover the air inlets or the outlet grid.
- Do not touch the appliance with wet hands.
- Never allow any liquid to enter the appliance.
- Never use the appliance in a humid place.
- Never use the appliance close to a heat source.
- Never place anything on the appliance or insert anything into it.
- Do not use the appliance close to flammable objects or products (curtains, aerosols, solvents, etc.).
- Never use the appliance in an inclined or horizontal position. Place the appliance on a flat, stable surface.
• In the case of prolonged absence: switch the appliance off using the button (9) and unplug it. - Switch off and unplug your appliance before moving it.
- Unplug the air purifier during assembly/disassembly of filters and feet and when cleaning the product.
OPERATING PRINCIPLE
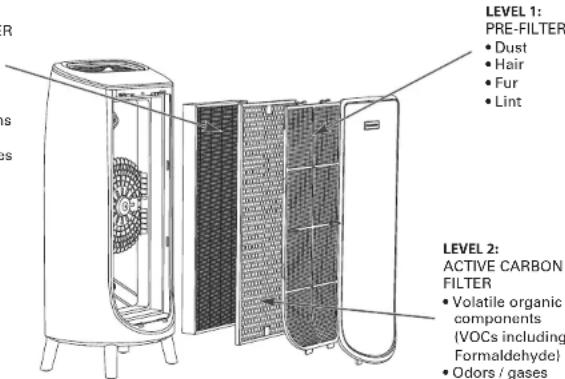
The new Intense Pure Air Home purifier from Rowenta/Tefal enables you to breathe up to 100% pure air in your home and protect your health with 3 filtration levels as described below. Each level is essential and traps characteristic pollutants:
LEVEL 3:
ALLERGY+ FILTER
- Fine particles
(PM2.5)
• Pollen
• Dust mites
• Animal allergens - Mold
- Bacteria / viruses
text_image
LEVEL 1: PRE-FILTER • Dust • Hair • Fur • Lint LEVEL 2: ACTIVE CARBON FILTER • Volatile organic components {VOCs including Formaldehyde} • Odors / gasesLEVEL 2:
ACTIVE CARBON
FILTER
• Volatile organic
components
(VOCs including
Formaldehyde
• Odors / gases


« HOW TO ACHIEVE CLEANER INDOOR AIR »
In addition to using your Intense Pure Air Home purifier, here are some tips on how to improve the quality of your indoor air;
- Ventilate the rooms for at least 10 min. every day, in summer and winter
- Maintain your ventilation system
- Limit the use of household products
- Do not smoke indoors
- Avoid home fragrances, incense sticks, scented candles, etc.
- Ventilate whenever any work is being conducted in your home and for several weeks afterwards
- Avoid green plants that are allergenic or need frequent watering
WHERE TO INSTALL THE APPLIANCE
Place the purifier on a flat, stable surface in the room requiring treatment.
To allow the air to circulate freely, avoid placing the appliance behind curtains, below a window, item of furniture or shelf unit, or close to any other obstacle, and leave at least 50 cm of free space on each side of the appliance.
BEFORE USING THE APPLIANCE FOR THE FIRST TIME
Make sure that the plastic packaging protecting the filters has been removed before using the appliance.
Also make sure that:
- The voltage of your electrical installation corresponds to the one indicated on the appliance.
- Your appliance can be used with a power plug without an earth connection. It is a class II appliance (double electrical insulation),
- The appliance is positioned in the house as described above,
• The air inlet and outlet grids are completely unobstructed, - Ensure the 3 filters and front panel have been correctly installed (see section titled filter assembly/dismantling paragraph).
This appliance is fitted with a device that automatically prevents it from operating if the front door is not correctly assembled.
• The 4 feet are correctly assembled
Inserting and replacing the filters
This appliance is equipped with 3 types of filters:
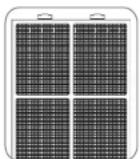
Pre-filter
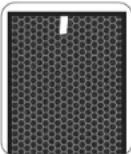
Active carbon
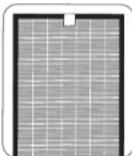
Allergy+ filter
NB: For optimum performance of the appliance, only use filters provided by Rowenta/Tefal.
To replace the filters, follow the instructions in the section « Disassembling/Reassembling filters ».
Please note: certain filters may emit a temporary slight odour, due to the transport and storage conditions.
SWITCHING THE APPLIANCE ON
Setting the pollution sensors
The appliance is preset to medium sensitivity.
If the air quality indicator remains:
- poor after 2 hours in operation although the air seems to be purified
-
excellent for more than 1 hour although the air seems to be polluted you can adjust the sensor sensitivity as follows:
-
When the air purifier is off, hold down the mode setting button for 3 seconds:
-
Set the sensitivity by briefly pressing the mode setting button:

| Red | ||
| Low sensitivity Medium sensitivity High sensitivity | ||
- Select high sensitivity if the air purifier indicates excellent air quality for more than 1 hour although the air seems to be polluted.
- Select low sensitivity if the air purifier continues to indicate poor air quality even though it has been operating for more than 2 hours and the air seems sufficiently purified.
- Press 'Start/Stop' button to validate the sensitivity setting.
OPERATION
Start
Briefly press this button to switch the air purifier on or off.
- Mode button (2)
- AUTODAY and AUTONIGHT mode: if the air quality level is excellent then the device does not run.
- Press this button to select one of the four modes. The corresponding indicator will turn on to indicate the selected mode.
– Daytime auto mode: the fan speed is set to 1,2,3 or 4. - Nighttime auto mode: The fan speed is set to 1 or 2.
- Quiet mode: The fan speed is set to minimum. Use this mode in quiet environments.
- Turbo mode: The fan speed is set to maximum. Use this mode when air quality is poor.
Light
You can change the light intensity of the appliance as you wish or according to the time of day.
| Press Air quality indicator | Control panel | |
| 1 | Light up | Light up |
| 2 | Moderate light | Moderate light |
| 3 | Off | Moderate light |
Timer / delayed start
- Timer: When the appliance is on, you can use this button to define the operating duration. Briefly press the button to select the number of operating hours desired (1, 2, 4 or 8) and the appliance will automatically turn off at the end of the selected period.
- Delayed start: When the appliance is off, briefly press the button to set the appliance to turn on in a certain number of hours (1, 2, 4 or 8).
3D pure air function (adjustable grid)
You can adjust the position of the air outlet grid manually, as desired. For an optimum, even flow of purified air in the room, set the angle to 45^ ; for maximum comfort, set the angle to 90^ .

Control Panel Lock
The lock system prevents the purifier from being accidentally mis-set during operation. To activate it, press the button (7) for 3 sec until the locked control panel indicator turns on. To exit this mode, press the button (7) again for 3 seconds, until the indicator turns off. When selected, the other buttons are locked.

Wi-fi function
Frequency band operated : 2400-2483,50MHz
Maximum radio-frequency power : 20dbm
To turn on or off the Wi-Fi function on your purifier, hold simultaneously the Wi-Fi button and the Light button during 3 seconds.
- When the Wi-Fi connection indicator 📋 flashes it means that the purifier lasts its connection.
Reset

OCK

First, the appliance will make a long bip to indicate Reset is launched. Then the appliance should erase all data regarding pairing. Once it's done, the product will turn off.
Indication of air quality
Air quality indicator (A) is located on the top of the appliance.
| Air Quality Air quality indicator color | |
| Excellent Blue | |
| Slight pollution | Green |
| Moderate pollution | Yellow |
| High pollution | Orange |
| Extreme pollution | Red |
HOW TO CONNECT YOUR PURIFIER TO INTERNET?
Download the app «Pure Air By Rowenta» /«Pure Air by Tefal» & follow the instructions on your smartphone :
- Sign in to create your Rowenta/Tefal account if you are new. Or log in the app if you already have an account.
- Make sure to stand close to the purifier during the pairing (2 meters maximum) and make sure the purifier is located near a strong Wi-Fi signal.
- Make sure your phone is connected to your local Wi-Fi network.
- Turn your purifier on & hold the Wi-Fi button for 3 seconds (you'll hear a «ding» sound and the Wi-Fi indicator will flash to indicate that your purifier is successfully connected to Wi-Fi.)
- Choose your Wi-Fi network and enter the network password to connect to your local Wi-Fi network.
- And you're done!
The Wi-Fi indicator lights to indicate that your purifier is successfully connected to your Pure Air app.
Connection issues
In case of pairing issues between the appliance and your domestic Wi-Fi network, refer to the information listed on the following link:
https://www.compatibility.groupeseb.com/CompatibilityList-Pureair-Rowenta.pdf https://www.compatibility.groupeseb.com/CompatibilityList-Pureair-Tefal.pdf
MAINTENANCE
Always switch the appliance off with the button (9) and unplug it before conducting any maintenance operation. You can clean the appliance with a slightly damp cloth.
IMPORTANT: Never use abrasive products which could damage your appliance's appearance.
FILTERS
| Filter Action Cycles | |
| Pre-filter | Clean Every 2 to 4 weeks |
| Active carbon filter | Replace Every 12 months |
| Allergy+ filter | Replace Every 2 years |
These figures are based on tests in which the air purifier is used for 8 hours per day in quiet mode.
The recommended frequency for cleaning and replacing the filters may vary depending on the duration of use and the operating environment.
- A light indicates when the allergy+ filter needs to be replaced.
The light display indicates when the carbon filter needs replacing.
- The pre-filter can be re-used: remove the dust using a vacuum cleaner or wash with water.
CAUTION:
- The appliance's efficiency can be reduced if the pre-filter is not cleaned regularly.
- Never use a pre-filter that is still damp.
- The pre-filter is the only filter which can be re-used and washed with water. The particle, and active carbon filters cannot be cleaned and re-used. Never wash with water.
- To replace the filters, follow the instructions in the section « Disassembling/Reassembling filters ».
Your replacement filters are available under the following codes:
| Filtre PU/PT618x | |
| Allergy+ filter | XD6077 |
| Active carbon filter | XD6061 |
IMPORTANT: Resetting the filters
The reset light flashes when a filter needs to be replaced or cleaned (Prefilter). Once the filter has
been replaced, hold down the reset button for 3 seconds.
Forced reset:
If you have replaced a filter before its end of life, force the reset of the filter replacement cycle:
- Hold the reset button for 3 seconds.
- Press the reset button briefly to select the filter you have changed.
- After selecting the filter to reset, hold the reset button for 3 seconds. The new filter life is then reset.
- If the reset filter button is not is activated for 10 seconds in forced reset mode, the reset mode is canceled.

- Avoid handling used filters if you suffer from allergies or asthma.
- Wear gloves when changing the filters, or wash your hands well afterwards.
- Put used filters directly into a closed, air-tight bag before throwing them away to avoid spreading pollutants.
POLLUTION SENSORS
The particles sensor and gas sensor need to be cleaned regularly (every 2 months) and appropriately.
Make sure you turn off and unplug the appliance before cleaning the pollution sensors and follow the recommendations below:
- Clean the air inlet and outlet using a soft brush or cloth.
- Open the sensor cover located on the right-hand side of the appliance.
- Lightly wet a cotton swab and remove any dust from the lens and the inlet/outlet. Wipe using a dry cotton swab.
- Clean the gas sensor using a soft brush or vacuum cleaner.


IMPORTANT:
- Never use a detergent or metal object to clean the sensors.
• The efficiency of the sensors may be reduced if not cleaned regularly. - Cleaning frequency varies depending on the operating environment of the appliance. If it is used in a dusty environment, clean the sensors more frequently.
STORAGE
When you are not using the appliance, store it in a cool, dry place.
IN THE EVENT OF A PROBLEM
- Never dismantle your appliance yourself. A poorly repaired appliance can cause risks for the user. - Check the troubleshooting table below before contacting an approved Service Center:
Problem Check Solution
| The appliance will not switch on. | Is the power cord connected? | Connect the power cord to a plug with the correct voltage. |
| Are all the display elements off? | Press the start button and select the required function. | |
| Is there a power outage? | You can use your purifier once the power turns on again. | |
| Is the front door closed? Close the front door properly. | ||
| The air flow does not change automatically. | Is the appliance in silent or boost mode? | Select the correct operating mode AutoDay or Auto Night. |
| The flow is a lot weaker than before. | Does the filter need to be cleaned or replaced? | Check the filter cleaning and replacement frequencies and clean/replace the filter(s) if necessary. |
| There is an unpleasant smell coming from the air outlet. | Does the filter need to be cleaned or replaced? | Check the filter cleaning and replacement frequencies and clean/replace the filter(s) if necessary. |
| The air quality light does not change color. | Is the sensor lens covered with dust? | Clean the sensor lens. |
| Does the light still indicate poor air quality? | Set the sensor sensitivity to “low” or “medium”. | |
| Does the light still indicate excellent air quality? | Set the sensor sensitivity to “high” or “medium”. | |
WARRANTY
Contact an approved Service Center if:
- your appliance has been dropped
- your appliance or its power cord is damaged
- your appliance is not working properly
ENVIRONMENT PROTECTION FIRST!

Your appliance contains valuable materials which can be recovered or recycled.
Leave it at a local civic waste collection point.

BESCHREIBUNG
Produktbeschreibung
https://www.compatibility.groupeseb.com/CompatibilityList-Pureair-Rowenta.pdf
https://www.compatibility.groupeseb.com/CompatibilityList-Pureair-Tefal.pdf
MANUTENZIONE
[Non-Text]
[Non-Text]
Botones de control
6 Luz
https://www.compatibility.groupeseb.com/CompatibilityList-Pureair-Rowenta.pdf
https://www.compatibility.groupeseb.com/CompatibilityList-Pureair-Tefal.pdf
MANTENIMIENTO
WAAR HET APPARAAT TE PLAATSEN?
HET APPARAAT INSCHAKELEN
https://www.compatibility.groupeseb.com/CompatibilityList-Pureair-Rowenta.pdf
https://www.compatibility.groupeseb.com/CompatibilityList-Pureair-Tefal.pdf
ONDERHOUD
https://www.compatibility.groupeseb.com/CompatibilityList-Pureair-Rowenta.pdf https://www.compatibility.groupeseb.com/CompatibilityList-Pureair-Tefal.pdf
KONSERWACJA
W PRZYPADKU PROBLEMÓW
https://www.compatibility.groupeseb.com/CompatibilityList-Pureair-Rowenta.pdf
https://www.compatibility.groupeseb.com/CompatibilityList-Pureair-Tefal.pdf

ОБСЛУЖИВАНИЕ
https://www.compatibility.groupeseb.com/CompatibilityList-Pureair-Rowenta.pdf
https://www.compatibility.groupeseb.com/CompatibilityList-Pureair-Tefal.pdf
ПОДДРЪЖКА
SFATURI PENTRU SIGURANTĂ
https://www.compatibility.groupeseb.com/CompatibilityList-Pureair-Rowenta.pdf https://www.compatibility.groupeseb.com/CompatibilityList-Pureair-Tefal.pdf
ÎNTRETINERE
https://www.compatibility.groupeseb.com/Compatibility/List-Pureair-Rowenta.pdf
https://www.compatibility.groupeseb.com/CompatibilityList-Pureair-Tefal.pdf
ÚDRŽBA
KDYŽ DOJDE K POTÍŽÍM
https://www.compatibility.groupeseb.com/CompatibilityList-Pureair-Rowenta.pdf
https://www.compatibility.groupeseb.com/CompatibilityList-Pureair-Tefal.pdf
ÚDRŽBA
https://www.compatibility.groupeseb.com/CompatibilityList-Pureair-Rowenta.pdf
https://www.compatibility.groupeseb.com/CompatibilityList-Pureair-Tefal.pdf
ODRŽAVANJE
Uvljek isključite aparat koristeći tipku (9) i iskopčajte ga iz napajanja prije obavljanja bilo kakvih radnji održavanja.
https://www.compatibility.groupeseb.com/CompatibilityList-Pureair-Rowenta.pdf
https://www.compatibility.groupeseb.com/CompatibilityList-Pureair-Tefal.pdf
ODRŽAVANJE
Obavezno isključite aparat pritiskom na taster (9) I iskopčajte ga iz struje pre nego što započnete bilo kakvo održavanje.
Možete očistiti aparat blago navlaženom krpom.
VAŽNO: Nikada ne koristite abrazivne proizvode koji bi mogli da naruše izgled aparata.
FILTERI
| Filter Postupak Ciklusl | ||
| Predfilter Čiščenje Jednom na svake 2 do 4 sedmice | ||
| Filter sa aktivnim ulgjem Zamena Jednom na svakih 12 meseci | ||
| Filter Allergy+ | Zamena | Jednom na svake 2 godine |
https://www.compatibility.groupeseb.com/CompatibilityList-Pureair-Rowenta.pdf
https://www.compatibility.groupeseb.com/CompatibilityList-Purealr-Tefal.pdf
ΣΥΝΤΗΡΗΣΗ
natural_image
Technical line drawing of an air conditioner unit with fan and cooling panel (no text or symbols)- TASE

Eelfilter Aktilvsöefilter Allergy+ filter
https://www.compatibility.groupeseb.com/CompatibilityList-Pureair-Rowenta.pdf
https://www.compatibility.groupeseb.com/CompatibilityList-Pureair-Tefal.pdf
HOOLDUS
https://www.compatibility.groupeseb.com/CompatibilityList-Pureair-Rowenta.pdf https://www.compatibility.groupeseb.com/CompatibilityList-Pureair-Tefal.pdf
KARBANTARTÁS
https://www.compatibility.groupeseb.com/CompatibilityList-Pureair-Rowenta.pdf
https://www.compatibility.groupeseb.com/CompatibilityList-Pureair-Tefal.pdf
PRIEŽIŪRA
natural_image
Three-panel image showing different types of solar panels: four grid-patterned, one solid black, one meshed, and one white with grid pattern (no text or symbols)Priekšfiltris Aktivas ogles filtrs Filtrs Allergy
SVARIGI. Lal lerice darbotos optimali, Izmantojiet tikai Rowenta/Tefal nodrošinatos filtrus.
https://www.compatibility.groupeseb.com/CompatibilityList-Pureair-Rowenta.pdf
https://www.compatibility.groupeseb.com/CompatibilityList-Pureair-Tefal.pdf
APKOPE
https://www.compatibility.groupeseb.com/CompatibilityList-Pureair-Rowenta.pdf
https://www.compatibility.groupeseb.com/CompatibilityList-Pureair-Tefal.pdf