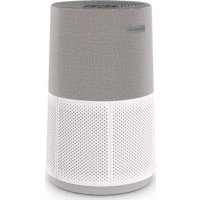
Eclipse 3in1 Connect QU5072 - Air purifier ROWENTA - Free user manual and instructions
Find the device manual for free Eclipse 3in1 Connect QU5072 ROWENTA in PDF.
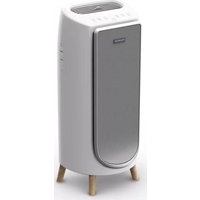
| Product type | 3-in-1 air purifier (purification, ventilation, heating) |
| Brand | Rowenta |
| Model | Eclipse 3in1 Connect QU5072 |
| Main functions | Purification, ventilation, heating, oscillation (30°/60°/90°), Wi-Fi connectivity |
| Operating modes | Automatic day, automatic night, manual, automatic/manual heating |
| Number of speeds | 8 manual speeds (speeds 2 to 8 in automatic) |
| Filters | Pre-filter (cleanable every 2 weeks), Particulate filter ref. XD6520F0 (replace every 6 months) |
| Air quality indicator | 5-color LED: blue (excellent), green (slight pollution), yellow (moderate), orange (heavy), red (extreme) |
| Connectivity | Wi-Fi 2.4 GHz (compatible WPA1/WPA2), Pure Air by Rowenta app |
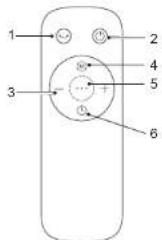
| Remote control | Yes, with magnetic holder, 2 AAA batteries included |
| Display | Digital screen, luminous air quality indicator |
| Timer / Delayed start | From 1 h to 12 h |
| Power supply | Mains (power cable included) |
| Maintenance and cleaning | Clean the pre-filter with a vacuum cleaner every 2 weeks; replace the particulate filter according to the indicator; clean the pollution sensor every 2 months with a soft brush |
| Safety | Automatic shutdown in case of overheating; do not cover the appliance |
| Warranty | Rowenta international warranty (see card) |
Frequently Asked Questions - Eclipse 3in1 Connect QU5072 ROWENTA
User questions about Eclipse 3in1 Connect QU5072 ROWENTA
0 question about this device. Answer the ones you know or ask your own.
Ask a new question about this device
Download the instructions for your Air purifier in PDF format for free! Find your manual Eclipse 3in1 Connect QU5072 - ROWENTA and take your electronic device back in hand. On this page are published all the documents necessary for the use of your device. Eclipse 3in1 Connect QU5072 by ROWENTA.
USER MANUAL Eclipse 3in1 Connect QU5072 ROWENTA
natural_image
Line drawing of a smart air purifier with a smartphone displaying 'Rowenta' and wireless signal icon (no text or symbols on main subject)QU507x
FR Veuillez lire attentivement le livret « Consignes de sécurité et d'utilisation » avant la première utilisation / EN Please read carefully the "Safety and use instructions" booklet before first use / DE Bitte lesen Sie vor der ersten Verwendung die „Sicherheits- und Gebrauchsanweisungen” sorgfältig durch / NL Neem vóór het eerste gebruik aandachtig het boekje met de veiligheids- en gebruiksvoorschriften door / IT Leggere con attenzione il libretto «Norme di sicurezza e d'uso» al primo utilizzo / ES Lea atentamente el folleto «Instrucciones de seguridad y de uso» antes de utilizar el aparato por primera vez / PT Leia atentamente o folheto «Instruções de segurança e utilização» antes da primeira utilização / RO Citiți cu atenție broșura „Instrucțiuni de siguranță și utilizare” însainte de prima utilizare / BG Molia, прочете внимателно книжката „Инструкции за безопасност и употреба” преди първа употреба / SL Pred prvo uporabo natančno preberite knjižico «Varnostna navodila in navodila za uporabo » / HR Prije prve uporabe pažljivo pročitajte knjižicu „Sigurnosne upute i upute za uporabu” / SR Pažljivo pročitajte brošuru „Uputstva za bezbednost i korišcjenje” pre prve upotrebe / BS Prije prve upotrebe pažljivo pročitajte knjižicu „Upute o sigurnosti i korištenju” / CS Pred prvním použítím si pečlivé přečtete přiručku „Bezpećnostni pokyny a návod k použăti” / SK Pred prvým použítim si pozorne prečitajte brožuru „Bezpećnostně pokyny a pokyny na použitie” / HU Az első hasznălat előtt figyelmesen olvassa el a „Biztonsági és hasznălati utasitások” cimů kézikönyvet / UK Уважно процитайте брошуру «Инструкції з техніки безпеки й використання» перед першим використанням виробу
FR Pour plus d'informations / EN For more information / DE Weitere Informationen / NL Voor meer informatie / IT Per ulteriori informazioni / ES Para más informaci Ï / PT Para obter mais informações / RO Pentru mai multe informații / BG 3a poveche informații / SL Za več informacij / HR Za više informacija / SR Za više informacija / BS Dodatne informacije / CS Pro vice informaci / SK Pre viac informacii / HU Tovabbi informaciok / UK Dokladnišha informația
DESCRIPTION
text_image
1 2 3 4 5 6 7 8 9 10 FRhttps://www.compatibility.groupeseb.com/CompatibilityList-Pureair-Rowenta.pdf
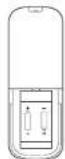
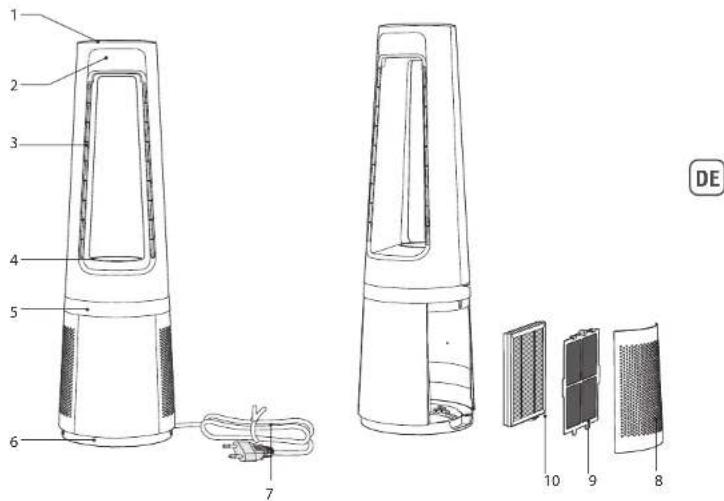
1 Control panel 6 Base
2 Screen 7 Power cord
3 Air outlet 8 Air inlet grid
4 Magnetic remote control holder 9 Pre-filter
5 Air quality indicator light 10 Particle filter XD6520F0
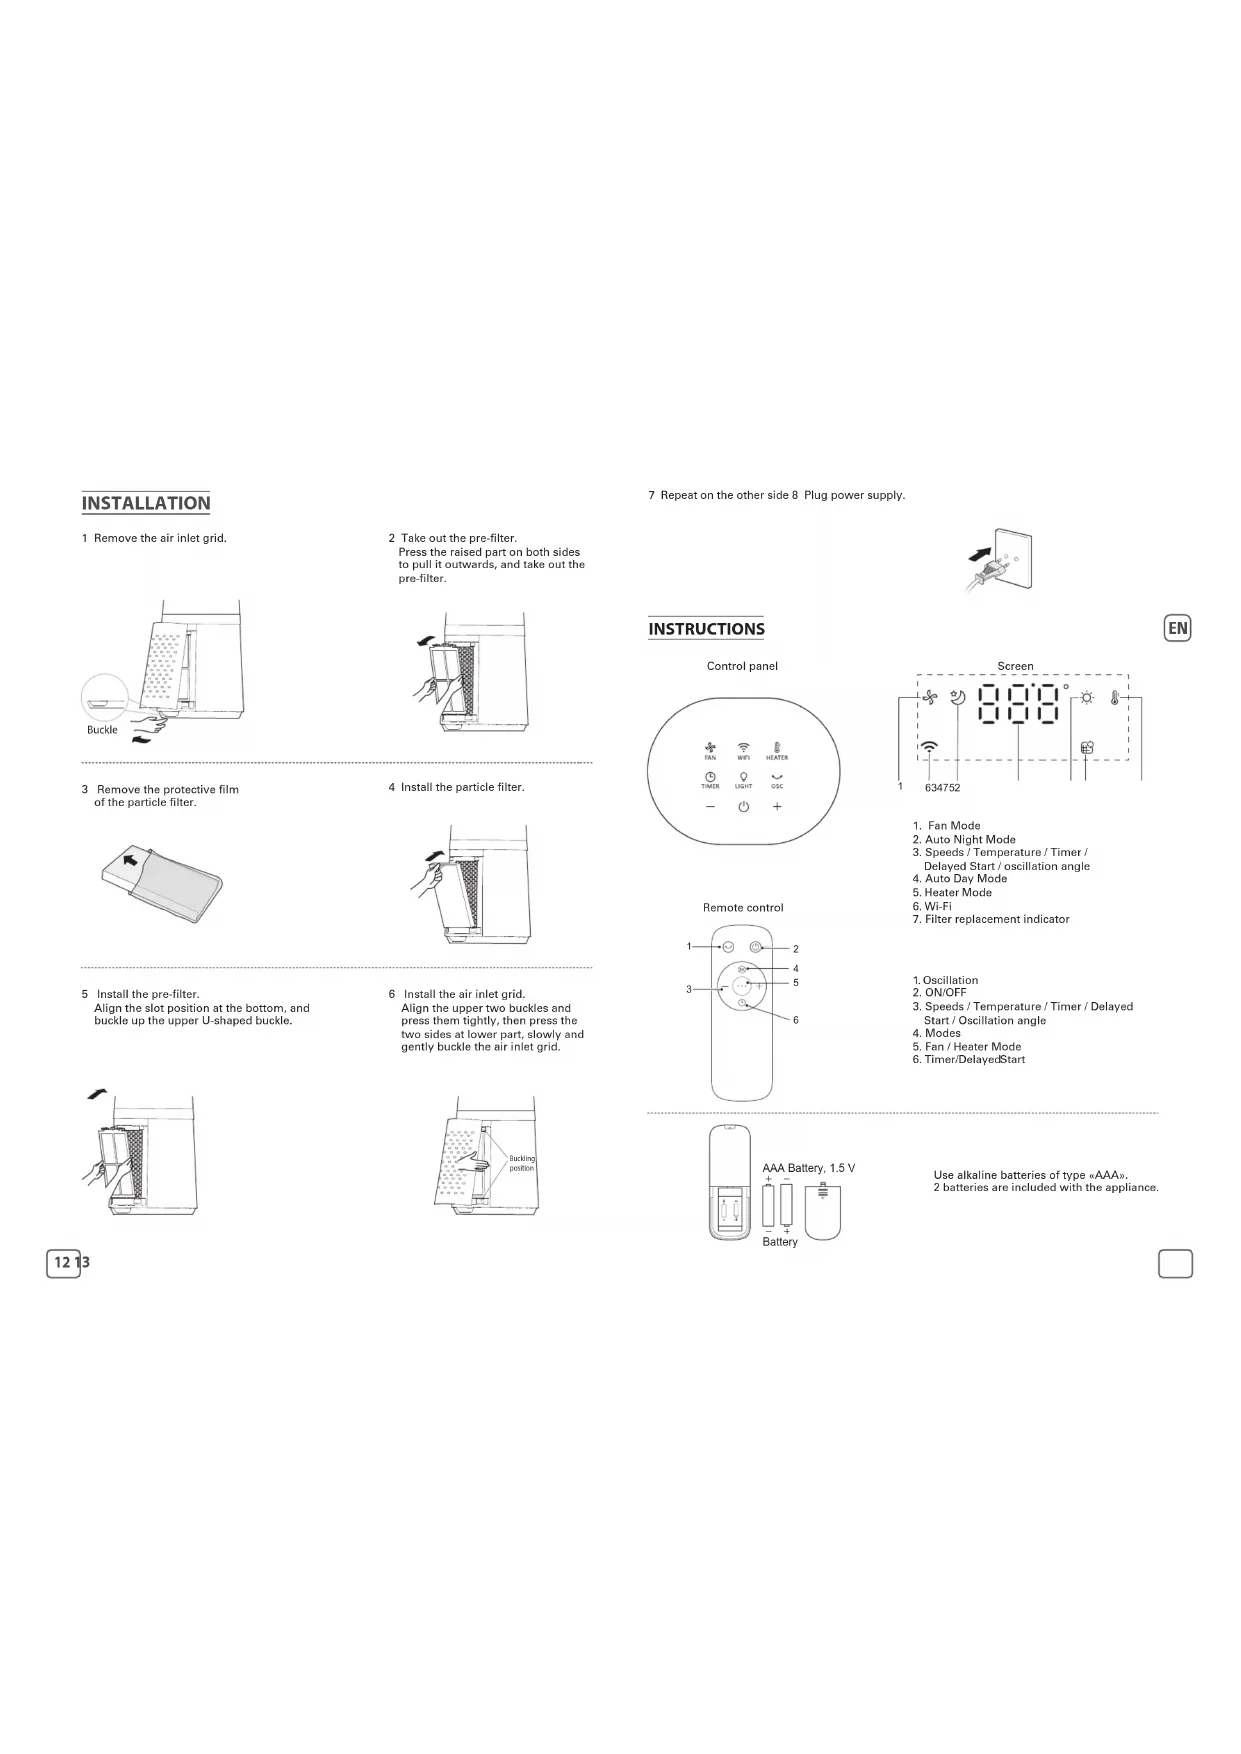
INSTALLATION
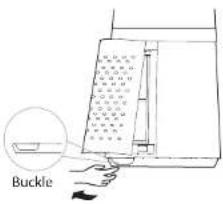
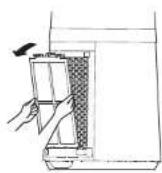
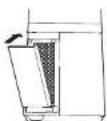
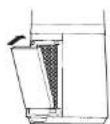
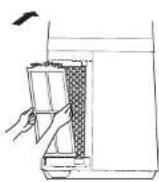
1 Remove the air inlet grid.
text_image
Buckle3 Remove the protective film of the particle filter.
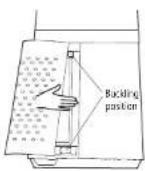
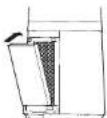
5 Install the pre-filter. Align the slot position at the bottom, and buckle up the upper U-shaped buckle.

2 Take out the pre-filter. Press the raised part on both sides to pull it outwards, and take out the pre-filter.
4 Install the particle filter.
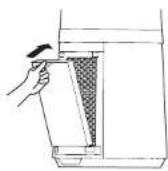
6 Install the air inlet grid. Align the upper two buckles and press them tightly, then press the two sides at lower part, slowly and gently buckle the air inlet grid.
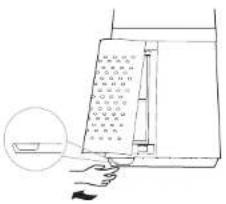
7 Repeat on the other side 8 Plug power supply.

INSTRUCTIONS
Control panel
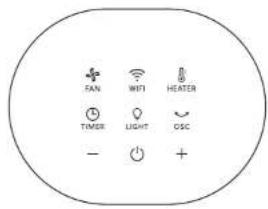
text_image
FAN WIFI HEATER TIMER LIGHT CSC -Remote control
Screen

text_image
8:00' 1 634752- Fan Mode
- Auto Night Mode
- Speeds / Temperature / Timer /
Delayed Start / oscillation angle - Auto Day Mode
- Heater Mode
- Wi-Fi
-
Filter replacement indicator
-
Oscillation
2.ON/OFF - Speeds / Temperature / Timer / Delayed Start / Oscillation angle
- Modes
- Fan / Heater Mode
- Timer/DelayedStart
Use alkaline batteries of type «AAA».
2 batteries are included with the appliance.

| Button Function Description | |
 | ON/OFF |
 | Press to activate the fan function. By default the product will be in Auto mode.InAuto mode, the fan speed will adjust itself according to the ambient temperature & pollution level (speeds 2 to 8).Press a second time to activate theAuto night mode: the fan speed is adjusted decrescendo (speeds 3 to 2 after 30mn) and the lights are off.Press + or - to switch tomanual modeand select your desired speed. |
 | Press to activate the heater function. By default the product will be in Auto mode.InAuto mode, the target temperature is 19^ C .Press a second time to activate theAuto night mode: the target temperature is 17^ C and the lights are off.Press + or - to switch tomanual mode.The maximum operating temperature is 35^ C . |
 | Press to manually set fan speed, heater target temperature, oscillation angle, timer and delayed start. |
| [3HW] | Press to activate or stop the oscillation function.Then press + or - to select the desired angle ( 30^ - 60^ - 90^ ).Filter reset: Long press (5s) to reset the filter. The bip sound indicates that the reset has been completed. |
| [GOZA] | Timer: Press once to activate the timer.Then press + or - to program the automatic shutoff from 1h to 12h.Delayed start: When the appliance is OFF, press the button to program the delayed start, then, press + or - to turn on the appliance from 1h to 12h later.Timer reset: Long press (5s) to stop the timer before completion. |
| [GCGO] | In Fan mode: the light is an air quality indicator (5-color index ranging from blue to red depending on the level of pollution in the room).In Heater mode: the light is always red.In both modes, press twice to switch the light off. |
NB : on the first use, the product default setting is fan function in auto mode.
When plugged, the product will save its last mode after each use.
Important: When in standby mode, the product will display « o » on the screen.
WARNING
- Never cover the appliance, it may cause overheating in both heater and fan modes.
- In case of overheating, switch off and unplug the appliance to let it cool down.
- Once the appliance cooled down, you can re-plug it and use it again.
INDICATION OF AIR QUALITY
The Air quality indicator is the ring light at the base of the product (5), operating on purification/fan mode. The LED will indicate the air quality level:
| Air Quality Air quality indicator color | |
| Excellent Blue | |
| Slight pollution Green | |
| Moderate pollution Yellow | |
| High pollution Orange | |
| Extreme pollution Red | |
The LED will remain red in heater mode.
HOW TO CONNECT YOUR PURIFIER TO INTERNET
Download the app «Pure Air By Rowenta» & follow the instructions on your smartphone :
- Sign in to create your Rowenta account if you are new. Or log in the app if you already have an account.
- Make sure to stand close to the purifier during the pairing (2 meters maximum) and make sure the purifier is located near a strong Wi-Fi signal.
- Make sure your phone is connected to your local Wi-Fi network.
- Turn your purifier on & hold the Wi-Fi button for 5 seconds (you'll hear a «ding» sound and the Wi-Fi indicator will flash to indicate that your purifier is successfully connected to Wi-Fi.)
- Choose your Wi-Fi network and enter the network password to connect to your local Wi-Fi network.
- And you're done!
The Wi-Fi indicator lights to indicate that your purifier is successfully connected to your Pure Air app.
Wi-Fi function
To launch a new pairing press the Wi-Fi button for 5 seconds.
- When the light is on, the product is paired/connected.
- When the light is flashing quickly then slowly, the product is pairing/connecting to the WIFI/
servers. - When the light is off, the product is not connected.
Product reset
To reset your product: press together the Wi-Fi + Fan buttons for 5 seconds (valid to reset within 5 minutes after the product is plugged in to avoid misoperation by user).
You will then hear a «bip» sound, indicating that the reset has been successful.
Connection issues
In case of pairing issues between the appliance and your domestic Wi-Fi network, refer to the information listed on the following link:
https://www.compatibility.groupeseb.com/CompatibilityList-Pureair-Rowenta.pdf
The appliance is not compatible with WiFi 5Ghz networks.
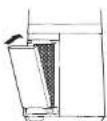
MAINTENANCE & CLEANING
Always switch the appliance off and unplug it before conducting any maintenance or cleaning operation. Use a damp cloth to clean the surface of the product. Clean the air inlet (8) and outlet (3) using a soft brush or cloth. Important: Do not use any abrasive materials, as these may damage the surface of the product.
Filter replacement
1 Filter model: XD6520F0 (including 2 sets)
3 Replace a new filter
2 The indicator is lighted when the particle filter needs to be replaced.

4 Long press the oscillation button for 5 seconds to turn off the indicator light for filter replacement.
Forced reset: If you have replaced a filter before its end of life, force the reset of the filter replacement cycle: Hold the oscillation button for 5 seconds. ∪ (beep sound).
IMPORTANT: it is recommended to change the filters as soon as the replace filter alert indicator is triggered to avoid a product malfunction.
Filters Action Cycles
| Pre-filter | Clean with vaccum cleaner | Every 2 weeks |
| Particle filter (ref: XD6520F0) | Replace when is lighted | Every 6 months (on average, according to the use environment). |

- Avoid handling used filters if you suffer from allergies or asthma.
- Wear gloves when changing the filters, or wash your hands well afterwards.
- Put used filters directly into a closed, air-tight bag before throwing them away to avoid spreading pollutants.
PARTICLE SENSOR
Particle sensor inlets must be cleaned regularly (every 2 months) and properly. Be sure to switch off and unplug the unit before cleaning the sensor inlets, and follow the recommendations below: Use a soft brush or vacuum cleaner to clean the sensor inlets near the remote control holder (4).
IMPORTANT: DO NOT use cleaning products on the particle sensor. It could alter its performance.

« HOW TO ACHIEVE CLEANER INDOOR AIR »
In addition to using your appliance, here are some tips on how to improve the quality of your indoor air:
- Ventilate the rooms for at least 10 min. every day, in summer and winter.
- Maintain your ventilation system.
- Limit the use of household products.
- Do not smoke indoors.
- Avoid home fragrances, incense sticks, scented candles, etc.
- Ventilate whenever any work is being conducted in your home and for several weeks afterwards.
- Avoid green plants that are allergenic or need frequent watering
STORAGE
When you are not using the appliance, store it in a cool, dry place with ambient conditions (no higher than 35^ C) and no dust, to avoid clogging the sensor and filters.
IN THE EVENT OF A PROBLEM
- Do not disassemble the appliance yourself. A poorly repaired appliance may be dangerous for the user.
- Check the troubleshooting table below before contacting an Approved Service Center:
IMPORTANT: IN CASE OF ANOMALY OR LOSS OF CONNECTION, PLEASE UNPLUG YOUR PURIFIER FOR A FEW MINUTES AND THEN PLUG IT BACK IN.
| Problem Check Solution | ||
| The appliance does not switch on. | Is the power cord connected? | Connect the power cord to a plug with the correct voltage. |
| Are all the display elements off? | Connect the power cord to a plug with the correct voltage. | |
| Is these a power outage? | You can use your purifier once the power turns on again. | |
| The air flow does not change automatically. | Is the appliance in manual mode? | Select the correct operating mode. |
| The flow is a lot weaker than before. | Does the filter need to be cleaned or replaced? | Check the filter replacement frequencies and replace the filter if necessary. |
| There is an unpleasant smell coming from the air outlet. | Does the light still indicate poor air quality? | Check the filter replacement frequencies and replace the filter if necessary. |
| The air quality indicator does not change color. | Is the sensor covered with dust? | Clean the sensor with soft brush. |
| The purifier doesn't connect | Is your phone connected to your personal Wi-Fi network at the beginning of the process? | Verify that you are conneted to your personal Wi-Fi network. |
| The purifier doesn't seem to connect? | Check that your purifier is plugged in and turned on. | |
| The Wi-Fi led of your purifier is not flashing? | Hold the Wi-Fi button for 5 seconds. | |
| The first pairing didn't work? | Restart the product to retry. | |
| My phone is connected to the Wi-Fi but not the purifier ? | Make sure the two devices are in close enough proximity to one another and close to the WIFI router. | |
| My phone isn't connecting to the Wi-Fi? | Check that your Wi-Fi router is connected to the InternetCheck that the Wi-Fi password didn't change | |
| Why did the pairing not work? | Check the compatibility : https://www.compatibility.groupeseb.com/CompatibilityList-Pureair-Rowenta.pdf | Supported encryption type: WPA_1/WPA_2,TIPK; PSK,AES Supported networks: 2,4GHz |
WARRANTY
Do not use the appliance and contact an Approved Service Centre if:
- Your appliance has been dropped;
- Your appliance or its power cord are damaged;
- Your appliance no longer functions properly.
- You can find a list of Approved Service Centres on the Rowenta international warranty card. www.rowenla.com
BESCHREIBUNG
text_image
1 2 3 4 5 6 7 DE 10 9 8text_image
Diagram showing a hand inserting a card into a printer, with an inset magnified view highlighting the card's size.https://www.compatibility.groupeseb.com/CompatibilityList-Pureair-Rowenta.pdf
text_image
Diagram showing a hand inserting a card into a device with a magnified inset highlighting the card's size.text_image
Labeled diagram of a portable energy lamp with numbered parts and cable connection
natural_image
Line drawing of a portable air conditioner unit (no text or symbols)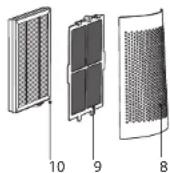
text_image
Diagram showing a hand pressing a button on a document with an arrow pointing to it, indicating a process or instruction.https://www.compatibility.groupeseb.com/CompatibilityList-Pureair-Rowenta.pdf
text_image
Diagram showing a computer monitor with a close-up of the screen, highlighting the screen area and cable.https://www.compatibility.groupeseb.com/CompatibilityList-Pureair-Rowenta.pdf
text_image
Labeled diagram of a portable electric heater with numbered parts and cable connection
natural_image
Line drawing of a cylindrical device with a handle and spout, no text or symbols present
PT
1 Painel de controlo 6 Base
2 Ecra 7 Cabo de alimentacao
3 Saída de ar 8 Grelha de entrada de ar
4 Suporte magnético para controlo remoto 9 Pre-filtro
5 Indicador da qualidade do ar 10 Filtro de partículas XD6520F0
INSTALAÇÃO
1 Retire a grelha de entrada de ar.
text_image
Diagram showing a computer monitor with a close-up of the screen, highlighting the screen area and cable.https://www.compatibility.groupeseb.com/CompatibilityList-Pureair-Rowenta.pdf
text_image
Technical diagram of a portable air conditioner with labeled parts including a heater, cord, and heat sink componentsnatural_image
Diagram of a printer with a paper airplane and cable inserted, showing internal components (no text or symbols)3 Scoateți película protectoare a filtrului de particule.

Sinstalatipre-filtrul.
https://www.compatibility.groupeseb.com/CompatibilityList-Pureair-Rowenta.pdf
text_image
Labeled diagram of a portable electric heater with numbered parts and cable connection
natural_image
Technical line drawing of a portable air purifier with internal grating and labeled components (no text or symbols present)text_image
Diagram showing a hand inserting a card into a device with a magnified inset highlighting the card's size.https://www.compatibility.groupeseb.com/CompatibilityList-Pureair-Rowenta.pdf
text_image
Labeled diagram of a portable electric heater with numbered parts and cable connectionnatural_image
Technical line drawing of a portable air purifier with labeled components (no text or symbols present)text_image
Diagram showing a hand pressing a button on a computer screen with a magnified view of the button's tip.https://www.compatibility.groupeseb.com/CompatibilityList-Pureair-Rowenta.pdf
text_image
Technical diagram of a two-port air purifier with labeled components and exploded view1 Upravljačka ploča 6 Postolje
2 Zaslon 7 Kabel za napajanje
3 Izlaz zraka 8 Rešetka otvora za ulaz zraka
4 Magnetski držač daljinskog upravljača 9 Predfilter
5 Indikator kvalitete zraka 10 Filter za čestice XD6520F0
INSTALACIJA
1 Skinite rešetku otvora za ulaz zraka.
text_image
Diagram showing a hand inserting a card into a device with a magnified inset highlighting the card's size.3 Skinite zaštitni film s filtera za čestice.
5Postavitepredfilter. Poravnajte položaj utora na dnu i zatvorite gornju kopču u obliku slova U.

2Izvaditepredfilter. Pritisnite izdignuti dio na obje strane kako biste ga izvukli van i izvadite predfilter.

4 Postavite filter za čestice.

https://www.compatibility.groupeseb.com/CompatibilityList-Pureair-Rowenta.pdf
3 Postavite novi filter
text_image
Technical diagram of a two-port air purifier with labeled components and exploded view1 Kontrolna tabla 6 Baza
2 Ekran 7 Kabl za napajanje
3 Izlaz za vazduh 8 Rešetka ulaza za vazduh
4 Magnetni držač za daljinski upravljač 9 Predfilter
5 Indikator kvaliteta vazduha 10 Filter za čestice XD6520F0
INSTALACIJA
1 Uklonite rešetku ulaza za vazduh.

text_image
Diagram showing a hand pressing a button on a computer screen with a magnified view of the button's tip.https://www.compatibility.groupeseb.com/CompatibilityList-Pureair-Rowenta.pdf
Uredaj nije kompatibilan sa Wi-Fi mrežama od 5 GHz.
ODRŽAVANJE I ČIŠĆENJE
3 Stavite novi filter
4 Držite dugo pritisnuto dugme za oscilaciju u trajanju od 5 sekunde da biste isključili indikator za zamenu filtera

Nametnuto resetovanje:
Ako ste zamenili filter pre nego što mu je istekao vek trajanja, nametnite resetovanje ciklusa zamene filtera:
Držite taster za oscilaciju 5 sekunde.
VAŽNO: Preporučljivo je da promenite filtere čim se aktivira indikator upozorenja za zamenu filtera kako biste izbegli kvar proizvoda.
text_image
Technical diagram of a portable air conditioner with labeled parts including top, front, and side views1 Upravljačka ploča 6 Postolje
2 Ekran 7 Kabal za napajanje
3 Izlaz zraka 8 Rešetka otvora za ulaz zraka
4 Magnetni držač daljinskog upravljača 9 Predfilter
5 Indikator kvaliteta zraka 10 Filter za čestice XD6520F0
INSTALIRANJE
1 Skinite rešetku otvora za ulaz zraka.
text_image
Diagram showing a hand pressing a button on a document with Chinese text, highlighting the button as an open button.3 Skinite zaštitni film s filtera za čestice.
5Postavitepredfilter. Poravnajte položaj utora na dnu i zatvorite gornju kopču u obliku slova U.
https://www.compatibility.groupeseb.com/CompatibilityList-Pureair-Rowenta.pdf
Aparat nije kompatibilan sa Wi-Fi mrežama od 5 GHz.
ODRŽAVANJE I ČIŠĆENJE
3 Postavite novi filter
4 Dugo pritisnite tipku za oscilaciju na 5 sekunde da biste isključili indikator radi zamjene filtera.

Prisilno resetiranje:
Ako ste zamijenili filter prije nego što mu je istekao životni vijek, izvršite prisilno resetiranje ciklusa za zamjenu filtera:
Pritisnite i držite tipku za oscilaciju 5 sekunde.
VAŽNO: preporućuje se filtere zamijeniti odmah kada se uključi indikator za upozorenje o zamjeni filtera da ne bi došlo do kvara aparata.
Filteri Radnja Ciklusi
| Predfilter Očlstite usislvačem Svake 2 sedmice | ||
| Filter za čestice (ref: XD6520F0) | Zamijenite ☐ kad zasvijetli | Every 6 months (on average, according to the use environment). |

«SAVJETI ZA ZAMJENU FILTERA »
- Izbjegavajte rukovanje iskorištenim filterima ako bolujete od alergije ili astme.
- Nosite rukavice tokom zamjene filtera ili nakon zamjene dobro operite ruke.
- Iskorištene filtere stavite direktno u zatvorenu, hermetički nepropusnu vrećicu prije
nego što ih bacite kako biste izbjegli širenje onečišćivača.
SENZOR ZAGAĐENJA
text_image
Technical diagram of a two-port air purifier with labeled components including heater, heater unit, and internal compartmentstext_image
Diagram showing a hand pressing a button on a document with Chinese text, highlighting the button as an open button.https://www.compatibility.groupeseb.com/CompatibilityList-Pureair-Rowenta.pdf
text_image
Technical diagram of a portable air purifier with labeled parts including tower, heater, and heat exchanger1 Ovladaci panel 6 Zakladna
2 Obrazovka 7 Napajaci kabel
3 Vystup vzduchu 8 Mriežka na privod vzduchu
4 Magnetický držiak dialkového ovládania 9 Predfilter
5 Indikátor kvality vzduchu 10 Časticovy filter XD6520F0
INSTALÁCIA
text_image
Diagram showing a hand pressing a button on a computer screen with a magnified view of the button's tip.https://www.compatibility.groupeseb.com/CompatibilityList-Pureair-Rowenta.pdf
Zariadenie nie je kompatibilné so sietami Wi-Fi 5 GHz.
ÚDRŽBA A ČISTENIE
text_image
Technical diagram of a two-port air purifier with labeled components and exploded viewtext_image
Diagram showing a printer with a grid of printed letters and a magnified view of the paper's tip, likely illustrating a printing or data transfer process.https://www.compatibility.groupeseb.com/CompatibilityList-Pureair-Rowenta.pdf
text_image
Labeled diagram of a portable air conditioner with numbered parts and a cable connection indicatornatural_image
Technical line drawing of a portable air purifier with labeled components (no text or symbols present)text_image
Diagram showing a hand inserting a card into a device with a magnified inset highlighting the card's size.https://www.compatibility.groupeseb.com/CompatibilityList-Pureair-Rowenta.pdf